
![]()
Customizing Organizational Structure in SAP ERP
In this chapter, you learn how to customize the key organizational units in Financial Accounting (FI). At the end of this chapter, you will be able to:
- Define a company
- Define a company code
- Assign a company to a company code
- Define a business area
- Define a segment
- Define and assign fiscal year variants to a company code
- Define open and closing periods variants and assign variants to a company code
Organizational Structure
Organizational structure is a formal line of command structured systematically to highlight the order of authority, relationships, position, communication, duties, responsibilities, and reporting procedure in an organization. The primary objective of an organization is to utilize its resources effectively to maximize return to the shareholders. To do this, an organization needs a formal organizational chart (organogram) spelling out how tasks and activities are allocated, coordinated, and supervised. In addition, it shows how information flows between various management levels.
SAP tends to mimic the conventional organizational structure in the representation and distribution of tasks in the system based on functions and departments. In SAP, the structure is made up of organizational units just like the conventional organizational structure in a business.
The organizational units in FI in SAP ERP are specifically geared toward meeting business functions and generating reports (financial statements) for external purposes while meeting legal regulations. Creating an organizational unit is a minimum requirement in SAP FI.
Organizational structure in FI is company code-specific. As part of organizational structure customization in a SAP system, it is therefore mandatory to define appropriate organizational units in the system for the system to be able to perform your business processes effectively.
Figure 1-1 depicts the organizational units in Financial Accounting and the sub-modules within Financial Accounting in SAP ERP using an organizational chart. The sub-modules in Financial Accounting include Accounts Payable, Accounts Receivable, General Ledger, Asset Accounting, and so on. Data entered at this level is valid for all company codes and organizational units in the client.

Figure 1-1. Example of organizational units of Financial Accounting in SAP
The Client
The client is an independent unit in the SAP ERP with its own master records and sets of tables. Data entered at this level is valid for all company codes (defined in the next section) and organizational units in the client. In other words, all the company codes in the client will have access to data created at this level. For that reason, the client is said to be the highest level in a SAP system hierarchy. The benefit of the client is that data is entered only once, thus eliminating duplication, reducing redundancies, and saving resources like storage space. As all company codes in the client can have access to the same data created at this level, the need to create individual data for each company code is eliminated.
Each client has its own unique log-on key, which must be entered by the user in order to access the client and perform business processes.
In a client, you can define one or more company codes. Likewise, one or more business areas can be assigned to one or multiple company codes, as depicted in Figure 1-2.
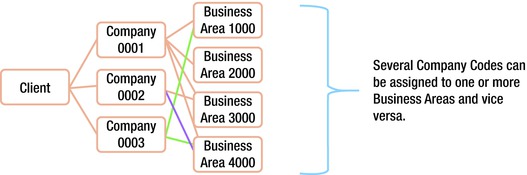
Figure 1-2. Many-to-many relationships between company codes and business areas
Company Code
A company code is a separate independent and legal entity that allows you to model and remodel your business organization based on financial reporting requirements (such as the profit and loss statements and balance sheets). Every company code in SAP ERP is represented with a unique four-character code. The code allows you to identify a company in a client. This is the case in an environment where you have more than one company code in a client.
In practice, global corporations have operations in several countries across the globe and it is often mandatory for global corporates by law to meet legal reporting and disclosure requirements in each country of their operation. Every country has its own accounting regulations with which companies operating within their border must comply. SAP ERP is beneficial in this aspect, because it allows organizational units in the same corporate organization functioning in various countries to function independently for reporting purposes. This enables you to meet specific tax and other legal reporting requirements by allowing you to use a separate unique company code for a company in each country.
In the SAP ERP when customizing company code, you define the following items:
- Company name
- Country
- Language key
- Currency
In addition, a company code must be assigned at least one operational or primary chart of accounts needed for business processes in the company code. Occasionally, a group chart of accounts may be needed for controlling purposes and a country-specific chart of accounts may be needed to meet country-specific reporting requirements. A group chart of accounts is optional. You will learn about chart of accounts in detail in Chapter 2.
When you log on to SAP ERP, the SAP Easy Access screen is displayed (Figure 1-3).
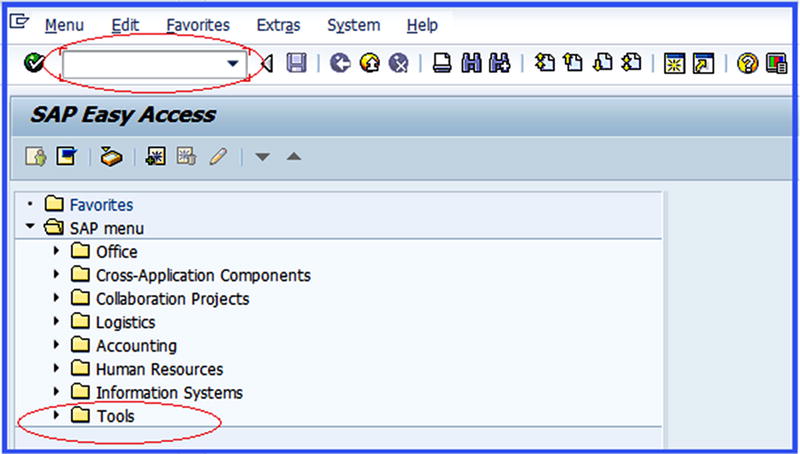
Figure 1-3. Select Tools to commence customizing
The Easy Access screen contains a list of functions to choose from. It is the initial point of entry into the SAP ERP. In order to call up the Customizing: Execute Project screen where you will commence your customzing, follow the menu path: SAP Easy Access ![]() Tools
Tools ![]() Customizing
Customizing ![]() IMG
IMG ![]() Execute Project (SPRO)
Execute Project (SPRO) ![]() SAP Reference IMG.
SAP Reference IMG.
A quicker way to access the same screen is by using transaction codes. Transaction codes are used to navigate a task in a single step, by bypassing the standard menu path that involves several time-consuming steps. You use a transaction code (TC) to access the task you want to execute by typing it into the Command Field, which is the blank field circled in red on the top-left side of the screen in Figure 1-3. Transaction codes are standard sets of alphabets and figures recognized by a SAP system that allow you to access specific tasks in SAP. The benefit of using transaction codes is that it is faster to access tasks or enter a customizing workspace that you want to execute in SAP.
The SAP Project Reference Object (SPRO) is a standard transaction code that allows you to access the Customizing: Execute Project screen without using the menu path. SAP ERP comes with a set of tables containing transaction codes. This table can be assessed by typing SE38 into the Command Field to go to the ABAP Editor: Initial, where you will look for the transaction code you want to use. The ABAP Editor: Initial is beyond the scope of this book. However, you can also access transaction codes on the Easy Access screen by choosing Extras ![]() Settings on the menu bar at the top of the screen or simply by pressing Shift+F9 on your keyboard. The Settings screen pops up with several options to choose from. Select Display Technical Names, which is the last item of the displayed list of available options by making sure that the checkbox is activated. Then press Enter. This action allows the system to display technical names before every function. A list of useful transaction codes appears in Appendix 2, which you can use as a reference.
Settings on the menu bar at the top of the screen or simply by pressing Shift+F9 on your keyboard. The Settings screen pops up with several options to choose from. Select Display Technical Names, which is the last item of the displayed list of available options by making sure that the checkbox is activated. Then press Enter. This action allows the system to display technical names before every function. A list of useful transaction codes appears in Appendix 2, which you can use as a reference.
To call up the Customizing: Execute Project screen, type SPRO into the Command Field now. Figure 1-4 will appear. This screen allows you to go to IMG Display screen, where you can select from the list of displayed tasks to commence your customizing.
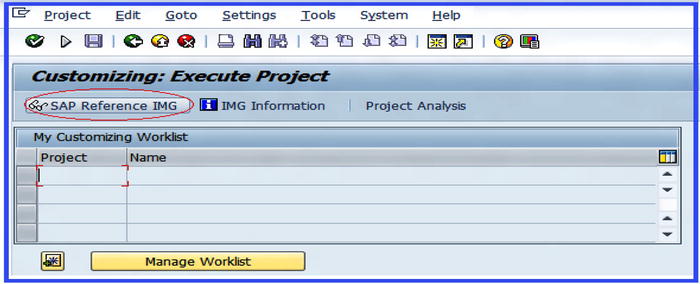
Figure 1-4. SAP Reference Implementation Guide
In the top-left of this screen, you’ll see the SAP Reference IMG button. IMG simply stands for Implementation Guide for customizing in SAP R/3. The button takes you to the lists of all the tasks that constitute implementations in the SAP ERP system that you can choose from as part of your configuration.
Click the ![]() button to go to the Display IMG screen (Figure 1-5). Display IMG contains a list of customizing steps available in the SAP ERP. Select Enterprise Structure from the tree structure. This is where you will start your configuration for this activity.
button to go to the Display IMG screen (Figure 1-5). Display IMG contains a list of customizing steps available in the SAP ERP. Select Enterprise Structure from the tree structure. This is where you will start your configuration for this activity.
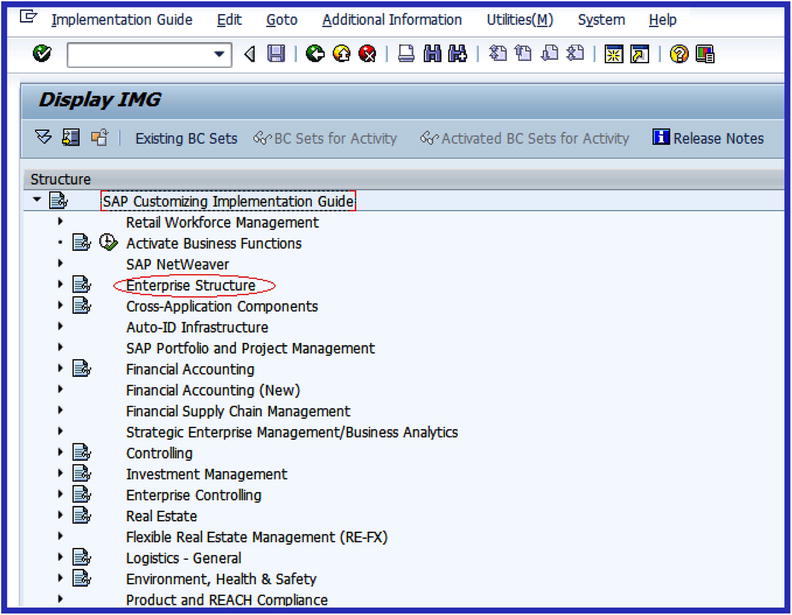
Figure 1-5. Customizing the Display IMG screen
In the Enterprise Structure under Financial Accounting, you will define your company, Company Code, Business Area, and Segment and assign a company code to your company.
Define a Company
In SAP, a company is an organizational unit treated as a legal entity from which a financial statement is generated in line with legal requirements. It is mandatory that a company be defined at least as part of financial accounting component to which one or more company codes are assigned in the SAP ERP system. You will define a company at this initial stage and then later in this chapter you will also define a company code and assign the company to the company code.
There are two ways to access the screen where company is defined in SAP R/3. You can follow this menu path: IMG ![]() Enterprise Structure
Enterprise Structure ![]() Definition
Definition ![]() Financial Accounting
Financial Accounting ![]() Define Company or you can use the transaction code OX15. This is a standard transaction code for creating your . When you use either the menu path or the TC, the Change View “Internal Trading Partners”: Overview screen appears (Figure 1-6). This is where you define the parameters for your new company. This screen displays the list of company codes in the system as an overview before you define your own company code.
Define Company or you can use the transaction code OX15. This is a standard transaction code for creating your . When you use either the menu path or the TC, the Change View “Internal Trading Partners”: Overview screen appears (Figure 1-6). This is where you define the parameters for your new company. This screen displays the list of company codes in the system as an overview before you define your own company code.
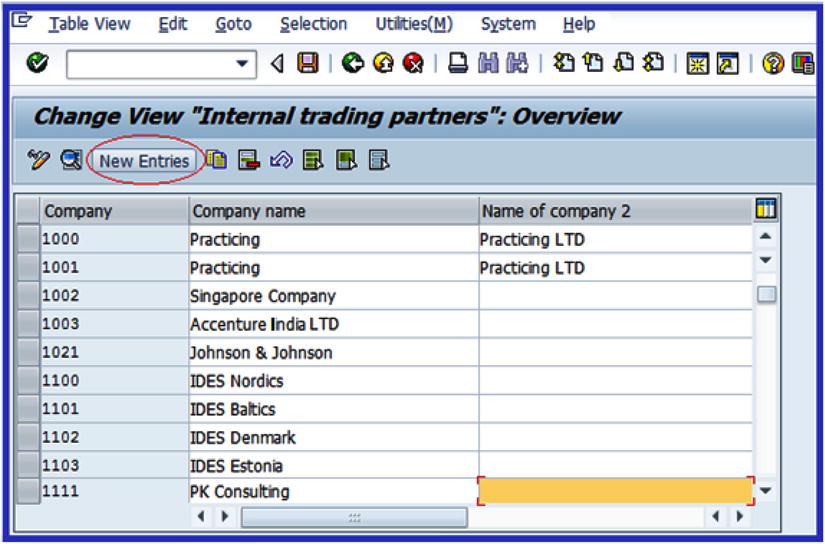
Figure 1-6. Defining the company code
![]() Note Notice in Figure 1-6 that a list of company codes is displayed on the screen. This is normal, as other company codes may already exist in the system.
Note Notice in Figure 1-6 that a list of company codes is displayed on the screen. This is normal, as other company codes may already exist in the system.
Click the ![]() button to go to the next screen, which is called New Entries: Details of Added Entries (Figure 1-7). You will define your company code using four characters and your company details.
button to go to the next screen, which is called New Entries: Details of Added Entries (Figure 1-7). You will define your company code using four characters and your company details.
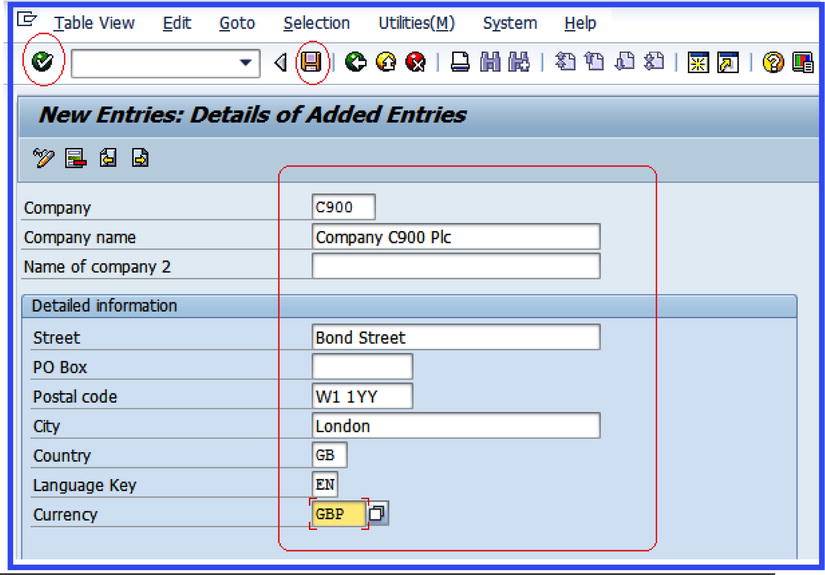
Figure 1-7. New Entries screen to enter your company’s details
The New Entries: Details of Added Entries screen is divided into two sections. The first section contains fields where you will enter your company code and company name. You have the option of entering a second company in the section if you have more than one company name. The second section is the detailed information section and it contains the field that will enable you to enter the company’s address, language key, and your company currency. Update the following fields using this information:
- Company: Enter four alphanumeric characters as your company code in this field. This code will serve as your company identifier in an environment where multiple company codes exist in the system. You can use up to four characters of your choice as you deem fit.
- Company Name: Enter your company name in this field. For example, the company name we use in this activity is Company C900 Plc. This field allows up to 25 characters.
- Detail Information: This section allows you to enter information about your company. Details entered here can include a correspondence address and the currency used when generating company code financial statements. Enter your company’s address, post code, city, country code, language key, and currency code in the appropriate fields.
![]() Note The SAP system comes with standard codes/keys for most countries:
Note The SAP system comes with standard codes/keys for most countries:
—Country code/key: This key is represented in the SAP ERP as the country key where your company is operating. For example, Great Britain’s code is GB, the United States’ is US, Germany’s is DE, and so on.
—Language code/key: This is your company language code. For example, Great Britain’s language code is EN, USA’s is EN, Germany’s is DE, and so on. Enter your company language key in this field. If you are not sure of your language key, you can search for it using the search function.
—Currency code/key: For example, for Great Britain the code is GBP, for the United States it is USD, for Germany it is EUR, and so on.
After you have entered your company code and address, press Enter on your keyboard or click the Enter ![]() button on the top-left side of the screen to confirm your entries.
button on the top-left side of the screen to confirm your entries.
![]() Note You cannot use an existing company code. If your company code already exists, the system will issue an error message when you click the Enter button, at the bottom of the screen. You will see “An entry already exists with the same key” on the status bar. If this happens, use another four characters as your company code.
Note You cannot use an existing company code. If your company code already exists, the system will issue an error message when you click the Enter button, at the bottom of the screen. You will see “An entry already exists with the same key” on the status bar. If this happens, use another four characters as your company code.
Finally, click Save ![]() . The system will notify you that
. The system will notify you that ![]() on the status bar at the bottom of the screen.
on the status bar at the bottom of the screen.
Since this is your first configuration exercise, when you try to save a newly created item the Prompt for Customizing Request screen will pop up. Customizing request allows the system to store your entries for transportation to other SAP systems. This happens only once, when you save your configuration the first time. If this screen pops up, follow these steps to create your request:
- Click the Create Request
 icon on the Prompt Customizing Request pop-up screen. This allows you to create your unique change request. You can create your own request number or choose from existing request numbers.
 - The Create Request screen is displayed. This screen allows you to enter a short description as a request description. Enter any description of your choice in the Short Description field and click the Save
 button.
 - The Prompt for Customizing Request dialog box is displayed again. Click the Enter
 button to save your configuration so far. Once the system has saved your settings, the system will notify you that
  on the status bar.
The next step in your configuration process is to return to the IMG Structure to perform another customizing task. Click the Back ![]() button on top-right side of the screen twice to return to the IMG Structure Implementation Guide. The implementation guide contains lists of all actions requiring implementation in SAP R/3.
button on top-right side of the screen twice to return to the IMG Structure Implementation Guide. The implementation guide contains lists of all actions requiring implementation in SAP R/3.
Define a Company Code
In this exercise, you define your company code. You can define more than one company code if required. In the SAP ERP, the company code is an organizational unit used in FI to structure a business process for financial reporting purposes. SAP FI gives you the option to edit (create from scratch) your company code or copy the parameters of an existing company code and modify them to meet your requirements.
In this activity you will create your company code from scratch instead of copying existing company code parameters. Choose Edit Company Code Data from the displayed list in Figure 1-8. Follow the menu path: IMG ![]() Enterprise Structure
Enterprise Structure ![]() Definition
Definition ![]() Financial Accounting
Financial Accounting ![]() Edit, Copy, Delete, Check Company Code or use the transaction code OX02 to go to the Choose Activity screen.
Edit, Copy, Delete, Check Company Code or use the transaction code OX02 to go to the Choose Activity screen.

Figure 1-8. Editing the company code data
![]() Note If you choose to copy an existing company’s data from the list of displayed company codes in the system instead of creating a new company code from scratch, use the activity Copy, Delete, Check Company Code in Figure 1-8. This allows you to copy an existing company’s code data that comes standard in the SAP system. Examples of standard company codes in SAP are 0001, 1000, 2000, and so on. The company code you have copied will retain most of the properties of the copied company code. Not all the properties are retained, so make sure you go through each step involved in customizing and update all the inherited properties of the copied company code to your own company code as appropriate.
Note If you choose to copy an existing company’s data from the list of displayed company codes in the system instead of creating a new company code from scratch, use the activity Copy, Delete, Check Company Code in Figure 1-8. This allows you to copy an existing company’s code data that comes standard in the SAP system. Examples of standard company codes in SAP are 0001, 1000, 2000, and so on. The company code you have copied will retain most of the properties of the copied company code. Not all the properties are retained, so make sure you go through each step involved in customizing and update all the inherited properties of the copied company code to your own company code as appropriate.
![]() Tip It is advisable to create your company code from scratch, as this will give you the opportunity to cover every step involved in customizing your company code.
Tip It is advisable to create your company code from scratch, as this will give you the opportunity to cover every step involved in customizing your company code.
When you choose Edit Company Code Data, the New Entries: Details of Added Entries screen is displayed (Figure 1-9). This screen allows you to enter your company code details in the appropriate fields. The company code details you enter in this screen will be treated by the system as your company data. The screen is divided into two sections. The first section contains the fields for your company code and name. The second section, which is the Additional Data section, contains your company’s city, country, currency, and language.

Figure 1-9. The New Entries screen is where you add your company’s details
Update the New Entries: Details of Added Entries screen with your company code data. To enter further address details, click the Address (Shift+F5) ![]() button at the top of the screen. This action will call up the Edit Address screen (Figure 1-10). This screen enables you to update your company code master record with the relevant information.
button at the top of the screen. This action will call up the Edit Address screen (Figure 1-10). This screen enables you to update your company code master record with the relevant information.

Figure 1-10. The screen to enter your company’s address and contact details
This screen is divided into five sections: Name, Search Terms, Street Address, PO Box Address, and Communication. Update each section with your company code information. It is not mandatory that you complete every field on this screen. Update the relevant fields only:
- Name: In this section you can enter your company title and name in the appropriate fields. The example uses Company C900 Plc as the company name. The name you enter here will represent your company code name in the system.
- Search Term 1 / 2: You have the choice of entering up to two search terms in this section. This is optional, but I recommend that you use meaningful terms. You can use the first four characters of your company name. For example, if your company name is Company C900 PLC, you could use COMP as your search term, as in Figure 1-10. The advantage of using search terms is that they allow you to search for a company code quicker in a situation where you have several company codes in the system.
- Street Address: This section allows you to enter a street/house number. This is usually your company’s street/house number, postal code/city, country, and region. Upon entering your country and region, the system will automatically display the timezone and region, which is your city code. This is usually the first two letters of your company code’s city.
- Post Box Address: If your company uses a post box address, you can enter it in this section. This may include a company’s post box, postal code, and company postal code.
- Communication: This section allows you to enter the language, phone number, mobile phone number, fax number, email, and so on used by your company for correspondence and contacts.
Update the Edit Address screen as in Figure 1-10. Click the Enter ![]() button or press Enter on the keyboard to confirm your entries. The Edit Address screen disappears and the new Entries: Details of Added Entries screen containing your company code data is displayed. Click the Save
button or press Enter on the keyboard to confirm your entries. The Edit Address screen disappears and the new Entries: Details of Added Entries screen containing your company code data is displayed. Click the Save ![]() button. The Prompt for Customizing Request screen pops up. Click the Enter
button. The Prompt for Customizing Request screen pops up. Click the Enter ![]() button at the bottom of the Prompt for Customizing Request screen. The system will then save your company code data and issue a notification that
button at the bottom of the Prompt for Customizing Request screen. The system will then save your company code data and issue a notification that ![]() on the Status bar at the bottom of the New Entries: Details of Added Entries screen.
on the Status bar at the bottom of the New Entries: Details of Added Entries screen.
Since you have just defined your company code, the next step in this activity is to assign your company code to your company. Return to the Display IMG screen by clicking the Back ![]() button twice, in order to assign the company code you have created for your company. The Display IMG screen is a tree structure containing all the customizing tasks in SAP R/3. Choose Assign Company Code to Company from the list of displayed items. This will take you to the screen where you will assign your company code to your company.
button twice, in order to assign the company code you have created for your company. The Display IMG screen is a tree structure containing all the customizing tasks in SAP R/3. Choose Assign Company Code to Company from the list of displayed items. This will take you to the screen where you will assign your company code to your company.
Assign Company Code to Company
To complete the customizing task of defining your company code, you must assign the company code to your company. The entire process is a simple, logical sequence. You define your company code, set the values for your company code, and assign your company code to your company (Figure 1-11).

Figure 1-11. Steps involved in defining and assigning a company code to a company
You assign your company code to your company from the Change View “Assign Company Code -> Company”: Overview screen (Figure 1-12). To access this screen, use the menu path: Enterprise Structure ![]() Assignment
Assignment ![]() Financial Accounting
Financial Accounting ![]() Assign Company Code to Company or use the transaction code OX16.
Assign Company Code to Company or use the transaction code OX16.

Figure 1-12. Assignment of your company to its company code
The Change View “Assign Company Code -> Company” Overview screen contains a list of company codes in the system. You may have a large number of companies in the system. Instead of having to scroll to search for your company among the company codes in the system, you can simply click the ![]() button at the bottom of the Change View “Assign Company Code -> Company”: Overview screen. The Another Entry screen pops up. Enter four identifier characters that make up your company code into the company code field and click the Enter
button at the bottom of the Change View “Assign Company Code -> Company”: Overview screen. The Another Entry screen pops up. Enter four identifier characters that make up your company code into the company code field and click the Enter ![]() button. Your company code will automatically be displayed on top of the company code list on the Change View “Assign Company Code -> Company” Overview screen.
button. Your company code will automatically be displayed on top of the company code list on the Change View “Assign Company Code -> Company” Overview screen.
![]() Note In SAP ERP R/3, you can create more than one company code depending on your client’s needs. If you chose to define another company code, repeat the previous steps by defining a company and a company code using another company code and name, and then assigning that company code to the company.
Note In SAP ERP R/3, you can create more than one company code depending on your client’s needs. If you chose to define another company code, repeat the previous steps by defining a company and a company code using another company code and name, and then assigning that company code to the company.
You will notice that your company code is displayed on top of all the company codes in the system. Your company code and city are displayed and the company field is blank. Simply type your company code into the company field. If you cannot remember your company code, use the Search function or Matchcode button next to the company field to search for your company code, as depicted Figure 1-12. After you enter your company code, save your company code settings.
Now that you have assigned your company code to your company, let’s look at how to define a business area, which will serve as an organizational unit for a specific segment of your business operations. You can use this for internal reporting purposes.
A business area is an organizational unit that represents a specific business segment in SAP that defines a functional area of operation, a plant, or an area of responsibility. For example, business areas can be a product the company sells, a geographical location, and so on. Business area is optional and is intended purely for internal financial reporting. They can be used across company codes for reporting. They are also viewed as balancing entities that can produce their own set of financial statements.
You define a business area in SAP ERP using four characters. A business area can be assigned to a company code or several company codes. Likewise, it is also possible to assign a company code to a business area or several business areas. The advantage of using a business area is that it allows management to generate internal financial reports on a business function or a combination of business functions. These reports aid management in decision-making, because they make it easy to tell how well a business area is performing.
You can create more than one business area, depending on your client’s requirements. In the exercise that follows, you will create two business areas: London and Manchester. Once business areas are created, it is then possible to generate profit-and-loss statements and balance sheets for business areas below the company code level. The financial statements created at this level are for internal purposes only and help management to determine the performance of each business area.
Define a Business Area
Problem: Your client wants to be able to access the performance of their business divisions by generating internal performance reports consisting of P&Ls and balance sheets for two business areas. You have been asked to define two business areas for your company code for Manchester and London to satisfy this requirement.
Defining a business area enables you to complete the settings that will allow your company to maintain financial statements by function, sales area, plant, or geographical location. Let’s define the business areas for Manchester and London. Follow the menu path: IMG ![]() Enterprise Structure
Enterprise Structure ![]() Definition
Definition ![]() Financial or use transaction code OX03.
Financial or use transaction code OX03.
The Change View “Business areas”: Overview screen is displayed. This is a table containing the list of business areas in the system. Click the ![]() button at the top-right side of the screen to access the screen where you will define your business area. The New Entries: Overview of Added Entries screen is displayed. This is a blank table of several rows and two columns that allows you to specify your business area code and add a description of your business area (Figure 1-13).
button at the top-right side of the screen to access the screen where you will define your business area. The New Entries: Overview of Added Entries screen is displayed. This is a blank table of several rows and two columns that allows you to specify your business area code and add a description of your business area (Figure 1-13).
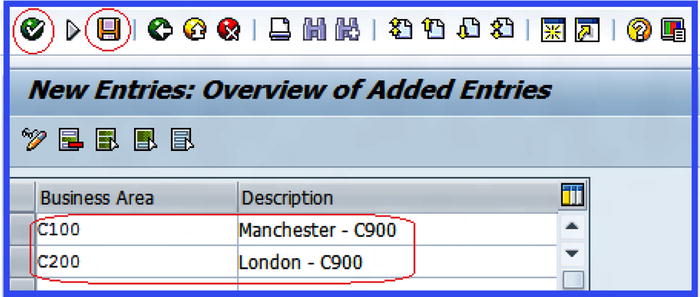
Figure 1-13. The main screen for defining business areas
Update the following fields:
- Business Area: Enter four characters for the business area. This code will enable you to identify your business areas. Figure 1-13 shows that we have created two business area codes: C100 for London and C200 for Manchester.
- Description: This field will enable you to enter the names or short descriptions of your business areas.
When you’re satisfied with your settings, in order to ensure that the system accepts your entries, click Enter ![]() to confirm your entries. Then save
to confirm your entries. Then save ![]() your business areas.
your business areas.
Segment
A segment is used to highlight items disclosed in financial reporting by segment. This is opposed to a business area, which forms part of an organizational unit for which a financial statement is drawn for internal purposes. Accounting principles and standards (U.S. GAAP, IFRS, IAS, and so on) mandate that companies produce segmental reporting in certain situations for external purposes. A segment may be a department, product, or geographic location. Segmental reporting is purely for transparency purposes when reporting the profit and risk situations of segments within an enterprise. The underlying reason behind this requirement is to assist users of the financial information to make better judgments about an entity’s involvement in different activities. Segment accounting allows a company to report the performance of their segment’s activities individually. The importance of segment reporting is that it places more emphasis on segment performance.
Define a Segment
Problem: Company C900 wants to be able to produce segmental reporting for two divisions of their operations. Your task is to define the two segments for Company C900 thus:
- Television and video systems as SEG-A
- Refrigerators and coolers as SEG-B
In the SAP ERP, you can carry out customization that allows you to meet segmental reporting requirements. To define a segment, follow this menu path: IMG ![]() Enterprise Structure
Enterprise Structure ![]() Definition
Definition ![]() Financial Accounting
Financial Accounting ![]() Define Segment. (Unfortunately, segments do not have transaction codes.) We will look at the segment you define in this activity in depth in Chapter 20, in the section entitled “Profit Center.”
Define Segment. (Unfortunately, segments do not have transaction codes.) We will look at the segment you define in this activity in depth in Chapter 20, in the section entitled “Profit Center.”
The Change View “Segments for Segment Reporting”: Overview screen is displayed. This is the screen where you will begin customizing your segments for segment reporting. Click the ![]() button at the top of the screen to go to the next screen (Figure 1-14).
button at the top of the screen to go to the next screen (Figure 1-14).
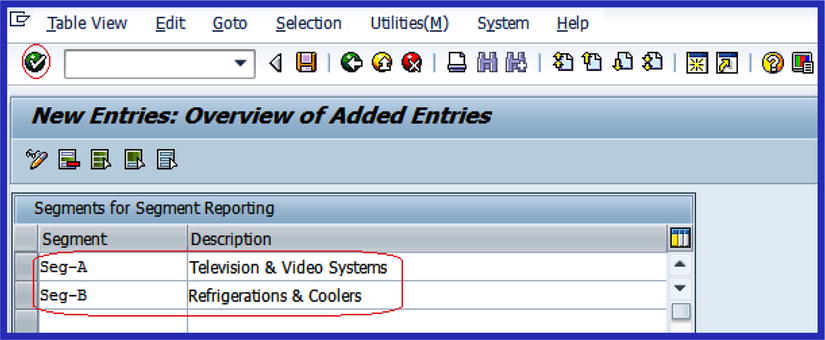
Figure 1-14. The main screen for defining segments
You will enter your segments in the system by updating the following fields:
- Segment: Enter a segment key in this field. This key will enable you to identify the segment in the system. We used segment key SEG-A for Television & Video Systems and SEG-B for Refrigerators & Coolers in this activity.
- Description: Enter your segment name or description in this field.
When you have updated the segments for segment reporting, click the Enter ![]() button at the top of the screen to confirm your entries and save
button at the top of the screen to confirm your entries and save ![]() your segment configuration.
your segment configuration.
The next step in this customizing activity is to create a fiscal year variant for your company code.
Fiscal Year Variant
The fiscal year represents the accounting year or annual accounting period. A fiscal year variant defines your company’s accounting posting periods. A proper business accounting transaction normally covers a 12-month period. The normal rule is that business transactions are assigned to the period during which the transaction took place. The fiscal year variant is customized to match your company’s fiscal year, which does not necessarily have to be the same as the normal calendar year (that is, January to December). SAP ERP is dynamic enough to fit into your company’s calendar or fiscal year.
Fiscal year variant is defined with posting periods. Posting periods are technical terms used to refer to months. In SAP ERP, the fiscal year is made up of 12 posting periods. Besides the normal 12 posting periods, you can define up to four special posting periods, which are used for posting year-end adjustments to closed periods. For example, if the normal fiscal period is closed, adjustments can still be posted in one of the four special periods.
![]() Note In SAP ERP you cannot exceed a maximum of 16 periods at any given time.
Note In SAP ERP you cannot exceed a maximum of 16 periods at any given time.
In SAP ERP, posting periods are identified by posting dates. As you can see in Figure 1-15, a fiscal year variant can be defined either as:
- Year independent
- Year specific (dependent)
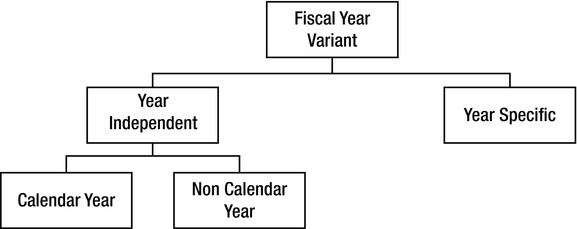
Figure 1-15. Types of fiscal year variants
With year independent, the accounting periods of a company remain the same each year (that is, the financial reporting year is constant). For example, an enterprise fiscal year is January to December of each year. There are two types of year independent fiscal year variants in SAP:
- Calendar year: The posting period is the same as the calendar year, usually 12 months. The posting period runs 12 months each year. For example, the U.S. financial year starts in January and ends in December.
- Non-calendar year: These are time periods that start and end any month of the year, except January and December. In the UK, for example, the fiscal year starts in April and ends in March. Since the non-calendar year did not start in January 1st, you use indicator -1 or +1 for the period of the year that belongs to the former or latter fiscal year.
![]() Note February is counted as 29 days irrespective of actual number of days in February in order for the system to take leap year into consideration.
Note February is counted as 29 days irrespective of actual number of days in February in order for the system to take leap year into consideration.
The SAP system comes with standard fiscal year variants. We recommend that you use the standard fiscal year variants supplied by the system. As examples, the fiscal year variant for the United States (January to December) is K4 and the fiscal year variant for the UK (April to March) is V3.
You can copy and modify the standard fiscal year variant.
If you decide to define your own fiscal year variant, use a two-digit alphanumeric identifier of your choice as your variant and maintain your fiscal year variant as appropriate.
Year Specific or Year Dependent
Year specific is used when the fiscal year/posting periods vary from year to year. This is uncommon in practice.
An example of a situation when this will arise is when posting periods are either greater than 12 months (extended fiscal year) or are less than 12 months (shortened fiscal year). The reason for a shortened fiscal year could be as a result of a company winding up or any other special reasons.
Maintain Fiscal Year Variant
Problem: The accounting team has asked you to define a calendar year fiscal variant (January–December) for your company code. You were advised by your colleagues to copy K4—the standard fiscal year variant supplied by SAP—and modify it to meet this requirement.
To access the screen where you will maintain your fiscal year variant, use the menu path: IMG ![]() Financial Accounting (New)
Financial Accounting (New) ![]() Financial Accounting Global Settings (New)
Financial Accounting Global Settings (New) ![]() Ledgers
Ledgers ![]() Fiscal Year and Posting Period
Fiscal Year and Posting Period ![]() Maintain Fiscal Year Variant (Maintain Shortened Fiscal Year). The transaction code is OB29.
Maintain Fiscal Year Variant (Maintain Shortened Fiscal Year). The transaction code is OB29.
The Change View “Fiscal Year Variants” Overview screen is displayed. This screen is split into two sections, the Dialog Structure section and the Fiscal Year Variants section (Figure 1-16), where you can customize your fiscal year. Since you want to copy the fiscal year variant K4 supplied by SAP in the system, you should use the ![]() button at the bottom to search for the fiscal year variant you want to use (in this case, it’s K4).
button at the bottom to search for the fiscal year variant you want to use (in this case, it’s K4).
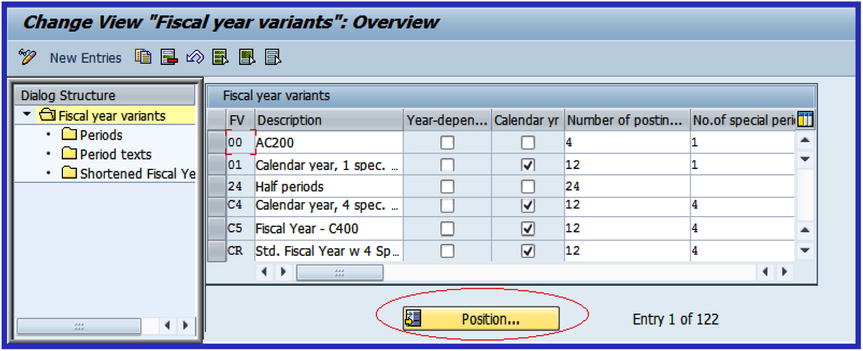
Figure 1-16. Searching for the fiscal year variant you want to copy
When you click the Position button, a dialog box called Another Entry (Figure 1-17) pops up. This dialog box enables you to search for the fiscal year variant supplied by the system (K4) that you want to adapt to your fiscal year variant.

Figure 1-17. Entering the fiscal year variant
Enter K4 in the FI. Year Variant field to call up K4 from the list of variants in the system.
Select K4 from the variant list and click the Enter button ![]() . The Change View “Fiscal Year Variants”: Overview screen is displayed (Figure 1-18). This screen allows you to copy an existing fiscal year supplied by the system or create your own fiscal year variant from scratch (see the following tip to create your own). To copy a fiscal year variant, select it and click the Copy icon
. The Change View “Fiscal Year Variants”: Overview screen is displayed (Figure 1-18). This screen allows you to copy an existing fiscal year supplied by the system or create your own fiscal year variant from scratch (see the following tip to create your own). To copy a fiscal year variant, select it and click the Copy icon ![]() on the top of the screen. When you copy a fiscal year variant, you are also copying its dependent settings defined by SAP.
on the top of the screen. When you copy a fiscal year variant, you are also copying its dependent settings defined by SAP.
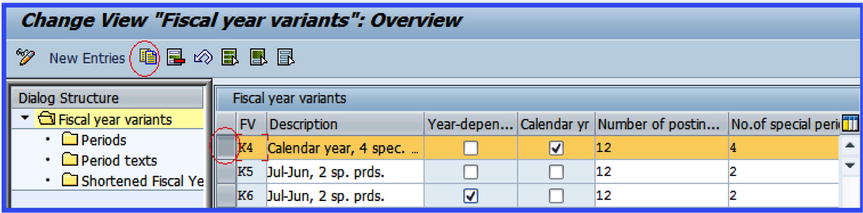
Figure 1-18. Copying the fiscal year variant
![]() Note When you copy a fiscal year variant, you have to change the fiscal year variant key to your own. Otherwise, you will not be able to save the fiscal year variant you have copied, because the system does not allow duplicate fiscal year keys. Once you have copied K4, change the fiscal year variant from K4 to any variant of your choice.
Note When you copy a fiscal year variant, you have to change the fiscal year variant key to your own. Otherwise, you will not be able to save the fiscal year variant you have copied, because the system does not allow duplicate fiscal year keys. Once you have copied K4, change the fiscal year variant from K4 to any variant of your choice.
If possible, avoid using the letters K or V as part of your fiscal year variant key, because many of the standard fiscal year variant keys supplied by the system start with either K or V.
To match the example we’re using in Figure 1-19, change the content of FV to C4 and change the Description field to Fiscal Year Variant – C900.
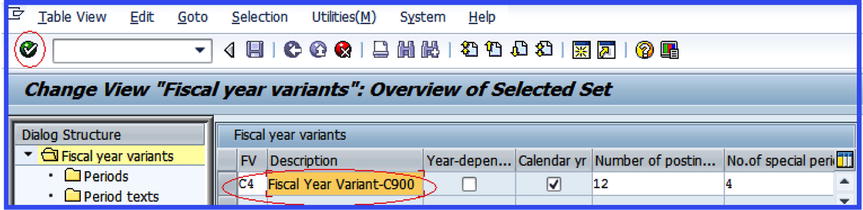
Figure 1-19. Updating the fiscal year variant
When you click the Enter ![]() button or press Enter on your keyboard, the Specify Object to be Copied screen pops up. This screen allows you to copy just the dependent entries or all of the dependent entries of the fiscal year variant you have marked for copying.
button or press Enter on your keyboard, the Specify Object to be Copied screen pops up. This screen allows you to copy just the dependent entries or all of the dependent entries of the fiscal year variant you have marked for copying.
Since you want to copy all of the dependent entries of the fiscal year variant K4, click the ![]() command button.
command button.
The Information dialog pops up, telling you the number of dependent entries you have copied from fiscal year variant K4.
Click the Enter ![]() button at the bottom of the information pop-up screen or press Enter on your keyboard to confirm.
button at the bottom of the information pop-up screen or press Enter on your keyboard to confirm.
Save ![]() your variant. The system will notify you on the status bar that
your variant. The system will notify you on the status bar that ![]() .
.
![]() Tip If you choose to define your own fiscal year variant, click the New Entries button at the top of the screen in Figure 1-16 and update the following fields:
Tip If you choose to define your own fiscal year variant, click the New Entries button at the top of the screen in Figure 1-16 and update the following fields:
FV: Enter a two-digit character as your fiscal year variant identifier key. It is recommended that you use an alphanumeric identifier. In the example in this section, the standard fiscal year variant supplied by SAP in the system, K4 (calendar year), was copied and modified to meet our desired requirement.
Description: This field allows you to describe or name your fiscal year variant. In the example in this section, the fiscal year variant C900 was used.
Year Dependent: If the fiscal year/posting periods vary each year, check the Year-Dependent checkbox. This is not very common in practice.
Calendar Yr: If the fiscal year is the same as the normal calendar year each year, check the Calendar Year checkbox.
Number of Posting Periods: Here you specify the number of posting periods. This will normally be a 12-month period.
No. of Special Posting Periods: SAP R/3 system allows up to four special periods for making postings outside the normal accounting periods.
Assign the Fiscal Year Variant to the Company Code
It is mandatory that you assign a fiscal year to a company code in SAP. Since you have defined or copied your fiscal year variant, the next step is to assign it to your company code. It is also possible to assign the standard fiscal year variant supplied by SAP in the system directly to your company code without having to define your own fiscal year variant. Follow this menu path: IMG ![]() Financial Accounting (New)
Financial Accounting (New) ![]() Financial Accounting Global Settings (New)
Financial Accounting Global Settings (New) ![]() Ledgers
Ledgers ![]() Fiscal Year and Posting Period
Fiscal Year and Posting Period ![]() Assign Company Code to a Fiscal Year Variant or use the transaction code OB37. You will then access the screen where you will assign the fiscal year you have defined to your company code (Figure 1-20).
Assign Company Code to a Fiscal Year Variant or use the transaction code OB37. You will then access the screen where you will assign the fiscal year you have defined to your company code (Figure 1-20).
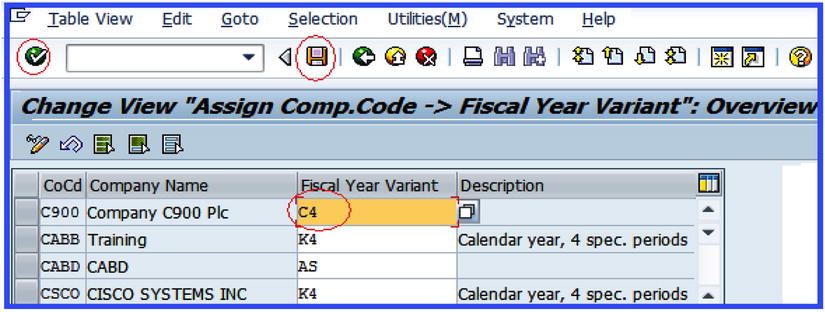
Figure 1-20. Assigning the company code to the fiscal year variant
The Change View “Assign Comp.Code -> Fiscal Year Variant”: Overview screen is displayed. To assign your company code to your fiscal year variant, search for your company code by using the Position button ![]() or using the scroll down arrow
or using the scroll down arrow ![]() and assigning your fiscal year variant as appropriate.
and assigning your fiscal year variant as appropriate.
Enter C4 in the Fiscal Year Variant column or use the Search function ![]() to search for your fiscal year variant (in this case, C4). Make sure that your fiscal year is entered into the Fiscal Year Variant column.
to search for your fiscal year variant (in this case, C4). Make sure that your fiscal year is entered into the Fiscal Year Variant column.
Click the Save ![]() button to save your fiscal year variant assignment.
button to save your fiscal year variant assignment.
![]() Note The system may issue a warning message that says, ‘No postings are possible without fiscal year,’ and the Save button is suppressed. This normally happens when some company codes are not assigned a fiscal year variant. If this happens, click the Enter button or press the Enter key on your keyboard several times until the Save button is activated. Then save your work. The system will notify you on the status bar that your data was saved.
Note The system may issue a warning message that says, ‘No postings are possible without fiscal year,’ and the Save button is suppressed. This normally happens when some company codes are not assigned a fiscal year variant. If this happens, click the Enter button or press the Enter key on your keyboard several times until the Save button is activated. Then save your work. The system will notify you on the status bar that your data was saved.
Opening and Closing Posting Periods
As mentioned previously, accounting transactions are usually assigned to periods. Posting periods are defined in fiscal year variants. The benefit of defining variants to open periods is to avoid the problem of posting accounting transactions to the wrong period. This is achieved by opening current periods and closing all other periods. At the end of the current period, the period is closed and the next period is opened. It is compulsory that at least two posting period intervals be open at any given time. On the other hand, you can open several posting periods at the same time (that is, more than two posting periods).
Posting periods are independent of the fiscal year; that is, they are not dependent on nor controlled by the fiscal year. Posting periods are defined at the global level in SAP ERP. This makes them accessible to several company codes in the system.
In SAP ERP, opening and closing periods are differentiated by account types. This allows you to determine which accounts are posted to a specific posting period. For example, posting can be permitted for accounts payable but not to accounts receivable. You can specify several account types simultaneously as part of your customizing open periods. Figure 1-21 lists the basic account types in SAP R/3.
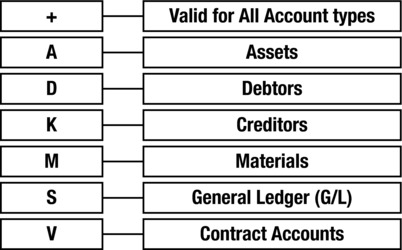
Figure 1-21. Account Types in an open period
In SAP ERP, it is mandatory that for each posting period, you specify the minimum account type ‘+’ for each open period. This account type is valid for all account types. The benefit of applying account types to an open period is that the system can determine whether a posting period specified in the posting period variant you defined can be posted to using the posting date entered in the document header.
As part of customizing opening and closing periods, the following items are defined:
- Define variants for open posting periods
- Assign variants to company codes
- Specify open and close posting periods
Let’s look at each in turn.
Define Variants for Open Posting Periods
Problem: You need to define the variants for posting periods for company C900 and assign the variant you have defined to the company code.
To define variants for open posting periods, follow the menu path: IMG: Financial Accounting (New) ![]() Financial Accounting Global Settings (New)
Financial Accounting Global Settings (New) ![]() Ledgers
Ledgers ![]() Fiscal Year and posting Periods
Fiscal Year and posting Periods ![]() Posting Periods
Posting Periods ![]() Define Variants for Open Posting Periods or use the transaction code OBBO.
Define Variants for Open Posting Periods or use the transaction code OBBO.
![]() Note Every company code must be assigned its own variant for open posting periods.
Note Every company code must be assigned its own variant for open posting periods.
The Change View Posting Periods: Define Variants: Overview screen is displayed. This is the screen where you define variants for opening posting periods. Click the ![]() button on top of the screen.
button on top of the screen.
The New Entries: Overview of Added Entries screen is displayed (Figure 1-22). This screen allows you to specify your company code variant code and the name of your variant. In practice, the posting period variant key is defined using your company code and your company name as the posting variant name.
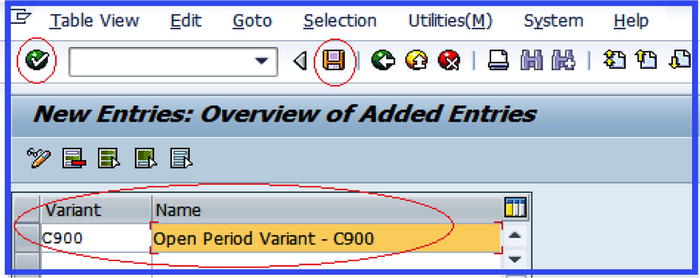
Figure 1-22. Overview of the added entries
Update the following fields:
- Variant: Enter four characters as the posting variant key in the variant field. It’s best to make it your company code. The code you enter here will be used when assigning posting variants later to your company code.
- Name: Enter the description or a variant name that best describes your variant in this field. In our example, we used Open Period Variant – C900 as our variant name.
Click the Enter button to confirm the variant you entered into the system. If the variant already exists in the system, the system will notify you on the status bar that “An entry already exists with the same key.” SAP R/3 does not allow duplicate variant keys. All you have to do when faced with this problem is use another variant key that the system will accept. Otherwise, the Save icon will be inactive and you will not be able to save your variant. Once the system accepts your variant, the Save button is activated and you can save your work. Save ![]() your posting variant.
your posting variant.
The next step is to assign the posting period variant to the company code.
Assign Variants to Company Code
The assignment of posting period variants is a part of customizing variants for opening periods. Every company code in SAP R/3 must be assigned a posting period variant. To access the screen where you can assign your company code to a posting period variant, use this menu path: IMG: Financial Accounting (New) ![]() Financial Accounting Global Settings (New)
Financial Accounting Global Settings (New) ![]() Ledgers
Ledgers ![]() Fiscal Year and Posting Periods
Fiscal Year and Posting Periods ![]() Posting Periods
Posting Periods ![]() Assign Variants to Company Code. Or use the transaction code OBBP.
Assign Variants to Company Code. Or use the transaction code OBBP.
The Change View “Assign Comp.Code -> Posting Period Variants”: Overview screen is displayed. Using the Position button at the bottom of the screen, search for your company code and update the variant fields by entering the variant for open posting periods that you defined (Figure 1-23).
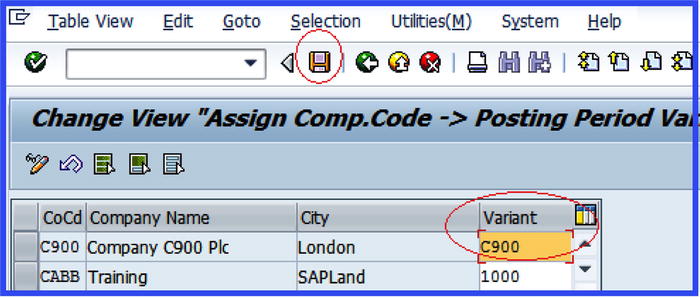
Figure 1-23. Assigning the company code to the posting period variant
Enter your four-digit variant—the C900 identifier—in the variant field shown in Figure 1-23 and save your customization.
Specify Open and Closing Periods
Problem: You can define your posting periods from scratch or you can copy existing posting periods and modify them to meet your requirement. To simplify your configuration, your colleagues have asked you to copy posting periods from company code 1000 and modify them to meet the client’s requirements.
As mentioned, posting periods are opened in fiscal year variants. You can open and close several posting periods simultaneously in SAP R//3. The advantage of opening and closing periods is that it helps prevent you from posting transactions to the wrong period in the sense that only valid periods are open. Any periods not relevant for posting are closed. To go to the screen where you can open and close posting periods, follow this menu path: IMG: Financial Accounting (New) ![]() Financial Accounting Global Settings (New)
Financial Accounting Global Settings (New) ![]() Ledgers
Ledgers ![]() Fiscal Year and Posting Periods
Fiscal Year and Posting Periods ![]() Posting Periods
Posting Periods ![]() Open and Close Posting Periods or use the transaction code OB52.
Open and Close Posting Periods or use the transaction code OB52.
The Change View “Posting Periods: Specify Time Intervals”: Overview screen is displayed (Figure 1-24).
Select all the accounts (+ A D K M S) belonging to company code 1000 that you want to copy from the list of displayed variants.

Figure 1-24. Copying the posting period intervals
Click the Copy ![]() button at the top-left side of the screen or choose Edit
button at the top-left side of the screen or choose Edit ![]() Copy As from the menu bar to copy the selected posting periods in Figure 1-24. The system will paste the variants you copied from company code 1000 to a new Change View “Posting: Specify Time Intervals”; Overview screen.
Copy As from the menu bar to copy the selected posting periods in Figure 1-24. The system will paste the variants you copied from company code 1000 to a new Change View “Posting: Specify Time Intervals”; Overview screen.
Update the variant identifiers 1000 by replacing them with your own C900 variants, as shown on the screen in Figure 1-25.
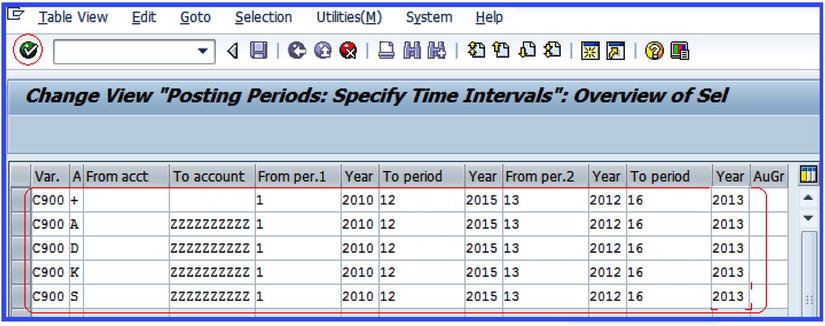
Figure 1-25. Update Posting Period Intervals
![]() Tip SAP has 12 normal posting periods and up to 4 special periods.
Tip SAP has 12 normal posting periods and up to 4 special periods.
Enter the range of open period intervals and years using the following information:

Four Special posting periods, use the following information:

Click Enter ![]() at the top of the screen or press Enter on your keyboard. Once the system has accepted your entries, it will notify you that
at the top of the screen or press Enter on your keyboard. Once the system has accepted your entries, it will notify you that ![]() on the status bar. Then save your work.
on the status bar. Then save your work.
![]() Note If your entries are rejected, you are using variant keys that exist in the system. Make sure your variant keys are unique to your company code.
Note If your entries are rejected, you are using variant keys that exist in the system. Make sure your variant keys are unique to your company code.
Summary
This chapter dealt with the basic elements of financial accounting configuration in Enterprise structure, which is fundamental to the configuration of the remaining chapters in this book. As part of the activities covered in this chapter, you learned what organizational structure is and how to customize organizational units in SAP ERP. As part of your customizing process, the chapter taught you how to define a company code and a fiscal year variant and how to assign a fiscal year to a company code. Other topics that were covered in this chapter include how to define posting periods and how to apply account types to open periods.
In the next chapter, you will learn how to customize master data, a chart of accounts, and retained earnings.