
![]()
Defining the Chart of Accounts
In this chapter, you learn how to define the chart of accounts, create general ledgers, and assign the chart of accounts to company codes.
At the end of this chapter, you will be able to:
- Demonstrate an understanding of the various charts of accounts represented in SAP ERP.
- Create a chart of accounts.
- Assign a company code to a chart of accounts.
- Define an account group to the chart of accounts.
- Define a retained earnings account.
The Chart of Accounts
A chart of accounts is a fundamental financial tool in SAP ERP. It contains the list of general ledger (G/L) accounts used by a company code or several company codes for posting daily financial activities and for reporting financial performance to the financial statement and balance sheet. Transactions are classified by transaction type in the chart of accounts. It holds basic information about the structure of general ledger accounts in the SAP ERP system, such as account numbers and names, as well as other control parameters that determine how G/L accounts are created and function in SAP ERP.
The benefits of the chart of accounts are that it:
- Defines the basic structure for creating G/L accounts.
- Gives you the flexibility to use the same chart of accounts for several company codes.
You can assign an additional two charts—country-specific and group—to the minimum required operational chart of accounts in a company code. Add country-specific chart of accounts when you want to be able to generate reports to meet country-specific reporting requirements and add group chart of accounts for consolidation purposes.
Three steps are involved in configuring the chart of accounts in SAP R/3 (Figure 2-1).
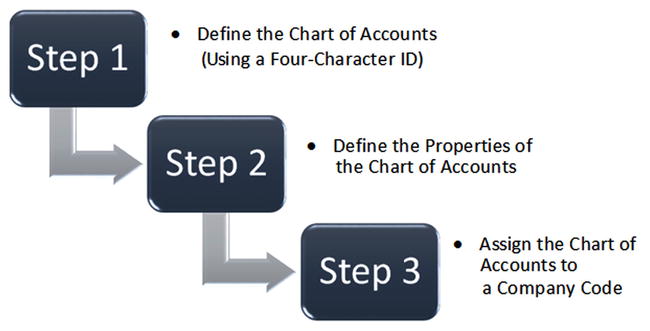
Figure 2-1. Steps involved in the customizing a chart of accounts
To create a general ledger and assign it to a company code, you must assign an operational chart of accounts to each company code in SAP ERP. One operational chart of accounts can be assigned to several company codes if those company codes have identical general ledger structures.
There are three charts of accounts in SAP ERP. Figure 2-2 shows the three charts of accounts and their purposes in SAP R/3.
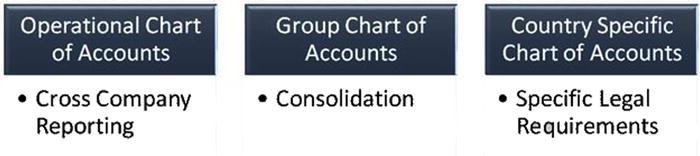
Figure 2-2. Available charts of accounts in SAP R/3
The functions of the three charts of accounts in SAP ERP are explained here:
- Operational chart of accounts: This is also referred to in the industry as a common chart of accounts. It is used to post the daily financial accounting and cost accounting transactions. Each company code must be assigned an operational chart of accounts.
- Group chart of accounts: Contains the corporate G/L accounts applicable to all company codes in the group. It’s purely for consolidation reporting for the group.
- Country-specific chart of accounts: This optional chart of accounts is important when a company in a corporate group is required by law to produce a financial report specifically to meet a country’s reporting requirements.
Since you now know what a chart of accounts is and understand the various chart of accounts available in SAP ERP, you’re ready to learn how to create a chart of accounts. The sample principle is applicable to the three chart of accounts when customizing. The only difference is that they are used to meet different reporting requirements.
Create the Chart of Accounts
Problem: Your task as an SAP FI consultant is to create a chart of accounts for company C900 Plc and assign it to your company code.
The chart of accounts you create will contain a list of G/L accounts used by your company code for reporting and posting activities. The chart of accounts is configured as a global setting. This means that the chart of accounts is available to all company codes in the client rather than just one. The following menu path will take you to the screen where you can customize your chart of accounts: IMG: Financial Accounting (New) ![]() General Ledger Accounting (New)
General Ledger Accounting (New) ![]() Master Data
Master Data ![]() G/L Accounts
G/L Accounts ![]() Preparations
Preparations ![]() Edit Chart of Accounts List. You can also use the transaction code OB13.
Edit Chart of Accounts List. You can also use the transaction code OB13.
The Change View “List of All Charts of Accounts”: Overview screen is displayed (Figure 2-3). This screen contains a list of all the charts of accounts that exist in the system. You can assign any of these charts to your company code or create your own chart of accounts. This is matter of choice or your requirements. This is where you create your chart of accounts.

Figure 2-3. The initial screen where you start defining your chart of accounts for your company code
Click the ![]() button on the top-left side of the screen to go to the New Entries: Details of Added Entries screen (Figure 2-4), where you will enter the information for the new chart of accounts.
button on the top-left side of the screen to go to the New Entries: Details of Added Entries screen (Figure 2-4), where you will enter the information for the new chart of accounts.

Figure 2-4. The screen where you define the new chart of accounts
Update the following fields:
- Chart of Accts: Enter a four-character ID for the chart of accounts key. This will allow you to identify your chart of accounts from the list of chart of accounts in the system. This four-character ID is unique to your chart of accounts. It cannot be used for any other chart of accounts in the system.
- Description: Enter a short description of your chart of accounts in this field. This activity uses Chart of Accounts for Company C900 as the description.
- General Specifications: In SAP R/3, charts of accounts are maintained in the language that you specify. In this section, choose the language that you want to use from the language list in the Maint. Language field. Master data can only be displayed and maintained in the language you specify here. Secondly, enter the length of your G/L account number in the Length of G/L Account Number field. There is no hard rule as to the length of the G/L account number. SAP gives you the flexibility of using up to 10 digits. The G/L account length is determined by your company’s preference. The length you specify here determines the length of G/L number of your chart of accounts. This example uses 10 for the G/L accounts length.
- Integration: As mentioned, you must assign your company code to a chart of accounts. You can also assign a country chart of accounts and/or group chart of accounts to meet certain reporting requirements. Country-specific charts are assigned to a chart of accounts using alternative account numbers. In SAP ERP all accounts, both internal and external, are managed technically by an integrated accounting system. The Controlling area uses the corresponding company code charts of accounts to manage cost elements. Assigning the controlling area to a company code is referred to as integration.
In the Integration section, you can choose whether you want the controlling integration to maintain cost elements manually or automatically. Although the system defaults to manual creation of cost elements, you can change this to automatic if necessary. I recommend that you use the manual creation of cost elements, which you will see in Chapter 18. Here’s what each option permits going forward:
- Manual creation of cost element: The system will not automatically create primary cost elements when you create your G/L accounts. Instead, you have to manually do this.
- Automatic creation of cost element: When a new G/L account is saved, the related cost elements are automatically created.
- Consolidation: Enter the group chart of accounts used by your corporate group. The group chart of accounts you enter here will be required when creating corporate G/L accounts that are used for consolidating financial statements reporting for the corporate group.
- Status: This section of the screen allows you to activate the blocked checkbox. This function blocks postings to the G/L account unless this checkbox is deactivated. For example, you can block your chart of accounts from being posted to until you have completed your configuration. We recommend that you not activate this function, unless your company or client requires this.
After updating the New Entries: Detail of Added Entries screen, click the Enter ![]() button at the top of the screen to confirm your entries and save
button at the top of the screen to confirm your entries and save ![]() your chart of accounts.
your chart of accounts.
The next step is to assign your company code to the chart of accounts you just created. To do this, you have to return to the Display IMG screen. Click the Back ![]() button at the top of the screen twice to return to the Display IMG screen. You will select the next task from the list of displayed IMG tasks in the next exercise.
button at the top of the screen twice to return to the Display IMG screen. You will select the next task from the list of displayed IMG tasks in the next exercise.
Assign Company Code to Chart of Accounts
Several company codes can be assigned to one chart of accounts, but only one operational chart of accounts is assigned to a company code (a group chart of accounts for consolidation reporting and a country-specific chart of accounts for meeting specific country reporting requirements can also be assignment to a company code). In most cases, there are several predefined charts of accounts in the system, which you can assign to your company code. To assign your company code to a chart of accounts, follow this menu path: IMG: Financial Accounting (New) ![]() General Ledger Accounting (New)
General Ledger Accounting (New) ![]() Master Data
Master Data ![]() G/L Accounts
G/L Accounts ![]() Preparations
Preparations ![]() Assign Company Code to Chart of Accounts. Or you can use the transaction code OB62.
Assign Company Code to Chart of Accounts. Or you can use the transaction code OB62.
The Change View “Assign Company Code -> Chart of Accounts Overview screen is displayed. Click the ![]() button at the bottom of the screen and then search for your company code. You will notice that the Chrt/Accts field in Figure 2-5 is blank. Search for the chart of accounts you have defined by clicking the Search function button next to the Chrt/Accts field or by typing your chart of accounts in the Chrt/Accts field.
button at the bottom of the screen and then search for your company code. You will notice that the Chrt/Accts field in Figure 2-5 is blank. Search for the chart of accounts you have defined by clicking the Search function button next to the Chrt/Accts field or by typing your chart of accounts in the Chrt/Accts field.

Figure 2-5. Assigning a chart of accounts to a company code
![]() Tip You have the option of assigning additional charts of accounts to your company code based on specific reporting needs. For example, if you want to provide a consolidated corporate report, assign a group chart of accounts to your company code with the operational chart of accounts. Likewise, if your goal is to provide country-specific reporting needs, you can assign a country chart of accounts to your company code.
Tip You have the option of assigning additional charts of accounts to your company code based on specific reporting needs. For example, if you want to provide a consolidated corporate report, assign a group chart of accounts to your company code with the operational chart of accounts. Likewise, if your goal is to provide country-specific reporting needs, you can assign a country chart of accounts to your company code.
Enter your chart of accounts in the Chrt/Accts field and then click the Enter ![]() button on the top-left side of the screen to confirm your entries. Finally, click the Save button
button on the top-left side of the screen to confirm your entries. Finally, click the Save button ![]() to save your chart of accounts.
to save your chart of accounts.
The next step is to define the account groups for the chart of accounts you just created. Account groups allow you to classify the G/L accounts that you will be creating in Chapter 5 into the right categories and assign the appropriate number ranges.
Define Account Group
A chart of accounts holds a large number of account types, and they determine how G/L accounts are created in SAP ERP. For proper management, accounts are systematically classified into appropriate account groups by grouping accounts with similar tasks together in the same general ledger. For example, all G/L accounts related to revenue are grouped together and assigned the same number range (array of numbers assigned to an object). G/L accounts belonging to account groups such as Liabilities, Expenditure, and Assets are also grouped together in the appropriate group and number ranges.
Figure 2-6 illustrates how account types are classified into account groups. For example, the number range 1–1000 is assigned to the Asset account group, and related account types like Land & Building, Furniture & Fittings, and Motor Vehicles are treated as assets in accounting. Likewise, the number range 1001–2000 is assigned to the account group Revenue, and it contains related account types like Sales, Interest Received, and Other Income. Finally, the number range 2001–3000 is assigned to the account group Expenditure, and it contains account types like Salaries, Office Supplies, and so forth.
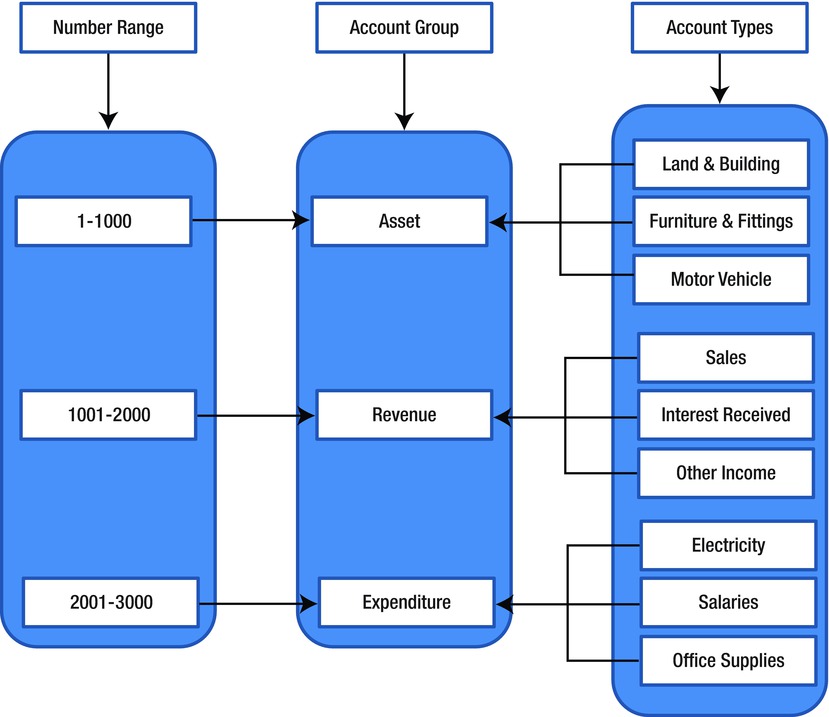
Figure 2-6. How account types are classified within account groups
Why are account groups important? There are two main reasons:
- They determine the number ranges assigned to an account when creating a G/L account.
- They determine the screen layout for creating G/L accounts in the company code area.
In this activity, instead of creating your own account groups, you will copy some of the predefined account groups from the INT chart of accounts supplied by the system. INT stands for international chart of accounts. These are universal charts of accounts supplied by SAP. They are not company code-specific; you can use them across company codes.
![]() Note You can create your own account groups or copy the account groups that meet your requirements from the predefined list and then modify them to meet your needs.
Note You can create your own account groups or copy the account groups that meet your requirements from the predefined list and then modify them to meet your needs.
Problem: You need to define the account groups for company C900 Plc by copying predefined groups supplied by SAP from the chart of accounts INT and modify them to meet company C900 Plc’s requirements.
![]() Tip It is much easier to copy predefined charts of accounts and modify them to meet your requirements, rather than create fresh charts of accounts from scratch.
Tip It is much easier to copy predefined charts of accounts and modify them to meet your requirements, rather than create fresh charts of accounts from scratch.
Whether you want to define an account group or copy an account group, follow this menu path: IMG: Financial Accounting (New) ![]() General Ledger Accounting (New)
General Ledger Accounting (New) ![]() Master Data
Master Data ![]() G/L Accounts
G/L Accounts ![]() Preparations
Preparations ![]() Define Account Group. Or you can use the transaction code OBD4.
Define Account Group. Or you can use the transaction code OBD4.
The Change View “G/L Account Groups”: Overview screen is displayed. This is where you define your account group. The system contains several predefined account groups. Search for an account group/chart of accounts that you want to copy by clicking the Position button ![]() at the bottom of the screen. This activity uses the predefined chart of accounts called INT (the international chart of account) supplied by the system. When you click the Position button, the Another Entry dialog box (Figure 2-7) pops up.
at the bottom of the screen. This activity uses the predefined chart of accounts called INT (the international chart of account) supplied by the system. When you click the Position button, the Another Entry dialog box (Figure 2-7) pops up.
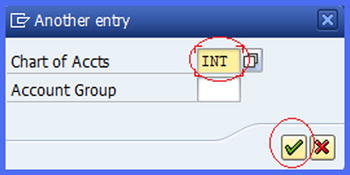
Figure 2-7. The Another Entry dialog box
Enter INT in the Chart of Accts field and click the Enter ![]() button at the bottom. All the chart of accounts for INT and the account groups in the system are displayed, as shown in Figure 2-8. Select the chart of accounts that meets your requirements from the displayed list. Table 2-1 contains a list of some of the charts of accounts that you can use and customize.
button at the bottom. All the chart of accounts for INT and the account groups in the system are displayed, as shown in Figure 2-8. Select the chart of accounts that meets your requirements from the displayed list. Table 2-1 contains a list of some of the charts of accounts that you can use and customize.
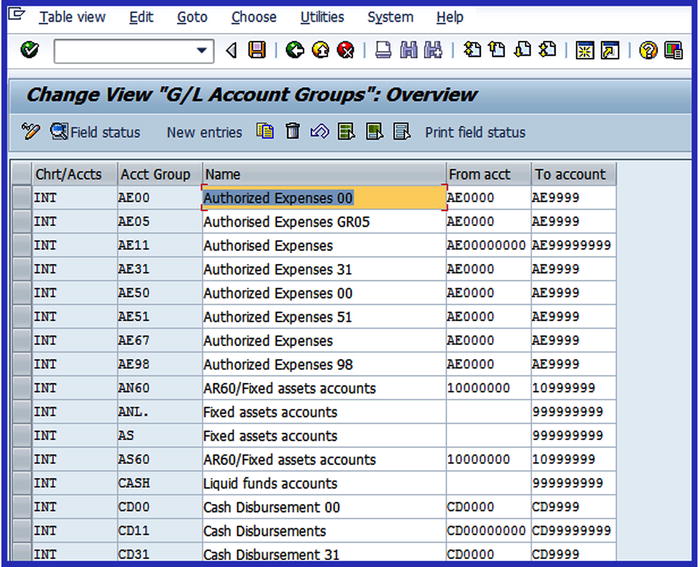
Figure 2-8. Lists of charts of accounts and account groups
Using the data in Table 2-1, highlight the listed charts of accounts and account groups shown in Figure 2-9.
Table 2-1. A list of values you can use for your chart of accounts
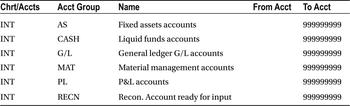
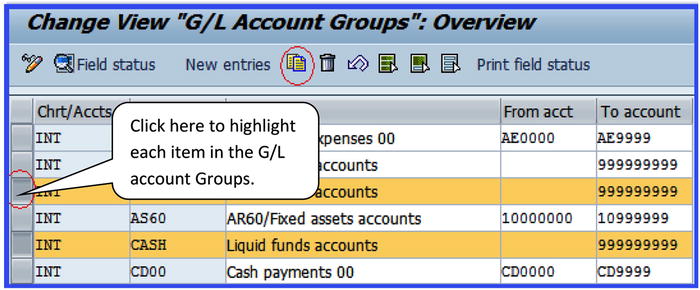
Figure 2-9. List of chart of accounts to select from
![]() Note There is no restriction on the chart of accounts you can use. We use the INT charts of accounts in this activity, because we believe that these charts of accounts are sufficient for this purpose.
Note There is no restriction on the chart of accounts you can use. We use the INT charts of accounts in this activity, because we believe that these charts of accounts are sufficient for this purpose.
Click on each object you want to copy on the screen using the items in Table 2-1 as your model to select or highlight them. You will notice that the selected items will turn yellow. Click the Copy ![]() button at the top of the screen to copy the selected charts of accounts from the list. The system will copy the specified charts of accounts INT and ask you to
button at the top of the screen to copy the selected charts of accounts from the list. The system will copy the specified charts of accounts INT and ask you to ![]() on the status bar at the bottom of the screen. Modify the copied chart of accounts by changing the content of Chrt/Accts fields from INT to your own chart of accounts that you defined earlier. This activity uses the CA90 chart of accounts, as shown in Figure 2-10.
on the status bar at the bottom of the screen. Modify the copied chart of accounts by changing the content of Chrt/Accts fields from INT to your own chart of accounts that you defined earlier. This activity uses the CA90 chart of accounts, as shown in Figure 2-10.
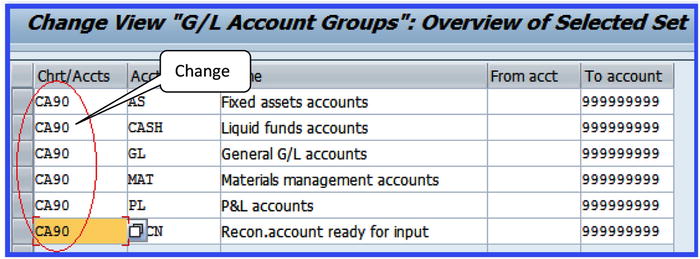
Figure 2-10. Updated chart of accounts list
Once you have changed the chart of accounts in Chrt/Accts from INT to your chart of accounts, click Enter ![]() at the top of the screen to confirm your entries and save
at the top of the screen to confirm your entries and save ![]() your work.
your work.
The final step in this activity is to define the retained earnings account. It will allow the system to transfer the net profit or loss in the P&L account at the end of the year to the balance sheet. Considering that the P&L account group is defined in the chart of accounts, it is important to also define a retained earnings account separately in order to allow profit or loss at the end of the year to be carried forward to the balance sheet as retained earnings or loss. Click the Back ![]() button on the top-left side of the screen to return to the tree structure. From there, you will choose the next task in your configuration (Define Retained Earnings Account). You can also use the menu path described in the following section.
button on the top-left side of the screen to return to the tree structure. From there, you will choose the next task in your configuration (Define Retained Earnings Account). You can also use the menu path described in the following section.
Define Retained Earnings Account
In accounting, a portion of the profits is held back at the end of a fiscal year as retained earnings (net profit) after distributing dividends to the shareholders in proportion to their investment in a corporation. Normally, the net profit or net loss figure is carried forward to retained earnings on the balance sheet. For example, Figure 2-11 shows that the retained earnings of $300 on the income statement is carried forward to the balance sheet.
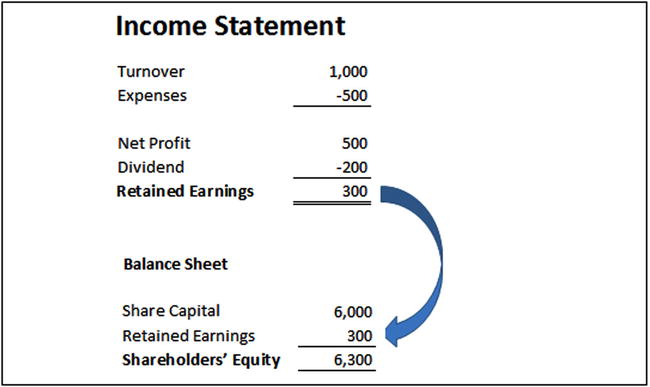
Figure 2-11. Illustration of retained earnings on the income statement and balance sheet
The amount carried forward is either added to the shareholders’ equity, if profit is realized, or deducted from the shareholders’ equity, if a loss is incurred. This indicates the profit position of a corporation.
When you’re customizing, retained earnings are assigned to the profit and loss (P&L) statement account type defined in the chart of accounts area of the P&L account. At the end of the year the system will automatically carry forward the balance of the P&L account to the retained earnings account. To define retained earnings in SAP R/3, follow this menu path: IMG: Financial Accounting (New) ![]() General Ledger Accounting (New)
General Ledger Accounting (New) ![]() Master Data
Master Data ![]() G/L Accounts
G/L Accounts ![]() Preparations
Preparations ![]() Define Retained Earnings Account. Or you can use the transaction code OB53.
Define Retained Earnings Account. Or you can use the transaction code OB53.
The Enter Chart of Accounts dialog box pops up. Enter your chart of accounts code in the Chart of Accounts field. Then click the Enter ![]() button to call up the Maintain FI Configuration: Automatic Posting – Accounts screen (Figure 2-12), where you assign the account type for retained earnings to the G/L account in your chart of accounts. This account assignment will allow the system to use the automatic function to carry forward retained earnings to the balance sheet. A typical account type commonly used in SAP R/3 is X. If you have more than one retained earnings to enter in the chart of accounts in the P&L Statement fields in your chart of accounts, you can use account types Y and Z to add additional retained earnings in your chart of accounts. This activity uses X for the P&L account type and CA90 for the chart of accounts, since we are only looking at one retained earnings.
button to call up the Maintain FI Configuration: Automatic Posting – Accounts screen (Figure 2-12), where you assign the account type for retained earnings to the G/L account in your chart of accounts. This account assignment will allow the system to use the automatic function to carry forward retained earnings to the balance sheet. A typical account type commonly used in SAP R/3 is X. If you have more than one retained earnings to enter in the chart of accounts in the P&L Statement fields in your chart of accounts, you can use account types Y and Z to add additional retained earnings in your chart of accounts. This activity uses X for the P&L account type and CA90 for the chart of accounts, since we are only looking at one retained earnings.
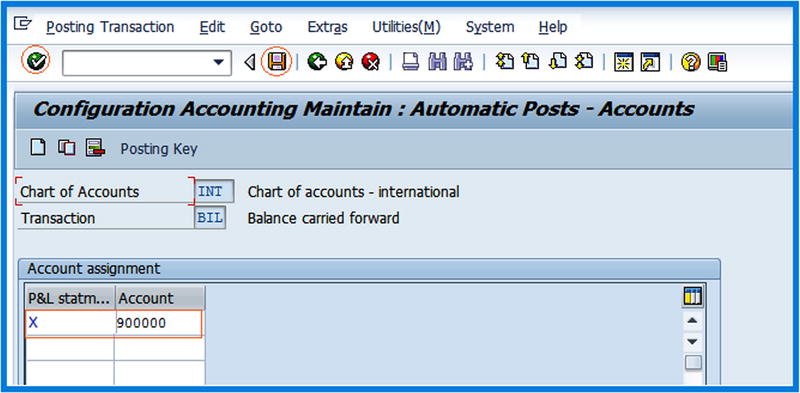
Figure 2-12. The screen where you assign a balance carried forward account to the P&L account using the appropriate account type
![]() Note X is a symbol used in SAP to represent an account type for retained earnings in the P&L statement. If you have more than one retained earnings, you cannot use account type X again once it has been used. You have to assign the next retained earnings account type Y and the next one Z.
Note X is a symbol used in SAP to represent an account type for retained earnings in the P&L statement. If you have more than one retained earnings, you cannot use account type X again once it has been used. You have to assign the next retained earnings account type Y and the next one Z.
Enter the account type in the P&L statement field and the appropriate G/L account in the Account field. This example uses X as the account type and 900000 as the G/L account. Click Enter ![]() at the top of the screen to accept your entries.
at the top of the screen to accept your entries.
![]() Note Since you have not created a G/L account for retained earnings, the system will issue a warning message on the status bar that says
Note Since you have not created a G/L account for retained earnings, the system will issue a warning message on the status bar that says ![]() . Click the Enter button twice or press the Enter button on your keyboard twice. The system will accept your G/L account temporarily to allow you to continue customizing. In Chapter 5, you will learn how to create G/L accounts.
. Click the Enter button twice or press the Enter button on your keyboard twice. The system will accept your G/L account temporarily to allow you to continue customizing. In Chapter 5, you will learn how to create G/L accounts.
Finally, save ![]() your retained earnings. The system will notify you that
your retained earnings. The system will notify you that ![]() on the status bar at the bottom of the screen.
on the status bar at the bottom of the screen.
Summary
This chapter explained what a chart of accounts is and how you define one. You also learned how to create a chart of accounts, which will serve as the structure for G/L accounts that you create in Chapter 5. You learned how to assign the chart of accounts you created to company codes. In order to complete this activity, you copied account groups for the INT (international) chart of accounts, which you then modified to meet your needs. Finally, you learned how to define a retained earnings account and an accounts type, which you assigned to your P&L accounts. This enables the system to automatically transfer the net profit or net loss after the distribution of dividends to the balance sheet as retained earnings.
The next chapter looks at the importance of document control in SAP ERP and explains how it affects the documents posted in the system.