
![]()
In this chapter, you will be looking at the purpose of document control, the application of important document types, and the importance of posting keys in SAP ERP.
At the end of this chapter, you will be able to:
Document Control
Hundreds of documents are created by companies as a result of transactions arising from business operations. To manage documents posted in the SAP system, it is important that they are categorized and stored sequentially for easy retrieval. Once a transaction is posted, the system generates a document, assigns a document number to the generated document, and saves the generated document in the system.
Every posting in the SAP system generates a document, and the document remains open until it is cleared and archived. For example, when an invoice is posted in the system, the system generates a document and assigns a document number. The invoice remains in the system as an open item. When payment is received for the invoice, the amount received is entered into the system and cleared with the outstanding invoice.
As mentioned earlier, hundreds of transactions are posted in the ERP system and identifying a document among hundreds of documents may become difficult. SAP uses a document-control technique that allows the system to structure document storage in a systematic manner using the document number, company code, and fiscal year.
The document number assigned to a document is obtained from the number range intervals that you will define later in this activity for your company code and your company fiscal year. Hence a document can only be identified in SAP ERP using the following items:
- Document number: This is a unique number that is assigned to a document automatically by the system during document posting or manually by the user during data input.
- Company code: This is your company’s identification code.
- Fiscal year: This is your company’s accounting year code. This is usually a 12-month period.
During document entry the user must specify the appropriate control keys for each document posted in the system. Every document in SAP ERP is controlled by two important keys:
- Document type
- Posting key
Document Type
Document type plays a very important role in SAP ERP and is defined by two-character values. This two-character key distinguishes the business transaction to be posted, such as vendor invoice, customer invoice, vendor invoice payment, and so on. It also determines document storage and the account to be posted. For example, the document type DR indicates a customer invoice posted to a customer account. Figure 3-1 lists some of the important document types. The importance of the document type is that it determines documents to be posted, the document storage type, and the account type to be posted.
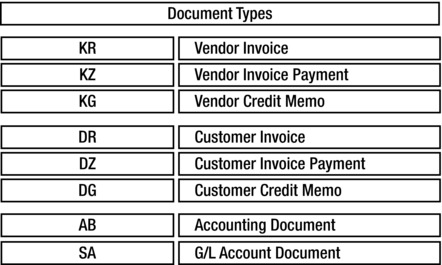
Figure 3-1. Important document types in SAP R/3
Document types are defined at the global level, which makes them available to all company codes within the client. Document types are used to control different business transactions in SAP ERP.
Document type controls the following:
- Which business transactions are to be posted. The importance of this is that it is easier to display line items based on the type of business transactions involved.
- Posting to account types when you assign appropriate document types to business transactions. For example, the document type DR will post to a customer account; KR will post to a vendor account; and so on. During document posting, you enter the document type in the document header field. This enables the system to differentiate between accounts to be posted.
- The number ranges for document numbers. The system assigns a number range to a document during posting, using the number range you created. The number range allows the system to store documents in the system based on similar number ranges. Number ranges therefore control document storage in the system.
![]() Note SAP comes with standard document types, which you can use as your document types. Some of the standard document types delivered by SAP are listed in Figure 3-1. You can also create your own document types, but it’s better to copy the standard document types supplied by SAP instead of creating your own document types from scratch. The reason is that when you create your own document types, you also need to make modifications to the standard table supplied by SAP, which can be time consuming.
Note SAP comes with standard document types, which you can use as your document types. Some of the standard document types delivered by SAP are listed in Figure 3-1. You can also create your own document types, but it’s better to copy the standard document types supplied by SAP instead of creating your own document types from scratch. The reason is that when you create your own document types, you also need to make modifications to the standard table supplied by SAP, which can be time consuming.
You have two options when defining a document number range in SAP ERP:
- Up to a future fiscal year: You define a large number range that the system assigns to documents systematically as a document number over one fiscal year. The system chooses the number from the number range that comes up next until the number range is finished. This method has the drawback of running out of numbers once the entire number range is used.
- Each fiscal year: You define a number range for each year. You can define number ranges for future years in advance. So at the beginning of next year, the system starts from the first number in the number range you defined for that year. The advantage of this method is that the number range is always sufficient.
Posting Key
Posting keys are defined by a two-digit number. They control the structure of line item entries in SAP ERP. Posting keys are defined at the client level, which makes them accessible to all company codes in the system. (Put another way, all company codes in the system within the same client can use the same posting keys simultaneously.) The importance of the posting key is that it determines the account type (that is,, if the account type is debit or credit) and the screen layout in SAP ERP. In order for the system to determine how an item is posted in the system, a posting key is entered during data entry. The posting key controls the following:
- The account to be posted
- Whether the line item should be posted as a debit or a credit
- How data you entered in the system is updated
SAP comes with predefined posting keys. Some important posting keys with their default posting key values are listed in Figure 3-2.
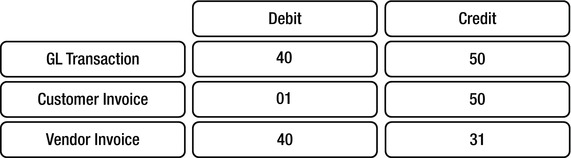
Figure 3-2. Important posting keys
Defining Number Ranges
Problem: You are to demonstrate to FI junior consultants how to define and copy number ranges for document postings.
A document in SAP ERP is assigned a unique number from a predefined number range. You define a number range in a sequential order and assign it to a two-character document type during document-range customizing. You can define number ranges in two ways in SAP ERP: by creating your own number ranges or by copying the standard number ranges supplied in the system.
![]() Note A document type can be represented by numbers or characters, or it can be alphanumeric.
Note A document type can be represented by numbers or characters, or it can be alphanumeric.
The number ranges you define in this activity will be assigned automatically to documents by the system during document posting. To get to the screen where you define number ranges, use this menu path: IMG: Financial Accounting (New) ![]() Financial Accounting Global Settings (New)
Financial Accounting Global Settings (New) ![]() Document
Document ![]() Document Number Ranges
Document Number Ranges ![]() Documents in Entry View
Documents in Entry View ![]() Define Document Number Ranges for Entry View. Or you can use transaction code FBN1.
Define Document Number Ranges for Entry View. Or you can use transaction code FBN1.
The Number Ranges for Accounting Documents screen is displayed (Figure 3-3). This screen is where you create the number ranges for your company code. Enter your company’s four-digit company code in the company code field on the screen, shown circled in red. In this activity, the company code is C900.
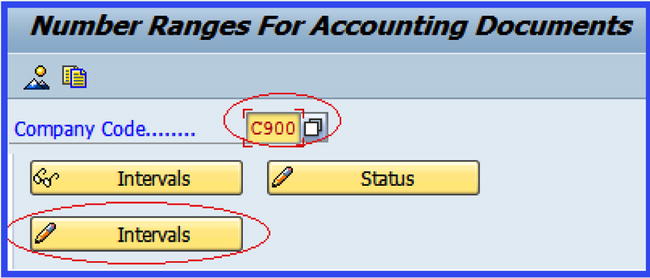
Figure 3-3. Number ranges for an accounting document
To maintain number ranges for your company code, click the ![]() button circled in red on the screen in Figure 3-3. This will display the Maintain Number Range Intervals screen, where you will create your number ranges. Notice that the input fields on the Maintain Number Range Intervals screen are inactive. Click the
button circled in red on the screen in Figure 3-3. This will display the Maintain Number Range Intervals screen, where you will create your number ranges. Notice that the input fields on the Maintain Number Range Intervals screen are inactive. Click the ![]() button at the top-left side of the screen to activate the screen input fields for number intervals insertion. Now update the following fields on the Insert Interval screen to match those in Figure 3-4.
button at the top-left side of the screen to activate the screen input fields for number intervals insertion. Now update the following fields on the Insert Interval screen to match those in Figure 3-4.
- No: This is the field where you enter your number range identifier. For example, you can start with 01, 02, and so on. These numbers allow you to define your number ranges in a systematic manner.
- Year: The year you enter determines the validity of your number range. It is important that you include the current year in your number range. This enables the system to assign a number range from the lower limit upward for each fiscal year automatically. The advantage of this method is that the number range is always sufficient. On the other hand, if you want the system to use a number range up to a future fiscal year, enter 9999 in the year field. The system will always use the next available number from the predefined number range.
- From number: This is the lower limit for your number range intervals (that is, the starting point of your number range). You can enter up to 10 numbers in this field. For example, 010000000.
- To number: This is the upper limit for your number range intervals (that is, where your number range ends). You can enter up to 10 numbers in this field. For example, 01999999999.
- Current number: No entry is needed in this field. This field shows the current number range that has been assigned by the system. During configuration, this figure always defaults to 0.
- Ext: When this checkbox indicator is selected, the system will allow the users to assign external numbers to documents during posting. If the checkbox is blank, the system will assign numbers to documents automatically from the number range intervals you specify here.

Figure 3-4. Specification of number range intervals
Click the Insert ![]() button circled in red on the bottom-right side of the screen in Figure 3-4 or press Enter on your keyboard. The system will accept your number range specification. The number range intervals you specified here will be assigned to documents during document posting by the user. In the example in Figure 3-4, we used 01 as the number range identifier, 2011 as the year, and 0100000000–0199999999 as the number range interval.
button circled in red on the bottom-right side of the screen in Figure 3-4 or press Enter on your keyboard. The system will accept your number range specification. The number range intervals you specified here will be assigned to documents during document posting by the user. In the example in Figure 3-4, we used 01 as the number range identifier, 2011 as the year, and 0100000000–0199999999 as the number range interval.
As part of this exercise, continue to specify number range intervals for the years 2012, 2013, 2014, 2015, 2016, 2017, and 2018. To do this, click ![]() at the top-left side of the screen to specify the number range for each year individually (Figure 3-5).
at the top-left side of the screen to specify the number range for each year individually (Figure 3-5).

Figure 3-5. The Maintain Number Range Intervals page
![]() Note If you want to use the future fiscal year number range method, enter 9999 in the year column. The system will then use the available number interval by choosing the current number from the number range that comes up next.
Note If you want to use the future fiscal year number range method, enter 9999 in the year column. The system will then use the available number interval by choosing the current number from the number range that comes up next.
When you have completed your number range customizing, save ![]() the number ranges you have defined. The Transport Number Range Intervals screen pops up, telling you about your number range transport. Accept by clicking the Enter
the number ranges you have defined. The Transport Number Range Intervals screen pops up, telling you about your number range transport. Accept by clicking the Enter ![]() button. The system will then notify you that
button. The system will then notify you that ![]() on the status bar at the bottom of the screen.
on the status bar at the bottom of the screen.
How to Display Number Intervals
To display the number range intervals you have created—to see what you have done—click the Back ![]() button at the top-left side of the screen to return to the previous screen (Number Ranges for Accounting Documents). Click the
button at the top-left side of the screen to return to the previous screen (Number Ranges for Accounting Documents). Click the ![]() button on the screen. Your number ranges will be displayed, as shown in Figure 3-6.
button on the screen. Your number ranges will be displayed, as shown in Figure 3-6.

Figure 3-6. The Display Number Range Intervals page
How to Delete Number Range Intervals
Before you can look at how to copy predefined number ranges provided by SAP in the system, you have to first delete the number ranges you just created. That’s because the system will not allow you to create an existing number range in the system. So delete the number ranges you created for the years 2011, 2012, 2013, 2014, 2015, 2016, 2017, and 2018.
On the Display Number Range Interval screen in Figure 3-6, click the Back ![]() button at the top-right side of the screen to return to the Number Ranges for Accounting Documents screen.
button at the top-right side of the screen to return to the Number Ranges for Accounting Documents screen.
The system will automatically default to your company code in the Company Code field. Otherwise, enter the company code you desire in the company code field manually and click the ![]() button to call up the number intervals you created earlier. The Maintain Number Range Intervals screen is displayed (Figure 3-7).
button to call up the number intervals you created earlier. The Maintain Number Range Intervals screen is displayed (Figure 3-7).

Figure 3-7. Deleting the number range intervals
A list of the number range intervals you have created is displayed. Select the number range intervals that you want to delete. For this activity, select all the displayed number range intervals—2011, 2012, 2013, 2014, 2015, 2016, 2017, and 2018. Click the Delete ![]() button at the top of the screen to delete them.
button at the top of the screen to delete them.
After deleting all the displayed number range intervals, notice that the Maintain Number Range Intervals screen becomes blank and the fields on the screen become inactive, which indicates you cannot enter values into these fields. Click the Save ![]() button to complete the task.
button to complete the task.
How to Copy Document Number Ranges
Problem: You need to copy the standard number range intervals from the company code 1000 and modify them to meet your number range intervals requirement.
Now let’s take a look at how to copy standard number range intervals from a predefined company code and then modify them to meet your requirements. In this case, we’ll use 1000, which is supplied by SAP in the system. This step is optional, but we’ll go through it so you know how to copy predefined number ranges.
Copied number range intervals work exactly the same way as number range intervals that you create. The advantage of copying number range intervals is that it is easier and quicker to copy multiple number ranges simultaneously, instead of having to create each individual fiscal year number ranges. To go to the screen where you define document number range intervals, follow this menu path: IMG: Financial Accounting (New) ![]() Financial Accounting Global Settings (New)
Financial Accounting Global Settings (New) ![]() Document
Document ![]() Document Number Ranges
Document Number Ranges ![]() Documents in Entry View
Documents in Entry View ![]() Define Document Number Ranges for Entry View. Or, you can use the transaction code FBN1.
Define Document Number Ranges for Entry View. Or, you can use the transaction code FBN1.
The Number Ranges for Accounting Documents screen is displayed (see Figure 3-3 earlier in the chapter). This is where you copy the predefined number range intervals from another company. Enter the company code for which you want to copy number ranges in the company code field, and click the Copy ![]() button at the top right of the screen. The Copy: Company Code dialog box pops up (Figure 3-8). As you can see, in this activity we copied company code 1000 containing predefined number ranges. It is not necessary that you copy company code 1000 number ranges. This is purely a matter of choice. But we recommend that you copy one of the following company codes: 0001, 1000, 2000, or 3000. These are some of the standard company codes with predefined number ranges supplied by SAP. On the Copy: Company Code screen, you specify both the company code from which you want to copy the number ranges and your company code.
button at the top right of the screen. The Copy: Company Code dialog box pops up (Figure 3-8). As you can see, in this activity we copied company code 1000 containing predefined number ranges. It is not necessary that you copy company code 1000 number ranges. This is purely a matter of choice. But we recommend that you copy one of the following company codes: 0001, 1000, 2000, or 3000. These are some of the standard company codes with predefined number ranges supplied by SAP. On the Copy: Company Code screen, you specify both the company code from which you want to copy the number ranges and your company code.
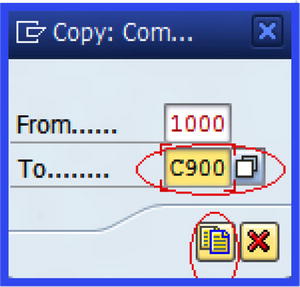
Figure 3-8. The copy company code number range intervals
The system will default to the source company code in the From field. Enter your company code in the To field. Since you are copying company code 1000’s number range intervals to your company code C900, click the Copy ![]() button circled in red at the bottom of the Copy: Company screen. The system will copy the number range intervals from company code 1000 to company code C900 and issue a notification on the status bar as follows:
button circled in red at the bottom of the Copy: Company screen. The system will copy the number range intervals from company code 1000 to company code C900 and issue a notification on the status bar as follows: ![]() .
.
You can display the number ranges you have just copied by clicking the ![]() button
button
Understand and Manage Field Status Variants
Field status variants are variants that hold the Field Status Groups in SAP R/3. A Field Status Group defines the screen layout for a general ledger account entry and controls document creation within a company code. Based on your specification, the Field Status Groups determine which fields accept input during document entry, as well as whether a field should be inactive, be required, or be optional.
In SAP R/3, field statuses are defined as global settings and are assigned Field Status Groups. Field status variants are independent of company codes (that is, they are available to all company codes in the client), because they are created at the client level. A Field Status Group is entered in the company code section of the GL accounts in the G/L account master records during the creation of a G/L account.
The Field Status Group you define controls the appearance of certain data entry fields in the data screen for G/L accounts.
![]() Note It best to simply copy the standard field status variants supplied by SAP.
Note It best to simply copy the standard field status variants supplied by SAP.
Define Field Status Variants
Problem: Copy the predefined field status variants for company code 1000 supplied by the system and modify them to meet your requirements.
In SAP R/3, several company codes can use the same field status groups. As part of customizing field status variants, you can specify field status variants and assign your company code to the field status variant you have defined. To proceed to the screen where you define field status variants, follow the menu path: Financial Accounting (New) ![]() Financial Accounting Global Settings (New)
Financial Accounting Global Settings (New) ![]() Ledgers
Ledgers ![]() Fields
Fields ![]() Define Field Status Variants. You can use the transaction code OBC4 instead, if you want.
Define Field Status Variants. You can use the transaction code OBC4 instead, if you want.
The Change View “Field Status Variants”: Overview screen is displayed (Figure 3-9). This screen is where you maintain your field status variant and assign field status groups to it.

Figure 3-9. Copying the field status variants
Search for field status variant 1000, which is the one we’ll use to copy. Then select it and copy it. When you copy the field status variants supplied by the system, you also copy any associated tables and parameters.
![]() Note Field status variant 1000 is simply the one we are using for this activity, but you can copy any field status variant from the list of variants supplied by SAP, because trying to create your own field status variant can be very difficult and time consuming. For example, you can copy field status variant 0001, 2000, and so on and get the same result.
Note Field status variant 1000 is simply the one we are using for this activity, but you can copy any field status variant from the list of variants supplied by SAP, because trying to create your own field status variant can be very difficult and time consuming. For example, you can copy field status variant 0001, 2000, and so on and get the same result.
Click the Copy ![]() icon circled in red at the top of the screen. The Change View “Field Status Variants”: Overview of Selected Set screen is displayed (Figure 3-10) showing the field status variants you have copied.
icon circled in red at the top of the screen. The Change View “Field Status Variants”: Overview of Selected Set screen is displayed (Figure 3-10) showing the field status variants you have copied.
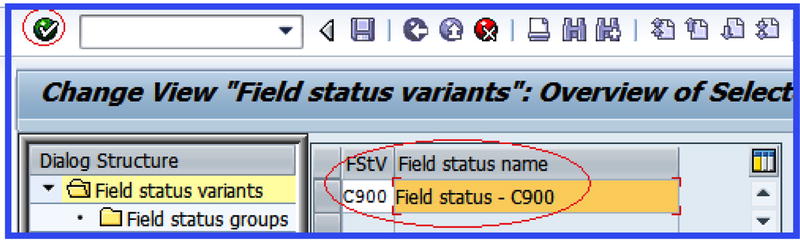
Figure 3-10. Editing the field status variants
Change the content of the following fields:
- FStV: Enter your field status variant key into this field. You can enter up to four characters as your key. Since you have copied the field status variant from company code 1000, change the field status variant 1000 to your own field status variant identifier of C900.
- Field status name: This field allows you to provide a short description or a name for your field status variant. Replace the content of this field with your own field status variant description, for example Field Status Variant – C900.
![]() Tip It is advisable to use your company code as your field status variant.
Tip It is advisable to use your company code as your field status variant.
Click the Enter ![]() button at the top of the screen or press Enter on your keyboard for the system to accept your entries. A dialog box—Specify Object to Be Copied—pops up, telling you the number of entries and dependent entries that you are about to copy. You can either copy the entry with dependent entries (that is, the field status variant with the field status groups it holds) or copy just the entry itself without dependent entries. (If you take the latter approach, you will have to define the dependent entries for your field status variants; otherwise, your field status variant may not work properly.) If you want to copy the field status variants with dependent entries, click the Copy All button on the screen. If you don’t want to copy dependent entries with the field status variants, click the Only Copy Entry button on the screen. In this activity, the object we are copying includes dependent entries. Click the
button at the top of the screen or press Enter on your keyboard for the system to accept your entries. A dialog box—Specify Object to Be Copied—pops up, telling you the number of entries and dependent entries that you are about to copy. You can either copy the entry with dependent entries (that is, the field status variant with the field status groups it holds) or copy just the entry itself without dependent entries. (If you take the latter approach, you will have to define the dependent entries for your field status variants; otherwise, your field status variant may not work properly.) If you want to copy the field status variants with dependent entries, click the Copy All button on the screen. If you don’t want to copy dependent entries with the field status variants, click the Only Copy Entry button on the screen. In this activity, the object we are copying includes dependent entries. Click the ![]() button to copy the object with all its dependent entries. The system will issue an Information screen telling you the number of dependent entries copied. Click the Enter
button to copy the object with all its dependent entries. The system will issue an Information screen telling you the number of dependent entries copied. Click the Enter ![]() button at the bottom of the Information screen or press Enter on your keyboard to confirm that you are satisfied with the copied entries. Then click the Save
button at the bottom of the Information screen or press Enter on your keyboard to confirm that you are satisfied with the copied entries. Then click the Save ![]() button to save your field status variant.
button to save your field status variant.
Display Field Status Variants
It is important to display the Field Status Groups you copied to see if you are satisfied with your customizing. To do this, stay on the Change View “Field Status Variants”: Overview screen in Figure 3-10. Notice that your field status variant is at the top of the list displayed on the screen. Select or highlight your field status ![]() from the field status variants list and double-click
from the field status variants list and double-click ![]() in the Dialog Structure section, on the left side of the screen (Figure 3-11) to open the folder. The field status groups assigned to your field status variant will be displayed on the right side of the screen.
in the Dialog Structure section, on the left side of the screen (Figure 3-11) to open the folder. The field status groups assigned to your field status variant will be displayed on the right side of the screen.
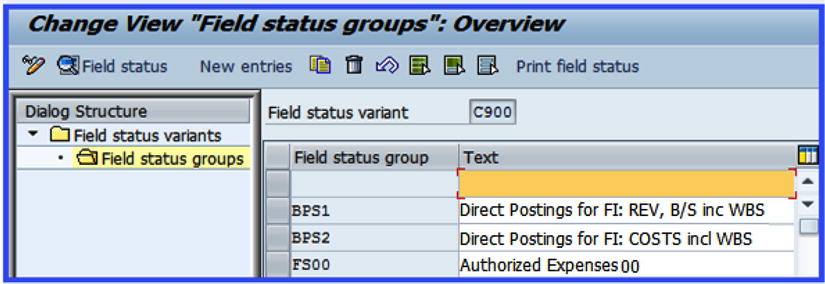
Figure 3-11. The Field Status Groups you copied are displayed
Assign Company Code to Field Status Variants
As mentioned earlier, field status variants are company code-independent since they are created at the global level. The field variant you just defined—C900—can be assigned to more than one company code. The next step in this activity is to assign the field status variant to your company code. The field status variant assigned to your company code will control the appearance of the data entry field in the data screen. To go to the screen where you can assign a field status variant to your company code, follow the menu path: IMG: Financial Accounting (New) ![]() Financial Accounting Global Settings (New)
Financial Accounting Global Settings (New) ![]() Ledgers
Ledgers ![]() Fields
Fields ![]() Assign Company Code to Field Status Variants. You can use the transaction code OBC5 if you prefer.
Assign Company Code to Field Status Variants. You can use the transaction code OBC5 if you prefer.
The Change View “Assign Company Code ![]() Field Status Variant” Overview screen is displayed (Figure 3-12) with list of company codes. Search for your company code by clicking the
Field Status Variant” Overview screen is displayed (Figure 3-12) with list of company codes. Search for your company code by clicking the ![]() button at the bottom of the screen.
button at the bottom of the screen.

Figure 3-12. Assigning a company code to a field status variant
Assign your field status variant to your company code. In this activity, we used C900. Save ![]() your company code assignment. The system will notify you that
your company code assignment. The system will notify you that ![]() at the bottom of the screen on the status bar.
at the bottom of the screen on the status bar.
Summary
This chapter explained document control by looking at document type and posting keys and their functions in SAP ERP. As part of the customizing exercise, you learned how to create number ranges, how to display the number ranges you created, and how to delete a number range. You also learned how to copy predefined number ranges provided by SAP in the system. You also learned the importance of field status variants. Finally, you learned how to create your own field status variants by copying predefined field status variants provided by SAP and learned how to assign field status variants you created to your company code.
Chapter 4 looks at how to define tolerance groups for GL accounts and define employee tolerance groups. Chapter 4 also walks through the various steps involved in customizing tolerance groups by first defining them and then assigning users to them to create accounts for clearing differences.