
![]()
Defining Tolerance Groups for G/L Accounts and Employees
In this chapter, you will learn the purpose of tolerance groups and how to define them in SAP R/3.
At the end of this chapter, you will be able to:
- Define tolerance groups for G/L accounts
- Define tolerance groups for employees
- Define tolerance groups for employees with a group key
- Assign users to tolerance groups
Tolerance Groups
Tolerance groups determine limits upon which acceptable payment differences are based. During document posting, the system will check for any difference and match it against the defined limits to determine if the difference is within the specified limits and automatically post the differences to a predefined account. If the difference is outside the set limit, the system will automatically reject the posting.
It is a normal business practice for payment differences to occur in a business transaction. The bottom line here is, what is the business willing to accept as an acceptable payment difference for a given business transaction? This occurs when an invoice amount entered in the system is different from the actual amount received to clear the outstanding invoice. For example, an outstanding invoice amount is $1,000 and the amount paid to clear the outstanding invoice is $950, leaving you with a difference of $50. If the acceptable limit for your tolerance groups is $45, the system will reject your posting because the difference is above the acceptable limit. On the other hand, if the payment difference is $45 or less, the system will accept your posting and post the difference to a specified predefined account, because the difference is within the defined acceptable limit.
There are several reasons why differences occur. A typical example is as a result of goods damaged on transit that reduce the value of the goods delivered. This brings up the concept of materiality, which is what a business considers to be material or significant differences that cannot be overlooked or ignored. To enable the system to perform limit checks, your company must define an acceptable payment difference.
Tolerances are necessary mainly for control purposes. In SAP ERP, maximum amounts deemed acceptable by a business are defined in tolerances in a company code and assigned to a tolerance group. Tolerances dictate payment difference authorizations (that is, tolerances are company code specific and determine the amount accounting clerks are permitted to post to the system per transaction for invoice clearing). Tolerances also allow you to specify settings that control the discounts that accounting clerks can grant per invoice as well as any tolerances over payment.
The advantage of using tolerances is that during posting, the system will automatically determine if payment differences are within the acceptable limits you defined. If a payment difference is within the payment difference limit, the system will accept the posting. If a payment difference posting exceeds the specified limit, the system will reject the posting. Tolerances reduce potential posting errors made by accounting clerks during document entry.
Three tolerances are represented in SAP ERP; we will look at each in turn:
- Tolerance groups for G/L accounts
- Tolerance groups for employees
- Tolerances for customers/vendors (discussed in Chapter 14)
The three levels of tolerance represented in SAP R/3 are depicted in Figure 4-1.
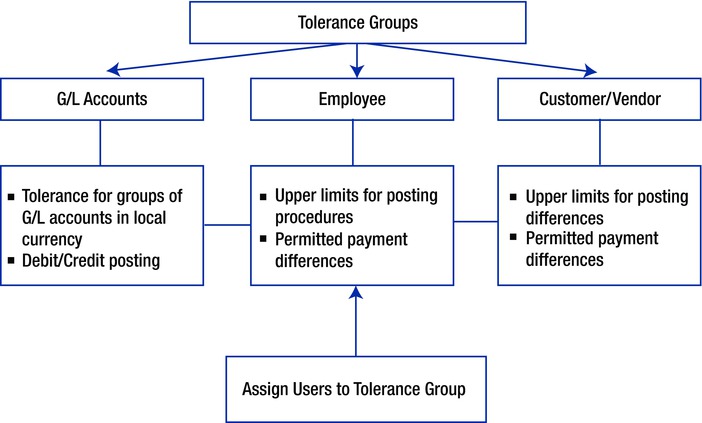
Figure 4-1. The three levels of tolerance groups
Define Tolerance Groups for G/L Accounts
Tolerance groups for G/L accounts define the limits within which credit and debit differences in local currencies are considered acceptable. The accounts’ differences are posted automatically during G/L account clearing. The tolerance groups defined for G/L accounts in this activity are eventually assigned to the general ledger account’s master record. During the account-clearing process, the system checks the tolerance groups to ascertain if the differences are within acceptable limits, as specified by your settings, and automatically posts the differences, if any, to the predefined accounts.
Problem: The accounts team at company C900 plc wants you to define acceptable payment differences, which will then be posted automatically to appropriate predefined accounts during document posting.
In this activity, you will be looking at the two steps involved in customizing tolerance groups for G/L accounts. You will learn how to customize default tolerance groups for G/L accounts and how to assign a group to the tolerance groups you defined for your G/L accounts.
The two tolerance groups defined in the configuration of tolerance for groups are as follows:
- Default Tolerance Group. This is a G/L tolerance without a tolerance group. You define this by leaving the Tolgroup blank (this is a default tolerance group and it is valid for all G/L tolerance groups in the system).
- Tolerance Group. As opposed to default tolerance groups, this is a G/L tolerance with a tolerance group. Here, you assign a specific tolerance group to the G/L tolerance. Unlike the G/L tolerance without a tolerance group, this tolerance group is valid only for the specified G/L tolerance groups. For example, if accounting clerks in group A are assigned to certain G/L tolerances, the system will not allow accounting clerks in group B to post to these G/L accounts during document entry.
Go to the screen where you will first define the default tolerance group by following this menu path: IMG: Financial Accounting (New) ![]() General Ledger Accounting (New)
General Ledger Accounting (New) ![]() Business Transactions
Business Transactions ![]() Open Item Clearing
Open Item Clearing ![]() Clearing Differences
Clearing Differences ![]() Define Tolerance Groups for G/L Accounts. You can also use the transaction code OBA0.
Define Tolerance Groups for G/L Accounts. You can also use the transaction code OBA0.
The Change View “Tolerances for Groups of G/L Accounts in Local Currency”: Overview screen appears (Figure 4-2).
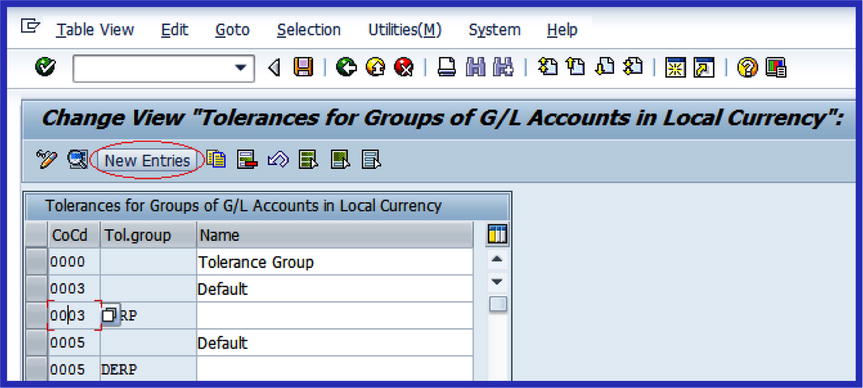
Figure 4-2. Here is where you define tolerance groups for G/L accounts
A list of existing tolerance groups is displayed on the screen. To create a default tolerance group, click ![]() on the top-left side of the screen. The New Entries: Details of Added Entries screen is displayed (Figure 4-3). This screen is where you specify tolerances for groups of G/L accounts.
on the top-left side of the screen. The New Entries: Details of Added Entries screen is displayed (Figure 4-3). This screen is where you specify tolerances for groups of G/L accounts.

Figure 4-3. Defining default tolerance groups for G/L accounts
Update the following fields:
- Company Code: Enter the four-digit character representing your company code in this field. The company code you enter in this field must be your company code or the company code you want to assign to your tolerance group.
- Tolerance Group: This is the field where you specify the tolerance group for your G/L accounts. The specification you make in this field will determine the acceptable payment differences posted to the G/L accounts. Since you are defining a default tolerance groups for G/L accounts, leave this field blank. When you leave this field blank, the system will assume that the tolerance group is a default tolerance group and is therefore valid for all G/L tolerance groups. Since a blank tolerance group is a default tolerance group, it is advisable to describe your tolerance group as “Default” in the Tolerance Group description field shown in Figure 4-3.
In the Tolerance for Groups of G/L Accounts in Local Currency section on the screen, you can specify debit/credit posting differences as absolute amounts or as percentages. The system uses only one of these specifications, either amount or percentage. During document posting, the system will check the amount and the percentage you specify and automatically use whichever is lower.
After updating the screen in Figure 4-3, click the Enter ![]() button at the top-left corner of the screen to confirm your entries and save
button at the top-left corner of the screen to confirm your entries and save ![]() your tolerance for groups for G/L accounts.
your tolerance for groups for G/L accounts.
The second step in this activity is to define the G/L tolerances with a tolerance group. This is when you assign a group to the G/L tolerance. Only the assigned group can post differences within the acceptable limit in the system. To go to the screen where you will carry out this configuration, click the Back ![]() button at the top-left of the screen to return to the previous screen (Change View “Tolerances for Groups of G/L Accounts in Local Currency”), shown in Figure 4-2. You will define your tolerance there.
button at the top-left of the screen to return to the previous screen (Change View “Tolerances for Groups of G/L Accounts in Local Currency”), shown in Figure 4-2. You will define your tolerance there.
On the Change View “Tolerances for Groups of G/L Accounts in Local Currency:” Overview screen, click the ![]() button at the top of the screen. The New Entries: Details of Added Entries screen (Figure 4-3) is displayed. Update the following fields to match those in Figure 4-4:
button at the top of the screen. The New Entries: Details of Added Entries screen (Figure 4-3) is displayed. Update the following fields to match those in Figure 4-4:
- Company Code: Enter the four-digit company code that you want to apply to your tolerance group in this field.
- Tolerance Group: Enter a four-digit character of your choice as the tolerance group key in this field. You can create as many tolerance groups as required by your company. The tolerance group key you define here will be assigned to a username. A username could be referred to as the user logon ID assigned to the user. In this activity, we used CLK1 as the tolerance group (Figure 4-4).
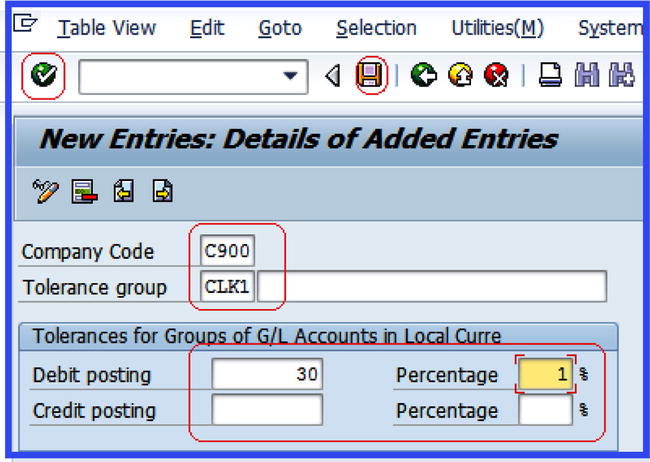
Figure 4-4. Defining tolerance groups for G/L accounts with tolerence group
![]() Note The relationship of the user ID and the tolerance group is a many-to-one relationship. That means that several user logon IDs can be assigned to the same tolerance group, but a user logon ID can be assigned to only one tolerance group.
Note The relationship of the user ID and the tolerance group is a many-to-one relationship. That means that several user logon IDs can be assigned to the same tolerance group, but a user logon ID can be assigned to only one tolerance group.
In the Tolerance for Groups of G/L Accounts in Local Currency section of the screen, specify the debit/credit postings (in amounts and in percentages) in the appropriate fields.
Click the Save button ![]() to save your tolerance group for G/L accounts.
to save your tolerance group for G/L accounts.
The next step is to define tolerance groups for employees. In this activity, you will define the limits that the system uses to determine the amount per document (invoice amount) and per open items (outstanding balance) that a user is permitted to post to the system.
Define Tolerance Groups for Employees
Tolerance groups set for employees define what an employee is permitted to post to the system. In order for the system to automatically determine the amount an employee can post to the system per document and per open items, you need to specify the following settings:
- The maximum amount per document the employee is permitted to post
- The maximum amount the employee can enter in the system per open item in customer/vendor account item
- The maximum cash discount per line item that the employee is permitted to grant to a customer or vendor
- The authorized permitted payment differences
Tolerance groups for employees are part of the global settings and can be accessed by either of the following menu paths:
- IMG: Financial Accounting (New)
 General Ledger Accounting (New) Business Transaction Open Item Clearing Clearing Differences Define Tolerance Groups for Employees
 - IMG: Financial Accounting (New) Financial Accounting Global Settings (New) Document Tolerance Groups Define Tolerance Groups for Employees
Problem: Your task is to define tolerance groups for employees and assign users to the tolerance groups you have defined.
Two employee-related tolerance groups are needed: a default tolerance group for employees (without a tolerance group key) and a tolerance group with an employee group key.
Define Default Tolerance Groups for Employees
The default tolerance groups for employees setting is a minimum requirement for clearing differences that is valid for all employees in the group. To define the default tolerance groups for employees, follow this menu path: IMG: Financial Accounting (New) ![]() General Ledger Accounting (New)
General Ledger Accounting (New) ![]() Business Transactions
Business Transactions ![]() Open Item Clearing
Open Item Clearing ![]() Clearing Differences
Clearing Differences ![]() Define Tolerance Groups for Employees. Or use the transaction code OBA4.
Define Tolerance Groups for Employees. Or use the transaction code OBA4.
The Change View “FI Tolerance Groups For Users”: Overview screen is displayed. On the top-left side of the screen, click the ![]() button. You will then go to the screen where you will create default tolerance groups for employees.
button. You will then go to the screen where you will create default tolerance groups for employees.
In the New Entries: Details of Added Entries screen (Figure 4-5), update the following fields:
- Group: Leave this field blank. Leaving it blank tells the system to treat this entry as the default tolerance group. A default tolerance group is a minimum requirement for all employee groups in the system. This is applicable when employees are not assigned to any specific tolerance group.
- Company Code: Enter your company code in this field. The company code you enter will serve as the company code for your tolerance groups for employees.

Figure 4-5. The Group item is blank, which sets it as the default tolerance groups for employees
In the Upper Limits for Posting Procedures section of this screen, enter the maximum amount an employee can post to the system per document. Fill in the following fields:
- Amount per Document: This is the maximum amount per document an employee is authorized to post. It is important to note that an employee will not be able to exceed the amount entered here during document posting.
- Amount per Open Item Account Item: This is the maximum amount per open item that the employee can enter in the line item in a vendor/customer account. An employee can post only an amount up to the specified amount made here per open item. The system will reject anything exceeding the specified amount.
- Cash Discount per Line Item: This is the maximum cash percentage discount per line item that the employee can grant. When an employee grants a discount during document posting, the system will check to make sure that the discount granted is within acceptable levels, per the line item you define here.
In the Permitted Payment Differences section of this screen, specify the Amount, Percentage, and Cash Discount Adjustment in the Revenue/Expenses fields as the permitted payment differences. During payment difference posting, the system will check the amount against the percentage and automatically use whichever is less.
After updating the screen shown in Figure 4-5, click the Enter ![]() button at the top of the screen or press Enter on your keyboard. The system will accept your settings. Finally, save
button at the top of the screen or press Enter on your keyboard. The system will accept your settings. Finally, save ![]() your configuration.
your configuration.
![]() Note The dot (.) is used to separate thousands and the comma (,) is used to separate pence/cents. For example, 190,222.22 is represented in SAP as 190.222,22.
Note The dot (.) is used to separate thousands and the comma (,) is used to separate pence/cents. For example, 190,222.22 is represented in SAP as 190.222,22.
The next step is to create another tolerance group for employees, this time with a group key. To go to the screen where you will carry out this configuration, click the ![]() Back button at the top of the screen to return to the previous screen.
Back button at the top of the screen to return to the previous screen.
Define Tolerance Groups for Employees with a Group Key
The group key you define in this activity will be assigned to one or more usernames (logon IDs) in the system for a tolerance group. This will be discussed in detail in Chapter 19. The employees you assign to the tolerance group in this activity will be restricted to the payment differences specified in the tolerance group. In other words, during document posting, these employees will not be able to exceed the permitted payment differences you specify.
On the Change View “FI Tolerance Groups For Users”: Overview screen, click the ![]() button at the top of the screen. You’ll go to the New Entries: Details of Added Entries screen, where you can specify the settings for tolerance groups for employees. Update the screen in Figure 4-6. Enter a group key in the Group field. We used CLK1 as the group key for this activity.
button at the top of the screen. You’ll go to the New Entries: Details of Added Entries screen, where you can specify the settings for tolerance groups for employees. Update the screen in Figure 4-6. Enter a group key in the Group field. We used CLK1 as the group key for this activity.

Figure 4-6. Tolerance groups for employees with a group key
Click the Enter ![]() button at the top-left side of the screen or press Enter on your keyboard to have the system accept your specifications. Then save
button at the top-left side of the screen or press Enter on your keyboard to have the system accept your specifications. Then save ![]() your configuration.
your configuration.
After you’ve completed the configuration of tolerance groups for employees, the next step is to assign user IDs to the tolerance groups you just defined.
Assign Users to Tolerance Groups
In this activity, you will assign an employee to a special tolerance group for posting and clearing payment differences. To go to the screen where you will assign employees to a tolerance group, follow this menu path: IMG: Financial Accounting (New) ![]() General Ledger Accounting (New)
General Ledger Accounting (New) ![]() Business Transactions
Business Transactions ![]() Open Item Clearing
Open Item Clearing ![]() Clearing Differences
Clearing Differences ![]() Assign Users to Tolerance Groups. Or you can use the transaction code OB57.
Assign Users to Tolerance Groups. Or you can use the transaction code OB57.
The Change View “Assign Users ![]() Tolerance Group”: Overview screen is displayed. This screen will display a list of usernames assigned to tolerance groups. To assign a username to a tolerance group, click the
Tolerance Group”: Overview screen is displayed. This screen will display a list of usernames assigned to tolerance groups. To assign a username to a tolerance group, click the ![]() button at the top of the screen. The screen in Figure 4-7 is then displayed.
button at the top of the screen. The screen in Figure 4-7 is then displayed.

Figure 4-7. Assign users to tolerance groups
Update the following fields on the screen:
- User Name: Enter the user ID you want to assign to a tolerance group in this field. The username you enter here is the user’s logon ID. This will allow the user to post an amount in the system up to the defined tolerance limit specified in the tolerance group you have assigned to that user.
- Tolerance Group: Enter the tolerance group key you defined in Figure 4-6. This will allow the user assigned to this tolerance group to post an amount within the tolerance limit defined for this tolerance group.
![]() Note The username should be your logon user ID. For example, Student1, Student2, Student3, User1, and so on.
Note The username should be your logon user ID. For example, Student1, Student2, Student3, User1, and so on.
After you have assigned a user ID to the tolerance group, click the ![]() Enter button at the top-right side of the screen or press Enter on your keyboard and save
Enter button at the top-right side of the screen or press Enter on your keyboard and save ![]() your configuration.
your configuration.
Summary
This chapter explained how tolerances serve as control mechanisms in SAP ERP. You looked at the steps involved when creating tolerances. You also looked at how the system controls payment differences through the tolerances you set during the customization process.
We took you through all the customization processes involved in creating tolerance groups for G/L accounts. This included defining the limits within which credit and debit differences in local currencies are considered by the system during posting. You also learned how to customize settings for tolerance groups for employees. You learned how to define default tolerance groups for employees and tolerance groups for employees with a group key.
Finally, as part of the customizing exercise, you learned how to assign users to tolerance groups that you defined.
In the next chapter, you learn what a G/L master record is and how to create G/L accounts in SAP ERP.