
![]()
Creating a General Ledger (G/L)
In this chapter, you learn how to create G/L accounts, use line items, and open item management in G/L accounts.
At the end of this chapter, you will be able to:
- Explain what a general ledger is
- Describe what a master record is
- Create G/L account master records
- Use a template to copy a G/L account
General Ledger
Business transactions are sorted and stored in G/L accounts that apply the double entry principle—dual control (debit and credit). Transactions posted to G/L accounts are classified into assets, liabilities, income, and expenditures, from which financial statements are drawn.
All financial transactions with business partners are posted to sub-ledgers in SAP ERP. Financial transactions are treated in accounting as debit or credit transactions. Several sub-ledgers are created in SAP R/3 to store financial accounting transactions in the system. The summary, or balance of sub-ledgers, is automatically posted in real-time to the reconciliation (general ledger) accounts as debit balance or credit balance by the system. For example, in Figure 5-1, the amounts of 1,500 and 2,000 were posted to Motor Vehicle and the amount of 5,000 was posted to Furniture & Fittings in the sub-ledger accounts. The system automatically posted the balances of both sub-ledgers to the G/L account in real-time.
Sub-ledgers are a subset of the general ledger used for recording individual items and transactions in accounting. Sub-ledgers include individual accounts payable, accounts receivable, assets, and bank account information. They hold accounts payable details such as the vendor’s name, number of transactions, dates, discounts, and payment terms Transactions are posted in the system as they arise in the sub-ledger. The summary or balance of sub-ledgers is posted to reconciliation accounts. In other words, balances in the sub-ledger are posted to the reconciliation accounts. The reconciliation accounts hold the balances of sub-ledgers from which a financial statement is drawn. The advantage of a reconciliation account is that it gives you a snapshot of the sub-ledger.
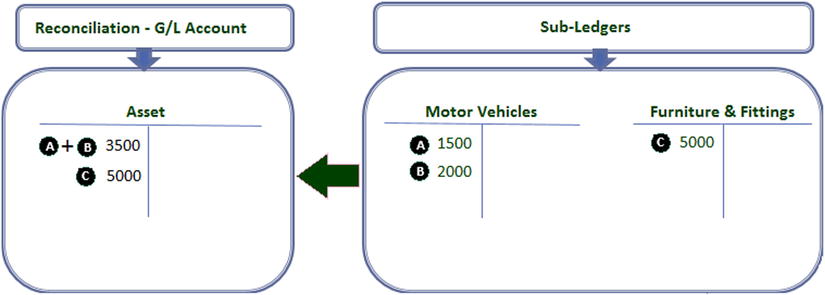
Figure 5-1. Automatic posting of sub-ledger balances to a reconciliation account
![]() Note Reconciliation accounts are G/L accounts that hold sub-ledger balances. Reconciliation accounts could be referred to as G/L accounts containing sub-ledger totals. The system automatically posts all postings to sub-ledgers to G/L reconciliation accounts. Therefore, reconciliation accounts are G/L account summaries of sub-ledgers in SAP R/3. Reconciliation accounts are assigned to business partners in the business partners’ master records.
Note Reconciliation accounts are G/L accounts that hold sub-ledger balances. Reconciliation accounts could be referred to as G/L accounts containing sub-ledger totals. The system automatically posts all postings to sub-ledgers to G/L reconciliation accounts. Therefore, reconciliation accounts are G/L account summaries of sub-ledgers in SAP R/3. Reconciliation accounts are assigned to business partners in the business partners’ master records.
Users don’t manually post to reconciliation accounts. The system automatically posts to the reconciliation accounts in real-time.
Next, you need to know what a general ledger master record is and how it controls accounting transactions in the general ledger accounts.
What Is a Master Record?
A master record contains vital information held in a business system database that remains relatively unchanged over a long period of time. This is the case when sets of data are commonly accessed, used, and shared by different individuals for different purposes across an organization in order to fulfill business processes in real-time. For example, a vendor’s details held in the system may be used by various departments. The sales team needs the vendors’ details in order to send them sales offers; the marketing department needs this information to send out marketing promotions; the accounting department needs the information for invoices and other accounting purposes; and so on.
Information that aids efficient business processes and tends not to change frequently (such as a customer/vendor name and address) is held in the system database. The idea behind maintaining a master record is to avoid having to re-enter the same information multiple times, thereby saving input time and avoiding unnecessary waste of system resources and redundancies (to free storage space and improve system speed). It’s better to not have to enter or store the same data in the system database several places.
Some typical examples of master data in a SAP R/3 database include customer data, vendor data, bank data, G/L accounts, material data, and so on.
- Transaction Data: Data triggered as a result of events arising from day-to-day business transactions. A typical transaction data is time-driven with a numerical value and often refers to one or more objects in the system. Examples of transaction data in SAP R/3 include invoices, payments, credit memos, and goods receipts.
- Table Data: Sets of tables containing data about objects, such as payment terms, tolerances, pricing conditions, and so on.
Now that you know what a master record is, let’s look at how to create G/L account master records in SAP ERP. A G/L master record contains data relating to a G/L account that remains in the system relatively for a while. The data held in the G/L master record controls the general ledger account behavior. The G/L master record also governs the treatment and posting of accounting transactions to the G/L accounts in the system.
Creating G/L Account Master Records
Various options are available when creating G/L master records in SAP ERP:
- Create G/L accounts with reference: This allows you to copy existing G/L accounts from another company code to yours. The company code you are copying the G/L accounts from is referred to as the “source” company code and your company code is the “target” company code. SAP comes with a standard chart of accounts and company codes in the system, along with sets of G/L account master records that can be copied when creating your G/L account master records. The benefit of copying existing G/L account master records is that your G/L account master records will inherit their properties, which saves time.
- Data transfer workbench: This is when you transfer G/L account master records from a legacy system. This function is ideal when you want to transfer G/L accounts from another system into SAP.
- By copying: The system allows you to copy G/L account master records already in the system. This is possible only when you have an existing chart of accounts that meets your requirements. For example, a chart of accounts that has a structure that matchs your G/L account master record could be copied in this manner.
- By creating manually: This is when you have to physically create G/L account master records individually. The drawback to this method is that it is time consuming, especially when you have to create large numbers of G/L accounts.
Let’s look at how to create G/L accounts in SAP ERP. In this activity, you will create your G/L accounts manually. This will give you the fundamental understanding of how to create G/L accounts step-by-step. You will also be looking at how to copy G/L accounts using existing G/L accounts as a template.
![]() Note All transactions in SAP FI work with G/L accounts. In the remaining chapters in this book, you will be creating G/L accounts, which you will assign to objects in your subsequent configurations.
Note All transactions in SAP FI work with G/L accounts. In the remaining chapters in this book, you will be creating G/L accounts, which you will assign to objects in your subsequent configurations.
Problem: You’ve been asked to create G/L accounts for the following items:
- Office supplies
- Misc. office expenses
- Sales revenue
- Share capital
Create a G/L Account: Office Supplies
Let’s start by creating a G/L account for office supplies. To create your G/L accounts, follow this menu path: SAP Easy Access: Accounting ![]() Financial Accounting
Financial Accounting ![]() General Ledger
General Ledger ![]() Master Records
Master Records ![]() G/L Accounts
G/L Accounts ![]() Individual Processing
Individual Processing ![]() Centrally. Or use the transaction code FS00.
Centrally. Or use the transaction code FS00.
The Edit G/L Account Centrally screen is displayed (Figure 5-2). The G/L accounts you create here are available to all company codes in the system. This means that all the company codes in the system with the same operational chart of accounts and same G/L structure can use the same G/L account (that is, several company codes can use one G/L account).
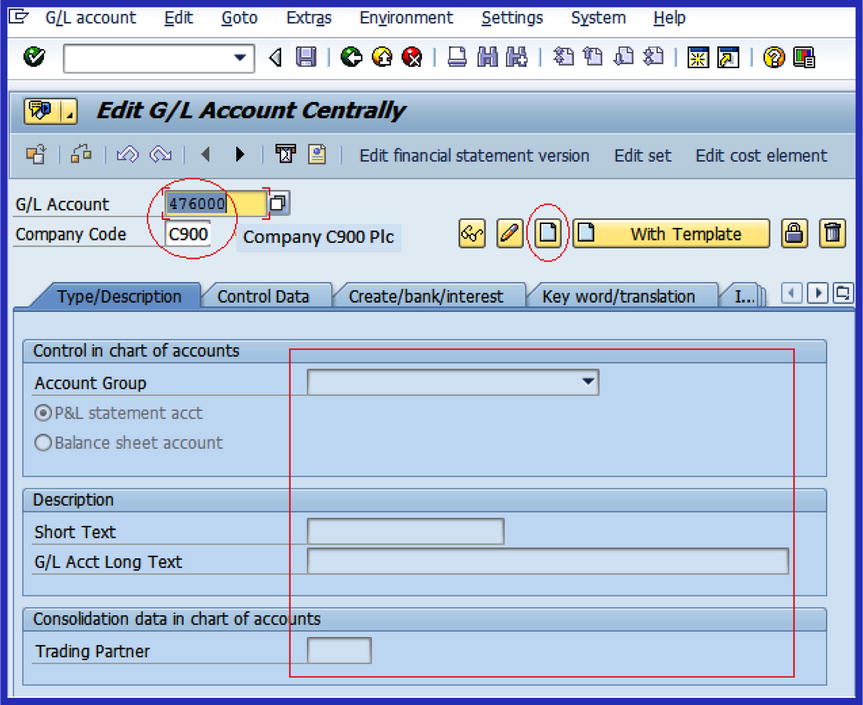
Figure 5-2. Edit a G/L account centrally
- G/L Account: Every G/L account in SAP ERP must be assigned a number, which serves as the G/L account number. Enter your G/L account number in the G/L Account field. The G/L account number that you enter here is restricted to the length of the G/L account number you specified when customizing the “Create Chart of Accounts” section in Chapter 2. The G/L account number is used to reference the G/L account. See the following note.
- Company Code: Every company represented in SAP ERP must be assigned a company code. Company codes are assigned to G/L accounts in the system. Enter your company code in the Company Code field. The company code you enter in this field will allow you to assign a G/L account to your company.
![]() Note The number you enter in the G/L Account field must be within the number range intervals you defined for your account group in Chapter 2.
Note The number you enter in the G/L Account field must be within the number range intervals you defined for your account group in Chapter 2.
Notice that only the company code and general ledger fields are open for data entry on this screen, while the remaining fields (circled in red) on the screen are inactive. This means the fields are not ready for data input.
![]() Note The Edit G/L Accounts Centrally screen has four important buttons that will help you create and navigate your G/L account:
Note The Edit G/L Accounts Centrally screen has four important buttons that will help you create and navigate your G/L account:
Display ![]() . This button is used to display a G/L account in the system.
. This button is used to display a G/L account in the system.
Change ![]() . This button is used to change or edit G/L account details.
. This button is used to change or edit G/L account details.
Create ![]() . This button is used to create a new G/L account.
. This button is used to create a new G/L account.
![]() This button allows you to copy an existing G/L account in the system using a template. This can be very handy if you are copying similar G/L accounts, because it allows the system to classify similar G/L accounts into the same account group and number range intervals.
This button allows you to copy an existing G/L account in the system using a template. This can be very handy if you are copying similar G/L accounts, because it allows the system to classify similar G/L accounts into the same account group and number range intervals.
The next step is to update the Control in the Chart of Accounts section of the screen (Figure 5-3). To activate the fields for data input, click the Create ![]() button on the right side of the screen.
button on the right side of the screen.
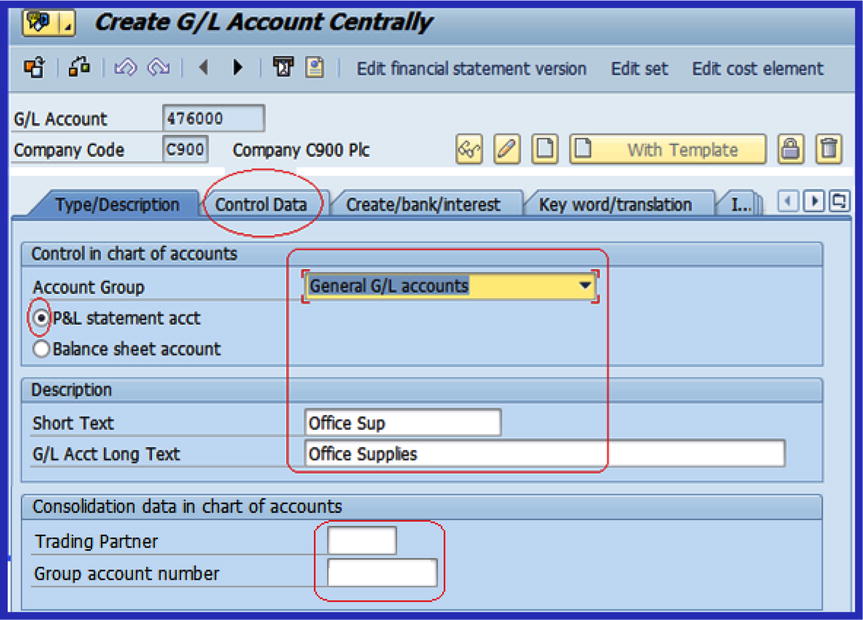
Figure 5-3. Create G/L account centrally—the Type/Description tab
Update the following fields:
- Account Group: As explained in Chapter 2, the account group is a tool in the SAP ERP that determines how master records are created. The importance of the account group is that it classifies G/L transactions into the same account groups you specified in Define Chart of Account in Chapter 2. When you click the drop-down arrow next to the Account Group field on the Control in the Chart of Accounts section, a list of the account groups you defined earlier is displayed. Select the account group appropriate for your G/L account. For example, if your G/L account is for posting transactions relating to assets, select Fixed Assets Accounts from the Account Group list displayed. All postings relating to assets will be classified as such, and the system will automatically assign a number to the item from the number range interval belonging to this account group. For this activity, we used General G/L Accounts as the Account Group.
- P&L Statement Account: This has a radio button. When activated, transactions posted to this G/L account will allow the system to treat the G/L items as P&L statement account items when generating financial statement reports. In this activity, we are creating a G/L account for office supplies. In accounting, office supplies are an expense so they are treated as a P&L item. Hence, you should select P&L Statement Acct.
- Balance Sheet Account: Likewise, if the radio button for Balance Sheet account is clicked, items posted to the G/L account are treated as balance sheet account items during financial statement reporting.
- Short Text: When creating a G/L account, you need to give a descriptive name to your G/L account. This will allow you to identify individual G/L accounts in the system. Since we are creating a G/L account for office supplies, we’ll use Office Sup as our short text description.
- G/L Account Long Text: Likewise, the G/L account long text field will allow you to use more detailed, descriptive text as your G/L account description or name. For example, general office supplies.
![]() Note In the Consolidation Data in the Chart of Accounts section in Figure 5-3, you can enter a trading partner and group account number for your G/L account. This is necessary if your company prepares consolidated financial statements for its corporate group. In that case, you should enter the company code responsible for the preparation of the consolidation account for the corporate group in the Trading Partner’s field and enter the consolidated G/L account number in in the Group Account Number field. The consolidated G/L account allows you to prepare consolidated financial statements for your corporate group in SAP ERP.
Note In the Consolidation Data in the Chart of Accounts section in Figure 5-3, you can enter a trading partner and group account number for your G/L account. This is necessary if your company prepares consolidated financial statements for its corporate group. In that case, you should enter the company code responsible for the preparation of the consolidation account for the corporate group in the Trading Partner’s field and enter the consolidated G/L account number in in the Group Account Number field. The consolidated G/L account allows you to prepare consolidated financial statements for your corporate group in SAP ERP.
The next step is to update the field in the Control Data section of the screen. This section of the screen contains the account control in the company code. Click the ![]() tab circled in red in Figure 5-3. The Control Data section will come to the forefront (Figure 5-4).
tab circled in red in Figure 5-3. The Control Data section will come to the forefront (Figure 5-4).
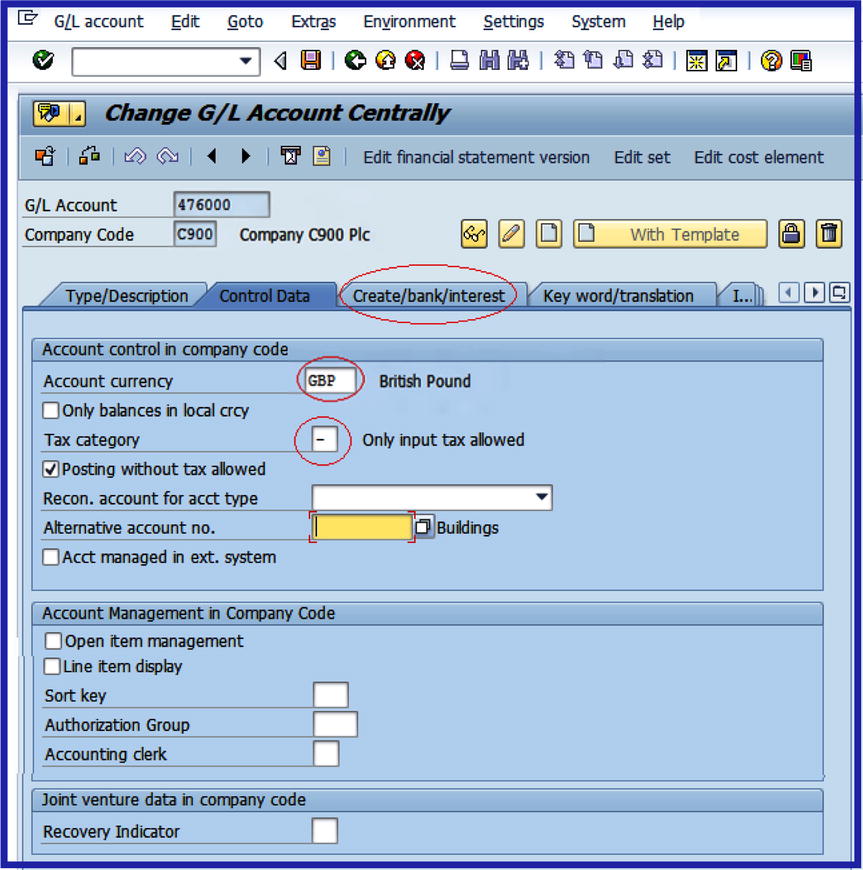
Figure 5-4. Create G/L account centrally—the Control Data tab
Update the following fields on the Control Data tab:
- Account Currency: This is the Company Code section of the G/L account master record data where you specify the currency of your G/L accounts. It is important to use the local currency for your G/L accounts for each company code. The advantage of using local currency is that it allows postings to be made to the G/L account in any currency and then converted. Postings made in foreign currency are translated into local currency. However, you can also choose to specify foreign currency as your G/L account currency. The drawback to this approach is that posting to the G/L account can only be made in this currency. The system automatically defaults to the local currency of your company code when creating a G/L account. This project examines a UK-based company, so the company code currency is GBP (Great Britain Pounds).
- Only Balances In Local Currency: Click the Only Balances In Local Currency checkbox if the transactions posted to this account must be maintained in local currency only. When you click this checkbox, the system will display and manage all currencies in the G/L master record in local currency (that is, the company code currency). This is important when you do not want the system to post any exchange rate differences that may occur, but you want to clear several currencies arising from transactions with your company code currency (local currency). It is important to note that you do not click the Only Balances In Local Currency checkbox for Accounts Payable (AP) and Accounts Receivable (AR) reconciliation accounts, because most transactions posted in AP & AR are in various currencies. Only Balances In Local Currency is clicked for balance sheet accounts without open item management, cash discount account clearing, or Goods Received (GR)/Invoice Receipts (IR) clearing accounts.
- Tax Category: This field allows you to specify if the G/L account is tax relevant. Using the Search Function button next to the Tax Category field, select the appropriate tax symbol that you want to use in your G/L account from the displayed tax list. The Tax Category could either be input tax or output tax. For example, if input tax is selected, every posting to this G/L account must contain input tax. In this activity, we used input tax “-” as the tax category.
- Posting Without Tax Allowed: This allows postings without tax to be posted in the G/L account, even though the tax category indicator is set.
- Reconciliation Account for Account Type: In the G/L master record, you use the Reconciliation Account For Account Type drop-down to specify that the G/L account is a reconciliation account. This function allows you to select from a list of reconciliation account types, for example, Assets, Customers, Vendors, and so on. Once this option is set, the G/L account will be considered a reconciliation account by the system. It is advisable that you maintain at least one reconciliation account in the general ledger. Every posting in the sub-ledger in SAP ERP is automatically posted to a corresponding reconciliation account. The reconciliation accounts are updated with sub-ledger balances as soon as transactions are posted in sub-ledgers. This procedure allows you to generate financial statements at any time from the general ledger.
- Open Item Management: By clicking this checkbox in the G/L master record, when you display line items in an account, the system will display all line items in the account marked as open or cleared. This option is ideal if you want to see items not cleared, or outstanding balances at any given point in time in an account. This makes it possible for you to determine if a posting exists in the G/L account that needs offsetting against a particular business transaction (that is, clearing an open item with payment).
Use open item management for the following accounts:
- Bank accounts
- GR/IR accounts
- Salary accounts
Line Item Display:This selection allows you to display or view business transactions posted to the account line-by-line.
Line item can lead to data redundancy (this is where same the data is stored twice or more in the system) and takes additional system resources. Therefore, line items should not be activated for the following items:
- Reconciliation accounts—If you need further breakdown of these accounts, you can view them in the respective sub-ledgers.
- Sale or Turnover accounts—You can view further details of these accounts in Sales Order Management.
- Material accounts—Further details on these accounts can be obtained from Material Management.
- Tax accounts—Detailed tax information can be obtained from related tax documents.
Sort Key: When this indicator is set in the G/L account master record, it allows you to set the sort key according to the sort key number you assigned. SAP comes with a list of standard sort keys you can choose from. The most commonly used sort keys are the first nine.
Sort Key
Description
001
Posting date
002
Doc. no, fiscal year
003
Document date
004
Branch account
005
Local currency amt
006
Doc. currency amount
007
Bill/exch. due date
008
Cost center
009
External document no.
The system automatically fills the assignment field in the line item based on the sort key you assigned to your general ledger master (this is done in the company code segment of your company code). When you assign a document number as your sort key and then display line items, the system will automatically sort your line items based on your selection criteria according to the document number. You can access the sort item list by using the search function on the Sort Key field.
The final step in creating the G/L account master record is to update the field in the Control of Document Creation in the Company Code section of the screen. Click the ![]() tab (Figure 5-5). You then need to update the Field Status Group field.
tab (Figure 5-5). You then need to update the Field Status Group field.
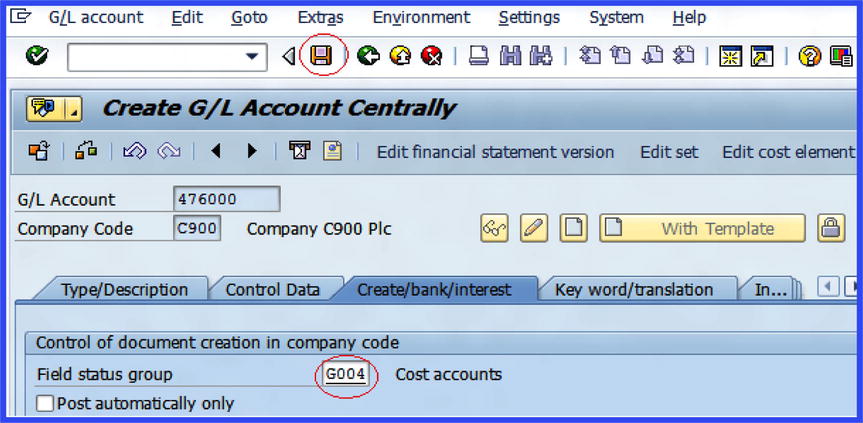
Figure 5-5. Create G/L account centrally—the Create/Bank/Interest tab
The Field Status Group field determines whether a field should be suppressed, required, or optional during document entry. If a field is set to suppressed, users will not be able to enter data into it during document entry. If the field is set to required entry, users are required to enter data into the field during document entry. If optional entry is set for a field, users can either input data in the field or leave it blank. Field status groups are entered in the Field Status field of the general ledger master record in the company code-specific area of each G/L account.
A field status variant contains a field status group, and a field status group is assigned to a company code in SAP ERP. SAP comes with a predefined field status group, which you can use for your field status variant. It is also possible to create your own field status groups, but we recommend that you use the predefined field status group provided by SAP in the system. When you create your own field status group, you also have to define the associated tables. This is beyond the scope of SAP FI.
Figure 5-6 shows some of the predefined field status groups in SAP ERP. You can access the list by clicking the Search Function key by the Field Status group.
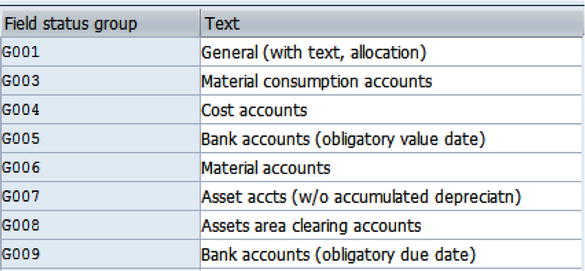
Figure 5-6. Some of the standard SAP-supplied field status groups
In the example in Figure 5-5, the G004-Cost Accounts field status group is assigned to the G/L master record. The reason we chose G004-Cost Accounts is because office supplies is an expense, and when you post entries in the G/L accounts, the system will automatically ask for the cost center, which you have to enter in the cost center field of the document entry screen before you can post the document.
As circled in red in Figure 5-5, enter G004 (Cost Accounts) in Field Status Group. Then save ![]() your G/L account.
your G/L account.
The next step in this activity is to learn how to copy G/L accounts using a template. You’ll do this by copying the office supplies G/L account and changing it to office expenses.
Create a G/L Account (Called Office Expenses) Using a Template
Problem: You need to create an office expenses account using the G/L account 477000. You’ll do this by copying the G/L account 476000 (office supplies) that you created earlier.
To go to the Display G/L Account Centrally screen (Figure 5-6), where you will copy the office supplies G/L account and use it as a template to create an office expenses G/L account, follow this menu path: SAP Easy Access: Accounting ![]() Financial Accounting
Financial Accounting ![]() General Ledger
General Ledger ![]() Master Records
Master Records ![]() G/L Accounts
G/L Accounts ![]() Individual Processing
Individual Processing ![]() Centrally. Or you can use the transaction code FS00.
Centrally. Or you can use the transaction code FS00.
The Display G/L Account Centrally screen appears (Figure 5-7).

Figure 5-7. Create a G/L account with a template
In the G/L Account field, enter your proposed G/L account number for expenses. This number must be within the range you defined for your account group in Chapter 2. In this activity, we used 477000. Also, enter your company code in the Company Code field. Then click the ![]() button on the top-right side of the screen, circled in red in Figure 5-7. The Reference Account dialog box pops up, as shown in Figure 5-8. Enter the G/L account number that you want to copy (office supplies) in the G/L Account field and update the Company Code field as well.
button on the top-right side of the screen, circled in red in Figure 5-7. The Reference Account dialog box pops up, as shown in Figure 5-8. Enter the G/L account number that you want to copy (office supplies) in the G/L Account field and update the Company Code field as well.
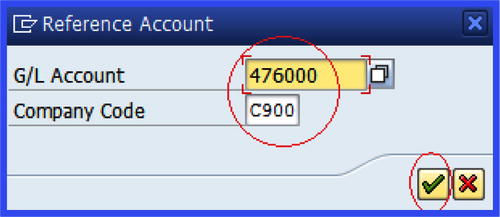
Figure 5-8. Reference Account dialog box
Enter the reference G/L account you want to copy in the G/L Account field, and the reference Company Code you are copying in the Company Code field. Click the Enter ![]() button to confirm your action. The system will then paste details of the G/L account you have copied into your new G/L account.
button to confirm your action. The system will then paste details of the G/L account you have copied into your new G/L account.
Change the contents of the Short Text field to a short G/L account name, and change the G/L Acct Long Text field to Office Expenses, as shown in Figure 5-9. Save ![]() your G/L account.
your G/L account.

Figure 5-9. Creating an G/L account centrally with a template—the Type/Description tab
G/L accounts are a fundamental configuration in SAP ERP, so you will be creating several G/L accounts during the course of this book. As part of this exercise, follow the steps in the preceding section to create an account for Administration Cost Accounting using the data in Table 5-1.
Table 5-1. Administration Cost Accounting
|
Field |
Input |
|---|---|
|
G/L Account |
|
|
Company Code |
|
|
Account Group |
|
|
P&L Statement Acct |
|
|
Short Text |
|
|
G/L Acct Long Text |
|
|
Tax Category |
|
|
Field Status Group |
|
![]() Note Appendix A contains the others G/L accounts that you will need later during your configuration. Go to Appendix A – Chapter 5 now to create the following accounts for this exercise:
Note Appendix A contains the others G/L accounts that you will need later during your configuration. Go to Appendix A – Chapter 5 now to create the following accounts for this exercise:
- Water supplies
- Electricity
- Gas
- Sale Revenue – Domestic
- Sales Revenue – Foreign
- Share Capital
- Retained Earnings
Display G/L Accounts
Finally, let’s look at the G/L accounts you have created so far in this activity. To do so, go to the Display G/L Account Centrally screen by following this menu path: SAP Easy Access: Accounting ![]() Financial Accounting
Financial Accounting ![]() General Ledger
General Ledger ![]() Master Records
Master Records ![]() G/L Accounts
G/L Accounts ![]() Individual Processing
Individual Processing ![]() Centrally. Or you can use the transaction code FS00.
Centrally. Or you can use the transaction code FS00.
Leave the G/L Account field blank and enter your company code in the Company Code field. Click the Search ![]() button next to the G/L Account field. It’s circled in red in Figure 5-10.
button next to the G/L Account field. It’s circled in red in Figure 5-10.

Figure 5-10. Displaying the G/L account
The G/L Account Number screen pops up. Notice that your Company Code and Chart of Accounts is entered by default. If they are not inserted for any reason, you should enter them yourself and click the Enter ![]() button at the bottom of the screen to confirm your action. The G/L accounts that you have created so far will be displayed (Figure 5-11).
button at the bottom of the screen to confirm your action. The G/L accounts that you have created so far will be displayed (Figure 5-11).
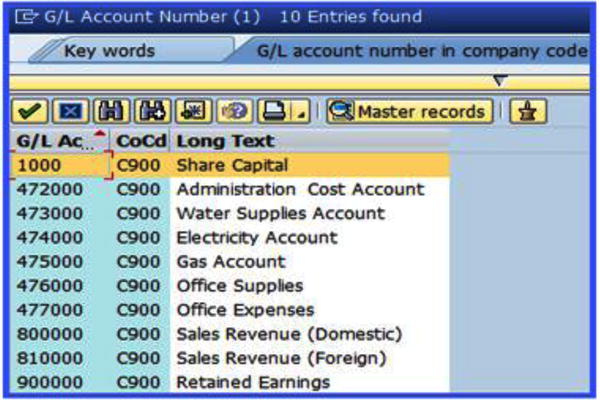
Figure 5-11. List of G/L accounts
Summary
This chapter explained what a general ledger is and also described what a master record is. You went through the configuration steps involved in creating a G/L account master record and learned how to copy a G/L account using an existing G/L account as a template. You also looked at the relationship among G/L accounts, sub-ledgers, and reconciliation accounts.
In the next chapter, you will learn how to set automatic open item clearing and how to define the exchange rate and foreign exchange rate valuations.