
![]()
Financial Statement Versions (FSV)
In this chapter, you learn what a financial statement version (FSV) is and go through the basic settings involved in defining financial statement versions.
At the end of this chapter, you will be able to:
- Explain and define financial statement versions (FSV)
- Define an FSV using the appropriate specifications
- Assign FSV hierarchy nodes to the appropriate G/L accounts
Financial Statement Versions
A Financial Statement Version (FSV) forms the basis for drawing up financial statements in SAP ERP. The primary objective of a publically-owned business is to maximize returns on investors’ equity. Therefore, the management needs to be able to ascertain the performance of the business in form reports at a given interval to help aid operational and strategic decision-making geared toward improving performance. In SAP ERP, hundreds of business transactions are posted to the general ledger in a fiscal year. But it’s not possible to know how well a business is performing from the G/L accounts that transactions are posted to. Hence, the need for FSV.
FSV is part of the closing procedure in SAP ERP. It is a tool designed specifically for generating financial statements (such as profit and loss statements and balance sheets) to meet specific legal disclosure requirements related to certain items (such as assets, liabilities, income, expenses, and so on) in financial reports.
SAP ERP comes with standard, predefined FSV that you can use as a template and adjust to meet your requirements. You can also define your own FSV afresh if you choose not to use the standard FSV supplied by SAP. Interestingly, you can define more than one FSV if you need to meet individual financial statement reporting needs of various stakeholders, such as the tax authority, investors, and internal management reporting.
To define FSV in SAP ERP, you must specify the following items:
- The items to be included in your FSV and the order and the hierarchical structure of each item
- The text describing each financial statement item
- The chart of accounts
- Totals to be displayed in your report
FSV is a combination of G/L accounts structured in hierarchical levels that are defined in the financial statement version’s directory and assigned to appropriate accounts. You can define more than one FSV to a specific chart of account or to a group of chart of accounts. Basically, FSV allows you to assign groups of accounts to items in the hierarchy.
Let’s look at how to define a basic FSV in SAP.
Define Financial Statement Versions
In this exercise, you go through the various steps involved in customizing FSV. You can define your own FSV from scratch or copy a predefined FSV supplied by SAP and modify it.
Problem: The accounting team is not sure of the benefits and function of an FSV. You have been asked by company C900 Plc to advise the accounting team on the benefits of using an FSV and then to create an FSV in SAP ERP.
To define an FSV, follow one of these menu paths:
- IMG: Financial Accounting (New)
 General Ledger Accounting (New) Periodic Processing Document Define Financial Statement Versions.
 - IMG: Financial Accounting (New) General Ledger Accounting (New) Master Data G/L Accounts Define Financial Statement Versions.
You can also use transaction code OB58.
The Change View Financial Statement Version Overview screen is displayed. Click the ![]() button at the top of the screen to go to the New Entries: Details of Added Entries screen, where you will specify the key for your financial statement version and describe the FSV’s general specifications (Figure 12-1).
button at the top of the screen to go to the New Entries: Details of Added Entries screen, where you will specify the key for your financial statement version and describe the FSV’s general specifications (Figure 12-1).
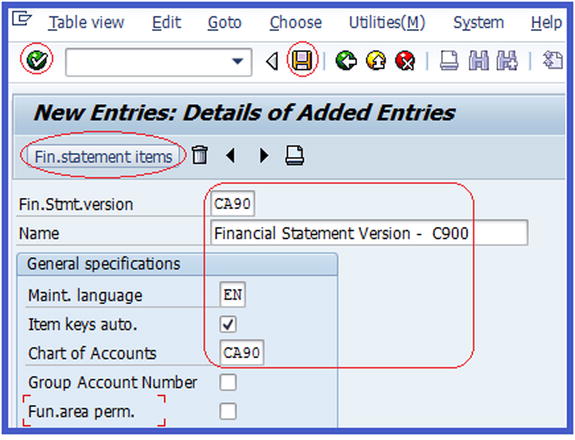
Figure 12-1. Initial entry screen where you start your customizing
- Fin.Stmt.Version: Enter your proposed FSV in this field. You can enter up to four digits in this field. This will serve as an identification key for your FSV. We recommend that you use your chart of accounts key here. This is ideal for FSV identification for your company code, especially when you have several FSV and company codes in the system.
- Name: Enter the text that best describes your FSV.
- General Specifications: Specify the following items:
- Maint.language: The language code is the language you want the system to use when maintaining FSV. For example, in this exercise we used EN (English).
- Chart of Accounts: In this field, you enter your company code’s chart of account that you defined in Chapter 2.
Click the Enter ![]() button at the top of the screen to confirm your entries and save
button at the top of the screen to confirm your entries and save ![]() your work.
your work.
The next step is to create the items for the FSV you just defined. You will create the nodes for the balance sheet, profit and loss statement, and unassigned accounts, which will then be enhanced in subsequent steps. To create the items for your FSV, click the ![]() button. The Change Financial Statement Version screen is displayed (Figure 12-2), where you will define the FSV hierarchy nodes for your FSV. The items for the FSV are defined in SAP ERP in a hierarchical structure.
button. The Change Financial Statement Version screen is displayed (Figure 12-2), where you will define the FSV hierarchy nodes for your FSV. The items for the FSV are defined in SAP ERP in a hierarchical structure.
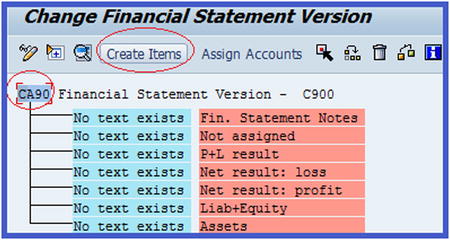
Figure 12-2. The standard hierarchical structure where you start creating your FSV items
To simplify the customization process, we will break it into four steps:
- Create items.
- Reassign items as subordinates.
- Assign FSV nodes to G/L accounts.
- Define the credit/debit shift.
![]() Note In practice, before you start creating the hierarchical structure of your FSV, it is advisable that you create a paper sketch of your FSV structure. This will serve as a guide when defining your FSV.
Note In practice, before you start creating the hierarchical structure of your FSV, it is advisable that you create a paper sketch of your FSV structure. This will serve as a guide when defining your FSV.
Notice in Figure 12-2 that the FSV you defined earlier is displayed as the heading in the hierarchy structure. Select the FSV circled in red by clicking on it. We used CA90 as the FSV.
Click the ![]() button. The Create Items screen will come up. On this screen, the FSV is displayed and the fields below your FSV are blank. You need to update this screen with the subheadings for your FSV items by typing them in (for example, Balance Sheet, Profit & Loss Account, and Unassigned Accounts), as shown in Figure 12-3.
button. The Create Items screen will come up. On this screen, the FSV is displayed and the fields below your FSV are blank. You need to update this screen with the subheadings for your FSV items by typing them in (for example, Balance Sheet, Profit & Loss Account, and Unassigned Accounts), as shown in Figure 12-3.
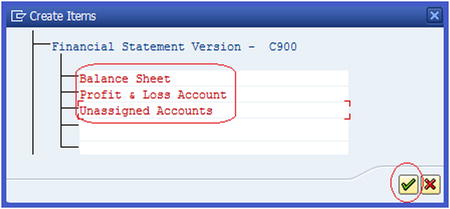
Figure 12-3. The screen where you create your FSV items
After typing in the subheading for your FSV items, click the Enter ![]() button on the bottom-left side of the pop-up screen or press Enter on your keyboard. The items you have entered in the Create Items screen will be copied into your FSV. Your FSV will look like the one shown in Figure 12-4, with the subheadings you entered below your FSV.
button on the bottom-left side of the pop-up screen or press Enter on your keyboard. The items you have entered in the Create Items screen will be copied into your FSV. Your FSV will look like the one shown in Figure 12-4, with the subheadings you entered below your FSV.
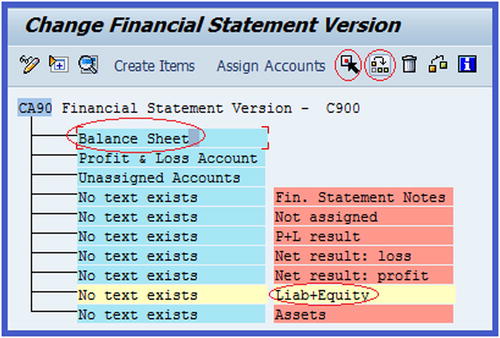
Figure 12-4. FSV hierarchy structure showing how items are reassigned
The next step is to reassign items supplied by SAP in Figure 12-4 (for example, P+L result, Net Result: Loss, Net Result: Profit, Liab+Equity, Assets, and so on) to your FSV as subordinates to the subheading you created in the FSV hierarchy. Subordinates will appear in the hierarchy under the subheadings you defined.
Step 2: Reassign Items as Subordinates
Let’s start by assigning subordinates to the balance sheet. To reassign Liab+Equity as a subordinate to the balance sheet in your FSV hierarchy, select the Liab+Equity item from the list of FSV items supplied by SAP (see Figure 12-4). Click the Select ![]() button on the top-right side of the screen to select it. Notice that the row containing Liab+Equity turns yellow, indicating that the item has been selected. Then select an item you want to reassign it to from the list of items in the FSV hierarchy. In this case, select Balance Sheet by clicking on it. Click the Reassign
button on the top-right side of the screen to select it. Notice that the row containing Liab+Equity turns yellow, indicating that the item has been selected. Then select an item you want to reassign it to from the list of items in the FSV hierarchy. In this case, select Balance Sheet by clicking on it. Click the Reassign ![]() button on the top-right side of the screen to reassign Liab+Equity to Balance Sheet. The Reassign Node dialog box pops up (Figure 12-5).
button on the top-right side of the screen to reassign Liab+Equity to Balance Sheet. The Reassign Node dialog box pops up (Figure 12-5).

Figure 12-5. The screen where you reassign an item to the same level or as a subordinate to an existing node in the FSV hierarchy structure
On the Reassign Node screen, the nodes you are reassigning are specified by the system. On this screen, you can choose to reassign a node to another node at the same level or as a subordinate. In this activity, you are reassigning Liab+Equity as a subordinate to Balance Sheet, so click the Subordinate button. Click the Enter ![]() button at the bottom-right side of the Reassign Node screen to confirm your action.
button at the bottom-right side of the Reassign Node screen to confirm your action.
![]() Note Choose Same Level from the Reassign Node screen if you want the item you are reassigning to be on the same level as the item you are assigning it to.
Note Choose Same Level from the Reassign Node screen if you want the item you are reassigning to be on the same level as the item you are assigning it to.
The next step is to add text to the items you have reassigned and determine which totals to output. During FSV review, the texts and totals will be displayed in the balance sheets and profit and loss statements.
Change Item Text
Notice in Figure 12-6 that the node for Assets and Liab+Equity states that No Text Exists. You need to add text to display in the financial statement.
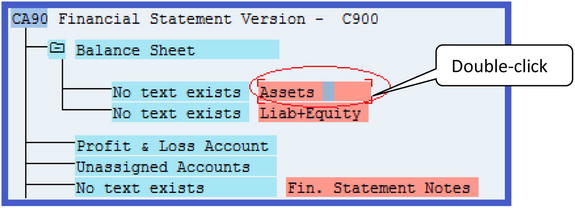
Figure 12-6. Double-click on item to call up the change text screen
To add text to the items in your FSV, double-click on the item you want to add text to. The Item: Change Texts screen will be displayed for that item. For example, if you double-click Assets, the screen that pops up will allow you to add text and activate display totals for Assets only (Figure 12-7).
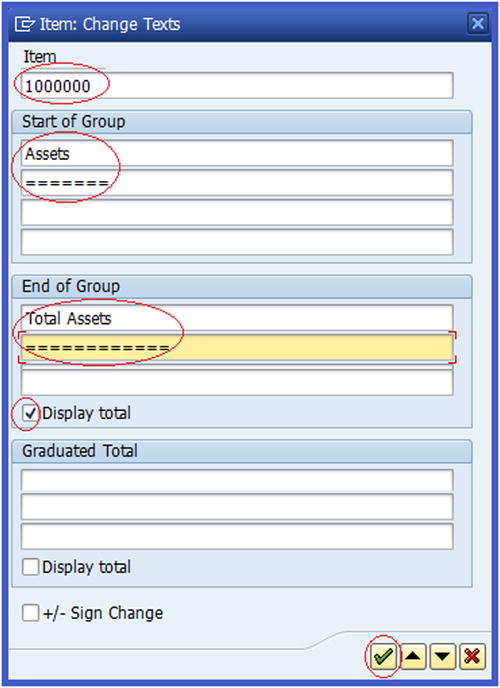
Figure 12-7. Item change text screen
![]() Note When you’re defining items in FSV, special codes are assigned to each item to maintain the classification of similar items under the same code and heading. These codes are designed in a systematic manner to form a logical sequence, often referred to as code classification. For example, the code for Asset is 200000, and the next items under Asset will be 200100, 200200, 200300, and so on. We will not be covering this topic further, as it is outside the scope of this book.
Note When you’re defining items in FSV, special codes are assigned to each item to maintain the classification of similar items under the same code and heading. These codes are designed in a systematic manner to form a logical sequence, often referred to as code classification. For example, the code for Asset is 200000, and the next items under Asset will be 200100, 200200, 200300, and so on. We will not be covering this topic further, as it is outside the scope of this book.
On the Item: Change Text screen, update the following fields:
- Item: Enter the item code and required text and select the totals to be output. We used 1000000 (see Figure 12-7).
- Start of Group: Enter the heading name for the specific group of items. The name you enter in this field will be displayed as the heading for the group in the report. If a G/L account is posted, this text is displayed before the item’s sub-items during the period.
- End of Group: The text you enter here will end the group. For example, Total Assets will be displayed as the last item in the group. If you enter text and select the Display Total option in this section, the total balance for assigned G/L accounts is output during the selected period.
The system should default to the Display Total checkbox being selected; if not, you have to click it. This will display the total amount for the group in the report.
Click the Enter ![]() button on the bottom-right side of the Item: Change Text screen or press Enter on your keyboard. The system will then assign the item classification code to your FSV group. Save
button on the bottom-right side of the Item: Change Text screen or press Enter on your keyboard. The system will then assign the item classification code to your FSV group. Save ![]() your FSV.
your FSV.
Following the process you just completed for Assets, assign a classification code and text to Liab+Equity using this information:
- Item: 2000000
- Group Start: Liabilities
- Display Total: Activate
Create Items for Liab+Equity
Next, you need to create more items as subordinates for 2000000 Liab+Equity using the Create Items button on the top-left side of the screen. To do this, select 2000000 – Liab+Equity and click the Create button. The Create Items screen is displayed (Figure 12-8). In the Balance Sheet section of your FSV, update the fields under 2000000 with the appropriate items.

Figure 12-8. Creating more items in FSV
To enter your updates in your FSV, click the Enter ![]() button on the bottom-right side of the screen. Your FSV screen will look like the one in Figure 12-9.
button on the bottom-right side of the screen. Your FSV screen will look like the one in Figure 12-9.
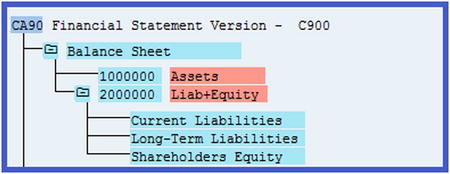
Figure 12-9. FSV hierarchy structure showing the items created
Save ![]() your FSV.
your FSV.
Complete the Nodes for FSV
Follow Steps 1 and 2 (create items and reassign items as subordinates) to create the nodes in your FSV for the following items:
- Create Intangible Assets, Fixed Assets, and Current Assets as subordinates to Assets.
- Reassign the P+L Result node to Income Statement and change the name to P+L Result.
- Assign the Net Result Loss & Net Result Gain nodes to Shareholders Equity.
- Reassign Net Result: Loss to Shareholders Equity as a subordinate.
- Reassign Net Result: Profit to Shareholders Equity as a subordinate.
- Change the name of Net Result: Loss to Retained Earnings.
- Change Net Result: Gain to Retained Earnings.
- Reassign the node not assigned to Unassigned Accounts.
- Click the
 button at the top of the screen and create the following nodes under current assets:
- Petty Cash and Current Bank Account as subordinates to Cash & Cash Equivalent.
- Short-Term Borrowings and Bank Short-Terms Loans as subordinates to Current Liabilities.
- Bank Overdraft and Bank Short-Term Borrowings as subordinates to Short-Term Borrowings.
- Barclays Bank as a subordinate to Current Bank Account.
- Bank Overdraft as a subordinate to the Barclays Bank node.
Now complete the nodes for your FSV using Figure 12-10 as your model.
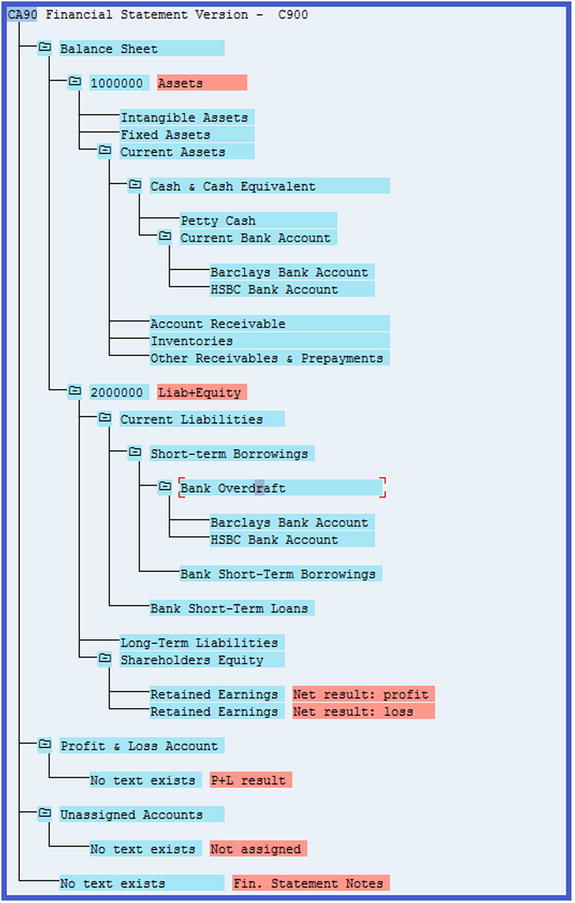
Figure 12-10. An extended FSV hierarchy structure showing the items you created
After you have reassigned these items and changed the appropriate text, save ![]() your work.
your work.
The next step is to assign your FSV nodes to the appropriate G/L accounts.
Step 3: Assign FSV Nodes to G/L Accounts
FSV is designed specifically for performance-reporting purposes, in order to meet certain requirements. It is important to assign G/L accounts to your FSV in a structured manner so that the summary of business transactions posted to the G/L accounts covering a given period can be generated as a financial statement. To assign G/L accounts to FSV, select the appropriate item or node from your FSV hierarchy structure and click the Assign Account button at the top of the screen.
You will not be able to assign G/L accounts to all the nodes in your FSV. Instead, we can teach you how to assign G/L accounts to your bank account. If you can assign G/L accounts to your bank account, you should be able to assign G/L accounts to the remaining nodes or items in your FSV, because the principle is the same. We advise that you trying assigning all the G/L accounts you have created to the nodes or items in your FSV.
Select the Barclays Bank Account node under Current Assets (Cash and Cash Equivalent) by clicking on it. You will assign a G/L account to it. When you click on a node an item, the system automatically selects the item.
Click the ![]() button on the top of the screen to call up the Change Accounts dialog box (Figure 12-11). On this screen you can assign appropriate G/L accounts to items or nodes in your FSV hierarchy structure.
button on the top of the screen to call up the Change Accounts dialog box (Figure 12-11). On this screen you can assign appropriate G/L accounts to items or nodes in your FSV hierarchy structure.
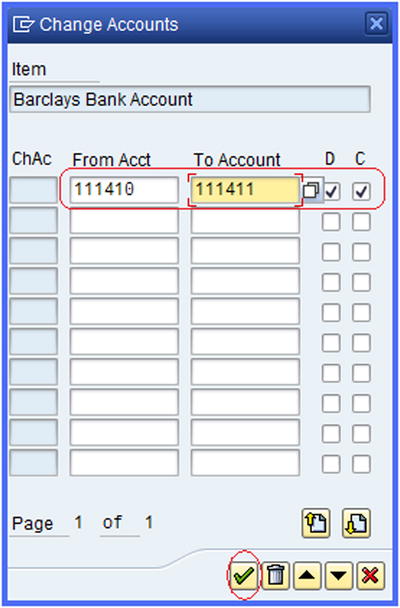
Figure 12-11. Assigning G/L accounts to an item in FSV
Update the following fields by entering the G/L account range you want to assign to your FSV node. You also must specify whether your G/L accounts are debit or credit:
- From Acct: Enter the starting G/L account number range of the G/L account you want to enter. In this exercise, we used 111410.
- To Account: Enter the ending G/L account number range in this field. In this exercise, we used 111431.
![]() Note The benefits of using a number range is that when you have multiple G/L account numbers, you only need to enter the start and end G/L accounts, and the system will assign the entire range.
Note The benefits of using a number range is that when you have multiple G/L account numbers, you only need to enter the start and end G/L accounts, and the system will assign the entire range.
- D: Stands for debit. When this field is activated or selected, the system will include all the debit G/L accounts in your bank account in the FSV. Select this checkbox.
- C: Stands for credit. When this field is activated or selected, the system will include all the credit G/L accounts in your bank account in the FSV. Select this checkbox.
Then click the Enter ![]() button or press Enter on your keyboard. This action will then assign your chart of accounts and G/L account number range to your FSV and indicate if the assigned G/L accounts are debit and/or credit by marking an X.
button or press Enter on your keyboard. This action will then assign your chart of accounts and G/L account number range to your FSV and indicate if the assigned G/L accounts are debit and/or credit by marking an X.
Notice that the range of G/L accounts that you have assigned will appear under the Barclays Bank Account node in the FSV Hierarchy structure (Figure 12-12).
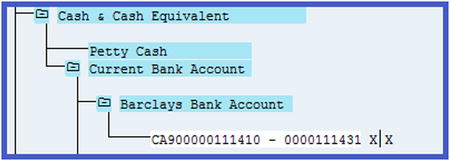
Figure 12-12. How the G/L accounts assigned to an item are displayed in FSV
Step 4: Define the Credit/Debit Shift
When your bank has a debit balance, it is considered an asset. This means that you have surplus cash in your bank account. On the other hand, if your bank has a credit balance, it is considered a liability. This means that you owe the bank, and it is referred to as overdraft (short-term borrowing). Cash balance surplus and deficits are disclosed separately in financial statements under different headings. For example, a debit bank balance is treated as an asset and a credit bank balance is treated as an overdraft under liability. So that the system can identify these transactions and disclose them separately in the financial statement (to meet accounting disclosure requirements), you have to specify these settings in your FSV.
Let’s look at how this is done using the Barclays Bank Account node in your FSV hierarchy structure as an example.
Select the Barclays Bank Account under Current Assets by clicking on it. Then click the Select ![]() button at the top of the screen. The item you have selected will turn yellow.
button at the top of the screen. The item you have selected will turn yellow.
Select the Barclay Bank Account node under Overdraft in the Liability section by clicking on it. On the menu bar, choose Edit ![]() Debit/Credit
Debit/Credit ![]() Define. The Define Debit/Credit Shift dialog box is displayed. The system will automatically select the first radio button for Debit Item (Barclays Bank Account) and Credit Item (Barclays Bank Account), as shown in Figure 12-13. Click the Enter
Define. The Define Debit/Credit Shift dialog box is displayed. The system will automatically select the first radio button for Debit Item (Barclays Bank Account) and Credit Item (Barclays Bank Account), as shown in Figure 12-13. Click the Enter ![]() button on the bottom-right side of the dialog box to confirm your bank account debit/credit shift assignment.
button on the bottom-right side of the dialog box to confirm your bank account debit/credit shift assignment.

Figure 12-13. The screen where you confirm the debit and credit item defaulted by the system for your bank account
Your FSV will now look like the one shown in Figure 12-14.
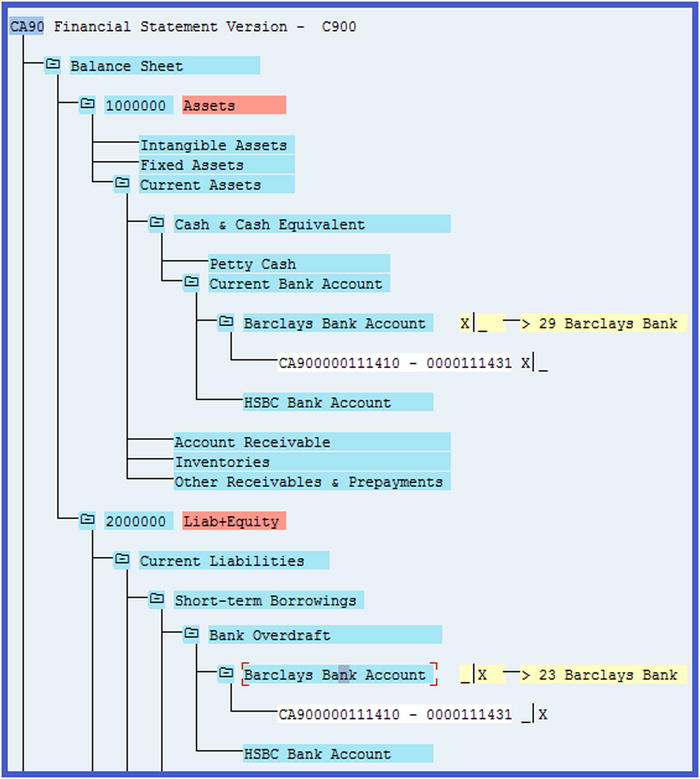
Figure 12-14. Hierarchical structure depicting the nodes and G/L accounts assigned to the FSV
The final step in this activity is to check the G/L accounts assigned to the FSV. When you perform a check, the system will tell you the items that have not been allocated to FSV, which will need to be assigned.
Check Assigned G/L Accounts to FSV
After assigning G/L accounts to your FSV nodes, it is important to carry out checks to find out if any of the items (G/L accounts) are not allocated to the FSV in your company code.
To do this, click the Check ![]() button on the top-right side of the screen. The Carry Out Check dialog is displayed. Make sure the following checkboxes are selected:
button on the top-right side of the screen. The Carry Out Check dialog is displayed. Make sure the following checkboxes are selected:
- Accts Assigned to 1 Side Only
- Nonassigned Accounts
- Incorrectly Assigned Accts
- Enter your company code in From Company Code field
Click the Enter ![]() button on the bottom of screen to confirm your specifications. The Check Financial Statement Version screen is displayed (Figure 12-15), showing the nonassigned accounts in the FSV (these are the G/L accounts that have not been allocated in the FSV but need to be assigned).
button on the bottom of screen to confirm your specifications. The Check Financial Statement Version screen is displayed (Figure 12-15), showing the nonassigned accounts in the FSV (these are the G/L accounts that have not been allocated in the FSV but need to be assigned).
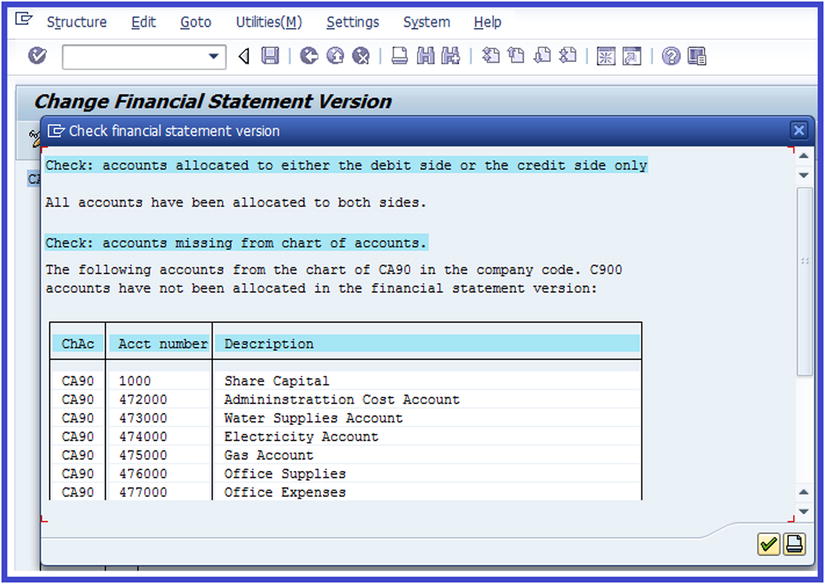
Figure 12-15. A list of G/L accounts not allocated to FSV
Go back and assign the displayed G/L accounts on the screen to the appropriate items (nodes) in the FSV. (You learned how to assign accounts to FSV items in Step 3.) Save ![]() your FSV.
your FSV.
Summary
This chapter showed you how to configure Financial Statement Versions (FSV). In doing this, you learned how to define your own FSV from scratch. This included how to create FSV items using the Create button. As part of this exercise, you created the following items:
- Balance sheet
- Profit and loss account
- Unassigned accounts
You went on to create other nodes and items as subordinates for your FSV. You assigned codes to the items you created and assigned G/L accounts to items in the FSV. Finally, you learned how to check the items assigned to the FSV.
In the next chapter, you will look at how to integrate FI into the other modules, including Material Management (MM) and Sales and Distribution (SD). In Material Management, you will look at the various steps that allow the system to carry out automatic posting from MM to FI.
Finally, you will learn how to assign G/L accounts to SD. In doing this, you will determine the sequence to be used to achieve this objective.