Now that you know how to use Illustrator, learning InDesign is easy. That’s because Illustrator and InDesign are like identical twins. Many of the tools, panels, and features are the same between the two, and they work on the same conceptual level. If you’re coming to InDesign from another page-layout application, such as QuarkXPress, PageMaker, or Publisher, three main things will be very different from your past experiences: the capability to place native files from other Adobe applications into layouts directly (no need for flattened EPS or TIFF files), direct import and export of PDF files, and the use of transparency. As you read through this chapter, you’ll understand why InDesign has quickly become the most popular page-layout application on the market.
When you first launch InDesign, you’re greeted with the InDesign CS3 welcome screen, as seen in Figure 8.1. The welcome screen is split into several sections. The top half enables you to quickly create a new file, create a new file based on a template, or open an existing file. The bottom half offers quick links to learn about new features, find helpful tutorials, and find out about some of the extras that come with InDesign.
To start from scratch and create a new file, choose File, New or press (Cmd-N) [Ctrl+N] to access the New Document dialog box (seen in Figure 8.2). Here you can specify the settings for your document.

Although you change just about any of these settings after you’ve already created your document, this is the only time all of these settings appear in a single, convenient dialog box.
Here’s an explanation of the items that appear in the New Document dialog box:
Document Preset—. All the settings found in the New Document dialog box can be saved as a document preset by clicking on the Save Preset button. Creating presets of often-used document sizes and specifications can save time. Document presets appear in this pop-up menu after they have been saved.
Number of Pages—. This setting determines the number of pages your document will have. Don’t worry if you don’t know—there are plenty of ways to add and remove pages from your document at any time.
Facing Pages—. A document that has facing pages will specify all pages as either a left page or a right page. If you turn off this option, all pages will be identical. You would use facing pages when designing a document such as a book or magazine, when you have layouts that might be different depending on the side of the page on which they appear.
Master Text Frame—. If you know you’ll be using master pages in your document, and if text will automatically flow from one page to another, using the Master Text Frame option will make life easier for you by automatically creating linked text frames on your master pages.
Page Size—. The page size is the actual size of your final page (also called trim size).
Columns—. Columns are vertical guides that divide a page. When you specify columns, you define how many you’d like and the amount of space that appears between each column, which is called the gutter.
Margins—. Margins are a defined area that encloses the content on your page (also called a safe area). Although you can always add content outside your defined margins, this setting helps you align objects and make pages appear consistent. It’s also used (along with the Columns setting) to define the width of text frames when automatically flowing text into a document.
Bleed—. Available when you click on the More Options button in the New Document dialog box, the Bleed setting defines a guide that extends past the page size. This helps you create your bleed and also defines an area that InDesign can use later in the workflow. The screen preview, Print dialog box, and PDF Export dialog box all contain an option to either include or exclude bleed. This makes it easy to create your file with bleed from the start, and then decide when to show the bleed and when to hide it later in the process. If you aren’t familiar with the term, bleed means the artwork extends beyond the edges of a page so that the art comes right up to the edge of the page after it has been printed and trimmed to size.
Slug—. This feature is also visible when you click on the More Options button. Sometimes people put information at the bottom or side of a file that describes the particular job or client. The information is called a slug, and internally, you want to print it, but externally, you usually don’t want others seeing it. By defining a slug area, you can specify an area off the page where you can add any kind of information. Like the bleed setting, you can control whether the slug will print or export to PDF.
After you’ve specified your new document settings, you can click the OK button to create a new InDesign file.
An InDesign template file is a special kind of InDesign file, sporting an .indt file extension instead of the usual .indd usually reserved for InDesign files. Templates are used for designs that are used repeatedly, and they can contain anything a normal InDesign file can contain, including layers, styles, page size—even artwork itself. When you open an InDesign template, the file opens as an untitled document (as if you had created a new file). This prevents you from accidentally overwriting the template file.
InDesign ships with many professionally designed royalty-free templates you can use. When you choose the New from Template button in the Welcome screen, InDesign automatically launches Bridge and navigates to the folder where these templates are installed.
As with just about any computer program, you can open a file by choosing File, Open or pressing (Cmd-O) [Ctrl+O] to bring up the Open dialog box. After you’ve located the file you want to open, click on the Open button to open the file. There are two file dialog boxes, the standard OS dialog box and an Adobe dialog. If you don’t recognize what you’re seeing, click the button in the lower-left corner (Use OS Dialog or Use Adobe Dialog) to switch between the two dialog boxes.
If you want to choose a file from a Version Cue project, you’ll need the Adobe dialog box. Of course, you can always use Adobe Bridge to browse for the right file you need.
Taking a look at the screen when you first start InDesign, you have the standard menu bar across the top of the screen and, directly beneath it, a context-sensitive Control panel. Along the left side of the screen is the toolbox, which contains all of InDesign’s tools as well as several other functions. The color proxy indicates the fill and stroke colors (you can choose new colors by double-clicking on them), and the two icons surrounding the proxy enable you to set the colors to the default white fill and black stroke and to swap the fill and stroke colors. Directly below the proxy icons are two icons to toggle attributes between the container and text, and three buttons that can be used to quickly apply three kinds of fills: a black fill, a black-to-white gradient, and none. Under those are buttons to toggle between different view modes: Normal, Preview, Bleed, and Slug. These controls can be seen in Figure 8.3.

Along the right side of your screen are some of InDesign’s panels. We discuss what each of them does and how to use them as we go through this chapter.
Finally, the document window is where you work on your file. The black outline is your document size. InDesign lists the filename and the view percentage right in the title bar of each file. Along the bottom left of the window, you’ll find a button to toggle the Structure pane, zoom and page controls, and a Version Cue status bar.
Adobe products use a graphics engine called Adobe Graphics Manager (AGM) to draw art to the screen. This technology gives you the capability to see pixel-perfect images in Photoshop and clean smooth vectors in Illustrator. When working in page-layout applications, people are used to seeing low-resolution previews for placed images, but InDesign can also use AGM to display high-quality previews of your layouts.
InDesign actually has three settings for how art is drawn to the screen, which you can choose from the View, Display Performance submenu. The Fast Display setting grays out all graphics for the speediest redraw, the Typical Display setting—InDesign’s default—draws low-resolution graphics to the screen, and the High Quality Display setting displays graphics at their full resolution. Using the High Quality Display setting slows redraw performance, but placed art and graphics files will appear just as they would in Illustrator or Photoshop.
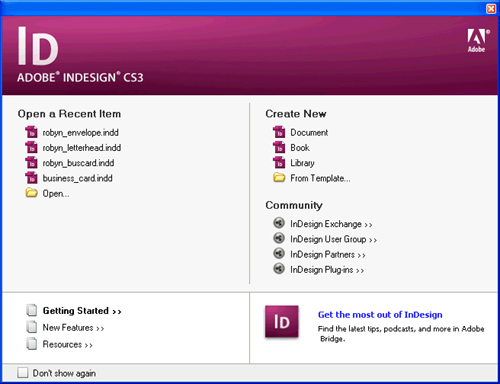
By default, InDesign documents have rulers showing, which appear horizontally across the top and vertically down the left side of the document window. You can toggle the view of rulers by choosing View, Show/Hide Rulers. You can right-click on either of the rulers to change their measurement method, as seen in Figure 8.4.
InDesign allows both rulers to use different measurement systems (which some workflows require). You can change the ruler zero point (the point from which distances are measured) by dragging the intersection of the horizontal and vertical rulers to any location within your document window, and you can reset the zero point by double-clicking on it.
Guides are horizontal and vertical lines that you can use to help align objects and create consistent layouts. Guides act like magnets when drawing and moving objects, making it easy to position items precisely. You can click on a ruler and drag a new guide onto your artboard. Guides act much like regular objects do, and you’ll notice that after you’ve created a guide, you can click on it to select it. Shift-click multiple guides to select more than one and move them all simultaneously. You can delete a guide simply by selecting it and pressing the Delete key. When you select a guide, the Control panel shows the coordinates for that guide, and you can specify an exact numerical location for the guide through the Control panel as well. You can even use the Align buttons in the Control panel to quickly distribute guides evenly.
InDesign is pretty smart, in that you can use the marquee-selection method to select guides. But if your marquee area has an actual object inside of it, the object will become selected, not the guides. You can’t move objects and guides simultaneously.
You select objects in InDesign the exact same way that you do in Illustrator. The Transform tools also work identically between the two applications. If you’re a QuarkXPress user, the two selection tools might be confusing at first, but you’ll get used to it. You’ll learn about when to use each of the different selection tools to perform different tasks as you read through this chapter.
As we discussed extensively in Part I, “The Suite,” InDesign is built to incorporate content from multiple sources into a single layout. Overall, you’ll be placing two main categories of content into your layouts: text and graphics. Let’s explore how this works.
All content on an InDesign page must reside within a frame, which is a container for the content. Think of this frame as a plate for your food. You don’t place food directly on your table (which would be rather messy); you first put a plate (the container) on your table and then place your food on the plate. Whether your “food” is a block of text or some kind of graphic, it must reside within a frame. InDesign has basically three types of frames: one that holds text, one that holds graphics, and one that is unassigned, as seen in Figure 8.5 This last type is actually just a regular vector shape. In fact, try not to even focus too much on what kind of frame something is because all that InDesign cares about is that you have some kind of frame, which, under the hood, is simply a vector object. Any shape can be a frame for content. You can copy and paste a shape from Illustrator, and it can be a frame in an InDesign layout.
The reason I say not to focus on the frame type is that an InDesign frame is like a chameleon: It changes to match its environment. If you select the Type tool and click on an existing graphic frame, InDesign automatically switches the frame to a text frame so you place text in it. Because InDesign just needs an underlying vector frame to hold content, it can change the type of frame to whatever it needs. If you think about it, InDesign is simply helping you by dynamically changing things as you work, keeping you from having to manually convert a frame from one type to another. The danger in this, of course, is that, at all times, InDesign assumes you know what you’re doing.
Rather than be forced to create frames every time you want to place text or a graphic, InDesign can sometimes create the frame for you so you don’t have to. Instead of trying to explain it, let’s explore how you actually place content into an InDesign document, and everything will become clear.
Placing text is basically a two-step process. You start by first choosing File, Place and picking the file you want to place. Then you specify where and how the text should appear in your document. When you’ve chosen a file to place from the Place dialog box, InDesign shows you a loaded cursor, indicating that text is ready to be placed, as seen in Figure 8.6.

At the bottom of the Place dialog box is an option called Show Import Options. With the option turned on, InDesign looks at the file type and presents additional options that you can apply to the text before you actually import it. For example, if the file that you’re placing is a Microsoft Word or Excel file, InDesign has specific filters that enable you to strip formatting out of the files or even to map Word styles to InDesign styles (so that text is styled to your specifications automatically as it is imported).
Next, you specify how and where the text will appear in your document, using any of the following techniques:
Click on any empty area in your document window. This places your text into a text frame that InDesign automatically creates for you. The width of the frame matches the width of your column.
Click and drag in any empty area in your document window to draw a text frame. When you release the mouse button, InDesign immediately places your text into the frame.
Click on an existing text frame or any empty frame (graphic or unassigned).
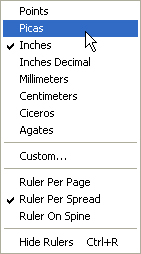
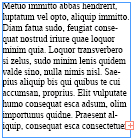
InDesign attempts to place all of your text into a frame, but if the frame isn’t big enough to hold all of the text, you’ll see an icon with a red plus sign on the lower right of the text frame, which indicates text overflow. You can either enlarge your text frame or have the overflow text spill into another text frame. Having text flow from one frame to another is called threading, and InDesign makes it quite simple to do.
When you click on a text frame with the Selection tool, you see eight handles that enable you to scale the frame, but you also see a larger box on the upper left and lower right of the frame. These boxes are called the in-port and out-port, respectively. Text flows into a frame through the in-port and flows out via the out-port. An empty in-port indicates the beginning of a story, and an empty out-port indicates the end of a story. As we mentioned earlier, a red plus sign in the out-port of a text frame indicates overflow text, meaning that there is more text in the story that isn’t currently visible (see Figure 8.7).
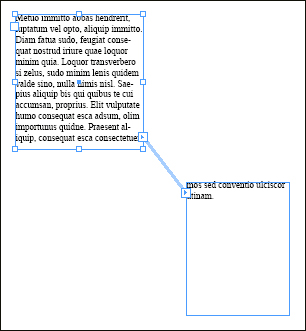
When you click on an out-port, your icon changes to the loaded text icon, and you can use any of the three techniques listed earlier to create a thread across text frames. A text thread is indicated by a blue arrow that appears in the in- or out-ports. If you choose View, Show Text Threads, InDesign shows a visible line connecting the ports, making it easier to identify how a thread of text flows, which can be especially helpful if you have several different text threads on a single page (demonstrated in Figure 8.8), as in a newsletter or newspaper layout.
Later in “The Power of Typography,” we talk about editing the text inside of the frames. Next, we explore how to place images into your layout.
InDesign can place many different kinds of image formats, including EPS, TIFF, and JPEG. However, because you’re using InDesign as a part of Adobe Creative Suite, you also have the capability to place native Photoshop (.psd), native Illustrator (.ai), and PDF files. InDesign offers rich import options and features to support these native files.
As with text, placing images is basically a two-step process. You start by first choosing File, Place and picking the file you want to place; then you specify where and how the image should appear in your document. When you’ve chosen a file to place from the Place dialog box, InDesign shows you a loaded cursor, indicating that a graphic is ready to be placed (see Figure 8.9).

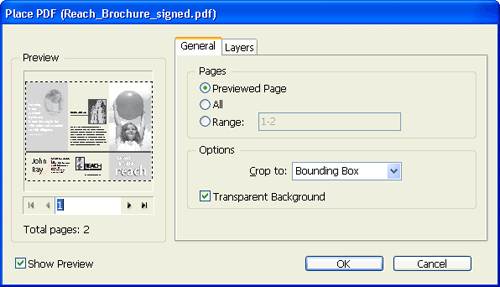
At the bottom of the Place dialog box is an option called Show Import Options. With the option turned on, InDesign looks at the file type and presents additional options that you can apply to the graphic before you actually import it. For example, if the file that you’re placing is a PDF file, InDesign’s PDF filter enables you to specify which page you want to place, or even to place all the pages in the PDF file at once, demonstrated in Figure 8.10.
Next, you’ll specify how and where the graphic will appear in your document, using any of the following techniques:
Click on any empty area in your document window. This places your graphic into a frame that InDesign automatically creates for you. The size of the frame matches the size of the graphic.
Click and drag in any empty area in your document window to draw a graphic frame. When you release the mouse button, InDesign immediately places your graphic into the frame. The graphic might be cropped (not fully visible) if the frame that you created isn’t large enough to display the entire graphic. Don’t worry, though; you can correct this later (see “Cropping and Scaling Images,” later in this chapter).
I’m sure you’re breezing along, telling yourself how easy this InDesign thing is. But in my experience, what you’re about to learn is the one thing that most people struggle with initially: cropping and scaling images. If you were able to grasp the concept of the two selection tools in Illustrator (the Selection tool and the Direct Selection tool), this will be easier to digest, but in any case, with a little bit of practice, you’ll do just fine.
From a conceptual point of view, a graphic that has been placed into an InDesign document is composed of two things: the image itself—which we’ll call the content—and the frame that holds the image—which we’ll call the container. When working with images, you must always be aware of when you want to make adjustments to the content individually, the container individually, or both the content and the container simultaneously. That’s where the two selection tools come into play. For the most part, when you want to edit the container, you’ll be using the Selection tool. When you want to edit the content, you’ll be using the Direct Selection tool. Let’s take a closer look.
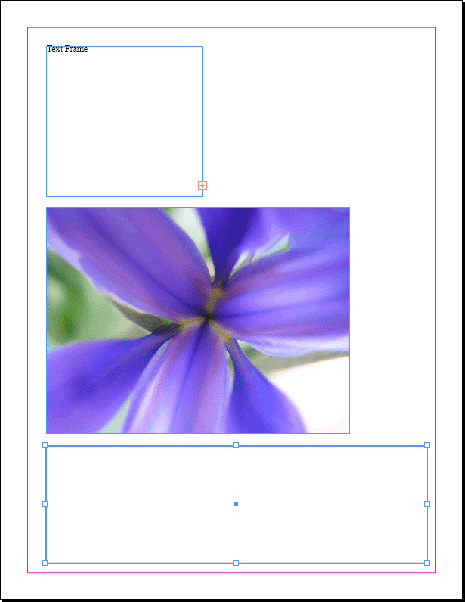
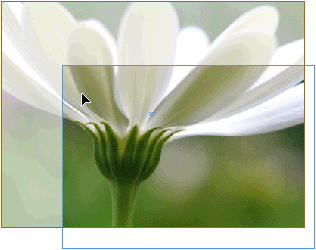
When you click on a placed graphic with the Selection tool, you’ll see a blue outline and the eight scale handles. What you currently have selected is actually the container, not the content. If you drag on any of the scale handles, you’ll notice that the size of the container changes, but the content inside the frame does not. If you resize the container to be smaller than the image inside of it, you effectively crop the image because you will be able to see only a portion of the image, as shown in Figure 8.11.

Switch to the Direct Selection tool and click on the graphic (don’t click on the path of the frame—click on the image itself). You’ll notice that the blue outline is gone and is now replaced with a red outline, with handles of the same scale. Depending on the size of the frame, the red outline might be smaller or larger than the actual frame. This red outline is the content of the frame. Click and drag on any of the scale handles to resize the image, and you’ll see that the image is being scaled, but the container is not changing size at all. When the content is selected, you can change the size of only the actual placed graphic. If you click and wait a second before you start dragging the mouse to scale, you’ll see a ghost image appear that will make it easier for you to resize your image, demonstrated in Figure 8.12. If you place your cursor within the frame, the cursor changes to the hand tool, and you can click and drag to position the content inside the container. Again, waiting a second before dragging enables InDesign to generate a preview to view the entire image.
When you select an image with the Selection tool, the size information in the Control panel or Transform panel reflects the size of the container. If you want to see how much an image was scaled, you have to first click on the image with the Direct Selection tool. The panels will then show the size information for the content of the frame.
InDesign sports a few additions to the Control panel that make this process a bit easier to manage. When you have an image selected, there are buttons that allow for the resizing of content within a container (or resizing the container to match the size of the content); for toggling between selecting the container and the content; and for rotating, scaling, and other common manipulation functions, as seen in Figure 8.13.
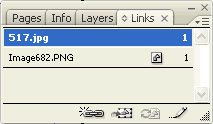
All placed content is tracked in the Links panel. When you place an image, a new listing appears in the Links panel, seen in Figure 8.14. This listing contains information about the placed image, such as file type, color space, and, most important, the actual location of the original file (which could be somewhere on your computer, on a CD or DVD, on a server, and so on). You can view this information by double-clicking on the filename in the Links panel.
InDesign can generate high-resolution previews when it can find the original of a linked file and when the High Quality view setting is used; otherwise InDesign stores a low-resolution preview in the InDesign document.
Several buttons along the bottom of the Links panel offer extended functionality for working with placed content. Relink enables you to either update a missing link or replace a current file with a completely different one (perfect for replacing low-resolution images with final high-resolution files). The Go To Link button navigates to the selected linked image in your file, which is helpful especially in larger publications or in files that were created by others. The Update Link button enables you to update linked files that have been modified outside of InDesign.
The last button at the lower right of the panel, Edit Original, is probably the most important. If you need to make modifications to a placed file, choosing Edit Original opens the linked file in the application that created the file so you can edit it. After you’ve made the required changes, you can save and close the file; upon returning to InDesign, the file will be updated automatically to reflect the changes you made.
From the Links panel flyout menu, you can choose Link File Info to view the metadata of the linked file; if you’re using Adobe Stock Photos compositions (comps) in your layout, you can choose Purchase This Image to access your shopping cart to buy the high-resolution version of the comp image.
Layers in Placed Photoshop Files
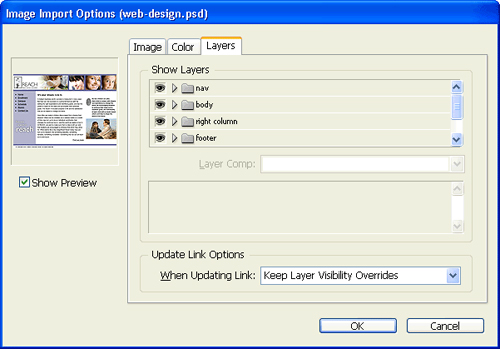
If you place layered Photoshop (PSD) files into an InDesign document, you can actually choose which layers of that file are visible in your layout. Select the graphic frame with the PSD and choose Object, Object Layer Options. You can then choose which layers you want to be visible and which ones you want to be hidden, as seen in Figure 8.15. You can also choose from different layer comps if the Photoshop file was saved with layer comps in it.
Take away all the fancy features of InDesign, and you expose the core of what really makes InDesign so special: typography. In fact, with a simple glance at a few columns of text in a newspaper or magazine, you can usually tell whether InDesign was used to lay out the page. My first real job (when I say “real,” I mean “paying”) was as a typesetter, and I used a sophisticated system in which I typed in codes to change typefaces. Then I had to wait until I developed the output from the imagesetter in a darkroom to see what my page actually looked like. Although that may sound archaic (and I assure you, it was), the result was perfectly kerned type, clear spacing, and immaculate columns.
At the time, PageMaker and QuarkXPress were touting how desktop publishing was going to change the world (which it did), but as a type professional, I simply couldn’t get the same beautiful typography that the “archaic” systems offered. You could buy a CD of 10,000 fonts for $20, but the quality you got in return wasn’t close to what you were used to seeing from a high-end typesetter. To many, the fine art of typography was lost. But our story has a happy ending—InDesign is the hero that saves the day.
Features such as optical kerning, optical margin alignment, the Paragraph Composer, and OpenType support bring professional-level typesetting into the hands of any designer. And through the use of paragraph and character styles for text, you can have InDesign set perfect text without skipping a beat.
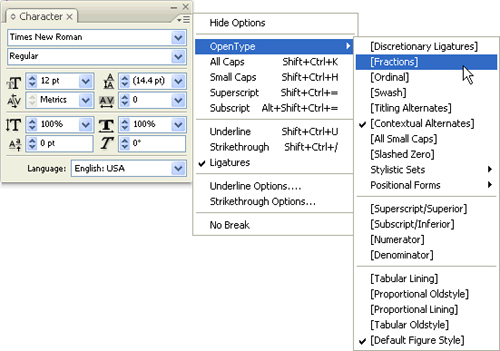
Before we get into the text features themselves, let’s talk about fonts. InDesign has full support for OpenType fonts, so you can take advantage of the extended technology such as Unicode and cross-platform compatibility that we discussed back in Chapter 7, “Using Adobe Illustrator CS3.” You can access OpenType options from the Character panel flyout menu (Window, Type and Tables, Character), shown in Figure 8.16. Additionally, you can specify OpenType functionality when defining both paragraph and character styles.
The Glyphs panel lets you view all glyphs in a typeface, which is extremely helpful when you’re looking for a specific glyph, such as the inch mark (which is hard to get because InDesign, in its infinite wisdom, tries to sell you on curly quotes instead). The Glyphs panel also becomes your best friend when using OpenType Pro fonts, which contain thousands of different glyphs, including alternate characters, as seen in Figure 8.17. To view the Glyphs panel, choose Window, Type and Tables, Glyphs. To insert a glyph into your text, just double-click the desired glyph.

I used to have a poster on my wall that read “Whoever dies with the most fonts, wins.” I know some people who take that saying to heart, and files from those people contain an abundance of fonts. Sometimes you need to reduce the number of fonts they’ve used in a file.
The Find Font command lets you make global font changes to your document. This is especially useful if you open a document for which you don’t have the correct fonts, or if you have several versions of a font and need to replace one version of say, Helvetica, with another.
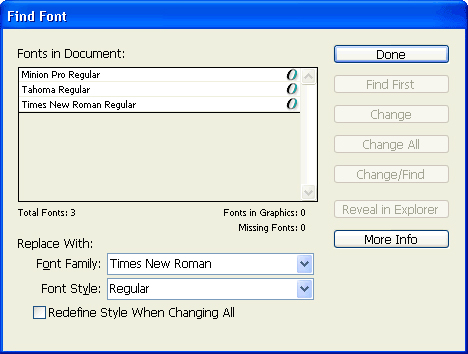
To replace fonts in your document, choose Type, Find Font. This displays the Find Font dialog box with a list of all fonts used in the document, demonstrated in Figure 8.18. Select a font from the list and then choose a replacement font from the pop-up menus at the bottom of the dialog box. After you have specified the source and replacement fonts, you can either find and replace specific instances of a font with the Find and Change buttons, or do a global replacement with the Change All button.
If you have trouble remembering what your fonts look like, InDesign offers a font preview in the Font menu. You can control this preview through the Font Preview Size setting in the Type preferences panel. The icons that appear to the left of each typeface indicate whether a font is TrueType, PostScript, OpenType, or Multiple Master.
InDesign has a full range of character-formatting capabilities, from simple stuff such as font and size to very precise control over kerning (space between pairs of characters), tracking (space between a range of characters), scaling (resizing), and baseline shift (vertical position of characters relative to the baseline).
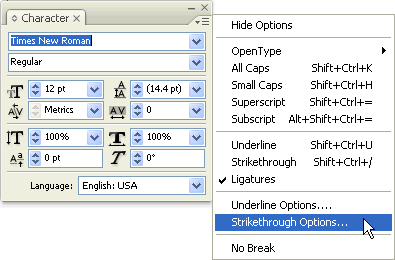
Character formatting can be accomplished using either the Control panel or the Character panel (Window, Type and Tables, Character). The Control panel actually has more functionality than the Character panel because it also includes controls for applying character styles. Two very useful but often-missed dialog boxes can be found in the panel menu (for both the Control and the Character panels): Underline Options and Strikethrough Options, which give you total control of your underlines and strikethroughs, seen in Figure 8.19.
InDesign’s kerning and tracking controls are particularly useful for making headlines and body text look good and fit the way you want them to. Both kerning and tracking work very subtly but can have a profound effect on the overall aesthetic of the page.
To kern a letter pair, position the insertion point between the two letters and use the kerning controls in the Character panel until the two letters are positioned as desired. Kerning is usually used to reduce whitespace between letter pairs, but it can be used to increase it as well.
To change the tracking for a block of text, start by selecting the entire block. Use the tracking controls in the Character panel to adjust the spacing of the text.
The difference between character and paragraph formatting is subtle yet significant: Whereas character formatting affects as little as a single character at a time, paragraph formatting automatically affects the entire paragraph. Keeping this in mind makes it simple to remember into what type of formatting category a certain control falls. For instance, alignment (flush left, center, justified, and so on) is paragraph based because you always affect an entire paragraph with a change to that option.
Paragraph-formatting controls are located primarily in the Paragraph panel, accessed by choosing Window, Type and Tables, Paragraph. Other paragraph-specific options are Paragraph Styles and Paragraph Rules (see the following text for more details on each).
One incredibly useful but totally invisible technology in InDesign is the Adobe Paragraph Composer, the type engine that controls character placement within InDesign. The Adobe Paragraph Composer is on by default, and it helps create better spacing, hyphenations, and the overall “color” of type. It is especially helpful in justified text.
If you want to use the Single Line Composer instead of the Paragraph Composer, you can switch between the two in the Paragraph panel flyout menu (see Figure 8.20).

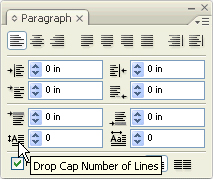
The term drop cap refers to the first character of a paragraph that has been enlarged downward to span more than one line (think books of fairy tales and nursery rhymes). Creating drop caps is almost ridiculously easy in InDesign. All you have to do is click in the desired paragraph and then use the Drop Cap controls in the Paragraph panel to set the height of the drop cap (see Figure 8.21).
A rule is a horizontal line above or below a paragraph of text. It looks like an object but acts like text, and it moves with the paragraph if text reflow causes the paragraph to move. Although they are usually simple lines, InDesign rules can be one of many types and can be any color or width.
To create a rule, select a paragraph and then access the Paragraph Rules command from the flyout panel menu on the Paragraph panel or Control panel (in paragraph mode). Select Rule Above or Rule Below from the pop-up menu at the top of the dialog box, and click the Rule On check box.
Styles are, without a doubt, the most powerful and flexible formatting feature of InDesign. A style is a collection of formatting instructions that can be applied to paragraphs or to characters. With styles you can ensure consistent formatting of all text in your document, and you can reformat vast amounts of text in just a few seconds. Both paragraph styles and character styles can be accessed in the same panel group (choose Window, Type and Tables, Character Styles or Window, Type and Tables, Paragraph Styles).
Paragraph styles are applied to entire paragraphs and contain both paragraph-level formatting, such as alignment, line spacing, and tab stops, and character-level formatting, such as font and font size.
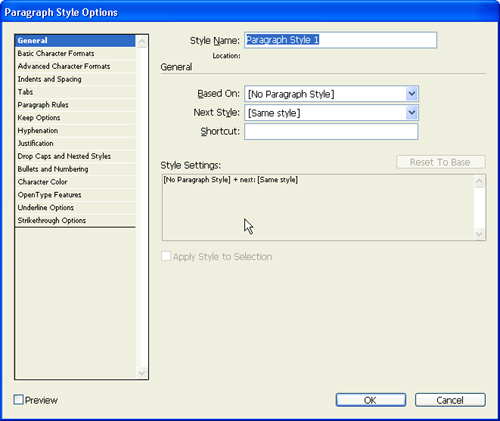
To create a paragraph style, select a paragraph of text and format it as desired. With the paragraph still selected, click the Create New Style button at the bottom of the Paragraph Styles panel. A new paragraph style (titled Paragraph Style 1) appears in the list of styles. Double-click this new style to open the Paragraph Style Options dialog box, shown in Figure 8.22. From here you can type in a new name for the style and set additional formatting options, if desired.
To apply a paragraph style to text, select the desired text and click on the name of the style you want to apply to that text. The paragraph will be reformatted to match the selected style.
If you change a style (by changing any of the formatting settings within the Paragraph Style Options dialog box), all paragraphs that have that style applied to them are instantly updated to reflect the changes. This is a huge timesaver and ensures a consistency that you could never achieve if you had to go back and reformat the text manually.
As you might suspect, character styles are styles that are applied to characters, not full paragraphs. Character styles are created, applied, and modified exactly the same way paragraph styles are, but to smaller blocks of text—words, characters, and sentences, for example.
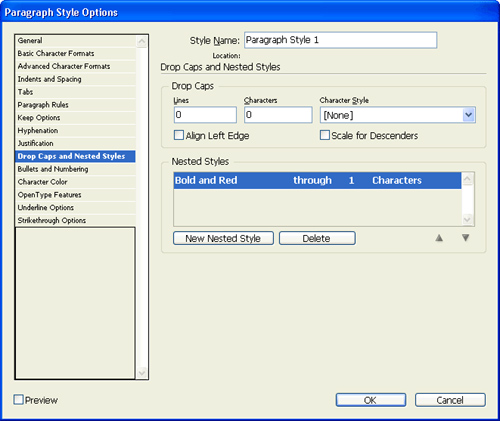
The term nested styles refers to character styles that are embedded inside paragraph styles. By setting up a paragraph style with nested character styles, you can apply complex formatting with one click of a button. For example, if you want to create a numbered list in which the number is bold and colored red, a word is bold and set to small caps, but the rest of the text on the line is normal weight and black, a nested style could apply all those settings at once.
To create a nested style, you first create the character styles you need. In the previous example, you would create a character style for text that is bold and colored red. Then you would create a new paragraph style and specify a nested style in which the first character of every paragraph has the bold and red character style applied to it, as seen in Figure 8.23.
Did you Know?
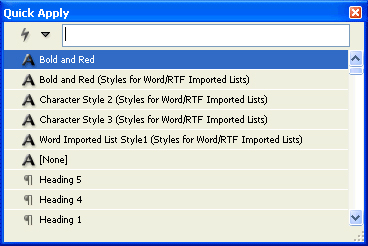
You can apply styles quickly while working in text using InDesign’s QuickApply feature. At any point, you can press (Cmd-Return) [Ctrl+Enter] to bring up a pop-up box with all of your defined styles, demonstrated in Figure 8.24. You can use your arrow keys to navigate to the style you want to apply, or you can type in the first few letters of the name of the style for which you are looking. Press (Cmd-Return) [Ctrl+Enter] to apply the style and close the pop-up box.
Tabs are variable-width spacer characters that you insert into your text by pressing the Tab key on your keyboard. Tab stops are paragraph-formatting instructions that determine how far a tab travels before it stops. Tab stops are created, modified, and deleted in the Tabs panel, which can be displayed by choosing Type, Tabs (see Figure 8.25).
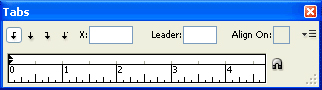
To set a tab stop, click on the type of tab stop you want (left-aligned, centered, right-aligned, or character-aligned), and then either click in the narrow strip above the dialog box ruler at the desired location or simply enter a location measurement in the X field.
If you want this tab stop to have a tab leader (a set of characters leading up to the tab stop), enter the character in the Leader field. If you are creating a character-aligned tab stop, the Align On field becomes active and you can enter a character other than a decimal point (the default) into this field.
To move an existing tab stop, just drag it to a new location. To delete a tab stop, drag it down off the tab ruler.
InDesign has four handy commands for changing text case: UPPERCASE, lowercase, Title Case, and Sentence case. All are available from the Type, Change Case submenu.
Converting text to outlines transforms normal text to drawn objects. After being converted, text can no longer be edited as text, but it can be manipulated as a graphic object. This is perfect for creating logos, labels, or other textual graphic treatments. It also lets you use text as a frame within which you can place other graphics.
To convert text to outlines, select the desired text and choose Type, Create Outlines.
The Story Editor is InDesign’s built-in text editor, which looks and feels very much like your standard word processor. The idea of the Story Editor is that you can edit text without worrying about how it looks in your layout. The text appears consistent in the Story Editor, so you don’t have to zoom in to read small point sizes or scroll between pages to make edits.
To activate the Story Editor, select a text frame and choose Edit, Edit in Story Editor (see Figure 8.26). Choose Edit, Edit in Layout to return to the normal view.

Some useful ideas for using the Story Editor include when you need to edit text in multiple-page layouts. If an article starts on page 2 but then finishes on page 24, you can still see the entire text in the Story Editor window. The Story Editor is also great for editing small type that you might have in your document (such as captions or legal speak) so that you can avoid having to continuously zoom in and out.
You can use the Story Editor Display panel in Preferences to control how text appears in the Story Editor.
InDesign has the capability to check the accuracy of your spelling in your document as you type. Just like you might see in a certain popular word processor, misspelled words appear with cute red squiggles under them. To turn on this feature, check Enable Dynamic Spelling in the Spelling panel of Preferences. Additionally, you can check the Enable Autocorrect box in the Autocorrect Preferences panel to have InDesign correct misspelled words as you type. A shortcut for activating both of these features can be found under the Edit, Spelling submenu.
To perform a traditional spell-check, choose Edit, Spelling, Check Spelling. The Check Spelling dialog box appears, as shown in Figure 8.27; just click the Start button, and InDesign will find all the words that aren’t in the InDesign dictionary (it’s interesting to note that InDesign is in the dictionary, but QuarkXPress is not). You can customize a few options for which words get flagged in the Spelling panel of the Preferences dialog box (and, no, there’s no option for “don’t flag competing products”).

As you’re checking your spelling, you might run across a word that you know is spelled right but InDesign doesn’t recognize it, such as qoph (a favorite “legal” word of Scrabble players everywhere). Click the Add button in the Check Spelling dialog box to add the word to your custom dictionary. From that point on, qoph won’t be flagged as being spelled incorrectly (which is nice because it wasn’t spelled wrong in the first place).
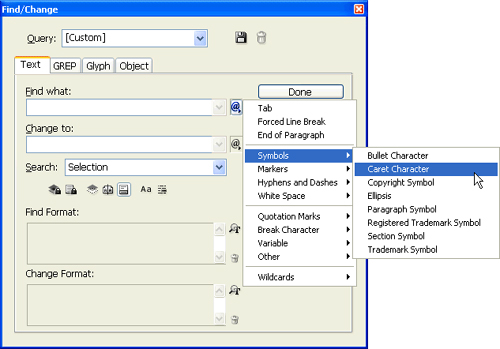
InDesign’s search-and-replace feature is deceptively powerful. In addition to the standard options for finding and changing text, pop-up menus to the right of the Find and Change fields in the Find/Change dialog box contain a very thorough list of special characters that you can search for and replace (see Figure 8.28). You can also search for and replace text or special characters in all open documents with a single command. For those with extremely complex search and replacement needs, a GREP (regular expression) search is available. GREP searches are based on patterns (called “regular expressions”) rather than specific text or characters. A regular expression might be written, for example, to match telephone numbers or email addresses.
The Find/Change dialog box can be accessed by choosing Edit, Find/Change.
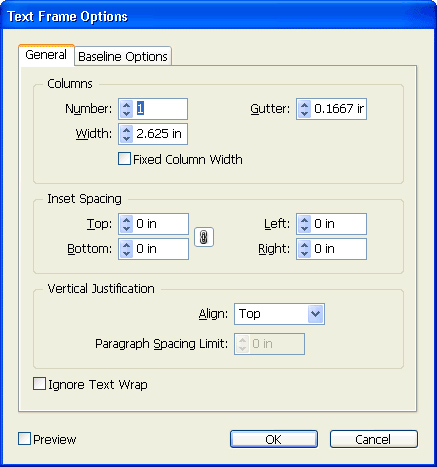
Each text frame has several options for displaying the text within it. These include multiple columns within a single frame, inset spacing (similar to page margins, but applied to the frame), baseline offset (the vertical distance above or below the imaginary line the text sits on), and vertical justification (the vertical placement of the text in its text box). To change any of these options, select a text frame and choose Object, Text Frame Options, as shown in Figure 8.29.
Most of the drawing tools found in InDesign come straight from Illustrator and work in the same way. We don’t cover tools such as the Pen or Rectangle tools here, but rather, we talk about some of the things that InDesign enables you to do with objects in your layout.
Any objects you create (paths, text objects, or images) can be grouped so that they stay with each other when they’re moved or otherwise manipulated. You can even group groups to keep things more organized.
To group objects, select the objects and choose Object, Group. When objects are grouped, clicking on any one of the objects in a group selects the entire group. You can still use the Direct Selection tool to select a single object or point, however, or ungroup using Object, Ungroup.
The Pathfinder panel is used to control the way shapes interact with each other. For instance, you can use the Pathfinder Add button to merge three circles to form a snowman (see Figure 8.30). Access the Pathfinder panel from the Object and Layout submenu of the Window menu.
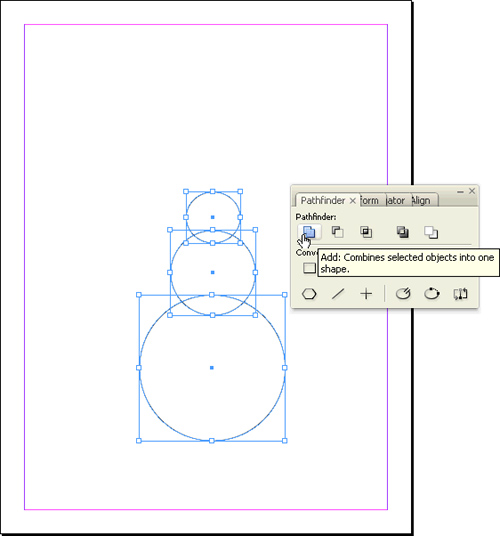
To use any of the Pathfinder functions, select the paths you want to affect and then click the button. Here are the different buttons and what they do:
Add merges two or more paths into a single path.
Subtract removes the area of the frontmost objects from the backmost object.
Intersect leaves only the overlapping area of the selected objects.
Exclude Overlap removes the overlapping area of the selected objects.
Minus Back removes the area of the backmost object from the frontmost objects (pretty much the opposite of Subtract).
Additionally, you can use any of the Convert to Shape buttons to change the shape of an existing frame.
InDesign has the capability to quickly align and distribute several objects at once. This is done through the Align panel, accessed by choosing Window, Object and Layout, Align. You can align and distribute objects in the exact same way as you do in Illustrator, by clicking on the different icons in the panels.
Unfortunately, InDesign doesn’t have the capability to “lock” the position of one object by defining a key object, like Illustrator can. If you want to align several objects relative to a particular object, you can lock the position of that object by choosing Object, Lock Position. Then select the objects and perform the Align function.
You can change the color of any selected object by either choosing a color from the Color panel or clicking on a swatch in the Swatches panel. Both panels are accessed directly under the Window menu.
As with Illustrator, objects in InDesign can have both their fill (the color, gradient, or pattern inside an object) and their stroke (the actual lines or borders that define the object) changed. The fill/stroke proxy in the toolbox, the Color panel, and the Swatch panel controls what is being changed. The solid square represents fill, whereas the hollow square represents stroke. Whichever of these is in front controls what is in focus. To make the stroke active when the fill is in front, click the stroke proxy. To make the fill active when the stroke is in front, click the fill proxy.
The Stroke panel lets you change the weight (thickness), corner, and ends of a stroke (if the selected path is closed and has no ends, the start and end options do nothing). You can also choose to align a stroke to the center line, inside, or outside of a path, as seen in Figure 8.31.

Swatches are a way for you to keep track of which colors are being used in your document. They also help you keep those colors consistent so that all your light blues match each other (because they’re applied to your objects with the same swatch).
To create a new swatch, click the New Swatch button at the bottom of the Swatches panel. Double-click the new switch, adjust the sliders until the color looks just right, and then click the OK button. A new swatch is created. To apply a color to an object, select the object and click on the swatch.
Two types of colors exist when it comes to printing: process colors and spot colors. Process colors are made by combining various percentages of cyan, magenta, yellow, and black (the four standard colors used in color printing). Spot colors are made by using a single ink that is a specific color. If you’re creating a design that is black and green, you’ll probably want to use a spot color for the green. A popular system for specifying spot colors is the Pantone Color system, and you can define Pantone colors as spot color swatches as well. When you choose to create a spot color from the Color Type pop-up menu in the Swatch Options dialog box, choose a Pantone library from the Color Mode pop-up menu (see Figure 8.32).

Corner effects can be used on any corner of any path (the corners on a rectangle, a star, or any path you’ve drawn with the Pen tool) to give the corners a little more visual interest than a standard corner. Access these settings by choosing Object, Corner Options.
Most objects in InDesign can be made transparent, which is really to say that you can make them less opaque so that objects below can be viewed through them. Of course, InDesign provides more than just basic opacity controls, but that’s what you’ll be using the most.
In the Effects panel (Window, Effects), you control both opacity (via the Opacity slider) and blending mode (via the pop-up menu). Slide the Opacity slider to the left (toward 0%) to make the selected object more transparent. Experiment with the different blending modes to see the results. You can also access these same settings (albeit through a slightly different interface) by choosing Object, Effects, Transparency.
You can apply drop shadows to any object. To do so, select the object and choose Object, Effects, Drop Shadow. Although most of the options are self-explanatory, as seen in Figure 8.33, one isn’t: The Size field controls how fuzzy the edges of the drop shadow are. Increase the size to make the shadow edges fuzzier (the fuzziness is transparent). You can also add noise to a drop shadow to prevent banding. Remember that drop shadows are object attributes, so you can apply a shadow only to an entire text frame, not individual words.

Feathering makes the edges of an object gradually fade transparently into the background. To feather an object, select it and choose Object, Effects, Basic Feather.
As you’ve seen in Photoshop, effects can be applied to create visual interest within a design. InDesign now sports many of the same effects as Photoshop. To add an effect, choose from Object, Effects. You’ll notice that the Effects dialog box is very similar to Photoshop. You can use the selections along the left side of the dialog box to activate and configure multiple effects on an object. Chapter 6, “Using Adobe Photoshop CS3,” has additional information on the effects available in InDesign.
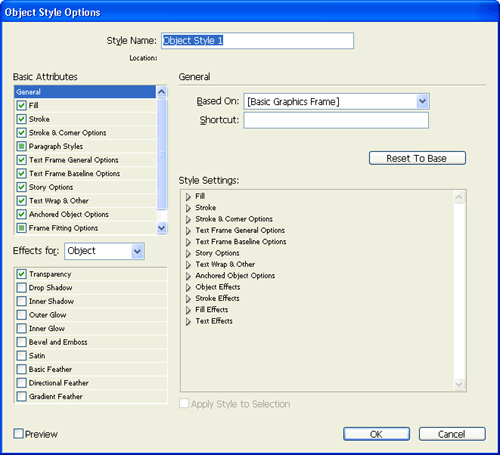
InDesign has the capability to define object styles, which enable you to quickly apply object attributes consistently across an entire document. To define an object style, open the Object Styles panel by choosing Window, Object Styles. Then choose New Object Style from the panel menu.
The New Object Style dialog box, shown in Figure 8.34, lets you specify different attributes, or you can select an already-styled object to have InDesign create a new style from that existing object. Object styles can also be applied using the QuickApply feature mentioned in the “Nested Styles” section.
Working in InDesign isn’t limited to just creating frames and filling them with content. You can also spend time arranging objects within your layout. Let’s explore some of the techniques that are used to manipulate page layouts in InDesign.
As you’re working in InDesign, you can drag objects from your layout into Bridge. Doing so creates an InDesign snippet, which is like a miniature InDesign file. You can then drag snippets back into any InDesign layout as you need them. These snippets are actually saved in an XML-based InDesign format (.inds) and can even be copied to servers or emailed to others as well. Snippets can contain styles and maintain all formatting of objects.
A text wrap specifies an object to repel text. Whenever the text of a document encounters an object with a text wrap, the text runs around the edges of the object. This is accomplished quite easily in InDesign with the Text Wrap panel.
To apply text wrap to an image, follow these steps:
Select the object with which you want to work.
Choose Window, Text Wrap to display the Text Wrap panel.
In the Text Wrap panel, select the type of text wrap and the offset between the text and the object, as seen in Figure 8.35.

The third option in the panel, Wrap Around Object Shape, enables you to specify a text wrap that follows the contour of an object’s shape. If you are wrapping text around a Photoshop image, you can even choose to have InDesign use an embedded Photoshop path or channel to define the contour of the object. Otherwise, you can have InDesign attempt to detect the edges of the object on its own.
The Pages panel, seen in Figure 8.36, is used to navigate within your document, rearrange pages, insert pages, duplicate or delete spreads, create master pages, and apply master pages to document pages.

You can jump to a page simply by double-clicking it, rearrange pages by dragging them within the Pages panel, and insert new pages by clicking the Create New Page button at the bottom of the Pages panel.
A spread is a collection of pages designed to be viewed together. The simplest type of spread is a two-page spread, such as the one that you are viewing right now as you read this book.
To duplicate or delete a spread, select the spread in the Pages panel and choose Duplicate Spread or Delete Spread from the panel flyout menu.
Master pages serve as templates for the pages within your document. If a master page has two text boxes and a placeholder for a page number in one corner, and you apply that master page to a regular page in your document, that regular page will have two text boxes and the correct page number in the corner. Master pages help ensure consistency from page to page.
To create a new master page, select the New Master command from the Pages panel flyout menu. Double-click on the new master page to view it, and then just create elements on the page as you normally would.
To apply a master page to a document page, simply drag the master page icon onto the desired document page.
To rename a master page or change other options, select the master page and then choose the Master Options command from the Pages panel flyout menu.
Like Photoshop and Illustrator, InDesign supports document layers. In InDesign, the best use of these layers is to separate different elements of your layout, such as text from graphics, or background objects from foreground objects, or different versions of a layout (say, for client approval). All documents have a default layer that contains everything unless you create your own layers. Layer actions are carried out through the Layers panel, seen in Figure 8.37.
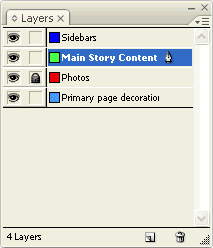
The three most common layer-related actions are adding layers, rearranging layers, and deleting layers:
To add a layer to a document, click the New Layer button at the bottom of the Layers panel.
To rearrange layers (moving one above or below another), simply drag the layer up or down in the list of layers.
To delete a layer (which deletes everything on the layer), drag it to the Trash button at the bottom of the Layers panel.
Double-clicking a layer lets you rename it or set layer options, and the two boxes to the left of the layer name let you set layer visibility (the eye icon) and lock a layer to prevent any changes to it (the lock icon).
The longer your document is, the more structure and navigational aids you need to give your reader. InDesign makes it easy to add page numbers, tables of contents, and indexes. It also lets you group document files into books to keep them organized.
One universal requirement of both large and small documents is page numbers. InDesign makes it very easy to add page numbers to your documents:
Double-click on the Master Page icon in the Pages panel.
Create a text frame on the master page where you want the page number to appear.
Choose Type, Insert Special Character, Markers, Current Page Number.
If your document layout includes facing pages, repeat this process for the second master page.
You can also easily change the format or starting number for the page numbers in different sections of your document using the Numbering and Sections Options dialog box, found under the Layout menu, as seen in Figure 8.38.

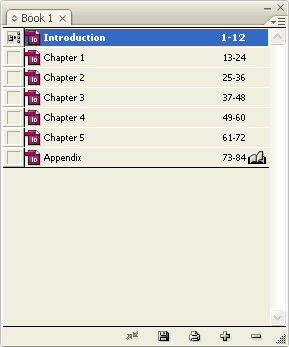
A book in real life is a collection of related pages, all bound together. A book in InDesign is a collection of related documents, also bound together. Collecting document files into a book makes it easier to access and organize documents, sequentially number chapters, and create tables of contents and indexes that span multiple documents.
To create a book, follow these steps:
Choose File, New, Book.
Enter a name for the book. The Book panel appears.
Click the Add Documents button at the lower-right corner of the Book panel.
Browse to the document you want to add and click the Open button.
Continue adding files until the book is complete. Drag filenames up or down in the list to change the order in which the documents appear in the book, as shown in Figure 8.39.
The Table of Contents (TOC) feature in InDesign is very deep and powerful, enabling you to create any variation of TOC imaginable. To start creating a TOC, you must first define TOC styles (Layout, Table of Contents Styles). Create a new style (click the New button), and choose which paragraph style is associated with that style. Repeat for each level of heading that you want to appear in the TOC.
To generate the TOC, choose Layout, Table of Contents; click OK; and then place the TOC in your document. You’ll need to replace the TOC each time you make an update to your document that might affect the TOC.
InDesign takes all the pain out of indexing: The process of tracking words and what pages they occur on is automatic and straightforward. All you have to do is provide the entries for the index, set up the basic structure, and apply any formatting to the index. In many ways, indexes and TOCs are alike—they track where certain words (indexes) or styles (TOCs) are located within your document.
To create an index, start by selecting an entry (any word in your document) and then displaying the Index panel (Window, Type and Tables, Index). Click the New Index Entry button (at the bottom of the panel), and then click OK in the dialog box that follows. You’ve created your first entry!
When you’ve created all your index entries, you’ll notice that the Index panel gives you a preview of your index. To create the real thing, choose Generate Index from the Index panel submenu, and place the text as you would any story. The Index text is not live or linked to the index panel, so if you make changes to your document, you’ll need to generate a new index and place it again.
One very useful feature of InDesign is how easy it is to create attractive and functional tables. InDesign tables support borders, fill colors, paragraph formatting, and table headers and footers. Tables also flow between text frames just like regular text.
To create a table, place the insertion point inside a text frame and choose Table, Insert Table. In the Insert Table dialog box, seen in Figure 8.40, specify how many rows and columns you want. You can also specify header and footer rows (see “Table Headers and Footers,” a little later in the chapter). Click OK when done.

To convert tabbed text to a table, select the text and choose Table, Convert Text to Table. In the Convert Text to Table dialog box, specify which characters to use as column separators (usually tabs) and row separators (usually paragraphs). Click OK when done.
After your table is created, you can enter data into it by clicking in a cell, typing your data, and pressing the Tab key to move to the next cell (or Shift+Tab to move to the previous cell). A tab character can be inserted into a cell with (Option-Tab) [Alt+Tab].
After tables are created, they can be easily modified. Typical changes include adding or deleting rows or columns, changing row height or column width, and merging cells.
Basic table modification in InDesign is a simple matter of adding, deleting, and adjusting rows and columns and merging cells:
To add rows or columns, select the same number of rows or columns that you want to add at the location where you want the new rows or columns inserted, and then choose Table, Insert, Row/Column.
To delete rows or columns, select the rows or columns you want to remove, and choose Table, Delete, Row/Column.
To adjust row height or column width, drag the bottom edge of the row or the right edge of the column. Hold down the Shift key while dragging to prevent rows below or columns to the right from moving.
Hold down the Shift key and drag the bottom or right edge of the entire table to change the height of all rows or the width of all columns.
To merge cells, select the desired cells and choose Table, Merge Cells.
To split a cell into two, select it, and then choose Table, Split Cells.
InDesign has a wide variety of formatting options to make your tables attractive and easy to read. The most common options are column/row strokes (cell borders), table borders, and fills. Before applying any formatting, though, you need to select the columns, rows, or individual cells with which you want to work:
To select multiple cells, drag across them with the text cursor.
To select entire rows, position the cursor on the left side of the table until the cursor changes to a right-pointing arrow and then click or click and drag.
To select entire columns, position the cursor at the top of the table until the cursor changes to a down-pointing arrow, and then click or click and drag.
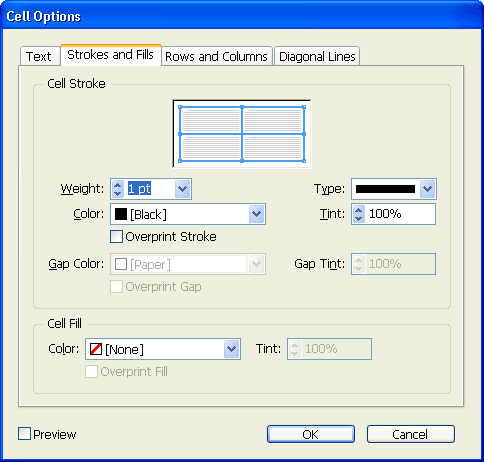
After cells are selected, you can format them by choosing Table, Cell Options, Strokes and Fills (choose Table, Table Options, Table Setup for stroke and fill options for the entire table). This dialog box contains controls for changing the weight, color, and type of stroke, as well as the fill color. The only tricky thing about this dialog box is the cell border proxy. This is a fake cell (or group of cells, if you have multiple cells selected) with blue borders (see Figure 8.41). Any border that is blue will be affected by your changes. Clicking a proxy toggles it between blue (selected) and gray (unselected).
Much as you can create styles for characters and paragraphs, you can use the Table Styles panel to create consistent table styles across all of your table objects. To create a new table style, open the Table Styles panel by choosing Window, Type and Tables, Table Styles. When the panel appears, click the new style icon (in the lower-right corner). Double-click the style to open the Table Style window and customize the style appropriately.
Conceptually, table headers and footers are very similar to traditional document headers and footers. The main difference is that, with document headers and footers, you have no control over the “units” of document data that they enclose—they always appear at the top and bottom of the page. With InDesign’s table headers and footers, though, you can have them appear once per page, once per frame, or every text column. Table headers and footers can also consist of as many rows as you want.
To set up table headers and footers, follow these steps:
After your table is created, the Table panel (Window, Type and Tables, Table) can be a quick way to perform such common table functions as changing the number of rows and columns, changing row height or column width, changing the vertical text alignment or the text rotation, and changing the text inset. The Table panel cannot be used to insert rows or columns, merge cells, or add borders and shading.
InDesign can add many of the same interactivity features you will find in Acrobat, such as hyperlinks, bookmarks, buttons, and embedded sound and movie files. These features let a viewer of a PDF version of your document click on things to jump to new locations or otherwise interact with the document. Obviously, if you are not going to be creating a PDF version of your document, you won’t be using any of these features. This section focuses on the two most common interactivity features, hyperlinks and bookmarks. Although you can add other types of interactivity in InDesign, it is much easier to open the PDF file in Acrobat and add the features there (especially because interactivity features cannot be previewed in InDesign anyway).
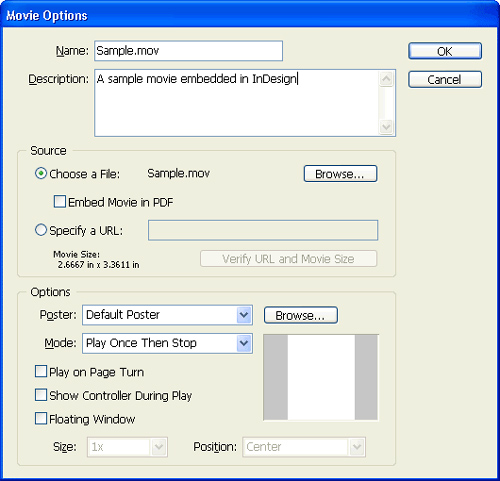
You can place movie and Flash files right into your InDesign layout as you would static images, like Photoshop files. Simply choose File, Place and navigate to a movie file. After you place a movie in your document, you can double-click on it to specify options such as poster frames, when you want the movie to play, and whether the movie will play just once or will loop repeatedly, as seen in Figure 8.42.
A hyperlink is a section of text that, when clicked, sends the viewer to a new location. This location can be either a page in another document or a URL that points to a web page or a file. All hyperlinks have two parts: a source and a destination. The source is the text that sends the viewer to a new location, and the destination is the location itself.
To create a hyperlink to a web page, do the following:
Select the text you want to use as the source.
Choose Window, Interactive, Hyperlinks.
Click the Create New Hyperlink button at the bottom right of the Hyperlinks panel.
In the New Hyperlink dialog box, select URL from the Type pop-up menu, as seen in Figure 8.43.
Enter the full URL in the URL field.
Click the OK button.

You can set the appearance of the link here as well, but you won’t be able to see what it looks like until you export the file to PDF, and none of the options really creates an acceptable appearance. I recommend instead that you choose the Invisible Rectangle option and format the text yourself in a way that lets the viewer know that it is a clickable item (such as blue underlined text).
Bookmarks are a feature of Acrobat that let you create a navigational structure for viewers that they can use to quickly move between pages or entire sections of a document. Unlike hyperlinks, bookmarks don’t appear within the document itself; they appear as a separate pane within the PDF document window.
Using and editing bookmarks is covered in detail in Chapter 11, “Using Adobe Acrobat 8 Professional,” but basically there are two types of bookmarks: page and text. Page bookmarks take you to a specific page, whereas text bookmarks take you to a specific block of text. Creating bookmarks can be done just as easily in InDesign as in Acrobat.
To create a bookmark, follow these steps:
To save your InDesign file, choose File, Save. It’s that easy. If you want to save your file to be compatible with InDesign CS, you can save it in the InDesign Exchange format (INX).
InDesign files can be exported to a few different file types. In some cases, such as PDF, the result matches (at least visually) exactly what was in the original document. However, in all cases, the native InDesign information is lost, meaning that InDesign functionality tied to the document, such as layers and object definitions, is gone when the file is exported. For that reason, be sure to always save a copy of the original InDesign file in addition to the exported version.
To export to PDF directly from InDesign, choose File, Export, and then choose Adobe PDF. You can choose from many different options, including compression and security settings. You can also choose to create a PDF file that conforms to the PDF/X standard.
Because there are so many different ways to create PDF files these days, and because there’s really no control over what a PDF can or cannot contain, leaders in the print community created a standard called PDF/X as a subset of the PDF spec that is tailored for CMYK and spot-color printing workflows. For example, a PDF/X-1a file has all transparency flattened, has no RGB content, and has all fonts embedded in the file.
If you need to export single pages in the EPS format (this can be useful for opening InDesign files in Adobe Illustrator or Photoshop), you can do so through the Export dialog box (File, Export). Choose EPS as your file type (which changes the extension to .eps), and click the Save button.
The Export EPS dialog box appears with a myriad of options. If you’ll be exporting for use in Photoshop or Illustrator, there’s no need to mess with most of the options unless you have placed images in your document. If you have placed images, you should review and adjust options as appropriate in the Advanced panel of the Export EPS dialog box. The important thing to pay attention to is the Flattener Preset setting, which should be set to High Resolution if you have transparency in your file.
You can view individual spot or process color plates onscreen in your document at any time. This is accomplished through the Separations Preview panel (accessed by choosing Window, Output, Separations Preview). In this panel, you can view each of the plates individually, or in any combination with other colors, by clicking the eyeballs on the left (see Figure 8.44). Note that when you are down to any one color, it always appears onscreen as black.
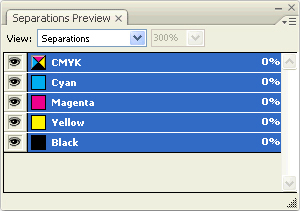
Additionally, you can choose Ink Limit from the View pop-up menu to have InDesign highlight the areas in your document that exceed the ink coverage percentage that you specify in the panel.
When printing color separations, you might want to specify certain settings for each ink, such as dot type and screen angle. You can access these settings by choosing Ink Manager from the Separation Preview panel flyout menu. The Ink Manager, shown in Figure 8.45, also enables you to specify ink aliases, which can be extremely helpful when working in a document that contains several spot colors.

If you have two versions of the same Pantone color in your document, you can specify one as an ink alias of the other, effectively combining both colors to separate to the same plate. The Ink Manager also contains a single button that you can use to convert all spot colors to process.
Preflighting in InDesign is the process of ensuring that all files and fonts are intact and current, and that all colors and print settings are correct. InDesign makes this process straightforward by providing a Preflight dialog box, accessed by choosing File, Preflight. Clicking on each of the items in the list on the left of the box (Summary, Fonts, Links and Images, Color and Inks, Print Settings, External Plug-ins) displays detailed information about those areas (see Figure 8.46).

The Package command (File, Package) provides a quick method for placing your InDesign file, all linked files, and any fonts used in the document into a single location (the same lists you saw when you chose File, Preflight, as described previously). You can then easily drag these files into an email or burn them onto a CD, confident that the recipient will have all the files needed to open, edit, and print your document.
The Cross-Media Export command (File, Cross-Media Export) packages the components of your document (text blocks, imagery, and so on) into a form (XHTML) that Dreamweaver (or other web tools) can use to create a web page (or series of pages) from your InDesign document content. You can also use the cross-media export feature to export to Adobe Digital Editions—an ebook format with a free reader available from Adobe.
Because InDesign is an aggregation application, you’ll find yourself needing to print from it more than all the other applications in the Adobe Creative Suite combined. To that end, the printing capabilities in InDesign (most of which are mimicked in Illustrator) are phenomenal. The following lists some of the more commonly used functions in the Print dialog box (shown in Figure 8.47).
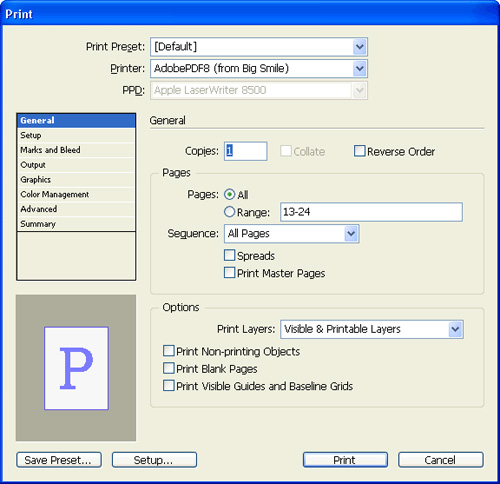
Although InDesign supplies all sorts of detailed options at print time, most people use only a handful, such as copies and page ranges.
Enter the number of copies you’d like in the Copies text box. Check the Collate button if (when printing more than one copy) you’d like the pages to come out in sets in order, as 1/2/3, 1/2/3, 1/2/3, instead of 1/1/1, 2/2/2, 3/3/3.
To print a subset of the pages in your document, choose the Range radio button and type in the pages you want to print. For contiguous pages, use a hyphen (for example, 2-4). For individual pages, use commas (for example, 1, 4, 7).
If you’re a tweaker when it comes to the Print dialog box, you’ll find the Print Presets invaluable. They enable you to store all the Print dialog box settings (save them by clicking the Save Preset button at the bottom of the dialog box) and retrieve them simply by choosing them from the Print Preset pop-up menu at the top of the Print dialog box.
If you click the Marks and Bleed item in the list at the left in the Print dialog box, you’re presented with an array of options for how various printer’s marks appear and how to handle bleeding (which is how far past the edge of the defined page ink should appear).
Clicking the All Printers Marks check box and then printing a test document is a great way to see what all these things look like and where they will appear on your document.
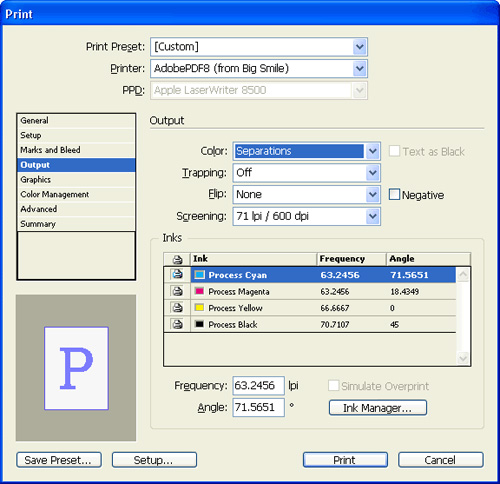
Separations are necessary for printing presses to reproduce color documents. Instead of one sheet being printed with all the colors on it, a separate sheet is printed for each color. Typically, you won’t be choosing this option unless you’re printing directly to plate or negatives (which are used to make plates for a printing press). To print separations, choose Output from the list on the left, and then choose Separations from the Color pop-up menu (see Figure 8.48).
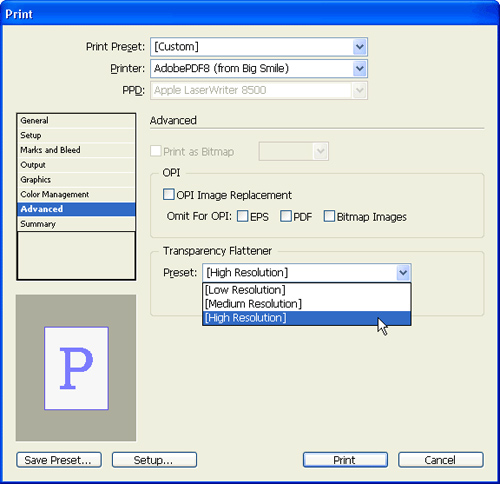
When printing files with transparency, flattening must occur to have the file print correctly. In the Advanced panel of the Print dialog box, you can specify a flattener preset that controls this flattening process, as demonstrated in Figure 8.49. The High Resolution setting results in the best quality output, but longer print times. For standard proofing, Medium Resolution is fine.
As you’ve probably gathered throughout this chapter, InDesign can be used to create almost any page layout that you can imagine. We’ll put that to the test later in the book with several projects that make heavy use of InDesign.
One important thing to take away from your reading is the consistency of the tools across the CS3 suite. Adobe has gone a long way towards standardizing the terminology, appearance, and functionality of tools across all of CS3. As you spend more time using each application, you’ll actually be learning skills that can be applied across the entire suite! Sweet!