Quality is never an accident; it is always the result of high intention, sincere effort, intelligent direction and skillful execution; it represents the wise choice of many alternatives. | ||
| --William A. Foster | ||
I recently began playing golf. (I’ve come to realize that up until a certain age, golf is the most boring, idiotic sport in the world, but suddenly one day you become infatuated with getting this little ball in a hole.) As a beginner, here I was with a bag full of different golf clubs, all with different numbers or names, and I had absolutely no idea when I was supposed to use which one. I also had no idea whether I was supposed to use all of them in any specific order. It was actually quite confusing.
As it turns out, each golf club is made for a specific purpose. A sand wedge is used to hit golf balls out of sand traps, drivers are used to hit balls long off the tee, and various irons can be used to give the ball just the right amount of lift or distance. A good golfer knows exactly which club to use in each situation.
Likewise, when using Adobe Creative Suite, a good designer knows exactly which program to use for each situation or task.
Some jobs call for using all the tools you’ve got. Yet some projects might require only one or two of them. The important thing to realize is that just because you have all of these tools, you don’t have to use all of them for every project. Knowing each and every feature of each and every program is also something you might not need (at least, not right away), so don’t get frustrated if learning all these applications seems like an insurmountable task. Getting a basic understanding of what each of these applications can do for you is enough to get you started—the rest will come in time.
Before you can start making decisions about which application to use for each kind of job, you have to know how each application works, what tools it has, and what its strengths are. The more you know about the tools you use, the easier it will be for you to decide how best to use them to your advantage.
In this chapter, we focus on each application by itself and the tasks that each can (and can’t) do. In Chapter 3, “The Game Plan: Developing a Workflow,” we discuss how to use all the Adobe Creative Suite applications together to complete full projects.
Adobe Bridge is in its second version (although it’s now named CS3 to better align with the rest of the products in the suite). It is released as a part of Adobe Creative Suite, although it is also included if you purchase individual versions of most Adobe applications.
Way back when Photoshop 7 was released, Adobe added a feature to Photoshop called the File Browser, which enabled users to quickly find the files they needed by using a visual interface. Turns out that people who used Illustrator, InDesign, and other Adobe applications wanted a way to easily browse files as well, and so Adobe completely pulled the file browser out of Photoshop and turned it into its own application, called Bridge.
Bridge acts as a hub for all the applications in the suite and actually goes far beyond simple image browsing. Adobe Bridge can perform complex searches, view and edit the metadata (descriptive information) of files without opening them, and perform time-saving tasks using scripts and functions across multiple files and applications.
You can launch Bridge as you would any other application, or you can launch it by clicking on the Go to Bridge button that appears in each of the suite applications (see Figure 2.1). Here’s a small sample of the kind of functionality you’ll find in Bridge CS3:
Use a variety of preview methods and settings so you can visually browse different file types, like a lightbox (see Figure 2.2).
Perform powerful searches across files using multiple criteria and file metadata. In addition, you can save searches as Collections so you can perform the same search again quickly.
Use a variety of workflow scripts to perform time-saving tasks such as batch processing files, tracing images, and building customized contact sheets.
Use Bridge Home to find tutorials, podcasts, and other valuable resources.
Synchronize color management settings across the applications in Adobe Creative Suite.
Set up and work with Version Cue servers and projects.
Search, browse through, and purchase royalty-free stock photo images with the Adobe Stock Photo service.

Now that you have a better understanding of what Bridge can do, let’s discuss when you should use it.
Bridge is perfect for a variety of tasks, including the following:
You just received a CD full of images from a photographer you’ve hired. Or you just downloaded all of the content from your digital camera. Now it’s your job to find just the perfect image for the project on which you’re working. With Bridge, you can narrow down your choices using hi-resolution previews and the capability to both rate and group images—all without having to physically open each file.
Just last week, you were working on some files, and now you can’t remember where you saved them. Using metadata as your search criteria, you can find all files that match a particular job number, font, or even a particular color.
You’re late for a meeting and have a folder full of images that need to be traced and converted to vectors in Illustrator. You can use Bridge’s workflow scripts to have your computer do the work for you while you head out to the meeting.
You’re working in InDesign and need to place some images into your layout. Rather than try to figure out what files you need from your hard drive or server, drag images directly from Bridge right into your InDesign layout.
You’re looking for a little bit of help using a feature with which you’re unfamiliar. Bridge can point you to the right resources, be it a tutorial, a movie clip, or even a podcast.
You’re working on a design piece and need the perfect image to convey your message. Through Bridge you can access Adobe Stock Photos where you can find, download, and purchase royalty-free images (see Figure 2.3).

Bridge CS3 is certainly faster than its predecessor, but it still isn’t as quick as navigating through files in Mac OS X Finder or Windows Explorer. So while there are tremendous benefits to using Bridge, there are times when you might choose to use your desktop instead.
Adobe Photoshop CS3 would have been Photoshop version 10 if Adobe had not renamed it for the Creative Suite.
What started out as a personal project for Thomas Knoll and his brother John in the late 1980s turned into Adobe Photoshop, an image-editing program that has since redefined how we look at computer graphics. Photoshop has since become a verb (“I just Photoshopped his head in the picture”). And Adobe has created other products, such as Photoshop Elements (a consumer version of Photoshop) and Photoshop Album (a digital photo album), an endeavor that almost makes the name Photoshop into a franchise itself.
Adobe Photoshop is what’s generally called a pixel-based (or raster-based) paint program. A raster is a matrix of dots, called pixels, that form to make a picture or an image (see Figure 2.4). The number of pixels in a raster image defines the resolution of that image. The resolution is usually specified as dpi (dots per inch) or ppi (pixels per inch); you’ve probably heard of images being described as 300dpi, for example. This means that for every inch in the raster image, there are 300 pixels or dots.

Think of it as a level of detail: To fit 300 pixels in 1 inch, you have to make them a lot smaller than the size of pixels you would need to fit 72 pixels in an inch. Having more and smaller pixels gives you better detail (see Figure 2.5). That’s why when you hear people talk about professional-quality images, they refer to them as high-resolution images.

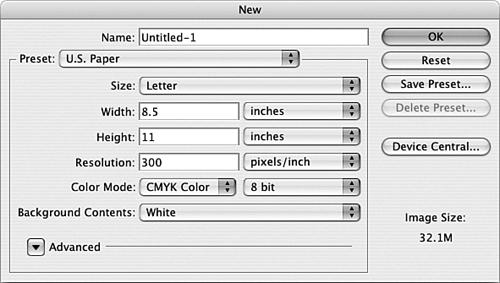
I know what you’re thinking: If higher-resolution images look better, let’s crank up the resolution to something like 1000dpi everywhere. Well, it’s a bit more complicated than that. First, the resolution of an image is determined when the image is created. When you scan an image using an image scanner, it gets scanned at a resolution that you set; when you take a photo with a digital camera, the photo is taken at a specific resolution; and when you create a new Photoshop document, you’re asked to determine what resolution you want the document to be (see Figure 2.6). After a resolution is set for an image, it can’t be changed. This means that if you enlarge a 300dpi photo to be twice its size (200%), the resulting image will be 150dpi. The pixels themselves get enlarged when you scale the photo, resulting in bigger pixels. What you get is usually less than ideal, resulting in a blocklike, jagged-edge image. When an image is such that you can see the individual pixels, it is called pixelated (see Figure 2.7).

Photoshop might rely on resolution, but its power lies in how it can manipulate those individual pixels. A wide range of pixel-based tools and effects gives you complete control over any image. By control, I mean the capability to change each and every pixel in your image. The following is just a sample of the kinds of tools and effects Photoshop provides:
Color correction and tonal filters to adjust the overall look of an image or to add special color effects, such as sepia tones
Cloning tools to manipulate or retouch images, such as adding or removing items from a photo
Blur and smudge effects to smooth out parts of an image or to add a sense of motion
Layers and alpha channels to assist in compositing multiple images into a single image, as in a photomontage or collage
Optimization settings and Web previews to easily specify image formats such as GIF, JPEG, and SWF
Slice tools to cut up images into HTML tables for better and more flexible design options
An animation palette to help create graphics that move for the Web
A Quick Selection tool and other selection tools to choose which parts of an image you want to adjust or work with
I’d like to focus on that last item for a moment. The one thing you’ll do most often within Adobe Creative Suite is select things. Until the day comes when computers can read our minds (and I constantly live in fear, knowing that day will come), we have to tell Photoshop—or any program, for that matter—what we want to do. More specifically, we need to indicate what part of the image (or the page, the illustration, and so on) we want to work with. As you’ll come to see, your options for the kinds of functions you can apply depend on your selection. It’s hard to change the font for some text if you have a blue circle selected. We discuss how to make selections as we cover each of the programs in Part II, “The Applications.”
Now that you have a better understanding of what Photoshop can do, let’s discuss when you should use this tool.
Photoshop is perfect for various tasks, including the following:
If a photograph is too yellow, too dark, or too blurry, or just needs adjustments in the highlights or shadows, you can access all kinds of tools and functions to make it just the way you want it—such as the cool Shadow/Highlight feature, for example. Likewise, blemished photos (ones with fingerprints, scratches, or cracks) or old, damaged photographs can be repaired with cloning tools or Photoshop’s spectacular Healing Brush tool.
Photo compilations such as collages and montages are perfect for Photoshop. With layers, masks, alpha channels, and more, Photoshop is well equipped to combine multiple images into single compositions.
Photoshop excels at web design. Many of the websites you see every day are designed using Photoshop. Because Photoshop allows for such precise control over the individual pixels of an image, designers can tweak pixel-based web graphics to perfection.
Web design is only half the job. Preparing graphics for the Web, such as optimizing, slicing, and adjusting the number of colors (otherwise called Web production) is just as important. Photoshop is perfect for this kind of work.
Do you consider yourself an artist? Photoshop is often used for digital painting and fine art. Attach a pressure-sensitive graphics tablet (such as a Wacom tablet) to your computer, and you can take advantage of Photoshop’s powerful brush engine to create paintings and original art.
Final art preparation and production is a necessary task in just about every project. Whether it’s resizing a photo, converting an image from RGB to CMYK or from a JPEG to a TIFF, or specifying spot colors for a duotone, Photoshop is up to the task. A perfect utility tool, Photoshop can both open and export a wide range of file formats.
As you can see, Photoshop can be used to perform a wide range of tasks, but keep in mind that there are certain things you don’t want to use Photoshop for. Because it’s pixel-based, you want to avoid using Photoshop for art that will be scaled to different sizes (logos, for instance). Things that might require a lot of editing or changes, such as text headlines, should also be avoided because it’s time-consuming to make those changes in Photoshop.
Adobe Illustrator CS3 would have been Illustrator version 13 if Adobe had not renamed it for the Creative Suite.
After inventing PostScript, a computer language specifically tailored for printing graphics on printers, John Warnock devised a program that would enable people to draw in PostScript. This became Adobe Illustrator. The first software program that Adobe sold, Illustrator was released in 1987 and has since come a long way from being a simple vector drawing program. It now does great 3D effects, transparency, web graphics, vector tracing, and more.
Described as a vector-based drawing program, Illustrator uses mathematical outlines (called Bézier curves) to define paths and shapes. Unlike Photoshop, which works with individual pixels, Illustrator is object based, meaning that you work with things such as shapes, lines, and text objects instead of a bunch of little dots. Don’t get the idea that Illustrator is a kids’ drawing program, though—nothing could be further from the truth. Illustrator has the capability to create art that is so photo-realistic, you’d think it was created in Photoshop (see Figure 2.8).

Let’s take a deeper look at what vector graphics are and how they work. In the early 1960s, a fellow by the name of Pierre Bézier developed a computer drawing system that consisted of points and paths to help design aircraft and cars (those paths would come to be known as Bézier paths). Think of the points and paths like those connect-the-dots exercises you did as a kid (although, if you’re anything like me, you still enjoy doing them). There are dots, which we call anchor points, and the lines that connect them, which we call paths. In the world of vectors, there are two kinds of paths, closed and open (see Figure 2.9). A closed path is one in which the path starts at one anchor point and then finishes at that same anchor point, whereas an open path doesn’t.
At a basic level, every vector object has two attributes, a fill and a stroke (see Figure 2.10). The fill is the part that fills up the area inside the path, and the stroke is the actual path itself. You can apply colors and settings to the fill of an object, the stroke, or both.
You’re probably asking yourself how Illustrator can create complex artwork if all it does is connect straight paths among all these anchor points. Good question. Well, it turns out that not all anchor points are created equal. In fact, Illustrator employs three kinds of anchor points (see Figure 2.11): corner points, smooth points, and combination points. Each kind controls how the paths that connect to it are drawn.

A vector shape can be made up of any combination of anchor points, so you can already get an idea of how precise vector graphics can be (see Figure 2.12). Illustrator’s Pen tool enables you to draw these vector shapes, as well as edit existing vector paths.

You’ll find a lot more than just the Pen tool in Illustrator, however. Here’s a small sample of the kinds of tools and features you’ll find in Illustrator:
Illustrator has spectacular 3D and artwork-mapping capabilities, making it easy to create not only the coolest art, but also realistic packaging mockups.
Many designs utilize parts of artwork repeatedly (logos, design elements, and so on), and Illustrator manages these artfully with the Symbols palette. Special tools let you spray symbols on your page, taking creativity to a new level.
A tracing feature enables you to convert pixel-based images into vector artwork.
A Save for Web feature enables you to export web graphics in just about any web format you might need, such as GIF, JPEG, SWF, or SVG.
A seemingly endless supply of vector drawing tools makes it as easy as possible to help you draw art, including Pen, Pencil, and Brush tools. There is also a Polygon tool, a Line tool, an Arc tool, and a Grid tool—even a vector Flare tool.
You’ll find a wide range of what Illustrator calls Live Effects, such as Drop Shadow for adding those nice soft shadows, Feather for giving vector shapes a soft edge, and many other effects—even Photoshop ones such as Gaussian Blur.
Illustrator’s Pathfinder palette makes editing vector shapes a breeze by giving you a plethora of options that let you combine shapes, cut holes in them, and more, all at the click of a button.
Illustrator contains a wealth of text options that enable you to set the perfect line or paragraph of type, as well as have text run along a free-form path.
Powerful Enveloping, Warp, and Liquefy tools enable you to twist, squeeze, bend, and distort art to your heart’s desire.
A Mesh tool and a Blend tool enable you to achieve painterly effects and smooth blends and gradations between colors—all vector, all the time.
Illustrator has an innovative Variables palette for helping to generate artwork automatically using scripting and a database.
Now that you have a better understanding of what Illustrator can do, let’s discuss when you should use it.
Illustrator is perfect for various tasks, including the following:
Most people use Illustrator for logo design and corporate identity. Because logos are continually scaled to different sizes (anywhere from a button on a website to a highway billboard or the side of a blimp), creating them as vector artwork is a must.
As if the name of the program wasn’t enough of a hint, Illustrator is the tool of choice for fine art and illustration. Illustrator’s diverse and flexible toolset allows for a wide variety of stylized artwork. Many of Illustrator’s tools also have support for pressure-sensitive tablets, to allow artists to put their ideas on screen easier, with more control.
With a full selection of text tools and the capability to place raster images into a file, Illustrator is a great single-page layout tool for creating flyers, advertisements, or sales sheets.
Walk down the aisle of your favorite supermarket and take a look at all the packages on the shelves. Chances are, just about every package you see was created with Illustrator. Package design demands unlimited creative options, custom color support, and reliable printing—all attributes of Illustrator.
Because most graphics on the Web are rasters, most people don’t think of Illustrator when they think of web design. The truth is, Illustrator is a great tool for designing web graphics. Illustrator’s Save for Web feature lets you export optimized web graphics directly, or you can bring art directly into Photoshop or Flash. An added benefit is that if you ever need to use those graphics for print, you don’t need to re-create the art at a higher resolution—you can use it right from Illustrator for just about any task.
In Illustrator, you can open and edit Illustrator files, EPS files (PostScript), PDF files, SVG (Scalable Vector Graphics) files, DXF/DWG files (AutoCAD)—even native FreeHand and CorelDRAW files. Illustrator can also export files in all kinds of formats, making it a valuable production and utility tool. Between Photoshop and Illustrator, you’ll be able to open and work with just about any kind of file you might get your hands on.
Graphs and charts are used to graphically represent numbers or other data that might be hard to grasp just by looking at a bunch of numbers. Illustrator’s Graph tool enables designers to quickly create eye-catching and appealing infographics that can be incorporated into annual reports, newsletters, and business presentations.
Going beyond the static image, Illustrator can convert layered and blended art into art that animates or moves when exported as a Flash (SWF) file. Illustrator is also used for creating art that is used in traditional animation such as television cartoons and animated motion pictures.
Maps, environmental graphics (such as signs), and architectural drawings require Illustrator’s precise vector tools and unique capability to structure art using layers, sublayers, groups, and subgroups.
It quickly becomes obvious that Illustrator is a powerful application that can perform a wide range of tasks. Keep in mind, however, that Illustrator can contain only one page per document, so it isn’t ideal for layouts such as newsletters, books, magazines, and other documents that require several pages. Although you can place raster images into an Illustrator document, you can’t edit the individual pixels, such as taking red eye out of a photo.
Adobe InDesign CS3 would have been InDesign version 5 if Adobe had not renamed it for the Creative Suite.
There is a lot of history behind InDesign. It started way back in 1986, when a company called Aldus introduced PageMaker, a ground-breaking program (most likely responsible for the era that would define the term desktop publishing) that enabled users to lay out pages on a computer screen and set type. As PageMaker evolved, it lost ground in the professional design community to competitor QuarkXPress. Adobe took ownership of PageMaker in 1994, but the technology that it was based on was limited in what it could do. Adobe began work on what it dubbed “the Quark Killer,” which was code-named K2. When K2 was finally named InDesign 1.0 and launched in 1999, it was greeted with little fanfare. Sure, there was hype, but being a version 1.0 product, it simply had too many issues that prevented people from using it. When Adobe released InDesign 2.0 in January 2001, it was a whole new ballgame.
Fast-forward to the present, and the battle ensues between QuarkXPress and InDesign—although, if you read the press reviews or the various forums on the Internet, Adobe already seems to have won the battle. There is a definite turn of the tide in today’s industry, as both designers and printers continue to move to adopt InDesign.
InDesign is generally called a page-layout program. Also dubbed an aggregate tool, InDesign basically enables you to gather content that was created in other applications and position the elements on a page to create a completed design. For example, to create a page of a catalog, you’d set up a page in InDesign, place a product photo you touched up in Photoshop, place the company logo you created in Illustrator, and import some text from Microsoft Word (see Figure 2.13). When you had the elements on the page, you could experiment with your design, moving the items around and adjusting them to complete your page design.

Whether you’re producing a magazine, a newsletter, or a brochure, nothing is more important than the way the text looks on your page. InDesign has many strengths, but typography is definitely first on that list because it was built to set perfect type quickly and consistently.
A professional designer pays close attention to how a paragraph of text reads. Things such as kerning and tracking (the amount of spacing between letters and words), justification (how text lines up to the margins), leading (pronounced “ledding,” the amount of space between lines), and the number of hyphens can make the difference between a block of text that’s easy to read and one that gives the reader a headache (see Figure 2.14). Various special characters such as curly quotes and ligatures (special character combinations such as fi, ffi, fl, and ffl) can really make an impact on the visual appearance of text as well.

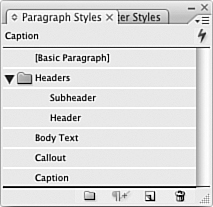
Adobe InDesign offers features such as paragraph styles that enable you to store all the information we just talked about, as well as specify font attributes, size, color, and more—all in a setting you can apply with one click of a button. For example, you can have paragraph styles (see Figure 2.15) set up for how you want a headline, body text, or a caption to look and have any text in your document match those attributes instantly.
What really makes InDesign shine above the competition is how it fits with all the things you need to do in the design process (something called workflow), which we talk about in intimate detail in Chapter 3. But just to give you an idea of what we’re talking about, InDesign understands native files from other applications in the Creative Suite, so you can easily drop native Illustrator, Photoshop, and PDF files into your InDesign layout. InDesign also exports PDF files directly, letting you effortlessly send proofs to clients or co-workers for review and approval.
Of course, InDesign contains a lot more than professional type tools. Here’s a sample of the kinds of tools and features you’ll find in InDesign:
InDesign has a powerful table editor for quickly laying out tables that can flow from one page to another.
Text-wrap controls can help create designs in which text follows the irregular shape of images, as well as other creative options.
InDesign’s Story Editor enables you to make quick edits by displaying text in a word processor–like window, while it updates live in your layout.
To make it easy, fast, and reliable to set type consistently, InDesign has paragraph and character style sheets.
You don’t have to worry about how good your spelling is because InDesign contains a handy spell checker.
InDesign offers the capability to apply such transparency effects as Photoshop-style blend modes and soft drop shadows.
OpenType is a new standard for type, and InDesign can take full advantage of all the features that OpenType brings. InDesign also has a handy Glyph palette to help you find just the glyph (or character) you need from any font.
InDesign saves you time with an innovative Edit Original feature, which enables you to quickly edit and update art that was placed into a layout.
When it comes time to print your file, InDesign has a full-featured Print dialog box that enables you to print color separations. InDesign even has an onscreen Separation Preview feature.
InDesign features an Export command for quickly creating PDFs that you can send to others for review.
Now that you have a better understanding of what InDesign can do, let’s discuss when you should use it.
InDesign is perfect for various tasks, including the following:
Product brochures and folders are perfect layout tasks for InDesign. These types of jobs normally include placing content from Photoshop and Illustrator, and demand consistent typography and table layouts.
InDesign has specific long-document support that makes it great for designing and laying out books. Besides all the benefits you get with professional-looking typography, InDesign can generate a table of contents automatically, can assist in generating indexes, and has a feature that will “stitch” several files together (individual chapters) to create an entire book with correct page numbering throughout.
Magazines and newspapers usually require quick assembly but also demand the capability to create eye-catching designs that will generate interest in subscribers and readers. InDesign gives designers creative features such as transparency effects, resulting in more creative options.
Most advertisements you see don’t have much text (people just don’t seem to have time to read anymore), but that doesn’t mean you can’t use InDesign to design great ads. InDesign can export files directly in the PDF/X-1a standard, which is used in the advertising industry.
Some documents, such as newsletters and periodicals, are based on templates and are published very often, which makes them perfect for the powerful text features in InDesign. The built-in Story Editor makes these specific tasks easy to do because you don’t need to scroll through complex layouts to change a few words of text.
Catalogs—you know, the ones you receive in the mail almost daily—utilize just about every aspect of what InDesign can do (complex layouts, tables, text treatments, and more). And InDesign’s high-resolution preview mode enables you to position photos and art precisely, and gives you a better idea of what the entire page will look like when printed.
Whether you’re designing a CD cover for the latest best-selling pop sensation or creating a DVD cover for your recent family vacation to San Jose (to visit Adobe, of course), InDesign helps you specify custom page sizes, bleeds, trim marks, fold marks, and more to ensure that your job prints as it should.
As technology pushes the publishing industry forward, standards such as XML are becoming even more important. InDesign’s capability to automatically flow and maintain structured content makes it perfect for XML-based workflows.
At the end of the day, printing your job flawlessly is most important. InDesign contains a wealth of features to ensure quality output every time, including the capability to preview color separations. InDesign makes for a wonderful print production tool.
After discussing how InDesign is used, you should have a better understanding of why it’s called an aggregate tool, gathering content from different sources to complete a layout. Although InDesign is also capable of handling complete projects from scratch on its own, it is usually better to use InDesign’s Edit Original feature to link graphics and edit them in the apps that handle specialized tasks better. Don’t mistake InDesign for a web design tool though—web design is better left to applications like Dreamweaver.
Adobe Flash CS3 would have been Flash version 9 if Adobe had not renamed it for the Creative Suite.
In the mid 1990s, the Web was almost completely pixel based. The most common image formats were low-resolution GIF and JPEG files, making for low-quality printouts of web pages, and few options for interacting with those images on screen. A company called FutureSplash created a web-browser plugin to allow for the display of vector-based images on the Web. More importantly, the format was also interactive, allowing designers to create animations.
In the late 90s, Macromedia bought FutureSplash and named the product and the technology Flash. Flash quickly grew in popularity because of its capability to create interactive animations with sound while keeping file sizes relatively small. In addition, Flash had a scripting language called ActionScript, which allowed designers and developers to create highly interactive content, such as online games and complex interfaces. It is rumored that one of the driving forces behind the merger of Adobe and Macromedia was Adobe’s desire to acquire Flash and its technology.
At the core, Flash is a web-based animation tool. But defining it as such would be overlooking what Flash really offers, which is a development platform for interactive design. That means Flash can be used to develop content for all kinds of uses—and not only for the Web, either. Flash is being used today to drive user interfaces and applications on cell phones and in cars. Tomorrow it could be your microwave or your wristwatch. And many components of Flash and what it supports, including video capabilities, help drive popular sites such as YouTube. But before we go too far, let’s begin with a basic understanding of what Flash itself actually does.
Flash uses a frame-based animation model. That means there’s a timeline with keyframes that determine how content changes and moves (see Figure 2.16). Because Flash uses vectors for its art, you can easily manipulate objects and layers much like you can in Illustrator. In fact, you can even draw elements in Illustrator and then bring them into Flash to make them move. After you’ve created your artwork, you can also specify how users will interact with your artwork. For example, you might use ActionScript to determine that when a user clicks and drags on an object, a music clip starts playing. You can even use Flash to develop an online gaming experience.

In reality, Flash is an application that serves two kinds of people. Designers look at Flash as a way to extend their creative vision, and to create artwork that goes beyond the capabilities of the printed page. On the other hand, developers see Flash as a powerful platform that they can use to develop interactive applications (see Figure 2.17), interfaces, and a new generation of Rich Internet Applications (commonly referred to as RIAs).

Flash content (.swf files) does require the Adobe Flash Player to view it. The player is included in the installers of today’s most popular web browsers, however, and recent data released by Adobe shows that 98% of computers have the player installed. To take advantage of the latest Flash files and ActionScript 3.0 though, users must download and install the latest version of the Adobe Flash Player (a free download from Adobe’s website). Adobe was also recently awarded an Emmy for its Flash Video technology, as many networks have moved to the Flash platform to deliver their TV shows and broadcast content online and on mobile devices.
With this introduction, let’s take a look at some of the features and functions that are available in Flash:
The vector-based drawing tools in Flash allow you to create content that can be scaled in a web browser without loss in quality or detail.
Flash is built on a powerful scripting language called ActionScript, which allows you to develop logic and higher levels or programmatic interactivity. Flash CS3 features the new ActionScript 3.0 language, which is more powerful and easier to use than previous versions.
Flash enables you to build animated content via the use of a frame-based timeline. This allows you to determine how elements move, when they should appear in a scene, and how the elements should interact with each other.
At the core of its graphics engine, Flash utilizes symbols, which is a way to create a graphic once in a document, and then to have all other instances of that graphic simply reference that one original copy. In this way, you can create complex designs that take up little file space.
Symbols can contain all kinds of attributes including animation, rollovers, links, and even sound. So user interface elements can animate and make sounds as you interact with them.
You don’t have to create all of your content in Flash. You can create artwork in both Photoshop and Illustrator, and then seamlessly move that content into Flash. For example, symbols can be defined in Illustrator first, and then be copied and pasted, with all settings intact, directly into Flash.
Flash can import video content and contains a variety of encoding options so you can set your video to play back as you specify.
Now that you have a better understanding of what Flash can do, let’s discuss when you should use it.
Flash is perfect for various tasks, including the following:
When you want to give your website the perfect touch, you can use Flash to design and create a fully interactive user interface, with features such as animated buttons and elements that hide and show themselves as the user moves the mouse pointer around the screen. Most importantly, you can also integrate music and sounds to make a truly complete experience.
Flash does a wonderful job when it comes to creating interactive web banners. When you need to create ads that are small in file size and that need to grab people’s attention, Flash offers the tools to make it happen quickly and easily.
Just because Flash can create complete interactive experiences doesn’t mean you can’t use it to create small, simple illustrations. Flash is perfect for adding helpful and interesting graphics to your website, especially if you consider that graphics and text print out looking much better when using Flash than they would if you were using, for example, animated GIFs.
A Flash-based presentation is a great way to promote yourself, your business, or your project. Flash presentations can be viewed over the Web or offline, giving you the ability to create highly interactive content that goes far beyond an ordinary slide presentation.
The Internet is filled with online games. Using Flash and ActionScript, you can design and develop interactive games.
Although it’s easy to get started using Flash, learning to take advantage of advanced features and to write ActionScript code can be daunting, especially if you’ve never written scripts before. Flash does offer an incredible array of features and options, but there are also times when you might find it easier to export Flash content directly from Illustrator or Photoshop instead. As with anything, it all depends on the needs of the particular job.
Adobe Dreamweaver CS3 would have been Dreamweaver version 9 if Adobe had not renamed it for the Creative Suite.
Whether or not you believe that the Internet was invented by Al Gore, the World Wide Web has pushed professional publishing and design to a new level. The tools to help publish rich web experiences have evolved as well. Back in the day (um, like several years ago), creating web graphics and publishing websites of any kind required an intimate knowledge of HTML, Unix-based systems and commands, and more. Hypertext Markup Language (HTML) is the code that defines how a web page should appear. (We talk in more detail about HTML later in this book.) At the time when Internet IPOs meant instant wealth and early retirement, a slew of WYSIWYG (what you see is what you get) HTML editors were released. Similar in concept to PageMaker or QuarkXPress, these programs, such as Adobe PageMill, attempted to allow designers to easily lay out pages without having to learn or know how to code HTML. There weren’t many success stories. A promotional QuarkXPress poster at the time proclaimed, “HTML is just like typesetting—yeah, like typesetting from 20 years ago.”
Macromedia set out to change that by introducing Dreamweaver—an application that was geared toward the development of websites. Quickly becoming the industry-standard website tool because of its support for web standards and professional coding features, Macromedia Dreamweaver became Adobe Dreamweaver when the two companies merged.
At first glance, Dreamweaver seems like an incredibly complex program, but on closer inspection, it begins to make a lot of sense. That’s because Dreamweaver takes care of just about every aspect of the process, from planning a website to designing it and publishing it to the Internet. If you had to make a comparison with a program such as InDesign, you’d have to give InDesign storyboards for planning your entire project, and then you’d need to add a printing press, to boot.
Let me explain. One of the most incredible aspects of the World Wide Web is how quickly you can distribute information. The Web is a medium that offers the capability to publish information so quickly—even in real time—to anywhere in the world. This can happen because the information is electronic; publishing information on the Web is as simple as copying a file from your computer to another computer (a server or “host”). Dreamweaver possesses the tools to perform all the steps involved in this process. There are site-layout tools to help you plan your website, a full range of web page layout tools, and a complete set of tools to upload your site to a server.
Much like Flash, Dreamweaver lives a double life. As a design tool, it allows you to lay out and design pages for your website. On the other hand, Dreamweaver is an extremely powerful web development tool that allows developers to write scripts and code (see Figure 2.18). Even more important, however, Dreamweaver embraces open standards like Cascading Style Sheets (CSS), Dynamic HTML (xHTML), and a new Spry Framework that allows increased website interactivity with little upfront work. Dreamweaver also features an impressive browser check feature so you can be sure that your site will appear correctly on any web browser. And Dreamweaver is linked to Adobe’s new CSS Advisor website, so even if you aren’t familiar with some of the latest web standards, you can quickly learn what you need (in addition to what you’re already learning in this book, of course).

The final part of the web publishing process involves uploading your website to a server, a process called taking your site “live.” Dreamweaver has a full range of site-management features (see Figure 2.19) that make it easy to track changes across your entire site, as well as manage updates and modifications. Basically, Dreamweaver knows exactly what needs to be uploaded when you modify your website and can do so at the click of a button. Dreamweaver also makes it easy to administer a site so that you can have several people contributing to or updating different parts of your site simultaneously.

It’s important to realize that some web design firms break up these processes into completely different departments. Site designs are done by information architects, web designers create the look of the site, and web developers oversee the technical aspects of coding and maintaining the site. Dreamweaver can handle all these tasks if you’re a department of one, but if you are part of a team, you can focus on just the part of Dreamweaver that you need. Of course, Dreamweaver has a whole range of features, some of which we mention here:
To help more and more people develop their sites with the added benefit of CSS, Dreamweaver contains a wealth of CSS-based templates and starter documents. Not only do these files help you get started quickly, the templates contain a wealth of comments that explain how to customize the settings to your exact needs and specifications.
With an added level of integration, you can copy and paste content from Photoshop directly into your page design in Dreamweaver. And if changes need to be made, you can double-click the art to edit the original layered image content right in Photoshop.
Dreamweaver’s Insert bar makes it easy to add all kinds of elements to a site. As an example, you can add Spry elements, like sliding buttons or accordions, to jazz up a web design and improve the page’s usability simply by dragging an icon into your page.
For publications published simultaneously to print and to the Web, Dreamweaver and InDesign can share XML content.
A Browser Compatibility Check feature checks your page and identifies any issues that might exist on specific browsers. For example, Dreamweaver might inform you that a page won’t look correct when viewed in Internet Explorer 6 on Windows. Dreamweaver will not only show you exactly where in your code the problem exists, it will even offer advice via the CSS Adviser website on how to solve the issue.
Dreamweaver has full File Transfer Protocol (FTP) capabilities, enabling you to upload your site directly to your web server.
A website has many components, such as HTML pages, scripts, and linked graphics. Dreamweaver enables you to keep track of all of these in a single place.
Paired with Adobe Contribute (available as part of Adobe Creative Suite 3 Web Premium software or as an individual product), you can set up administration rights and have other people perform updates to the website.
Now that you have a better understanding of what Dreamweaver can do, let’s discuss when you should use it.
Dreamweaver is perfect for various tasks, including the following:
Management is an extremely important part of maintaining a website. Dreamweaver does this exceptionally well by keeping track of links. For example, say that you change the name of a web page. Any link that might already link to that page needs to be updated with the new name. Dreamweaver automatically updates these links for you (free of charge, I might add).
As alluded to earlier, Dreamweaver excels in giving the designer the capability to lay out web pages, allowing for the placement of images copied right out of Photoshop. This makes it possible to quickly implement your web designs.
Although you can use Photoshop, Flash, and Illustrator to create high-impact designs for the Web, you can use Dreamweaver alone to create more straightforward and simple web designs. This is helpful for creating quick sites for internal purposes or for websites for which getting a specific look isn’t a requirement.
Have a website already? Dreamweaver can create new websites from scratch, or it can import a website that already exists, enabling you to take advantage of Dreamweaver’s site-management features.
For those who still like to write their own code, Dreamweaver can serve that purpose very well. Dreamweaver is a great tool not only for HTML coding, but for writing scripts as well.
Dreamweaver has a full complement of tools for creating online forms, including adding value fields, pop-up lists, submit buttons, and more, making it a snap to create feedback forms, order forms, and the like.
If you’ve never been involved with web design, it might take some getting used to. Overall, though, the concepts are similar to those you’ve seen in the print world. Of course, just because Dreamweaver can design pages doesn’t mean you should use it to design your next print brochure. As a specialized tool for all that the Web brings to the table, Dreamweaver will fit your needs today and for the future as well.
Adobe Acrobat doesn’t have the same CS3 moniker as the other applications in the Suite, mainly because it plays a large role as an enterprise-level business application as well as a graphics tool. In addition, while Acrobat Professional is an integral part of Adobe Creative Suite, it was developed according to a different timeline and was actually released several months before Adobe Creative Suite 3 was even announced.
In an effort to be able to view a document—as it was carefully designed—on just about any computer in the world, John Warnock and the folks at Adobe came up with the Portable Document Format (PDF). Acrobat would be the name of the product that could display these PDF files, which would look right, fonts and all, on any computer. Adobe created a version of Acrobat called Acrobat Reader, which it gave away free of charge. The full version of Acrobat was still needed to create PDF files (a process called distilling), so the company made money selling the full version of Acrobat—and people who created these documents were assured that anyone could view those documents with the free reader. Nice concept, eh?
Chances are, you’ve seen a PDF file before. Of course, the initial benefit of working with PDF files is that you’re safe knowing that what you are creating on your screen will look right on someone else’s computer. There are many other benefits, such as the capability to password-protect your PDF file so that only the people who are supposed to see it are able to. Adobe Acrobat 8 Professional basically enables you to take control of your PDF files.
Let’s start from the beginning. Acrobat enables you to create PDF files in several ways:
You can print your file from any application to an Acrobat Printer, which was installed when you installed Acrobat.
You can use the Distiller part of Acrobat (it’s a separate application that comes with Acrobat) to create PDF files from any PostScript file.
You can open just about any kind of file in Acrobat Pro and export it as a PDF. You could open existing PDF files as well if you wanted to save the PDF with different settings than it already had.
Of course, you can also export or save PDF files directly from any of the other applications in the Adobe Suite.
When you have a PDF file, Acrobat can do many things with it. What’s interesting to note is that many people aren’t aware of even half the things Adobe Acrobat can do (see Figure 2.20). Most people use it like the free Adobe Reader, to view and print PDF files.

But let’s explore how we use PDF files today and see how you can use tools such as Acrobat Pro to make your life easier (I’m sure you’ve heard that one before...). You create a PDF to send to a client or a co-worker for approval. Inevitably, there will be corrections, comments, changes, and such, so the one reviewing the document prints the file, makes some comments, and faxes it or hand-delivers it back to you. Or the person might send you an email describing the desired changes. This process might repeat itself several times before the job is ready to go. But who are we kidding here? If your job is anything like mine, at least 5—maybe even 10—people need to review that document. The next thing you know, you have emails and faxes out the wazoo, and you can’t even keep track of who said what.
Acrobat has a set of commenting and reviewing tools that enables users to make comments directly in the PDF file (see Figure 2.21). For example, you can highlight or strikethrough text, add sticky notes, draw arrows, and add scribbles, as well as add dynamic “stamps” such as Approved or Rejected, with time and date stamps that note exactly when the file was approved or rejected. The client simply indicates changes in the PDF and sends the file back to you. What’s better is that Acrobat lets you merge the comments of several files into a single file. So if your document is being reviewed by 10 people, you can look at a single PDF file that has comments from everyone. Each comment is identified by who created it and when it was created (see Figure 2.22). You can even print a summary of all the comments in a specific PDF—great for billing purposes.

By the Way
Comments are stored in a separate “layer” on a PDF file, called Annotations. This not only keeps the original data intact, but it also enables you to save the comments into a separate file (called an FDF file). This is extremely useful when dealing with large PDF files. For example, say you send a 10MB PDF file of a catalog to a client for comments. The client can make comments and then send back just the FDF file (see Figure 2.23), saving the time it would take to keep sending that 10MB file back and forth over email.

Commenting and reviewing are just a sample of the many features you’ll find in Adobe Acrobat 8 Professional. Here’s a partial list of the tools and features you’ll soon find yourself using in Acrobat Pro:
Acrobat has a fantastic feature that enables you to kick off a review process via email that automatically tracks comments and makes it easier for people who prefer to do things via email.
With a full-featured Print dialog box, Acrobat can print any PDF file (with correct authorization), including creating color separations for prepress.
Acrobat Pro has a Preflight tool that helps ensure that your PDF file is ready for print and that highlights the problematic areas based on preset criteria.
For electronic forms and to indicate approvals, Acrobat has the capability to add digital signatures to a file.
You can export PDF files to conform to any of several PDF standards, such as PDF/X-1a and PDF/X-3.
Acrobat contains touch-up editing tools that enable you to modify text and perform certain edits to PDF files.
For creating eForms, Acrobat has the capability to create form fields, buttons, and more.
Acrobat has the capability to link or even embed interactive content into your PDF files, such as QuickTime movies and Flash (SWF) files.
A Search tool enables you to quickly find the text you’re looking for throughout an entire PDF file.
Acrobat can encrypt files with passwords that enable you to control whether the document can be printed or changed. You can even use a process called Certification that enables you to specify even higher levels of security.
Now that you have a better understanding of what Acrobat Professional can do, let’s discuss when you should use it.
Acrobat is perfect for various tasks, including the following:
Acrobat is used for viewing PDF files (of course).
Acrobat is the best tool for creating or resaving PDF files for various purposes, such as for PDF/X-1a or PDF/X-3 compliance, or for web-optimized viewing.
With the capability to select and edit text as well as art elements, Acrobat is a great tool for making small edits or for “touching up” PDF files.
As mentioned earlier, Acrobat is just the tool you need for commenting and reviewing, getting approvals, and more. The email–based review process makes it easier than ever to get people involved in the process as well.
How can you be sure that your PDF files are ready to print? You can create your own Preflight profiles and check each PDF, as well as use Acrobat’s onscreen Separation Preview feature to ensure that your color separations are correct. Of course, you can (and should) use Acrobat to print all your PDF files.
As eForms become more popular, you can use Acrobat to fill out PDF-based forms. Not only is Acrobat a great way to work with internal forms in your company (job tickets, for example), but you also can use Acrobat to fill out forms online, such as with tax and insurance forms.
Use Acrobat to digitally sign documents or authorize PDFs by certifying them. In the United States, laws have been passed to allow such signatures to be legally binding, enabling people to digitally sign mortgage documents, contracts, tax forms, and more.
Protect your files by assigning passwords to limit how your PDF files can be used. Different levels of security allow for either printing the file only as a low-resolution proof, or not allowing printing or copying at all.
Chances are, you’re probably a bit surprised at (if not overwhelmed by) just how much Acrobat Pro can do. Don’t worry, we go into a lot more detail about each of these features in Chapter 11, “Using Adobe Acrobat 8 Professional.” Although Acrobat can perform certain edits to PDF files, if you have more complex editing to do, you’ll want to make those changes in the application the file was originally created in, if at all possible. As a last resort, you can always open a PDF in Adobe Illustrator (one page at a time).
We’ve discussed each application in Adobe Creative Suite in detail, noting where each one came from, the specific features that each can be relied on to perform, and examples of some of the key features they possess.
You should now have a clear understanding of what each of the individual applications in Adobe Creative Suite 3 Design Premium does. In the next chapter, we discuss how all these programs work together to help you complete projects (and spend your weekends at home instead of at the office).