
Software reverse engineering, also known as reverse code engineering (RCE), is the art of dissecting closed-source binary applications. Unlike open source software, which theoretically can be more easily peer-reviewed for security, closed source software presents the user with a “black box.” Historically, RCE has been performed on Windows platforms, but there is now a growing need for expert Linux reversers as well, as we will explain in Chapter 3.
RCE allows you to see inside the black box. By disassembling a binary application, you can observe the program execution at its lowest levels. Once the application is broken down to machine language, a skilled practitioner can trace the operation of any binary application, no matter how well the software writer tries to protect it.
As a security expert, why would you want to learn RCE? The most common reason is to reverse malware such as viruses or Trojans. The antivirus industry depends on the ability to dissect binaries in order to diagnose, disinfect, and prevent them. In addition, the proliferation of unethical commercial spyware and software antipiracy protections that “phone home” raises serious privacy concerns.
Tip
In this chapter, we work on desktop Windows operating systems. Since Windows is a closed source and often hostile platform, by Darwinian pressure Windows RCE has now matured to the pinnacle of its technology. In subsequent chapters, we touch upon the emerging science of RCE on other platforms, including Linux and Windows CE, in which RCE is still in its infancy.
The legality of RCE is still in question in many areas. Most commercial software ships with a “click-through” end-user license agreement (EULA). According to the software manufacturers, clicking “I AGREE” when you install software contractually binds you to accept their licensing terms. Most EULAs include a clause that prevents the end user from reverse engineering the application, in order to protect the intellectual property of the manufacturer. In fact, the Digital Millennium Copyright Act (DMCA) now provides harsh criminal penalties for some instances of reverse engineering.
For example, those of us who spoke at the Defcon 9 computer security conference in Las Vegas in July 2001 were shocked and distressed to hear that one of our fellow speakers had been arrested simply for presenting his academic research. Following his speech on e-book security, Dmitry Sklyarov, a 27-year-old Russian citizen and Ph.D. student, was arrested on the premises of the Alexis Park Hotel. This FBI arrest was instigated by a complaint from Adobe Systems, maker of the e-book software in question.
In a move that seemed to give new legal precedent to the word, when obtaining the warrant the FBI agent adduced written proof that Defcon was advertised as a “hacker” conference and asserted that the speakers must therefore be criminals. However, the arresting FBI agent neglected to note in this warrant request that other high-ranking law enforcement officers, members of the military, and even fellow FBI agents have been featured speakers at this same “hacker” conference and its harbinger, Black Hat. In fact, Richard Clarke, Special Advisor to President Bush for Cyberspace Security, spoke at Defcon the following year.
Sklyarov helped create the Advanced eBook Processor (AEBPR) software for his Russian employer, Elcomsoft. According to Elcomsoft, their software permits e-book owners to translate Adobe’s secure e-book format into the more common Portable Document Format (PDF). Since the software only works on legitimately purchased e-books, it does not inherently promote copyright violations. It is useful for making legitimate backups in order to protect valuable data.
Sklyarov was charged with distributing a product designed to circumvent copyright protection measures, which was now illegal under the DMCA (described later in this section). Widespread outcry by academics and civil libertarians followed, and protests gained momentum outside of Adobe offices in major cities around the world. Adobe, sensing its grave error, immediately backpedaled—but it was too little, too late. The damage had been done.
Sklyarov was subsequently released on $50,000 bail and was restricted to California. In December 2001, he was permitted to return home to Russia with his family, under the condition that he remain on call to return to the U.S. and testify against his employer, Elcomsoft. After a painful legal battle, both Sklyarov and Elcomsoft were completely exonerated.
There still may be some breathing space left in the law as DMCA has a limited provision allowing “security experts” to circumvent protection schemes in order to test security. However, the interpretation of this clause remains nebulous.
“Modern” RCE started with programmers who circumvented copy protection on classic computer games, such as those written for the Apple II in the early 1980s. Although this trend quickly became a way to distribute pirated computer software, a core of experts remained who developed the RCE field purely for academic reasons.
One of the legendary figures of those heady days was the Old Red Cracker, (+ORC). Not only was +ORC a genius software reverser, he was a prolific author and teacher of the subject. His classic texts are still considered mandatory reading for RCE students.
In order to further RCE research, +ORC founded the High Cracking University, or +HCU. The “+” sign next to a nickname, or “handle,” designated members of the +HCU. The +HCU students included the most elite Windows reversers in the world. Each year the +HCU published a new reverse engineering challenge, and the authors of a handful of the best written responses were invited as students for the new school year.
One of the professors, known as +Fravia, maintained a motley web site known as “+Fravia’s Pages of Reverse Engineering.” In this forum +Fravia not only challenged programmers, but society itself to “reverse engineer” the brainwashing of a corrupt and rampant materialism. At one point +Fravia’s site was receiving millions of traffic hits per year, and its influence was widespread.
Today, most of the old +HCU has left Windows for the less occult Linux platform; only a few, such as +Tsehp, have remained to reverse Windows software. A new generation of reversers has rediscovered the ancient texts and begun to advance the science once again. Meanwhile, +Fravia himself can still be found wandering his endless library at http://www.searchlores.org.
As a software reverse engineer, you are only as good as your tools. Before diving into practical examples later in the chapter, we first review some of the classic Windows RCE tools. Some you can learn in a day, while others may take years to master.
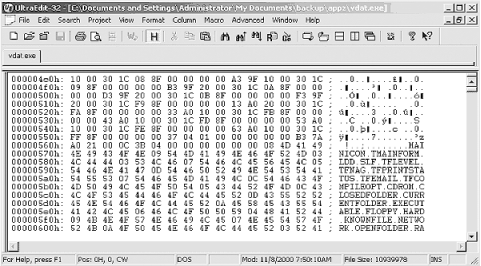
To edit binaries in hexadecimal (or opcode patching ), you need a good hex editor. One of the best is Ultra Edit, by Ian Meade (http://www.ultraedit.com/), shown in Figure 2-1.
A disassembler attempts to dissect a binary executable into human-readable assembly language. The disassembler software reads the raw byte stream output from the processor and parses it into groups of instructions. These instructions are then translated into assembly language instructions. The disassembler makes a best guess at the assembly language code, often with variable results. Nevertheless, it is the most essential tool for a software cracker.
A popular disassembler, and one that is the tool of choice for many expert reverse engineers, is IDA Pro. IDA (http://www.datarescue.com) is a multiprocessor, multioperating-system, interactive disassembler. It has won numerous accolades, not the least being chosen as the official disassembler of the +HCU in 1997.
IDA treats an executable file as a structured object that has been created from a database representing the source code. In other words, it attempts to re-create viable source code (as opposed to W32DASM, which only displays the code it thinks is important).
One of the most powerful features of IDA is the use of FLIRT signatures. FLIRT stands for Fast Library Identification and Recognition Technology. This means that IDA uses a proprietary algorithm to attempt to recognize compiler-specific library functions.
Mastering IDA takes considerable time and effort. The company admits in the user’s manual that IDA is difficult to understand. However, once you have mastered IDA, you’ll probably prefer it to the combination of W32DASM + SoftICE (discussed next). This section walks you through a few basic IDA configuration and manipulation steps.
A configuration file controls IDA’s preferences. Search your Program Files directory for the IDA folder and use a text editor to open Ida.cfg (the configuration file). The configuration file is read two times. The first pass is performed as soon as IDA is loaded, while the second pass is performed when IDA determines the processor type. All processor-specific tuning is located in the second part of the config file.
IDA allows you to choose the default processor at program
startup. As you can see in Example 2-1, the developers
have created support for an extensive range of processor types.
Here, you can view the processors that IDA supports. For example, if
you mostly crack PocketPC (Windows CE) applications, you will
probably be using the ARM processor. Otherwise, the default is
setting is "metapc"
(x86).
Example 2-1. Processor-specific parameters in IDA Pro
/* Extension    Processor */
  "com" :       "8086"                  // IDA will try the specified
  "exe" :       "metapc"                // extensions if no extension is
  "dll" :       "metapc"                // given.
  "drv" :       "metapc"
  "sys" :       "metapc"
  "bin" :       "metapc"
  "ovl" :       "metapc"
  "ovr" :       "metapc"
  "ov?" :       "metapc"
  "nlm" :       "metapc"
  "lan" :       "metapc"
  "dsk" :       "metapc"
  "obj" :       "metapc"
  "prc" :       "68000"                 // PalmPilot programs
  "axf" :       "arm710a"
  "h68" :       "68000"                 // MC68000 for *.H68 files
  "i51" :       "8051"                  // i8051   for *.I51 files
  "sav" :       "pdp11"                 // PDP-11  for *.SAV files
  "rom" :       "z80"                   // Z80     for *.ROM files
  "cla*":       "java"
  "s19":        "6811"
  "o":          "metapc"
IDA allows you to tune several options for disassembly. For example, you can determine whether you want to automatically analyze 90h NOPs. The configuration for this is shown in Example 2-2.
Example 2-2. IDA options for disassembly
#ifdef __PC_  _                           // INTEL 80x86 PROCESSORS
USE_FPP                 = YES
                                        // Floating Point Processor
                                        // instructions are enabled

// IBM PC specific analyzer options

PC_ANALYSE_PUSH         = YES           // Convert immediate operand
                                        // of "push" to offset
                                        //
                                        //      In sequence
                                        //
                                        //              push    seg
                                        //              push    num
                                        //
                                        //      IDA will try to
                                        //convert <num> to offset.
                                        //
PC_ANALYSE_NOP          = NO            // Convert db 90h after
                                        // "jmp" to "nop"
                                        // Now it is better to turn
                                        // off this option
                                        // because the final pass
                                        // of the analysis will
                                        // convert 90h to nops
                                        // more intelligently.
                                        //
                                        //      Sequence
                                        //
                                        //      jmp     short label
                                        //      db      90h
                                        //
                                        //      will be converted to
                                        //
                                        //      jmp     short label
                                        //      nop
Now, it’s time to fire up IDA. Run the program and open the target binary that you happen to be using. Figure 2-2 shows IDA’s startup window.

On most Windows files you will use the Portable Exectuable (PE) format (discussed later in this chapter), so select this option. Select your processor type if you have not already configured the default in your config file. Make sure both “Analysis” options are checked. Under Options, make sure the “Load resources” and “Make imports segment” boxes are checked. Also make sure “Rename DLL entries” and “Manual load” are unchecked.
When you are ready, press OK and watch IDA work its magic.
In order to view strings in IDA, select View → Open Subviews → Strings (Figure 2-3). You will also see the other subview options. The keyboard shortcut for strings is Shift-F12. Take some time to explore this sample disassembly and to get used to moving around in IDA.

+Fravia calls SoftICE (http://www.numega.com) the “Alpha and the Omega” of debuggers. However, what many modern reverse engineers are too young to remember (unless your hair is as grey as that of the authors) is that the forefather of SoftICE itself, known as ICE-86, was actually a hardware-based in-circuit emulator from Intel, designed to debug their seminal 8086 processor. A full description of this hardware can be found in the classic 8086 Family User’s Manual published by Intel in 1979.
SoftICE allows you to single-step through program code and to edit memory, registers, variables and flags on the fly as the program executes. The following function keys let you step through code and edit memory in SoftICE:
- F8
Single-step.
- F10
Program step.
- F11
Return to a routine from a call.
- F12
Forward to next Return.
- D
Display memory contents.
- S
Search memory for a string.
- WW
Watch a register.
Once you have SoftICE installed, your system will boot WINICE.EXE along with Windows. SoftICE is integrated with the Windows operating system itself, at Ring 0, which is what makes it so powerful. SoftICE is configured by editing the WINICE.DAT file. Remove the semicolons in WINICE.DAT to uncomment the particular features that you need. For example, if you are editing WINICE.DAT to include 32-bit calls (recommended), uncomment the following lines:
gdi32.dll
kernel32.dll
user32.dll
SoftICE is a complex application. In fact, it comes with a large, two-volume user’s manual just to help get you started with the basics of its use. However, the most difficult part of using SoftICE is remembering the command shortcuts. If you are performing RCE with SoftICE, you will need a reference list that you can keep handy while you are cracking. Even the official user’s manual for SoftICE doesn’t list these critical breakpoints. For this reason, we have included a basic list of useful SoftICE commands and breakpoints in the Appendix. We also recommend that you read through the SoftICE user’s manual at least once before working the examples at the end of this chapter.
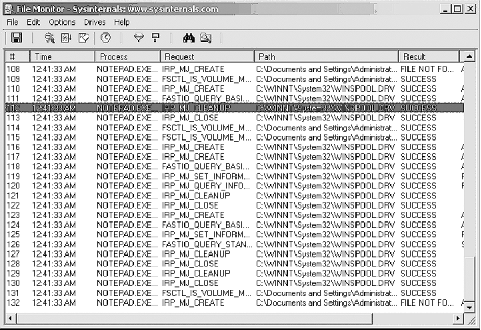
The wizards at SysInternals (http://www.sysinternals.com) have developed two powerful, real-time system monitors: regmon and filemon. The programs are freely available for personal use, with source code, from their web site. With these two programs, you can see which hidden registry and file calls your target binary is making. The programs are easy to master.
To use filemon, first install and run the program. You’ll soon see a flood of data scrolling down the filemon window, which will rapidly overwhelm you. Our goal here is to focus on one application that we want to monitor; i.e., NOTEPAD.exe (Figure 2-4).

Immediately after starting the target application, enter Ctrl-E to pause the data capture. Then scroll up until you find the .exe name, and hit Ctrl-L to enter it into the filter window (Figure 2-5).

Next, hit Ctrl-X to clear the display and then Ctrl-E to toggle capture on again. You will see that you have a pure capture that is focused on file access by one executable only—in this case, NOTEPAD.exe (Figure 2-6).
For regmon, the process is nearly identical (Figure 2-7). By using regmon, you can focus on a suspected Trojan, for example, to see the hidden registry calls that it utilizes.

Many commercial software programs are compressed with commercial "packers” (e.g., AsPack from http://www.aspack.com) in order to save space or to frustrate disassemblers. Unfortunately, you will not be able to disassemble a binary if it is packed. Fortunately, there are tools to unpack a packed binary. This section reviews the tools and methods used for unpacking a compressed application so that you may proceed to reverse engineer it.
Tip
The science of unpacking compressed binaries is very complex and comprises an entire subspecialty of RCE.
IThe native file format of Windows is the Portable Executable (PE). “Portable” means that all Windows platforms and processors recognize the program. In order to understand the process of unpacking a compressed application, it is first necessary to understand the structure of the Win32 PE file format (Figure 2-8). This format has remained relatively constant over the years, even with newer 64-bit Windows platforms.

The programmer’s assembler or compiler creates the PE sections automatically. The purpose of the DOS MZ header is so that if you happen to run DOS (Disk Operating System), DOS can recognize the program. In contrast, the DOS stub is simply a built-in executable provided to display an error message (e.g., “This program cannot be run in MS-DOS mode”) in case the operating system does not recognize DOS.
We are most interested in the third section, the PE header , a structure that contains several fields used by the PE loader . When you execute the program on an operating system that can process the PE file format, the PE loader uses the DOS MZ header to find the starting offset of the PE header, thus skipping the DOS stub.
The data in a PE file is grouped into blocks called sections . These sections are organized based on common attributes, rather than on a logical basis. Thus, a section can contain both code and data, as long as they have the same attributes.
Following the PE header is an array of structures known as the section table . A structure holds section-specific data such as attribute, file offset, and virtual offset.
During program execution, the PE header maps each section into memory based on the information stored in the sections. It also assigns attributes to each section in memory based on information in the section table. After mapping the PE file into memory, the PE loader imports data from an array known as the import table.
For educational purposes, at some point you may want to learn how to manually unpack an unknown binary. However, the RCE scene has developed useful tools to help you save time by addressing many commercial packers (make sure to get permission from all relevant software manufacturers before reverse engineering their code). In addition, there are tools to help unpack even unknown compression schemes. ProcDump, written by G-RoM, Lorian, and Stone, is a powerful tool to help with unpacking. Figure 2-9 shows the startup screen, which lists open tasks and modules. Simply press Unpack to start the unpacking wizard.

After starting ProcDump, you’ll see a split-screen GUI. The top contains a list of processes running under Windows; the bottom of the GUI lists all modules attached to a certain process. On the right side of this screen, you’ll see the following six buttons:
- Unpack
Unpacks an executable or a dump file
- Rebuild PE
Rebuilds the PE header of a executable or dump file
- PE Editor
Allows you to edit a PE header
- Bhrama Server
Starts the Bhrama Server (which allows you to write your own custom plug-ins for ProcDump)
- About
Provides application info
- Exit
Ends ProcDump
To unpack an application, start by clicking the Unpack button. Then, choose the name of the commercial or other packing program that protects the program. Next, an Open Dialog will pop up. Choose the executable you want to unpack and click Open.
ProcDump will load the executable in memory. When this is done, hit OK, and the program will unpack automatically.
A personal firewall is a useful addition to the reverse engineer’s arsenal. Personal firewalls are software applications that run on end-user machines to filter data passing through the TCP/IP stack. For example, if there is a hidden backdoor installed on your system, a good personal firewall can alert you to normally hidden communication. Similarly, a personal firewall can uncover commercial spyware when it attempts to “phone home.” Please note that you still might be fooled, as some products use port redirection/tunneling or even methods as simple as embedding the signal in an allowed SMTP message. An example of a personal firewall is Zone Alarm, from http://www.zonelabs.com.
Tip
A sniffer is another valuable tool for a reverse engineer. We will cover packet dissection in Chapter 6.
Install managers are programs that monitor unknown binaries as they install on your system. There are many commercial install managers, like In Control 5 (Figure 2-10).

One way that install managers work is by comparing a “snapshot” of your drive files, startup files, and registry keys before and after installation (Figure 2-11).

As you can see, install managers are valuable for detecting hidden system changes during installation. In particular, they are useful to track spyware and Trojan changes to your system so that you can develop disinfection steps by hand. Simply start the uninstall manager, browse to the program you want to install, and then use the uninstall manager to launch the installer.
Before beginning your practical journey, there is one final issue to note. Similar to software debugging, reverse engineering by definition goes in reverse. In other words, you must be able to think backward. Zen meditation skills will serve you better than many years of formal programming education. If you are good at solving verbal brain-teaser riddles on long trips with friends, you will probably be good at RCE. In fact, master reversers like +Fravia recommend cracking while intoxicated with a mixture of strong alcoholic beverages. While for health reasons we cannot recommend this method, you may find that a relaxing cup of hot tea unwinds your mind and allows you to think in reverse. The following segments walk you through live examples of Windows reverse engineering.
Tip
Since it is illegal to defeat protections on copyrighted works, reverse engineers now program their own protection schemes for teaching purposes. Thus, crackmes are small programs that contain the heart of the protection scheme and little else.
Example 1 is Muad’Dib’s Crackme #1.
Tip
The sample binaries (crackmes) used in this chapter may be downloaded from our web site at http://www.securitywarrior.com.
This is a simple program, with a twist. The program’s only function is to keep you from closing it. For example, when you run the program you will see an Exit button. However, pressing the Exit button does not work (on purpose). Instead, it presents you with a nag screen that says, “Your job is to make me work as an exit button” (Figure 2-12).

Thus, the crackme emulates shareware or software that has features removed or restricted to the user (i.e., crippleware). Your job is to enable the program in order to make it fully functional. Fortunately, the program itself gives you a great clue. By searching the disassembled program for the following string:
"Your job is to make me work as an exit button"
you will probably be able to trace back to find the jump in the program that leads to functionality—i.e., a working Exit button.
Once you have installed IDA Pro, open your target (in our case, Muad’Dib’s Crackme #1) and wait for it to disassemble. You will be looking at the bare, naked ASM. Go straight for the protection by searching the convenient list of strings that IDA Pro has extracted (Figure 2-13).

Double-clicking on our target string takes us directly to the target code in the disassembly (Figure 2-14).

We arrive at this code:
* Reference To: KERNEL32.ExitProcess, Ord:0075h
                                  |
:00401024 E843000000              Call 0040106C
;( ThisCalls ExitProcess when we click on theWindows Exit Cross)
:00401029 55                      push ebp
:0040102A 8BEC                    mov ebp, esp
:0040102C 817D0C11010000          cmp dword ptr [ebp+0C], 00000111
:00401033 751F                    jne 00401054
:00401035 8B4510                  mov eax, dword ptr [ebp+10]
:00401038 6683F864                cmp ax, 0064
:0040103C 752A                    jne 00401068
:0040103E 6A00                    push 00000000

* Possible StringData Ref from Data Obj ->"GOAL:"
                                  |
:00401040 682F304000                  push 0040302F
; This references the text in the MessageBox

* Possible StringData Ref from Data Obj ->"Your job is to make me work as an exit
button!"
                                  |
:00401045 6800304000              push 00403000
:0040104A FF7508                  push [ebp+08]
;These lines push the Caption and Handle of the MessageBox

* Reference To: USER32.MessageBoxA, Ord:01BBh

:0040104D E832000000                Call 00401080
:00401053 EB2A                      jmp 00401068
This is the call to the annoying message box that we want to bypass! We need to patch this address to jump to the Exit Process API. This is the heart of the protection.
Looking back at line 401024, we see it calls the exit process 0040106C, as follows:
* Referenced by a CALL at Address:
|:00401024               ;This made the call to 0040106C

* Reference To: KERNEL32.ExitProcess, Ord:0075h
;This is the Exit Process API call that we need.
|:0040106C FF2504204000                jmp dword ptr [00402004]
Thus, we will patch with this jump instead. We replace the bytes at offsets 40104D and 401053 with those at offset 40106C, and when we click on the Exit button, the program will exit and the nagging message box will not appear.
The best way to patch it is to replace these lines:
:0040104D E832000000                    Call 00401080
:00401053 EB2A                          jmp 00401068
with the following:
:0040104D FF2504204000                  jmp dword ptr [00402004]
:00401053 90                            nop
Thus, 0040104D now jumps to the ExitProcess address. The program exits appropriately when we click on either the X or the Exit button. 00401053 is extraneous, so we can just NOP it; this involves changing the JMP to a NOP (no operation).
In order to do the actual opcode patching, you need to open the program in a hex editor. After you have installed the hex editor, simply right-click the binary program in Windows and select “open with Ultra Edit.” You will see the raw hex code (Figure 2-15) ready to be patched.

How do we find the bytes that we need to patch? Search the hex dump for a unique string of hex bytes that represents the target code. For example, to find:
:0040104DE832000000Call 00401080 :00401053EB2Ajmp 00401068
we search for its unique hex string (Figure 2-16):
E832000000EB2A
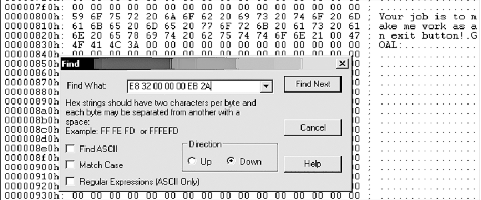
The key is to search for a hex string that is long enough that it will be unique in the application.
Once you have found the target bytes, carefully replace them to bypass the jump. Then, simply save the binary application again and run it. In our example, the program exits properly when you click the Exit button.
One of the most important functions of RCE is to reverse engineer malicious code such as computer viruses or Trojans. In this example, we will be reversing the notorious SubSeven Trojan by MobMan. By reverse engineering a Trojan, you can find its unique hex byte signature, its registry entries, etc., for the purposes of antivirus programs or manual extraction. However, in this case we will be reversing SubSeven in order to demonstrate its hidden secret. Interestingly, we will demonstrate why these days you can’t even trust an honest Trojan writer!
At the time of this writing, you can obtain the Trojan from http://www.subseven.ws or, when that site goes down (which it undoubtedly will), by a simple web search. Credit for this discovery goes to the Defiler, and portions are reprinted with permission from +Tsehp. For this exercise, you need SoftICE installed and running.
You may choose from several versions of SubSeven, each of which will give you slightly different results. After installing the software, you configure the server portion using the accompanying EditServer program (Figure 2-17). In this exercise, we will use the localhost address for the server and configure it with port 666 and password “Peikari.”

Make sure to use an uninstall manager when installing any malware so that you will be able to manually remove it later. For this exercise, you must turn off your virus scanners, or you will be unable to work with the malware. Once the server is configured, launch the client. The disclaimer that appears (Figure 2-18) is quite ironic, as we will soon see.

We point the client to localhost (127.0.0.1), as shown in Figure 2-19. Note that we will change the port from the default of 27374 to read “666” (which is how we configured our server).

Next, open SoftICE’s symbol loader to import winsock exports (wsock32.dll), depending on your operating system. After you load the SubSeven server in SoftICE’s symbol loader, the Trojan will run. Once you click “connect” to reach localhost, the password dialog pops up. In this case, enter a dummy password that is different from the real password (Peikari) that we chose previously.
The server uses the WSOCK32!recv function to retrieve data sent from a socket:
int recv (

SOCKET s,
char FAR* buf,
int len,
int flags
);
The second parameter (char FAR*
buf) is the important one, as the data will be stored
within it. Before you continue to enter the password, hit Ctrl-D to
break into SoftICE. Now set a breakpoint on the recv function, as
follows:
bpx recv do "d esp->8"
Enter Ctrl-D again, then click OK to send the password to the client. SoftICE will break on the bpx. Press F11, and you will see your dummy password in SoftICE’s data window, along with its current address in memory.
Now set a bpr on the password’s address (e.g., bpr 405000 405010 RW). Run the program again, and this time SoftICE will break at location 004040dd. You will see the following code:
0167:004040dd 8b0e        mov       ecx,[esi]  ; our password
0167:004040df 8b1f        mov       ebx,[edi]
0167:004040e1 39d9        cmp       ecx,ebx
0167:004040e3 755         jnz       0040413d
0167:004040e5 4a          dec       edx
0167:004040e6 7415        jz        004040fd
0167:004040e8 8b4e04      v         ecx,[esi+04] ; move 1st 4 chars into ecx
0167:004040eb 8b5f04      mov       ebx,[edi+04] ; move another 4 chars into ebx
0167:004040ee  39d9       cmp       ecx,ebx ; compare the two values
The program breaks at line 4040dd after we set a bpr on our dummy password. Thus, the
password must be located inside the buffer to which esi points. The first four characters are
moved into ecx, and another four
characters are moved into ebx.
They will then be compared.
We have now found the cmp
that compares our dummy password with the real one, right? Wrong! We
have stumbled on to the fact that the author of SubSeven
has put a backdoor in his backdoor! Type
d edi to see the data contents of
the edi register in SoftICE, and
you will see the following:
016F:012A3DD4 31 34 34 33 38 31 33 36-37 38 32 37 31 35 31 30  1443813678271510
016F:012A3DE4 31 39 38 30 00 69 6F 00-28 00 00 00 22 00 00 00  1980.io.(..."...
016F:012A3DF4 01 00 00 00 13 00 00 00-53 75 62 73 65 76 65 6E  ........Subseven
016F:012A3E04 5F 5F 5F 3C 20 70 69 63-6B 20 3E 00 10 3E 2A 01  __  _< pick >..>*.
016F:012A3E14 10 3E 2A 01 38 00 00 00-53 75 62 73 65 76 65 6E  .>*.8...Subseven
This number (14438136782715101980) is not the password we set.
We now disable all of the breakpoints (bd
*) and run the program, this time entering the password
14438136782715101980. SubSeven responds with “connected.”
This exercise reveals that SubSeven’s author has secretly included a hardcoded master password for all of his Trojans! The Trojan itself has been Trojaned. You just can’t trust anyone these days.
The example crackmes from this chapter are at http://www.securitywarrior.com. Due to their controversial nature, some of the references in this book have volatile URLs. Whenever possible, we list the updated links at http://www.securitywarrior.com.
Windows Internet Security: Protecting Your Critical Data, by Seth Fogie and Cyrus Peikari. Prentice Hall, 2001.
“.NET Server Security: Architecture and Policy Vulnerabilities.” Paper presented at Defcon 10, August 2002.
“PE header Format.” Iczelion’s Win32 Assembly Homepage. (http://win32asm.cjb.net )
“Mankind comes into the Ice Age.” Mammon_’s Tales to his Grandson.
“An IDA Primer.” Mammon_’s Tales to Fravia’s Grandson.
SoftICE breakpoints. (http://www.anticrack.de)
“WoRKiNG WiTH UCF’s ProcDump32,” by Hades.
Win32 Assembly Tutorial. Copyright 2000 by Exagone. (http://exagone.cjb.net)
SubSeven official site. (http://www.subseven.ws)
“Reversing a Trojan: Part I,” by the Defiler. Published by +Tsehp.
Muad’dib’s Crackme, published by +Tsehp.