
Chapter 2: Understanding Kotlin Coroutines
In the previous chapter, you revisited the concept of asynchronous programming and how it helps you execute long-running tasks in the background without freezing the app and annoying your app’s users. You learned how to carry out asynchronous programming with Threads, AsyncTasks, and Executors. Finally, you were introduced to the new way of doing it on Android: Kotlin Coroutines and Flows.
Coroutines is a Kotlin library for multithreading and asynchronous programming, such as making network calls and accessing files or databases. Kotlin Coroutines is Google’s official recommendation for asynchronous programming on Android. Android Jetpack libraries, such as ViewModel, Lifecycle, WorkManager, and Room, include support for Kotlin Coroutines. Third-party Android libraries, such as Retrofit, now provide support for Kotlin Coroutines.
In this chapter, we will dive deep into Kotlin Coroutines. You will learn how to use coroutines to carry out asynchronous programming in Android with simple code. You will also learn how to create coroutines in your Android app. Then, we will discuss other building blocks of coroutines, such as builders, scopes, dispatchers, contexts, and jobs.
In this chapter, we’re going to cover the following topics:
- Creating coroutines in Android
- Exploring coroutine builders, scopes, and dispatchers
- Understanding coroutine contexts and jobs
- Exercise – using coroutines in an Android app
By the end of this chapter, you will have an understanding of using Kotlin coroutines. You will be able to add coroutines for various cases in your Android apps. You will also understand the basic building blocks of Coroutines: builders, scopes, dispatchers, contexts, and jobs.
Technical requirements
For this chapter, you will need to download and install the latest version of Android Studio. You can find the latest version at https://developer.android.com/studio. For an optimal learning experience, a computer with the following specifications is recommended: Intel Core i5 or equivalent or higher, 4 GB of RAM minimum, and 4 GB available space.
The code examples for this chapter can be found on GitHub at https://github.com/PacktPublishing/Simplifying-Android-Development-with-Coroutines-and-Flows/tree/main/Chapter02.
Creating coroutines in Android
In this section, we will start by looking at how to create coroutines in Android. Coroutines provide an easy way to write asynchronous code with Kotlin’s standard functions. You can use coroutines when making a network call or when fetching data from or saving data to a local database.
A simple coroutine looks as follows:
CoroutineScope(Dispatchers.IO).launch {performTask()
...
}
It has four parts: CoroutineScope, Dispatchers, launch, and the lambda function that will be executed by the coroutine. An instance of CoroutineScope was created for the coroutine’s scope. Dispatchers.IO is the dispatcher that will specify that this coroutine will run on the I/O dispatcher, the one usually used for input/output (I/O) operations such as networking, database, and file processing. launch is the coroutine builder that creates the coroutine. We will explore these components in detail later in this chapter.
The following diagram summarizes these parts of a coroutine:

Figure 2.1 – Parts of a coroutine
In Android Studio, the Editor window identifies the suspending function calls in your code with a gutter icon next to the line number. As shown on line 16 in the following screenshot, the performTask() call has the suspend function call gutter icon next to it:

Figure 2.2 – Android Studio suspend function call gutter icon
Let’s say you have an Android application that displays the list of movies that are currently playing in cinemas. So, let’s look at the ways you can use the suspend function and add coroutines to the project.
If you’re using Retrofit 2.6.0 or above, you can mark the endpoint function as a suspending function with suspend, as follows:
@GET("movie/now_playing")suspend fun getMovies() : List<Movies>
Then, you can create a coroutine that will call the getMovies suspending function and display the list:
CoroutineScope(Dispatchers.IO).launch {val movies = movieService.getMovies()
withContext(Dispatchers.Main) {displayMovies(movies)
}
}
This will create a coroutine that fetches the movies in the background. The withContext call will change the context of the coroutine to use Dispatchers.Main to display the fetched movies in the main thread.
If you are using Room-KTX 2.1 or above, you can add the suspend keyword to your Data Access Object (DAO) functions so that the query or operation can be executed on the background thread and the result will be posted on the main thread. The following is an example:
@Dao
interface MovieDao { @Query("SELECT * from movies")suspend fun getMovies(): List<Movies>
...
}
This will make the getMovies query a suspending function. When you call this function, Room-KTX internally executes the query on a background thread. The results can be displayed on the main thread without it freezing your app.
When you create a coroutine inside another coroutine, the new coroutine becomes the child of the original coroutine. The original coroutine becomes the parent of the new coroutine. This can be seen in the following code:
CoroutineScope(Dispatchers.IO).launch {performTask1()
launch {performTask2()
}
...
}
The second coroutine that was launched with performTask2 was created using the Coroutine Scope of the parent coroutine.
In this section, you explored how to add coroutines to your Android project and learned how to create coroutines for your app. In the next section, you will explore some of the building blocks of coroutines: builders, scopes, and dispatchers.
Exploring coroutine builders, scopes, and dispatchers
In this section, you will learn how to use coroutine builders and explore coroutine scopes and dispatchers. Coroutine builders are functions that are used to create coroutines. Coroutine scope is the scope with which the coroutines run. Dispatchers specify in what thread the coroutine will run.
Coroutine builders
In the previous section, you created a coroutine with launch. However, there are other ways to create coroutines. Coroutine builders are the functions that you can use to create coroutines. To create a coroutine, you can use the following Kotlin coroutine builders:
- launch
- async
- runBlocking
async and launch need to be started on a coroutine scope. Meanwhile, runBlocking doesn’t need to be started from a coroutine scope.
The launch keyword creates a coroutine and doesn’t return a value. Instead, it returns a Job object that represents the coroutine.
The launch coroutine builder is ideal to use when you want to run a task and then forget about it (this means you are not waiting for the result of the operation). Here’s an example of using the launch coroutine builder:
class MainActivity : AppCompatActivity() {val scope = MainScope()
override fun onCreate(savedInstanceState: Bundle?) {super.onCreate(savedInstanceState)
setContentView(R.layout.activity_main)
val progressBar =
findViewById<ProgressBar>(R.id.progressBar)
scope.launch {delay(1_000)
progressBar.isVisible = true
}
}
}
Once the activity has been created, a coroutine will be launched. This coroutine will call the delay suspending function to delay the coroutine for a second, resume, and display the progress bar; then, it’s done.
On the other hand, the async builder is similar to launch but it returns a value: a Deferred object. Later, you can get this value with the await function. The async builder should be used when you want to execute a task and want to get the output of said task. An example of using the async coroutine builder is as follows:
class MainActivity : AppCompatActivity() {val scope = MainScope()
override fun onCreate(savedInstanceState: Bundle?) {super.onCreate(savedInstanceState)
setContentView(R.layout.activity_main)
val textView =
findViewById<TextView>(R.id.textView)
scope.launch { val text = async {getText()
}
delay(1_000)
textView.text = text.await()
}
}
}
Here, a coroutine was started with async to call the getText function. This will return a deferred object called text. There will be a delay of 1 second and then the actual value from text will be called with text.await(), which will be set as the text for textView. With async, two tasks can be computed in parallel.
runBlocking starts a new coroutine and blocks the current thread until the task has been executed. This is useful for cases when you need to block the thread. Creating unit tests is one of these cases:
class MainActivity : AppCompatActivity() { override fun onCreate(savedInstanceState: Bundle?) {super.onCreate(savedInstanceState)
setContentView(R.layout.activity_main)
val progressBar =
findViewById<ProgressBar>(R.id.progressBar)
runBlocking {delay(2_000)
progressBar.isVisible = true
}
}
}
In the preceding code, the runBlocking code will create a coroutine and block the thread. After a delay of 2,000 milliseconds (2 seconds), it will display the progress bar.
In this section, you explored how to use coroutine builders to create coroutines. You also learned about the async, launch, and runBlocking coroutine builders.
In the next section, you will explore coroutine scopes.
Coroutine scopes
CoroutineScope is the scope with which the coroutine will run. It defines the life cycle of the coroutines created from it, from its start to its end. If you cancel a scope, it will cancel all the coroutines it created. Coroutines follow the principle of structured concurrency – that is, a mechanism that provides the structure of a coroutine.
The launch and async coroutine builders are extension functions from CoroutineScope for creating coroutines.
For example, let’s say we have created a coroutine using MainScope:
class MainActivity : AppCompatActivity() {val scope = MainScope()
override fun onCreate(savedInstanceState: Bundle?) {super.onCreate(savedInstanceState)
setContentView(R.layout.activity_main)
val progressBar =
findViewById<ProgressBar>(R.id.progressBar)
scope.launch {progressBar.isVisible = true
}
}
}
This launches a coroutine using MainScope to display the progress bar.
MainScope is the main CoroutineScope for the main thread, which uses Dispatchers.Main for its coroutine. It is normally used for creating coroutines that will update the user interface.
You can also create a CoroutineScope instead of using MainScope by creating one with the CoroutineScope factory function. The CoroutineScope function requires you to pass in a coroutine context. CoroutineContext is a collection of elements for the coroutines that specify how the coroutine should run.
You passed a dispatcher and both a dispatcher and a job in the previous examples for the coroutine context. Dispatchers and jobs are coroutine context elements. You will learn more about coroutine contexts later in this chapter.
Your CoroutineScope must have a job and a way for the coroutine to be canceled, such as when Activity, Fragment, or ViewModel has been closed.
In the next section, we will look at a built-in coroutine scope called lifecycleScope, which is part of Jetpack’s Lifecycle library.
lifecycleScope
lifecycleScope is a CoroutineScope from Jetpack’s Lifecycle library that you can use to create coroutines. It is tied to the Lifecycle object (similar to your activity or fragment) and is automatically canceled when the life cycle is destroyed. Thus, you no longer need to manually cancel them.
lifecycleScope simplifies how scopes are created, how jobs are handled, and how they can be canceled within your activity or fragment. A lifecycleScope uses Dispatchers.Main.immediate for its dispatcher and a SupervisorJob for its job, such as viewModelScope.
To use lifecycleScope, you must add the following line to your app/build.gradle file dependencies:
implementation "androidx.lifecycle:lifecycle-runtime-ktx:2.4.1"
An example of lifeCycleScope is as follows:
class MainActivity : AppCompatActivity() { override fun onCreate(savedInstanceState: Bundle?) {super.onCreate(savedInstanceState)
setContentView(R.layout.activity_main)
val progressBar =
findViewById<ProgressBar>(R.id.progressBar)
lifecycleScope.launch {progressBar.isVisible = true
}
}
}
When the activity is created, it launches a coroutine from lifecycleScope to display the progress bar.
To change the dispatcher that the coroutine will use, you can pass in a dispatcher when using the launch and async coroutine builders:
lifecycleScope.launch(Dispatchers.IO) { ... }This will use the Dispatchers.IO dispatcher instead of the lifecycleScope object's default Dispatchers.Main.immediate for the coroutine that was launched.
Aside from launch, lifecycleScope has additional coroutine builders, depending on the life cycle’s state:
- launchWhenCreated
- launchWhenStarted
- launchWhenResumed
As the name suggests, launchWhenCreated launches the coroutine when the life cycle is created, launchWhenStarted launches the coroutine when the life cycle is started, and launchWhenResumed launches the coroutine when the life cycle goes back to the Resumed state.
In the next section, we will look at a built-in CoroutineScope from ViewModel called viewModelScope.
viewModelScope
viewModelScope is the ViewModel’s default CoroutineScope for creating coroutines. It is ideal to use if you need to do a long-running task from ViewModel. This scope and all running jobs are automatically canceled when ViewModel is cleared (that is, when onCleared is invoked).
viewModelScope simplifies the creation of Scope, handling the job, and canceling within ViewModel. A viewModelScope uses Dispatchers.Main.immediate for its dispatcher and uses a SupervisorJob for the job. A SupervisorJob is a special version of Job that allows its children to fail independently of each other.
To use viewModelScope, you must add the following line to your app/build.gradle file dependencies:
implementation "androidx.lifecycle:lifecycle-viewmodel-
ktx:2.4.1"
You can use viewModelScope like so:
class MovieViewModel: ViewModel() { init { viewModelScope.launch {fetchMovies()
}
}
}
This launches a coroutine from viewModelScope that will be used to run the fetchMovies() function.
To change the dispatcher that the coroutine will use, you can pass in a dispatcher when using the launch and async coroutine builders:
viewModelScope.launch (Dispatchers.IO) { ... }This will use Dispatchers.IO for the coroutine, instead of viewModelScope’s default of Dispatchers.Main.
coroutineScope{} and supervisorScope{}
The coroutineScope{} suspending builder allows you to create a CoroutineScope with the coroutine context from its outer scope. This calls the code block inside and does not complete until everything is done.
You can use a coroutineScope{} builder like so:
private suspend fun fetchAndDisplay() = coroutineScope { launch {val movies = fetchMovies()
displayMovies(movies)
}
launch {val shows = fetchShows()
DisplayShows(shows)
}
}
This will create a coroutine scope that will call the fetchMovies function, set its return value to the movies object, and then call the displayMovies function with movies. Another child coroutine will call the fetchShows function, set its return value to the shows object, and then call the displayShows function with shows.
When a child coroutine fails, it will cancel the parent coroutine and the sibling coroutines. If you do not want this to happen, you can use supervisorScope{} instead of coroutineScope{}.
The supervisorScope{} builder is similar to the coroutineScope{} builder but the coroutine’s Scope has a SupervisorJob. This allows the children of supervisorScope to fail independently of each other.
An example of supervisorScope is as follows:
private suspend fun fetchAndDisplayMovies() =
supervisorScope { launch {val movies = fetchMovies()
displayMovies(movies)
}
launch {val shows = fetchShows()
displayShows(shows)
}
}
This will create a supervisor scope (with a SupervisorJob) that will call the fetchMovies function. When a child coroutine fails, the parent and sibling coroutines will continue to work and will not be affected.
GlobalScope
GlobalScope is a special CoroutineScope that is not tied to an object or a job. It should only be used in cases when you must run a task or tasks that will always be active while the application is alive. As such, if you want to use GlobalScope, you must annotate the call with @OptIn(DelicateCoroutinesApi::class).
For all other cases in Android, it is recommended to use viewModelScope, lifecycleScope, or a custom coroutine scope.
Test scopes
Kotlin has a kotlinx-coroutines-test library for testing coroutines. This testing library includes a special coroutine scope that you can use to create tests for your coroutines. You will learn more about testing coroutines in Chapter 4, Testing Kotlin Coroutines.
In this section, you learned about CoroutineScope, as well as about MainScope and creating coroutine scopes with the CoroutineScope function. You also learned about built-in scopes such as viewModelScope and lifecycleScope.
In the next section, you will learn about coroutine dispatchers.
Coroutine dispatchers
Coroutines have a context, which includes the coroutine dispatcher. Dispatchers specify what thread the coroutine will use to perform the task. The following dispatchers can be used:
- Dispatchers.Main: This is used to run on Android’s main thread, usually for updates to the user interface. A special version of Dispatchers.Main, called Dispatchers.Main.immediate, is used to immediately execute the coroutine in the main thread. The viewModelScope and lifecycleScope coroutine scopes use Dispatchers.Main.immediate by default.
- Dispatchers.IO: This is designed for networking operations, and for reading from or writing to files or databases.
- Dispatchers.Default: This is used for CPU-intensive work, such as complicated computations or processing text, images, or videos. If you don’t set a dispatcher, Dispatchers.Default will be chosen by default.
- Dispatchers.Unconfined: This is a special dispatcher that is not confined to any specific threads. It executes the coroutine in the current thread and resumes it in whatever thread that is used by the suspending function.
You can set the dispatchers when setting the context in CoroutineScope or when using coroutine builders.
When using MainScope as the coroutine scope for your coroutine, Dispatchers.Main is used by default:
MainScope().launch { ... }This coroutine will automatically use Dispatchers.Main so that you no longer need to specify it.
If you used a different coroutine scope, you can pass in the dispatcher that will be used by the coroutine:
CoroutineScope(Dispatchers.IO).launch {fetchMovies()
}
The preceding code creates a CoroutineScope that will be run using Dispatchers.IO for the dispatcher.
You can also pass in a dispatcher when using the launch and async coroutine builders:
viewModelScope.launch(Dispatchers.Default) { ... }This will launch a coroutine using the Dispatchers.Default dispatcher.
To change the context of your coroutine, you can use the withContext function for the code that you want to use a different thread with. For example, in your suspending function, getMovies, which gets movies from your endpoint, you can use Dispatchers.IO:
suspend fun getMovies(): List<Movies> { withContext(Dispatchers.IO) { ... }}
In the preceding code, the getMovies function uses Dispatchers.IO to fetch the list of movies from a network endpoint.
In this section, you learned what dispatchers are and what dispatchers you can use, depending on your needs. You also learned how to use withContext to change the specific thread the coroutine runs on.
In the next section, you will explore coroutine contexts and jobs.
Understanding coroutine contexts and jobs
In this section, you will learn about coroutine contexts and jobs. Coroutines run in a coroutine context. A job is the context of the coroutine that allows you to manage the coroutine’s execution.
Coroutine contexts
Each coroutine runs in a coroutine context. A coroutine context is a collection of elements for the coroutines that specifies how the coroutine should run. A coroutine scope has a default coroutine context; if it’s empty, it will have an EmptyCoroutineContext.
When you create a CoroutineScope or use a coroutine builder, you can pass in a CoroutineContext. In the previous examples, we were passing a dispatcher:
CoroutineScope(Dispatchers.IO) {…
}
viewModelScope.launch(Dispatchers.Default) { ... }The preceding example shows how to pass a dispatcher in the CoroutineScope function or in the coroutine builder.
What you’re passing in these functions is a CoroutineContext. The following are some of the CoroutineContext elements you can use:
- CoroutineDispatcher
- Job
- CoroutineName
- CoroutineExceptionHandler
The main CoroutineContext elements are dispatchers and jobs. Dispatchers specify the thread where the coroutine runs, while the job of the coroutine allows you to manage the coroutine’s task.
Jobs allow you to manage the life cycle of the coroutine, from the creation of the coroutine to the completion of the task. You can use this job to cancel the coroutine itself. You’ll learn more about coroutine cancelations in Chapter 3, Handling Coroutines Cancelations and Exceptions.
CoroutineName is another CoroutineContext you can use to set a string to name a coroutine. This name can be useful for debugging purposes. For example, you can add a CoroutineName using the following code:
val scope = CoroutineScope(Dispatchers.IO)
scope.launch(CoroutineName("IOCoroutine")) {performTask()
}
This will give the name of IOCoroutine to the coroutine that was launched using the Dispatchers.IO dispatcher.
As the coroutine context is a collection of elements for the coroutine, you can use operators such as the + symbol to combine context elements to create a new CoroutineContext:
val context = Dispatchers.Main + Job()
MainScope, viewModelScope, and lifecycleScope, for example, use something like the following for the coroutine scope’s context:
SupervisorJob() + Dispatchers.Main.immediate
Another coroutine context element you can use is CoroutineExceptionHandler, an element you can use to handle exceptions. You will learn more about CoroutineExceptionHandler in Chapter 3, Handling Coroutines Cancelations and Exceptions.
In the previous section, you used the withContext function to change the dispatcher to specify a different thread to run your coroutine. As the name implies, this changes the coroutine context with the dispatcher, which is a CoroutineContext element itself:
withContext(Dispatchers.IO) { ... }This changes the coroutine context with a new dispatcher, Dispatchers.IO.
In the next section, you will learn about jobs.
Coroutine jobs
A job is a ContextCoroutine element that you can use for the coroutine context. You can use jobs to manage the coroutine’s tasks and its life cycle. Jobs can be canceled or joined together.
The launch coroutine builder creates a new job, while the async coroutine builder returns a Deferred<T> object. Deferred is itself a Job object – that is, a job that has a result.
To access the job from the coroutine, you can set it to a variable:
val job = viewModelScope.launch(Dispatchers.IO) { ... }The launch coroutine builder creates a coroutine running in the Dispatchers.IO thread and returns a job. A job can have children jobs, making it a parent job. Job has a children property you can use to get the job’s children:
val job1 = viewModelScope.launch(Dispatchers.IO) { val movies = fetchMovies()
val job2 = launch {...
}
...
}
In this example, job2 becomes a child of job1, which is the parent. This means that job2 will inherit the coroutine context of the parent, though you can also change it.
If a parent job is canceled or failed, its children are also automatically canceled. When a child’s job is canceled or failed, its parent will also be canceled.
A SupervisorJob is a special version of a job that allows its children to fail independently of each other.
Using a job also allows you to create a coroutine that you can later start instead of immediately running by default. To do this, you must use CoroutineStart.LAZY as the value of the start parameter in your coroutine builder and assign the result to a Job variable. Later, you can then use the start() function to run the coroutine, as shown here:
val lazyJob = viewModelScope.launch (start=CoroutineStart.LAZY) {delay(1_000)
...
}
...
lazyJob.start()
This will create a lazy coroutine. When you are ready to start it, you can simply call lazyJob.start().
With the Job object, you can also use the join() suspending function to wait for the job to be completed before continuing with another job or task:
viewModelScope.launch { val job1 = launch {showProgressBar()
}
...
job1.join()
...
val job2 = launch {fetchMovies()
}
}
In this example, job1 will be run first and job2 won’t be executed until the former job (job1) has finished.
In the next section, you will learn more about the states of coroutine jobs.
Coroutine job states
A job has the following states:
- New
- Active
- Completing
- Completed
- Canceling
- Canceled
These states of a job and its life cycle are summarized in the following diagram:
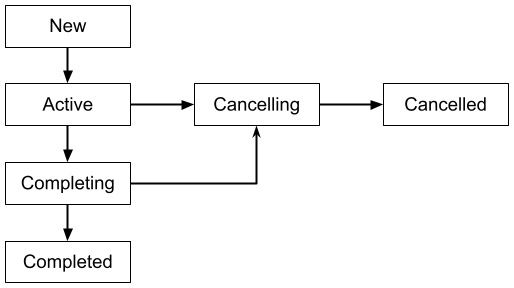
Figure 2.3 – Coroutine job life cycle
When you start a coroutine, a job is created in the New state. It then becomes Active when the job automatically starts or when you call the start() or join() function. The job is in the Active state while the job is running.
Completing a job moves it into the Completing state and then into the Completed state once its children complete their tasks.
If a job is canceled manually or failed because of an exception, it will go into the Canceling state and then into the Canceled state once its children complete.
A Job object has three properties you can use to check the state of the job:
- isActive: This property is true when the job is running or completing, and false otherwise.
- isComplete: This property is true when the job has finished its task (canceled or completed), and false otherwise.
- isCancelled: This property is true if the job has been canceled or is being canceled, manually or because of an exception, and false otherwise.
You will learn more about jobs and how they are used to cancel coroutines in Chapter 3, Handling Coroutines Cancelations and Exceptions.
In this section, you learned about coroutine contexts and jobs. CoroutineContext is a collection of coroutine context elements for the coroutines that specifies how the coroutine should run. Examples of CoroutineContext elements are dispatchers and jobs. A job is created from a coroutine. You can use it to manage the coroutine’s tasks and life cycle.
Now, you will use what you have learned so far to add coroutines to an Android project.
Exercise – using coroutines in an Android app
In this exercise, you will be working with an application that displays movies that are playing now in cinemas. You will be using The Movie Database API version 3 to get the list of movies. Go to https://developers.themoviedb.org/3 and register for an API key. Once you’ve done that, follow these steps:
- Open the Movie App project in the Chapter02 directory in this book’s code repository.
- Open MovieRepository and update apiKey with the value from The Movie Database API:
private val apiKey = "your_api_key_here"
- Open the app/build.gradle file and add a dependency for kotlinx-coroutines-android:
implementation ‘org.jetbrains.kotlinx:kotlinx-
coroutines-android:1.6.0’
This will add the kotlinx-coroutines-core and kotlinx-coroutines-android libraries to your project, allowing you to use coroutines in your code.
- Also, add the dependencies for the ViewModel extension library:
implementation ‘androidx.lifecycle:lifecycle-
viewmodel-ktx:2.4.1’
This will add the ViewModel KTX library to your project. It includes a viewModelScope for ViewModel.
- Open the MovieViewModel class, navigate to the fetchMovies function, and add the following code:
fun fetchMovies() {
_loading.value = true
viewModelScope.launch(Dispatchers.IO) {
}
}
This will create a coroutine that will run in Dispatchers.IO (on a background thread for network operations). The coroutine will be launched using viewModelScope.
- In the fetchMovies coroutine, call the MovieRepository’s fetchMovies function to fetch the list of movies from The Movie Database API:
fun fetchMovies() {
_loading.value = true
viewModelScope.launch(Dispatchers.IO) {
movieRepository.fetchMovies()
_loading.postValue(false)
}
}
The coroutine will be launched and will call the fetchMovies function from MovieRepository.
- Run the application. You will see that the app displays a list of movies (with a poster and a title), as shown in the following screenshot:

Figure 2.4 –The app displaying a list of movies
In this exercise, you created a coroutine using the ViewModel’s viewModelScope, used the launch coroutine builder, and executed a task to fetch the movies from the repository.
Summary
In this chapter, you learned more about Kotlin coroutines and how you can use them for asynchronous programming in Android.
You learned how to create coroutines with coroutine builders such as launch, async, and runBlocking. Then, you learned about dispatchers and using them to set the thread that the coroutines run on. You also learned about coroutine scopes and built-in scopes such as viewModelScope and lifecycleScope.
After that, you learned about coroutine contexts and jobs. CoroutineContext is the context for the coroutine and includes elements such as dispatchers that the coroutine will run on and a job, which you can use to manage the coroutine’s task.
Finally, you completed an exercise where you added a coroutine to an Android project. You used the ViewModel’s viewModelScope for the coroutine scope, the launch coroutine builder, and implemented the coroutine to fetch the list of movies using Dispatchers.IO.
In the next chapter, you will learn how to handle coroutine cancelations, timeouts, and exceptions.