
Watercolor Tools & Materials
Watercolor is a dynamic medium that lends itself to painting spontaneously. Because it’s so versatile, watercolor can be used in a variety of ways to produce a range of strokes—for example, you can layer your colors to create rich, intense blends, or you can paint with thin, diluted washes. You also can use household objects, such as toothbrushes, rags, table salt, and sponges to create special effects in watercolor. Because watercolor has a tendency to run and bleed in unexpected ways, you often will be pleasantly surprised by the accidental effects that result.
PAINTS
Watercolors are available in tubes, cakes, and pans. Tube paints are popular because they’re easy to use and they last a long time; cakes and pans are small, light, and convenient to transport. Whichever type you choose, buy the artist’s grade paints; they’re made with better pigments and have fewer additives, so the colors are more vibrant and intense.

PAINT CHOICES Pan and cake watercolors usually come as convenient boxed sets, such as the one shown here. When working with pans, use a wet brush to scrub and loosen the pigment. Then use the empty wells on the opposite side for mixing colors. Tube watercolors are sold as sets or individual tubes.
COLOR PALETTE
All you really need to begin painting in watercolor are at least one warm and one cool version of each of the primary colors (red, yellow, and blue), as shown below. (See page 10 for more about color temperature.) However, it’s also nice to have a few additional colors so that you don’t have to continuously mix commonly used colors, such as green.

PAINTING SURFACES
Watercolor supports can be anything from illustration board to fabric, but most artists use various types of watercolor paper. Hot-press paper has a smooth texture, cold-press paper has a medium texture, and rough paper has the most grainy, tactile surface. Paper also comes in different weights, designated in pounds. Lightweight, 140-lb paper is popular and is suitable for beginners, but a 260-lb or 300-lb paper won’t warp under multiple layers of wet paint.
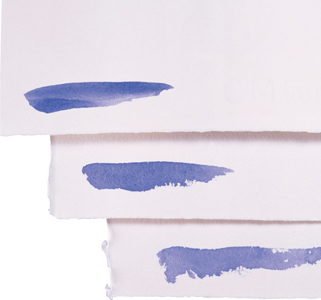
TEXTURE VARIATIONS Here are examples of how paint appears on hot-press (top), cold-press (center), and rough (bottom) paper.
PAINTBRUSHES
With watercolor brushes, size is indicated by a measurement (such as fractions of inches) or a number (such as 2). In general, the smaller the number, the smaller the brush. Each shape—such as flat or round—is best suited to a particular task; for example, large rounds are good for covering large areas with color, whereas small rounds are ideal for detail work. Hair types are either natural or synthetic; both work well with watercolor. The five brushes shown below make a good starter set.

FLAT The wide bristles of a 1" flat brush are great for laying in washes and filling in large areas.

LARGE ROUND This brush can hold a lot of water or paint and is ideal for applying medium to large areas of color.

MEDIUM ROUND A good all-around brush, a medium round can produce thick or thin lines, depending on the amount of pressure you apply.

SMALL ROUND The fine point of this brush makes it a great choice for painting small details.

LINER OR RIGGER This small, thin brush is best for painting very fine details and intricate lines.
MIXING PALETTES
Many watercolorists prefer using plastic palettes, as they are lightest in weight and thus ideal for painting outdoors. Some plastic palettes even have lids so you can save your colors between painting sessions. When choosing a mixing palette, make sure you have plenty of room for washes and that your widest brush will fit into the wells.

PALETTE SELECTION As shown here, watercolor palettes come in many shapes and sizes—but they all contain wells for holding color and areas for mixing.
BRUSH CARE
Your brushes will last a long time if you care for them properly. During a painting session, keep the bristles of your unused brushes submerged in clean water—but don’t submerge the wooden handle. (Never leave the brushes standing in water between sessions.) Also, never let a brush sit with paint in its bristles, even during a painting session. When you finish a session, be sure to thoroughly clean your brushes. (See the caption below for detailed instructions.)

CLEANING YOUR BRUSHES To properly clean your brushes without damaging their delicate hairs or bristles, first rinse the brush in cool water; then use paper towels to wipe off as much paint as possible. (Always pull straight away from the bristles—never pull sideways.) Then, using a very mild soap or shampoo and cool water, gently rub the bristles in the palm of your hand (as shown) to loosen any remaining paint. Rinse thoroughly and blot with a paper towel. Finally, reshape the bristles with your fingers and lay the brush flat on a paper towel to dry. You should, however, avoid contact between your skin and cadmium paints.
ADDITIONAL MATERIALS
Once you have all the essentials, you’ll want to gather a few additional items to complete your starter collection of watercolor materials. You’ll find it helpful to have tools on hand for creating special effects, “saving” whites, speeding up the drying time of the paints, and cleaning up your workspace.

EXTRAS You’ll find the following items helpful: a pencil and an eraser for sketching; cotton swabs and tissues for lifting out areas of color or blotting paint; artist’s tape for securing your support; paper towels for cleanup; a razor blade, rubbing alcohol, a white crayon, a sponge, and a toothbrush for creating special effects; a spray bottle for moistening your paints or support; and a hair dryer for speeding up the drying time of the paint.
STRETCHING WATERCOLOR PAPER
Light- or medium-weight papers can warp when you apply wet paint, but they will stay flat if they are stretched first. stretched paper is much more pleasant to work on because it eliminates the ridges caused by buckling. stretching paper isn’t difficult, but you will need to do it well in advance of painting; you need to soak the paper in water, and it will take at least two hours to dry completely.

1 You’ll need a ruler, a pencil, scissors, gummed or masking tape, a sponge, and a flat board or another work surface. First use a ruler to draw light pencil lines as a guide for the tape. Draw the lines all around the paper, about 1/2" away from the edges.
2 Fill a sink, tub, or large tray with clean water, and then immerse the paper briefly. Turn it over once to make sure both sides are evenly and thoroughly wet.

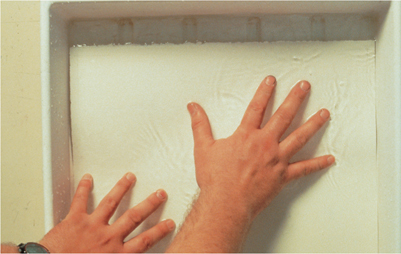
3 Place the paper on your board or work surface, and then smooth over it with a damp sponge to remove any creases or air bubbles.

4 Cut four pieces of tape a little longer than the lengths of the four sides of the paper. If you’re using gummed tape, dampen the gummed side slightly by pulling it over the wet sponge. Don’t wet it too much or it may stretch and tear.

5 Place the strips of tape along the four edges and press them in place, smoothing them with your hand as you go. Trim away the excess tape with scissors, and then stand the board upright until the paper is completely dry.