
Okay, we just got the minimum required introduction to Spring Web Flow concepts; there are plenty of advanced concepts out there to master in Spring Web Flow. We are not going to see all those things, because that itself deserves a separate book. As of now, this is enough to understand the checkout-flow.xml flow definition file. But before that, we will provide a quick overview of our checkout flow. The following diagram will give you the overall idea of the checkout flow that we just implemented:
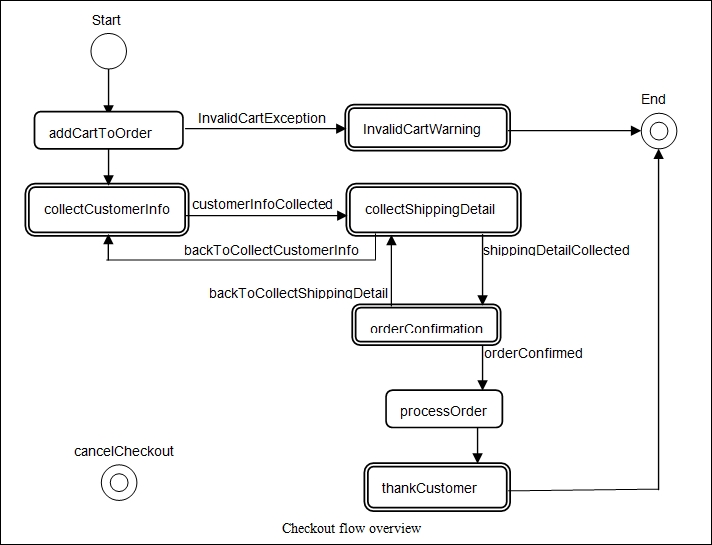
Our checkout flow diagram has a start state and an end state; each rounded rectangle in the diagram defines an action state and each double-line-bordered rounded rectangle defines a view state. Each arrowed line defines transition, and the name associated with it defines the event that causes that particular transition. The checkout-flow.xml file just contains this flow in an XML representation.
If you open the checkout-flow.xml file, the first tag you encounter within the <flow> tag is the <var> tag:
<var name="order" class="com.packt.webstore.domain.Order" />
The <var> tag creates a variable in a flow. This variable will be available to all states in a flow, which means we can reference and use this variable inside any state within the flow. In the preceding <var> tag, we just created a new instance of the Order class and stored it in a variable called order.
The next thing we defined within the checkout-flow.xml file is the <action-state> definition. As we already learned, action states are normally used to invoke backend services, so in the following <action-state> definition we have just invoked the validate method of the cartServiceImpl object and stored the result in the order.cart object:
<action-state id="addCartToOrder">
   <evaluate expression = "cartServiceImpl.validate(requestParameters.cartId)"
         result="order.cart" />

<transition to="invalidCartWarning" on-exception = "com.packt.webstore.exception.InvalidCartException" />

<transition to="collectCustomerInfo" />
</action-state>
As we already defined the order variable at the start of the flow, it will be available in every state of this flow. So we have used that variable (order.cart) in the <evaluate> tag to store the result of this evaluated expression: cartServiceImpl.validate(requestParameters.cartId).
The validate method of cartServiceImpl tries to read a cart object based on the given cartId. If it finds a valid cart object, then it returns that. Otherwise, it will throw an InvalidCartException; in such a case we route the transition to another state whose ID is invalidCartWarning:
<transition to="invalidCartWarning" on-exception = "com.packt.webstore.exception.InvalidCartException" />
If no such exception is thrown from the expression evaluation, we naturally transit from the addCartToOrder state to the collectCustomerInfo state:
<transition to="collectCustomerInfo" />
If you notice the collectCustomerInfo state, it is nothing but a view state in checkout-flow.xml. We defined the View that needs to be rendered via the view attribute and the Model that needs to be attached via the model attribute:
<view-state id="collectCustomerInfo" view="collectCustomerInfo.jsp" model="order">
  <transition on="customerInfoCollected" to="collectShippingDetail" />
</view-state>
Upon reaching this view state, Spring Web Flow renders the collectCustomerInfo View and waits for the user to interact; once the user has entered the customer info details and pressed the submit button, it will resume its transition to the collectShippingDetail view state. As we already learned, a transition can be triggered via an event, so here the transition to the collectShippingDetail state would get triggered when the customerInfoCollected event is triggered. How do we fire this event (customerInfoCollected) from the View? We will see later in this chapter:
<transition on="customerInfoCollected" to="collectShippingDetail" />
The next state defined within the checkout flow is collectShippingDetail; again this is also a view state, and it has two transitions back and forth: one is to go back to the collectCustomerInfo state and the next is to go forward to the orderConfirmation state:
<view-state id="collectShippingDetail" model="order">
   <transition on="shippingDetailCollected" to="orderConfirmation" />
   <transition on="backToCollectCustomerInfo" to="collectCustomerInfo" />
</view-state>
Note that here in the collectShippingDetail state, we haven't mentioned the view attribute; in that case Spring Web Flow would consider the id of the view state to be the View name.
The orderConfirmation state definition doesn't need much explanation. It is more like the collectShippingDetail view state, where we have furnished all the order-related details and we ask the user to confirm them; upon confirmation, we move to the next state, which is processOrder:
<view-state id="orderConfirmation">
   <transition on="orderConfirmed" to="processOrder" />
   <transition on="backToCollectShippingDetail" to = "collectShippingDetail" />
</view-state>
Next, the processOrder state is an action state that interacts with the orderServiceImpl object to save the order object. Upon successfully saving the order object, it stores the order ID in the flow variable (order.orderId) and transits to the next state, which is thankCustomer:
<action-state id="processOrder">
   <evaluate expression="orderServiceImpl.saveOrder(order)" result="order.orderId"/>
   <transition to="thankCustomer" />
</action-state>
The thankCustomer state is a view state that simply shows a thank you message with the confirmed order ID to the end user, and transits to the end state:
<view-state id="thankCustomer" model="order">
   <transition to="endState"/>
</view-state>
In our checkout flow, we have two end states; one is the normal end state where the flow execution arrives naturally after the flow ends, and the other one is the end state when the user presses the Cancel button in any of the Views:
<end-state id="endState"/>
<end-state id="cancelCheckout" view="checkOutCancelled.jsp"/>
Note in the cancelCheckout end state, we have specified the name of the landing page via the view attribute. The transition to the cancelCheckout end state happened through the global transitions configuration:
<global-transitions>
   <transition on = "cancel" to="cancelCheckout" />
</global-transitions>
A global transition is for sharing some common transitions between states. Rather than repeating the transition definition every time within the state definition, we can define it within one global transition so that that transition will be available implicitly for every state in the flow. In our case, the end user may cancel the checkout process in any state; that's why we have defined the transition to the cancelCheckout state in global-transitions.
Okay, we have totally understood the checkout flow definition (checkout-flow.xml). Now our Spring MVC should read this file during the boot up of our application, so that it can be ready to dispatch any flow-related request to the Spring Web Flow framework. We are able to do this via some web flow configurations, as mentioned in step 5.
In step 5, we have created beans for FlowExecutor and the FlowDefinitionRegistry. As its name implies, the flowExecutor executes a flow based on the given flow definition. The flowExecutor gets its flow definition from a flowDefinitionRegistry bean. We can configure as many flow definitions in a flowDefinitionRegistry as we want.
A flowDefinitionRegistry is a collection of flow definitions. When a user enters a flow, the flow executor creates and launches an exclusive flow instance for that user based on the flow definition:
@Bean
public FlowDefinitionRegistry flowRegistry() {
       return getFlowDefinitionRegistryBuilder()
               .setBasePath("/WEB-INF/flows")
               .addFlowLocationPattern("/**/*-flow.xml")
               .build();
   }
In the preceding web flow configuration, we created the flowDefinitionRegistry bean, whose base-path is /WEB-INF/flows, so we need to put all our flow definitions under the /WEB-INF/flows directory in order to get picked up by the flowDefinitionRegistry. That's why in step 4 we created our checkout-flow.xml under the src/main/webapp/WEB-INF/flows/checkout/ directory. As I already mentioned, a flowDefinitionRegistry can have many flow definitions; each flow definition is identified by its ID within the flowDefinitionRegistry. In our case, we have added a single flow definition, whose ID is checkout and whose relative location is /checkout/checkout-flow.xml.
One important thing to understand before we wind up web flow configuration is the ID of a flow definition forms the relative URL to invoke the flow. By this what I mean is that in order to invoke our checkout flow via a web request, we need to fire a GET request to the http://localhost:8080/webstore/checkout URL, because our flow ID is checkout. Also, in our flow definition (checkout-flow.xml), we haven't configured any start-state, so the first state definition (which is the addCartToOrder
action-state) will becomes the start-state, and addCartToOrder
action-state, expecting a cartId, should be present in the request parameter of the invoking URL:
<action-state id="addCartToOrder">
   <evaluate expression = "cartServiceImpl.validate(requestParameters.cartId)" result="order.cart" />

   <transition to="invalidCartWarning"   on-exception="com.packt.webstore.exception.InvalidCartException" />
   <transition to="collectCustomerInfo" />
</action-state>
So the actual URL that can invoke this flow would be something similar to http://localhost:8080/webstore/checkout?cartId=55AD1472D4EC, where the part after the question mark (cartId=55AD1472D4EC) is considered as a request parameter.
It is good that we have defined our checkout flow and configured it with the Spring Web Flow, but we need to define two more beans named flowHandlerMapping and flowHandlerAdapter in our WebFlowConfig
.java, to dispatch all flow-related requests to the flowExecutor. We did that as follows:
@Bean
   public FlowHandlerMapping flowHandlerMapping() {
       FlowHandlerMapping handlerMapping = new FlowHandlerMapping();
       handlerMapping.setOrder(-1);
       handlerMapping.setFlowRegistry(flowRegistry());
       return handlerMapping;
   }

   @Bean
   public FlowHandlerAdapter flowHandlerAdapter() {
       FlowHandlerAdapter handlerAdapter = new FlowHandlerAdapter();
       handlerAdapter.setFlowExecutor(flowExecutor());
       handlerAdapter.setSaveOutputToFlashScopeOnRedirect(true);
       return handlerAdapter;
   }
flowHandlerMapping creates and configures handler mapping, based on the flow ID for each defined flow from flowRegistry. flowHandlerAdapter acts as a bridge between the dispatcher servlet and Spring Web Flow, in order to execute the flow instances.
Consider the following web flow registry configuration; it has a single flow definition file, namely validate.xml. How will you form the URL to invoke the flow?
@Bean
public FlowDefinitionRegistry flowRegistry() {
    return getFlowDefinitionRegistryBuilder()
            .setBasePath("/WEB-INF/flows")
  .addFlowLocation("/customer/validate.xml","validateCustomer")
            .build();
}
http://localhost:8080/webstore/customer/validatehttp://localhost:8080/webstore/validatehttp://localhost:8080/webstore/validateCustomer
Consider the following flow invoking URL:
http://localhost:8080/webstore/validate?customerId=C1234
In a flow definition file, how will you retrieve the customerId HTTP request parameter?
<evaluate expression = "requestParameters.customerId " result = "customerId" /><evaluate expression = "requestParameters(customerId)" result = "customerId" /><evaluate expression = "requestParameters[customerId]" result = "customerId" />
We have done everything to roll out our checkout flow, but one last thing is pending: creating all the Views that need to be used in the view states of our checkout flow. In total, we have six view states in our flow definition (collectCustomerInfo, collectShippingDetail, orderConfirmation, invalidCartWarning, thankCustomer, and cancelCheckout), so we need to create six JSP files. Let's create all of them:
- Create a JSP View file called
collectCustomerInfo.jspunder thesrc/main/webapp/WEB-INF/flows/checkout/directory, add the following code snippet to it, and save it:<%@ taglib prefix="c" uri="http://java.sun.com/jsp/jstl/core"%> <%@ taglib prefix="form" uri="http://www.springframework.org/tags/form"%> <%@ taglib prefix="spring" uri="http://www.springframework.org/tags"%> <html> <head> <meta http-equiv="Content-Type" content="text/html; charset="utf-8"> <link rel="stylesheet" href="//netdna.bootstrapcdn.com/bootstrap/3.0.0/css /bootstrap.min.css"> <title>Customer</title> </head> <body> <section> <div class="jumbotron"> <div class="container"> <h1>Customer</h1> <p>Customer details</p> </div> </div> </section> <section class="container"> <form:form modelAttribute="order.customer" class="form- horizontal"> <fieldset> <legend>Customer Details</legend> <div class="form-group"> <label class="control-label col-lg-2" for="name">Name</label> <div class="col-lg-10"> <form:input id="name" path="name" type="text" class="form:input-large" /> </div> </div> <div class="form-group"> <label class="control-label col-lg-2" for="doorNo">Door No</label> <div class="col-lg-10"> <form:input id="doorNo" path="billingAddress.doorNo" type="text" class="form:input-large" /> </div> </div> <div class="form-group"> <label class="control-label col-lg-2" for="streetName">Street Name</label> <div class="col-lg-10"> <form:input id="streetName" path="billingAddress.streetName." type="text" class="form:input-large" /> </div> </div> <div class="form-group"> <label class="control-label col-lg-2" for="areaName">Area Name</label> <div class="col-lg-10"> <form:input id="areaName" path="billingAddress.areaName" type="text" class="form:input-large" /> </div> </div> <div class="form-group"> <label class="control-label col-lg-2" for="state">State</label> <div class="col-lg-10"> <form:input id="state" path="billingAddress.state" type="text" class="form:input-large" /> </div> </div> <div class="form-group"> <label class="control-label col-lg-2" for="country">country</label> <div class="col-lg-10"> <form:input id="country" path="billingAddress.country" type="text" class="form:input-large" /> </div> </div> <div class="form-group"> <label class="control-label col-lg-2" for="zipCode">Zip Code</label> <div class="col-lg-10"> <form:input id="zipCode" path="billingAddress.zipCode" type="text" class="form:input-large" /> </div> </div> <div class="form-group"> <label class="control-label col-lg-2" for="phoneNumber">Phone Number</label> <div class="col-lg-10"> <form:input id="phoneNumber" path="phoneNumber" type="text" class="form:input-large" /> </div> </div> <input type="hidden" name="_flowExecutionKey" value="${flowExecutionKey}"/> <div class="form-group"> <div class="col-lg-offset-2 col-lg-10"> <input type="submit" id="btnAdd" class="btn btn-primary" value="Add" name="_eventId_customerInfoCollected" /> <button id="btnCancel" class="btn btn- default" name="_eventId_cancel">Cancel </button> </div> </div> </fieldset> </form:form> </section> </body> </html> - Similarly, create one more JSP View file called
collectShippingDetail.jspunder the same directory, add the following code snippet to it, and save it:<%@ taglib prefix="c" uri="http://java.sun.com/jsp/jstl/core"%> <%@ taglib prefix="form" uri="http://www.springframework.org/tags/form"%> <%@ taglib prefix="spring" uri="http://www.springframework.org/tags"%> <html> <head> <meta http-equiv="Content-Type" content="text/html; charset="utf-8"> <link rel="stylesheet" href="//netdna.bootstrapcdn.com/bootstrap/3.0.0/css /bootstrap.min.css"> <title>Customer</title> </head> <body> <section> <div class="jumbotron"> <div class="container"> <h1>Shipping</h1> <p>Shipping details</p> </div> </div> </section> <section class="container"> <form:form modelAttribute="order.shippingDetail" class="form-horizontal"> <fieldset> <legend>Shipping Details</legend> <div class="form-group"> <label class="control-label col-lg-2 col-lg-2" for="name" />Name</label> <div class="col-lg-10"> <form:input id="name" path="name" type="text" class="form:input-large" /> </div> </div> <div class="form-group"> <label class="control-label col-lg-2 col-lg-2" for="shippingDate" />shipping Date (dd/mm/yyyy)</label> <div class="col-lg-10"> <form:input id="shippingDate" path="shippingDate" type="text" class="form:input-large" /> </div> </div> <div class="form-group"> <label class="control-label col-lg-2" for="doorNo">Door No</label> <div class="col-lg-10"> <form:input id="doorNo" path="shippingAddress.doorNo" type="text" class="form:input-large" /> </div> </div> <div class="form-group"> <label class="control-label col-lg-2" for="streetName">Street Name</label> <div class="col-lg-10"> <form:input id="streetName" path="shippingAddress.streetName." type="text" class="form:input-large" /> </div> </div> <div class="form-group"> <label class="control-label col-lg-2" for="areaName">Area Name</label> <div class="col-lg-10"> <form:input id="areaName" path="shippingAddress.areaName" type="text" class="form:input-large" /> </div> </div> <div class="form-group"> <label class="control-label col-lg-2" for="state">State</label> <div class="col-lg-10"> <form:input id="state" path="shippingAddress.state" type="text" class="form:input-large" /> </div> </div> <div class="form-group"> <label class="control-label col-lg-2" for="country">country</label> <div class="col-lg-10"> <form:input id="country" path="shippingAddress.country" type="text" class="form:input-large" /> </div> </div> <div class="form-group"> <label class="control-label col-lg-2" for="zipCode">Zip Code</label> <div class="col-lg-10"> <form:input id="zipCode" path="shippingAddress.zipCode" type="text" class="form:input-large" /> </div> </div> <input type="hidden" name="_flowExecutionKey" value="${flowExecutionKey}"/> <div class="form-group"> <div class="col-lg-offset-2 col-lg-10"> <button id="back" class="btn btn-default" name="_eventId_backToCollectCustomerInfo"> back</button> <input type="submit" id="btnAdd" class="btn btn-primary" value="Add" name="_eventId_shippingDetailCollected"/> <button id="btnCancel" class="btn btn- default" name="_eventId_cancel">Cancel</button> </div> </div> </fieldset> </form:form> </section> </body> </html> - Create one more JSP View file called
orderConfirmation.jspto confirm the order by the user, under the same directory, then add the following code snippet to it and save it:<%@ taglib prefix="c" uri="http://java.sun.com/jsp/jstl/core"%> <%@ taglib prefix="form" uri="http://www.springframework.org/tags/form"%> <%@ taglib prefix="spring" uri="http://www.springframework.org/tags"%> <%@ taglib prefix="fmt" uri="http://java.sun.com/jsp/jstl/fmt"%> <html> <head> <meta http-equiv="Content-Type" content="text/html; charset="utf-8"> <link rel="stylesheet" href="//netdna.bootstrapcdn.com/bootstrap/3.0.0/css /bootstrap.min.css"> <title>Order Confirmation</title> </head> <body> <section> <div class="jumbotron"> <div class="container"> <h1>Order</h1> <p>Order Confirmation</p> </div> </div> </section> <div class="container"> <div class="row"> <form:form modelAttribute="order" class="form-horizontal"> <input type="hidden" name="_flowExecutionKey" value="${flowExecutionKey}" /> <div class="well col-xs-10 col-sm-10 col-md-6 col- xs-offset-1 col-sm-offset-1 col-md-offset-3"> <div class="text-center"> <h1>Receipt</h1> </div> <div class="row"> <div class="col-xs-6 col-sm-6 col-md-6"> <address> <strong>Shipping Address</strong> <br> ${order.shippingDetail.name}<br> ${order.shippingDetail.shippingAddress.doorNo}, ${order.shippingDetail.shippingAddress.streetName} <br> ${order.shippingDetail.shippingAddress.areaName}, ${order.shippingDetail.shippingAddress.state} <br> ${order.shippingDetail.shippingAddress.country}, ${order.shippingDetail.shippingAddress.zipCode} <br> </address> </div> <div class="col-xs-6 col-sm-6 col-md-6 text-right"> <p> <em>Shipping DateDate: <fmt:formatDate type="date" value="${order.shippingDetail.shippingDate}" /></em> </p> </div> </div> <div class="row"> <div class="col-xs-6 col-sm-6 col-md-6"> <address> <strong>Billing Address</strong> <br> ${order.customer.name}<br> ${order.customer.billingAddress.doorNo}, ${order.customer.billingAddress.streetName} <br> ${order.customer.billingAddress.areaName}, ${order.customer.billingAddress.state} <br> ${order.customer.billingAddress.country}, ${order.customer.billingAddress.zipCode} <br> <abbr >P:</abbr> ${order.customer.phoneNumber} </address> </div> </div> <div class="row"> <table class="table table-hover"> <thead> <tr> <th>Product</th> <th>#</th> <th class="text-center">Price</th> <th class="text-center">Total</th> </tr> </thead> <tbody> <c:forEach var="cartItem" items="${order.cart.cartItems}"> <tr> <td class="col-md-9"> <em>${cartItem.product.name}</em></td> <td class="col-md-1" style="text-align: center"> ${cartItem.quantity}</td> <td class="col-md-1 text- center">${cartItem.product.unitPrice} </td> <td class="col-md-1 text- center">${cartItem.totalPrice} </td> </tr> </c:forEach> <tr> <td> </td> <td> </td> <td class="text-right"><h4> <strong>Grand Total: </strong> </h4></td> <td class="text-center text- danger"><h4> <strong>$${order.cart.grandTotal} </strong> </h4></td> </tr> </tbody> </table> <button id="back" class="btn btn-default" name="_eventId_backToCollectShippingDetail"> back</button> <button type="submit" class="btn btn- success" name="_eventId_orderConfirmed"> Confirm <span class="glyphicon glyphicon-chevron-right"></span> </button> <button id="btnCancel" class="btn btn- default" name="_eventId_cancel">Cancel</button> </div> </div> </form:form> </div> </div> </body> </html> - Next, we need to create another JSP View file called
invalidCartWarning.jspto show an error message in case the cart is empty at the checkout; add the following code snippet toinvalidCartWarning.jspand save it:<%@ taglib prefix="c" uri="http://java.sun.com/jsp/jstl/core"%> <%@ taglib prefix="spring" uri="http://www.springframework.org/tags"%> <html> <head> <meta http-equiv="Content-Type" content="text/html; charset="utf-8"> <link rel="stylesheet" href="//netdna.bootstrapcdn.com/bootstrap/3.0.0/css /bootstrap.min.css"> <title>Invalid cart </title> </head> <body> <section> <div class="jumbotron"> <div class="container"> <h1 class="alert alert-danger"> Empty Cart</h1> </div> </div> </section> <section> <div class="container"> <p> <a href="<spring:url value="/market/products" />" class="btn btn-primary"> <span class="glyphicon-hand-left glyphicon"> </span> products </a> </p> </div> </section> </body> </html> - To thank the customer after a successful checkout flow, we need to create one more JSP View file, called
thankCustomer.jsp, as follows:<%@ taglib prefix="c" uri="http://java.sun.com/jsp/jstl/core"%> <%@ taglib prefix="spring" uri="http://www.springframework.org/tags"%> <%@ taglib prefix="fmt" uri="http://java.sun.com/jsp/jstl/fmt"%> <html> <head> <meta http-equiv="Content-Type" content="text/html; charset="utf-8"> <link rel="stylesheet" href="//netdna.bootstrapcdn.com/bootstrap/3.0.0/css /bootstrap.min.css"> <title>Invalid cart </title> </head> <body> <section> <div class="jumbotron"> <div class="container"> <h1 class="alert alert-danger"> Thank you</h1> <p>Thanks for the order. your order will be delivered to you on <fmt:formatDate type="date" value="${order.shippingDetail.shippingDate}" />! </p> <p>Your Order Number is ${order.orderId}</p> </div> </div> </section> <section> <div class="container"> <p> <a href="<spring:url value="/market/products" />" class="btn btn-primary"> <span class="glyphicon-hand-left glyphicon"> </span> products </a> </p> </div> </section> </body> </html> - If the user cancels the checkout in any of the Views, we need to show the checkout cancelled message; for that we need to have a JSP file called
checkOutCancelled.jspas follows:<%@ taglib prefix="c" uri="http://java.sun.com/jsp/jstl/core"%> <%@ taglib prefix="spring" uri="http://www.springframework.org/tags"%> <html> <head> <meta http-equiv="Content-Type" content="text/html; charset="utf-8"> <link rel="stylesheet" href="//netdna.bootstrapcdn.com/bootstrap/3.0.0/css /bootstrap.min.css"> <title>Invalid cart </title> </head> <body> <section> <div class="jumbotron"> <div class="container"> <h1 class="alert alert-danger">check out cancelled</h1> <p>Your Check out process cancelled! you may continue shopping..</p> </div> </div> </section> <section> <div class="container"> <p> <a href="<spring:url value="/market/products" />" class="btn btn-primary"> <span class="glyphicon-hand-left glyphicon"> </span> products </a> </p> </div> </section> </body> </html> - As a last step, open
cart.jspfromsrcmainwebappWEB-INFviewsand assign the value<spring:url value="/checkout?cartId=${cartId}"/>to thehrefattribute of the checkout link, as follows:<a href= "<spring:url value="/checkout?cartId=${cartId}"/>" class="btn btn-success pull-right"> <span class="glyphicon-shopping-cart glyphicon"> </span> Check out </a> - With all these steps executed, now run the application and enter the
http://localhost:8080/webstore/market/productsURL. Next, click on the Details button of any of the products and click on the Order Now button from the product details page to add products to the shopping cart. Now go to the cart page by clicking the View Cart button; you will be able to see our Checkout button on that page. Just click on the Checkout button; you will be able to see a web page as follows to collect the customer info: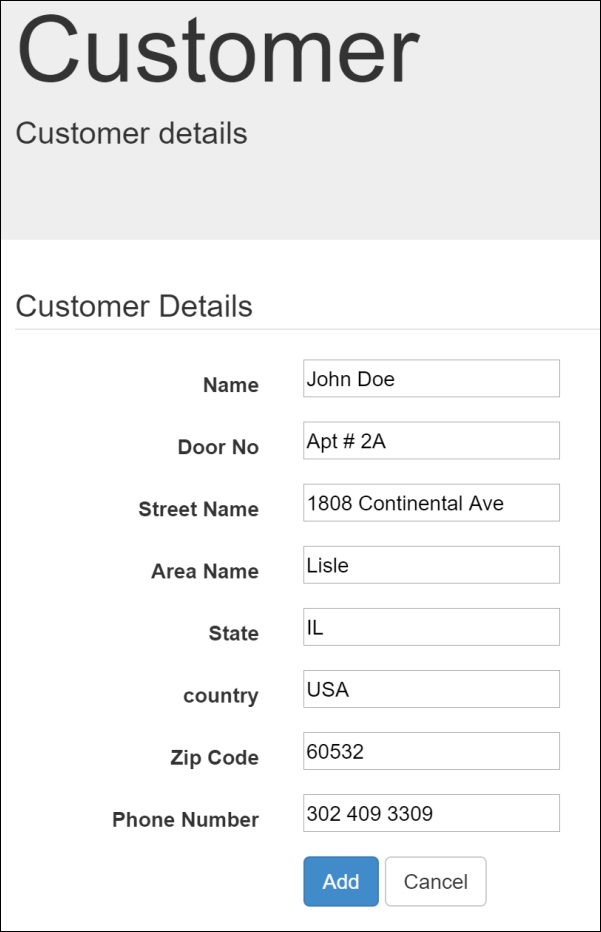
Customer details collection form
- After furnishing all the customer details, if you press the Add button, Spring Web Flow will take you to the next view state, which is to collect shipping details, and so on up to confirming the order. Upon confirming the order, Spring Web Flow will show you the thank you message View as the end state.
What we have done from steps 1 to 6 is a repeated task, creating JSP View files for each view state. We defined the model attribute for each view state in checkout-flow.xml:
<view-state id="collectCustomerInfo" view="collectCustomerInfo.jsp" model="order">
      <transition on="customerInfoCollected" to="collectShippingDetail" />
   </view-state>
That Model object gets bound to the View via the modelAttribute attribute of the <form:form> tag, as follows:
<form:form modelAttribute="order.customer" class="form-horizontal">
         <fieldset>
            <legend>Customer Details</legend>

            <div class="form-group">
               <label class="control-label col-lg-2" for="name">Name</label>
               <div class="col-lg-10">
                  <form:input id="name" path="name" type="text" class="form:input-large" />
               </div>
            </div>
In the preceding snippet of collectCustomerInfo.jsp, you can see that we have bound the <form:input> tag to the name field of the customer object, which comes from the Model object (order.customer). Similarly, we have bound the shippingDetail and order objects to collectShippingDetail.jsp and orderConfirmation.jsp respectively.
It's good that we have bound the Order, Customer, and ShippingDetail objects to the Views, but what will happen after clicking the submit button in each View, or say, the Cancel or back buttons? To know the answer, we need to investigate the following code snippet from collectCustomerInfo.jsp:
<input type="submit" id="btnAdd" class="btn btn-primary" value="Add" name="_eventId_customerInfoCollected" />
On the surface, the preceding <input> tag just acts as a submit button, but the real difference comes from the name attribute (name="_eventId_customerInfoCollected"). We have assigned the value _eventId_customerInfoCollected to the name attribute of the <input> tag for a purpose. The purpose is to instruct Spring Web Flow to raise an event on submission of this form.
When this form is submitted, Spring Web Flow raises an event based on the name attribute. Since we have assigned a value with the _eventId_ prefix (_eventId_customerInfoCollected), Spring Web Flow recognizes it as the event name and raises an event with the name customerInfoCollected.
As we already learned, transitions from one state to another state happen with the help of events, so on submitting the collectCustomerInfo form, Spring Web Flow takes us to the next view state, which is collectShippingDetail:
<view-state id="collectCustomerInfo" view="collectCustomerInfo.jsp" model="order">
   <transition on="customerInfoCollected" to="collectShippingDetail" />
</view-state>
Similarly, we raise events when clicking the Cancel or back buttons; see the following code snippet from collectShippingDetail.jsp:
<button id="back" class="btn btn-default" name="_eventId_backToCollectCustomerInfo">back</button>

<button id="btnCancel" class="btn btn-default" name="_eventId_cancel">Cancel</button>
Okay, so we understand how to raise Spring Web Flow events from a View to directly transition from one view state to another state. However, we need to understand one more important concept regarding Spring Web Flow execution—each flow execution is identified by the flow execution key at runtime. During flow execution, when a view state is entered, the flow execution pauses and waits for the user to perform some action (such as entering some data in the form). When the user submits the form or chooses to cancel the form, the flow execution key is sent along with the form data, in order for the flow to resume where it left off. We can do that with the help of the hidden <input> tag, as follows:
<input type="hidden" name="_flowExecutionKey" value="${flowExecutionKey}"/>
If you look carefully, we have this tag in every flow-related View file, such as collectCustomerInfo.jsp, collectShippingDetail.jsp, and so on. Spring Web Flow stores a unique flow execution key under the model attribute name flowExecutionKey in every flow-related View; we need to store this value in the form variable called _flowExecutionKey in order for it to be identified by Spring Web Flow.
So that's all about the View files associated with our checkout flow definition. But we need to invoke the flow upon clicking the Checkout button from the cart page. As we already learned to invoke our checkout flow, we need to fire a web request with the cart ID as the request parameter, so in step 7 we have changed the href attribute of the checkout link, to form a request URL something similar to http://localhost:8080/webstore/checkout?cartId=55AD1472D4EC.
So now, if you click on the Checkout button after selecting some products and placing them in the shopping cart, you will able to initiate the checkout flow; the following screenshot shows the order confirmation page that will be shown as an outcome of reaching the orderConfirmation state:
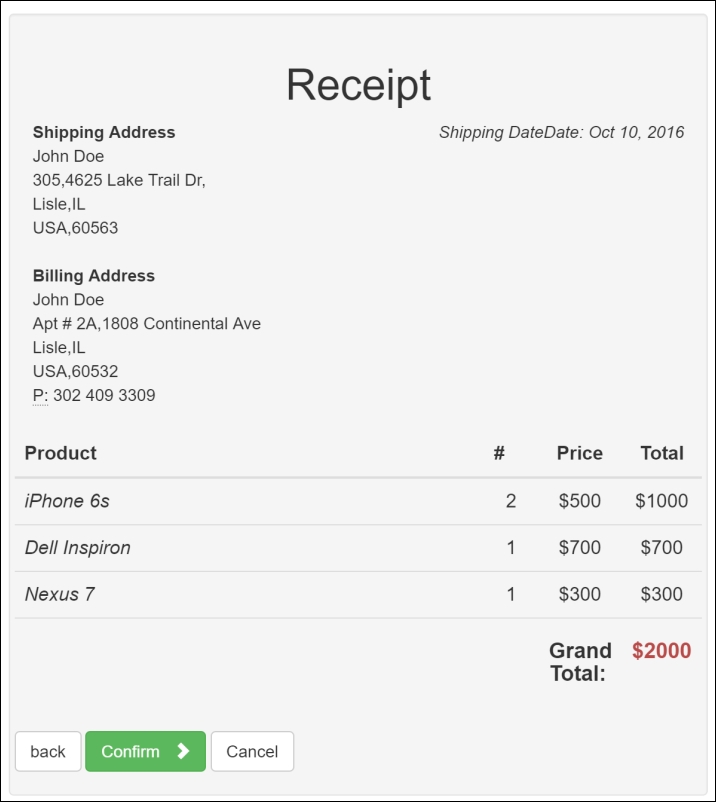
Order confirmation view state
Although we have finished our checkout flow, there is still a bit of room to improve the flow. Every time the checkout flow starts, it collects the customer details, but what if a returning customer makes an order—they probably don't want to fill in their details each time. You can autofill returning customer details from existing records. You can also update the inventory of products upon confirmation.
Here are some of the improvements you can make to avoid collecting customer details for returning customers:
- Create a customer repository and service layer to store, retrieve, and find customer objects. You can probably have methods such as the following in your
CustomerRepositoryandCustomerServiceinterfaces, and in their corresponding implementation classes:public void saveCustomer(Customer customer)public Customer getCustomer(String customerId)public Boolean isCustomerExist(String customerId)
- Define a view state in
checkout-flow.xmlto collect customer IDs. Don't forget to create the corresponding JSP View file to collect customer IDs. - Define a decision state in
checkout-flow.xmlto check whether a customer exists inCustomerRepository, throughCustomerService. Based on the retuning Boolean value, direct the transition to collect the customer details view state or prefill theorder.customerobject fromCustomerRepository. The following is the sample decision state:
      <decision-stateid="checkCustomerExist">
      <if test="customerServiceImpl.isCustomerExist(order.customer.
      customerId)"
      then=" collectShippingDetail"
      else=" collectCustomerInfo"/>
      </decision-state>
- After collecting customer details, don't forget to store them in
CustomerRepositorythrough an action state. Similarly, fill in theorder.customerobject after the decision state.