
Before we create an application in Spring, first we need to obtain Spring Library. We can download the Spring distribution ZIP files that are available in the Spring Maven Repository. Else, we can simply add the dependencies for Spring into project's pom.xml file whenever we use Maven for application development.
Spring packaging is modular, allowing you to pick and choose the component you want to use in your application. Spring comes with a large selection of sample applications that can be referred while building your application.
- Downloading Spring distribution ZIP files: The complete Spring Framework library can be downloaded by opening the link http://repo.spring.io/release/org/springframework/spring/ and selecting the appropriate subfolder for the version needed for your application development. Distribution ZIP files end with
dist.zip, for example,spring-framework-4.1.4.RELEASE-dist.zip.Download the package and extract it. Under the
libfolder, you will find a list of Spring JAR files that represents each Spring module. - Checking Spring out of GitHub: You can check out the latest version of code from Spring's GitHub repository at https://github.com/spring-projects/spring-framework.
To check out the latest version of the Spring code, first install Git from http://git-scm.com/, open the Git Bash tool, and run the following command:
git clone https://github.com/spring-projects/spring-framework
After extracting the downloaded Spring Framework ZIP file, you will get the directory structure, as shown in the following screenshot:
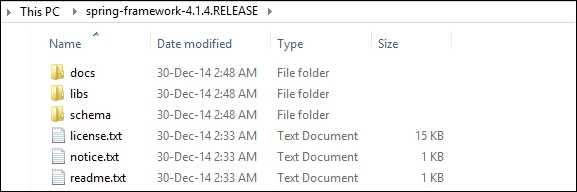
The spring-framework-4.14.RELEASE folder, as shown in the preceding screenshot, contains docs, libs, and schema subfolders. The lib folder contains the Spring JAR files, as shown in the following screenshot:
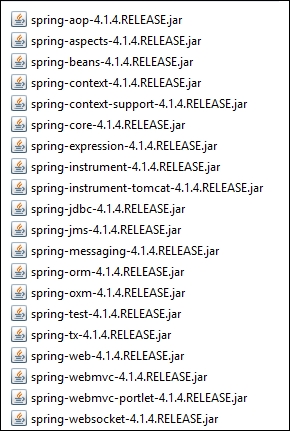
Shown in the preceding screenshot is a list of JAR files required while developing applications using Spring. You can find more details on these JAR files at http://www.learnr.pro/content/53560-pro-spring/40 and http://agile-hero.iteye.com/blog/1684338.
SpringSource Tool Suite (STS) is a powerful Eclipse-based development environment for developing Spring application. The latest version of STS can be downloaded from http://spring.io/tools/sts. We will use STS IDE for all our examples in this book. The following screenshot shows a snapshot of an STS dashboard:

Let's now create a simple Spring application using Spring STS.
With basic understanding of the Spring Framework, we can now create a simple Spring application example. All the examples in this book have been written using the STS IDE.
We will write a simple Spring application that will print greeting message to user. Do not worry if you do not fully understand all the code in this section; we'll go into much more detail on all the topics as we proceed through this book.
The following steps will help you create your Spring project in STS:
- The first step in creating a Spring application is to create a new Spring project in the STS IDE. Navigate to File | New | Spring Project, as shown in the following screenshot:

- Name your Spring project
SimpleSpringProjectand select the Simple Java template, which creates a Simple Spring project using the Java build without a top-level package and with default Spring configuration and project natures, as shown in the following screenshot: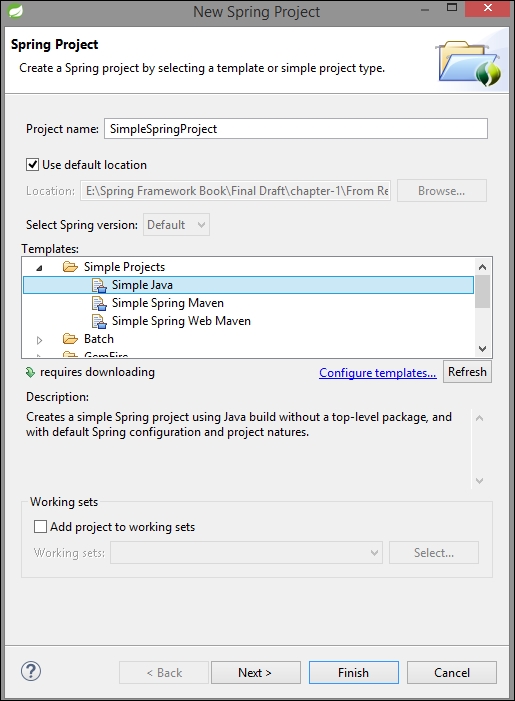
- Then, click on Finish, which will create the project in a workspace.
Let's add the basic Spring JAR files to the build path of this Spring project:
- Add the Spring Framework libraries and common logging API libraries to your project. The common login library can be downloaded from http://commons.apache.org/proper/commons-logging/download_logging.cgi. To add required libraries, right-click on the project named
SimpleSpringProjectand then click on the available options in the context menu, that is, Build Path | Configure Build Path to display the Java Build Path window, as shown in the following screenshot:
- Now, use the Add External JARs button from the Libraries tab in order to include the following core JARs from the Spring Framework and common logging installation directories:
spring-aop-4.1.4.RELEASEspring-aspects-4.1.4.RELEASEspring-beans-4.1.4.RELEASEspring-context-4.1.4.RELEASEspring-context-support-4.1.4.RELEASEspring-core-4.1.4.RELEASEspring-expression-4.1.4.RELEASEcommons-logging-1.2
The Libraries tab is as shown in the following screenshot:

Now, you will have the content in your Project Explorer, as shown in the following screenshot:

Now let's create the actual source files under the SimpleSpringProject project:
- First, create the packages named
org.springframework.chapter1.serviceandorg.springframework.chapter1.main, as shown in the following screenshot. To do this, right-click onsrcin package explorer section and navigate to New | Package.
- Create a class called
MainClass.javainside theorg.springframework.chapter1.mainpackage. Then, create an interface namedGreetingMessageService.javaand its implementation classGreetingMessageServiceImpl.javainside the packageorg.springframework.chapter1.service, as shown in the following screenshot:
The following is the content of interface GreetingMessageService.java and its implementation GreetingMessageServiceImpl.java:
GreetingMessageService.java:package org.springframework.chapter1.service; public interface GreetingMessageService { public String greetUser(); }GreetingMessageServiceImpl.java:package org.springframework.chapter1.service; import org.springframework.stereotype.Service; @Service public class GreetingMessageServiceImpl implements GreetingMessageService { public String greetUser() { return "Welcome to Chapter-1 of book Learning Spring Application Development"; } }
The GreetingMessageService interface has a greetUser() method. The GreetingMessageServiceImpl class implements the GreetingMessageService interface and provides definition to the greetuser() method. This class is annotated with the @Service annotation, which will define this class as service class.
Tip
Downloading the example code
You can download the example code files from your account at http://www.packtpub.com for all the Packt Publishing books you have purchased. If you purchased this book elsewhere, you can visit http://www.packtpub.com/support and register to have the files e-mailed directly to you.
The following is the content of the file MainClass.java:
package org.springframework.chapter1.main;

import org.springframework.chapter1.service.GreetingMessageService;
import org.springframework.context.ApplicationContext;
import org.springframework.context.support.ClassPathXmlApplicationContext;

public class MainClass {
   public static void main(String[] args) {
          ApplicationContext context = new ClassPathXmlApplicationContext(
                       "beans.xml");
          GreetingMessageService greetingMessageService = context.getBean(
                       "greetingMessageServiceImpl", GreetingMessageService.class);
          System.out.println(greetingMessageService.greetuser());
   }
}
In MainClass.java, we are creating ApplicationContext using framework API, as shown in the following:
ApplicationContext context = new ClassPathXmlApplicationContext(
                      "beans.xml");
This API loads Spring beans configuration file named beans.xml, which takes care of creating and initializing all the bean objects. We use the getBean() method of the created ApplicationContext to retrieve required Spring bean from the application context, as shown in the following:
GreetingMessageService greetingMessageService = context.getBean(
   "greetingMessageServiceImpl", GreetingMessageService.class);
The getBean() method uses bean ID and bean class to return a bean object.
The Spring bean configuration file is used to configure the Spring beans in the Spring IoC container. As we have annotated the GreetingMessageServiceImpl class with @Service annotation, the next step is to add <context:component-scan> in the bean configuration file. To do this, follow these steps:
- Create a Spring Bean Configuration file under the
srcdirectory. To do this, right-click onsrcin package explorer section and then navigate to New | Spring Bean Configuration File. - Enter the bean name
beansand click on Next, as shown in the following screenshot:
- Select the context option and click on Finish, as shown in the following screenshot:

- Now the Spring bean configuration file is created. Add the following code to create an entry. The contents of the
beans.xmlfile are as follows:<?xml version="1.0" encoding="UTF-8"?> <beans xmlns="http://www.springframework.org/schema/beans" xmlns:xsi="http://www.w3.org/2001/XMLSchema-instance" xmlns:context="http://www.springframework.org/schema/context" xsi:schemaLocation="http://www.springframework.org/schema/beans http://www.springframework.org/schema/beans/spring-beans.xsd http://www.springframework.org/schema/context http://www.springframework.org/schema/context/spring-context-4.1.xsd"> <context:component-scan base-package="org.springframework.chapter1.service"/> </beans>
When the Spring application gets loaded into the memory, in order to create all the beans, the framework uses the preceding configuration file, as shown in the following screenshot:

The Spring bean configuration file can be named anything, but developers usually keep the name beans.xml. This Spring bean configuration file should be available in classpath.
Once you are done with creating source files and beans configuration files, you are ready for the next step, that is, compiling and running your program.
To execute the example, run the MainClass.java file. Right-click on MainClass.java and navigate to Run As | Java Application. If everything goes fine, then it will print the following message in STS IDE's console, as shown in the following screenshot:

We have successfully created our first Spring application, where you learned how to create the Spring project and executed it successfully. We will see detailed examples in the next chapter.