Chapter 7
Summarizing It All
IN THIS CHAPTER
Working with things great and small
Understanding symmetry, peaks, and plateaus
Getting descriptive
Serving up statistics on a tray
Measures of central tendency and variability are excellent ways of summarizing a set of scores. They aren’t the only ways, though. Central tendency and variability make up a subset of descriptive statistics. Some descriptive statistics are intuitive — like count, maximum, and minimum. Some are not — like skewness and kurtosis.
In this chapter, I discuss descriptive statistics, and I show you Excel’s capabilities for calculating them and visualizing them.
Counting Out
The most fundamental descriptive statistic I can imagine is the number of scores in a set of scores. Excel offers five ways to determine that number. Yes, five ways. Count them.
COUNT, COUNTA, COUNTBLANK, COUNTIF, COUNTIFS
Given an array of cells, COUNT gives you the amount of those cells that contain numerical data. Figure 7-1 shows that I’ve entered a group of scores, selected a cell to hold COUNT’s result, and opened the Function Arguments dialog box for COUNT.

FIGURE 7-1: The Function Arguments dialog box for COUNT, showing multiple arguments.
Here are the steps:
-
Enter your data into the worksheet and select a cell for the result.
I entered data into columns C, D, and E to show off COUNT’s multi-argument capability. I selected cell C14 to hold the count.
- From the Statistical Functions menu, select COUNT and click OK to open the Function Arguments dialog box for COUNT.
-
In the Function Arguments dialog box, enter the appropriate values for the arguments.
In the Number1 box, I entered one of the data columns for this example, like C1:C12.
I clicked in the Number2 box and entered another data column. I entered D1:D6.
I clicked in the Number3 box and entered the last column, which in this example is E1:E2.
- Click OK to put the result in the selected cell.
COUNTA works like COUNT, except that its tally includes cells that contain text and logical values in its tally.
COUNTBLANK counts the number of blank cells in an array. In Figure 7-2, I use the numbers from the preceding example, but I extend the array to include cells D7 through D12 and E3 through E12. The array in the Range box is C1:E12. The Argument Functions dialog box for COUNTBLANK shows the number of blank cells (16, for this example).

FIGURE 7-2: COUNTBLANK tallies the blank cells in a specified array.
COUNTIF shows the number of cells whose value meets a specified criterion. Figure 7-3 reuses the data once again, showing the Arguments Function dialog box for COUNTIF. Although the range is C1:E12, COUNTIF doesn’t include blank cells.

FIGURE 7-3: COUNTIF tallies the amount of cells whose data meet a specified criterion.
The criterion I used, >= 89, tells COUNTIF to count only the cells whose values are greater than or equal to 89. For this example, that count is 2.
 This probably won’t make much difference as you use the
 COUNTIF function, but a little quirk of Excel shows up here: If you put double quotes around the criterion, the result appears in the dialog box before you click OK. If you don’t, it doesn’t. If you click OK without quoting, Excel supplies the quotes and the result appears in the selected cell, and Excel applies the quotes.
COUNTIFS can use multiple criteria to determine the count. If the criteria come from two arrays, they must have the same number of cells. This is because COUNTIFS counts pairs of cells. It includes a pair of cells in the count if one of the cells meets a criterion and the other meets a criterion. Take a look at Figure 7-4.

FIGURE 7-4: Working with COUNTIFS.
In this example, COUNTIFS operates in C1:C6 and D1:D6. The criterion for the cells in column C is >=40. The criterion for the cells in column D is >50. This means that COUNTIFS counts cell-pairs whose C cell holds a value greater than or equal to 40 and whose D cell holds a value greater than 50. Only two cell-pairs meet these conditions, as the dialog box shows.
You can use a cell range more than once in COUNTIFS. For example,
=COUNTIFS(C1:C12,">30",C1:C12,"<60")
gives the number of cells in which the value is between 30 and 60 (not including 30 or 60).
The Long and Short of It
Two more descriptive statistics that probably require no introduction are the maximum and the minimum. These, of course, are the largest value and the smallest value in a group of scores.
MAX, MAXA, MIN, and MINA
Excel has worksheet functions that determine a group’s largest and smallest values. I show you what MAX is all about. The others work in a similar fashion.
Figure 7-5 reuses the scores from the preceding examples.

FIGURE 7-5: The Function Arguments dialog box for MAX.
I selected a cell to hold their maximum value and opened the Function Arguments dialog box for MAX. Here are the steps you can follow:
-
Type your data into the worksheet and select a cell to hold the result.
I entered data into columns C, D, and E to show off
MAX’s multi-argument capability. For this example, I selected cell C14. - From the Statistical Functions menu, select MAX to open the Function Arguments dialog box for
MAX. -
In the Function Arguments dialog box, enter the appropriate values for the arguments.
In the Number1 box, I entered one of the data columns: C1:C12.
Clicking the Number2 box creates and opens the Number3 box. In the Number2 box, I entered another array: D1:D6.
I clicked in the Number3 box and entered the last array: E1:E2.
- Click OK to put the result in the selected cell.
MAX ignores any text or logical values it encounters along the way. MAXA takes text and logical values into account when it finds the maximum. If MAXA encounters the logical value TRUE, it converts that value to 1. MAXA converts FALSE, or any text other than “TRUE”, to 0.
MIN and MINA work the same way as MAX and MAXA, except that they find the minimum rather than the maximum. Take care when you use MINA, because the conversions of logical values and text to 0 and 1 influence the result. With the numbers in the preceding example, the minimum is 22. If you enter FALSE or other text into a cell in any of the arrays, MINA gives 0 as the minimum. If you enter TRUE, MINA gives 1 as the minimum.
Getting Esoteric
In this section, I discuss some little-used statistics that are related to the mean and the variance. For most people, the mean and the variance are enough to describe a set of data. These other statistics, skewness and kurtosis, go just a bit further. You might use them someday if you have a huge set of data and you want to provide some in-depth description.
Think of the mean as locating a group of scores by showing you where their center is. This is the starting point for the other statistics. With respect to the mean:
- The variance tells you how spread out the scores are.
- Skewness indicates how symmetrically the scores are distributed.
- Kurtosis shows you whether or not the scores are distributed with a peak in the neighborhood of the mean.
 Skewness and kurtosis are related to the mean and variance in fairly involved mathematical ways. The variance involves the sum of squared deviations of scores around the mean. Skewness depends on cubing the deviations around the mean before you add them all up. Kurtosis takes it all to a higher power — the fourth power, to be exact. I get more specific in the subsections that follow.
SKEW and SKEW.P
Figure 7-6 shows three histograms. The first is symmetric; the other two are not. The symmetry and the asymmetry are reflected in the skewness statistic.

FIGURE 7-6: Three histograms showing three kinds of skewness.
For the symmetric histogram, the skewness is 0. For the second histogram — the one that tails off to the right — the value of the skewness statistic is positive. It’s also said to be skewed to the right. For the third histogram (which tails off to the left), the value of the skewness statistic is negative. It’s also said to be skewed to the left.
Where do zero, positive, and negative skew come from? They come from this formula:
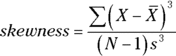
In the formula, ![]() is the mean of the scores, N is the number of scores, and s is the standard deviation. This formula is for the skewness of a sample. The formula for the skewness in a population uses N rather than N-1.
is the mean of the scores, N is the number of scores, and s is the standard deviation. This formula is for the skewness of a sample. The formula for the skewness in a population uses N rather than N-1.
I include this formula for completeness. If you’re ever concerned with skewness of a sample, you probably won’t use this formula anyway because Excel’s SKEW function does the work for you.
To use SKEW:
-
Type your numbers into a worksheet and select a cell for the result.
For this example, I’ve entered scores into the first ten rows of columns B, C, D, and E. (See Figure 7-7.) I selected cell H2 for the result.
- From the Statistical Functions menu, select SKEW to open the Function Arguments dialog box for
SKEW. -
In the Function Arguments dialog box, type the appropriate values for the arguments.
In the Number1 box, enter the array of cells that holds the data. For this example, the array is B1:E10. With the data array entered, the Function Arguments dialog box shows the skewness, which for this example is negative.
- Click OK to put the result into the selected cell.

FIGURE 7-7: Using the SKEW function to calculate skewness.
The Function Arguments dialog box for SKEW.P (the skewness of a population) looks the same. As I mention earlier, population skewness incorporates N rather than N-1.
KURT
Figure 7-8 shows two histograms. The first has a peak at its center; the second is flat. The first is said to be leptokurtic. its kurtosis is positive. The second is platykurtic; its kurtosis is negative.

FIGURE 7-8: Two histograms, showing two kinds of kurtosis.
Negative? Wait a second. How can that be? I mention earlier that kurtosis involves the sum of fourth powers of deviations from the mean. Because four is an even number, even the fourth power of a negative deviation is positive. If you’re adding all positive numbers, how can kurtosis ever be negative?
Here’s how. The formula for kurtosis is

where ![]() is the mean of the scores, N is the number of scores, and s is the standard deviation.
is the mean of the scores, N is the number of scores, and s is the standard deviation.
Uh, why 3? The 3 comes into the picture because that’s the kurtosis of something special called the standard normal distribution. (I discuss normal distributions at length in Chapter 8.) Technically, statisticians refer to this formula as kurtosis excess — meaning that it shows the kurtosis in a set of scores that’s in excess of the standard normal distribution’s kurtosis. If you’re about to ask the question “Why is the kurtosis of the standard normal distribution equal to 3?” don’t ask.
This is another formula you’ll probably never use because Excel’s KURT function takes care of business. Figure 7-9 shows the scores from the preceding example, a selected cell, and the Function Arguments dialog box for KURT.

FIGURE 7-9: Using KURT to calculate kurtosis.
To use KURT:
-
Enter your numbers into a worksheet and select a cell for the result.
For this example, I enter scores into the first ten rows of columns B, C, D, and E. I select cell H2 for the result.
- From the Statistical Functions menu, select KURT to open the Function Arguments dialog box for
KURT. -
In the Function Arguments dialog box, enter the appropriate values for the arguments.
In the Number1 box, I enter the array of cells that holds the data. Here, the array is B1:E10. With the data array entered, the Function Arguments dialog box shows the kurtosis, which for this example is negative.
- Click OK to put the result into the selected cell.
Tuning In the Frequency
Although the calculations for skewness and kurtosis are all well and good, it’s helpful to see how the scores are distributed. To do this, you create a frequency distribution, a table that divides the possible scores into intervals and shows the number (the frequency) of scores that fall into each interval.
Excel gives you two ways to create a frequency distribution. One is a worksheet, and the other is a data analysis tool.
FREQUENCY
I show you the FREQUENCY worksheet function in Chapter 2 when I introduce array functions. Here, I give you another look. In the upcoming example, I reuse the data from the skewness and kurtosis discussions so that you can see what the distribution of those scores looks like.
Figure 7-10 shows the data once again, along with a selected array, labeled Frequency. I’ve also added the label Intervals to a column, and in that column I put the interval boundaries. Each number in that column is the upper bound of an interval. The figure also shows the Function Arguments dialog box for FREQUENCY.

FIGURE 7-10: Finding the frequencies in an array of cells.
This is an array function, so the steps are a bit different from the functions I show you earlier in this chapter:
-
Enter the scores into an array of cells.
The array, as in the preceding examples, is B1:E10.
-
Enter the intervals into an array.
I entered 5, 10, 15, 20, 25, and 30 into G2:G7.
-
Select an array for the resulting frequencies.
I put Frequency as the label at the top of column H, so I selected H2 through H7 to hold the resulting frequencies.
- From the Statistical Functions menu, select FREQUENCY to open the Function Arguments dialog box for
FREQUENCY. -
In the Function Arguments dialog box, enter the appropriate values for the arguments.
In the Data_array box, I entered the cells that hold the scores. In this example, that’s B1:E10.
FREQUENCYrefers to intervals as bins, and holds the intervals in the Bins_array box. For this example, G2:G7 goes into the Bins_array box.After I identified both arrays, the Function Arguments dialog box shows the frequencies inside a pair of curly brackets. Look closely at Figure 7-10 and you see that Excel adds a frequency of zero to the end of the set of frequencies in the third line of the dialog box.
-
Press Ctrl+Shift+Enter to close the Function Arguments dialog box.
Use this keystroke combination because
FREQUENCYis an array function.
When you close the Function Arguments dialog box, the frequencies go into the appropriate cells, as Figure 7-11 shows.

FIGURE 7-11: FREQUENCY’s frequencies.
If I had assigned the name Data to B1:E10 and the name Interval to G2:G7, and used those names in the Function Arguments dialog box, the resulting formula would have been
=FREQUENCY(Data,Interval)
which might be easier to understand than
=FREQUENCY(B1:E10,G2:G7)
(Don’t remember how to assign a name to a range of cells? Take a look at Chapter 2.)
Data analysis tool: Histogram
Here’s another way to create a frequency distribution — with the Histogram data analysis tool. To show you that the two methods are equivalent, I use the data from the FREQUENCY example. Figure 7-12 shows the data along with the Histogram dialog box.

FIGURE 7-12: The Histogram analysis tool.
The steps are listed here:
- Enter the scores into an array, and enter intervals into another array.
- Click on Data | Data Analysis to open the Data Analysis dialog box.
- From the Analysis Tools menu, select Histogram to open the Histogram dialog box.
-
In the Histogram dialog box, enter the appropriate values.
The data are in cells B1 through E10, so B1:E10 goes into the Input Range box. The easiest way to enter this array is to click in B1, press and hold the Shift key, and then click in E10. Excel puts the absolute reference format ($B$1:$E$10) into the Input Range box.
In the Bin Range box, I enter the array that holds the intervals. In this example, that’s G2 through G7. I click in G2, press and hold the Shift key, and then click in G7. The absolute reference format ($G$2:$G$7) appears in the Bin Range box.
- Select the New Worksheet Ply radio button to create a new tabbed page and to put the results on the new page.
- Select the Chart Output check box to create a histogram and visualize the results.
- Click OK to close the dialog box.
Figure 7-13 shows Histogram’s output. The table matches up with what FREQUENCY produces. Notice that Histogram adds More to the Bin column. The size of the histogram is somewhat smaller when it first appears. I used the mouse to stretch the histogram and give it the appearance you see in the figure. The histogram shows that the distribution tails off to the left (consistent with the negative skewness statistic) and seems to not have a distinctive peak (consistent with the negative kurtosis statistic). Notice also the chart toolset (the three icons) that appears to the right of the histogram. The tools enable you to modify the histogram in a variety of ways. (See Chapter 3.)

FIGURE 7-13: The Histogram tool’s output (after stretching the chart).
By the way, the other check box options in the Histogram dialog box are Pareto Chart and Cumulative Percentage. The Pareto Chart option sorts the intervals in order, from highest frequency to lowest, before creating the graph. The Cumulative Percentage option shows the percentage of scores in an interval combined with the percentages in all the preceding intervals. Selecting this check box also puts a cumulative percentage line in the histogram. (You’d have to select both the Pareto Chart option and the Cumulative Percentage option to duplicate the effect of the Pareto chart I describe in Chapter 3.)
Can You Give Me a Description?
If you’re dealing with individual descriptive statistics, the worksheet functions I discuss get the job done nicely. If you want an overall report that presents nearly all the descriptive statistical information in one place, use the Data Analysis tool I describe in the next section.
Data analysis tool: Descriptive Statistics
In Chapter 2, I show you the Descriptive Statistics tool to introduce Excel’s data analysis tools. Here’s a slightly more complex example. Figure 7-14 shows three columns of scores and the Descriptive Statistics dialog box. I’ve labeled the columns First, Second, and Third so that you can see how this tool incorporates labels.

FIGURE 7-14: The Descriptive Statistics tool at work.
Here are the steps for using this tool:
- Enter the data into an array.
- Select Data | Data Analysis to open the Data Analysis dialog box.
- In the Analysis Tools menu, choose Descriptive Statistics to open the Descriptive Statistics dialog box.
-
In the Descriptive Statistics dialog box, enter the appropriate values.
In the Input Range box, I enter the data. The easiest way to do this is to move the cursor to the upper-left cell (C1), press the Shift key, and click in the lower-right cell (E9). That puts $C$1:$E$9 into Input Range.
- Select the Columns radio button to indicate that the data are organized by columns.
- Select the Labels in First Row check box because the input range includes the column headings.
- Select the New Worksheet Ply radio button to create a new tabbed sheet within the current worksheet, and to send the results to the newly created sheet.
- Select the Summary Statistics check box, and leave the others deselected.
-
Click OK to close the dialog box.
The new tabbed sheet (ply) opens, displaying statistics that summarize the data.
As Figure 7-15 shows, the statistics summarize each column separately. When this page first opens, the columns that show the statistic names are too narrow, so the figure shows what the page looks like after I widen the columns.

FIGURE 7-15: The Descriptive Statistics tool’s output.
The Descriptive Statistics tool gives values for these statistics: Mean, standard error, median, mode, standard deviation, sample variance, kurtosis, skewness, range, minimum, maximum, sum, and count. Except for standard error and range, I discuss all of them.
Range is just the difference between the maximum and the minimum. Standard error is more involved, and I defer the explanation until Chapter 9. For now, I’ll just say that standard error is the standard deviation divided by the square root of the sample size and leave it at that.
By the way, one of the check boxes left deselected in the example’s Step 6 provides something called the Confidence Limit of the Mean, which I also defer until Chapter 9. The remaining two check boxes, Kth Largest and Kth Smallest, work like the functions LARGE and SMALL.
Be Quick About It!
Quick Analysis was a wonderful addition to Excel 2013, but it still hasn’t made its way to the Mac. You select a range of data and an icon appears in the lower-right corner of the selection. Clicking the icon (or pressing Ctrl+Q) opens numerous possibilities for visualizing and summarizing the selected data. Mousing over these possibilities gives you a preview of what they look like. Selecting one puts it into your worksheet.
The worksheet in Figure 7-16 shows the percentages by age group that used the indicated media in 2006 (Source: U.S. Statistical Abstract). I selected the data, which caused the Quick Analysis icon to appear. Clicking the icon opened the panel with the options.

FIGURE 7-16: Selected data, the Quick Analysis icon, and the panel of options for visualizing and summarizing the data.
Figure 7-17 shows what happens when I mouse over FORMATTING | Data Bars.

FIGURE 7-17: Mousing over FORMATTING | Data Bars.
Want to see what a column chart looks like? Mouse over CHARTS | Clustered Column. (See Figure 7-18.)

FIGURE 7-18: Mousing over CHARTS | Clustered Column.
How about inserting the means? That’s TOTALS | Average, as in Figure 7-19.

FIGURE 7-19: Mousing over TOTALS | Average.
I could go on all day with this, but I’ll just show you a couple more. If you’d like to add some professional-looking table effects to the selection, try TABLES | Table. (See Figure 7-20.)

FIGURE 7-20: Mousing over TABLES | Table.
I couldn’t finish off this topic without taking a look at the sparklines in Quick Analysis. When I mouse over SPARKLINES | Column, the result is Figure 7-21. The columns give a concise look at important age-related trends: Contrast the Internet sparkline with the sparklines for Newspapers and TV.

FIGURE 7-21: Mousing over SPARKLINES | Column.
Instant Statistics
Suppose that you’re working with a cell range full of data. You might like to quickly know the status of the average and perhaps some other descriptive statistics about the data without going to the trouble of using several statistical functions. You can customize the status bar at the bottom of the worksheet to track these values for you and display them whenever you select the cell range. To do this, right-click the status bar to open the Customize Status Bar menu. (See Figure 7-22.) In the area third from the bottom, selecting all the items displays the values I mention in the preceding section (along with the count of items in the range — numerical and non-numerical).

FIGURE 7-22: The Customize status bar menu.
Figure 7-23 shows these values displayed on the status bar for the cells I selected.

FIGURE 7-23: Displaying values on the status bar.