
One of the computer's greatest strengths is its ability to perform an action repeatedly without getting bored or making careless mistakes. It can calculate the average test scores for a dozen students, print 100 party invitations, or compute the monthly bills for a million customers with no trouble or complaining.
The lessons you've read so far, however, don't tell you how to do these things. Until this point, every step the computer takes requires a separate line of code. To add 10 numbers, you would need to write 10 lines of code (or one long one).
In this lesson you learn how to make the computer execute the same lines of code many times. You learn how to loop through arrays and collections of items to take action or perform calculations on them.
The following sections describe the kinds of loops provided by Visual Basic. The final section describes two statements you can use to change the way a loop works: Exit and Continue.
A For loop uses a variable to control the number of times it executes a series of statements. The For loop's syntax is as follows:
Forvariable[Asdatatype] =startTostop[Stepamount]statements...Next [variable]
Where:
variable— This is the looping variable that controls the loop.[Asdatatype] — If present, this declares the looping variable's data type. This gives the variable the loop's scope so it is not visible outside the loop. Usually the data type isInteger.start— This is the looping variable's initial value.stop— The loop continues until the looping passes this value.[Step amount] — By default, the looping variable increases by 1 each time through the loop, but this statement can change that. Theamountis the value by which the looping variable changes each time through the loop. Note thatamountcan be negative.statements— These are the statements that you want the loop to execute.Next [variable] — TheNextkeyword ends the loop. The looping variable's name is optional but recommended because it makes the code easier to read.
For example, the following code displays the numbers 0 through 9, followed by their squares, in the Output window:
For i As Integer = 0 To 9
    Console.WriteLine(i & ": " & i * i)
Next i
This code is relatively straightforward. It uses the looping variable i declared as part of the loop. The value i starts at 0 and increases by 1 each time through the loop until it reaches 9. After the final pass through the loop with i = 9, the loop ends.
Here's a slightly more complicated example that calculates factorials. The program converts the value selected in the NumericUpDown control named nudNumber into a long integer and saves it in variable n. It initializes the variable factorial to 1 and then uses a loop to multiply factorial by each of the numbers between 2 and n. The result is 1 * 2 * 3 * ... * n, which is n!.
' Get the input value n.
Dim n As Long = CLng(nudNumber.Value)

' Calculate n!.
Dim factorial As Long = 1
For i As Long = 2 To n
    factorial *= i
Next i

' Display the result.
txtResult.Text = factorial.ToString()
Note
The Factorials program available as part of the Lesson19 download on the book's web site (www.wrox.com or www.vb-helper.com/24hourvb.html) demonstrates this code.
You may recall that Lesson 16 used code to calculate Fibonacci numbers, and in that lesson's Exercise 1 you calculated factorials. Those programs used 20 lines of code to calculate and store 20 values that the program then used as a kind of lookup table.
The factorial calculation code shown here is more efficient. It doesn't require a large array to hold values. It also doesn't require that you know ahead of time how many values you might need to calculate (20 for the earlier programs), although the factorial function grows so quickly that this program can only calculate values up to 20! before the result won't fit in a long integer.
Note
The For loop is often the best choice if you know exactly how many times you need the loop to execute.
A For Each loop executes a block of code once for each item in an array or list. The syntax of the For Each loop is as follows:
For Eachvariable[Asdatatype] Initemsstatements...Next [variable]
Where:
variable— This is the looping variable that controls the loop.[Asdatatype] — If present, this declares the looping variable's data type. This gives the variable the loop's scope so it is not visible outside the loop. This should be a data type compatible with whatever is in the array or collection.items— This is the array or list of items over which you want to loop.statements— These are the statements that you want the loop to execute.Next[variable] — TheNextkeyword ends the loop. The looping variable's name is optional but recommended because it makes the code easier to read.
For example, the following code calculates the average of the test scores stored in the ListBox named lstScores.
' Make sure the list isn't empty.
If (lstScores.Items.Count = 0) Then
    MessageBox.Show("There are no items to average.")
Else
    ' Add up the values.
    Dim total As Integer = 0
    For Each value As Integer In lstScores.Items
        total += value
    Next value

    ' Calculate the average.
    Dim average As Double = total / lstScores.Items.Count
' Display the result.
MessageBox.Show("Average: " & average.ToString("0.00"))
End IfAfter confirming that the ListBox isn't empty, the code creates a variable named total and sets it equal to 0. It then loops through the items in the ListBox, adding each value to total.
Warning
This code loops over the items in a ListBox, treating those items as integers. If the ListBox contains something other than integers, such as file names or other strings, the program will crash.
The code finishes by dividing total by the number of items in the ListBox.
Note
When you need to perform an operation on all the items in an array or list, a For Each loop is often your best choice.
A While loop executes as long as some condition is true. The syntax for a While loop is as follows:
Whileconditionstatements...End While
Where:
condition— The loop executes as long as this Boolean expression is true.statements— These are the statements that you want the loop to execute.
For example, the following code calculates a number's prime factors:
' Get the input number.
Dim number As Long = Long.Parse(txtNumber.Text)

' Find the factors.
Dim result As String = "1"

' Consider factors between 2 and the number.
For factor As Long = 2 To CLng(Math.Sqrt(number))
    ' Pull out as many copies of this factor as possible.
    While (number Mod factor = 0)
        result &= " * " & factor
        number = factor
    End While
Next factor
' Add whatever is left. If number <> 1 Then result &= " * " & number ' Display the result. txtResult.Text = result
Note
The PrimeFactors program available as part of the Lesson19 download on the book's web site (www.wrox.com or www.vb-helper.com/24hourvb.html) demonstrates this code.
The code starts by getting the user's input number. It builds a result string and initializes it to "1."
Next, the code users a For loop to consider the numbers between 2 and the square root of the user's number as possible factors.
For each of the possible factors, it uses a While loop to remove that factor from the number. As long as the factor divides evenly into the remaining number, the program adds the factor to the result and divides the user's number by the factor.
The code finishes by adding any remaining value and displaying its result.
Note
Loops that use incrementing integers to decide when to stop are often easier to write using For loops instead of While loops. A While loop is particularly useful when the stopping condition occurs at a less predictable time, as in the factoring example.
Visual Basic provides two forms of Do loops. The first is similar to a While loop but with different syntax. The second is also similar to a While loop except it checks its stopping condition at the end of the loop instead of the beginning (so it executes its code at least once).
The syntax of the first kind of Do loop is as follows:
Do Whileconditionstatements...Loop
The syntax of the second kind of Do loop is as follows:
Do
    statements...
Loop While condition
In both versions:
statements— These are the statements that you want the loop to execute.condition— The loop continues to execute as long as this Boolean expression is true.
The following code uses a Do loop to calculate the greatest common divisor (GCD) of two numbers, the largest number that divides them both evenly:
' Get the input values.
Dim a As Long = Long.Parse(txtA.Text)
Dim b As Long = Long.Parse(txtB.Text)

' Calculate the GCD.
Dim remainder As Long
Do
    remainder = a Mod b
    If (remainder <> 0) Then
        a = b
        b = remainder
    End If
Loop While (remainder > 0)

txtResult.Text = b.ToString()
Note
The GCD program available as part of the Lesson19 download on the book's web site (www.wrox.com or www.vb-helper.com/24hourvb.html) demonstrates this code.
Note
Notice that the variable remainder used to end the loop is declared outside of the loop even though it doesn't really do anything outside of the loop. Normally, to restrict scope as much as possible you would want to declare this variable inside the loop if you could.
However, the loop ending test executes in a scope that lies outside of the loop, so any variables declared inside the loop are hidden from the test.
It's important that any loop eventually ends, and in this code it's not completely obvious why that happens. It turns out that each time through the loop (with the possible exception of the first time), a and b get smaller. If you run through a few examples, you'll be able to convince yourself.
If the loop runs long enough, b eventually reaches 1. At that point b must evenly divide a no matter what a is so the loop ends. If b does reach 1, then 1 is the greatest common divisor of the user's original numbers and those numbers are called relatively prime.
Note
A Do loop with the test at the end always executes its code at least once because it doesn't check its condition until the end. That's why you should pick a Do loop over a While loop or vice versa. If you might not want the loop to execute even once, use a While loop or a Do While loop. If you need to run the loop once before you can tell whether to stop, use a Do loop with the test at the end.
The Exit and Continue statements change the way a loop works.
The Exit statement makes the code exit a loop immediately without executing any more statements inside the loop. A second keyword after Exit determines the kind of loop that exits. That second keyword can be For, Do, or While to exit the corresponding kind of loop.
Note
If the Exit statement is inside a nested series of loops, it exits the closest enclosing loop of the appropriate type.
For example, the following code searches the selected items in a ListBox for the value Carter. If it finds that value, it sets the Boolean variable carterSelected to true and breaks out of the loop. If the ListBox has many selected items, breaking out of the loop early may enable the program to skip many loop iterations and save some time.
' See if Carter is one of the selected names.
Dim carterSelected As Boolean = False
For Each name As String In lstNames.SelectedItems
    If (name = "Carter") Then
        carterSelected = True
        Exit For
    End If
Next name

MessageBox.Show(carterSelected.ToString())
The Continue statement makes a loop jump to its looping statement early, skipping any remaining statements inside the loop after the Continue statement. Like the Exit statement, the Continue statement takes a second keyword that indicates what kind of loop should continue.
Note
If the Continue statement is inside a nested series of loops, it continues the closest enclosing loop of the appropriate type.
For example, the following code uses a For Each loop to display the square roots of the numbers in an array. The Math.Sqrt function cannot calculate the square root of a negative number, so to avoid trouble the code checks each value. If it finds a value less than zero, it uses the Continue statement to skip the rest of that trip through the loop so it doesn't try to take the number's square root. It then continues with the next number in the array.
' Display square roots.
Dim values() As Single = {4, 16, −1, 60, 100}
For Each value As Single In values
    If (value < 0) Then Continue For
    Console.WriteLine(String.Format(
        "The square root of {0} is {1:0.00}",
        value, Math.Sqrt(value)))
Next value
The following shows this program's results:
The square root of 4 is 2.00
The square root of 16 is 4.00
The square root of 60 is 7.75
The square root of 100 is 10.00
Note
The Break and Continue statements make loops work in nonstandard ways, which sometimes makes the code harder to read, debug, and maintain. Use them if it makes the code easier to read, but ask yourself whether there's a simpler way to write the loop that avoids these statements. For example, the following code does the same things as the previous code but without a Continue statement:
' Display square roots.
Dim values() As Single = {4, 16, −1, 60, 100}
For Each value As Single In values
    If (value >= 0) Then
        Console.WriteLine(String.Format(
            "The square root of {0} is {1:0.00}",
            value, Math.Sqrt(value)))
    End If
Next valueIn this Try It, you make the simple login form shown in Figure 19-1. When the program's startup form loads, it enters a loop that makes it display this form until the user enters the correct username and password or clicks the Cancel button.

Note
You can download the code and resources for this Try It from the book's web page at www.wrox.com or www.vb-helper.com/24hourvb.html. You can find them in the Lesson19 folder in the download.
In this lesson:
Build a main form that displays a success message.
Build the login dialog shown in Figure 19-1.
In the main form's
Loadevent handler, create an instance of the login dialog. Then enter aWhileloop that displays the dialog and doesn't stop until the user enters a username and password that match values in the code. If the user clicks Cancel, close the main form.
Use a
Booleanvariable namedtryingToLoginto control the loop. Initialize it toTruebefore the loop and set it toFalsewhen the user either cancels or enters the right username and password.To determine whether the user entered a valid username and password, compare them to the strings "User" and "Secret." (A real application would validate these values against a database or by using some other authentication method.)
Build a main form that displays a success message.
Place labels on the form to display the message.
Build the login dialog shown in Figure 19-1.
Create the controls shown in Figure 19-1.
Set the password
TextBox'sPasswordCharproperty toX.
In the main form's
Loadevent handler, create an instance of the login dialog. Then enter aWhileloop that displays the dialog and doesn't stop until the user enters a username and password that match values in the code. If the user clicks Cancel, close the main form and break out of the loop.The following code shows one possible solution:
' Make the user log in.
Private Sub Form1_Load() Handles MyBase.Load
    ' Create a LoginForm.
    Dim frm As New LoginForm()

    ' Repeat until the user successfully logs in.
    Dim tryingToLogin As Boolean = True
    While tryingToLogin
        ' Display the login dialog and check the result.
        If (frm.ShowDialog() = DialogResult.Cancel) Then
            ' The user gives up. Close and exit the loop.
            Me.Close()
            tryingToLogin = False
        Else
            ' See if the user entered valid values.
            If ((frm.txtUsername.Text = "User") AndAlso
                (frm.txtPassword.Text = "Secret")) Then
                ' Login succeeded. Stop trying to log in.
                tryingToLogin = False
            Else
                ' Login failed. Display a message and
                ' let the loop continue.
                MessageBox.Show("Invalid username and password.")
            End If
        End If
    End While

    ' If we get here, we're done trying to log in.
End Sub
Note
Please select Lesson 19 on the DVD to view the video that accompanies this lesson.
Make a program that calculates the sum 1 + 2 + 3 + ... + N for a number N entered by the user.
Make a program that calculates the Nth Fibonacci number for a number N entered by the user. The Fibonacci sequence is defined as follows:
Fibonacci(0) = 0
Fibonacci(1) = 1
Fibonacci(N) = Fibonacci(N - 1) + Fibonacci(N - 2)
Hint: Use a loop. Define variables
fiboN, fiboNMinus1, andfiboNMinus2outside the loop. Inside the loop, make the variables hold Fibonacci(N), Fibonacci(N - 1), and Fibonacci(N - 2). (To test your code, Fibonacci(10) = 55 and Fibonacci(20) = 6,765.)Make a program that lets the user enter test scores into a
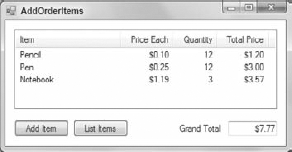
ListBox. After adding each score, display the minimum, maximum, and average values. (Hint: Before you start the loop, initializeminimumandmaximumvariables to the value of the first score. Then loop through the rest of the list revising the variables as needed.)Copy the program you built for Lesson 14's Exercise 1 (or download Lesson 14's version from the book's web site) and add the List Items button shown in Figure 19-2. When the user clicks the button, display the items and their values in the Output window as a semicolon-separated list similar to the following:
**********
Pencil;$0.10;12;$1.20;
Pen;$0.25;12;$3.00;
Notebook;$1.19;3;$3.57;
**********
Hint: The
ListViewcontrol'sItemsproperty is a collection ofListViewItemobjects. Loop through that collection to get information about each row.Hint: Each
ListViewItemhas aSubItemsproperty that is a collection ofListViewItem.ListViewSubItemobjects. Loop through each item'sSubItemscollection to get the values for that row. UseConsole.Writeto add data to the Output window without adding a carriage return.Make a program that uses a
ListBoxto display all possible four-letter words using the letters A, B, C, and D. (Hint: Make an array containing the letters A, B, C, and D. Use aFor Eachloop to loop through the letters. Inside that loop, use another loop to loop through the letters again. After four nested loops, concatenate the looping variables to get the word.)
Note
You can find solutions to this lesson's exercises in the Lesson19 folder inside the download available on the book's web site at www.wrox.com or www.vb-helper.com/24hourvb.html.