
Most of the programs described in earlier lessons display output on the computer's screen. Lessons 31 and 32 explain how to save output in files.
This lesson explains a third method for saving output: printing. Using these techniques, you can print text, shapes, images — just about anything you want.
Warning
Before you start a printing project, however, be warned that printing in Visual Basic isn't trivial. It's easy enough to display some text or a few lines in a printout, but producing a complex formatted document can be a lot of work.
If you need to produce a nicely formatted resume, graph, or grid of values, you should ask yourself whether there's an easier way than writing a bunch of Visual Basic code. For example, Microsoft Word is great at producing nicely formatted text documents, and Microsoft Excel does a wonderful job of making charts and graphs. You can certainly generate these sorts of printouts using Visual Basic, but it may be a lot faster if you use another tool such as Word or Excel.
The PrintDocument component sits at the center of the printing process. To print, a program creates an instance of this class either at design time or at run time. It adds event handlers to catch the object's events and then lets the object do its thing. As the object generates pieces of the printout, it raises events to let the program supply graphics for it to print.
The PrintDocument object raises four key events:
BeginPrint— Raised when the object is about to start printing. Here the program can do whatever it must to get ready to print such as opening files, gathering information from a database, or downloading data from a web page.QueryPageSettings— Raised when the object is about to start printing a page. The program can modify the page's settings. For example, it might adjust the margins so even pages have bigger margins on the left than odd pages or vice versa to allow for a staple in a double-sided document.PrintPage— Raised when the object needs to generate contents for a page. This is where the program does its drawing. It should set the event handler'se.HasMorePagesparameter toFalseif this is the last page.EndPrint— Raised after the object has finished printing. The program can perform any necessary cleanup here.
The BeginPrint, QueryPageSettings, and EndPrint event handlers are optional. For simple printouts, you may only need the PrintPage event handler.
The PrintPage event handler gives you a parameter named e of type PrintPageEventArgs. This object contains the HasMorePages parameter that you use to tell the PrintDocument whether this is the last page, a Graphics object that you use to draw the page's contents, a PageBounds property that indicates how big the page is, and a MarginBounds property that specifies the page's margins.
The easiest way to generate a printout using the PrintDocument object is to place the object on a form and give the object a PrintPage event handler to generate the pages. When you're ready to print, simply call the object's Print method to send the printout to the default printer. As it builds the pages, the PrintDocument raises its PrintPage event to find out what to draw.
Once you've done this much, it's practically trivial to add a print preview capability to the program. Add a PrintPreviewDialog object to the form and set its Document property to the PrintDocument object that you already created. To display a print preview, simply call the dialog's ShowDialog method. The dialog uses the associated PrintDocument object to generate the necessary preview and displays the result.
Figure 33-1 shows the PrintShapes example program (available as part of this lesson's code download) displaying a four-page print preview that contains a triangle, rectangle, ellipse, and diamond.

The following code shows the program's PrintPage event handler:
' The number of the next page.
Private NextPageNum As Integer = 0

' Print a page.
Private Sub pdocShapes_PrintPage(ByVal sender As System.Object,
 ByVal e As System.Drawing.Printing.PrintPageEventArgs) _
 Handles pdocShapes.PrintPage
    ' These are used to draw the triangle and diamond.
    Dim xmid As Single =
        CSng((e.MarginBounds.Left + e.MarginBounds.Right) / 2)
    Dim ymid As Single =
        CSng((e.MarginBounds.Top + e.MarginBounds.Bottom) / 2)

    ' See which page this is.
    Select Case NextPageNum
        Case 0 ' Draw a triangle.
            Dim trianglePoints() As PointF =
            {
                New PointF(xmid, e.MarginBounds.Top),
                New PointF(e.MarginBounds.Left, e.MarginBounds.Bottom),
                New PointF(e.MarginBounds.Right, e.MarginBounds.Bottom)
            }
            Using thePen As New Pen(Color.Red, 10)
                e.Graphics.DrawPolygon(thePen, trianglePoints)
            End Using

        Case 1 ' Draw a rectangle.
            Using thePen As New Pen(Color.Blue, 10)
                e.Graphics.DrawRectangle(thePen, e.MarginBounds)
            End Using

        Case 2 ' Draw an ellipse.
            Using thePen As New Pen(Color.Green, 10)
                e.Graphics.DrawEllipse(thePen, e.MarginBounds)
            End Using

        Case 3 ' Draw a diamond.
            Dim diamondPoints() As PointF =
            {
                New PointF(xmid, e.MarginBounds.Top),
                New PointF(e.MarginBounds.Right, ymid),
                New PointF(xmid, e.MarginBounds.Bottom),
                New PointF(e.MarginBounds.Left, ymid)
            }
            Using thePen As New Pen(Color.Black, 10)
                e.Graphics.DrawPolygon(thePen, diamondPoints)
            End Using
    End Select

    NextPageNum += 1
    If (NextPageNum > 3) Then
        ' This is the last page. Start over if we print again.
        e.HasMorePages = False
NextPageNum = 0
Else
' We have more pages.
e.HasMorePages = True
End If
End SubThe NextPageNum variable stores the number of the next page for the program to print.
The event handler uses a Select Case statement to determine which shape it should draw. Depending on the page number, it uses the e.Graphics object's DrawPolygon, DrawRectangle, or DrawEllipse method to draw different shapes.
The code uses different Pen objects to draw the various shapes. For example, it draws the triangle with a 10-pixel-wide red pen. The Using statements automatically dispose of the Pens' resources when the program is done with them.
After it draws the current page's shape, the program increments NextPageNum. If the new page number is greater than 3, the program has finished drawing all of the pages (there are 4 of them, numbered starting with 0), so it sets e.HasMorePages to False. It also resets NextPageNum to 0 so the program starts over the next time you click one of the buttons.
If the next page number is not greater than 3, then the program has more pages to print, so it sets e.HasMorePages to True.
The following code shows how the program displays print previews and generates printouts:
' Display a print preview.
Private Sub btnPreview_Click() Handles btnPreview.Click
    ppdShapes.ShowDialog()
End Sub

' Print to the default printer.
Private Sub btnPrint_Click() Handles btnPrint.Click
    pdocShapes.Print()
End Sub
Note
Unfortunately, there isn't room in this lesson to really get into the drawing routines that you use to generate fancier printouts. For a more complete introduction to graphics programming in Visual Basic, see my PDF-format Wrox Blox Visual Basic Graphics Programming available at www.wrox.com/WileyCDA/WroxTitle/Visual-Basic-Graphics-Programming.productCd-0470343486.html.
The PrintShapes program described in the preceding section demonstrates the basic techniques you need to print. It uses a PrintPage event handler to draw different shapes on four pages of a printout.
You can print text in much the same way you print shapes. The only real difference is that to draw text you use the e.Graphics object's DrawString method instead of one of the other Graphics methods such as DrawPolygon or DrawEllipse.
Example program PrintText (available as part of this lesson's code download) uses the following code to print a series of names on a single page:
' Print some text on one page.
Private Sub pdocShapes_PrintPage(ByVal sender As System.Object,
 ByVal e As System.Drawing.Printing.PrintPageEventArgs) _
 Handles pdocText.PrintPage
    ' Make a font to use.
    Using theFont As New Font("Times New Roman", 20)
        ' Get the coordinates for the first line.
        Dim x As Integer = e.MarginBounds.Left
        Dim y As Integer = e.MarginBounds.Top

        ' Print some text.
        Dim names() As String =
        {
            "Arsenal", "Burnley", "Chelsea", "Liverpool",
            "Man City", "Portsmouth", "Tottenham", "Wigan"
        }
        For Each name As String In names
            ' Print the name.
            e.Graphics.DrawString(name, theFont, Brushes.Black, x, y)

            ' Move down for the next line.
            y += 30
        Next name
    End Using

    ' We only have one page.
    e.HasMorePages = False
End Sub
The program first creates a large font to use when drawing text. It uses a Using statement to dispose of the font's resources when the program is done with it.
Next the code sets variables x and y to the coordinates where the first name should appear. In this example, the program displays the first line in the upper-left corner of the page's margin bounds.
The program then loops through an array of names. For each name, the program uses the e.Graphics object's DrawString method to draw the name. It then adds 30 to the variable y so the next name is printed farther down the page.
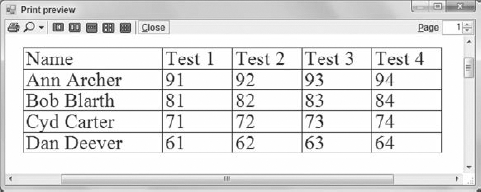
In this Try It, you build a program that prints and displays a preview of the table shown in Figure 33-2. You build an array of Student objects and then loop through them displaying their values as shown in the figure.

Note
You can download the code and resources for this Try It from the book's web page at www.wrox.com or www.vb-helper.com/24hourvb.html. You can find them in the Lesson33 folder of the download.
In this lesson:
Start a new project and create the program's main form. Add
PrintDocumentandPrintPreviewDialogcomponents to do the printing and previewing.Add appropriate event handlers to the Preview and Print buttons.
Add a
Studentclass withFirstNameandLastNameproperties. Also give it aTestScoresproperty that is an array of integers.Create the
PrintPageevent handler.Create an array of
Studentobjects. Initialize them using array and object initializers.Loop through the
Studentobjects, printing them using code similar to the code used by the PrintText example program described earlier.Draw a rectangle around the table.
Don't forget to set the
PrintPreviewDialog'sDocumentproperty to thePrintDocumentcomponent.This example doesn't do anything fancy with properties so they can be auto-implemented.
It might help to define variables
x0, x1, and so on to keep track of where each column should begin.
Start a new project and create the program's main form. Add
PrintDocumentandPrintPreviewDialogcomponents to do the printing and previewing.This is reasonably straightforward.
Add appropriate event handlers to the Preview and Print buttons.
Use code similar to the following:
' Display a print preview.
Private Sub btnPreview_Click() Handles btnPreview.Click
    ppdTable.ShowDialog()
End Sub

' Print to the default printer.
Private Sub btnPrint_Click() Handles btnPrint.Click
    pdocTable.Print()
End Sub
Add a
Studentclass withFirstNameandLastNameproperties. Also give it aTestScoresproperty that is an array of integers.Use code similar to the following:
Public Class Student
    Public Property FirstName As String
    Public Property LastName As String
    Public Property TestScores As Integer()
End Class
Create the
PrintPageevent handler.Create an array of
Studentobjects. Initialize them using array and object initializers.Loop through the Student objects, printing them using code similar to the code used by the PrintText example program described earlier.
Draw a rectangle around the table.
Use code similar to the following:
' Print the table.
Private Sub pdocTable_PrintPage(ByVal sender As System.Object,
 ByVal e As System.Drawing.Printing.PrintPageEventArgs) _
 Handles pdocTable.PrintPage
    ' Make some data.
    Dim students() As Student =
    {
        New Student() With {.FirstName = "Ann",
            .LastName = "Archer",
            .TestScores = {91, 92, 93, 94}},
        New Student() With {.FirstName = "Bob",
            .LastName = "Blarth",
            .TestScores = {81, 82, 83, 84}},
        New Student() With {.FirstName = "Cyd",
.LastName = "Carter", .TestScores = {71, 72, 73, 74}}, New Student() With {.FirstName = "Dan", .LastName = "Deever", .TestScores = {61, 62, 63, 64}} } ' Get the coordinates for the first row and the columns. Dim y As Integer = e.MarginBounds.Top Dim x0 As Integer = e.MarginBounds.Left Dim x1 As Integer = x0 + 200 Dim x2 As Integer = x1 + 100 Dim x3 As Integer = x2 + 100 Dim x4 As Integer = x3 + 100 ' Make a font to use. Using theFont As New Font("Times New Roman", 20) ' Draw column headers. e.Graphics.DrawString("Name", theFont, Brushes.Black, x0, y) e.Graphics.DrawString("Test 1", theFont, Brushes.Black, x1, y) e.Graphics.DrawString("Test 2", theFont, Brushes.Black, x2, y) e.Graphics.DrawString("Test 3", theFont, Brushes.Black, x3, y) e.Graphics.DrawString("Test 4", theFont, Brushes.Black, x4, y) ' Move Y down for the first row. y += 30 ' Loop through the Students displaying their data. For Each aStudent As Student In students ' Display the Student's values. e.Graphics.DrawString(aStudent.FirstName & " " & aStudent.LastName, theFont, Brushes.Black, x0, y) e.Graphics.DrawString(aStudent.TestScores(0).ToString(), theFont, Brushes.Black, x1, y) e.Graphics.DrawString(aStudent.TestScores(1).ToString(), theFont, Brushes.Black, x2, y) e.Graphics.DrawString(aStudent.TestScores(2).ToString(), theFont, Brushes.Black, x3, y) e.Graphics.DrawString(aStudent.TestScores(3).ToString(), theFont, Brushes.Black, x4, y) ' Move Y down for the next row. y += 30 Next aStudent End Using ' Draw a box around it all. e.Graphics.DrawRectangle(Pens.Black, x0, e.MarginBounds.Top, x4 - x0 + 100, y - e.MarginBounds.Top) ' We're only printing one page. e.HasMorePages = False End Sub
Note
Please select Lesson 33 on the DVD to view the video that accompanies this lesson.
Copy the program you built in this lesson's Try It and add additional drawing code to produce the result shown in Figure 33-3.
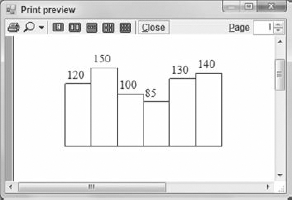
Make a program that prints a bar chart similar to the one shown in Figure 33-4.
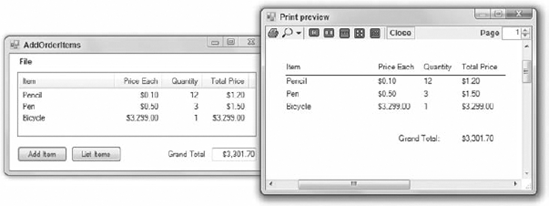
Copy the program you built for Lesson 21's Try It (or download the version available on the book's web site) and add a File menu with Print Preview and Print commands. Figure 33-5 shows the program displaying a print preview.
Hints:
Make a column widths array to hold the columns' widths, and loop through the
ListView'sColumnscollection to set them.Loop through the
Columnscollection to draw column headers, using the columns widths array to determine how much room each header needs.Loop through the
ListView'sItemscollection. For each item, loop through itsSubItemscollection to print the sub-items, using the columns widths array to determine how much room each sub-item needs.Finish by displaying the grand total.
Note
You can find solutions to this lesson's exercises in the Lesson33 folder inside the download available on the book's web site at www.wrox.com or www.vb-helper.com/24hourvb.html.