
One of Visual Basic's more confusing data types is Date. A Date represents a date, a time, or both. For example, a Date variable might represent Thursday April 1, 2011 at 9:15 a.m.
In this lesson, you learn how to work with dates and times. You learn how to create Date variables, find the current date and time, and calculate elapsed time.
Note
The DateTime data type is a synonym for Date.
You can initialize a Date variable to a literal value by surrounding it in number signs as shown here:
Dim dueDate As Date = #10/31/2011 1:23:00 PM#
You can also initialize a Date by using the New keyword as in the following code:
Dim dueDate As New Date(2011, 10, 31)
The preceding code uses a year, month, and day to initialize its Date variable, but the Date type lets you use many different kinds of values. The three most useful combinations of arguments specify the following (all as integers):
Year, month, day
Year, month, day, hour, minute, second
Year, month, day, hour, minute, second, milliseconds
You can also add a kind parameter to the end of the second and third of these combinations to indicate whether the value represents local time or UTC time. (Local and UTC times are explained in the next section.) For example, the following code creates a Date representing 12 noon on March 15, 2010 in the local time zone:
Dim idesOfMarch As New Date(2010, 3, 15, 12, 0, 0, DateTimeKind.Local)
Windows has several different notions of dates and times. Two of the most important of these are local time and Coordinated Universal Time (UTC).
Local time is the time on your computer as it is configured for a particular locale. It's what you and a program's user typically think of as time.
UTC time is basically the same as Greenwich Mean Time (GMT), the time at the Royal Academy in Greenwich, London.
For most everyday tasks, local time is fine. If you need to compare data on computers running in different time zones, however, UTC time can make coordination easier. For example, if you want to know whether a customer in New York created an order before another customer created an order in San Salvador, UTC enables you to compare the times without worrying about the customers' time zones.
A Date object's Kind property indicates whether the object represents local time, UTC time, or an unspecified time. When you create a Date, you can indicate whether you are creating a local time or UTC time. If you do not specify the kind of time, Visual Basic assumes you are making an unspecified time.
After you create a Date, the type provides a couple of methods for converting it between local and UTC values. The ToLocalTime method converts a Date object to local time. Conversely, the ToUniversalTime method converts a time to UTC time.
Note
The ToLocalTime and ToUniversalTime methods don't affect a Date if it is already in the desired format. For example, if you call ToLocalTime on a variable that already uses local time, the result is the same as the original variable.
The Date type provides many useful properties and methods for manipulating dates and times. Table 15-1 summarizes some of Date's most useful methods. It indicates which methods are shared, meaning you invoke them using the type name, rather than a variable name, as in Date.IsLeapYear(2012).
Table 15.1. TABLE 15-1
METHOD | PURPOSE |
|---|---|
| Adds a |
| Adds a specified number of days to the |
| Adds a specified number of hours to the |
| Adds a specified number of minutes to the |
| Adds a specified number of months to the |
| Adds a specified number of seconds to the |
| Adds a specified number of years to the |
| Returns |
| (Shared) Returns |
| (Shared) Parses a string and returns the corresponding |
| Subtracts another |
| Converts the |
| Returns the |
| Returns the |
| Returns the |
| Returns the |
| Returns the |
| Converts the |
Table 15-2 summarizes the Date's most useful properties.
Table 15.2. TABLE 15-2
PROPERTY | PURPOSE |
|---|---|
| Gets the |
| Gets the |
| Gets the |
| Gets the |
| Gets the |
| Returns the |
| Gets the |
| Gets the |
| Gets the |
| (Shared) Gets the current date and time |
| Gets the |
| |
| (Shared) Gets the current date without a time |
| (Shared) Gets the current UTC date and time |
| Gets the |
A Date represents a point in time (July 20, 1969 at 20:17:40). A TimeSpan represents an elapsed period of time (1 day, 17 hours, 27 minutes, and 12 seconds).
One of the more useful ways to make a TimeSpan is to subtract one Date from another to find the amount of time between them. For example, the following code calculates the time that elapsed between the first and last manned moon landings:
Dim firstLanding As New Date(1969, 7, 20, 20, 17, 40)
Dim lastLanding As New Date(1972, 12, 11, 19, 54, 57)
Dim elapsed As TimeSpan = lastLanding - firstLanding
MessageBox.Show(elapsed.ToString())
The code creates Date values to represent the times of the two landings. It then subtracts the first date from the second to get the elapsed time and uses the resulting TimeSpan's ToString method to display the duration. The following text shows the code's output in the format days.hours:minutes:seconds.
1239.23:37:17
Table 15-3 summarizes the TimeSpan's most useful properties and methods.
Table 15.3. TABLE 15-3
PROPERTY | MEANING |
|---|---|
| The number of days. |
| The number of hours. |
| The number of milliseconds. |
| The number of minutes. |
| The number of seconds. |
| Converts the |
| The entire |
| The entire |
| The entire |
| The entire |
| The entire |
Note that you can use the + and – operators to add and subtract TimeSpans, getting a new TimeSpan as a result. This works in a fairly obvious way. For example, a 90-minute TimeSpan minus a 30-minute TimeSpan results in a 60-minute TimeSpan.
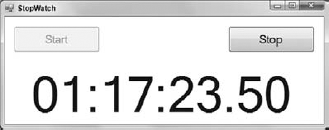
In this Try It, you use Date and TimeSpan variables to build the stopwatch application shown in Figure 15-1. When the user clicks the Start button, the program starts its counter. When the user clicks the Stop button, the program stops the counter.
Normally the TimeSpan's ToString method displays a value in the format d.hh:mm:ss.fffffff. In this example, you use String.Format to display the elapsed time in the format hh:mm:ss.ff.
Note
You can download the code and resources for this Try It from the book's web page at www.wrox.com or www.vb-helper.com/24hourvb.html. You can find them within the Lesson15 folder.
In this lesson:
Create the form shown in Figure 15-1. In addition to the controls that are visible, give the form a
TimerwithInterval = 1. Initially disable the Stop button.When the user clicks the Start button, start the
Timer, disable the Start button, and enable the Stop button.When the user clicks the Stop button, stop the
Timer, enable the Start button, and disable the Stop button.When the
Timer'sTickevent fires, display the elapsed time in the formathh:mm:ss.ff.
TimeSpandoesn't use the same formatting characters as aDate; for example, you can't simply use a format string such ashh:mm:ss.ff. Instead, use theTimeSpanproperties to get the elapsed hours, minutes, seconds, and milliseconds and then format those values.
Create the form shown in Figure 15-1. In addition to the controls that are visible, give the form a
TimerwithInterval = 1. Initially disable the Stop button.Add the Start and Stop buttons and a
Labelto the form as shown in Figure 15-1. Set the Stop button'sEnabledproperty toFalse.Add a
Timerand set itsIntervalproperty to 1 millisecond. (This is much faster than your computer can actually fire theTimer'sClickevent, so theTimerwill run as quickly as it can.)
When the user clicks the Start button, start the
Timer, disable the Start button, and enable the Stop button.To remember the time when the user clicked the Start button, create a
Datefield namedStartTime:' The time when the user clicked Start. Private StartTime As Date
Add the following code to the Start button's
Clickevent handler:StartTime = Date.Now btnStart.Enabled = False btnStop.Enabled = True tmrElapsed.Enabled = True
When the user clicks the Stop button, stop the
Timer, enable the Start button, and disable the Stop button.Add the following code to the Stop button's
Clickevent handler:btnStart.Enabled = True btnStop.Enabled = False tmrElapsed.Enabled = False
When the
Timer'sTickevent fires, display the elapsed time in the formathh:mm:ss.ff.Use code similar to the following. Notice that the code divides the number of milliseconds by 10 to convert it into hundredths of seconds.
' Subtract the start time from the
' current time to get elapsed time.
Dim elapsed As TimeSpan = Date.Now - StartTime

' Display the result.
lblElapsed.Text = String.Format(
    "{0:00}:{1:00}:{2:00}.{3:00}",
    elapsed.Hours,
    elapsed.Minutes,
    elapsed.Seconds,
    elapsed.Milliseconds / 10)
Note
Please select Lesson 15 on the DVD to view the video that accompanies this lesson.
Make a program with a Birth Date
TextBoxand a Calculate button. When the user enters a birth date and clicks the button, calculate the person's current age and add items to aListBoxthat display the age converted into each of days, hours, minutes, and seconds.Make a program that displays the days of the week for your next 10 birthdays in a
ListBox.Make a program with two
TextBoxesfor dates and aButton. When the user clicks theButton, the program should calculate the time between the dates and display it in a message box.Modify the program you built for Exercise 3 to use
DateTimePickercontrols instead ofTextBoxes. To keep things simple, just display the total number of days between the dates. Use the controls'Valueproperties to get the selected dates. (This control prevents the user from entering invalid dates. Preventing the user from making mistakes is generally a good idea.)
Note
You can find solutions to this lesson's exercises in the Lesson15 folder inside the download available on the book's web site at www.wrox.com or www.vb-helper.com/24hourvb.html.