
Find Your Way Around Maps
Regardless of platform, the Maps app regularly adds new and more detailed maps for locations around the world. With Big Sur, Maps also gains several new general-purpose features, as well as a few that are currently either available in, or applicable to, only limited geographical areas.
Get to Know the Sidebar
The Maps app has a new sidebar (Figure 24), which you can show or hide by clicking the sidebar ![]() icon on the toolbar.
icon on the toolbar.
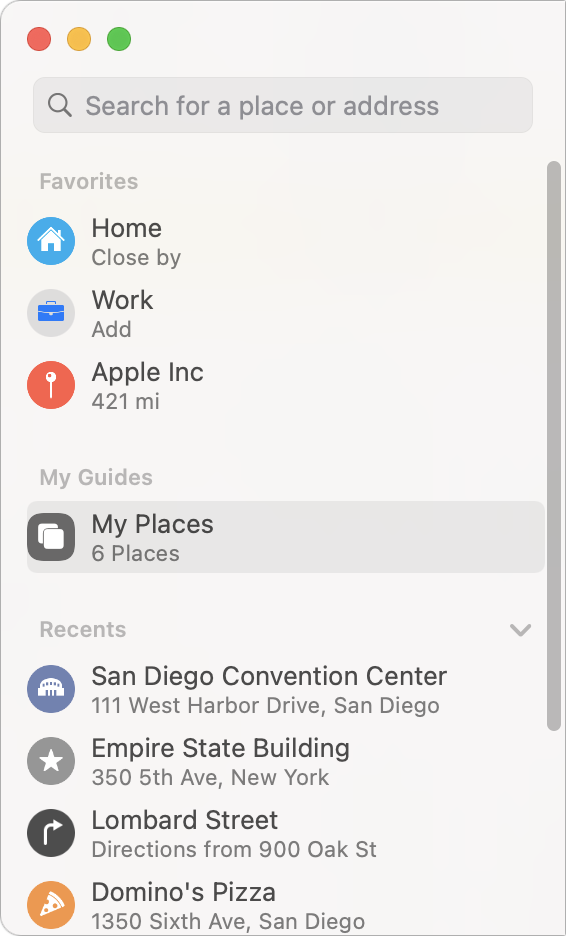
The top portion of the sidebar shows your favorites, which include by default your home and work addresses (if they exist on your Me card in Contacts). To add another location to the Favorites list, select it on the map and click Add to Favorites at the bottom of the popover that appears.
Under Favorites is a heading called My Guides, which (theoretically, at least) shows saved lists of interesting places in a particular category (see “Use Guides,” next). Next is a list of recently viewed locations. (In some cases, the single most recently viewed item also appears at the top of the sidebar.) To delete an item from the sidebar, right-click (or Control-click) it and choose Delete from the contextual menu.
Use Guides
In Maps, a guide is essentially a virtual portion of a guidebook—that is, a professionally researched list of places in a given category (sushi restaurants, hiking trails, or historic buildings, say), complete with photos, descriptions, and all the details you need to plan a visit. It’s a way to get useful travel planning information right from within Maps rather than having to do web searches and buy books.
That sounds great, but Apple’s announcement of this feature included only a handful of major cities (San Francisco, New York, London, and Los Angeles), and of these, only San Francisco had guides available as of late August 2020. Limited availability is a common theme in new Maps-related features, as you’ll see throughout this chapter. For now, it’s potentially useful if you happen to be visiting one of those places. However, you can also make your own guide—of a sort—and share it with your friends and family.
View or Save a Guide
To see a guide, simply search for a location that offers guides. For example, type San Francisco in the search field in Maps and press Return. In the popover that appears next to the location’s pin (Figure 25), a selection of guides—if any exist—shows up under a “Place Name Guides” heading. Click See More for the full list. (Currently, San Francisco has nearly two dozen guides, from sources such as Lonely Planet, The Infatuation, and AllTrails.)

Click a guide to view its contents in a scrolling popover. If you want to save this guide for future reference, click Add to My Guides. It then appears in the Maps sidebar under the My Guides heading.
Create a Guide
You can create your own guides, too, although user-created guides look and act much differently than Apple-provided guides.
To create a guide, click the plus ![]() icon on the toolbar and choose Create New Guide from the pop-up menu. A New Guide item appears in the sidebar under My Guides. Right-click (or Control-click) this and choose Edit Guide. Type a name for it, and optionally click Change Key Photo to select a new thumbnail photo for the guide.
icon on the toolbar and choose Create New Guide from the pop-up menu. A New Guide item appears in the sidebar under My Guides. Right-click (or Control-click) this and choose Edit Guide. Type a name for it, and optionally click Change Key Photo to select a new thumbnail photo for the guide.
Add a Location to a Guide
To add a location to a guide you’ve created, do either of the following:
Visit that location on the map and display its details. Then click the plus
 icon within the popover and choose the name of the guide you want to add it to from the pop-up menu.
With no location popover showing, click the plus
 icon on the toolbar and choose Add New Place To > Your Guide Name. Then click the plus
  icon next to a recently viewed place, or use the search field to locate the place you want to add and click its plus icon.
To view the locations you’ve added to a custom guide, double-click the guide’s name in the Maps sidebar. The display expands to show the individual locations.
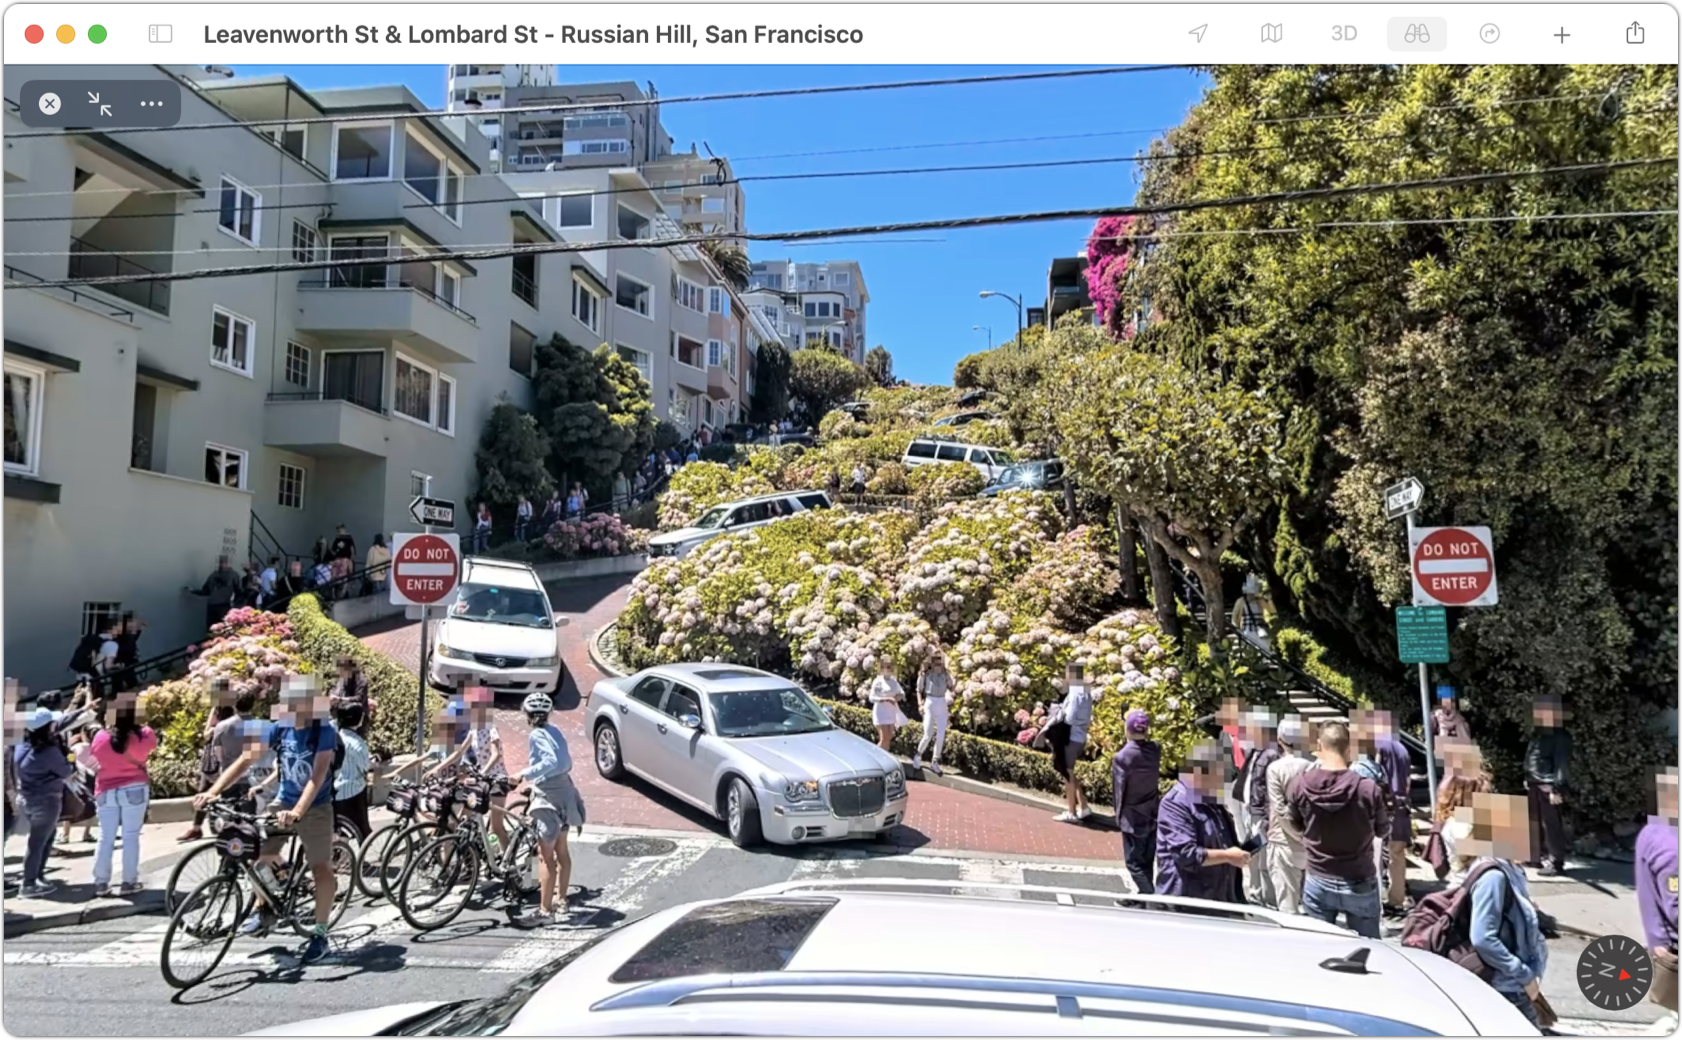
Look Around
Much like a smoother, faster, more elegant version of Google’s Street View, the Look Around feature in Maps lets you fluidly navigate through a 360° view of a location. The only thing not to like, in keeping with the theme of this chapter, is that it’s available so far only in a limited number of locations, and Apple doesn’t spell out where those are. (San Francisco, of course, is on the list, as are Los Angeles and New York; San Diego, where I live, is not.)
The only way to use Look Around is to click a Look Around button, which in turn shows up only if you’re in a location that supports the feature. This button may appear in either of two places: just below a location name in the list that drops down from the search field as you type, or in the location’s popover, on top of the first thumbnail photo (Figure 26).
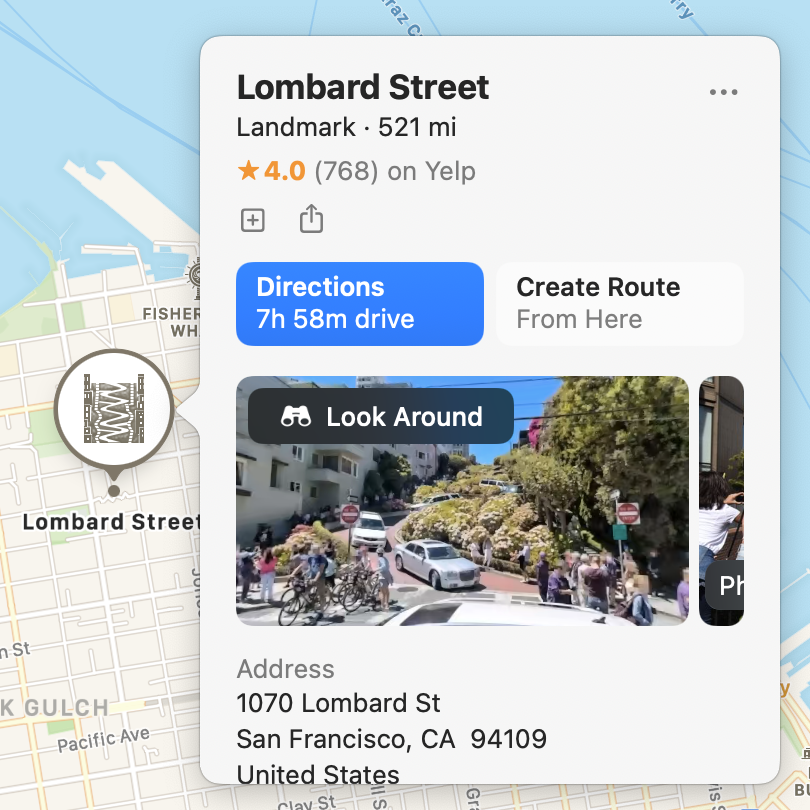
Either way, click Look Around to switch to an interactive view (Figure 27). Drag your pointer in any direction to change your orientation, or click to move in the direction of your pointer. To leave the Look Around view, click the X ![]() icon in the upper-left corner of the display.
icon in the upper-left corner of the display.
Indoor Maps
Street maps are great, but once you get inside a large building, you may need more help navigating. So Maps adds support for the interiors of numerous airports, malls, and other large public places (Figure 28).

Although the indoor maps don’t have much detail, you can at least see which shops, restaurants, and other services are in the nearest concourse, and which ones require you to take five moving walkways, a shuttle train, and a ski lift.
Live ETA Updates
When you’re using your iPhone for directions, it tells you your estimated time of arrival (ETA). Since iOS 13, it has been possible for you to share your ETA with friends and family so they know when to expect you too. In Big Sur, Maps can take this a step further, by showing your friend your exact location on a map, updating it as you progress.
Cycling Routes
When you use Maps to find directions between two locations, you could previously select driving, walking, and transit directions. Now a fourth option is available: bicycle routes. After getting directions, click the bicycle ![]() icon and the best bike routes are shown (Figure 29), with graphs indicating elevation changes. Each route shows traffic, and if you click the arrow
icon and the best bike routes are shown (Figure 29), with graphs indicating elevation changes. Each route shows traffic, and if you click the arrow ![]() icon next to a route option, each leg of the route indicates what type of path you’ll be using (a bike lane, a shared road, or a side road, for example), as well as any obstacles you may face (such as stairs or extremely steep hills). To send the selected route to your iPhone, click the Share
icon next to a route option, each leg of the route indicates what type of path you’ll be using (a bike lane, a shared road, or a side road, for example), as well as any obstacles you may face (such as stairs or extremely steep hills). To send the selected route to your iPhone, click the Share ![]() icon on the toolbar and choose your iPhone.
icon on the toolbar and choose your iPhone.
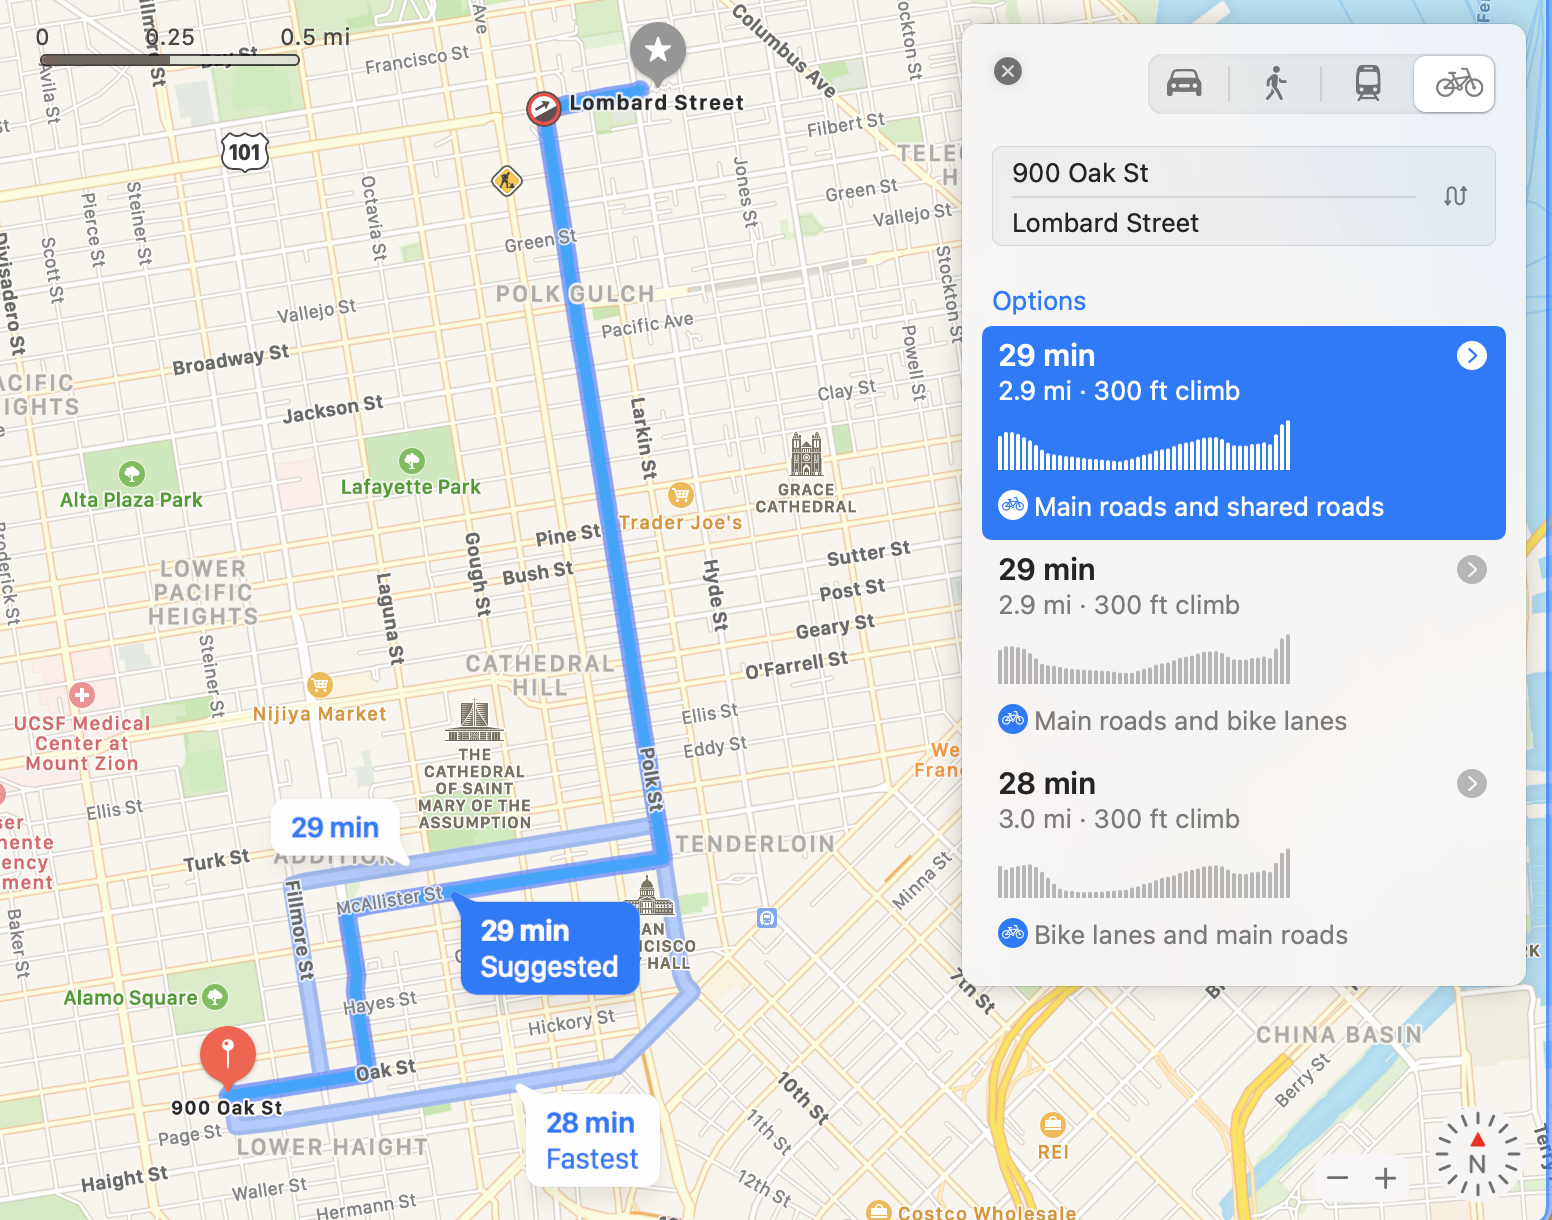
Bike routes are available in San Francisco, Los Angeles, New York, Shanghai, Beijing, and other places Apple does not specify (though San Diego, sadly, is not one of them). Presumably this list will grow over time.
Learn About Other New Maps Features
Maps in Big Sur has several other new features that I can’t test for one reason or another, but I mention them for the benefit of readers who can use them:
Routing for electric cars: If you’re planning a driving route and you have an electric car, wouldn’t it be nice for that route (and its associated ETA) to take into account the locations of charging stations that are compatible with your vehicle? This now happens automatically if you also have an iPhone running iOS 14 or later and a compatible car, and you’ve added the car on your iPhone. Since I don’t own an electric car (yet!), I can’t show you how this works.
Congestion zones: Some cities, especially in Europe, have zones where you’re required to pay a special toll during certain hours, as a way of reducing congestion. In those cities, driving route options automatically indicate any congestion zone tolls (Figure 30). Click Options and select Tolls to search for routes (if any) that avoid these zones.
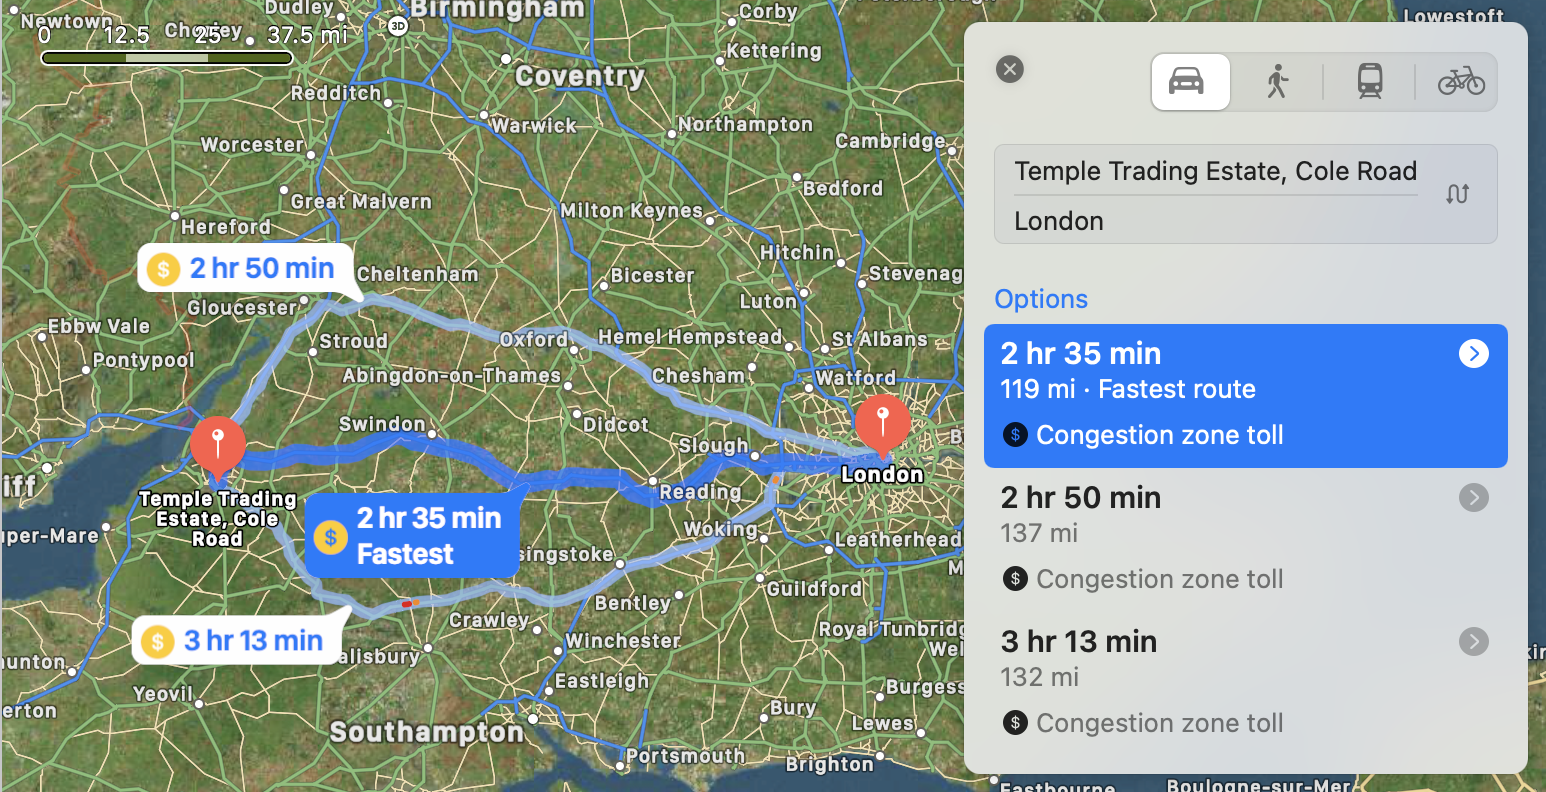
Figure 30: All three major routes from Bristol to London require traveling through congestion zones. License plate restrictions: In some cities, cars are restricted as to where they can drive (at least on certain days) based on their license plate number. Maps plans to support a variety of Chinese cities with these restrictions, and will offer a way to enter and securely store your license plate number in the app. (I presume these options will appear only for users in China.)