Share Resources Securely
No Mac is an island. From almost the company’s first days, Apple has given the Mac the ability to talk with other devices—and share things with them. macOS can share files, folders, and volumes, as well as share a variety of services, like internet access and even content from Apple cached to a local network server.
What’s critical is that you make choices to share only the things you want to, and that you don’t open up access in a way that reduces your security and exposes your data or system to exfiltration or attack.
An extremely popular additional way to share for the last several years is via cloud-based services that let you upload or sync files, and then access them yourself or share them to others, often with granular access controls. I look into some of the best-known of these—including Apple’s iCloud Drive—to compare features and security options.
Allow Network Access to Services
If you open System Preferences > Sharing (Monterey and earlier, Figure 26) or System Settings > General > Sharing (Ventura, Figure 27) preference, you’ll notice many resources your Mac can share with other devices on your local network—and, in some cases, beyond.
You can share your screen, files, printers, and internet connection, for example, and you can also enable various types of remote access to your Mac.
All these features can be handy, especially in that they enable multiple Macs in your home or office to talk to each other. You can copy a file from a Mac in the other room, or view what’s on the screen of the Mac upstairs when you’re downstairs.
However, Apple pairs easy local access with easy remote access: if your Mac is reachable from the internet, some services you share locally can be available remotely. Some may require a password, but that could be easily guessable if you haven’t been thinking about internet-based attacks. And just having certain services active, like Remote Login, could allow remote attacks if an exploit turned up in Apple’s system software, before such exploits were known and patched.
Let’s first look at how exposed you might be, and then at how you can safely run services and share files with macOS’s built-in controls.
What’s Your Risk of Internet Intrusion?
The most likely determinant of risk to attacks or intrusion via the internet is how directly reachable your Mac is. While the vast majority of routers have a public IP address, very few computers on local networks do. Almost always, your router receives traffic and then re-addresses it to your Mac.
Let’s start back with the basics, though. A public IP address is simply one that’s uniquely assigned across the internet, and can be reached from anywhere else on the internet. Your router almost certainly has a public IP address, because that’s how it interacts with the rest of the world on your behalf.
It’s a very low bar for any interested party to scan all the originally defined set of public addresses on the internet—yes, as many as hundreds of millions of them—to find open access for services that the scanner might know potential security exploits for, sometimes far out of date…but there are a lot of old, unpatched machines on the internet. Thus, with a public address, there’s no obscurity possible.
Most homes and businesses rely on private IP addresses for everything but their broadband connection’s router, however. These reserved ranges are only used on local networks, are managed by a router (using something called Network Address Translation or NAT), and typically assigned out automatically with DHCP (less well known as Dynamic Host Configuration Protocol).
Private addresses, which are usually in the form 10.0.1.x or 192.168.1.x, can be reached without any special effort by other devices on the same network of privately assigned addresses. However, when a device on your network makes a request outside its private network range, like viewing a webpage, the router rewrites the request to use the router’s public IP address, and sends it out; the router receives a reply and then forwards it to the locally connected device that requested it.
If you were to have a public IP address on your Mac—not just on your router—it would be like standing on a street corner instead of being inside a house with a locked door and a mail slot. Anyone can come up to and start talking to you or assault and rob you! (Unlike in the world of atoms, where violent crime is minimal and has drastically fallen in recent years, an internet mugger can attack targets wherever they are and a huge number simultaneously.)
The same effect happens if you configure your router to connect its public address with specific services on one or more devices on the local network. For instance, some people want to have a globally available web server or fileserver, and it’s not terribly hard to expose the correct connection. That makes that web server or fileserver just as exposed as if the Mac had a public IP address—but only those services, not everything else shared on the Mac.
NAT isn’t designed as a security measure: it’s just a spreadsheet the router maintains to wire requests and replies together. It’s incidentally a general security measure because it makes potentially exploitable open doors on your devices nearly impossible to reach without being specifically targeted, particularly with a router that can be subverted.
You may already be sure you don’t have a public IP address on your Mac: your ISP charges extra for public addresses you use beyond the one attached to your router, and you know you’re not paying for it; your ISP doesn’t offer public addresses; you specifically made sure you weren’t getting one from your ISP; or you’ve configured your router and you know exactly how you set things up.
If you’re not sure, walk through this list:
Check your Mac’s address: You can examine the IP address assigned for your active network interfaces. In Monterey and earlier, open System Preferences > Network and select in turn each of your active interfaces in the list on the left; in Ventura, go to System Settings > Network and select each of your active interfaces in the main panel:
Ethernet and most interfaces show the address in the main pane under or next to “IP Address.”
For a Wi-Fi interface, the address appears in Monterey and earlier at the top at the end of a descriptive chunk of text as “…has the address x.y.z.a.” In Ventura, click Details to see the address next to IP Address (Figure 28).

Figure 28: In Ventura, a Wi-Fi network nests its address in the Details view. Check your router: Connect using the administrative controls for your routers, log in, and look at where your router shows its WAN (Wide Area Network), Modem, or Internet IP address, and how network addresses are handed out under DHCP, LAN (Local Area Network) or similar labels (Figure 29). The WAN side is almost always a public IP; the LAN/DHCP part almost always private.
Figure 29: On my ISP-supplied router, the “Modem” address is a public one. (Blurred for privacy.)
If the IP address of your Mac or LAN/DHCP addresses on the router is in any of these ranges, it’s a private one, where “x” is any number from 0 to 255: 10.x.x.x, 172.16.x.x to 172.31.x.x, or 192.168.x.x. Otherwise, it’s almost assuredly public.
IPv6 Networking Adds a Wrinkle
Technically, the IP address style of x.y.z.a, like 192.168.0.1 or 36.44.0.6, is IPv4 (version four), which has been in use for decades. For nearly 20 years, internet mavens have been trying to move the networks that comprise the internet to IPv6, which has a lot of advantages, including a much larger potential number of addresses—billions versus hundreds of undecillions (that’s 1038).
However, the trouble has been all the inertia of having billions of devices and hundreds of millions of routers and pieces of plumbing designed around IPv4. A lot of the internet can now handle IPv6, but nobody wants to pull the bandage off yet, because of private addressing. IPv6 was designed before NAT became de facto and a sort of quasi-security measure used by ISPs and corporate networks alike.
For most of us, that means until private addressing can work in a similar way within IPv6, our ISPs have assigned our routers a public IPv4 address, and have chosen one of several paths with IPv6:
Ignored/disabled: Your ISP may simply not pass IPv6 traffic, and it’s not an issue for security.
Allow, but disabled by default: You can use IPv6, but you have to configure your router to allow it. My ISP, CenturyLink, requires a special router for its fiber-optic service, and has detailed instructions for enabling IPv6. Since I have no specific need of it, I’ve left it disabled to reduce my exposure on the public internet.
Turned on by default: You may have an ISP, like my editor Joe Kissell, who enables IPv6 by default through its system, and your router and devices all automatically get IPv6 addresses, just as they do IPv4 ones.
If you’re in that last situation, you may have publicly reachable IPv6 addresses—it can be hard to tell, because some ISPs use techniques described in the article linked above that are almost, but not quite, like NAT. If the IPv6 addresses are truly publicly accessible, they expose the same kind of general risk to remote attack as with public IPv4 addresses, and follow the advice that comes in the next section.
But some analysis suggests it’s not as bad as it might seem. The Internet Society has an interesting FAQ about IPv6 and security, and notes that attackers could find “infrastructure nodes” reasonably easily—the routers that form the backbone of the internet and connect ISPs, streaming services, data center, and so forth all together.
But, the document explains, “It is generally unfeasible though to address scan a network for client devices, since their addresses are randomized over a very large address space.” Simplified, it means that it’s not a needle in a haystack, but 10,000 needles in a Nebraska’s area of haystacks. (With IPv4, it’s a cubic foot of hay and you can see all the needles inside.)
If you’re truly concerned, you can disable IPv6, as it isn’t a mandatory or critical part of using the internet. Here are three possibilities, the first two of which will affect your entire network:
Disable IPv6 at the router: Find the manual for your router and follow instructions to disable IPv6. It may be as simple as selecting a radio button.
Ask your ISP to disable IPV6: Contact your ISP and ask them to disable IPv6 on your account or router if they control your router or have the ability to do this at a higher network level.
Disable IPv6 on your Mac: If you can’t or don’t want to disable IPv6 network-wide, disable IPv6 on your Mac. Go to System Preferences > Network (Monterey and earlier) or System Settings > Network (Ventura), select your interface (or each active interface) in the list, click the Advanced button, select TCP/IP, and choose “Link-local only” from the IPv6 popup menu. Click OK; in Monterey and earlier, then click Apply. This leaves other devices still reachable via IPv6, but at least locks down your Mac.
Configure Your Mac’s Services
With all that in mind, you might wonder: what should I open for use and what’s safe? I advise always turning on only the services you need, and I’ll spell out a few that are worthwhile and how to configure them just ahead.
But you should have different considerations under these sets of circumstances:
Privately addressed Mac on a network in which all users are trusted: If you’re by yourself or you trust your roommate and family to not attempt to access things they shouldn’t, you can enable what you like and just configure for general safety.
Privately addressed Mac on a network in which not all users are trusted: If you share a network with other people—which could include kids or parents who may not be as safe or honest with you as you might like—consider locking things down further and using the fewest possible services.
Publicly addressed Mac: You need to take more care to set passwords and configure limitations, and to consider whether to leave services active all the time or only when you know you or someone you trust needs them.
High-risk individual or group: People who believe themselves at elevated risk shouldn’t operate any services on public addresses, and should think strongly about not running them even on privately addressed networks. It’s very easy for so-called Internet of Things (IoT) or “embedded devices” to be compromised. That can include DVRs, routers, smart-home gear, and more. A subverted device on your local network can have the same access as anyone else on the network.
Hold that in your head now as I run you through a few items in System Preferences > Sharing (Monterey and earlier) or System Settings > General > Sharing (Ventura) that can be valuable to enable (or disable). Configuration options appear in the main pane in Monterey and earlier; in Ventura, click the info ![]() icon next to whichever service I mention to access those detailed settings.
icon next to whichever service I mention to access those detailed settings.
Screen Sharing
If you have a “headless” Mac (one without a monitor) you use for various services, or you have machines in different parts of a house or office you want to access remotely, screen sharing is handy.
I recommend deselecting two options in the Computer Settings dialog:
Anyone may request permission to control screen: There’s no reason to allow this except momentarily if you want to allow someone to request access.
VNC viewers may control screen with password: VNC is an outdated protocol that Apple’s screen-sharing technology extends with more security and features. There’s no good reason to keep this option turned on, particularly because VNC passwords are notoriously easy to crack.
File Sharing
The File Sharing service in macOS offers a high granularity of controls to choose which folders and volumes are accessible to which people, including with what kind of access: read/write, read-only, or write-only (to drop items into without seeing the shared item’s contents).
In configuring File Sharing, I recommend the following:
Click Options and deselect any macOS user who doesn’t need remote access, and the click Done.
In the Shared Folders list, select items you don’t need shared and click the minus
 icon (Figure 30).
Figure 30: Precisely controlling access to shared folders helps reduce unwanted access of files and other exposure. (Ventura shown here.) In the Users list for each shared folder in turn, click the pop-up menu and choose No Access for users and groups that can’t be removed, then select the user or group and click the minus
icon to remove those that can.
What you’re left with a limited, tightly controlled set of folders and volumes that only people you have approved can interact with.
Remote Login, Management, Apple Events
Apple offers powerful but somewhat obscure ways to access, manage, and use a Mac remotely:
Remote access lets you connect via the SSH (secure shell) protocol, commonly used in Unix/Linux, as well as access file sharing with SFTP (Secure File Transfer Protocol), which is really “FTP using SSH.” It’s rarely needed except for particular purposes, such as if you need remote command-line access.
Remote Management connects with Apple Remote Desktop (ARD), a corporate and academic tool. If you’re not using ARD, don’t enable this service.
Remote Apple Events is a very tweaky thing that lets an AppleScript running on one Mac send control events to another. It’s rare you need this, and you will know if so.
Share Carefully via Cloud Services
Because of the fraught nature of putting your Mac or a service on it directly in the path of the entire internet, it’s almost always the case that you can share files more easily, with more control, and more securely using a cloud-based sharing service, with a lot of provisos that I describe along with each service.
Each of these services partitions access, so you know precisely what you are letting someone view or download, and whether they can modify, delete, or upload files. You can set a time limit that a link will work, and usually restrict whether something can be downloaded or just viewed online. You may also be able to tell when they access or view files and see exactly what changes they make, if they have permission to modify files.
All the major tech companies offer them, and you may already have free access to substantial storage, or already be paying for a subscription plan or higher level of storage for other purposes.
All of these services encrypt data at rest and use encrypted transport (HTTPS, primarily) for uploads, downloads, and link creation. However, if someone is able to access your account, they can view, delete, modify, download, and add files without any restriction.
If you want to share files in a truly secure, end-to-end manner, however, the gold standard is end-to-end encryption (often abbreviated E2EE). With E2EE, the ecosystem you use generates and retains keys only at endpoints, on devices under your control. (Sometimes you’re involved in generating them, but usually the key creation and management is silently handled by the software.)
Data accessible by logging in to iCloud.com never included E2EE before December 2022. Then Apple added an option for iCloud that everyone who can should take advantage of: Advanced Data Protection (ADP). ADP requires at least macOS 13.1 Ventura, iOS 16.2, or iPadOS 16.2. With ADP, iCloud Drive and other items synced, shared, and available via iCloud.com are now protected by E2EE for you and with people with whom you share—so long as they also ADP enabled. See Enable Advanced Data Protection for more on ADP.
If you or your shared partners don’t have ADP enabled or can’t turn it on, you can layer E2EE on top of standard secure cloud services, because data that’s encrypted before transfer and stored in these locations remains encrypted, and is only decrypted by end points that have the keys.
That is, if you have an encrypted disk image and upload it, that integral encryption isn’t stripped off. If someone downloads the disk image, they still have to break the encryption applied to that data to access what’s inside.
But you can be more sophisticated than a disk image. Software that handles its own encryption—say, the password-management app 1Password—can safely hold and sync its separately encrypted data on a sync service. (1Password works only with iCloud and Dropbox, in addition to its own syncing service at 1Password.com.) Someone stealing your 1Password vault has stolen trash.
Beyond software that uses E2EE for its internal format are packages that allow generic file sync by effectively tunneling the end-to-end encryption across a sync service! From your perspective, the files are readily available; to everyone in between you and your devices, including the sync services, it’s just a bunch of garbage-looking data. This is a nifty workaround.
I can’t recommend a service, as I don’t use any, but there are two options you can test for this purpose that are Mac compatible:
- Cryptomator is an open-source solution to create an encrypted package, called a vault. It’s free to use on Mac, Windows, and Linux. The Android and iOS/iPadOS apps have a one-time $9.99 purchase price to cover development costs.
- VeraCrypt is also free, open-source software for creating virtual encrypted disks or partitions. The project supports Linux, macOS, and Windows.
iCloud Drive
Apple’s iCloud Drive is integrated into macOS, iOS, and iPadOS, and lets you use your free or paid iCloud space to store and share files.
A shared folder requires an Apple ID to access, and the contents are all accessible to whomever is invited or has the link, depending on the permissions you set. Up to 100 people can be invited to a folder. Only folders you create can be shared—not ones that Apple manages or that are created for apps. Storage space is occupied only in the sharing party’s iCloud account, which makes it handy if other people don’t have large iCloud storage subscriptions.
iCloud Drive appears by default as an item in the Finder window sidebar. You can select it there, or you can choose Go > iCloud Drive or press ⌘-I. Apple overhauled the Finder interface in Ventura significantly, so I’ll show you both the older and new methods.
Share iCloud Drive Items in Monterey and Earlier
To share a file or folder:
Control-click or right-click any individual file or folder stored in iCloud Drive, and then select Share > Share File or Share Folder.
A Share dialog appears with access options (Figure 31).
Now choose permissions:
- From the “Who can access” pop-up menu, select either “People you invite” to limit access, or “Anyone with the link,” which opens it up to anyone who obtains the link.
Figure 31: iCloud Drive offers lots of controls. From the Permission pop-up menu, choose “Can make changes” (read/write) or “View only” (read-only).
Optionally check “Anyone can add people” if you would like other people to have the ability to add collaborators.
Select an app. If you choose to invite people, selecting Copy Link or AirDrop also prompts you for email addresses and phone numbers; with Mail and Messages, you enter the invitees’ information within the app.
Click Share.
Once shared, the item has a label next to it in the Finder that reads “Shared by me.” You can select the item and select Share > Manage Shared File/Folder and see with whom it’s shared, remove and add members. If and when you’re ready to stop sharing, click Stop Sharing.
Share iCloud Drive Items in Ventura
Ventura streamlines and updates iCloud Drive file and folder sharing. This includes expanding sharing options to third parties, who can create extensions that appear in the sharing dialog. Here’s how you share files and folders:
Select items to share:
Control-click or right-click any individual file or folder stored in iCloud Drive, or
Select multiple files and folders—you must select at least one, but they can be in any combination—and Control-click or right-click an item in the selection.
A share popover dialog appears (Figure 32). Select Send Copy or Collaborate from its popup menu, new in Ventura.
Figure 32: This popover menu puts all the options within reach. If you select Collaborate, additionally choose permissions by clicking the text below Collaborate (Figure 33):
From the first popup menu below Permissions, choose “Only people you invite” to limit access, or “Anyone with the link” to open it up to anyone.
From the second popup menu, choose “Can make changes” (read/write) or “View only” (read-only).
Under Adding People, choose “Allow others to invite” or “Only you can invite others.” (A third option, Mixed, appears when a file or folder was shared before the release of Ventura or iOS 16/iPadOS 16.)
Figure 33: Collaborate provides additional options for controlling who can view, edit, and invite. Select people or groups from recent interactions in Messages and elsewhere; or click one of the options, like Mail or AirDrop, to use to share the link to the item or set of items.
In the dialog, sheet, or app prompt that appears, complete the process of sharing.
Once shared, the item has a label next to it in the Finder that reads “Shared by me.” To make changes, you have to select a single item, as in Monterey and earlier, then Control-click or right-click to choose Manage Shared File/Folder. This reveals a dialog box that shows with whom the item is shared, and from which you can remove and add members (if you have permission), change permissions, or change invitation parameters. If and when you’re ready to stop sharing, click Stop Sharing.
Work with iCloud Drive Shared Items Elsewhere
You can access nearly identical options from iCloud.com and iOS/iPadOS:
From iCloud.com: Log in to iCloud.com and click iCloud Drive. Select a file or folder and then click the Share File/Folder
 icon. Email and Copy Link destinations are available. Click Share Options to access permissions.
From iOS/iPadOS: Open the Files app, select a file or folder, tap the Share
 icon, and tap Share File/Folder in iCloud. More apps appear than in macOS for sending invitations. Tap Share Options to modify permissions.
Dropbox
Dropbox is an exceedingly popular service for simple syncing across devices that offers several different ways to share files with strong controls on access. It has integrated macOS support, as well as full-featured apps for iOS/iPadOS and other major platforms, and a sophisticated web app.
In macOS, Dropbox uses some jiggery-pokery to add icons to the right of files and folders in the Finder in its folder. The Dropbox folder is the only one that’s synced, and it’s located by default in your home folder. Files and folders may be ![]() online only, and files
online only, and files ![]() and folders
and folders ![]() may be synced and up to date locally. Files show a syncing
may be synced and up to date locally. Files show a syncing ![]() icon while they’re being uploaded or downloaded.
icon while they’re being uploaded or downloaded.
Control-click or right-click a file or folder inside the Dropbox folder, and a series of menu items appears. Here are the items you’re really concerned with:
Share: This opens a dialog box with extensive options to let people have access to a file or folder (Figure 34). The dialog lets you invite people, create publicly available or password-protected links for sharing, and set an end-date for access. Use this option for sharing items that you want people to have ongoing access to, particularly for folders that you might optionally want to let people drop items into or modify. (Shared folders count against other people’s Dropbox storage limits.)
Send with Transfer: Dropbox lets you send files without providing any access to your Dropbox space. The transfer can be password protected and have an expiration date.
Copy Dropbox Link: Selecting this creates a public link that anyone who has it can use to download the particular item. For certain kinds of files, like images and PDFs, the link allows viewing inline on a website, too.
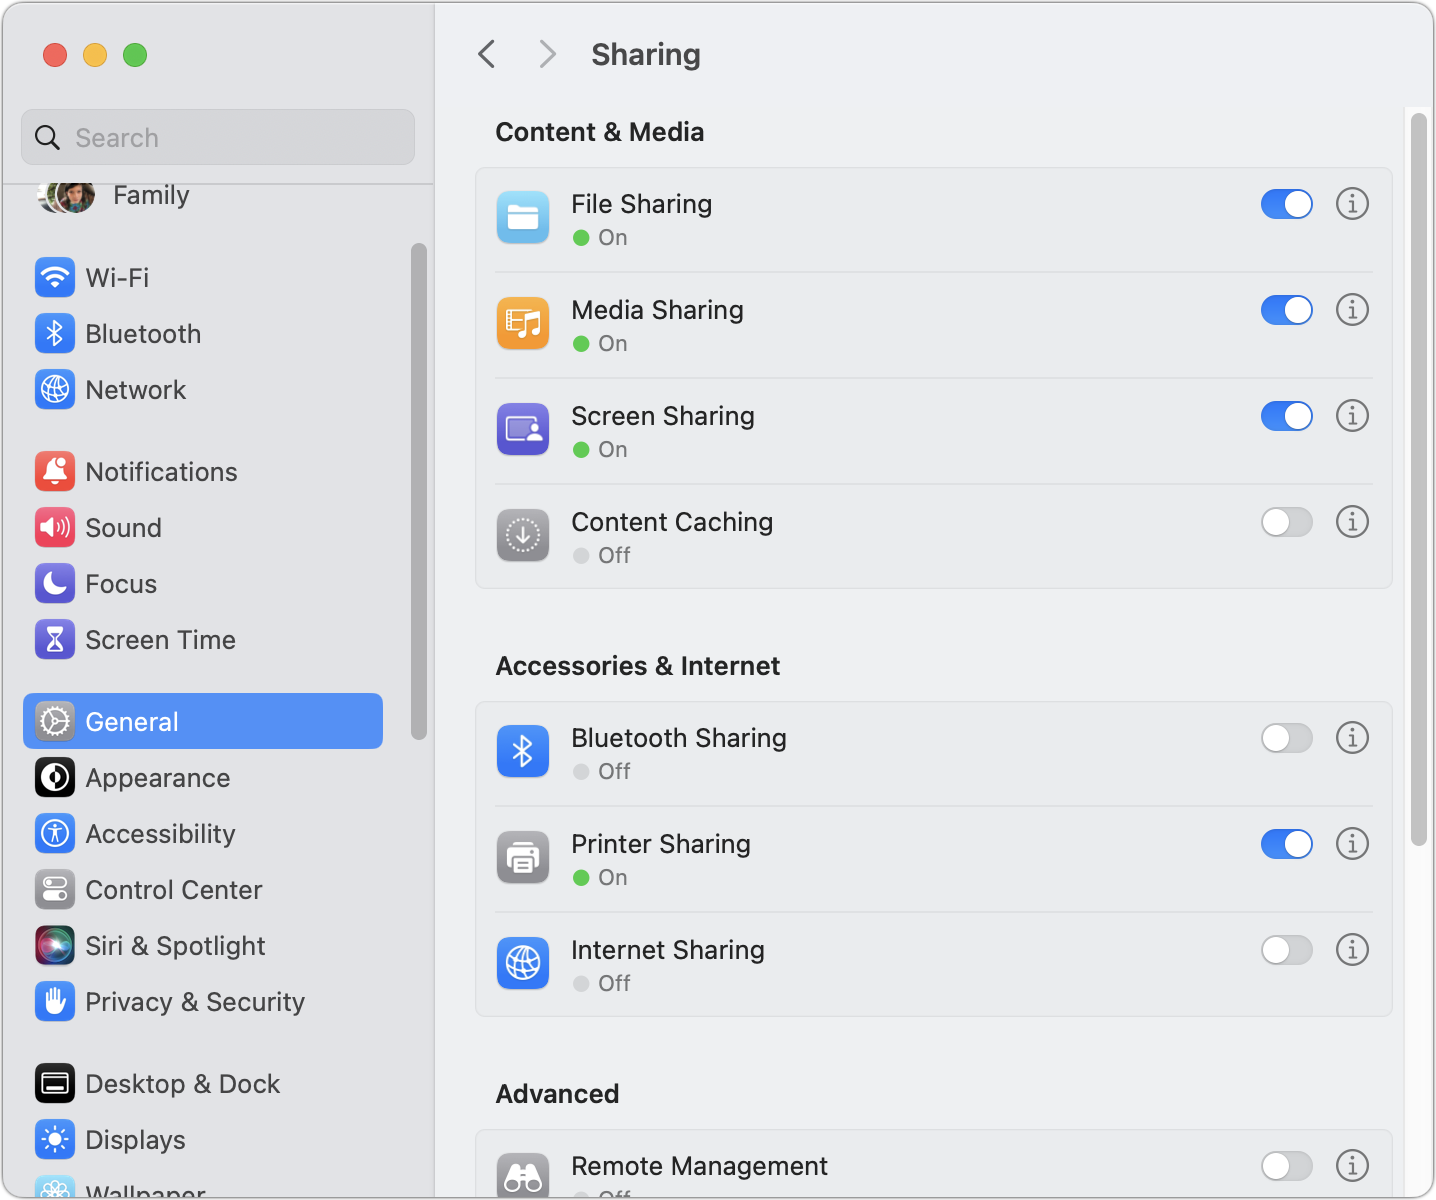
Figure 34: Dropbox offers extensive customization of access and protection for shared items.
Google Drive and Microsoft OneDrive
Two other major firms’ apps don’t offer file-level Finder integration, but can sync files automatically and provide macOS access via a web app. Both also have iOS/iPadOS apps.
The advantage of both is that you might already have paid for storage:
Google Drive: Google Drive provides access to the 15 GB of free storage available for all Google individual accounts or to the larger pool of paid Google One tiers that start at 100 GB for $19.99 per year. Business accounts include a higher starting storage allocation. Google allows public and invitation-based links with varying permission, but doesn’t offer automatic expiration.
Microsoft OneDrive: Anyone can get 5 GB of free storage in Microsoft OneDrive by setting up a Microsoft account, purchase small amounts of storage, or get 1 TB for each user on paid plans (whether one individual or a family of up to six). OneDrive’s sharing options are comparable to those of Dropbox, with options for invitations, public links, and an expiration date for the link.