Learn macOS Startup and Disk Protections
Apple builds in a huge array of tools that help if your machine is physically compromised, as when someone gains access to your computer without your permission, someone takes your Mac away without your knowledge or steals it in order to try to break into it, or when someone extracts hardware from your Mac.
Starting a few years ago, Apple embedded the same chip-based Secure Enclave technology into Macs that had already appeared in iPhones and iPads for a few years. That’s a big improvement for device security and data integrity.
But Apple has layered much more underneath and around it. In this chapter, I start by explaining how the Secure Enclave works in a Mac, and then proceed to talk about disk encryption and encrypting disks, and protecting your startup drive and working with Apple’s security safeguards.
I also dig into the way Apple limits password attempts when logging into a MacOS account, and your options for making sure deleted files can’t be recovered by someone else later. I conclude with a quick look at how Apple Pay can be disabled on a Mac with a Secure Enclave and Touch ID when you switch among users or multiple startup volumes.
The Secure Enclave
Apple created the Secure Enclave processor, first for the iPhone, as a way to provide a tamper-resistant one-way vault to handle encryption secrets, biometric information, and many kinds of private data. The design of the Secure Enclave prevents Apple from accessing information inside it, so the chip that contains it can’t be removed or manipulated without almost always destroying its contents.
The Secure Enclave processor is part of all M-series Apple silicon Macs. It’s also found in Intel Macs with a T2 Security Chip, as listed here with their model years:
MacBook Pro, 13-inch (2018 through early 2020)
MacBook Pro 15-inch (2018 and later)
MacBook Pro 16-inch (2019)
MacBook Air (2018 through early 2020)
iMac, Retina 5K, 27-inch, (2020)
iMac Pro (2017)
Mac mini (2018)
On a Mac, the Secure Enclave is used for a number of different purposes, some of which are directly relevant to this chapter:
Touch ID: Fingerprints are enrolled and stored securely within, and logins send patterns to the Secure Enclave to match.
SSD encryption: Macs with a T2 chip or M-series processor all use SSDs, and they have hardware-based always-on disk encryption. This is intertwined with FileVault, as explained next.
Boot integrity: The Secure Enclave has some hardcoded information that prevents subverting a Mac when it starts up. Startup is a bootstrap process, like “pulling oneself up by one’s bootstraps.” Little bits of software get more complicated pieces of software running in a cascade until the OS is running. With the Secure Enclave, the first stage is loaded from read-only memory—instructions burned permanently into silicon—and each subsequent stage relies on encrypted validation to avoid hijacking.
Storage of encryption keys: Apple uses the Secure Enclave to keep the raw stuff of encryption unavailable to anyone—even Apple. Developers can also make use of the Secure Enclave for keys they want their apps to store.
Secure Enclave has no management associated with it. It’s just neatly there carrying out cryptographic and validation operations behind the scenes.
A T2 chip or M-series processor is needed for only some of what follows, but these chips make every operation faster and more secure.
FileVault Protection
FileVault prevents access to your Mac at startup without the password for an account with permission to boot the computer. On Macs without a T2 chip or M-series processor, FileVault also performs full-disk encryption (often called FDE), which is automatic and cannot be turned off on T2/M-series Macs. Entering an account password with FileVault enabled allows the Mac to unlock the startup disk.
Because FileVault is integrated into macOS at a deep level, there’s only an on/off button. You don’t need to manage any of the parts.
Decide on Using FileVault
FileVault is an additional protection for all users that prevents unwanted access to their data. However, despite my strong recommendation to enable it, it is overkill for some people that could result in them losing access to their data in specific circumstances.
What are those circumstances?
First, they would have to either be unable to remember or find their macOS account password, or the FileVault login data for accounts would have to become corrupt and reject a legitimate password.
Second, they then couldn’t find their FileVault Recovery Key, discussed below in Consider Security and Integrity with the Recovery Key.
I think readers of this book are likely routinely entering their macOS account password, and are unlikely to forget it. But it is the case that you can experience a problem that scrambles the normal startup FileVault login. If so, your FileVault Recover Key is your only hope. If that becomes unretrievable, you’re sunk.
There’s a potential mitigation, which is using the escrow method I describe in that section to allow Apple to store your Recovery Key securely in your iCloud online account. However, some people aren’t comfortable with that, either.
So before you proceed, consider if protection for your data when the computer is turned off is worth this risk to you.
Encrypt the Startup Drive
Full-disk encryption puts a layer between the operating system and a storage drive that automatically decrypts all information coming off the drive and encrypts it as it’s written. This means all information on the drive “at rest” is fully encrypted.
Only while a Mac is active is stored information vulnerable to interception: macOS holds the encryption key in memory to allow it to encrypt and decrypt data on the fly. This allows macOS to treat an encrypted volume as if it were effectively not encrypted at all while the volume is in use, including letting you share the volume over a network and back it up to an external drive, a networked volume, or an internet service, and use sync services like Dropbox, iCloud Drive, and OneDrive.
Whenever a Mac is shut down, a drive is an inaccessible vault, with no more information accessible than a lump of solid metal. The key material necessary to decrypt its data can’t be accessed.
Because FDE requires real-time, on-the-fly encryption and decryption of all data read from and written to the disk, this weighed on older Macs at the time FileVault was introduced, as they lacked specialized, optimized encryption instructions in their CPUs.
Newer models then and later had such instructions, and the overhead was very low—almost negligible. But it could still take hours to enable FileVault for the first time, or disable it to remove protection or to disable/reenable to change the special last-ditch recovery that I describe in Enable and Manage FileVault.
The introduction of the T2 chip, and, later, M-series Apple silicon, removed all overhead, because both chips include dedicated encryption circuitry that makes these operations cost-free. In fact, Apple made the decision for security reasons that FDE is always enabled on T2/M-series Macs, even if FileVault is not. This also means T2/M-series Macs can enable or disable FileVault in seconds, if desired.
Macs that predate the T2 chip have to use FileVault in order to enable encryption on the startup volume.
Protect at Boot
If you have FileVault disabled with a T2 chip or M-series Mac, the startup process begins with operations that retrieve the security key, which is mediated by the Secure Enclave. If the SSD drive is removed from the Mac, which in modern Macs is difficult enough to be infeasible, the decryption information remains in the Secure Enclave left behind. It seems unlikely a thief or corporate or government spy would take the drive and not the whole computer, however.
How FileVault keeps user data secure when a Mac is started up or rebooted differs between Intel Macs and M-series Macs.
Boot with FileVault on an Intel Mac
FileVault effectively creates a two-stage startup process on Intel Macs that it disguises as one. Without FileVault active, when you perform a cold start on an Intel Mac or restart it, macOS loads from the startup volume. If you’re set to log in automatically—which I highly recommend against—it proceeds to boot. Otherwise, you’re asked to select an account and enter a password before that stage.
With FileVault active, your Intel Mac doesn’t boot from the startup volume. Instead, it starts up from the hidden recovery volume, presenting a screen that seems identical to the full macOS login screen. But the key required to decrypt the startup volume’s contents remains unavailable until you select an account—one that is allowed to log in with FileVault enabled—and enter the associated password.
At that point, recovery mode’s loader unlocks the FileVault encryption key and starts loading macOS with the selected user. Pre-T2 Macs manage this unlocking process differently than T2 Macs, which rely on the Secure Enclave to manage keys, but both show you the same thing.
Boot with FileVault on an M-Series Mac
With an M-series Mac, the startup process is slightly different, but just as secure. Because of additional protections available in Apple silicon combined with macOS starting in Big Sur, an M-series Mac can unlock the system files to boot directly into macOS without exposing any user data files.
Your data and Mac remain protected until a valid account password is entered, at which point the key protecting the data is made available for use, and startup proceeds.
Enable and Manage FileVault
You manage FileVault in macOS’s settings. Here’s what to do:
In Monterey or earlier, open System Preferences > Security & Privacy > FileVault (Monterey and earlier) and Unlock the Pane or Setting; in Ventura, go to System Settings > Privacy & Security and scroll down to find the FileVault section.
Click Turn On FileVault. In Ventura, you’re now prompted to use Touch ID or enter your administrator password.
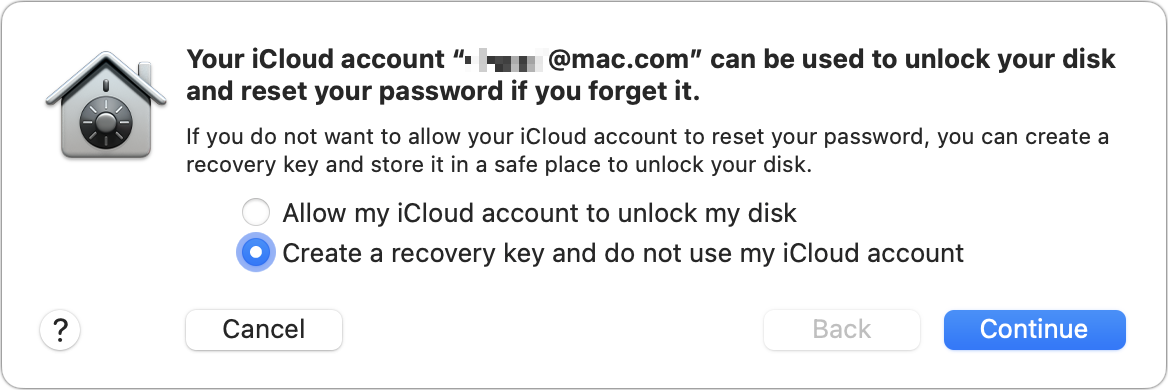
macOS prompts you about how to handle the Recovery Key, which I will explain the nature of further just below: you can opt for “Allow my iCloud account to unlock my disk” or “Create a recovery key and do not use my iCloud account” (Figure 35). Make your choice and click Continue. (You can also cancel at this stage, or click Back.)
Figure 35: Two distinct choices shape a possible recovery. If you opted to create a recovery key, it appears now, once, and never again (Figure 36). Record it; see below.
Figure 36: I can show you this key, because I re-generated it. One of three things happens depending on your startup volume and hardware:
For an internal startup volume on a T2/M-series Macs, FileVault takes a few seconds to perform housekeeping tasks and is now enabled.
For an external startup volume on an M-series Mac, FileVault encryption starts. In my testing with an SSD, it took just a couple of minutes and didn’t require a restart.
On Intel Macs without a T2 chip, whether with an internal or external drive, FileVault requires a restart and can take hours to encrypt a hard drive (or far less for an SSD). However, once that’s complete, there’s no further overhead.
In some cases, you may see an option labeled Enable Users, which lets you select which users may log in via the FileVault process from a cold start or a restart. Click that button and review which users aren’t enabled. If you want to add them, you select the user, enter their password, and click OK.
You can disable FileVault by clicking Turn Off FileVault. With a T2/M-series Mac’s internal startup volume or an M-series external startup volume, this again happens almost instantly; for other Macs, the system has to restart and slowly decrypt the contents.
Consider Security and Integrity with the Recovery Key
The FileVault Recovery Key is a precious object that you should treat like the gold that it is virtually made of. If anything goes wrong with the boot portion of your Mac’s operating system, or in the unlikely event you forget the password to your computer’s account, the Recovery Key is the only way you can decrypt the drive. Without it and any backup that is accessible, its contents are truly gone for good.
Apple, knowing this, allows you to store the Recovery Key in your iCloud account. It’s not available for you to view or retrieve manually: it can only be retrieved through the recovery mode process that allows you to unlock FileVault when no account password will work. (See Reset Password with FileVault Recovery Key and Regain Access for more on recovery.)
However, if you let Apple store the key, then it is protected only by normal iCloud credentials. That has three implications:
If you lose access somehow to your iCloud account, the key is not retrievable. (In that case, immediately turn FileVault off and back on to generate a new Recovery Key unrelated to the previous one.)
If someone gains access to your iCloud credentials, they could unlock a Mac you own that they have access to by using the FileVault recovery process.
A government agency, rightly or wrongly, could force Apple legally or extrajudicially to provide this key for a device they had seized or otherwise obtained. To my knowledge, this has never occurred, but it’s possible Apple would be constrained from revealing it in any country in which it occurred; that seems unlikely given the company’s stance on encryption and privacy.
If you choose to create a Recovery Key locally, you need to copy it down immediately or store it in a password manager before dismissing the dialog. I use 1Password to ensure that the key is backed up securely across my devices.
System File Protections
Apple keeps upping the ante on how it makes sure that macOS’s core files—all the bits and pieces in the operating system that allows apps to run—aren’t messed about with.
What if Apple could just prevent system files from being modified at all by placing all of them on a read-only disk, effectively blocking at nearly the lowest level the ability to modify those files?
That was a hard task, given that system files and user data files co-existed on the same startup volume. But, hmm, wait a tick! What if you could split system files into one volume and data files into another, but have them appear seamless as a single “drive” in macOS? The system volume would be read-only; the data volume could be read/write, but would also have all the sandboxing protections in place discovered back in
That’s exactly what Apple did starting with Catalina. Apple’s modern filesystem, APFS (Apple File System), among other improvements added the concept of breaking a drive into containers instead of partitions. (Partitions can still be used, but there’s no advantage.)
In the long-used previous filesystem, Mac OS Extended (sometimes called HFS+), a drive was broken into partitions, and each partition could be mounted as a volume. One volume was much like another.
In APFS, a drive is broken into containers, which is like a partition in occupying a preset portion of the disk’s full capacity. Each container can contain one or more volumes, and each volume can have a role. A role defines the kind of data stored on it. Roles include data (for regular mountable data volumes), system (for system files starting in Catalina), and backup (for Time Machine backups starting in Big Sur).
Catalina’s system role also added another variation on containers and volumes, called a volume group. A volume group is two or more interrelated volumes that present as a single entity to the Finder and user. Behind the scenes, however, multiple volumes are managed by the system.
The reason for this was to take a previous system integrity concept to yet another level: all system files are on one volume in the startup volume group; all user data is on another volume.
If you upgrade a pre-Catalina installation of macOS to Catalina or Big Sur, the installer renames your startup volume “Name - Data”—if it was “Joe’s Big Drive” it becomes “Joe’s Big Drive - Data”. It’s also assigned the data role. System files are migrated off to the system-only drive, which retains the base name.
However, you never see “ - Data” if all goes well. macOS seamlessly presents both volumes as a single entity.
Big Sur went even further. It doesn’t even mount the system volume. Instead, it uses a “snapshot” feature of APFS that allows the filesystem to capture a particular point in time. Starting in Big Sur, a snapshot of the system volume is loaded that can’t be changed, because it has no writable components—it’s like looking at a picture. As you can see in Figure 37, the system is marked as an APFS Startup Snapshot, and has a unique name, while the main system volume is grayed out. The label snapshot appears to the right of the nested volume.

On top of that, each file on a Big Sur or later system volume has a separate cryptographically generated hash that’s stored in the volume’s metadata. Whenever a file is read from the system volume, that same crypto operation is performed, and the resulting hash of the loaded file checked against the one that’s stored—any modification, however unlikely it could be to occur at all, would be immediately spotted. That’s why this approach is called a Signed System Volume. The metadata and other volume attributes are hashed and collected in something called the seal, which is verified at boot time. If the seal can’t be verified, you’re prompted to reinstall macOS.
Monterey kept the same structure, but added the capability for M-series Macs to install multiple versions of macOS on a single drive. With Big Sur, an M-series Mac could only have a single system because of some low-level decisions about how the Mac decided whether a system could validly start up. With Monterey, you can create additional partitions and install unique copies of macOS into each partition. (Ventura hasn’t introduced any changes I could find.)
With M-series Macs, Apple also has what’s called hardware-based memory protection. Hackers often use a system or app exploit to overflow an area reserved for pure data into an area that contains executable program code. This lets them insert malicious code that is run in place of legitimate code. Memory protection in M-series processors marks memory areas as either full of executable code or full of data, but not both. In that scenario, a hacker cannot write malicious code into an area that can be executed; nor can they execute code that’s in a place only inert data is stored. An app can change the state of memory areas explicitly, and that’s a place that hackers will certainly aim for. But it’s much higher-hanging fruit.
In a similar but distinct bit of processor-based protection, after macOS loads on a Mac with Apple silicon, the memory its central components occupy—its kernel—are locked using “kernel integrity protection,” so they cannot be modified while macOS is running.
Do you feel safe now? You should to the extent that it’s feasible that Apple has taken every modern and many inventive measures to render the system immutable.
Startup Protections
This wasn’t enough? Really? Really. There’s more. Apple has several methods of further preventing your Mac from being started up in a way you don’t want, as well as with newer Macs with T2 or M-series chips in being used after startup in ways you don’t want.
For Intel Macs, you can lock down the way in which your computer boots, restricting it to a specific startup volume. With Intel Macs with a T2 chip, you can also vary the level of system protection you want, to prevent someone from potentially installing an older version of macOS or a non-Mac operating system.
M-series Macs manage Target Disk Mode uniquely, and has a different spin on controlling system startup security.
Firmware Password (Intel Macs)
Setting a firmware password on your Intel-based Mac prevents every booting method from working besides the disk selected while macOS is running in System Preferences > Startup Disk (Monterey and earlier) or System Settings > General > Startup Disk (Ventura) unless the firmware password is entered.
That includes disables alternative disks starting up (by holding down the Option key or other methods), single-user mode, recovery mode, and Target Disk Mode (allowing the Mac to be mounted as a volume on another Mac). Macs with a T2 Security Chip can also separately block booting from any external or removable media (see Startup Options with an Intel Mac with a T2 Chip, below).
Enable the firmware password with these steps:
Restart your Mac in recovery mode. (See How to Restart in Recovery Mode.)
Launch Firmware Password Utility:
On a T2-equipped Mac, select Utilities > Startup Security Utility.
On an older Intel Mac, select Utilities > Firmware Password.
Click Turn on Firmware Password.
Enter a password and click Set Password.
Quit the app and choose Apple > Restart.
The next time you attempt to perform any disk operation than using the macOS-specific startup disk, you’re prompted with a bland image of a lock and password field at which you can enter the password to allow your alternative boot (Figure 38). Click the arrow to proceed.
Share a Disk (M-Series Macs)
As part of enhanced protections on M-series Macs, Apple no longer allows the simple option of restarting your Mac and holding down the T key to enable Target Disk Mode, and have the Mac mounted on another Mac as a volume.
Instead, you have to follow these steps to share a volume, which makes it appear as a networked volume on the other Mac:
Restart in recovery mode. (See How to Restart in Recovery Mode.)
Choose Utilities > Share Disk.
Select the disk to share, and click Start Sharing (Figure 39).

Figure 39: Sharing your M-series Mac as a disk requires using a special recovery mode. If prompted, choose an account and enter its password.
Connect your Mac to another one via a USB data cable (with Type-A or USB-C plugs on either or both ends) or a Thunderbolt 3 or 4 cable.
On the other Mac in the Finder, click the Network link in the sidebar to view the shared Mac’s volume.
Click the Mac in the main window, click Connect As in the upper-right corner, select Guest as the user, and click Connect.
You can now transfer files between the two computers. When you’re finished, eject the mounted Mac volume by selecting it and dragging it to the Eject icon in the Dock or pressing ⌘-E.
Startup Security Utility
In Macs with T2 and M-series chips, Apple boosted security as it could only when it had absolute control over the entire boot process, something made possible with the Secure Enclave and other elements. The T2 and M-series options vary somewhat, but they center around user control of what versions of macOS can run (the latest or other); the T2 utility also adds boot media options separate from the firmware password.
Startup Options with an Intel Mac with a T2 Chip
On an Intel Mac with a T2 Security chip, you can select among three levels of security: full medium, and none.
Full Security is set by default, and it locks your Mac to booting only with either the current version of macOS installed or a version of macOS that is “signed” and “currently trusted.” This includes Boot Camp, however, Apple’s tool for booting into a Windows installation, because Boot Camp is developed and managed by Apple (Figure 40).
If you try to start up from anything failing those requirements, your Mac will tell you a software update is needed if macOS is on the startup volume; with Windows, it will tell you to install Boot Camp.
You are also alerted if there’s no way to reach the internet, as the Mac won’t be able to start up in those circumstances. You have to pick a different startup volume that meets the rules, or use the steps below to downgrade security.
The notion of “currently trusted” seems to leave open the possibility that Apple might eventually sunset older versions of macOS if it deems them unable to be protected. But I can also imagine scenarios in which particular release of macOS (like 13.0.1, let’s pretend) is found to be inherently insecure.

Medium Security can be useful if you need to start up or install an older version of macOS, including one that’s been deprecated due to security concerns. (This also allays concerns by Mac users that they could be locked out of macOS releases they want to use.)
No Security is a risky option that’s useful only for security researchers and custom Windows, Linux, and other startup systems that Apple doesn’t support.
Also in this utility, you can specifically restrict certain kinds of media from starting up your Mac. If you’re at a higher level of risk of attack, you will want to select or retain “Disallow booting from external or removable media.”
When Disallow is set, you can’t use the Option key to start up from other volumes after restarting your Mac or at a cold start. If you try to set a disallowed boot type in macOS in the Startup Disk preference pane, macOS notes, “Security settings do not allow this Mac to use an external startup disk.” It helpfully offers a Restart button alongside the OK one.
To configure Startup Security Utility, follow these steps:
Restart in recovery mode. (See How to Restart in Recovery Mode.)
Choose Utilities > Startup Security Utility.
At the Authentication Needed dialog, click Enter macOS Password.
Select an administrator user, enter in the corresponding password, and click OK.
Make the desired changes in the utility.
Quit the utility and then choose Apple > Restart.
Startup Options with an M-Series Mac
Apple has taken a slightly different approach to its startup security policy with M-series Macs. There’s no option to disable security altogether (Figure 41). Instead you have Full Security, which has all the restrictions and benefits of the Intel-based version described above; Reduced Security, like Medium Security but with two extra options.

Reduced Security adds the option to select or deselect the ability of a user to install signed kernel extensions; and for remote management, which is used in schools and businesses, to control these kernel extensions and software updates. Some organizations may need particular extensions for security software, and may also want to delay automatic software updates in case of incompatibility or support burdens.
With an M-series Mac, follow these steps:
Restart in recovery mode. (See How to Restart in Recovery Mode.)
Choose Utilities > Startup System Recovery.
The app launches. Click Unlock to mount the disk, which will be encrypted.
Enter an administrator user and password and click Unlock.
Select the drive (even if there’s just one) and click Security Policy.
Select the level of security you want to apply and click OK.
Quit the utility and choose Apple > Restart.
Password Lockout Protections
On a Mac with a Secure Enclave, you can’t keep entering an incorrect password without the system taking notice and action. Or, more particularly, someone trying to break into your Mac can’t.
After your Mac has started up and reached a point at which you can enter an account password, and the password is repeatedly entered incorrectly, Apple enforces certain limits and timeouts. This is true in the login window on all Macs with a Secure Enclave, as well as when using Target Disk Mode with an Intel Mac with a T2 chip. (M-Series Macs use the distinct disk-sharing method—see Share a Disk (M-Series Macs)—that requires authenticating first.)
With Macs that lack a Secure Enclave, Apple doesn’t enforce any lockout or delays I can find. That’s in part because there’s no good way for the Mac to track reliably the number of attempts. Once a Secure Enclave is in the mix, however, the attempts are logged within that special hunk of circuits, and can’t be modified or worked around.
You can enter your password incorrectly five times in a row without any delay between entries. Starting after the fifth try, Apple imposes a delay before the next attempt may be made.
After five attempts, there’s a one-minute delay. After the sixth, five minutes; after the seventh and eighth, 15 minutes for each; after the ninth, an hour. The next steps are unclear: Apple’s security documentation says on the same page that you have to 30 attempts and that password logins are disabled after 10 incorrect entries. This seems like something they need to fix.
If we disregard the 10-try-lockout, the document says you can also try to log in by restarting in recovery mode. (see How to Restart in Recovery Mode.) You have 10 attempts to log in that way.
If you have FileVault enabled, you have a shocking 60 attempts each by trying to use the FileVault recovery key or iCloud recovery process (which are exclusive of each other), and through an institutional key if your Mac is managed in a company.
Following that, the Secure Enclave locks the whole thing down, and the drive’s data is unrecoverable. The Mac has to be erased and a new system installed to use it again.
Secure Deletion
When you delete a file by putting it in the Trash and then emptying the Trash, you might think it’s somehow gone forever. But file deletion ironically doesn’t erase the file from your drive. It simply makes a change to the disk’s catalog indicating that the space occupied by that file is available and can be overwritten with something else if and when necessary.
As a result, even if you’ve deleted a file, someone using file-recovery software could potentially undelete it later, as long as no other file has been stored in exactly the same spot since then. (That someone may be you if you accidentally deleted the file and don’t have a backup.)
Hard drives may eventually overwrite the deleted file’s freed-up storage with new data, but that isn’t a guarantee that the previous file can’t be recovered. With specialized equipment, it’s sometimes possible to retrieve old versions of files that have been overwritten one or more times with new data. It’s painstaking, technically challenging, and expensive work—which means it would happen only when the stakes are quite high—but it can be done.
With an SSD, it’s even harder to ensure data is gone for good: SSDs use wear leveling, which spreads your data spread out all over an SSD, as opposed to the specific physical locations that are mapped on an HDD. Each memory cell in an SSD has a maximum number of times in its usable life that it can be erased and rewritten before it fails. Wear leveling ensures that the last previously written-to location is the least likely to be overwritten soon relative to any other location that’s available on the drive. SSDs also employ trim, which tells the controller that a given location is no longer able to be erased. With even more expensive gear than required for HDDs, data can be retrieved to an alarming extent from SSDs.
The solution for this is very simple: use FileVault on an older Mac to encrypt the drive, or have a Mac with a T2 or M-series chip, on which all drive data is always encrypted. Unencrypted data is sometime easy to piece together and recover; encrypted data, even were the key to be extracted, can be effectively impossible to put back together.
However, macOS does include an option for pre-T2/M-series Macs that include hard drives: secure erase. It’s not effective nor useful for SSDs, because of wearing leveling and trim, as the erasure only covers areas that the operating system thinks it’s erasing, not every single cell in the SSD. As a result, Apple doesn’t make the option available when you select an SSD in Disk Utility.
It’s more likely you’re using an external hard drive for photos, videos, and other media due to cost and capacity, so this may make sense in some situations.
You can access secure deletion for hard drives via Disk Utility:
Open Disk Utility, select the drive or volume, and click Erase.
Click Security Options
Move the slider to the desired level of security and click OK; then click Erase. The slider has four notches:
Fastest: Regular erase—doesn’t overwrite the data.
One-pass (second notch): Overwrite the data once with zeroes.
Three-pass (third notch): Overwrite the data three times—twice with random data, and once with non-random data.
Most Secure: Overwrite the data seven times, meeting a US Department of Defense standard.
The three-pass and Most Secure options can take a long time, and are necessary only in extreme cases, but if you want to make it all but impossible for someone to recover a file, you can.
Apple Pay Valid Only for a Single User
Apple allows Macs with a Secure Enclave and Touch ID enabled to store Apple Pay card information, so you can make purchases in apps and via Safari directly with your fingerprint. There’s no need to use a separate device. Setting up Apple Pay is straightforward, and handled via System Preferences > Wallet & Apple Pay (Monterey and earlier) or System Settings > Wallet & Apple Pay (Ventura).
The security situation you may encounter, however, is when you set up Apple Pay either with another account on the same Mac or on an external startup drive! In the former case, Apple warns you in a notification (Figure 42). In the latter case, when you restart from your primary startup volume, macOS also alerts you (Figure 43).

Whether you set it up with a separate macOS user or an external volume, you can reset Apple Pay to work with your current main account with your current volume. However, it involves several steps:
Open System Preferences > Wallet & Apple Pay (Monterey and earlier) or System Settings > Wallet & Apple Pay (Ventura).
Click the plus
 icon in the lower-left corner in Monterey or earlier or the Add Card button in Ventura.
macOS prompts you about changing back (Figure 44). When prompted, enter your password or use Touch ID to proceed.
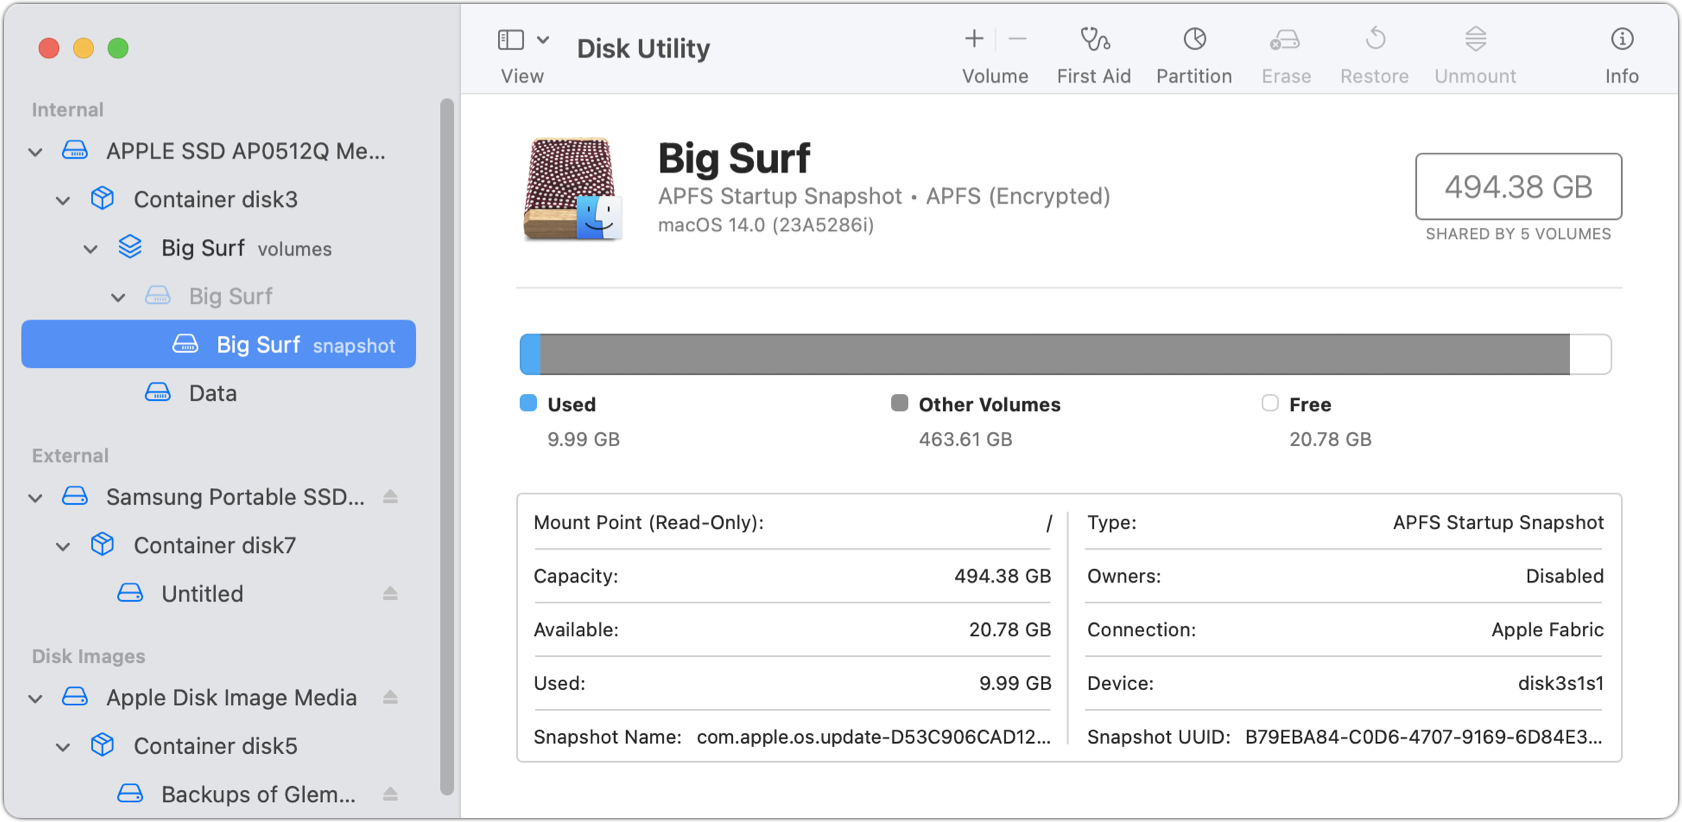
Figure 44: Approve resetting Apple Pay. Select the cards you want to use and click Next.
For each card, you will have to confirm details, such as entering your Apple ID password or the security code on the card. You will also have to accept terms and conditions for many cards, and receive two-factor authentication for some.