Authenticate Your Apple ID Login
Authentication is a single word for a broad concept: proving to an entity, in this case Apple and their Apple ID system, that you are the person with the rights to a given Apple ID account. Apple requires that you prove your identity in one of several ways:
Account name: First, and in every case you have to have the account name of the Apple ID. Before mid-September 2023, this was always and only your account’s primary email address (or, if applicable, icloud.com, mac.com, or me.com variants). However, with the release of iOS 17/iPadOS 17 and Sonoma, Apple broadened that to let you use any phone number or email address associated with the account.
Password: For the longest time, Apple required just an account password to gain entry. Starting several years ago, they introduced what are now two additional methods to secure your login. (A fourth—two-step verification—was an interim measure and has been retired for years.)
Second factor: As I spend a lot of this chapter explaining, Apple dramatically reduced the risk of account hijacking by requiring a second element, sent separately after you entered your password, to confirm a login. Nearly every Apple ID is protected by some form of two-factor authentication, or 2FA for short.
Touch ID, Face ID, or passkeys for website logins: On an iPhone, iPad, or Mac, you can use Touch ID, Face ID, or a passkey (see Where Passkeys Fit In) to log into iCloud.com and some other sites. These methods rely on existing trust backed by biometric or other proof.
In this chapter, I explain the ins and outs of managing the technologies required to access your Apple ID on all your devices.
Pass on the Singular Password
Using a password generator and manager to create a long, strong, and unique password for your Apple ID is the right way to start. But it’s only one part of the security problem. If someone acquires the password to your Apple ID account, it can be game over. With a password in hand, a malicious party can log in to see your contacts and calendar entries, read your email and send email as if from you, access private photos (yes, people have stolen and distributed nude pictures), lock you out of your devices, and make purchases that they can download.
If you use your iCloud email as a login or a backup email for other services, the password lets an attacker reset your accounts elsewhere because they can receive password-reset emails.
But what if there were a way to keep your password from being the key to the castle? There is! Two-factor authentication (2FA), widely used across the computer industry, is something that you likely have encountered in a variety of forms beyond your Apple ID login. Apple more or less enforces 2FA Apple ID logins on devices and through their various websites, with certain exceptions described below.
Get To Know and Deploy 2FA
Apple offers two kinds of 2FA for Apple ID logins: the six-digit code-based approach you already know, and a newer hardware security key. Most security keys are USB-based, a little nubbin that’s smaller than a typical USB thumb drive. To use the key, you plug it in via USB or Lightning and tap or press it. Some security keys support NFC for touchless use. A hardware security key has a tiny built-in computer used to create unique encryption keys for every site or service you enroll the device at that can’t be spoofed. Apple added support for security key authentication for your Apple ID in February 2023. It’s complicated, and I explain it in Deploy a Security Key with Apple ID.
I’ll start with a general overview of 2FA, proceed to code-based 2FA, and finish up with security keys. The end of this chapter offers troubleshooting advice for 2FA login problems.
A second factor strongly protects your Apple ID login. It’s also used more generally for many sites and app logins. Let’s first look at how 2FA works in the abstract before proceeding into how Apple has tied a second factor into the Apple ID login process.
How 2FA Works
In the security world, something that proves your identity is called a factor. We typically sort factors into three kinds of elements: something you know, something you have, and something you are:
Know: A password, PIN, or other piece of knowledge you possess.
Have: A device like an iPhone, iPad, or Mac; an authentication app installed on a smartphone, tablet, or computer (Figure 14); or a USB or NFC key that generates codes. This factor is something you physically possess or to which you have access.
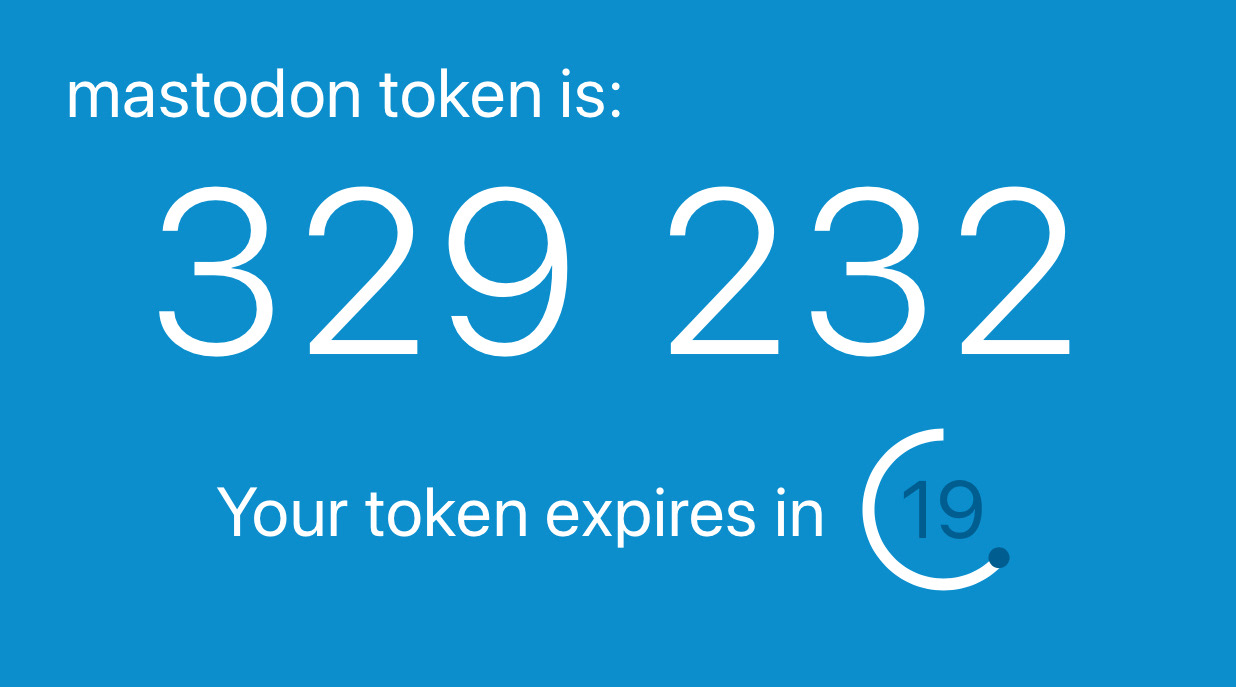
Figure 14: An authentication app, like Authy (seen here), generates tokens needed for secure login. Are: Your fingerprint, retina, handprint, and other biometric markers that are unique and are part of you. (These can be spoofed in some cases, but not casually.)
With 2FA, you combine two factors: typically a password plus a confirmation step that requires possession of a device. That confirmation step for the Apple ID ecosystem for most people and for nearly all websites and apps is a six-digit code. It might be sent by text, generated by an app, or offered on the QuickType bar in iOS/iPadOS or later or AutoFill in Safari for macOS. If you use a security key with your Apple ID or other organizations’ websites, it’s plugging in, tapping buttons on, or waving an NFC key near your device.
Another alternative for the second factor is confirming account access within a secured piece of hardware: with Apple, that’s actually the first step in its 2FA process, in which a popup dialog appears that warns about an account login; with other services, it’s often an app that lets you confirm a log in because the app has already carried out a validated two-factor log in of its own. For instance, Facebook and Google let you validate a login by opening their apps on an iPhone and confirming you are trying to log in to your account.
With two factors, someone who obtains just your password is out of luck when they try to log in. They enter it, and then have to provide a code, acquire your hardware security key, or use another method connected with a trusted device, a trusted app on a specific device, or a phone number associated with your account. Without that, your account remains protected.
While you can enable 2FA for many online services and accounts, Apple has its own system for Apple ID that’s deeply embedded in its hardware ecosystem.
Enable Apple’s 2FA
For any current Apple ecosystem user, it’s almost certain that code-based 2FA has already been activated for your Apple ID account. Apple created a mandatory upgrade pathway several years ago. Only a limited number of people avoided it or disabled 2FA within a two-week grace period offers once 2FA is first turned on. (If you don’t use 2FA, Apple will harangue you endlessly about your choice through popups.)
If you haven’t enabled 2FA yet—or are helping someone upgrade their account—don’t worry. It’s very simple. And once you enable 2FA for an Apple ID on any device, it’s enabled on every device that uses the same Apple ID in iCloud settings.
Enable 2FA in iOS or iPadOS
To turn on 2FA on your iPhone or iPad, follow these steps:
Tap Settings > Account Name > Sign-In/Password & Security.
Tap Turn On Two-Factor Authentication (Figure 15).
Tap Continue.
Apple prompts you to provide a trusted phone number; it may pre-enter the phone number with an iPhone. (If you get a warning that the number is already in use, see the sidebar below.) You can opt to either receive an SMS (text) message, or an automated call, in which a code is spoken by an artificial voice.
Tap Next.
Enter the verification code that arrives via SMS or by voice.
Code-based two-factor authentication is now active.

Enable 2FA in macOS
The steps are quite similar in macOS, with one difference when it comes to the phone number:
Go to System Preferences > Apple ID > Password & Security (Monterey) or System Settings > Account Name > Sign-In/Password & Security (Ventura or later). You may be prompted to enter your password.
Click Turn on Two-Factor Authentication.
You must confirm that an already-provided phone number is accurate. As with iOS and iPadOS, you can opt to receive a code as an SMS or automated voice call.
Enter the verification code that arrives.
And, voilà! You’ve turned on code-based two-factor authentication.
Log In with 2FA
Once you’ve enabled code-based or hardware key 2FA, the login process is a little different. It works in a seamless and integrated fashion with the last several versions of iOS, iPadOS, and macOS, but for hardware running older operating system versions, you’ll have to use a slightly different method, as described below in Log In with Code-Based 2FA from a Legacy Device.
Log In with Hardware 2FA
While I haven’t yet told you how to Deploy a Security Key with Apple ID, this is the right place in the sequence to tell you how to log in using one. The process is nearly identical in iOS, iPadOS, macOS, and the iCloud.com and Apple ID websites:
Go to any location where you can log in to Apple ID, such as in the Settings app in iOS/iPadOS or iCloud.com.
Enter your Apple ID username and password.
You’re prompted to activate the security key (Figure 16). Plug it in and tap or press it, depending on the device, or, for an NFC key, hold it nearby and activate it.
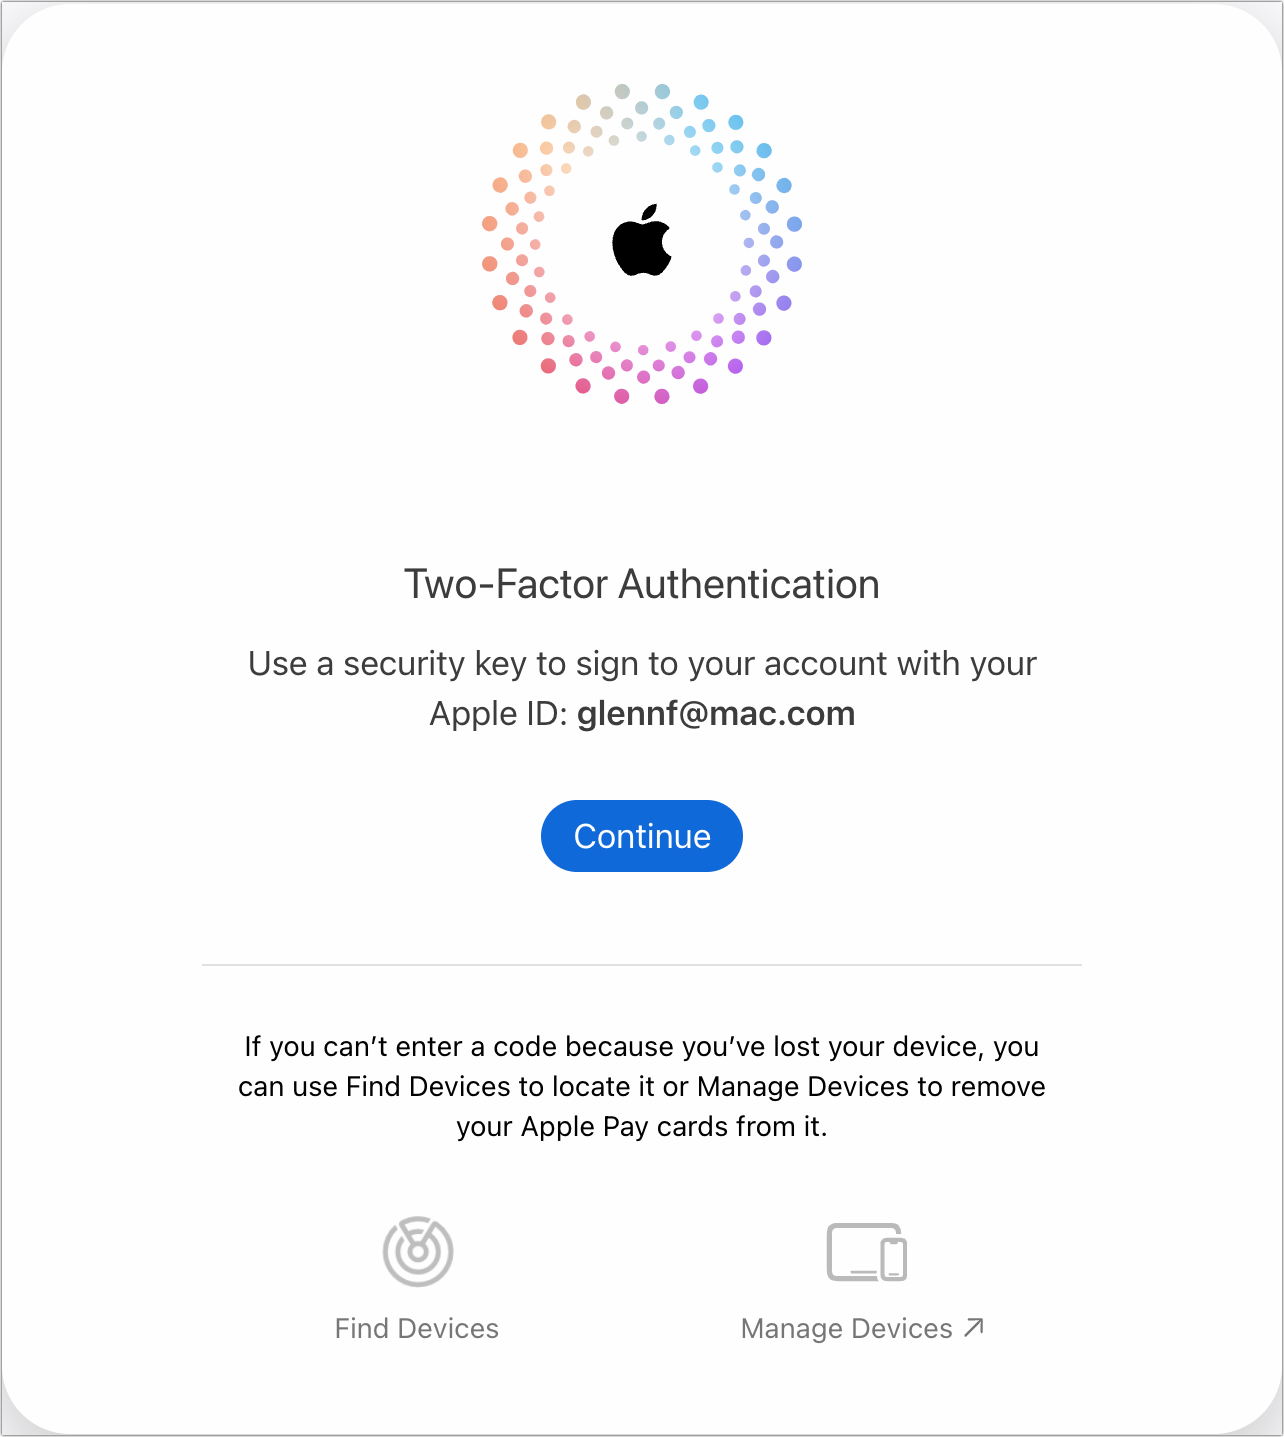
Figure 16: Insert and activate your plug-in key or activate an NFC key nearby. Your device or the Apple website recognizes the validity of the security exchange and logs you in.
With an Apple website, you’re given the option to trust the browser, obviating a 2FA login for a while (Figure 17).

Log In with Code-Based 2FA via iOS, iPadOS, or macOS
The process of logging in with 2FA using an Apple-provided code starts the same no matter where you begin: you enter your Apple ID (if it’s not already pre-filled for you) and the account’s password, and click or tap whatever button lets you proceed.
Next, all iOS, iPadOS, and macOS devices logged in to iCloud services with that Apple ID display a dialog showing your rough location (Figure 18). Click or tap Allow to proceed. That dialog disappears on all devices other than the one with which you just interacted.
This step resembles the app-based confirmation available with Dropbox, Google, and others, but it’s more like the appetizer before receiving the second factor. By providing this alert on all trusted devices, it helps disclose someone attempting to log in to your account before it proceeds further.
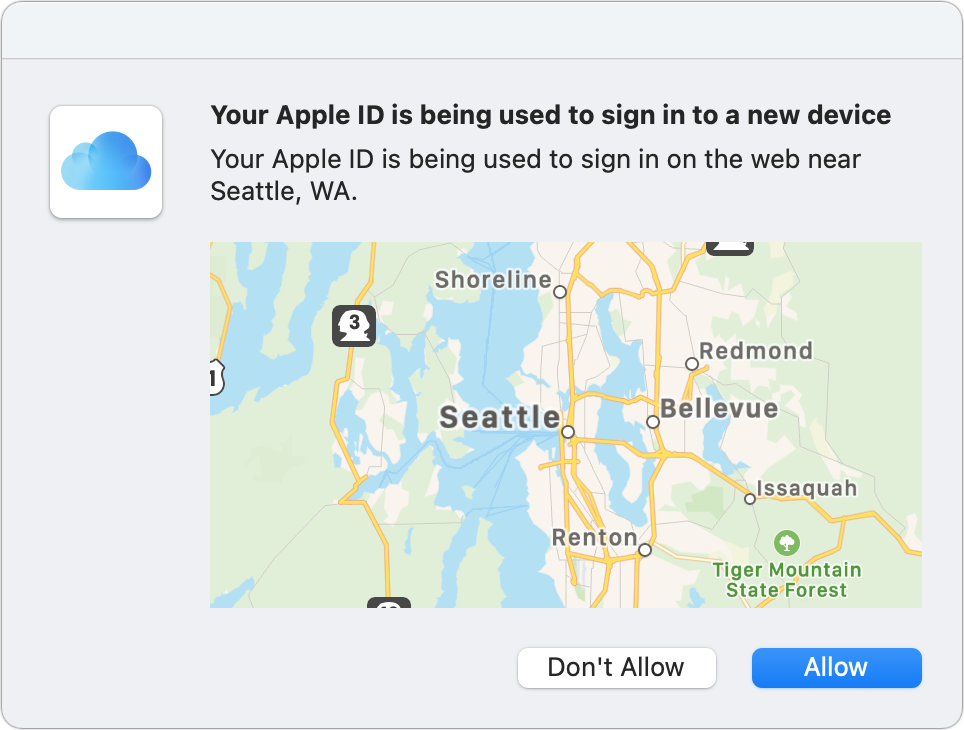
On the device you agreed to allow access to the account via iOS, iPadOS, or macOS, the operating system brings up a dialog with a six-digit code (Figure 19). Enter that code in the software, website, or device prompt to which you’re gaining access. With iCloud.com, you can also agree to trust the browser for 30 days.

Log In with Code-Based 2FA via the Web
Logging in to iCloud.com via a web browser using 2FA baffles many readers because the 2FA prompt to allow access and provide a code appears on the browser’s device (if it’s also logged in to the same iCloud account). Doesn’t that violate the separate-factors principle?
Not really! Because you’ve trusted the hardware device on which you’re logging in—whether a Mac, iPhone, or iPad—the trust lies in that device, and its physical nature. You know the password, but you still have to have the hardware. Starting at least by iOS 17/iPadOS 17, Apple provides a slightly more specific alert when a code is for a web login (Figure 20)—possibly earlier, but this is when I spotted it.

Apple updated iCloud.com logins a few years ago to support Touch ID within macOS. If you have 2FA enabled, you may be able use Touch ID for a login without being prompted for 2FA.
Log In with Code-Based 2FA by SMS or Voice Call
Sometimes you might be trying to log in to an Apple site or service and not have a trusted device for that Apple ID nearby. Or, as I explain in Set Up 2FA Codes Without a Device, you may have an Apple ID that you upgraded to 2FA but don’t have that account ever logged in to iCloud on a device you use.
In that case, Apple lets you choose a fallback path like this:
Enter your Apple ID and password at the site or service.
When prompted to enter the six-digit verification code, click or tap “Didn’t get a verification code.”
A dialog appears that should offer you choices that include Text Me (Figure 21). Click or tap that. (The message will vary depending on whether you have voice, text, or both available.)
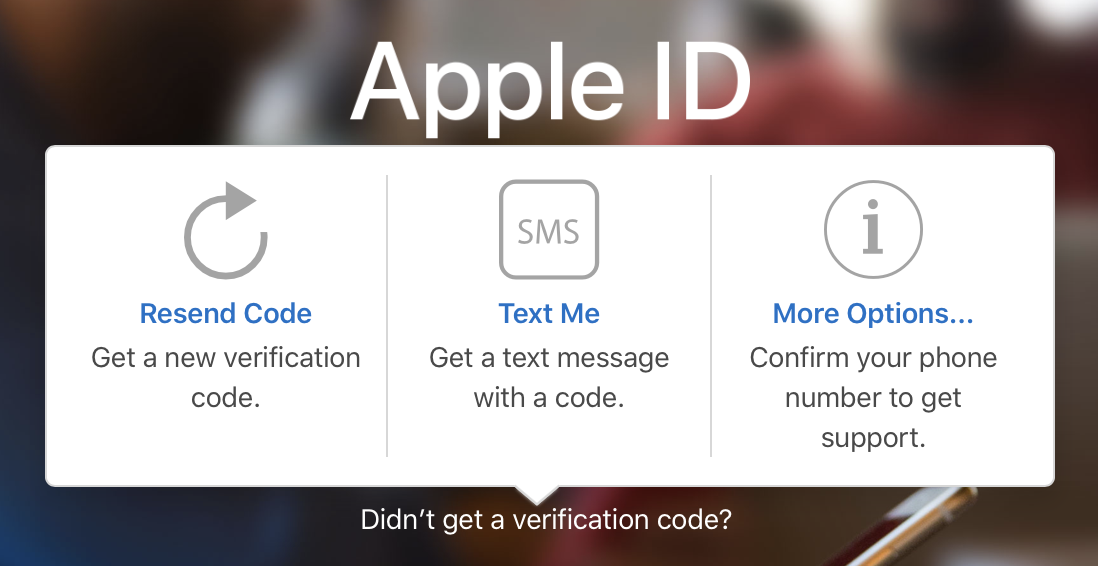
Figure 21: Apple presents an alternative method of receiving a verification code. If you have multiple trusted numbers for SMS codes or automated voice calls, you will be given a choice which shows just part of the number. If there’s just a single choice, Apple automatically texts you or calls you.
Enter the code. Messages offers to autofill the code in iOS/iPadOS and macOS.
Log In with a Passkey to Apple Websites
Starting with iOS 17/iPadOS 17 and Sonoma, you can bypass passwords and second factors when logging in to Apple websites using your Apple ID. For instance, visit appleid.apple.com, you’re typically prompted to validate a stored login with Touch ID or Face ID, and then receive either a 2FA code or use a security key.
However, in a browser you don’t have login information stored for—such as somebody else’s computer or under Android or Windows—a passkey is now a secure alternative. You can also reach the passkey login option to access an account other than the default one stored for biometric login via Touch ID or Face ID.
Here’s how to log in to your Apple ID account with a passkey:
Go to appleid.apple.com and click Login.
If you’re presented with a Touch ID or Face ID option, click “Use a different Apple ID.”
Enter any email address or phone number associated with your Apple ID and press Return.
Click “Sign in with Passkey” (Figure 22).
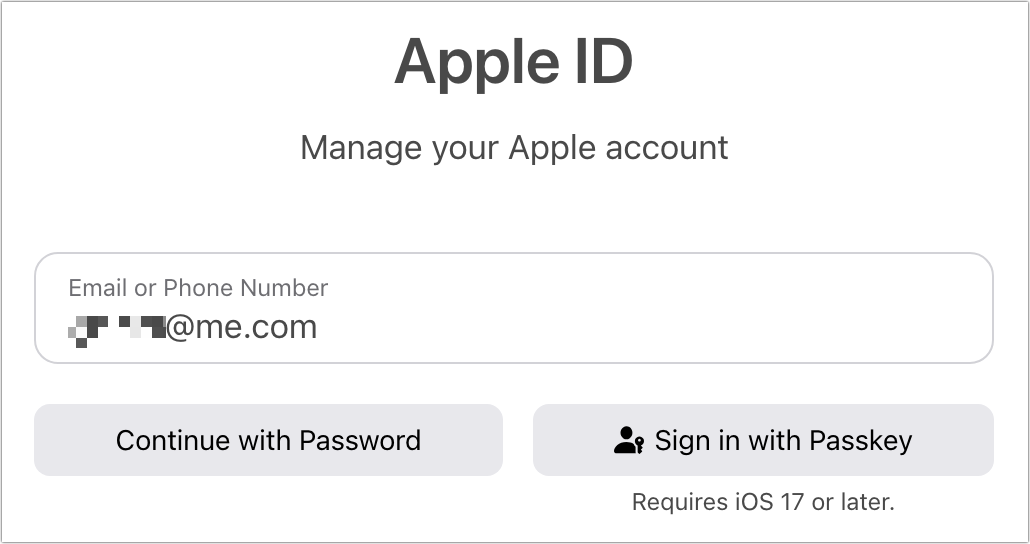
Figure 22: Click “Sign in with Passkey” to proceed. A Sign In dialog (or similar in other browsers and platforms) appears that shows a QR code and says you need to scan it (Figure 23). Use your iPhone or iPad to scan the code and tap “Sign in with a Passkey.”
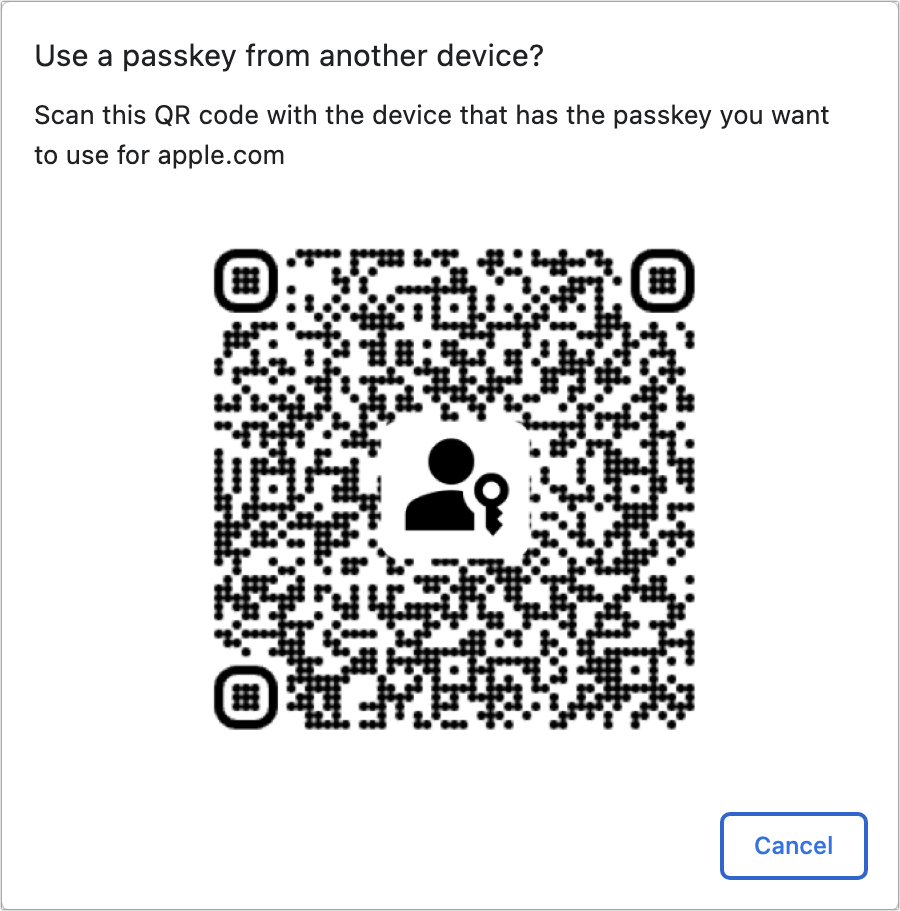
Figure 23: Scan the passkey, here shown for a Google Chrome login in macOS. (Sample QR code from Google inserted.) On your iPhone or iPad, you’re asked to validate the sign in. You may be asked to tap Continue before your device accepts a Touch ID or Face ID approval.
You’re now logged in!
Log In with Code-Based 2FA from a Legacy Device
You may be using older hardware—or hardware you chose not to upgrade—that can’t support 2FA logins in the way that newer versions of the operating systems can. That includes systems running iOS 8 and older and macOS 10.10 Yosemite and older, as well as the 2nd and 3rd generation Apple TV models.
On those devices, Apple has a way to use the 2FA code that’s not immediately obvious:
Try to log in using your Apple ID and password.
The login attempt will not be successful, but this will trigger the 2FA sequence on any modern iOS, iPadOS, or macOS device associated with the Apple ID. Allow the login and view the code.
Back on your original device, re-enter the password and add, at the end, the six-digit code. Do not insert a space between the password and code.
The login should now be accepted.
To skip step 2, you can generate a 2FA code within iOS, iPadOS, or macOS. On an iPhone or iPad, go to Settings > Account Name > Sign-In/Password & Security and tap Get Verification Code.
In macOS, go to System Preferences > Apple ID > Password & Security (Monterey) or System Settings > Account Name > Sign-In/Password & Security (Ventura or later) and click Get (a) Verification Code.
Why Apple May Prompt You for a Passcode
In some circumstances, Apple may ask you to enter the passcode or passphrase for your iPhone or iPad as part of 2FA authentication on an iPhone, iPad, or Mac (Figure 24). That may seem completely wrong, right? Why would your mobile device’s access code have anything to do with logging in?
It comes from a proper level of privacy and security, not a lack of it. If you use iCloud Keychain, the People album in Photos, the Find My network, or some other services, Apple never knows the content of the data shared among your devices. Each of your devices shares a set of encryption keys that allow them to exchange information privately via iCloud without Apple having any way of decrypting it.

If you once set up one or more of these services among your iCloud-linked devices before enabling 2FA, you used a different process you may have forgotten that allowed them to exchange a shared secret via an iCloud Security Code.
For new devices after you enable 2FA, you have to share the secret. Apple claims that it might prompt you to enter an iCloud Security Code. That may be true! But I believe that’s only the case when you’ve received your 2FA code via a trusted device. If you use a trusted phone, Apple switches up the verification.
Instead of using the iCloud Security Code, it lets you unlock the private data only your devices can decrypt using the passcode of one of those devices (typically your iPhone).
Apple doesn’t retain or upload the passcode of the other device. Rather, it unlocks the secured data from the privately synced iCloud set, and generates a new encryption key for your newly added device, which is then synced among all the other devices is the set.
The company hasn’t documented this process at all, so I’m making a slight conjecture from observations. Not even a screen capture or the text that appears above is on Apple’s support or marketing sites.
Work with Code-Based 2FA
Apple relies on a variety of not-always-consistent methods to decide which devices function as your Apple ID second factor. The gist is:
Your trusted devices include all iOS, iPadOS, and macOS hardware logged in via iCloud using the Apple ID.
You can change trusted phone numbers from any logged-in device or on the Apple ID site.
When you can’t use an Apple-controlled login with a second factor, you can generate a password for third-party email, contacts, and calendar software from the Apple ID site. See Use App-Specific Passwords.
Let’s walk through how you manage each of these elements.
Change or Add Trusted Devices
You can add a trusted device by using it to log in to your Apple ID account via iCloud. In iOS or iPadOS, go to Settings > Account Name. In macOS, go to System Preferences > Apple ID (Monterey) or System Settings > Account Name (Ventura or later). Similarly, to remove a trusted device from the set, log out of iCloud on that device.
Because 2FA maps one-to-one to a logged-in iCloud account, your set of associated iCloud devices and your set of 2FA trusted devices are always identical.
With iOS or iPadOS, that one-to-one relationship ties up the entire device. However, with macOS, each person with a macOS user account can log in using a different Apple ID in their respective account’s Apple ID preference pane. This can be helpful even if you don’t routinely log in to that macOS account, as it provides another trusted device as a backup in case something goes wrong and you lose access to other trusted devices or phone numbers.
Change or Add Trusted Phone Numbers
Apple requires that you have at least one trusted phone number connected to your Apple ID, although you can add more. As noted earlier, Apple seems to sometimes restrict you from associating the same phone number with multiple Apple IDs—some people can’t, yet I and others can.
This can put you in a conundrum. Suppose you have a phone number already used with a different Apple ID—say, you have a split between an iCloud account and a purchases account, like many long-time Apple ecosystem people do. You want to add that number as a backup for a different Apple ID, to improve your odds of recovering account access should something go wrong. If you’re one of the people who gets an “already in use” error, what to do? The easiest thing is to sign up for a free Google Voice number in a country in which it’s offered.
You can add or delete a trusted phone number on the Apple ID site (via Sign-In and Security > Account Security), in iOS or iPadOS (Settings > Account Name > Sign-In/Password & Security), and in macOS Monterey (System Preferences > Apple ID > Password & Security) or macOS Ventura or later (System Preferences > Account Name > Sign-In/Password & Security).
Deploy a Security Key with Apple ID
Starting with iOS 16.3/iPadOS 16.3 and macOS Ventura 13.2, you can use hardware security keys to protect your Apple ID login instead of code-based authentication. Here’s how it works and how to switch to security keys for authentication.
How a Security Key Protects Your Login
Where 2FA in general and code-based 2FA in particular take a while to explain, security keys are much simpler. Designed around a broadly supported industry protocol called FIDO (after the name of the trade group that developed it), each security key has a chip inside it that generates a unique set of encryption keys for each site at which you enroll using the hardware key (Figure 25).
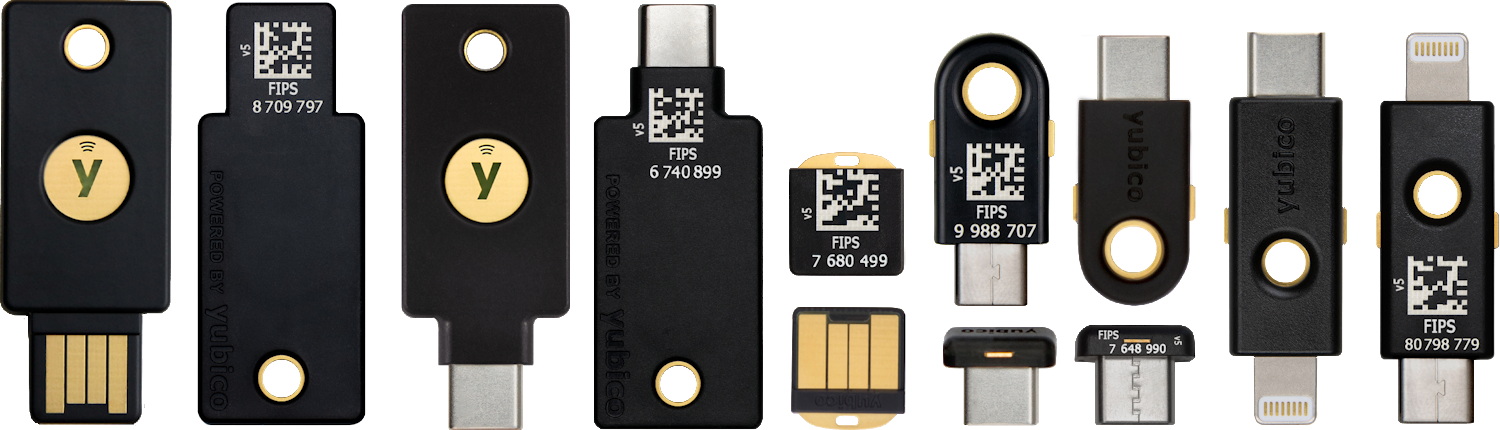
To use a security key, you insert it into a USB Type-A, USB-C, or Lightning jack and press, touch, or tap it. With a touchless NFC security key, you bring it near a device that supports NFC. The security key then generates the appropriate information at the time of enrollment or when you log back in later or are asked to prove valid access.
Several companies offer these keys. Yubico pioneered them and has the largest variety, including one that has USB-C and Lightning plugs on opposite ends. They cost about $20 to $60 each. You need two for Apple ID enrollment, so consider that when calculating the cost. This ZDNet round-up has great advice.
Enroll Your Apple ID with Security Keys
You can enroll in security key authentication for your Apple ID via iOS 16.3/iPadOS 16.3 or later or macOS 13.2 or later. Apple requires you have at least two security keys in case one is lost. You will want to store them in different locations you have access to.
In any situation in the past in which you were prompted to enter a code for authentication, you will now need to have one of your security keys handy. Apple explicitly notes that’s always the case for all of the following tasks:
Add a new device.
Log in to an Apple website with your Apple ID.
Reset your Apple ID.
Unlock a locked Apple ID account.
Add or remove security keys (but not remove security key authentication completely; that requires a device passcode).
Enroll Your Apple ID via macOS
Here’s how to set up security keys for your Apple ID in macOS:
Go to System Settings > Account Name > Sign-In/Password & Security and click Add to the right of the Security Keys label (Figure 26).

Figure 26: Click Add to start the process. Apple presents an overview of how security keys affect your account. Click Add Security Keys to continue.
You may be prompted to remove devices from your account that haven’t been online for 90 days or more. Click Remove Inactive Devices if that works for your needs.
If prompted to enter your account password, do so.
Apple warns you two keys are required; click Continue.
Even though the dialog says Apple ID and “Apple ID wants to make changes,” enter your macOS account’s password and click Allow.
To add each security key, you’re presenting with an Add the First Security Key or Second Security Key screen. Follow these steps for both passes:
Click Continue.
When prompted to Add Security Keys, insert the key and then activate it: press a button, put your fingers on two sides of it, or tap it, as the case may be (Figure 27).
Name the key uniquely in macOS—perhaps write a number on it in indelible marker—and click Continue. By default, Apple fills in the key’s model name.

Figure 27: Insert or activate your key when prompted.
After enrolling both keys, Apple may provide a list of devices currently signed in to your iCloud account. You can select those to log out at this step, click Stay Signed In to All, or even click Cancel to end the process without enrollment. (If you only have a single device in your account, you won’t be prompted, naturally.)
At the acknowledgement screen, click Done.
Apple sends an email to your Apple ID-associated address to confirm enrollment (or alert you of that fact).
Enroll Your Apple ID via iOS/iPadOS
The process is nearly identical to using macOS. Two differences:
Start at Settings > Account Name > Sign-In/Password & Security and tap Add Security Keys or Set Up next to the Security Keys label.
When you’re prompted to add a key in step 5b above, you can bring an NFC-equipped security key near the top of your iPhone or iPad and it will be recognized and activated.
Change Security Keys
Apple doesn’t require a security key to be present to remove it or disable security key authentication, nor to add additional keys.
Go to Settings (iOS/iPadOS)/System Settings (macOS) > Account Name > Sign-In/Password & Security. Tap Two-Factor Authentication > Number next to the Security Keys label or click Edit next to the Security Keys label (Figure 28).
In iOS/iPadOS:
Tap an entry and you can rename it, or tap Remove Key and confirm to remove it.
Tap Remove All Keys and confirm by tapping Remove to disable authentication. Then enter your iPhone or iPad passcode.
Tap Add Security Key to enroll additional keys. Apple prompts you for the device passcode. Enter it and tap Done.

In macOS:
Click an entry’s name to change the name.
Select an entry and click the minus
 icon to remove it and confirm its removal.
Click Remove All Keys and enter your macOS account password.
Click the plus
 icon to enroll additional keys. Apple prompts you for your Mac account password.
Use App-Specific Passwords
Apple relies on 2FA for all account access with three exceptions. To allow third-party apps to work with contacts, calendar entries, and email, Apple allows setting an app-specific password that can work only with those three kinds of data. This is true with code-based 2FA as well as hardware security keys.
To generate one of these passwords, you have to visit the Apple ID site and log in. I suggest never reusing them: generate a new one for every piece of software on each computer or mobile device that requires a password using these steps:
Go to the Apple ID site and log in to your account.
Click Sign-In & Security at left and click App-Specific Passwords.
Click the plus
 icon to the right of Passwords (Figure 29).
Figure 29: On the Apple ID site, you can generate an app-specific password. If you logged in to the website using Touch ID, the site may prompt you to enter your account password for the first password you generate—which, oddly enough, you can also use Touch ID for.
The site generates the app-specific password (Figure 30). It will not be displayed again and it cannot be retrieved. (If you use a password manager, store it there, too, just in case.)
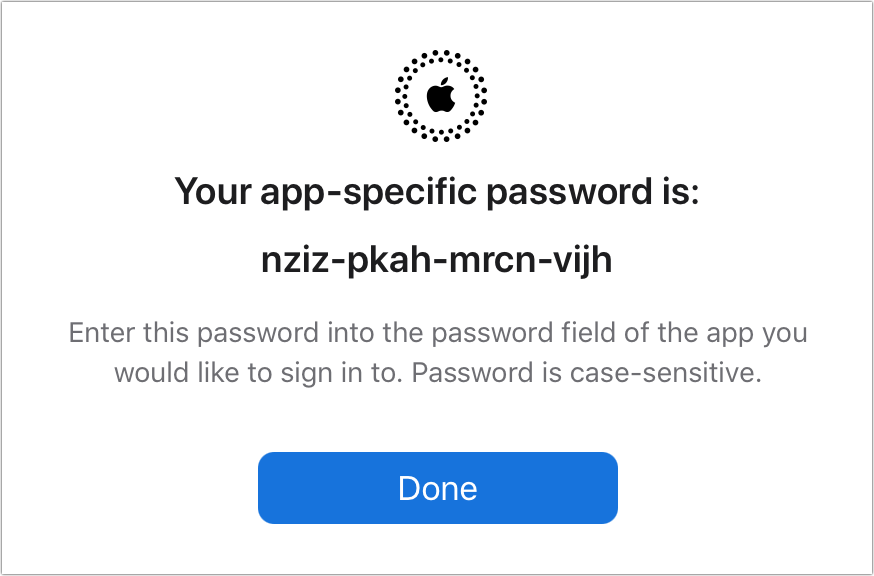
Figure 30: This password appears once. I’ve already revoked it, so even showing it doesn’t risk that you might break into my account. Anyway, I trust you. Click Done.
In a third-party app, like Thunderbird for email, Fantastical for calendars, or BusyContacts for contacts, enter your account information as prompted, but for a password use the app-specific one you generated in these steps.
Apple emails you at the associated Apple ID address that a new app-specific password was generated just to be sure it wasn’t created without your knowledge.
If you’re later concerned about the security of one of these passwords, or even of all of them, you can revoke them, and they immediately stop working everywhere. Here’s how:
In that same Security area in step 3 above, click Edit.
Click View History under the App-Specific Passwords header.
Enter your Apple ID password if prompted.
Either: Click the Revoke
 icon next to an appropriate password you want to revoke and confirm by clicking Revoke.
Or: Click Revoke All and confirm revoking all app-specific passwords.
Generate new passwords and enter them in your various third-party apps.
Click Done.
Troubleshoot Apple ID Login Problems
The advantage of additional authentication is that it restricts account access to people who have the requisite information. But what if you lose access to the necessary elements to log in? For instance, what if you forget your password or lose your phone? Or both your security keys are destroyed? Not to fear—or at least, not to fear too much. You typically have a way back.
You Forget Your Password
You may feel self-conscious, but it happens to the best of us. You’re particularly at risk of forgetting a password if you don’t need to log in to your account regularly and you have no record of your password but in your memory. With code-based 2FA, Apple offers three ways to reset your password; security keys allow the first two.
Reset a Password in iOS/iPadOS with Extra Authentication
Follow these steps to reset your Apple ID password in iOS or iPadOS with code-based 2FA or security keys enabled:
Go to Settings > Account Name > Sign-In/Password & Security.
Tap Change Password.
You’re next prompted for your iPhone or iPad passcode. (This isn’t a code transmitted by Apple. It’s the one you use to unlock your iPadOS or iOS device.)
If you have security keys enabled, you’re prompted to activate one.
On the “Change Password” screen that appears, you must enter a new password and verify it.
Tap Change.
Your Apple ID password is now changed. Your other devices will ask you to enter the new password when you use them.
Reset a Password in macOS with 2FA Enabled
Here’s how to reset a password for your Apple ID account with code-based 2FA or security keys enabled in macOS:
Go to System Preferences > Apple ID > Password & Security (Monterey) or System Settings > Account Name > Sign-In/Password & Security (Ventura or later).
Click the Change Password button.
You may be prompted to enter a password for an administrative account, and you should do so and click OK.
If you have security keys enabled, you’re prompted to activate one.
A Change Password dialog appears. Enter your new password and enter it again in the Verify field.
Click Change.
Your password is now changed. Your other devices will ask you to enter the new password when you use them.
Reset a 2FA Password on the Apple ID Website
You can also use the Apple ID iForgot website to change an account password if you’re using code-based 2FA, but it requires hopping through a few hoops, and switching to one of your devices to complete the process.
Here’s how to proceed with code-based 2FA only:
Visit the Apple ID iForgot website.
Enter your Apple ID email address and click Continue.
Apple displays phone numbers associated with the Apple ID with all but the last two digits replaced with bullets, like (•••) •••-••12. Enter the full phone number for any of those and click Continue.
As with a 2FA login, a dialog appears on your trusted devices, a list of which Apple shows on the site (Figure 31). Find any of those devices and tap Show or click Allow in the Reset Password message.

Figure 31: Apple lists all your trusted devices generically. You must use one of these to reset your password. If prompted, click or tap Reset Password (Figure 32).

Figure 32: You may be prompted to confirm this step. Enter your device passcode or macOS account password and click Continue.
Enter a new password and then re-enter it in the Verify field, and tap Next or click Change.
Your password is now changed and may need to be re-entered in a number of locations.
You Lose Your Trusted Devices
All is not lost with a code-based 2FA-protected account, even if your hardware goes missing, so long as you have a trusted phone number available. As soon as you can, log in to iCloud.com using your Apple ID. You can verify the log in via a trusted phone number.
You Lose a Trusted Phone Number
With code-based 2FA, if you have a trusted device or another trusted phone number, you can use the methods described in Change or Add Trusted Phone Numbers to add a new number and revoke one you’ll never get back.
You Lose Access to Everything
The worst-case scenario happens when you have a catastrophic loss, such as in an accident, a major theft, or natural disaster, or even have to leave a country of which you’re a resident suddenly. I describe how to cope with this scenario next.
Delete Your Apple ID
It might be strange to tell you how to get rid of your Apple ID in a book devoted to explaining the use and troubleshooting of one. But you may wind up with multiple accounts and want to be sure that one you no longer use has nothing remaining active.
You don’t use any of the typical locations to delete your account. Instead, you start at the Apple Data and Privacy website, where the company provides access that varies by country to data it has stored about you.
Here’s how to delete an Apple ID account permanently:
Start at the Data and Privacy website.
Click “Request to delete your account” under “Delete your account.”
Apple provides a long page of warnings, concluding with a pop-up menu from which you select your reason. After choosing an option, click Continue to proceed.
You have to review two more pages of details: first, a checklist of what will happen next; second a set of terms and conditions associated with deletion. Click Continue on the first, and check the box indicating acceptance, and click Continue on the second.
Apple asks for ways to contact you about the status of your account’s deletion. You can provide another Apple ID, a phone number, or an email address. Click Continue.
On the final page, Apple provides a code you can reference corresponding to the account deletion if you have questions in the future. Make a note of it and then click Continue.
There’s even more! Apple shows additional warnings and information. Click Delete Account to proceed.
Finally, on a confirmation screen, click Sign Out.