
Chapter 12
Working with Maps
The iPad has a powerful mapping application called Maps. It uses Google Maps to interactively find and display locations using map and satellite imagery. With Maps, you can get directions, view traffic, and more.
In this chapter, you’ll discover how to navigate maps, bookmark locations, “walk down” a street in Street view, and even use your iPad as a compass. Maps isn’t just a powerful app; it’s a fun one, as well. Let’s get started.
Launch the app by tapping the Maps icon (see Figure 12–1). It looks like a small map that shows a section of Interstate 280. The pin on the icon just happens to be where Apple’s headquarters is located in Cupertino, California. This takes you into the Maps application, where you can view and explore geography from around the world.
Figure 12–1. The Maps icon
Maps Screen
Tap the icon to launch the Maps app. When you do, you’ll be presented with your Maps screen (see Figure 12–2).
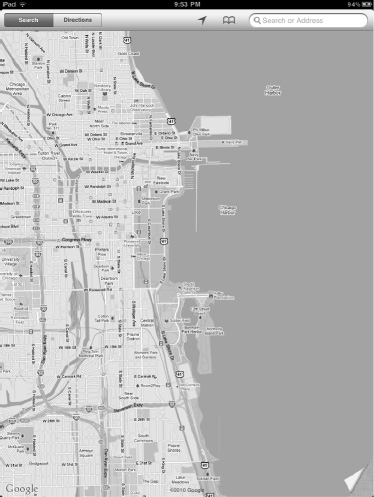
Figure 12–2. The Maps screen. Note the page curl at the bottom right of the screen.
At the top of the Maps screen, you’ll see the Maps toolbar (see Figure 12–3).
Figure 12–3. The Maps toolbar
The Maps screen, including the toolbar, shows the basic Maps interface, which consists of the following:
Search/Directions tab: This tab allows you to switch between the search and direction functions of the Maps app. You can search for local business, attractions, and specific addresses. You can also easily get directions to and from those locations.
Current Location: This button, which looks like an arrowhead, finds your current location on the map by using the iPad’s built-in positioning tools. These built-in tools vary, depending on which iPad you have. The iPad Wi-Fi + 3G uses both the Global Positioning System (GPS) and Skyhook Wi-Fi positioning to locate you. Skyhook Wi-Fi positioning uses known wireless hotspot locations to triangulate your current position. The iPad Wi-Fi only uses Skyhook Wi-Fi positioning because there is no GPS chip inside the iPad Wi-Fi.
Bookmarks: The Bookmarks icon at the left side of the search field links to your saved locations. From the Bookmarks pop-up that appears when you tap the Bookmarks icon, you can edit your bookmarks, see recently viewed locations, or choose a location from your contacts list.
Search field: Marked with a spyglass, the search field allows you to enter addresses and other queries. You can type an entire address (1600 Pennsylvania Avenue, Washington, DC); you can find addresses for contacts (Bill Smith) or landmarks (Golden Gate Bridge); and you can even find pizza places in any ZIP code across the country (Pizza 11746). When in Directions mode, the search field will turn into two search fields, so you can enter beginning and end points.
Map: The map itself takes up the rest of the screen. It’s fully interactive. You can scroll by dragging your finger along the map, or you can zoom in and out using pinches and double-taps.
Page curl: In the lower-right corner of the map (see Figure 12–2), you’ll see the corner is curled up a bit. Tap the curl, or tap and hold and then drag the curl with your finger to reveal map settings. This allows you to change map views, get traffic conditions, and drop pins.
Navigating Maps
The iPad Maps app makes it so you can explore the world from the comfort of your couch. As with any other app, you navigate the map using gestures. You can also view the map in different modes.
Gestures
On maps you use gestures to zoom in, zoom out, pan, and scroll:
Zoom in: You have two ways of zooming in. Either pinch the map with two fingers; or, using one finger, double-tap the location on the map that you want to zoom in on. Double-tap again to zoom in even closer.
Zoom out: You can zoom out in two ways. Either reverse-pinch the map with two fingers; or, using two fingers, double-tap the map. Double-tap with two fingers again to zoom even further out.
Panning and scrolling: Touch and drag the map up, down, left, or right to move the map around and view another location.
Changing Map Views
The default map view is Google’s standard road map with orange, yellow, and white streets. But the Maps application also allows you to look at the map in four additional views, as well as with a traffic overlay (see Figure 12–4).
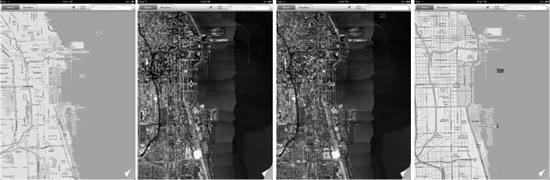
Figure 12–4. Four map views, from left to right: Standard, Satellite, Hybrid, and Terrain
To access these features, tap, or tap and drag the page curl at the bottom of the Maps screen. The map will curl up, and you’ll be presented with the settings page (see Figure 12–5). Your settings include map views, overlays, and a special Drop Pin feature, which places, or drops, a pin anywhere on the map. These dropped pins let you easily mark a business, street corner, beach, or any other kind of location on a map.
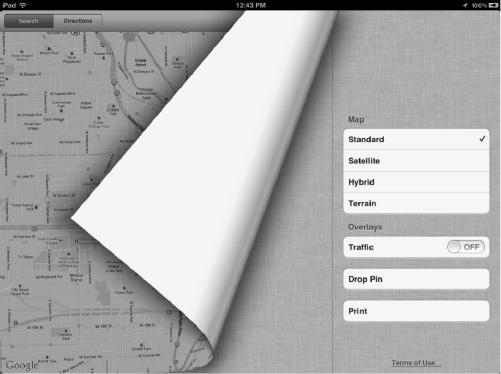
Figure 12–5. The Maps setting page lies behind the page curl in the map.
Here are the basic map views and what they do:
Standard: This is the default map view. It uses Google’s standard road map.
Satellite: This view shows you the world using satellite imagery. It’s perhaps the coolest map view because you can zoom in on streets and see little blips of people walking about on the day that the satellite imagery was taken. No labels appear in Satellite view.
Hybrid: This view combines the Standard and Satellite views. You see the map in satellite imagery, but it has labels, roads, and borders overlaid on it.
Terrain: This view shows you the terrain of a given map, including relief maps of the terrain. The Terrain view also overlays roads, borders, and labels. This view is great if you’re thinking of doing a cross-country cycle—you’ll be able to see how hilly areas of your route are.
TIP: The Standard view uses orange, yellow, and white to color streets. Orange indicates interstate highways, yellow indicates state highways and county parkways, and white indicates local and private streets.
Traffic: Tap to turn Traffic On. While on, the current traffic conditions will be overlaid on the map. To see current traffic conditions, you will need to be connected to a Wi-Fi or 3G network. We’ll talk more about the Traffic feature later in this chapter.
Drop Pin: Tapping this button causes the page to uncurl and drops a location pin in the center of the map. Use a dropped pin to easily mark a business, street corner, beach, or any other kind of location on a map. You can also drop a pin by touching and holding anywhere on the map. We’ll talk more about dropping pins later in this chapter.
Print: Tap this button to print the map to an AirPrint-compatible printer.
You’ll notice we said that the Maps app allows you to view the map in Standard view, as well as four additional views; thus, it gives you five views in all. The fifth view is called Street view, and you access it from search results or a dropped pin. We’ll talk more about Street view later in this chapter.
Finding Locations
The Maps app gives you multiple ways to find locations. You can search for locations using the search field, automatically find your current location using the iPad’s built-in GPS or Skyhook location services, or even just zoom in and browse the map like a bird flying overhead.
Depending what you are looking for, some types of search are better than others. For example, if you are looking for your favorite spot on a beach, chances are it doesn’t have an address or name, so your best bet is to navigate to the beach and then zoom in and scroll around in Satellite view until you find that favorite spot.
Search
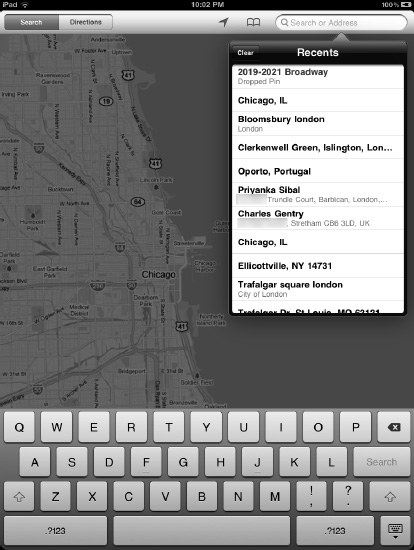
You’ll find most of your locations through the search function in the toolbar at the upper right of your screen (see Figures 12–2 and 12–3). Tap the search field, and a Recents pop-up window and keyboard appears (see Figure 12–6). Remember that if you have a hardware keyboard synced to your iPad, the software keyboard will not appear on the screen.
There are many ways to search for a location on your iPad. You can enter an entire address (1600 Pennsylvania Avenue, Washington, DC); you can find a contact’s address by typing in the contact’s name (Bill Smith); or you can find the address for a landmark by entering its name (Eiffel Tower). You can even find pizza places by entering your local ZIP code and the keyword pizza (Pizza 60605).
The Recents pop-up window shows you all your recent searches, including recent directions (see Figure 12–7). Tap any of the results in the Recents list to be taken to its location. Tap the Clear button in the Recents pop-up window to clear the Recents results list. Clearing the Recents list ensures that no one else who uses your iPad will be able to see the locations you have searched for. For example, if you looked up directions to a special restaurant that you are taking your wife to for her birthday, you don’t want her seeing it. Clearing the Recents list ensures she won’t. Be careful not to clear the list if you are going to be frequently pulling up the same directions, however. The Maps app can save any kind of location, whether or not it has an address; however, it does not have the ability to permanently save direction routes. Regardless, those routes will remain in the Recents list—for quick access—until you clear it.
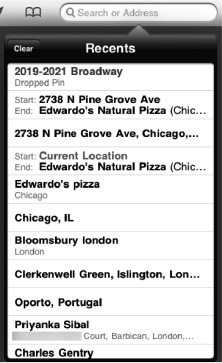
Figure 12–7. The search field with the Recents list
Enter your search query, and one or more red pins will fall onto the map. Imagine you’re taking a trip next week to Chicago and you want get some Chicago-style pizza. Search on the criteria Pizza Chicago, and the map will show several red pins, all of them representing pizza places in the city (see Figure 12–8).
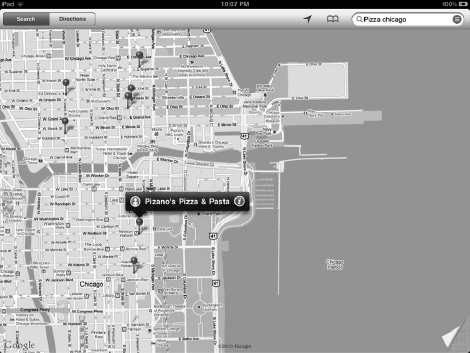
Figure 12–8. Search result pins on the map
When you touch one of the red pins, you get the pin’s Information bar (see Figure 12–9). The Information bar tells you the name of the establishment (a pizzeria, in this case) and displays an icon on either side. Those icons represent the Information window and Street view.
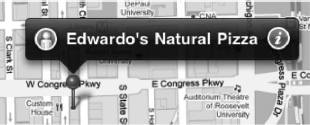
Figure 12–9. A search result pin’s Information bar shows the name of the establishment with a Street View icon on the left and an Information icon on the right.
You can also view your search results as a list. After the pins fall onto the map, a gray circle with three lines appears in the search field next to your queried search term. Tap the circle, and your results will be presented in a drop-down list (see Figure 12–10). You can then keep tapping names in the list and see their locations bounce to life on the map.
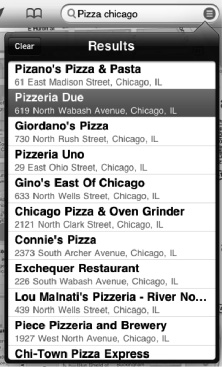
Figure 12–10. The search results list
The Information Window
Tap the white and blue i on the pin’s Information bar to make the Information window slide open. The Information window (see Figure 12–11) displays information for the establishment, such as its phone number, web page, and physical address.
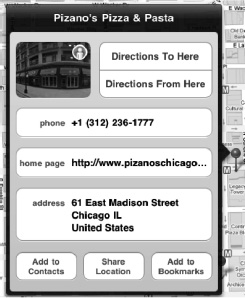
Figure 12–11. The Information window
The Information window provides the following options for a given location on your iPad:
Image: Depending on the establishment, you may see a thumbnail icon of the establishment’s Street view in the Information window. You can tap this thumbnail to be taken to Street view. You’ll see more on that in a bit.
Directions To Here: Tap here to be taken to the Directions toolbar. The address of the establishment will be populated in the second (end destination) directions field. We’ll talk more about directions later in this chapter.
Directions From Here: Tap here to be taken to the Directions toolbar. The address of the establishment will be populated in the first (origin destination) directions field.
Phone: This displays the establishment’s phone number. Touch and hold to copy the number to the clipboard. Tap the phone number to initiate a FaceTime call. FaceTime calls work only if the number is a valid FaceTime number.
Homepage: This displays the establishment’s web address. Tap it to close Maps and be taken to the web address in Safari.
Address: This displays the establishment’s address. Touch and hold to copy the address to the clipboard.
Add to Contacts: Tapping this button will add the name of the establishment and its phone number, web address, and physical address to a contact. This contact presents you with two options: Create New Contact and Add to Existing Contact.
If you choose Create New Contact, a New Contact window will slide up (see Figure 12–12) in the Information window, populating contact fields with information and also allowing you to add more information to the contact. Tap Done to save the new contact.
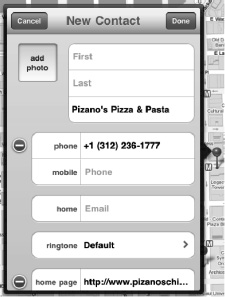
Figure 12–12. The New Contact window lets you add a search result’s information to your address book from within the Maps app.
If you choose Add to Existing Contact, a list of all your contacts from your address book will slide up in the Information window. Tap the contact you want to add the information to. The information will be added, and the contacts list will slide away.
FaceTime: If you have chosen to look up the address for a friend you already have in your address book, you'll see a FaceTime button instead of an Add to Contacts button. Tapping the FaceTime button will bring up a dialog box that asks at which number or e-mail address you want to FaceTime the person at. Tap which one you want, and FaceTime will open and proceed to call your contact. Check out Chapter 15 for more on FaceTime.
Share Location: Tapping this button will allow you to e-mail a link of the establishment’s name, add a Google Maps link, and attach a vCard (a virtual business card the receiver can choose to add to an address book).
Add to Bookmarks: Tapping this button will allow you to save the location to your Maps bookmarks. You’ll be able to name the bookmark, so you can change “Edwardo’s Natural Pizza Restaurant” to “My favorite pizza joint.” We’ll talk more about bookmarks in a moment.
Tap anywhere on the map to close the Information window.
Street View
Street view is the fifth way to view maps that we mentioned earlier. Street view uses Google technology to display 360-degree panoramic views of a given location. To enter Street view, tap the white and orange Street View icon in the pin’s Information bar (see Figure 12–9), or tap the picture thumbnail in the Information window (see Figure 12–11). Your map will begin to zoom in on the pin; it will then tilt up and present you with a street-level panoramic view (see Figure 12–13).
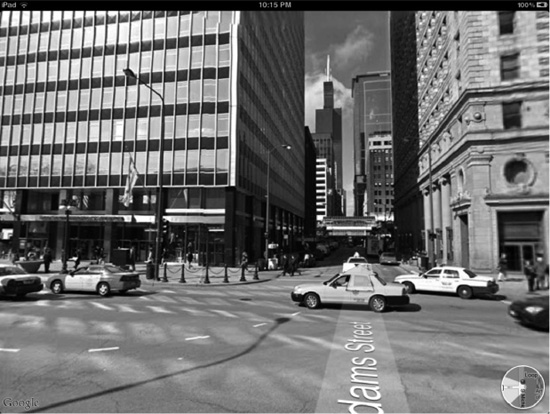
Figure 12–13. Street view fills the entire screen. Tap the white Arrow icon on the road to move forward down the street. Tap the map’s Navigation icon to return to Map view.
Google has had Street view available on the Web for some time, but using it on the iPad brings it to a whole different level. The fact that you can touch and drag and pinch and zoom around the street gives Street view an immediacy it never had previously.
While in Street view, drag your finger around to experience the 360-degree panoramic views. Pinch or double-tap the screen to zoom in. Reverse-pinch to zoom back out. To “walk” down the street, find the big white arrow icons at the end of a street label and tap them. You’ll then move in that direction.
The small circular Navigation icon sits at the bottom right of a Street view map. It shows you the direction you are looking in. Tap the icon to return to your last Map view location.
Street view isn’t available in all cities yet, but it is in most major North American and European ones. Street view is a wonderful tool because it lets you check out what a place or area looks like in advance. Thinking of moving to a new area of town? You can virtually scroll down the street in Street view to see whether you like the looks of it before you take the time and trouble to start searching for houses in the neighborhood.
Current Location
Curious about where you are in the world? The Maps app allows you to find your current location with a tap of a button. The Current Location button is in the toolbar at the top of the screen (see Figure 12–3). It looks like an arrowhead. Tap it to jump to your current location on the map.
The Current Location feature works by using the iPad’s built-in positioning tools. These built-in tools vary depending on which iPad you have. The iPad Wi-Fi + 3G uses both GPS and Skyhook Wi-Fi positioning to locate you. The iPad Wi-Fi uses only Skyhook Wi-Fi positioning, because there is no GPS chip inside the iPad Wi-Fi.
GPS uses satellite-location technology to pinpoint your location with an accuracy of up to 16 feet (5 meters). Skyhook Wi-Fi positioning uses known wireless hotspot locations to triangulate your current position with an accuracy of 60 to 100 feet (20 to 30 meters).
As mentioned earlier, if you have an iPad Wi-Fi + 3G, it will use both technologies to pinpoint your location. Even though GPS has a much more accurate range, there are some areas where Skyhook has an advantage over GPS, namely, in urban locations. Tall buildings can obscure GPS satellite signals, so Skyhook’s wireless network triangulation has an advantage there.
Your current location is signified by a blue dot, as shown in Figure 12–14. If the Maps app can’t determine your exact location, a blue circle appears around the dot. The circle can range in size—its size depends on how precisely your location can be determined. The circle means you are somewhere in the vicinity of that circle on the map. The smaller the circle, the more precise the current -location marker.
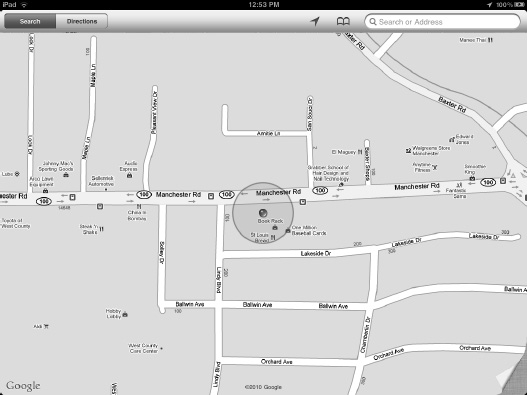
Figure 12–14. The blue dot surrounded by the circle represents your approximate location.
NOTE: Location Services must be turned on for your iPad to find your current location. To turn on Location Services, go to Settings ![]() Location Services and make sure the switch is set to On.
Location Services and make sure the switch is set to On.
When you are in Current Location mode, the Current Location icon in the toolbar turns blue. After you’ve found your current location, if you drag the map around, you can simply tap the Current Location button again to have the map center back on it.
You can tap the blue current location dot on the map to open the current location’s Information bar (see Figure 12–15). The address of the current location will be displayed. Tap the i button to get the Information window for the location, including the ability to get directions to/from the location, bookmark it, add it to contacts, or e-mail the location. Tap the Street View button to enter Street view (if available in the area).

Figure 12–15. The current location’s Information bar displays the address of your current location.
Digital Compass
Not only can your iPad find your current location, but when it does, you can use it as a compass. With your current location found, tap the blue Current Location button in the toolbar to activate the Digital Compass mode.
The Current Location icon changes to a Compass icon in the toolbar (see Figure 12–16), and a headlight emanates from the blue dot on the map to show you the location you are facing (see Figure 12–17). The map will rotate as you do, so the top of the map will always show what’s ahead of you, and the bottom will show what’s behind you. A compass will appear in the top right of the screen to show you which way north is.

Figure 12–16. The Current Location button (left) turns into the Digital Compass button (right) when you tap it twice.
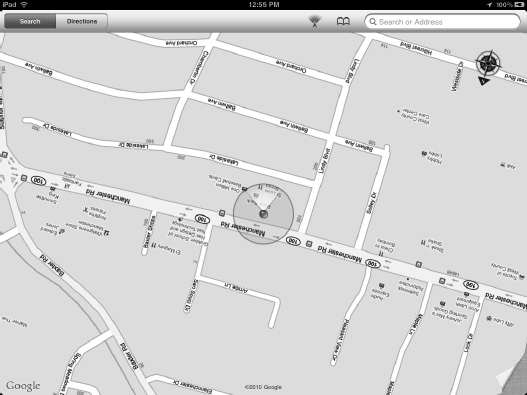
Figure 12–17. Digital Compass mode. This is the same image as in Figure 12–14, but with the Digital Compass turned on. Notice how the map is pointing the other direction; that’s because the iPad is facing that direction, which in this case is south. Note the compass pointing north in the upper-right corner and the “headlight” emanating from the blue current location dot.
The first time you use Digital Compass mode, you’ll need to calibrate the compass. A gray icon will appear on the screen telling you to move your iPad in a figure eight (see Figure 12–18). Doing so will complete the calibration. Lots of metal and magnets (like those found in a car’s speaker system) affect compasses. You may need to calibrate the compass from time to time, but the iPad will tell you when calibration is needed.

Figure 12–18. The Digital Compass calibration notice
TIP: The Current Location and Digital Compass features are cool, but both require Location Services to be on, which requires extra battery power. If you aren’t using either, turn Location Services off to conserve battery power. To turn off Location Services, select Settings ![]() Location Services and make sure the switch is set to Off.
Location Services and make sure the switch is set to Off.
Bookmarking and Viewing Saved Locations
You can bookmark locations you’ve navigated to in Maps in two ways: by dropping a pin or by tapping the Add to Bookmarks button in the location’s Information window. Dropping a pin allows you to mark any location on a map, regardless of whether it has a physical address; you can then add the pin’s location to your saved bookmarks. Once you’ve saved locations, you can view them all in the handy Bookmarks menu.
Dropping a Pin
Navigate to a point of interest on the map without doing a search for something. In the example in Figure 12–19, we found a location by Chicago’s Shedd Aquarium that has beautiful views of the sunrise over Lake Michigan. To drop a pin, all you have to do is press and hold your finger on the map where you want to drop it. After a second or two, a purple pin will fall and stick in the map.
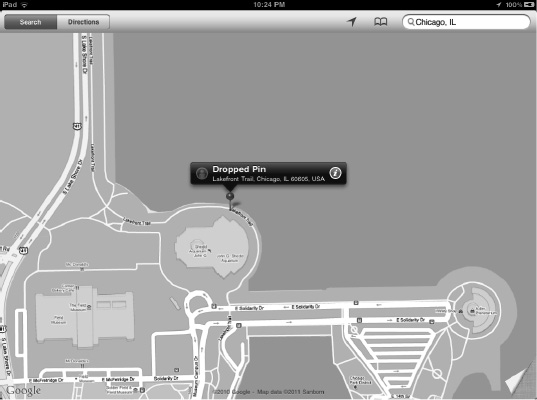
Figure 12–19. A dropped pin and its Information bar with the approximate address
The pin’s Information bar will appear with the approximate address of the pin, as well as the usual icons for Street view and the Information window. If the pin’s location isn’t exactly where you want it, you can tap and hold the purple pin’s head and drag it to the location you want. Remove your finger to sink the pin into the map.
Tap the i button to bring up the Information window for the pin’s location (see Figure 12–20). This window’s options include the ability to get directions to/from the location, bookmark it, add it to contacts, or e-mail the location. You can also tap the Street View button to enter Street view (if it’s available in the area).
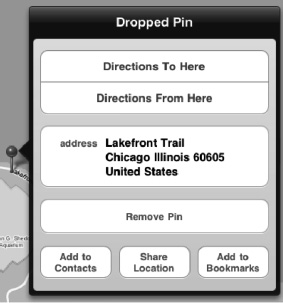
Figure 12–20. A dropped pin’s Information window lets you find directions, add the location to contacts and bookmarks, or share the location.
You can also drop a pin in the center of the map by accessing the Maps settings page behind the page curl in the lower-right corner (see Figure 12–6). Tap, or tap and drag the page curl at the bottom of the Maps screen and then tap the Drop Pin button. The settings page will uncurl, and a pin will drop in the center of the map. You can then tap and drag the pin to move it to anywhere you want on the map.
Dropping pins might seem like a nice but unnecessary feature at first. If you can search maps with the app’s powerful search features, you might wonder why you would want to manually add locations. Again, dropped pins are great because they allow you to mark locations that do not have a fixed address, like a good trail in the mountains, the site of your first kiss (for the romantics among you), or even the location of your favorite bench in Central Park.
Bookmarking
So far in this chapter, we’ve shown you several ways to bookmark locations, whether it be by a dropped pin or the Information windows of a business, friend, or address you looked up. But where are all those bookmarks you’ve saved? In the Bookmarks window, of course!
Tap the Bookmarks icon in the Maps title bar; the icon looks like a book folded open (see Figure 12–3). The Bookmarks window will appear, presenting three views: Bookmarks, Recents, and Contacts (see Figure 12–21).
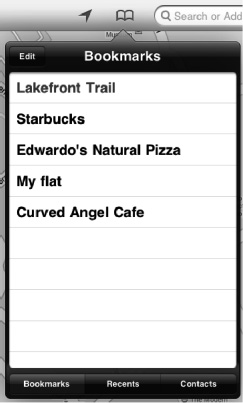
Figure 12–21. The Bookmarks window displays your bookmarked locations, recent locations, and contact locations.
The different views of the Bookmarks window behave like this:
Bookmarks: This view lists all the bookmarks you’ve saved in the Maps app. Tap any bookmark to jump to it on the map. Tap the Edit button to delete a bookmark, move it up or down the Bookmarks list, or change the name of the bookmark.
Recents: This view lists all the recent search queries, driving directions, and dropped pins you’ve made (see Figure 12–22). Tap any item on the list to jump to it on the map. Tap the Clear button to remove all items from the list. Remember, clearing your Recents list will ensure that people who use your iPad can’t spy on locations you’ve searched for. Be aware, however, that it will also clear your direction routes. Routes can’t be bookmarked, so the only way to quickly access them is through the Recents window. If you clear the window, you’ll need to perform your route searches from scratch.
Contacts: This list shows you all your contacts (see Figure 12–22). Tap any contact on the list to jump to its address on the map (provided you have the contact’s address in your contacts book). If a contact has more than one address, you’ll be asked to choose which address to navigate to. Tap the Groups button to navigate through your contact groups.
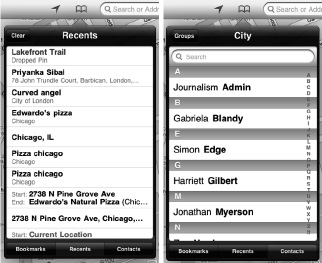
Figure 12–22. The Bookmarks windows for Recents and Contacts
TIP: To close any pop-up window, such as the Bookmarks window or a search results list, tap anywhere on the map. The pop-up window will fade away.
Directions and Traffic
The iPad Maps app lets you search for directions and view current traffic conditions. Like the Maps app itself, directions and traffic require an Internet connection. If you have an iPad Wi-Fi + 3G, this won’t be an issue if you’re using it to find directions while on the road. If you have an iPad Wi-Fi only, you’ll need to look up the directions before you leave home.
Directions
To get directions, tap the Directions tab in the Maps toolbar (see Figure 12–3). You’ll notice that the search field becomes a double field to enter your start and end locations (see Figure 12–23). The Maps app will make your current location, if available, the starting location. If you don’t want to use your current location as the starting address, tap it into the first search field anyway. From there, you can tap the X to remove it or choose another location from the Recents pop-up list that appears.

Figure 12–23. The Maps toolbar changes to accept directions input when you tap the Directions button.
NOTE: You can also begin a directions search from any pin’s Information window.
To enter an address from one of your contacts, tap the Bookmarks icon, and then choose a contact. You’ll be asked to choose Directions to Here or Directions From Here. Choose the one you want, and the contact’s address will be populated in the appropriate directions field. To reverse the start and end points, tap the curvy S arrow to switch the points (and get reverse directions). The reverse directions feature is nice because sometimes the route you used to get somewhere isn’t the quickest route back. Reverse directions will show you whether another route home is quicker.
When you have selected both a start point and an end point, one or more blue lines will appear on the map showing suggested routes you can take. Tap the route label (Route 1, Route 2, and so on) to select a route (see Figure 12–24). A green pin represents your starting location on the map, and a red pin indicates your end location. You’ll also notice that a blue Directions bar has appeared at the bottom of the screen (see Figure 12–25). The Directions bar lets you choose between driving (a Car icon), public transit (a Bus icon), or walking (a Person icon) directions. These different modes of transportation may give you different direction routes on the map between the same two locations. This is because people aren’t allowed to walk on highways, and cars aren’t allowed to drive on pedestrian streets or on certain bus routes, depending on the city you live in.

Figure 12–24. The map with the directions route
Figure 12–25. The Directions bar allows you to switch between driving, public transit, and walking directions.
Driving or Walking Directions
Tap the icon for either driving or walking. You’ll see the length of the route and the estimated time it will take to get there. If traffic data is available, the estimated journey time will adjust accordingly.
To navigate through the directions step by step, tap the blue Start button. The Directions bar will change to the one shown in Figure 12–26. Tap the icon of the three dots with lines trailing after them to see the directions displayed in a list format (see Figure 12–27). Tap any step in the list to be taken to that part of the route on the map. To return to the Directions bar, tap the blue icon in the top-left corner of the Directions List window.
Figure 12–26. Tap the left arrow or right arrow icon to move through the directions step by step.
If you’d like to navigate through the directions step by step in the map, tap the right arrow icon on the bar. Each subsequent tap will bring you forward one step in the route. To move back a step, tap the left arrow icon.
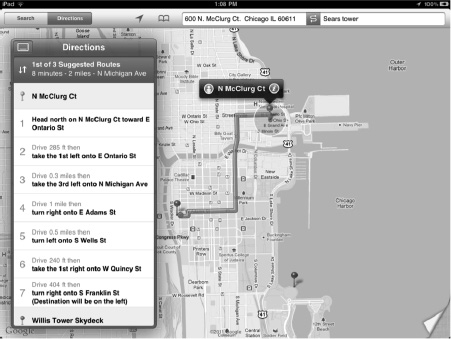
Figure 12–27. Directions presented in a list format. Note the map displays a circle to show you what step of the route you are on.
Public Transit Directions
Tap the Bus icon to select the public transit option. In the blue Directions bar, you’ll see the estimated time it will take to get there. If traffic data is available, the estimated journey time will adjust accordingly.
Tap the Clock icon to display a pop-up list of departure times and schedules (see Figure 12–28). Tap Depart to choose a date and time. The depart field defaults to the current date and time unless you change it. Below the depart time, you’ll see a list of alternate schedules. Select one, and then tap the Done button.
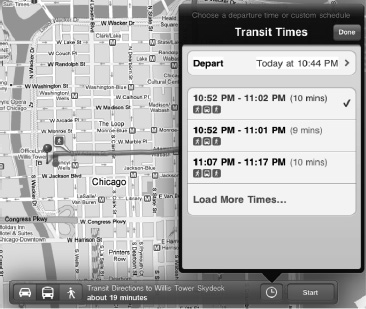
Figure 12–28. The Directions bar shows public transit routes. The Clock icon allows you to select between different transit schedules.
To navigate through the directions step by step, tap the blue Start button. The Directions bar will change to the one shown in Figure 12–29. Tap the icon of the three dots with lines trailing after them to see the directions displayed in a list format. Tap any step in the list to be taken to that part of the route on the map. To return to the Directions bar, tap the blue icon in the top-left corner of the Directions List window.

Figure 12–29. Tap the left arrow or right arrow icon to move through the public transit route step by step.
If you’d like to navigate through the directions step by step in the map, tap the right arrow icon on the bar. Each subsequent tap will bring you forward one step in the route. To move back a step, tap the left arrow icon.
NOTE: We’ve mentioned it before, but unfortunately you can’t bookmark routes. That’s a pity because it would be nice to be able to quickly pull up traffic conditions on your favorite routes. Ideally Apple will add this feature in the future.
Traffic
The Maps app can display traffic conditions that help you when planning an immediate journey. To turn on traffic conditions, tap or tap and drag the page curl at the bottom of the Maps screen and switch Traffic to On (see Figure 12–6). Back on the map, you’ll notice that green, yellow, and red lines have appeared over some of the roads (see Figure 12–30).
Just how on Earth does the Maps app know what the current traffic conditions are? Most major U.S. cities have sensors embedded in the highways and major roads. These sensors feed data back, in real time, to the Department of Transportation (DOT). The DOT uses this information to update digital traffic signs that report local traffic conditions (such as those bright Broadway-like signs that hang from overpasses on major metro highways that tell you how long it will take to get to a certain exit). The DOT also shares this data, which Google collects and uses to display near real-time traffic maps.

Figure 12–30. Traffic overlays on the map
Green lines indicate traffic is flowing at least 50 mph. Yellow lines mean that traffic is flowing between 25 and 50 mph. Red highways mean that traffic is moving below 25 mph. A gray route indicates that traffic data is not available for that street or highway.
The traffic feature is limited to certain regions, mostly major metropolitan areas in the United States, France, Britain, Australia, and Canada; however, new cities and countries are frequently added. If you don’t see traffic conditions, try zooming out on the map. If you still don’t see any, they aren’t available in your area yet.
Maps in Other Apps
You aren’t limited to using the Maps app only if you want to see or use maps on the iPad. Several other iPad apps allow you to navigate and search their own maps, as well as use maps for other things. Here are just a few.
Flixster
Flixster is a popular iPad app that allows you to look up movies in your area. Among its many features, the app shows you a list of theaters near you—based on your current location—and shows you the location of the theater on the app’s built-in Google map. It is free in the App Store.
The Weather Channel
The Weather Channel app is a versatile app that shows you all the weather information you could dream of. It also uses a built-in Google map that displays overlays, including Doppler Radar, cloud coverage, temperatures, rain, and UV index maps (see Figure 12–31). It’s free in the App Store.
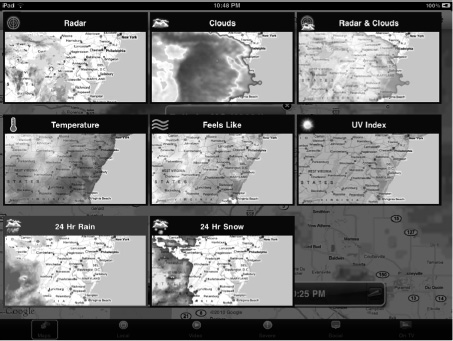
Figure 12–31. The Weather Channel app’s map overlays
Ndrive US HD
Ndrive is a powerful navigation app for the iPad. It uses its own built-in mapping software and stores map data on your iPad, so you can use it without an Internet connection. You can use the app to plan routes, get step-by-step directions, and locate more than 1.5 million points of interest. It’s $4.99 in the App Store.
UpNext 3D Cities
UpNext gives you maps of New York City, Washington D.C., and San Francisco, among others, in 3D. Swipe and zoom on the 3D maps, and touch a building to find out what businesses are inside (see Figure 12–32). It’s an amazing app and shows you where the future of personal mapping apps is going. It’s free in the App Store.
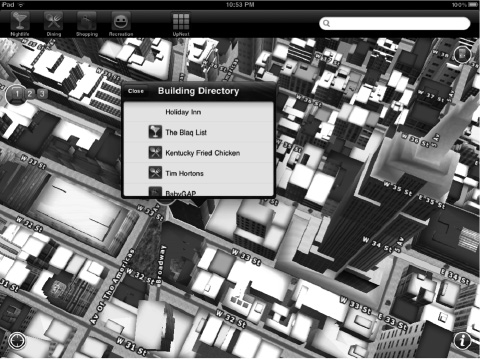
Figure 12–32. Touchable 3D buildings in UpNext 3D Cities
Find a Lost iPad
Have you lost your iPad? Don’t worry! Apple has created a free app called Find My iPhone. Yes, it says “iPhone,” but it works for iPads and iPod touches, as well. Using this app, you can locate all your iDevices from any iPhone, iPad, or iPod touch, or by logging into your iCloud account at www.icloud.com.
Before you can find a lost iPad, you need to make sure you’ve installed and set up the Find My iPhone app on the device. Therefore, it’s best to do that as soon as you get your iPad. Once you’ve set up Find My iPhone to work with your iPad and other iOS devices, launch the app and sign in. You’ll then be presented with the screen shown in Figure 12–33.
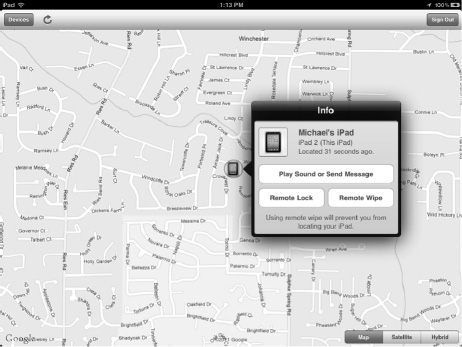
Figure 12–33. The Find My iPhone app shows you where your iPad and other iOS devices are at any given time.
From the Devices button in the top-left corner, you can choose what iOS device you want to see the location of. Select a device, and it will be located on the map. An iPad will be represented by a tiny iPad icon. Tap the icon to see the name of the device, and then tap the blue Info button to display a pop-up window that shows you the various actions you can perform with the device (Figure 12–33):
Play Sound or Send Message: This lets you display a text message on your iPad or play a sound at full volume for two minutes (even if the iPad is muted). The sound feature is great if you don’t know where in the house you have left your iPad or iPhone.
Remote Lock: Use this to set up a remote passcode lock on your device or initiate your current passcode lock. This will keep anyone out of the device who doesn’t know the passcode.
Remote Wipe: This is a worst-case scenario feature. If your iPad has been stolen and you don’t want to play detective and track it to the perpetrator’s house, you can remote wipe your iPad. Remote wiping your iPad will permanently erase all your personal data on it, ensuring that whoever has or finds your iPad can’t commit identity theft against you.
Find a Friend
Your iPad is so amazing that not only can it help you find other iOS devices and Macs you own, it can help you find friends as well! Well, not “find friends” as in make new ones, but it can help you find the friends you already know. It does this through an app (and iCloud service) called Find My Friends (Figure 12–34).

Figure 12–34. The Find My Friends icon
Using Find My Friends, you can instantly see the location of any of your friends who have iPhones, iPod touches, or iPads. That is, you can see where they are as long as they’ve given you permission. The Find My Friends app allows you to also share your location. It’s a great way to see where you are in location to your friends. Perhaps you’re out shopping and you’re thinking of grabbing a coffee. Just open Find My Friends and looks for any buddies that are near you to meet up for a quick drink.
As you can see in Figure 12–35, all your friends who have allowed you to know their location show up in a list. Tap the friend’s name to get the address of where they are and also view their location on a map.
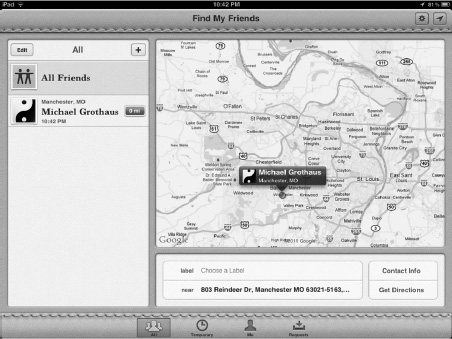
Figure 12–35. The Find My Friends app shows you a list of the locations of all your friends.
And for those of you concerned about privacy know that Apple has built in a great many privacy options. For instance, you can choose to share your location for only a certain period, such as three hours; or a certain time of day, such as from noon to 5 p.m. You can also revoke all location invitations at any time, which will disable any of your friends from following you.
The Find My Friends app is a great new social networking app that’s a free download in the App Store. The only requirement is that you have a free iCloud account. Get one at www.icloud.com.
Summary
The Maps app puts the world in your hands. With it, you can find directions to your favorite pizza joint, get an instant fix on your current location, or check out what the tops of the Pyramids of Giza look like without leaving your living room. You’ve learned how to use maps to find public transport times and routes, to get current traffic conditions, or just to virtually stroll down the street of a neighborhood you are thinking of moving to. Here are some tips to take away with you:
- When a person or business is in your contacts list, save yourself some time. Don’t type in the entire address, but instead enter a few letters of the name and select the contact.
- Tap individual items on the directions list to jump to that part of your route.
- The Recents list (in Bookmarks) shows both recent locations and recent directions.
- URLs that link to Google Maps automatically open in the Maps application, whether they are tapped in Safari or in Mail.
- Street view is fun, and it’s useful if you want to explore an area of your city—or almost any major city in the world—you’ve never visited.
- Plenty of other apps support map usage on the iPad. Some use Google Maps, and some use their own mapping software. Check out the recommendations in this chapter, or search maps or navigation in the App Store to find a plethora of apps that take advantage of interactive maps.
- Don’t forget to download and install the free Find My iPhone app. Use it to track lost or stolen iOS devices. Also the Find My Friends app is a great way to set up impromptu meetings with your friends!