
Chapter 9
Enjoying Music, Video, and Books
Your iMac comes equipped with apps for enjoying music, video, and books. iTunes enables you to copy songs from CDs, play them back, and watch videos, movies, and podcasts. iBooks enables you to build an e-book library on your iMac and read books comfortably.
Listen to iTunes Radio and Internet Radio
Add E-Books to iBooks and Read Them
Set Up Home Sharing
iTunes includes a feature called Home Sharing that enables you to share songs among your Macs, PCs, and iOS devices. Home Sharing saves time and effort over copying song files manually between your computers. To use Home Sharing, you must have an Apple ID — for example, one you create when setting up an account on Apple’s iTunes Store. If you do not already have an Apple ID, you can create one in a couple of minutes.
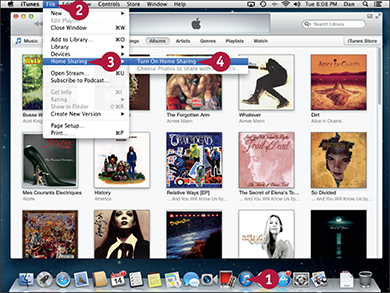
Set Up Home Sharing
![]() Click iTunes (
Click iTunes (![]() ) on the Dock.
) on the Dock.
iTunes opens.
![]() Click File.
Click File.
The File menu opens.
![]() Highlight Home Sharing.
Highlight Home Sharing.
The Home Sharing submenu opens.
![]() Click Turn On Home Sharing.
Click Turn On Home Sharing.
The Home Sharing screen appears.

![]() Type your Apple ID.
Type your Apple ID.
![]() Type your password.
Type your password.
![]() Click Turn On Home Sharing.
Click Turn On Home Sharing.
The Home Sharing screen appears.

![]() Click Done.
Click Done.

![]() Click the Source pop-up menu (
Click the Source pop-up menu (![]() ).
).
![]() Click the appropriate shared library in the Home Shares list on the menu.
Click the appropriate shared library in the Home Shares list on the menu.
The shared content appears.
![]() Select the items you want to import.
Select the items you want to import.
![]() Click Import.
Click Import.
iTunes imports the items.
TIPS
Can iTunes automatically transfer new items I purchase to my iMac?
Yes. Click the Source pop-up menu (![]() ), and then select a share in the Home Shares category to display the shared content. Click Settings to display the Home Sharing Settings dialog. Click the check box (
), and then select a share in the Home Shares category to display the shared content. Click Settings to display the Home Sharing Settings dialog. Click the check box (![]() changes to
changes to ![]() ) for each item you want to transfer automatically, and then click OK.
) for each item you want to transfer automatically, and then click OK.
How can I share music without using Home Sharing?
Click iTunes and then click Preferences. Click Sharing to display the Sharing pane. Click the Share my library on my local network option (![]() changes to
changes to ![]() ) and then click the Share entire library option (
) and then click the Share entire library option (![]() changes to
changes to ![]() ) or the Share selected playlists option (
) or the Share selected playlists option (![]() changes to
changes to ![]() ). Others can then play your shared content but not copy it.
). Others can then play your shared content but not copy it.
Add Your Music to iTunes
iTunes enables you to build your music library quickly by adding your existing songs to it. You can copy songs from your CDs by using a SuperDrive or other optical drive. You can also import songs that you already have as digital files on your iMac.
When importing songs from CDs, you can choose among different settings to create files using different formats and higher or lower audio quality. The highest-quality files give the best sound but require the most space on your iMac’s disk.
Add Your Music to iTunes

iTunes opens.
![]() Insert a CD in the optical drive.
Insert a CD in the optical drive.
iTunes looks up the CD’s details online and opens a dialog asking if you want to import the CD.
Note: If you want to prevent iTunes from prompting you to import each audio CD you insert, click Do not ask me again (![]() changes to
changes to ![]() ) before clicking No.
) before clicking No.
![]() Click No.
Click No.
The dialog closes.
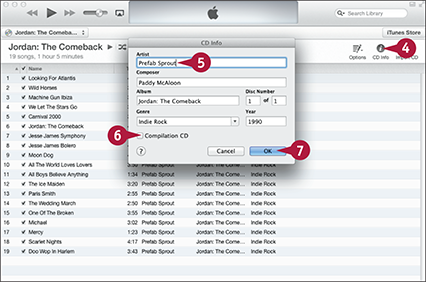
![]() Click CD Info.
Click CD Info.
The CD Info dialog opens.
![]() Verify that the information is correct. If it is not, correct it.
Verify that the information is correct. If it is not, correct it.
Note: Many entries for CDs in the online database that iTunes uses contain misspelled or inaccurate information.
![]() Click Compilation CD (
Click Compilation CD (![]() changes to
changes to ![]() ) if the CD is a compilation by various artists.
) if the CD is a compilation by various artists.
![]() Click OK.
Click OK.

![]() Click Import CD.
Click Import CD.
The Import Settings dialog opens.
![]() Click the Import Using pop-up menu (
Click the Import Using pop-up menu (![]() ) and select the encoder to use.
) and select the encoder to use.
![]() Click the Setting pop-up menu (
Click the Setting pop-up menu (![]() ) and select the setting.
) and select the setting.
![]() Click Use error correction when reading Audio CDs (
Click Use error correction when reading Audio CDs (![]() changes to
changes to ![]() ).
).
![]() Click OK.
Click OK.
The Import Settings dialog closes.
iTunes imports the songs.

![]() When iTunes finishes importing, click Eject (
When iTunes finishes importing, click Eject (![]() ).
).
The optical drive ejects the CD.
TIPS
How can I create MP3 files rather than AAC files?
In the Import Settings dialog, click the Import Using pop-up menu (![]() ) and select MP3 Encoder. Click the Setting pop-up menu (
) and select MP3 Encoder. Click the Setting pop-up menu (![]() ) and select the quality you want: Higher Quality gives reasonable quality, but for top quality, select Custom and then select the 320 kbps bitrate in the Stereo Bit Rate pop-up menu (
) and select the quality you want: Higher Quality gives reasonable quality, but for top quality, select Custom and then select the 320 kbps bitrate in the Stereo Bit Rate pop-up menu (![]() ).
).
Should I use error correction?
Using error correction for reading CDs is almost always a good idea. Importing may be a little slower, but not enough to matter.
Buy Songs Online
iTunes enables you to buy songs and other content from the iTunes Store, Apple’s online store for music and media. To buy items from the iTunes Store, you must set up an account including either your credit card details or another means of payment, such as an iTunes Gift Card, PayPal, or an allowance account. If you do not already have an account, iTunes prompts you to set one up when you first attempt to buy an item.
Buy Songs Online
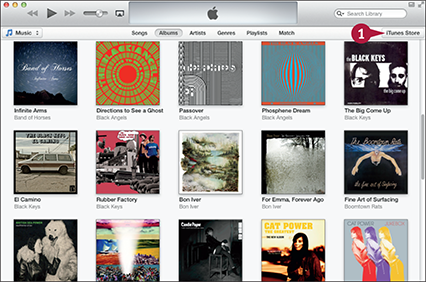
![]() In iTunes, click iTunes Store.
In iTunes, click iTunes Store.
iTunes displays the home page of the iTunes store.

![]() Position the mouse pointer over Music.
Position the mouse pointer over Music.
A pop-up menu button (![]() ) appears.
) appears.
![]() Click the pop-up menu button.
Click the pop-up menu button.
The pop-up menu opens.
![]() Click the type of music you want to browse.
Click the type of music you want to browse.
iTunes displays the kind of music you clicked.

![]() Click an item to display information on it.
Click an item to display information on it.

![]() Highlight a song and click Play (
Highlight a song and click Play (![]() ) to play a sample.
) to play a sample.
![]() Click the price button.
Click the price button.
Note: If the Sign In to the iTunes Store dialog opens, type your password, and then click Buy.
iTunes downloads the song.
![]() Position the mouse pointer over Library.
Position the mouse pointer over Library.
![]() Click the pop-up menu button (
Click the pop-up menu button (![]() ).
).
![]() Click Purchased.
Click Purchased.
The Purchased playlist appears, showing your purchase.
Play Songs
iTunes makes it easy to play back your songs. You can view your music listed by songs, albums, artists, or genres, which enables you to quickly locate the songs you want to hear. You can also search for songs using artist names, album or song names, or keywords.
After locating the music you want to hear, you can start a song playing by simply double-clicking it. You can then control playback by using the straightforward controls at the top of the iTunes window.
Play Songs
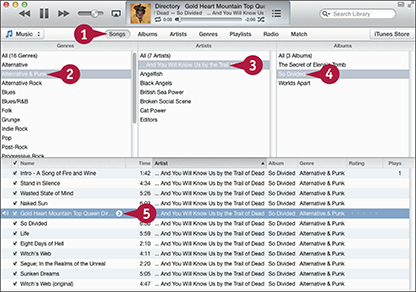
![]() In iTunes, click Songs.
In iTunes, click Songs.
iTunes switches to Songs view.
The column browser appears.
Note: If the column browser does not appear, click View, highlight Column Browser, and select Show Column Browser.
![]() Click the genre.
Click the genre.
![]() Click the artist.
Click the artist.
![]() Click the album.
Click the album.
![]() Double-click the song.
Double-click the song.
The song starts playing.
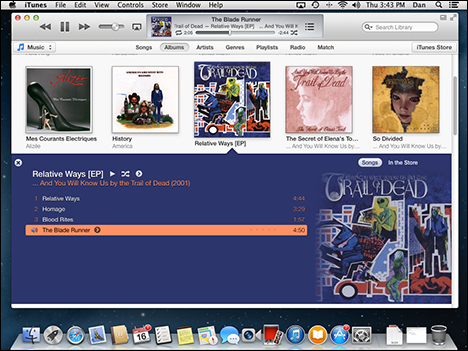
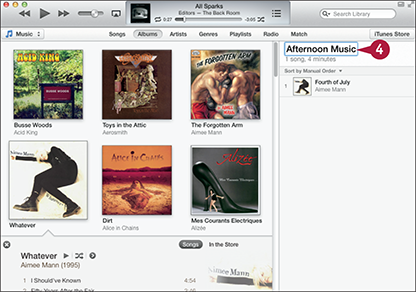
Play a Song in Albums View

![]() Click Albums.
Click Albums.
iTunes switches to Albums view.
![]() Click the album you want to open.
Click the album you want to open.
The album’s contents appear.
![]() Double-click the song.
Double-click the song.
The song starts playing.
A You can click Close (![]() ) to close the album’s pane.
) to close the album’s pane.
B You can click In the Store to see songs by this artist in the iTunes Store.
Play a Song in Artists View

![]() Click Artists.
Click Artists.
iTunes switches to Artists view.
![]() Click the artist whose music you want to see.
Click the artist whose music you want to see.
![]() Scroll up or down to locate the album.
Scroll up or down to locate the album.
![]() Double-click a song to start it playing.
Double-click a song to start it playing.
C You can click Play (![]() ) to play the whole album.
) to play the whole album.

![]() Click Genres.
Click Genres.
iTunes switches to Genres view.
![]() Click the genre you want to browse.
Click the genre you want to browse.
![]() Scroll up or down to locate the album.
Scroll up or down to locate the album.
![]() Double-click a song to start it playing.
Double-click a song to start it playing.
TIP
How can I search for songs?
Click in the search box and start typing your search term. iTunes shows matching items as you type. Click an item to go to it in your current view. Position the mouse pointer over an item and click Add (![]() ) to add it to the Up Next list of songs to play. Click More (
) to add it to the Up Next list of songs to play. Click More (![]() ) to display a menu of other actions, such as adding the song to a playlist or creating a Genius playlist based on it.
) to display a menu of other actions, such as adding the song to a playlist or creating a Genius playlist based on it.
Play Videos
iTunes enables you to play videos, including video podcasts. You can buy music videos, TV shows, and movies from the iTunes Store or export files of your own movies from iMovie or other applications. After adding videos to iTunes, you access them by selecting Movies in the Source pop-up menu.
You can watch video content either within the iTunes window or full screen. You can also play videos from your iMac to a TV connected to an Apple TV.
Play Videos

![]() In iTunes, click the Source pop-up menu (
In iTunes, click the Source pop-up menu (![]() ) and then click Movies.
) and then click Movies.
Note: To watch a TV show, click TV Shows on the Source pop-up menu. To watch a music video you have purchased, click Music, click Playlists on the navigation bar, and then click Purchased.
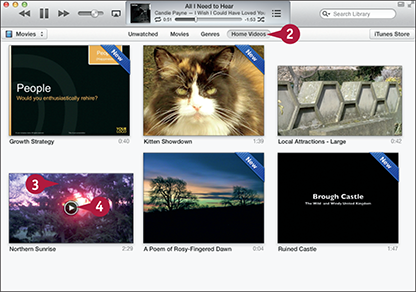
![]() On the navigation bar, click the view to use: Unwatched, Movies, Genres, Home Videos, or List.
On the navigation bar, click the view to use: Unwatched, Movies, Genres, Home Videos, or List.
iTunes displays the movies in the view you click.
![]() Position the mouse pointer over the movie you want to play.
Position the mouse pointer over the movie you want to play.
The Play button appears.
![]() Click Play (
Click Play (![]() ).
).
iTunes starts playing the movie.

![]() Move the mouse pointer over the video.
Move the mouse pointer over the video.
The pop-up control bar appears.
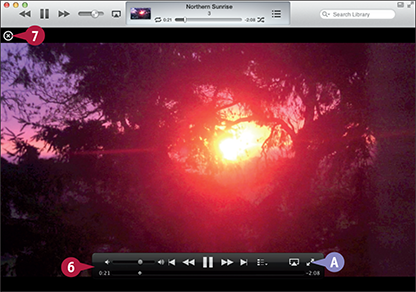
![]() Use the controls on the pop-up bar to control playback.
Use the controls on the pop-up bar to control playback.
A You can click Full Screen (![]() ) to switch to full-screen viewing.
) to switch to full-screen viewing.
![]() Click Close (
Click Close (![]() ) to stop viewing the video.
) to stop viewing the video.
TIP
How do I play a video from iTunes on the TV connected to my Apple TV?
First, make sure your iMac is connected to the same network as the Apple TV via either a wireless network or a wired network. You can then click AirPlay (![]() ) to the right of the volume control in iTunes to display the AirPlay menu. Click the Apple TV’s name on the menu. iTunes sends the video output to the Apple TV, which displays it on the TV’s screen.
) to the right of the volume control in iTunes to display the AirPlay menu. Click the Apple TV’s name on the menu. iTunes sends the video output to the Apple TV, which displays it on the TV’s screen.
Create Playlists
iTunes enables you to create playlists that contain the songs you want in your preferred order. Playlists are a great way of getting more enjoyment out of your music. You can listen to a playlist, share it with others, or burn it to a CD for listening on a CD player.
To create a playlist, you drag items to the Playlists pane. In Songs, Albums, Artists, or Genres view, the Playlists pane automatically appears on the right side of the window when you start dragging songs.
Create Playlists

![]() In iTunes, navigate to a song you want to put into a new playlist.
In iTunes, navigate to a song you want to put into a new playlist.
![]() Click the song and drag it to the right.
Click the song and drag it to the right.
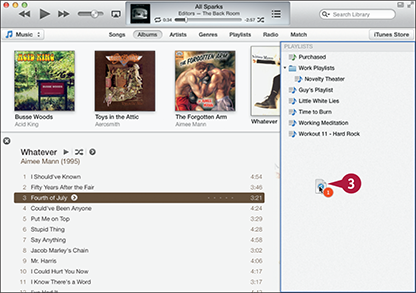
![]() Drop the song in open space in the Playlists pane.
Drop the song in open space in the Playlists pane.
Note: You can drag the song to an existing playlist to add it to that playlist.
iTunes creates a new playlist, assigns it a default name based on the song name, and displays an edit box around the name.
![]() Type the name for the playlist.
Type the name for the playlist.
![]() Press
Press ![]() .
.
The playlist takes on the new name.
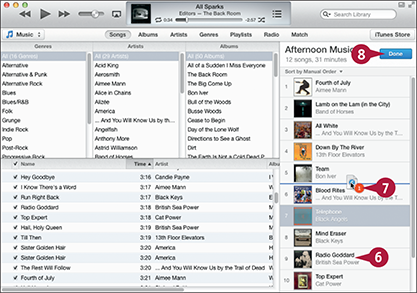
![]() Click and drag other songs, artists, albums, or genres to the playlist.
Click and drag other songs, artists, albums, or genres to the playlist.
Note: You can click and drag songs to the playlist from other views, such as Songs view or Genres view.
![]() Click and drag the songs in the playlist into the order you want.
Click and drag the songs in the playlist into the order you want.
![]() Click Done.
Click Done.
iTunes creates the playlist.
You can now play the playlist by clicking Playlists and then double-clicking the playlist.
TIP
How can I keep my playlists organized?
You can organize your playlists into playlist folders. Click File, highlight New, and then select Playlist Folder. iTunes creates a folder and displays an edit box around the name. Type the name for the folder and press ![]() to apply it. You can then click and drag playlists to the folder. Click Expand (
to apply it. You can then click and drag playlists to the folder. Click Expand (![]() ) to expand a folder and reveal its playlists; click Collapse (
) to expand a folder and reveal its playlists; click Collapse (![]() ) to collapse the folder and hide its playlists.
) to collapse the folder and hide its playlists.
Create Smart Playlists
Instead of creating playlists manually by adding songs to them, you can have iTunes’ Smart Playlists feature create playlists automatically for you. A Smart Playlist is a playlist iTunes builds based on criteria you specify. You can set iTunes to update a Smart Playlist automatically as well.
To create a Smart Playlist, you set up the criteria, also called rules, and name the playlist. iTunes then adds content to the playlist for you.
Create Smart Playlists

![]() In iTunes, click File.
In iTunes, click File.
The File menu opens.
![]() Highlight New.
Highlight New.
The New submenu opens.
![]() Click Smart Playlist.
Click Smart Playlist.
Note: You can also start a Smart Playlist by pressing ![]() +
+![]() +
+![]() .
.
The Smart Playlist dialog opens.
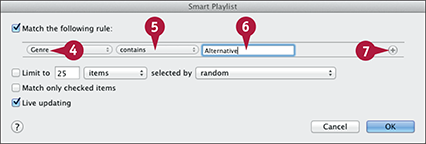
![]() Click the first
Click the first ![]() and select the item for the first condition — for example, Genre.
and select the item for the first condition — for example, Genre.
![]() Click the second
Click the second ![]() and select the comparison for the first condition — for example, contains.
and select the comparison for the first condition — for example, contains.
![]() Click the text field and type the text for the comparison — for example, Alternative — making the condition “Genre contains Alternative.”
Click the text field and type the text for the comparison — for example, Alternative — making the condition “Genre contains Alternative.”
![]() To add another condition, click Add (
To add another condition, click Add (![]() ).
).

![]() Click the Match pop-up menu (
Click the Match pop-up menu (![]() ) and select any to match any of the rules or all to match all the rules.
) and select any to match any of the rules or all to match all the rules.
![]() Set up the second condition by repeating steps 4 to 6.
Set up the second condition by repeating steps 4 to 6.
Note: You can add as many conditions as you need to define the playlist.
A You can limit the playlist by clicking Limit to (![]() changes to
changes to ![]() ) and specifying the limit.
) and specifying the limit.
![]() Click Live updating (
Click Live updating (![]() changes to
changes to ![]() ).
).
![]() Click OK.
Click OK.
iTunes creates the Smart Playlist and adds it to the Playlists section of the Source list.

B An edit box appears around the suggested name.
![]() Type the name for the Smart Playlist.
Type the name for the Smart Playlist.
![]() Press
Press ![]() .
.
iTunes applies the name to the playlist.
TIPS
How do I produce a Smart Playlist the right length for a CD?
In the Smart Playlist dialog, first click Limit to (![]() changes to
changes to ![]() ). Click the left pop-up menu (
). Click the left pop-up menu (![]() ) and select minutes, and then set the number before it to 74 or 80, depending on the capacity of the CD.
) and select minutes, and then set the number before it to 74 or 80, depending on the capacity of the CD.
What does the Match Only Checked Items option do?
Click Match only checked items (![]() changes to
changes to ![]() ) to restrict your Smart Playlist to songs whose check boxes are selected. This means you can uncheck the check box for a song to prevent it from appearing in your Smart Playlists.
) to restrict your Smart Playlist to songs whose check boxes are selected. This means you can uncheck the check box for a song to prevent it from appearing in your Smart Playlists.
Create a Custom CD
iTunes enables you to burn a playlist to a CD or DVD. You can create an audio CD that you can play in almost any CD player, an MP3 CD that you can play in only some CD players and DVD players, or a data DVD that contains backups of your media files.
To create CDs or DVDs, you need a SuperDrive or other optical burner either connected to your iMac via USB or built into your iMac. You also need a blank recordable CD or recordable DVD.
Create a Custom CD

![]() In iTunes, click Playlists.
In iTunes, click Playlists.
iTunes switches to Playlists view.
![]() Click the playlist you want to burn to CD.
Click the playlist you want to burn to CD.
The songs in the playlist appear.
![]() Verify that the playlist is short enough to fit on a CD.
Verify that the playlist is short enough to fit on a CD.
Note: An audio CD can hold a maximum of 74–80 minutes of audio. To ensure all the CD will play consistently, do not exceed 74 minutes.
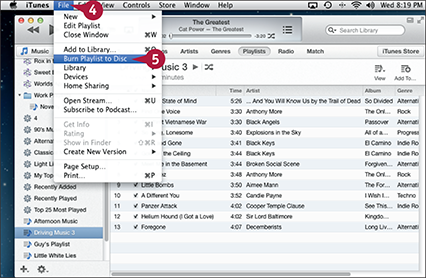
The File menu opens.
![]() Click Burn Playlist to Disc.
Click Burn Playlist to Disc.
The Burn Settings dialog opens.
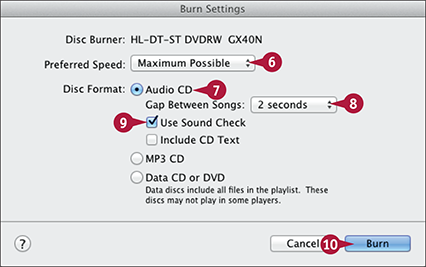
![]() Click the Preferred Speed pop-up menu (
Click the Preferred Speed pop-up menu (![]() ) and select Maximum Possible.
) and select Maximum Possible.
![]() Click Audio CD (
Click Audio CD (![]() changes to
changes to ![]() ).
).
![]() Click the Gap Between Songs pop-up menu (
Click the Gap Between Songs pop-up menu (![]() ) and select the gap, such as 2 seconds.
) and select the gap, such as 2 seconds.
![]() Click Use Sound Check (
Click Use Sound Check (![]() changes to
changes to ![]() ) if you want iTunes to standardize the songs’ volume on the CD.
) if you want iTunes to standardize the songs’ volume on the CD.
![]() Click Burn.
Click Burn.
iTunes prompts you to insert a CD.
![]() Insert a CD in your iMac’s optical drive.
Insert a CD in your iMac’s optical drive.
iTunes checks the disc and burns the CD.

A The display shows the progress of the burn.
iTunes displays the CD’s contents when it finishes burning the CD.
![]() Play the CD to test it.
Play the CD to test it.
![]() Click Eject (
Click Eject (![]() ) to eject the CD.
) to eject the CD.
Listen to iTunes Radio and Internet Radio
iTunes enables you to listen to online radio stations. The iTunes Radio feature comes set to access a selection of stations on demand, which means you can pause the radio stream and resume it from the same place. You can skip some songs if you do not want to listen to them, and you can create custom stations.
You can also use iTunes to access radio stations that broadcast across the Internet in real time. When listening to such stations, you cannot pause the content or skip songs.
Listen to iTunes Radio and Internet Radio
Listen to a Radio Station
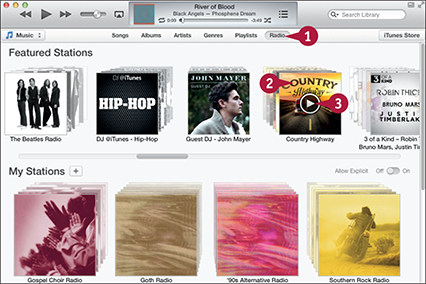
![]() In iTunes, click Radio.
In iTunes, click Radio.
The Radio screen appears.
Note: If the main window displays an informational message about iTunes Radio, click Start Listening.
![]() Position the mouse pointer over the station to which you want to listen.
Position the mouse pointer over the station to which you want to listen.
The Play button (![]() ) appears.
) appears.
![]() Click Play (
Click Play (![]() ).
).
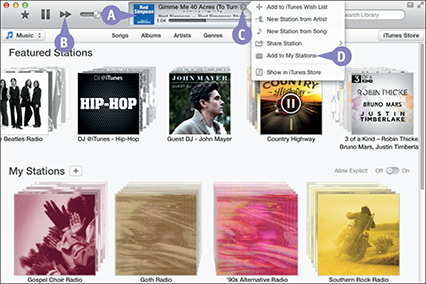
A Details of the current song appear.
B You can click Skip (![]() ) to skip to the next track.
) to skip to the next track.
C You can click More (![]() ) to display a menu of other actions, such as creating a new station from the artist or song.
) to display a menu of other actions, such as creating a new station from the artist or song.
D You can click Add to My Stations to add this station to your list of stations.
Customize Your List of Stations

![]() Click Add (
Click Add (![]() ).
).
The Add Station panel opens.
![]() Click the genre you want to browse.
Click the genre you want to browse.
E You can type an artist’s name, a keyword, or a genre.
The stations in the genre appear.

![]() Click Play (
Click Play (![]() ) to preview the genre.
) to preview the genre.
![]() Click Add.
Click Add.
iTunes adds the station to your My Stations list.
Note: To remove a station from your My Stations list, press ![]() +click the station and then click Delete.
+click the station and then click Delete.
TIPS
How can I listen to Internet radio stations?
Click iTunes, click Preferences, and then click General. Click the Internet Radio option (![]() changes to
changes to ![]() ) and click OK. Click Internet on the navigation bar, and a list of categories appears. Expand the category you want and then double-click a radio station to start it playing.
) and click OK. Click Internet on the navigation bar, and a list of categories appears. Expand the category you want and then double-click a radio station to start it playing.
How can I listen to an Internet radio station that does not appear on iTunes’ list?
If the station does not appear in iTunes’ list, find out the URL of the station’s audio stream by consulting the station’s website. In iTunes, click File and select Open Stream to display the Open Stream dialog. Type or paste the URL into the dialog and click OK. iTunes starts playing the radio station’s audio stream.
Enjoy Podcasts
A podcast is an audio or video file that you can download from the Internet and play on your iMac or a digital player like the iPhone, iPad, or iPod. iTunes enables you to access a wide variety of podcasts on the iTunes Store. The iTunes Store makes a wide variety of podcasts available. You can either download a single podcast episode or subscribe to a podcast so that iTunes automatically downloads new episodes for you.
Enjoy Podcasts

![]() In iTunes, double-click iTunes Store.
In iTunes, double-click iTunes Store.
iTunes displays the home page of the iTunes Store.
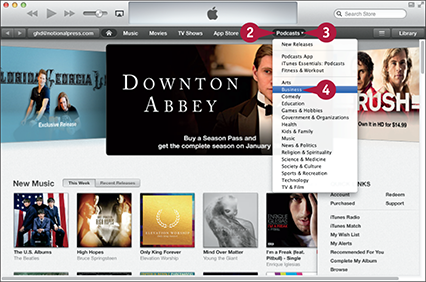
![]() Position the mouse pointer over Podcasts.
Position the mouse pointer over Podcasts.
A pop-up menu button (![]() ) appears.
) appears.
![]() Click the pop-up menu button.
Click the pop-up menu button.
The pop-up menu opens.
![]() Click the category of podcasts you want to browse.
Click the category of podcasts you want to browse.
iTunes shows the category you clicked.

![]() Click the podcast you want to view.
Click the podcast you want to view.
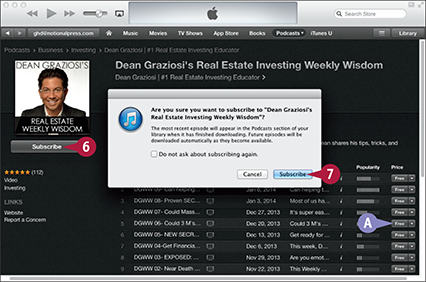
![]() Click Subscribe if you want to subscribe to the podcast.
Click Subscribe if you want to subscribe to the podcast.
A confirmation dialog opens.
A You can click a price button or a Free button to download a single episode.
![]() Click Subscribe.
Click Subscribe.
iTunes subscribes you to the podcast and downloads the available episodes.
TIP
How do I watch the podcasts I have downloaded?
In iTunes, click Podcasts on the navigation bar. The list of podcasts appears. Click Expand (![]() ) to expand a podcast so that you can see the available episodes. You can then double-click the episode you want to listen to or watch. iTunes starts playing the podcast and displays a bar of pop-up controls for managing playback.
) to expand a podcast so that you can see the available episodes. You can then double-click the episode you want to listen to or watch. iTunes starts playing the podcast and displays a bar of pop-up controls for managing playback.
Add E-Books to iBooks and Read Them
OS X includes the iBooks app, which enables you to enjoy electronic books, or e-books, on your iMac. Using iBooks, you can read e-books that you already have on your iMac, download free or paid-for e-books from online stores, or read PDF files stored on your iMac.
Before you can read e-books that you have on your iMac, you must add them to iBooks. You can then open a book and start reading it.
Add E-Books to iBooks and Read Them
Add Your E-Books to iBooks

![]() Click iBooks (
Click iBooks (![]() ) on the Dock.
) on the Dock.
Note: If iBooks (![]() ) does not appear on the Dock, click Launchpad (
) does not appear on the Dock, click Launchpad (![]() ) on the Dock and then click iBooks (
) on the Dock and then click iBooks (![]() ) on the Launchpad screen.
) on the Launchpad screen.
The iBooks window opens.
![]() Click File.
Click File.
The File menu opens.
![]() Click Add to Library.
Click Add to Library.
The Add to Library dialog opens.
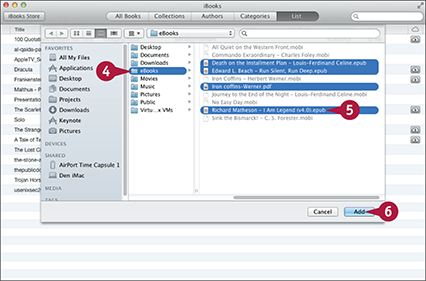
![]() Navigate to the folder that contains the books.
Navigate to the folder that contains the books.
![]() Select the books you want to add to iBooks.
Select the books you want to add to iBooks.
![]() Click Add.
Click Add.
The Add to Library dialog closes.
The books appear in iBooks.
Read E-Books
![]() Click iBooks (
Click iBooks (![]() ) on the Dock.
) on the Dock.
The iBooks window opens.
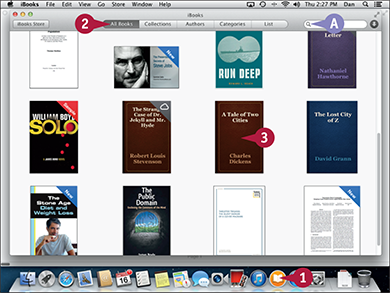
![]() Click the button for the view by which you want to browse. For example, click All Books to view all your books.
Click the button for the view by which you want to browse. For example, click All Books to view all your books.
A You can search for a book by clicking in the search box and typing keywords.
![]() Click the book you want to open.
Click the book you want to open.
![]() Press
Press ![]() to display the next page or
to display the next page or ![]() to display the previous page.
to display the previous page.

B You can click and drag the slider to move quickly through the book.
C You can click Appearance (![]() ) to adjust the appearance of the page and the text.
) to adjust the appearance of the page and the text.
D You can click Library (![]() ) to display your library, leaving the book open.
) to display your library, leaving the book open.
![]() When you finish reading, click Close (
When you finish reading, click Close (![]() ).
).
The book closes, and your library appears.
Buy Books on the iBooks Store
The iBooks app connects directly to the online Apple bookstore, which you can browse to find e-books. Some e-books are free; others you have to pay for, but many have samples that you can download to help you decide whether to buy the book.
After you download an e-book, it appears on your iBooks bookshelf. You can then open it and read it as described in the previous section, “Add E-Books to iBooks and Read Them.”
Buy Books on the iBooks Store

![]() Click iBooks (
Click iBooks (![]() ) on the Dock.
) on the Dock.
Note: If iBooks (![]() ) does not appear on the Dock, click Launchpad (
) does not appear on the Dock, click Launchpad (![]() ) on the Dock and then click iBooks (
) on the Dock and then click iBooks (![]() ) on the Launchpad screen.
) on the Launchpad screen.
The iBooks window opens.
![]() Click iBooks Store.
Click iBooks Store.
iBooks displays the home page of the iBooks Store.

![]() Scroll down to browse the categories and books on the home page.
Scroll down to browse the categories and books on the home page.
A The Free section is a great place to build your library without spending money.
![]() Click a book you want to view.
Click a book you want to view.
iBooks displays the book’s details.

![]() Read about the book.
Read about the book.
B You can click Get Sample to download a sample of the book.
![]() Click the price button or the Free button to buy the book.
Click the price button or the Free button to buy the book.
The Sign In to Download from the iBooks Store dialog opens.
![]() Type your Apple ID.
Type your Apple ID.
![]() Type your password.
Type your password.
![]() Click Buy.
Click Buy.
iBooks downloads the book.
The Read button appears.

![]() Click Read.
Click Read.
The book opens for reading.
TIPS
Which e-book formats can I add to iBooks?
You can add e-books in the widely used ePub format, and documents in the even more widely used Portable Document Format, or PDF for short. You can also add e-books in the iBooks Author format, which Apple’s iBooks Author app uses for its files.
How can I sync books I buy on my iPad to my iMac?
In iBooks on the Mac, click iBooks and select Preferences to open the Preferences window. Click Store, and then click Download new purchases automatically (![]() changes to
changes to ![]() ). Click Close (
). Click Close (![]() ) to close the Preferences window.
) to close the Preferences window.