
Chapter 12

You can customize many aspects of OS X to make it work the way you prefer. You can change the desktop background, personalize the Dock icons, and adjust the keyboard and pointing device. You can also run apps or open specific documents each time you log in or set your iMac to go to sleep automatically when you are not using it.
Configure Your Mouse or Trackpad
Control Checking for Software Updates
Change the Desktop Background
OS X enables you to change the desktop background to show the picture you prefer. OS X includes many varied desktop pictures and solid colors, but you can also set any of your own photos as the desktop background. You can tile, stretch, or crop the photo to fill the screen or center it on the screen.
Whether you use the built-in pictures or your own pictures, you can choose between displaying a single picture on the desktop and displaying a series of images that change automatically.
Change the Desktop Background

![]() Press
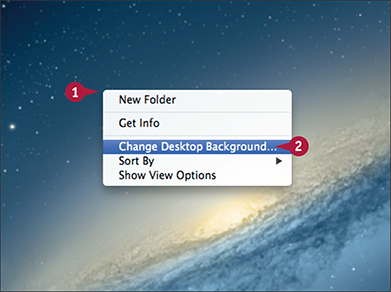
Press ![]() +click the desktop.
+click the desktop.
The contextual menu opens.
![]() Click Change Desktop Background.
Click Change Desktop Background.
The Desktop pane in System Preferences appears.

![]() Click the category of image you want to see.
Click the category of image you want to see.
A Apple contains the built-in desktop backgrounds.
B iPhoto contains your iPhoto library.
C Folders contains your folders.
D Click Add (![]() ) to add a folder.
) to add a folder.
The images appear in the right-hand pane.
![]() Click the image you want to use.
Click the image you want to use.
The image appears on the desktop.
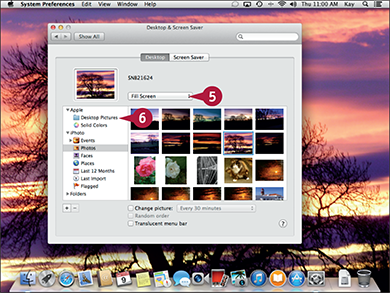
![]() If you chose a photo or picture of your own, click the pop-up menu (
If you chose a photo or picture of your own, click the pop-up menu (![]() ) and click the way to fit the image to the screen. See the tip for details.
) and click the way to fit the image to the screen. See the tip for details.
![]() If you want to set a series of background images, click the category.
If you want to set a series of background images, click the category.
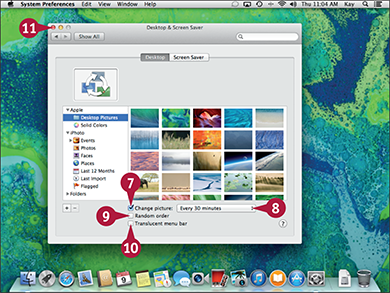
![]() Click the Change picture option (
Click the Change picture option (![]() changes to
changes to ![]() ).
).
![]() Click the Change picture pop-up menu (
Click the Change picture pop-up menu (![]() ) and click the interval — for example, Every 30 minutes.
) and click the interval — for example, Every 30 minutes.
![]() Click the Random order option (
Click the Random order option (![]() changes to
changes to ![]() ) if you want the images to appear in random order.
) if you want the images to appear in random order.
![]() Click the Translucent menu bar option (
Click the Translucent menu bar option (![]() changes to
changes to ![]() ) if you want the menu bar to appear solid gray rather than translucent.
) if you want the menu bar to appear solid gray rather than translucent.
![]() Click Close (
Click Close (![]() ).
).
System Preferences closes.
Set Up a Screen Saver
OS X enables you to set a screen saver to hide what your screen is showing when you leave your iMac idle. A screen saver is an image, a sequence of images, or a moving pattern that appears on the screen. You can choose what screen saver to use and the length of the period of inactivity before it starts.
OS X comes with a variety of attractive screen savers. You can download other screen savers from websites.
Set Up a Screen Saver
![]() Press
Press ![]() +click the desktop.
+click the desktop.
The contextual menu opens.
![]() Click Change Desktop Background.
Click Change Desktop Background.
The Desktop pane of Desktop & Screen Saver preferences opens.

![]() Click Screen Saver.
Click Screen Saver.
The Screen Savers pane appears.
![]() Click a screen saver in the list on the left.
Click a screen saver in the list on the left.
The screen saver you clicked starts playing in the Preview area.
![]() Click the Starts after pop-up menu (
Click the Starts after pop-up menu (![]() ).
).
The pop-up menu opens.

![]() Click the length of time to wait until the screen saver starts.
Click the length of time to wait until the screen saver starts.
Note: To turn off the screen saver, select Never in the Start After pop-up menu.
![]() Position the mouse pointer over the preview.
Position the mouse pointer over the preview.
The Preview button appears.
![]() Click Preview.
Click Preview.
The screen saver preview appears full screen.

![]() Click anywhere on the screen saver when you want to stop the preview.
Click anywhere on the screen saver when you want to stop the preview.
The Screen Saver pane appears.
![]() Press
Press ![]() +
+![]() .
.
System Preferences closes.
Customize the Dock
OS X enables you to customize the Dock so that it contains the icons you find most useful and it appears in your preferred position on the screen. You can add apps, files, or folders to the Dock; reposition the Dock’s icons; and remove most of the existing items if you do not need them.
To customize the Dock, you drag items to it, from it, or along it. You can also use the Dock’s contextual menu to change the Dock’s position, configuration, or behavior.
Customize the Dock
Add an App to the Dock

![]() Click Launchpad (
Click Launchpad (![]() ) on the Dock.
) on the Dock.
The Launchpad screen appears.
![]() Click and drag the app to the left side of the divider line on the Dock.
Click and drag the app to the left side of the divider line on the Dock.
The app’s icon appears on the Dock.
Note: After opening an app, you can press ![]() +click its Dock icon, highlight or click Options, and then click Keep in Dock.
+click its Dock icon, highlight or click Options, and then click Keep in Dock.
Add a File or Folder to the Dock
![]() Click Finder (
Click Finder (![]() ) on the Dock.
) on the Dock.

![]() In the Finder window, navigate to the file or folder you want to add to the Dock.
In the Finder window, navigate to the file or folder you want to add to the Dock.
![]() Click and drag the file or folder to the right side of the divider line on the Dock.
Click and drag the file or folder to the right side of the divider line on the Dock.
The item’s icon appears on the Dock.
![]() If the app is running, press
If the app is running, press ![]() +click its Dock icon and select Quit from the contextual menu.
+click its Dock icon and select Quit from the contextual menu.
Note: The Dock displays an icon for each running app. So if the app is running, you can drag the icon from the Dock, but it will not disappear.

![]() Click and drag the icon from the Dock to the desktop. When a puff of smoke appears, release the icon.
Click and drag the icon from the Dock to the desktop. When a puff of smoke appears, release the icon.
The icon vanishes in a puff of smoke.
Configure the Dock
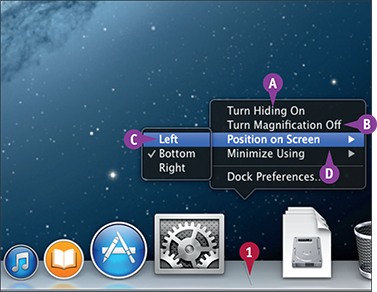
![]() Press
Press ![]() +click the Dock divider bar.
+click the Dock divider bar.
A Click Turn Hiding On to hide the Dock when the mouse pointer is not over it.
B Click Turn Magnification Off to turn off magnification.
C Click Position on Screen and then click Left, Bottom, or Right to reposition the Dock.
D Click Minimize Using and then click Genie Effect or Scale Effect.
TIP
How else can I customize the Dock?
You can increase or decrease the size of the Dock by clicking the Dock divider bar and dragging it up or down. For more precise control of the Dock, press ![]() +click the Dock divider bar and then click Dock Preferences to display the Dock pane in System Preferences. Here you can change the Dock size, turn on and adjust magnification, set the Dock’s position, and choose the effect for minimizing windows. You can also choose other options for controlling the Dock’s appearance and behavior.
+click the Dock divider bar and then click Dock Preferences to display the Dock pane in System Preferences. Here you can change the Dock size, turn on and adjust magnification, set the Dock’s position, and choose the effect for minimizing windows. You can also choose other options for controlling the Dock’s appearance and behavior.
Add or Remove Desktop Spaces
OS X enables you to create multiple desktop spaces on which to arrange your documents and apps. You can switch from space to space quickly to move from app to app. You can tie an app to a particular space so that it always appears in that space or allow it to appear in any space.
When you no longer need a desktop space, you can remove it in just moments. To configure desktop spaces, you use Mission Control.
Add or Remove Desktop Spaces
Create a Desktop Space and Add Apps to It
![]() Press
Press ![]() or
or ![]() +
+![]() .
.
Note: On some keyboards, you press ![]() to invoke Mission Control.
to invoke Mission Control.
The Mission Control screen appears.
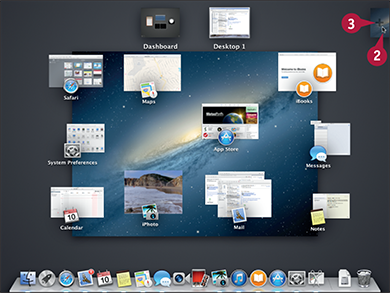
![]() Move the mouse pointer to the upper-right corner of the screen.
Move the mouse pointer to the upper-right corner of the screen.
Note: If you have positioned the Dock on the right, the + sign appears in the upper-left corner of the screen.
A panel showing a + sign appears.
![]() Click the + panel.
Click the + panel.

A Another desktop space appears at the top of the Mission Control screen.

![]() Click a window and drag it to the desktop space in which you want it to appear.
Click a window and drag it to the desktop space in which you want it to appear.
![]() Click the desktop space you want to display.
Click the desktop space you want to display.
The desktop space appears.
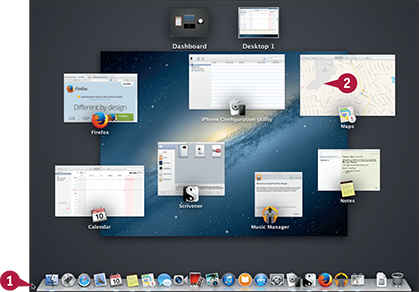
![]() Press
Press ![]() .
.
The Mission Control screen appears.

![]() Position the mouse pointer over the desktop space you want to close.
Position the mouse pointer over the desktop space you want to close.
The Close button (![]() ) appears.
) appears.
![]() Click Close (
Click Close (![]() ).
).
The desktop space closes.
![]() Click the desktop space you want to display.
Click the desktop space you want to display.
Mission Control displays that desktop space.
TIP
How can I assign an app to a particular desktop?
First, use Mission Control to activate the desktop to which you want to assign the app. Then press ![]() +click or right-click the app’s Dock icon, click Options, and click This Desktop. If you want to use the app on all desktops, click All Desktops in the Assign To section of the Options menu.
+click or right-click the app’s Dock icon, click Options, and click This Desktop. If you want to use the app on all desktops, click All Desktops in the Assign To section of the Options menu.
Set Up Hot Corners
OS X’s Hot Corners feature enables you to trigger actions by moving the mouse pointer to the corners of the screen. You can set up from one to four hot corners. Each hot corner can perform an action such as opening Mission Control, displaying your desktop, or starting the screen saver.
To set up hot corners, you use the Hot Corners dialog. You can open this dialog from the Mission Control pane or the Screen Saver pane in System Preferences.
Set Up Hot Corners
Set Up a Hot Corner

![]() Press
Press ![]() +click System Preferences (
+click System Preferences (![]() ) on the Dock.
) on the Dock.
The contextual menu opens.
![]() Click Mission Control.
Click Mission Control.
System Preferences opens and displays the Mission Control pane.
![]() Click Hot Corners.
Click Hot Corners.

![]() Click the pop-up menu (
Click the pop-up menu (![]() ) for the hot corner you want to set.
) for the hot corner you want to set.
The pop-up menu opens.
![]() Click the action you want to assign to the corner.
Click the action you want to assign to the corner.
![]() Choose other hot corner actions as needed.
Choose other hot corner actions as needed.
Note: You can set up multiple hot corners for the same feature.
![]() Click OK.
Click OK.
The Hot Corners dialog closes.
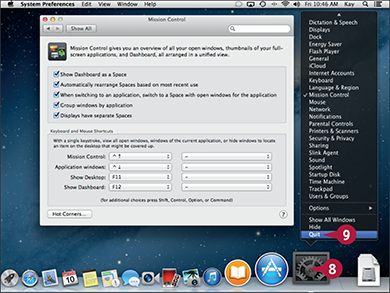
![]() Press
Press ![]() +click System Preferences (
+click System Preferences (![]() ) on the Dock.
) on the Dock.
The contextual menu opens.
![]() Click Quit.
Click Quit.
System Preferences closes.
Use a Hot Corner to Run Mission Control
![]() Move the mouse pointer to the hot corner you allocated to Mission Control.
Move the mouse pointer to the hot corner you allocated to Mission Control.
The Mission Control screen appears.
![]() Click the window you want to display.
Click the window you want to display.
TIP
Are there other ways I can run Mission Control using the Magic Mouse or Magic Trackpad?
You can use the mouse’s secondary button or a gesture, or another button or gesture, to run Mission Control. In the Keyboard and Mouse Shortcuts section in Mission Control preferences, click the Mission Control pop-up menu (![]() ) and select the mouse button or gesture. Press and hold
) and select the mouse button or gesture. Press and hold ![]() ,
, ![]() ,
, ![]() ,
, ![]() , or a combination of the four keys to add them to the keystroke. Use the same technique for the Application Windows pop-up menu, the Show Desktop pop-up menu, and the Show Dashboard pop-up menu.
, or a combination of the four keys to add them to the keystroke. Use the same technique for the Application Windows pop-up menu, the Show Desktop pop-up menu, and the Show Dashboard pop-up menu.
Add a Second Display
OS X enables you to add an external display to your iMac to give yourself more space for your apps. The easiest type of display to connect is a Thunderbolt display, but you can also connect other types of displays by using suitable converter cables, such as a Mini DisplayPort-to-DVI connector or Mini DisplayPort-to-VGA connector.
After connecting the external display using a suitable cable, you use the Displays pane in System Preferences to set the resolution and specify the arrangement of the displays.
Add a Second Display
![]() Connect the display to your iMac.
Connect the display to your iMac.
![]() Connect the display to power and turn it on.
Connect the display to power and turn it on.

![]() Click Apple (
Click Apple (![]() ).
).
The Apple menu opens.
![]() Click System Preferences.
Click System Preferences.
The System Preferences window opens.

![]() Click Displays.
Click Displays.
Note: Your iMac may automatically open the Displays pane of System Preferences after you connect the display and turn it on.
The Displays pane opens on each display.

![]() In the Displays pane for the external display, click Display.
In the Displays pane for the external display, click Display.
![]() Click Best for display (
Click Best for display (![]() changes to
changes to ![]() ) to apply the display’s best resolution.
) to apply the display’s best resolution.
A You can click Scaled (![]() changes to
changes to ![]() ) and then click a different resolution.
) and then click a different resolution.

![]() In the Displays pane for the iMac’s display, click Arrangement.
In the Displays pane for the iMac’s display, click Arrangement.
The Arrangement pane appears.
![]() Click and drag either display thumbnail to match the displays’ physical locations.
Click and drag either display thumbnail to match the displays’ physical locations.
![]() To move the menu bar and Dock, click and drag the menu bar from the iMac’s icon to the external display’s icon.
To move the menu bar and Dock, click and drag the menu bar from the iMac’s icon to the external display’s icon.
![]() Click Close (
Click Close (![]() ).
).
System Preferences closes.
TIPS
Can I add two external displays?
This depends on your iMac’s specification and the monitor types. Most iMacs released from 2011 onward support two Thunderbolt displays.
Can I use my iMac as a display for my MacBook?
If your iMac supports Target Display mode, as most recent iMac models do, you can use it as a display. With the iMac running, connect a male-to-male Mini DisplayPort cable to each Mac’s Thunderbolt port or Mini DisplayPort. The iMac enters Target Display mode automatically, and the other Mac’s screen appears. You can press ![]() +
+![]() to toggle between Target Display mode and the iMac’s own output.
to toggle between Target Display mode and the iMac’s own output.
Configure Your Keyboard
OS X enables you to customize the settings for your keyboard. You can change the repeat rate and the delay until repeating starts; you can create text shortcuts; and you can turn on automatic spell checking.
If you have difficulty pressing the keys, you can turn on Sticky Keys or Slow Keys. Sticky Keys enables you to set a modifier key, such as ![]() , without having to hold it down. Slow Keys increases the delay between you pressing a key and OS X registering the keystroke.
, without having to hold it down. Slow Keys increases the delay between you pressing a key and OS X registering the keystroke.
Configure Your Keyboard

![]() Press
Press ![]() +click System Preferences (
+click System Preferences (![]() ) on the Dock.
) on the Dock.
The contextual menu opens.
![]() Click Keyboard.
Click Keyboard.
System Preferences opens and displays the Keyboard pane.
![]() Click and drag the Key Repeat slider to control how quickly a key repeats.
Click and drag the Key Repeat slider to control how quickly a key repeats.
![]() Click and drag the Delay Until Repeat slider to set the repeat delay.
Click and drag the Delay Until Repeat slider to set the repeat delay.
![]() Click Text.
Click Text.
The Text pane appears.
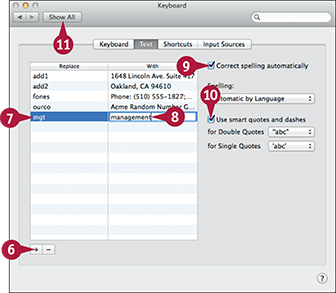
![]() Click Add (
Click Add (![]() ).
).
![]() Type the text that will trigger the replacement.
Type the text that will trigger the replacement.
![]() Type the replacement text.
Type the replacement text.
![]() Click the Correct spelling automatically option (
Click the Correct spelling automatically option (![]() changes to
changes to ![]() ) to use automatic spell checking.
) to use automatic spell checking.
![]() Click the Use smart quotes and dashes option (
Click the Use smart quotes and dashes option (![]() changes to
changes to ![]() ) if you want OS X to replace regular quotes and dashes with smart quotes and dashes.
) if you want OS X to replace regular quotes and dashes with smart quotes and dashes.
![]() Click Show All.
Click Show All.
The System Preferences pane appears.

![]() If you want to use Sticky Keys or Slow Keys, click Accessibility. Otherwise, go to step 16.
If you want to use Sticky Keys or Slow Keys, click Accessibility. Otherwise, go to step 16.
Note: Sticky Keys displays the current modifier keys on-screen. For example, when you press ![]() , the ⌘ symbol appears on-screen.
, the ⌘ symbol appears on-screen.
The Accessibility pane appears.

![]() Click Keyboard.
Click Keyboard.
![]() Click the Enable Sticky Keys option (
Click the Enable Sticky Keys option (![]() changes to
changes to ![]() ) if you want to press modifier keys separately from the keys they modify.
) if you want to press modifier keys separately from the keys they modify.
![]() Click Enable Slow Keys if you want to slow down OS X’s registration of keystrokes.
Click Enable Slow Keys if you want to slow down OS X’s registration of keystrokes.
Note: You can click Options to configure Sticky Keys or Slow Keys.
![]() Click Close (
Click Close (![]() ).
).
System Preferences closes.
Configure Your Mouse or Trackpad
OS X automatically configures your iMac’s pointing device with default settings. You can customize the settings to make the pointing device work the way you prefer. For example, you can select the gestures to use with the Magic Mouse or Magic Trackpad.
You can adjust the speed at which OS X tracks the movement you input with your pointing device. You can also enlarge the cursor to make it easier to see on-screen.
Configure Your Mouse or Trackpad

![]() Press
Press ![]() +click System Preferences (
+click System Preferences (![]() ) on the Dock.
) on the Dock.
The contextual menu opens.
![]() Click Mouse or Trackpad, as appropriate. This example uses Trackpad.
Click Mouse or Trackpad, as appropriate. This example uses Trackpad.
System Preferences opens and displays the Mouse pane or the Trackpad pane.
![]() Click and drag the Tracking speed slider to adjust the tracking speed.
Click and drag the Tracking speed slider to adjust the tracking speed.
![]() Click each option you want to use (
Click each option you want to use (![]() changes to
changes to ![]() ).
).
![]() Click another tab.
Click another tab.
The pane associated with the tab appears.

![]() Click each option you want to use (
Click each option you want to use (![]() changes to
changes to ![]() ).
).
![]() When you finish choosing trackpad options, click Show All.
When you finish choosing trackpad options, click Show All.
The System Preferences pane appears.

![]() Click Accessibility.
Click Accessibility.
The Accessibility pane appears.

![]() Click Mouse & Trackpad.
Click Mouse & Trackpad.
A You can click the Enable Mouse Keys option (![]() changes to
changes to ![]() ) if you want to turn on Mouse Keys. This feature enables you to control the mouse pointer using the keyboard number pad.
) if you want to turn on Mouse Keys. This feature enables you to control the mouse pointer using the keyboard number pad.
![]() Click and drag the Double-click speed slider to adjust the double-click speed.
Click and drag the Double-click speed slider to adjust the double-click speed.
![]() Click Close (
Click Close (![]() ).
).
System Preferences closes.
TIP
What are the options on the Scroll & Zoom tab and More Gestures tab in Mouse preferences or Trackpad preferences?
The Scroll & Zoom tab in Trackpad preferences enables you to choose options for scrolling, zooming, and rotating using the trackpad. The More Gestures tab in Mouse preferences and Trackpad preferences lets you choose extra gestures. Click a check box (![]() changes to
changes to ![]() ) to turn a gesture on. If the preference has a pop-up button (
) to turn a gesture on. If the preference has a pop-up button (![]() ), click it to display options you can choose — for example, the number of fingers to use for swiping left or right.
), click it to display options you can choose — for example, the number of fingers to use for swiping left or right.
Make the Screen Easier to See
OS X’s Accessibility features include several options for making the contents of your iMac’s screen easier to see. You can invert the colors, use grayscale instead of colors, enhance the contrast, and increase the cursor size. You can also turn on the Zoom feature to enable yourself to zoom in quickly up to the limit you set. To configure these options, you open System Preferences and work in the Accessibility pane.
Make the Screen Easier to See

![]() Click System Preferences (
Click System Preferences (![]() ) on the Dock.
) on the Dock.
The System Preferences pane appears.
![]() Click Accessibility.
Click Accessibility.
The Accessibility pane appears.

The Zoom options appear.
![]() Click the Use keyboard shortcuts to zoom option (
Click the Use keyboard shortcuts to zoom option (![]() changes to
changes to ![]() ).
).
![]() Click the Zoom follows the keyboard focus option (
Click the Zoom follows the keyboard focus option (![]() changes to
changes to ![]() ) if you want the zoomed area to follow the focus of the keyboard.
) if you want the zoomed area to follow the focus of the keyboard.
![]() Click Zoom Style and select Fullscreen or Picture-in-picture, as appropriate.
Click Zoom Style and select Fullscreen or Picture-in-picture, as appropriate.
![]() Click More Options.
Click More Options.
The More Options dialog opens.
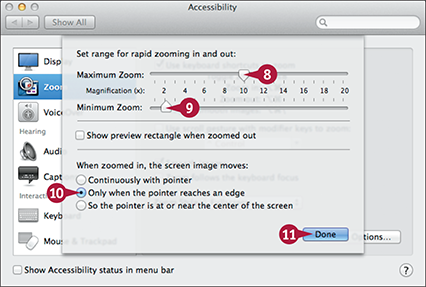
![]() Click and drag the Maximum Zoom slider to set the maximum zoom.
Click and drag the Maximum Zoom slider to set the maximum zoom.
![]() Click and drag the Minimum Zoom slider to set the minimum zoom.
Click and drag the Minimum Zoom slider to set the minimum zoom.
![]() In the “When zoomed in, the screen image moves” area, click the option button for the zoom motion you want (
In the “When zoomed in, the screen image moves” area, click the option button for the zoom motion you want (![]() changes to
changes to ![]() ).
).
![]() Click Done.
Click Done.
The More Options dialog closes.

![]() Click Display.
Click Display.
![]() Click the Invert colors option (
Click the Invert colors option (![]() changes to
changes to ![]() ) if you want to invert the video colors.
) if you want to invert the video colors.
![]() Click and drag the Enhance Contrast slider if you want to increase the contrast.
Click and drag the Enhance Contrast slider if you want to increase the contrast.
![]() Click and drag the Cursor Size slider if you want to make the cursor bigger.
Click and drag the Cursor Size slider if you want to make the cursor bigger.
![]() Click Close (
Click Close (![]() ).
).
System Preferences closes.
TIP
What is the quickest way to turn on the Universal Access features for seeing the screen?
The quickest way to turn on the Universal Access features for seeing the screen is to use keyboard shortcuts. Press ![]() +
+![]() +
+![]() to toggle zoom on or off. With zoom turned on, press
to toggle zoom on or off. With zoom turned on, press ![]() +
+![]() +
+![]() to zoom in by increments. Press
to zoom in by increments. Press ![]() +
+![]() +
+![]() to zoom out by increments. If you enable the Smooth Images feature by clicking the Smooth images option (
to zoom out by increments. If you enable the Smooth Images feature by clicking the Smooth images option (![]() changes to
changes to ![]() ) in the Zoom options, you can press
) in the Zoom options, you can press ![]() +
+![]() +
+![]() to toggle Smooth Images on or off.
to toggle Smooth Images on or off.
Customize Spotlight Searches
OS X’s Spotlight feature indexes your iMac’s files so that you can easily search them from either the Spotlight icon on the menu bar or from a Finder window. To improve the search results that Spotlight returns, you can customize the folders that Spotlight searches. You can exclude folders you do not want to search and change the order of the other folders to set search priorities. To customize Spotlight, you work in the Spotlight pane in System Preferences.
Customize Spotlight Searches

![]() Click Spotlight (
Click Spotlight (![]() ).
).
The Spotlight search field opens.
![]() Type a few letters in the search field.
Type a few letters in the search field.
The list of search results appears.
![]() Click Spotlight Preferences.
Click Spotlight Preferences.
The System Preferences window opens with the Spotlight pane at the front.

![]() Click Search Results.
Click Search Results.
![]() Click the check box for any item you want to exclude from searches (
Click the check box for any item you want to exclude from searches (![]() changes to
changes to ![]() ).
).
![]() Click and drag the categories into the order in which you want to see search results.
Click and drag the categories into the order in which you want to see search results.
A You can disable or change the keyboard shortcuts for Spotlight.

![]() Click Privacy.
Click Privacy.
The Privacy pane appears.
![]() Click Add (
Click Add (![]() ).
).
Note: Adding a folder to the exclusion list prevents even a search in a Finder window showing that folder’s contents from finding matches. This can be confusing to users, because the files are right there and clearly match the search criteria.
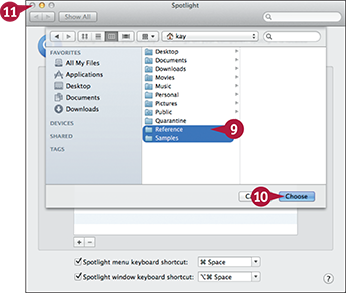
![]() Click the folder you want to add.
Click the folder you want to add.
Note: You can select two or more folders by clicking the first and then ![]() +clicking each of the others.
+clicking each of the others.
![]() Click Choose.
Click Choose.
The dialog closes, and the folder appears in the list.
![]() Click Close (
Click Close (![]() ).
).
System Preferences closes.
TIP
Is there another way to add folders to the Privacy list?
Instead of using the dialog to build the list of folders you do not want Spotlight to search, you can work from a Finder window. Click Finder (![]() ) on the Dock to open a Finder window, and position it so that you can see both it and the Spotlight preferences pane. Click and drag from the Finder window to the Spotlight preferences pane the folders you want to protect to add them to the list. You can select multiple folders to save time.
) on the Dock to open a Finder window, and position it so that you can see both it and the Spotlight preferences pane. Click and drag from the Finder window to the Spotlight preferences pane the folders you want to protect to add them to the list. You can select multiple folders to save time.
Run Apps at Login
OS X enables you to set apps to open automatically each time you log in to your iMac. By opening your most-used apps automatically, you can save time getting started with your work or play. Opening apps at login does make the login process take longer, so it is best to run only those apps you always use. You can configure an app to open automatically either from the Dock or by using the Login Items pane in Users & Groups preferences.
Run Apps at Login
Use the Dock to Set an App to Run at Login
![]() If the app does not have a Dock icon, click Launchpad (
If the app does not have a Dock icon, click Launchpad (![]() ) on the Dock and then click the app.
) on the Dock and then click the app.

![]() Press
Press ![]() +click the app’s Dock icon.
+click the app’s Dock icon.
The contextual menu opens.
![]() Click or highlight Options.
Click or highlight Options.
![]() Click Open at Login.
Click Open at Login.
A check mark appears next to Open at Login.
Use System Preferences to Set an App to Run at Login

![]() Press
Press ![]() +click System Preferences (
+click System Preferences (![]() ) on the Dock.
) on the Dock.
The contextual menu opens.
![]() Click Users & Groups.
Click Users & Groups.
The Users & Groups pane appears, showing your user account.
![]() Click Login Items.
Click Login Items.
Note: If you need to run an app in the background, click the Hide option (![]() changes to
changes to ![]() ) next to the app.
) next to the app.

![]() Click Add (
Click Add (![]() ).
).
A dialog opens showing a list of the apps in the Applications folder.
Note: You can also add documents to the list for automatic opening. To do so, navigate to the document, click it, and click Add. OS X opens the document in its default app at login.
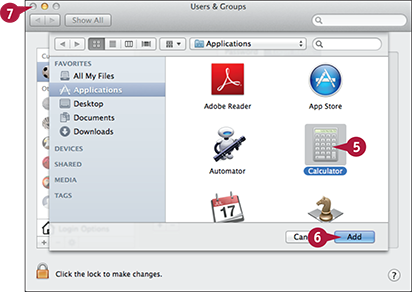
![]() Click the app you want to run automatically at login.
Click the app you want to run automatically at login.
Note: To select multiple apps, click the first, and then press ![]() +click each of the others.
+click each of the others.
![]() Click Add.
Click Add.
The dialog closes.
The app appears in the list.
![]() Click Close (
Click Close (![]() ).
).
System Preferences closes.
TIP
How else can I add an app to the Login Items pane?
Instead of clicking Add (![]() ) and using the dialog to pick the apps, you can click and drag the apps from a Finder window. Click Finder (
) and using the dialog to pick the apps, you can click and drag the apps from a Finder window. Click Finder (![]() ) on the Dock to open a Finder window, and then click Applications in the sidebar. Click the app you want, and then drag it across to the Login Items pane of Account preferences.
) on the Dock to open a Finder window, and then click Applications in the sidebar. Click the app you want, and then drag it across to the Login Items pane of Account preferences.
Put Your iMac to Sleep
OS X’s Energy Saver feature enables you to set your iMac to put itself to sleep after a period of inactivity. You can also configure Energy Saver to put the display to sleep after a shorter period of inactivity, thus saving more power when you are not using your iMac. You can put your iMac to sleep manually at any time by clicking Apple (![]() ) to open the Apple menu and then clicking Sleep.
) to open the Apple menu and then clicking Sleep.
Put Your iMac to Sleep
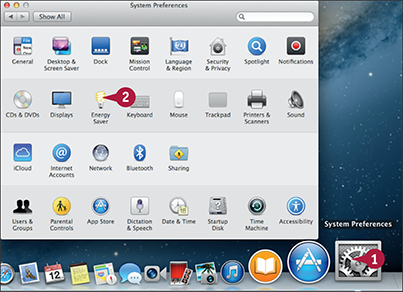
![]() Click System Preferences (
Click System Preferences (![]() ) on the Dock.
) on the Dock.
The System Preferences pane opens.
![]() Click Energy Saver.
Click Energy Saver.
The Energy Saver pane appears.
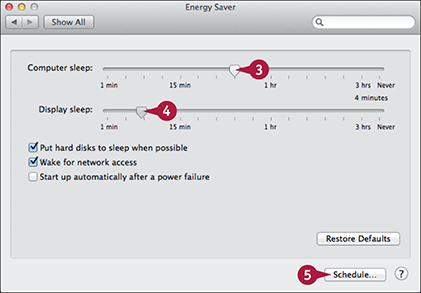
![]() Click and drag the Computer sleep slider to set the period of inactivity before putting the iMac to sleep.
Click and drag the Computer sleep slider to set the period of inactivity before putting the iMac to sleep.
![]() Click and drag the Display sleep slider to set the period of inactivity before blanking the display.
Click and drag the Display sleep slider to set the period of inactivity before blanking the display.
Note: Set Display Sleep to a shorter time than Computer Sleep.
![]() Click Schedule if you want to set a schedule for your iMac. Otherwise, go to step 14.
Click Schedule if you want to set a schedule for your iMac. Otherwise, go to step 14.
The Schedule dialog opens.

![]() Click the Start up or wake option (
Click the Start up or wake option (![]() changes to
changes to ![]() ).
).
![]() Click the pop-up menu (
Click the pop-up menu (![]() ) and click a frequency: Weekends, Weekdays, Every Day, or a particular day of the week.
) and click a frequency: Weekends, Weekdays, Every Day, or a particular day of the week.
![]() Click the stepper control (
Click the stepper control (![]() ) to set the wake-up time.
) to set the wake-up time.

![]() Click the check box on the second row (
Click the check box on the second row (![]() changes to
changes to ![]() ).
).
![]() Click the pop-up menu (
Click the pop-up menu (![]() ) and select Sleep, Restart, or Shut Down, as needed.
) and select Sleep, Restart, or Shut Down, as needed.
![]() Click the pop-up menu (
Click the pop-up menu (![]() ) and select the frequency.
) and select the frequency.
![]() Click the stepper control (
Click the stepper control (![]() ) to set the time.
) to set the time.
![]() Click OK.
Click OK.
The Schedule dialog closes.
![]() Click Close (
Click Close (![]() ).
).
System Preferences closes.
TIP
Which button do I press to wake my iMac from sleep?
You can press any key on the keyboard to wake the iMac. If you are not certain whether the iMac is asleep or preparing to run a screen saver, press ![]() ,
, ![]() ,
, ![]() , or
, or ![]() . These keys do not type a character if the iMac turns out to be awake instead of asleep. You can also move your mouse or move your finger on the trackpad to wake your iMac.
. These keys do not type a character if the iMac turns out to be awake instead of asleep. You can also move your mouse or move your finger on the trackpad to wake your iMac.
Control Checking for Software Updates
OS X’s App Store app enables you to check easily for software updates available through the App Store. These include updates for OS X itself, the apps that Apple releases, and third-party apps sold through the App Store. To keep your iMac running smoothly and protect it from both online and offline threats, you should apply software updates when they become available.
You can configure the App Store feature to check automatically for updates on a schedule. You can also check for updates manually.
Control Checking for Software Updates

![]() Click Apple (
Click Apple (![]() ).
).
The Apple menu opens.
![]() Click System Preferences.
Click System Preferences.
The System Preferences pane appears.

![]() Click App Store.
Click App Store.
The App Store pane opens.

![]() Click the Automatically check for updates option (
Click the Automatically check for updates option (![]() changes to
changes to ![]() ).
).
![]() Click the Download newly available updates in the background option (
Click the Download newly available updates in the background option (![]() changes to
changes to ![]() ).
).
A You can click the Install app updates option (![]() changes to
changes to ![]() ) if you want OS X to install app updates automatically.
) if you want OS X to install app updates automatically.
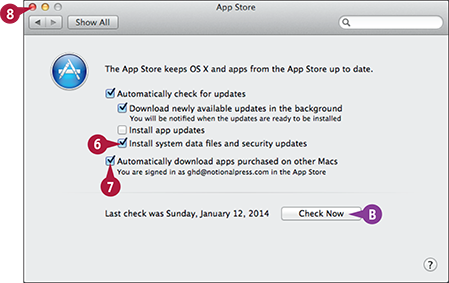
![]() Click the Install system data files and security updates option (
Click the Install system data files and security updates option (![]() changes to
changes to ![]() ).
).
![]() Click the Automatically download apps purchased on other Macs option (
Click the Automatically download apps purchased on other Macs option (![]() changes to
changes to ![]() ) if you want to automatically add apps you buy on other Macs using the same Apple ID to your iMac.
) if you want to automatically add apps you buy on other Macs using the same Apple ID to your iMac.
B You can click Check Now to check for updates.
![]() Click Close (
Click Close (![]() ).
).
System Preferences closes.
TIP
Which updates should I install?
It is normally a good idea to install all updates to keep your iMac protected against threats and to make sure you have the latest fixes and upgrades for OS X and your apps. For security, click the Install system data files and security updates option (![]() changes to
changes to ![]() ) to make App Store install these items automatically. You may prefer to install the app updates manually at a time of your choosing.
) to make App Store install these items automatically. You may prefer to install the app updates manually at a time of your choosing.