
6
Test Automation for Mobile
The demand for releasing quality mobile applications across multiple platforms warrants a solid test automation framework to thoroughly inspect and catch any regression issues. Mobile application developers have the necessity to rapidly release bug fixes and new features to keep up with the competition. This makes mobile test automation indispensable in the development life cycle. In this chapter, let us take a hands-on approach to thoroughly review mobile test automation and its setup.
Here are the main topics we will be looking at in this chapter:
- Getting to know Appium
- Knowing WebdriverIO and its advantages
- Setting up Appium and WebdriverIO
- Writing our first mobile test
- Key considerations for mobile automation
- Optimizing our mobile automation framework
Technical requirements
We will continue using Node.js, which we installed in Chapter 4. We need the Java Development Kit (JDK) on our machines (which can be found at this link: https://adoptium.net/temurin/releases) to download and install the compatible version with the operating system. Please remember to set up the JAVA_HOME path in your .zshrc or .bashrc files. JAVA_HOME should point to the directory where the JDK was installed.
Next, we will be needing Android Studio, which can be installed using the following link: https://developer.android.com/studio. Similar to the JAVA_HOME path, the ANDROID_HOME variable should be set up in your .zshrc or .bashrc files and point to the directory where the Android SDK is installed. Also, make sure to append the PATH variable to include the platform-tools and tools folders within the SDK. We will be using a demo Android application from github.com/appium/android-apidemos for our automated testing. This is Google’s demo application used for testing Appium. All the code and setup used in this chapter can be found at https://github.com/PacktPublishing/B19046_Test-Automation-Engineering-Handbook/tree/main/src/ch6.
Getting to know Appium
Appium is one of the most popular test automation frameworks on the market. It has several salient features that help automate iOS and Android applications. Let us start with knowing its fundamentals.
What is Appium?
Appium is an open source tool for automating native, hybrid, and mobile web applications. Appium primarily operates on iOS/Android mobile applications and can support Windows desktop applications as well. Appium uses vendor-provided frameworks under the hood—namely, XCUITest and UIAutomator for iOS and Android platforms, respectively.
Appium wraps these vendor-provided frameworks into the WebDriver API. As we have seen in Chapter 2, Appium uses a client-server architecture and extends the existing WebDriver protocol by adding additional API methods to support mobile automation. For engineers who have previously worked with WebDriver for web automation, this should be quite familiar and should not be brand new. It supports multiple programming languages such as Java, JavaScript, Python, Ruby, and so on.
Now, let us review Appium’s advantages in the next section.
Advantages of using Appium
One of the chief advantages of Appium is its cross-platform compatibility. It allows users to write tests against multiple platforms using a single API. Configurations for both Android and iOS can be done within the same project. This enables the reuse of the majority of the code between iOS and Android platforms with minimal configuration changes. Since it uses vendor-provided frameworks, we do not have to compile Appium-specific code or third-party integrations as part of the application being tested. It can also work with major test runners and frameworks out there due to its compatibility with a wide variety of programming languages. Another primary feature of Appium is that it supports writing tests on both emulators and physical devices. Being an open source tool, it has tremendous community support, and anyone can extend its attributes.
Let us next look into what WebdriverIO is and review its advantages.
Knowing WebdriverIO and its advantages
WebdriverIO is an end-to-end (E2E) test automation framework written in JavaScript that lets you automate modern web applications in different browsers and operating systems. With the help of Appium, it also supports automating mobile applications in iOS and Android. WebdriverIO is simple and quick to get started with very few lines of code.
It provides simple wrapper methods to interact with web elements that are easy to pick up for beginners and, more importantly, helps write clean code. Since frontend development happens more commonly in JavaScript, it is possible for all engineers to easily contribute to tests. It is also a strong open source tool with huge community support.
Having looked at what Appium and WebdriverIO are, let us now go over the steps to install and set them up.
Setting up Appium and WebdriverIO
Combining Appium with WebdriverIO helps build an extremely scalable and customizable mobile automation framework. Let us start with Appium installation on macOS.
Appium installation
Next, let us go ahead and install Appium. This can be done using the npm install –g appium@next command to install a version above 2.0 globally. The use of @next here is to force an installation of a beta version (2.0.0). If by the time you install this, 2.0 is available as the latest stable version, you do not have to use @next. With the appium –v command, double-check the version after installation.
Appium involves multiple installations working in tandem, and it would be convenient to have a tool that could provide us with constant feedback on the health of our setup. appium-doctor does just that. Let us install it using the npm install –g appium-doctor command, and the installation can be checked using appium –version.
appium-doctor can be executed for the Android platform through the appium-doctor --android command. It primarily checks for the presence of all dependencies and their path. Users should be on the lookout for any errors in the output from executing appium-doctor and fix them before proceeding further.
There is one more installation before we can wrap up this section. Let us now install the necessary Appium drivers for iOS and Android using the following commands:
appium driver install xcuitest
appium driver install uiautomator2
The installations can be verified using appium driver list, as shown in Figure 6.1:
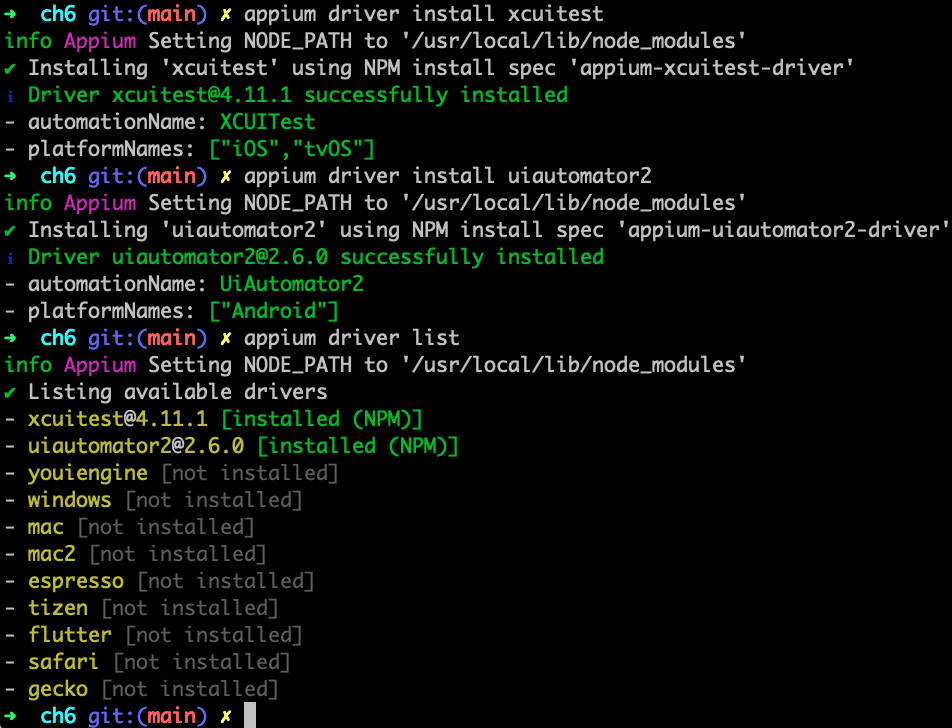
Figure 6.1 – Appium driver installation
This completes the Appium setup for macOS, and we have a couple more steps before we can start writing our first tests. Before diving into the WebdriverIO setup, let us look at how to configure an Android emulator.
Configuring an Android emulator
Emulators are virtual devices that let engineers set up and test against a variety of devices on the computer. Let us go over how to set up an Android emulator in this section:
- In the home dialog of Android Studio, click on the Virtual Device Manager option, as shown in Figure 6.2:
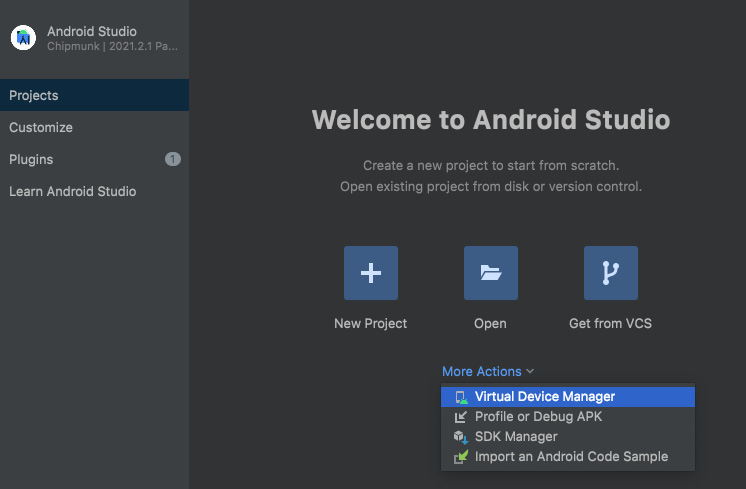
Figure 6.2 – Android Studio Virtual Device Manager
- The Android Studio installation usually comes with an emulator, as shown in Figure 6.3. You can add another device by clicking on the Create device button at the top left of the dialog box. This opens an additional dialog to set up the new hardware:
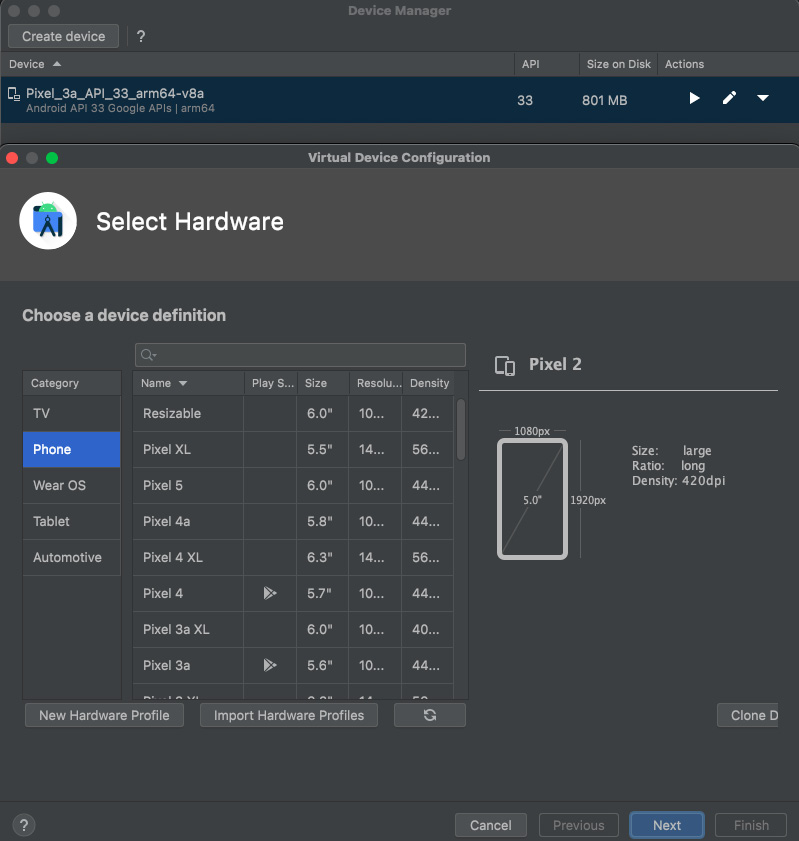
Figure 6.3 – Android Studio device selection
- For our example, let us select Pixel 4a and hit Next, which will take us to the System Image selection dialog.
- Please make sure to download two different versions here. We will be running the Appium tests on one version and connecting the Appium Inspector on the other. In our case, we will be downloading the Android API versions 32 and 33, as shown in Figure 6.4:
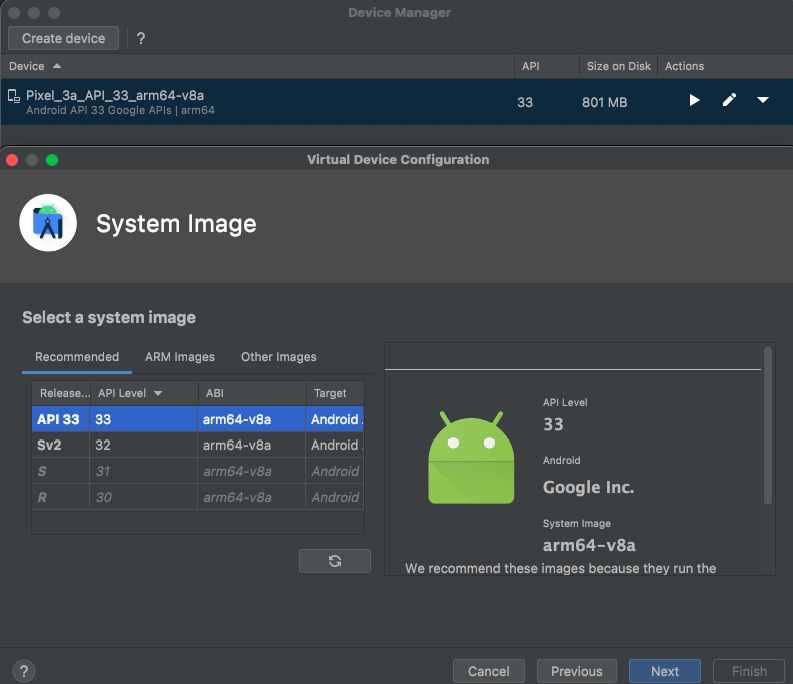
Figure 6.4 – Android Studio system images
- Hit the Next button and complete the emulator setup with the Finish button.
- On the Device Manager dialog, hit the play button against one of the devices, as highlighted in green in Figure 6.5. This will open the device emulator:
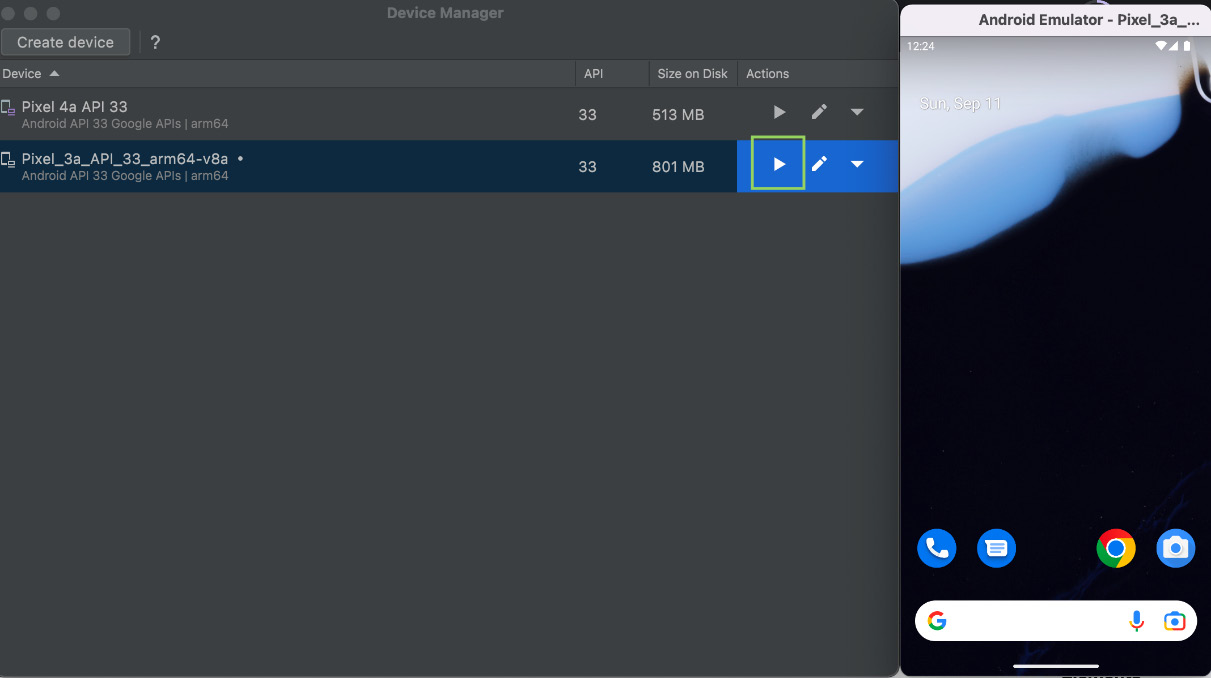
Figure 6.5 – Opening the Android device emulator
We are now set up with Appium and an emulated device to test on. Let us now dive into WebdriverIO installation and setup.
Configuring WebdriverIO with Appium
Let us begin with the WebdriverIO setup by creating and initializing a new directory named webdriverio-appium. You could also name it based on whichever project name suits your needs. Once we are inside the directory, let us run the npm init –y command to set up our project. This should create a package.json file within the directory.
Next, let us install the CLI for WebdriverIO using the npm install @wdio/cli command. This is used for setting up the configuration for WebdriverIO using the CLI. Let us now run npx wdio config. This npx command goes inside the node_modules folder to find WebdriverIO, which we just installed, and runs the config command using the CLI.
On running this command, we go through a series of steps, with each of them requiring a selection. Let us look at them one by one. Refer to Figure 6.6 for a summary of the options selected for configuring WebdriverIO through the CLI:
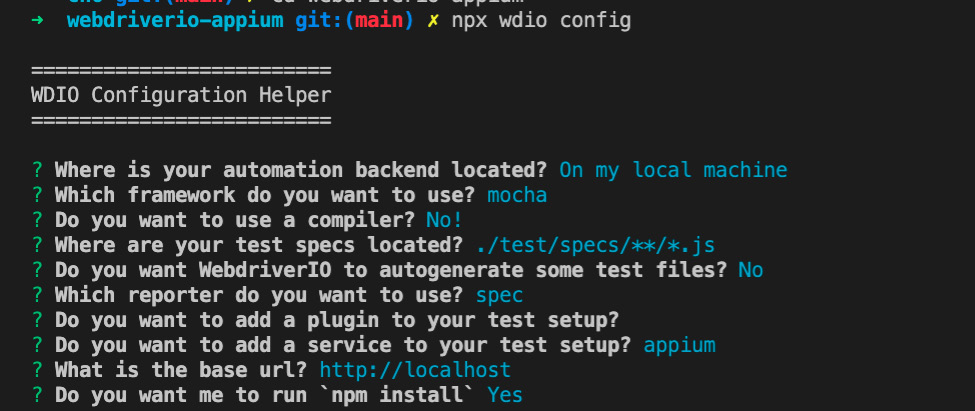
Figure 6.6 – WebdriverIO configuration
Here are the steps
- In the first step, we will be selecting the location of the automation backend. Since we are not running the tests externally yet, we will be selecting the first option, which is the local machine.
We will be using the Mocha framework for our tests, and that option should be selected in the next step.
- In the next step, we will be selecting the No option as we will not be using any compiler in our tests.
- We will go with the default location for our test specs in the next step.
- We will type No in the next step as we will be starting all our tests from scratch and do not need the autogenerate option.
- We will stick with the default spec reporter in the next step.
- Let us skip adding any plugins at this step.
- In the next step, since we will be running the tests from Appium, we will not be needing any additional drivers. So, let us select the appium option.
- We can ignore the base URL step as we will not be running a test on the web, and move on to the next step.
- In the last step, we can select Yes for running the npm install.
The use of the CLI to configure WebdriverIO is productive as we circumvent the need for installing these packages manually. WebdriverIO does a lot of heavy lifting for us to configure the fundamental requisites for our project.
Before proceeding, please make sure to install Appium and its drivers again within the webdriverio-appium folder as this is where we will be storing and executing our tests.
In the next section, let us look at additional WebdriverIO configuration for Android.
WebdriverIO Android configuration
As part of the WebdriverIO setup through the CLI, you will notice that a new wdio.conf.js file has been created. This is the primary file where we will be making changes to get WebdriverIO working with Appium. Let us now go ahead and look at how it’s set up to start making changes.
Quickly browsing through this file shows the customizable port number (4723) where the Appium server will spin up. All configurations that we did through the CLI should also be reflected in this file. The important change to be done in this file is in the capabilities section. It shows the browser as Chrome by default. Here, we will be specifying the Android settings to connect to the Appium server and run it via WebdriverIO.
Let us now copy our test application within our project by creating a new app/android folder structure, as shown in Figure 6.7:
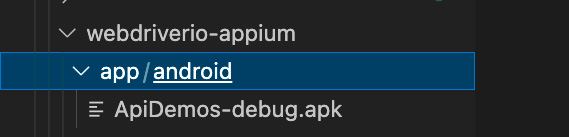
Figure 6.7 – Copying test Android app
We are now ready to update the capabilities section of the config file. Refer to Figure 6.8 for the values to be used here. We have added the platform name and platform version, which are Android and 13.0, respectively, in this case. Then, we added the device name, which should be the same as the one set up for the emulator in Android Studio. The automation name is the name of the driver used for Android automation.
For the app path, we use the path library to dynamically create a complete path to the test app within our project, as shown in the following screenshot. This library is built-in in Node.js and doesn’t need to be installed separately. The path library must be initialized at the beginning of this config file using const path = require('path'). This completes the preliminary customization of the config file for the Android application:
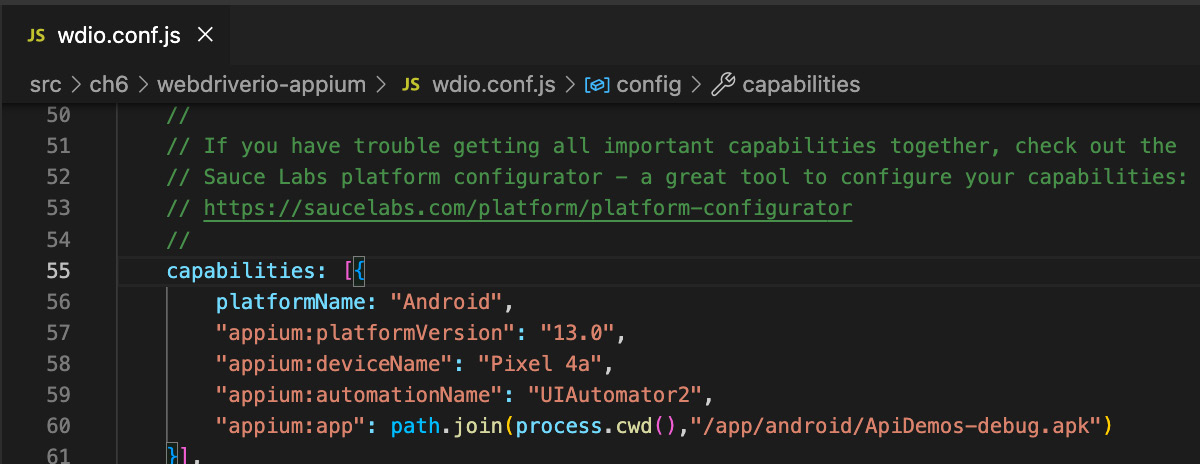
Figure 6.8 – wdio config: capabilities section
Before we try to run the app with WebdriverIO, let us create a test folder and an empty test file, as shown in Figure 6.9. Also, launch the specified emulator from within Android Studio:
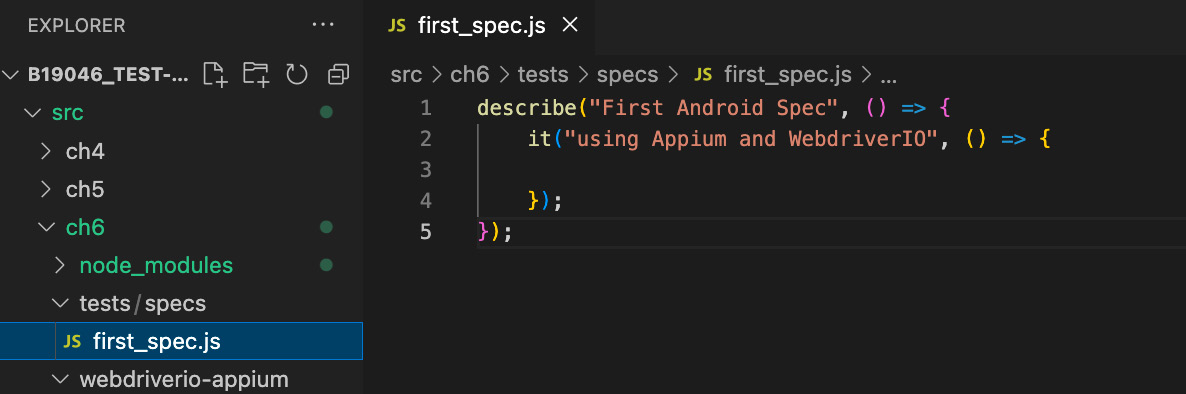
Figure 6.9 – Test folder and file creation
We are now ready to run this spec. For running this spec, use the npx wdio command. This command by default uses the wdio.config.js file to spin up the Appium server, load the test app, and execute the test. Results from the empty test can be seen in Figure 6.10:
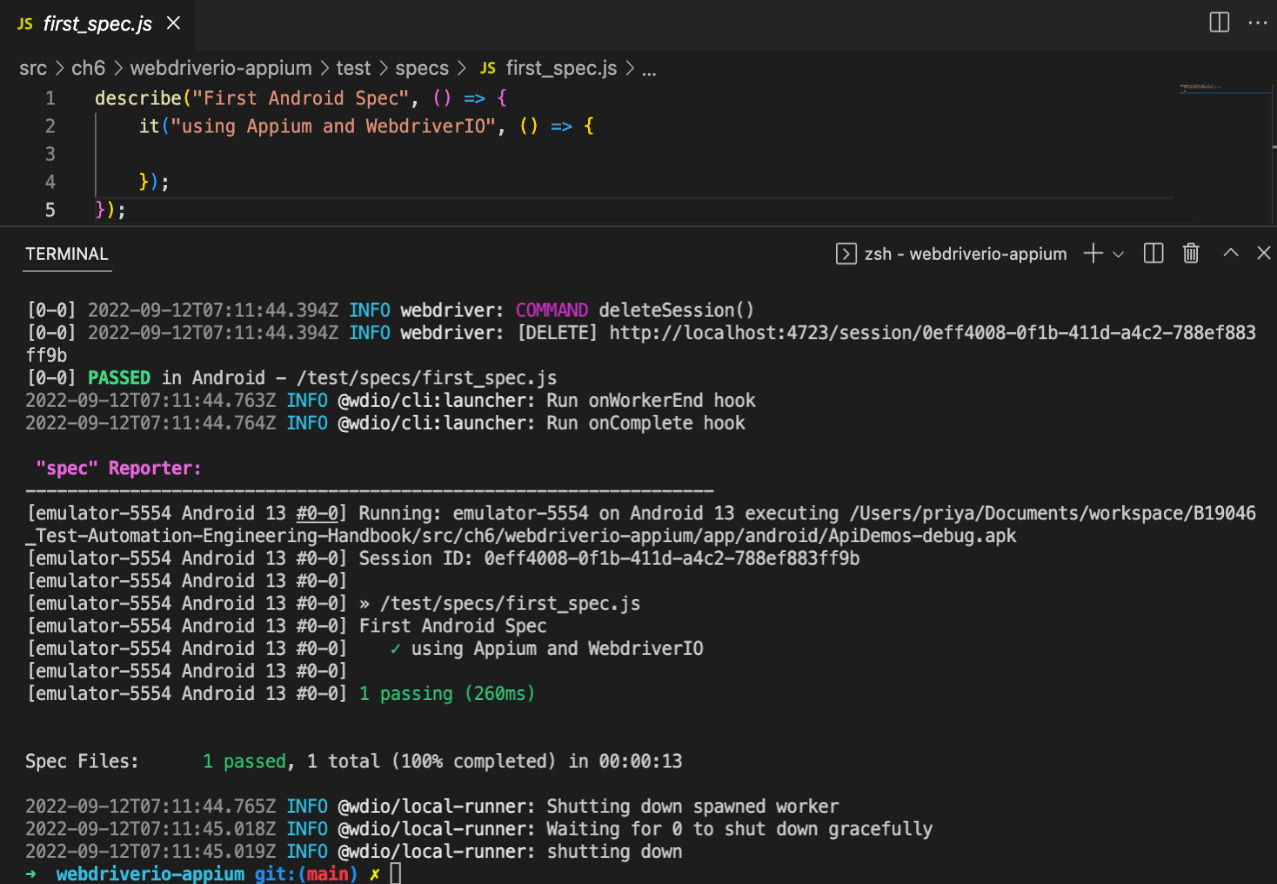
Figure 6.10 – WebdriverIO test run log
This confirms that our installation/setup is complete for Android, and we can go over the manual configuration for the Appium Inspector tool.
Appium Inspector installation and configuration
Let us begin by installing the Appium Inspector, which is a handy tool to inspect mobile elements on the desktop. The latest release can be downloaded from the following link: https://github.com/appium/appium-inspector/releases. Opening the application after completing the download and installation would display a dialog, as shown in Figure 6.11. In this dialog, when we put in the server information and desired capabilities and hit the Start Session button, we will be able to connect the inspector with the emulator. We will look at the details to be filled in here in detail in the subsequent sections:
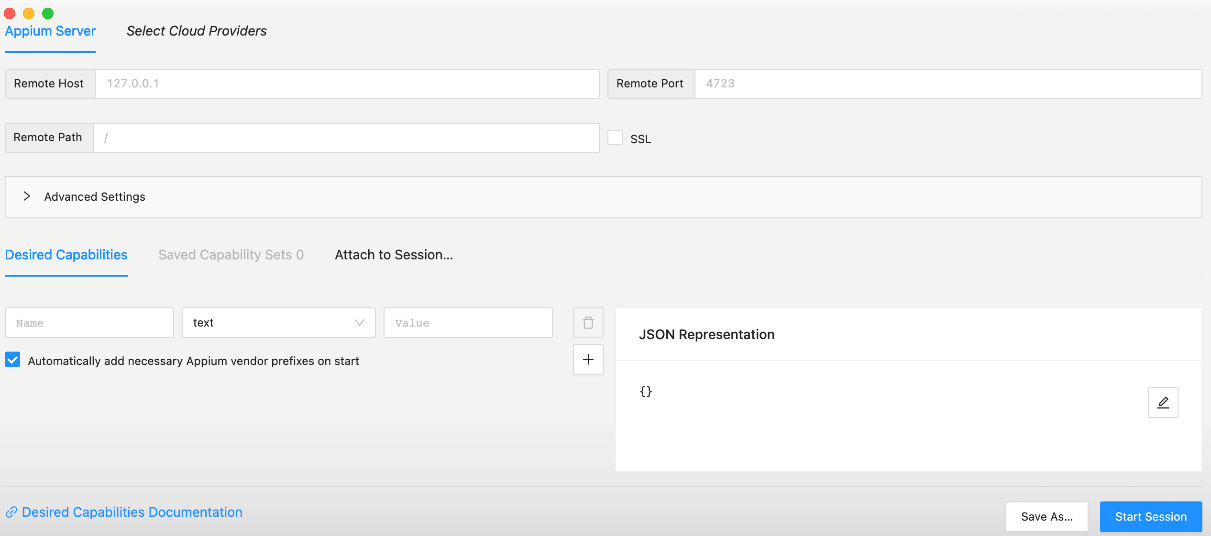
Figure 6.11 – Appium Inspector tool
In the previous section, we used an emulator to run automated tests with WebdriverIO. Now, let us configure another emulator that can be used to find elements on our Android application. Earlier in this chapter, we added a virtual device within Android Studio, which was shown in Figure 6.6.
So, we already have two different virtual devices set up—namely, Pixel 4a and Pixel 3a. Now, let us set up Pixel 3a on the Appium Inspector tool. We will be adding capabilities, as illustrated in Figure 6.12, under the Desired Capabilities section of the tool. Also, remember to update the port number to 4724 since we are already using 4723 for running our WebdriverIO tests:
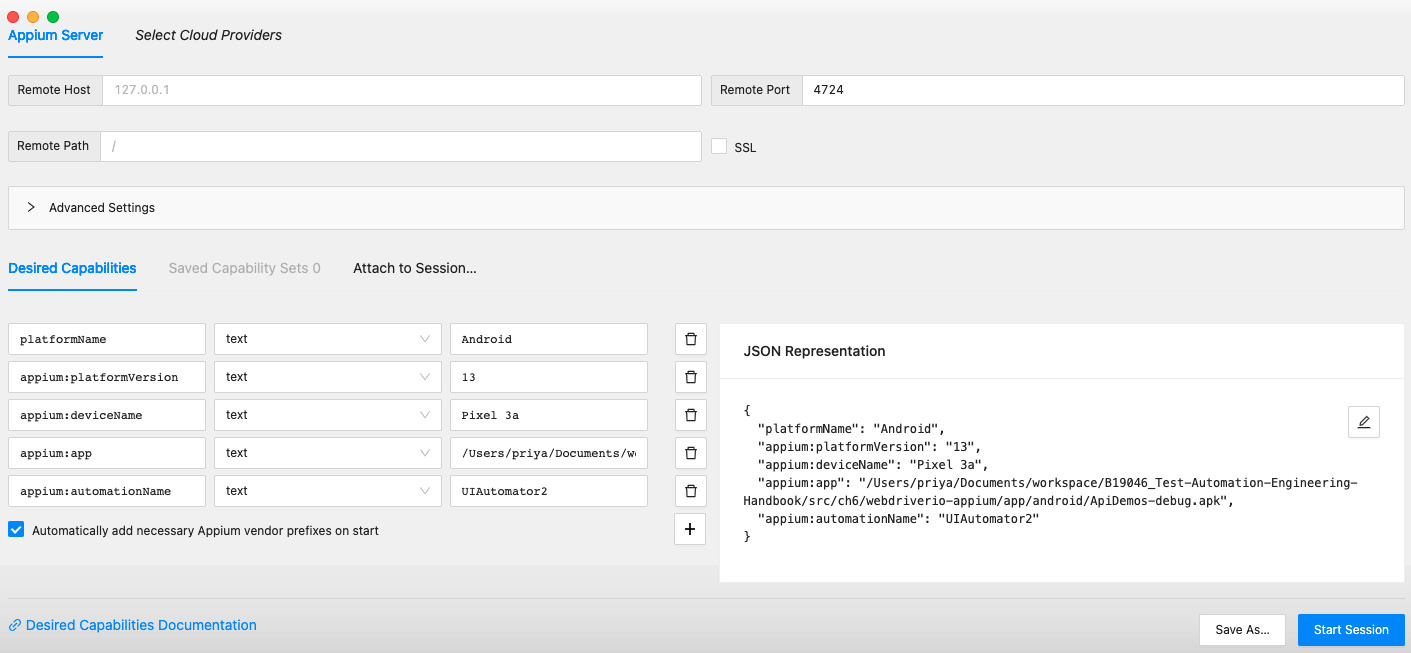
Figure 6.12 – Appium Inspector configuration
Next, bring up the Appium server on port 4724 using the appium –p 4724 command. Once the server is up, hit the Start Session button on the Appium Inspector window to load our application on the Pixel 3a emulator. Figure 6.13 shows the test application loaded simultaneously in the emulator and Appium Inspector window:
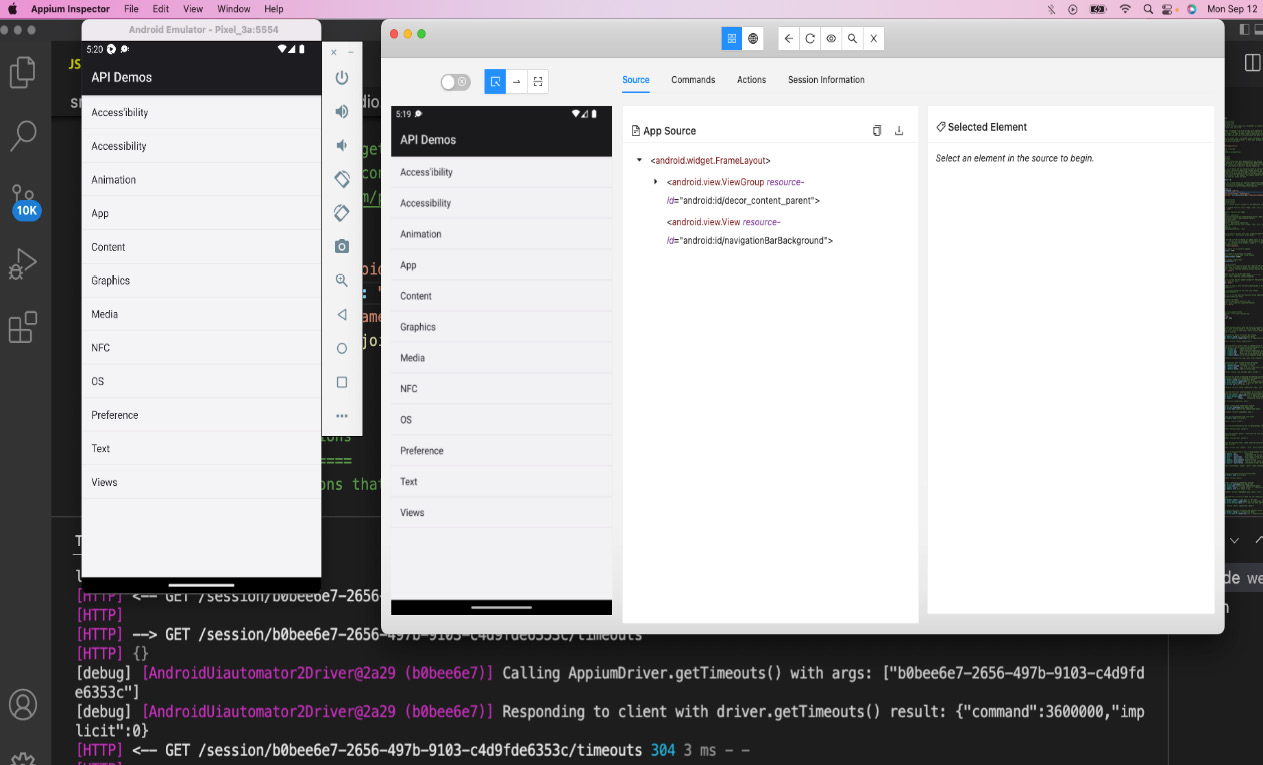
Figure 6.13 – Test application loaded in Appium Inspector and the emulator
In the next section, let’s understand how an async function works in JavaScript and then write a test to validate mobile elements.
Writing our first mobile test
WebdriverIO tests necessitate the use of JavaScript functions with async/await loops. This corresponds to the asynchronous nature of the calls made within the tests. Let us try to understand what these functions are and how to write one.
JavaScript functions with async/await
Let’s quickly understand what async/await functions are and how they are used in JavaScript. Async stands for asynchronous, and it permits the execution of a function without blocking the flow of the program. It uses promises, which are nothing but values that get fulfilled in the future. For example, let us consider a case where a third-party API is called from within a function as a promise. If the call and its response are successful, then the promise is fulfilled, but if there is a network failure, then it is rejected. We could define specific behavior for each of these cases.
When the async keyword is used before a function, it always makes it return a promise. Similarly, the await keyword used within the async function waits until the promise resolves. async/await are essentially the syntactic sugar in JavaScript that let programmers write asynchronous code in a synchronous manner. We will be using async/await keywords in the next section to write tests in WebdriverIO.
Figure 6.14 shows an example of a simple function with a promise using async/await keywords. A promise named simple_promise is being created, and it is set to be resolved after a timeout of 5 seconds. The result of simple_promise is stored in the result variable, which is then printed onto the console:
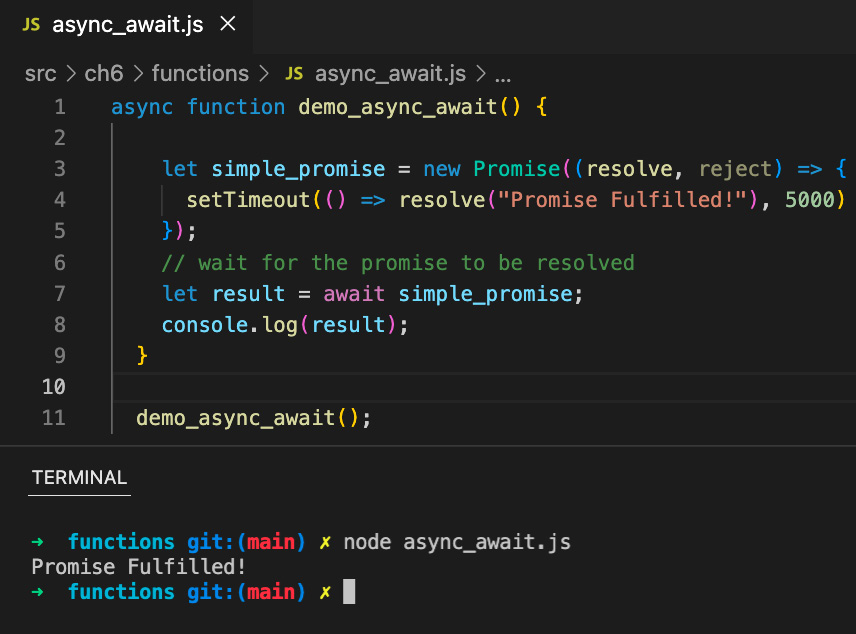
Figure 6.14 – JavaScript function with async/await
That was a very quick introduction to promises and JavaScript functions with async/await loops. There is definitely more to it, and these functions can get extremely complicated easily. We will just be using a simple async/await loop in our WebdriverIO test in the next section. Let us now get to writing a test for a mobile application.
First Appium/WebdriverIO test
We are finally ready to write our WebdriverIO test and run it in the Android emulator using Appium. Let us use the spec first_spec.js file to identify an element using its accessibility ID and perform an assertion on it. The advantage of using this selector is that it is cross-platform compatible. This avoids the need to have a platform-specific locator strategy.
Another advantage of using this selector is that it does not change with localization. A straightforward way to do this would be by loading the Android app in the Appium Inspector tool, as shown previously in Figure 6.13, and clicking on the element to be identified from the leftmost pane. This displays the complete set of properties of that element on the rightmost pane where its accessibility ID can be found. Figure 6.15 demonstrates this selection where the Animation option is selected and its properties are shown:
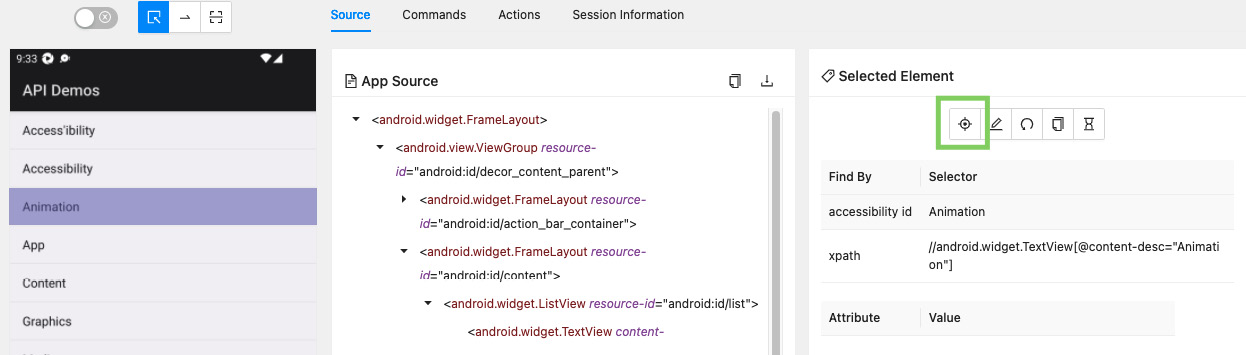
Figure 6.15 – Inspecting an element via Appium Inspector
Let us now write a simple test to click on the Animation option and verify that the Bouncing Balls option is displayed on the subsequent screen. The user can navigate to the menu within Animation by using the highlighted Tap icon in Figure 6.15. We begin the test by capturing the Animation option using its accessibility ID. The tilde symbol (~) is used for that.
Then, we use the click () function to interact with the captured element. In the next menu, we capture the Bouncing Balls element and verify its presence with the toBeExisting() function. The test can be triggered using the npx wdio command:
describe ("First Android Spec", () => {it ("to find element by accessibility id", async () => {const animationOption = await $("~Animation");await animationOption.click();
const bouncingBalls = await $("~Bouncing Balls");await expect(bouncingBalls).toBeExisting();
});
});
Figure 6.16 shows the results of the test execution, with the Appium Inspector showing the selected menu option:
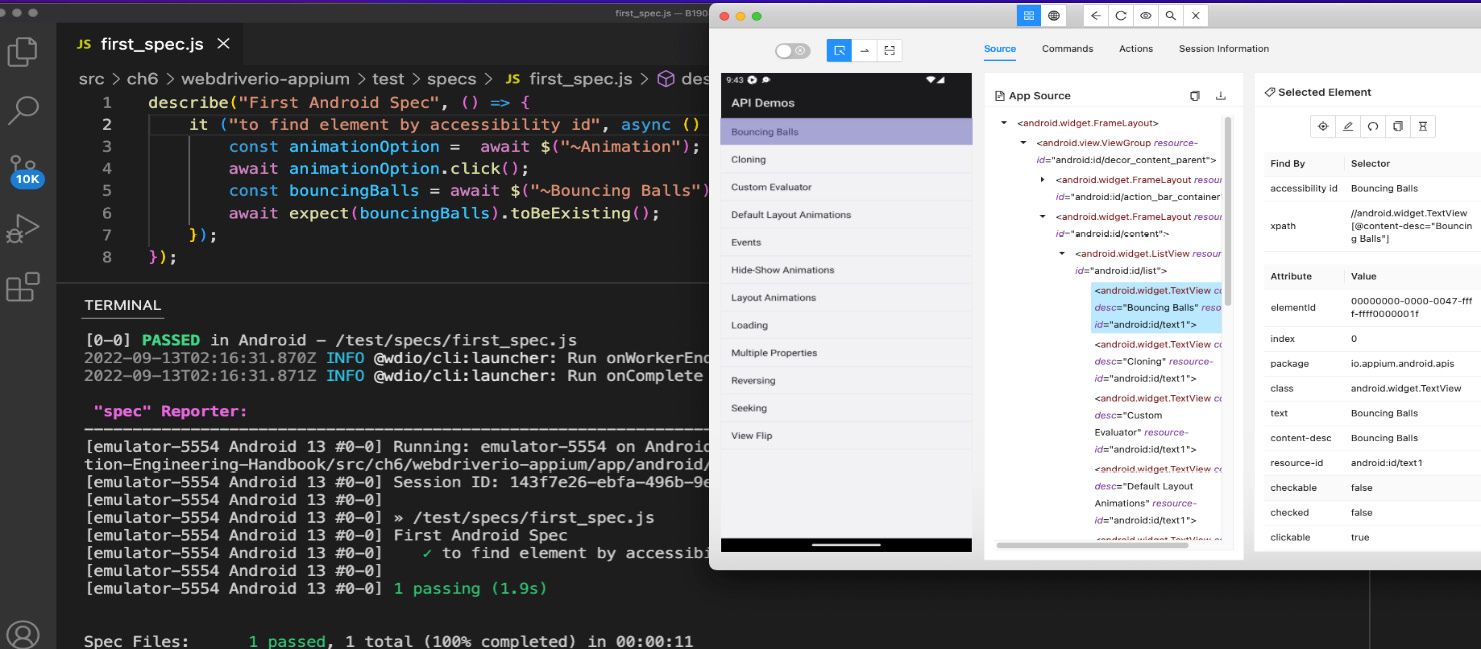
Figure 6.16 – Appium test execution
Other selector options to explore are class, xpath, and elementId. When using these selectors, users should be wary of their uniqueness and how concise they are. This completes our section for Android mobile automation. We went through the installation and setup process and got to the point where we are able to write our own tests. For further exploration of the various features that Appium offers, refer to the documentation at https://appium.io/docs/en/about-appium/api/.
In the next section, let us survey a few key considerations for mobile automation.
Key considerations for mobile automation
Mobile automation is different from web automation in many ways, and it gets complicated with the various versions of the operating systems and the use of emulators. Let us now look at some common areas of complexity to look for when working on mobile test automation.
Areas of complexity
Mobile automation poses certain challenges that are common across platforms. Let us examine them one by one now:
- One of the major challenges is that a mobile application can be run on different devices from distinct manufacturers on multiple versions of operating systems. A solid automated test strategy addressing these compatibilities is a must-have.
- Usability testing to assure a consistent user experience across these platforms must be planned and executed within the testing cycle rather than being an afterthought.
- Testing for various geographical regions and cultures must be performed to verify the accuracy and relevance of the mobile application.
- Every platform has its own native actions, and test automation should account for them and design tests to verify them.
- Every mobile application must be thoroughly security-tested for possible threat and vulnerability scenarios.
- Testing for a range of internet speeds and bandwidths should also be performed to verify the stability of the mobile application in urban as well as remote areas.
- Mobile devices come with diverse screen resolutions, and it is the role of test automation to validate that the application renders correctly in all of them.
- Test automation should consider the type of mobile application being tested. The test approach for a native application that is designed to work only on a specific device should be different from a hybrid application. For example, Progressive Web Apps (PWAs) are expected to work on any device and therefore involve a more diverse testing effort.
Let us next review some iOS-specific factors that influence test automation.
iOS-specific considerations
Creating automated tests for the iOS platform needs distinct installations and further setup. Let us list here the various pieces that work together to write a functional iOS test:
- iOS has a separate development environment called Xcode, and this is used to spin up the emulator’s specific iOS platform. This can be downloaded from the AppStore.
- Xcode Command Line Tools comes with many useful tools such as Apple LLVM, compiler, linker, and Make for easy execution of software through the command line:
Here is an example of the capabilities section of the wdio.config.js file for iOS:
platformName: "iOS",
"appium:platformVersion": "15.0",
"appium:deviceName": "iPhone 13",
"appium:automationName": "XCUITest",
"appium:app": path.join(process.cwd(),"/app/iOS/Test-iOS.app")
Let us look at the pros and cons of using emulators for automated mobile testing in the next section.
Real devices versus emulators
The chief aspect of mobile automated testing lies in choosing between emulators and physical devices. You might say that testing against a physical device is more realistic, but it comes at a cost. At the same time, testing with emulators has certain drawbacks. Let us explore the differences in detail here.
An emulator is a software program that simulates the hardware and operation of the mobile device. Its main goal is to provide the user with an experience of using a real device. It is usually platform-specific and is customizable to use different versions of the hardware and software. One of the key advantages of using emulators for test automation is their cost. Their easy availability also makes them a viable option for testing. Unlike real devices, they also come with certain features to aid in testing. Their main downside is in replicating certain performance issues such as battery life and network connectivity. The test results in these areas may be unreliable. It also gets increasingly complicated to test the device behavior when multitasking. This is where using real devices come in very handy.
Testing on real devices includes running automated tests in the same way the end users would use handsets. The results in this case are highly reliable and can be effectively used to validate battery and other performance issues. Using real devices comes with a high cost, though. Every model with every upgrade must be bought and maintained in terms of both hardware and software. Cross-platform testing becomes impossible with real devices as the OS must be updated for every change. A good mobile test automation strategy should include a combination of both real devices and emulators. This gives the right balance for testing both functional and performance aspects of the mobile device with its dependencies on the platform. Let us now look at how cloud service providers (CSPs) assist in mobile test automation.
Choosing CSPs
Cloud-based mobile application testing provides the option to users to link with multiple mobile devices at the same time. It is a key aspect of today’s mobile automation strategy. It enables us to scale testing with ease while testing features across multiple geographic locations. Organizations can choose to use a private cloud for their testing, which drastically reduces security concerns. Cloud-based providers give you options to combine various versions of hardware and software for testing. Usually, the number of such combinations available to the users is in the scale of thousands. This allows us to test and debug issues much quicker. Testing teams can focus purely on the functional and performance aspects while leaving the device/emulator maintenance to the service providers (SPs). This also avoids the cost of setting up an on-premise testing lab.
Some notable cloud providers are as follows:
- Sauce Labs
- BrowserStack
- LambdaTest
- Kobiton
- AWS Device Farm
- Firebase Test Lab
These providers have a predefined subscription and offer several advanced built-in features to suit testing needs. They come up with a default test pipeline setup that can also be run in parallel to save time. An important consideration while choosing a cloud-based provider is to review their quality and security standards before entering into a contract with them. The cost of moving out of a cloud-based mobile platform rises the longer you are with them. Let us review some ways to optimize our mobile test framework.
Optimizing our mobile automation framework
Let us now look at a couple of ways to optimize our framework. The ability to switch between Android and iOS tests without manually changing the configuration each time is a useful addition to our test framework. This can be easily achieved in WebdriverIO by separating out the wdio.conf.js files for these platforms. Figure 6.17 shows the setup of a config folder with respective config files:
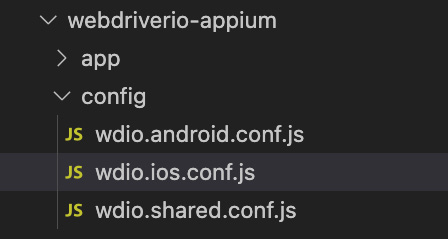
Figure 6.17 – WebdriverIO config file setup
Each of the config files for the platforms will contain platform-specific information, as shown in Figures 6.18 and 6.19. The corresponding sections should be removed from the shared config file:
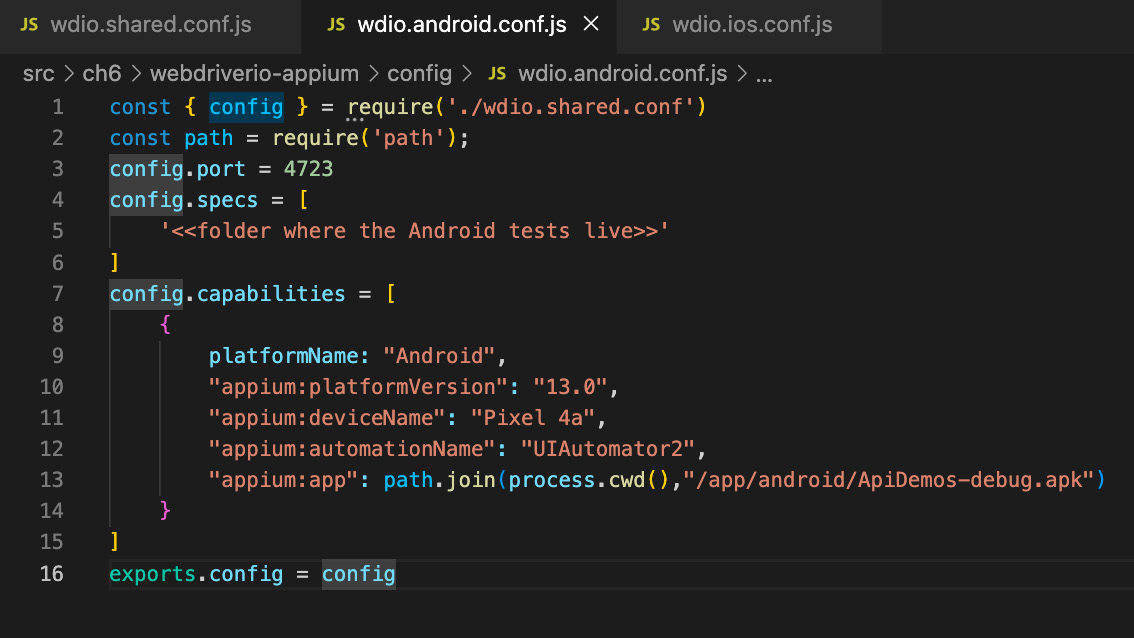
Figure 6.18 – WebdriverIO Android config file
The Android config file holds the path where the Android tests live and their platform-specific capabilities:
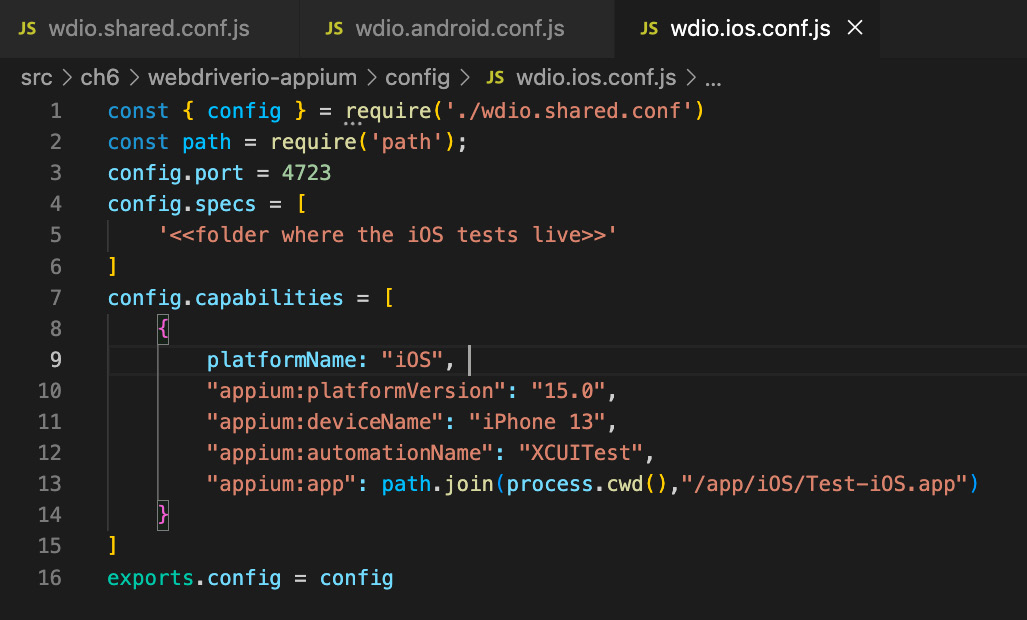
Figure 6.19 – WebdriverIO iOS config file
The iOS config file similarly holds iOS-specific information. The port value remains the same in these files, but it may change when executed using a cloud-based provider for these platforms. Another change would be the way we execute these tests. Now that we have distinct config files, we will run them using the npx wdio config/wdio.android.conf.jscommand.
Another quick way to optimize our tests is by using hooks. Hooks are essentially reusable code that can be run multiple times but defined only once. The commonly used hooks in WebdriverIO are before, beforeEach, after, and afterEach. The before hook runs before the first test in the block, and the after hook runs after the last test in the block. beforeEach and afterEach hooks run before and after each test in the block. Hooks can help reduce test dependency, which in turn helps reduce code duplication. All prerequisites for a given block/test can be grouped into before and beforeEach blocks. Similarly, all cleanup and teardown steps can be organized into after and afterEach blocks.
This brings us to the end of this chapter. Let us quickly summarize what we have learned in this chapter.
Summary
In this chapter, we covered various aspects of mobile test automation. We started with understanding what Appium and WebdriverIO are. Then, we dived into their installation and setup in detail. We learned how to set up and execute tests in WebdriverIO using Appium. While doing this, we also absorbed how to use the Appium Inspector tool to find elements and used it in our spec.
Then, we moved to review certain key considerations for mobile test automation. In that section, we surveyed the areas of complexity, understood the difference between using real devices and emulators, and investigated the advantages of using CSPs. Finally, we picked up a couple of ways to optimize our test framework.
In the next chapter, we will be taking up the exciting topic of test automation in the API world. We will be using the Postman tool to achieve that. We will also learn about using Docker containers to execute our API tests.
Questions
- What is Appium doctor used for?
- What are the disadvantages of using an emulator for mobile testing?
- Name some common challenges with mobile test automation.
- What are the benefits of using CSPs for mobile test automation?
- How do hooks help in the test framework?