
9
CI/CD and Test Automation
We have been introduced to different kinds of testing so far in this book, and the chief tenet of these various test types is to produce an accurate and reliable software application at every change. This is much easier said than done. Successful testing efforts not only ensure sufficient test coverage exists but also emphasize the persistence of this coverage throughout the project life cycle. This is where CI/CD practices and techniques facilitate and improve software quality. CI/CD stands for continuous integration and continuous delivery. Test automation is at the core of CI/CD techniques, and in fact, CI/CD implementation is considered lacking without proper integration with automated tests.
In this chapter, we will be diving deep to understand the fundamentals of CI/CD and how CI/CD systems work. We will also review some test automation strategies for CI/CD and finally learn to create a job on the CI pipeline.
We will cover the following topics:
- What is CI/CD?
- Test automation strategies for CI/CD
- GitHub Actions CI/CD
Technical requirements
We will be working on GitHub Actions in the last part of this chapter to implement a CI job. The repository used will be https://github.com/PacktPublishing/B19046_Test-Automation-Engineering-Handbook. It is advised to possess a basic familiarity with the GitHub UI and how it works to follow along.
What is CI/CD?
CI/CD software engineering practices allow us to automate the building and testing of code to validate it meets the specifications. After all the tests have passed, they equip the teams with options to automate the delivery of code. Continuous Integration, Continuous Delivery, and Continuous Deployment together significantly reduce the time it takes to deliver application enhancements while the engineering team can solely focus on product and code enhancements. Figure 9.1 illustrates how these processes work in tandem to elevate software delivery levels:
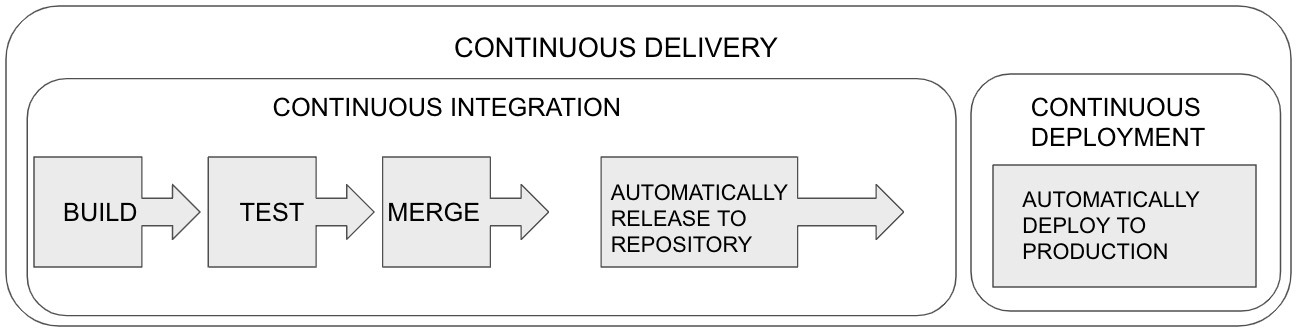
Figure 9.1 – CI/CD
Let us take a quick look at the CI/CD process in the next section.
CI/CD process
CI/CD methodologies and the associated systems take a big leap in terms of software quality improvements than any other technology has done in the recent past. Automated tests are run as part of the CI system every time a code or configuration change is made and thus serve as a comprehensive regression test bed. Modern CI systems can not only execute tests that check functional behavior but also validate the performance and security aspects of the software application. A well-implemented CI system inspires good development practices by providing constant feedback. One of the great benefits of CI systems is the visibility they provide the entire team into the release and feedback process. Any member can visualize the progress and view failures with just a click of a few buttons.
The CI/CD process starts when the developers commit their code changes into Git. The CI system picks up this change and triggers a new instance of the pipeline. At this stage, the code gets compiled, and the first set of tests (unit and component) are run. Code linting tools and code coverage analysis tools are also run at this point. If the build and tests pass, then a merge request is created by the developer to get feedback from the team. After this code review feedback cycle, the developer merges the code to the main/master branch, which triggers the unit/component tests again. Additionally, the code artifact created as part of the build process gets deployed to the subsequent test environment. This is where smoke and end-to-end (E2E) tests are run to validate business scenarios involving multiple services and/or UIs. This feedback loop continues until the code finally gets deployed to the production environment where additional tests may run.
Let us dive deep into CI in the next section and understand its nuances.
CI basics
CI addresses software integration problems effectively and efficiently. As the application under development becomes complex and the code base involves multiple components, it is vital to get feedback at every code change. The CI development practice enables engineers to integrate their work frequently and detect errors instantly through code compilation and building, and running unit tests. Each engineer usually commits at least once a day and hence encourages breaking down big changes into logical chunks of code. Building and testing of the product often occur numerous times a day in an automated manner leading to a much higher confidence level in the state of the project.
Figure 9.2 illustrates the major parts of a CI system. The CI server typically keeps polling the version control repository every minute or so and runs a preconfigured build script by fetching the latest version of the source files. The CI software has a dashboard and offers options to kick off various stages of the build process at will. The CI software is also capable of messaging the stakeholders of the current build via emails and/or instant messaging platforms. It is generally considered a good practice to perform database setup as well as part of the CI build script to ensure the coherence of the whole software application:
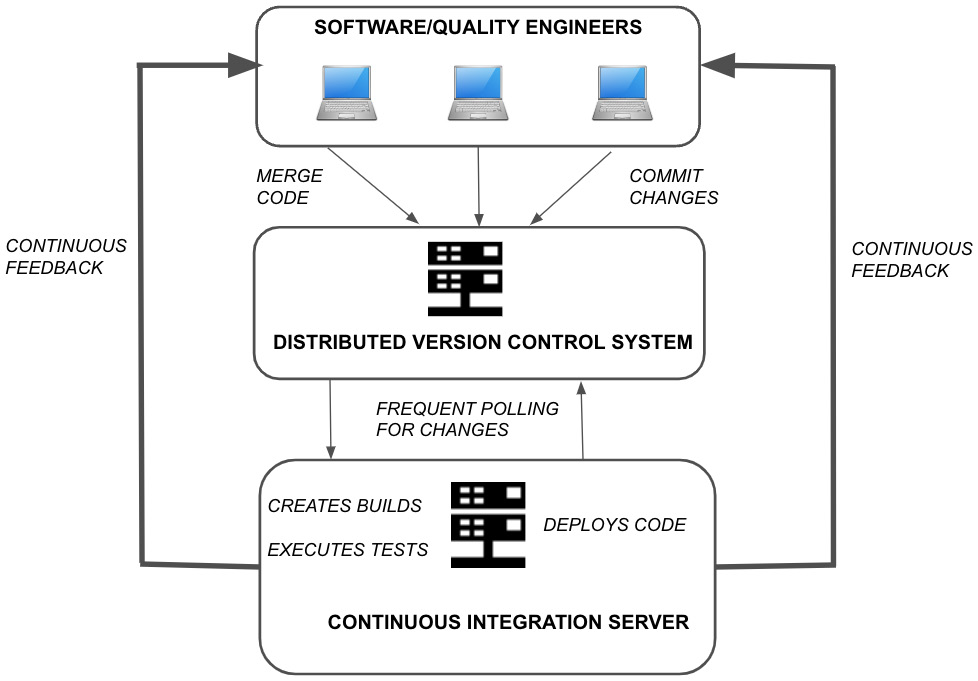
Figure 9.2 – Parts of a CI system
Some of the good development practices that result from implementing a CI system are as follows:
- Logically breaking down big code changes
- Identification of broken code faster
- Fixing broken builds swiftly
- Increased automated test coverage
- Frequent code reviews/peer feedback
CI systems efficiently enable compiling and building of source code once and deploying it to multiple environments. Even though the build’s configurability may vary by platform, the CI process effectively remains the same. The usual practice is to execute the same build script against an environment-specific properties file. This makes sure we release usable software at any time and to any environment. This is a tremendous advantage and takes a lot of manual effort without CI systems in place.
Implementing a CI system in existing projects is usually a daunting task as the team may feel they have to go modify numerous processes they have been comfortable with over a period of time. It is critical to educate the team about all the extra time they gain by not performing repetitive build tasks and the overall increase in visibility from integrating individual changes into the code base.
As you may have noticed, the role of a quality engineer in the overall CI process appears minimal. But it is not so. It is vital for a quality engineer to constantly review the automated tests run as part of the pipeline to enhance coverage and reduce flakiness. This also gives quality engineers an opportunity to get involved early in the build and deployment process at every change. A quality engineer is also responsible for establishing the right quality mindset in the team. When there is a failure in the CI pipeline due to functional or E2E tests, it is often a quality engineer who responds first, debugs the failure, and logs a defect if necessary.
This brings us to the end of this section on CI. Let us next review in detail CD and the deployment pipeline.
CD and deployment pipeline
CD is the process of delivering software from development to the end user in an effective manner using a deployment pipeline. A deployment pipeline is a collection of automated processes to take the software from the engineer’s machine to the end users of the product. This practice aims to curb the manual steps involved in deploying software and enables faster and more stable deployments to production-like environments. The primary aim of CD is to construct a software delivery process that is dependable and repeatable. Figure 9.3 shows the capabilities built within a deployment pipeline. A key advantage of the CI/CD system is its ability to roll back to the most recent working version of the software when critical errors occur. Failures with configuration or code can be found quickly and reverted if necessary:
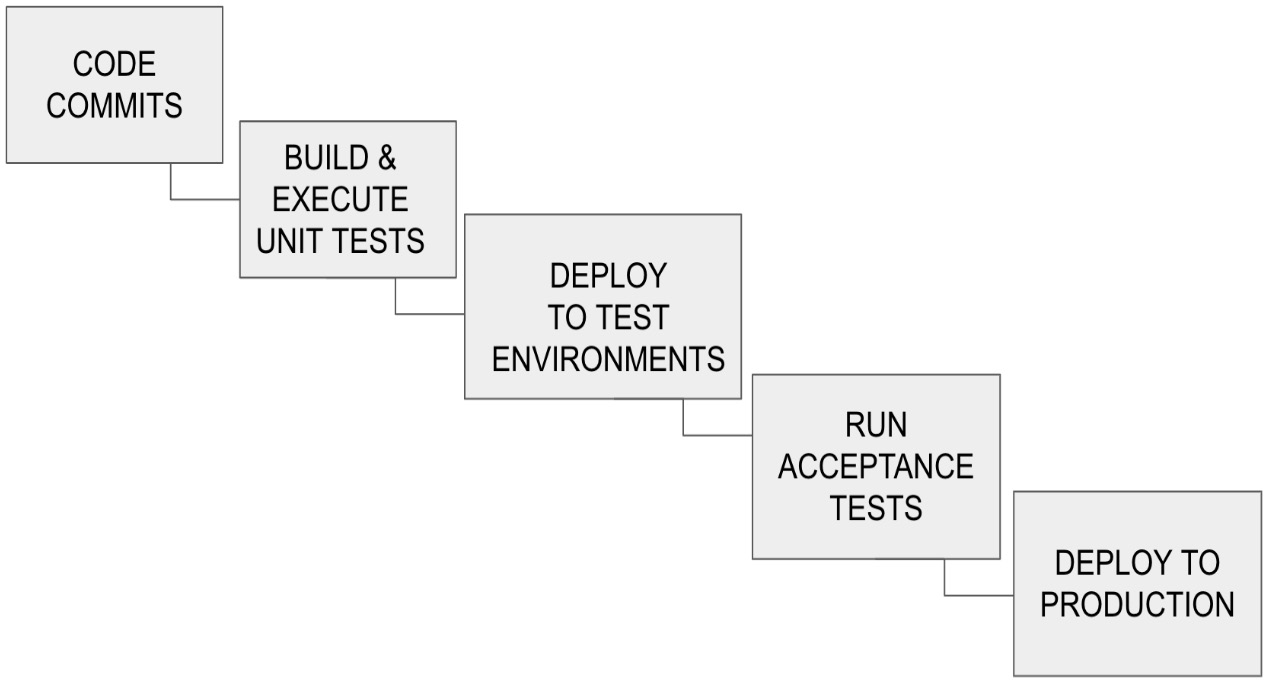
Figure 9.3 – Components of a deployment pipeline
Some of the key aspects involved in this methodology are as follows:
- Effective software configuration management
- CI
- Building and maintaining a deployment pipeline
- Automated infrastructure and environment management
Every code or configuration change introduced runs through the same set of processes, and by the time it is deployed to the production environment, we can be sure that:
- The code can be built without any errors
- The engineers are certain that their changes are working based on unit and functional tests passing as part of the pipeline
- Product and business teams accept the change due to the successful run of E2E and user acceptance test cases as part of the pipeline
- The delivery ecosystem is in place because the code was deployed and tested in a production-like environment
- A copy of the latest code and configuration change exists on the version control repository
As appealing as it may sound from the outside, implementing a CD process is daunting and takes the effort of many teams working in unison. The key lies in examining and understanding the existing deployment system, breaking it down into simple and repeatable steps, and using the latest technologies to automate it. It can be done incrementally so that over time, it evolves into a refined and efficient system.
One of the central aspects of the CD process is to automate the acceptance tests to be executed as part of the deployment pipeline. These acceptance tests may be E2E UI or API tests. These have the significant advantage of blocking a build that has failed a key business specification to be deployed to production or even a production-like environment. By updating the automated tests consistently for every code change, the tests ascertain that the candidate build delivers the intended value to the end users. A common drawback with running automated acceptance tests as part of the pipeline is that they take too long to complete for a single merge to the master. This is mainly because the underlying application and all of its configuration have to be built and deployed before any of the pre-requisite steps for the tests can be run. This adds time to the overall acceptance test cycle when the test run times are included. It is common for projects to have acceptance tests that run a few minutes to multiple hours, but there is always room for increasing the efficiency of the automated tests. Quality engineers and software development engineers in test (SDETs) should always be on the lookout for ways to refactor their tests effectively to reduce the overall deployment pipeline runtimes.
Another major advantage of the CD process is its capacity to validate certain non-functional requirements (NFRs) as part of the deployment pipeline. It is not uncommon to unearth architectural discrepancies in the late stages of a project life cycle, the reason being the nature of the NFRs themselves and also the availability of all the components to execute sensible tests against them. This challenge can be addressed through CD by including tests that validate certain performance thresholds for the application as part of the CI pipeline. It is not possible to design an extremely performant and scalable application at the inception of a project. But having these tests provides an initial comfort level with a code change, and if there are considerable performance impacts, further load tests can be performed in a full-fledged performance environment to identify the bottleneck.
There should be additional considerations made in terms of security and data compliance when working with cloud platforms. It is a good practice to include cloud network connectivity and security tests that run at regular intervals as part of the CD process. This ensures that the components are all connected and working together in a holistic cloud environment in a secure manner.
CD involves not just the collaboration between engineers and the infrastructure team but demands support from product owners/managers, executive sponsors, and everyone involved in between. It is a paradigm shift and the new norm in the software delivery world. In the next section, let us take up some considerations for test automation in the world of CI/CD.
Test automation strategies for CI/CD
Having understood what a CI/CD system entails, let us now review a few test automation strategy considerations for CI/CD. It is much easier to build test automation into CI systems earlier in the project rather than adding it later on. It is essential to understand that all tests cannot be run all the time since that would be an enormous overhead on the CI pipeline as the code base increases. Having the right test automation strategy to utilize CI/CD systems frees up engineers’ capacity that can be utilized in other areas. It goes without saying that building an accurate and reliable software application is possible only by establishing quality right from the lowest building block. Let us start by looking at unit and component tests.
Unit/component tests
Unit tests verify the behavior of the smallest blocks of code, usually a single class or an object, whereas component tests exercise larger blocks of code involving multiple classes/objects. Both these tests have minimal external dependencies and often involve mocking of objects that are outside the validation logic of the test. They are usually the fastest to run and hence provide the quickest feedback. All unit and component tests should be run as part of the CI pipeline, and the recommendation is to run them on every commit to the branch and on every merge to the master branch. This paves the way for quick and efficient debugging when a failure occurs due to change. It also gives engineers the much-needed confidence that their changes work in tandem with other components upon merging the code. Let us next take a look at API tests.
API tests
API tests, as we have seen earlier, verify the functional correctness of API endpoints. These tests focus mainly on the business logic of the API as opposed to unit tests, which deal with much smaller units of code. API tests should be automated and run as part of the CI pipeline as much as possible on every merge to the master branch. Since the advent of microservices, it has become a common practice to break down business logic into multiple microservices, each containing a collection of API endpoints. Each microservice essentially has associated API tests that should be run on every code merge into the repository. This lays a perfect foundation for a wider test coverage for the core business logic and running these as part of the CI pipeline rapidly flags alterations to the existing business logic.
Running API tests for a specific microservice in a CI system is a ripe ground for using containers as these tests do not demand the presence of all dependent services. Dependent services, if any, can be mocked to ensure the continuity of the tests.
Next, let us take up how E2E tests can fit into CI pipelines.
E2E tests (API and UI)
E2E API and UI tests form a critical part of the feedback on a CI pipeline. These are usually the longest-running tests as they exercise the complete system under test and also due to the additional setup they require. They require a fully installed software application, including the databases in a test or staging environment, with all the dependencies in place. Vendor service calls may be mocked in these tests to save costs. These longer-running tests can be triggered by the CI system and run in an isolated test environment at planned intervals. They can also be invoked by the CI pipeline as part of a job that deploys application code to a specific environment.
UI tests in general tend to be brittle when compared to API tests, and it is essential to hand-pick a selection of E2E tests to run in the context of CI. Long-running CI pipelines can damage an engineering team’s productivity, and hence it is crucial to include only stable tests. Running these tests on every commit or build could spell disaster, and it is mandatory to monitor and optimize the CI pipeline’s runtimes whenever an E2E test case is added to the test suite.
Let us next look at smoke tests and how they can be utilized in a CI system.
Smoke tests
Smoke tests do not address a specific architectural component; instead, they focus on delivering a clean build. Smoke tests are a collection of test cases that are run at the end of a deployment job to give confidence in the quality of the build. They are selected based on the business use cases and workflows in the application and verify they work as per the specifications on every deployment to an environment. Smoke tests are a combination of E2E API/UI and component tests. Though minimal and conservative, there are smoke tests that can be run against the production environment. Major CI/CD systems and test automation frameworks provide features such as tagging that help flag smoke tests with ease. Additional precautions have to be taken to organize environment-specific variables in the CI/CD system if the same smoke test suite is designed to run against multiple environments.
Table 9.1 summarizes the content discussed in this section:
|
Type of Test |
Recommended CI/CD Strategy |
|
Unit/component tests |
Tests with minimal dependencies and the quickest feedback cycle to be run on every commit and every merge to master |
|
API tests |
Tests that verify the functional correctness of the API endpoints to be run on every merge to master |
|
E2E API tests |
Long-running tests involving sequential API calls to test business workflows to be run on every deployment to test environments |
|
E2E UI tests |
Long-running tests involving user actions to test business workflows to be run on every deployment to test environments |
|
Smoke tests |
A subset of tests selected to be run on every deployment to an environment |
Table 9.1 – CI/CD strategies for various test types
Figure 9.4 illustrates how a CI/CD system incorporates constant feedback into the development process:
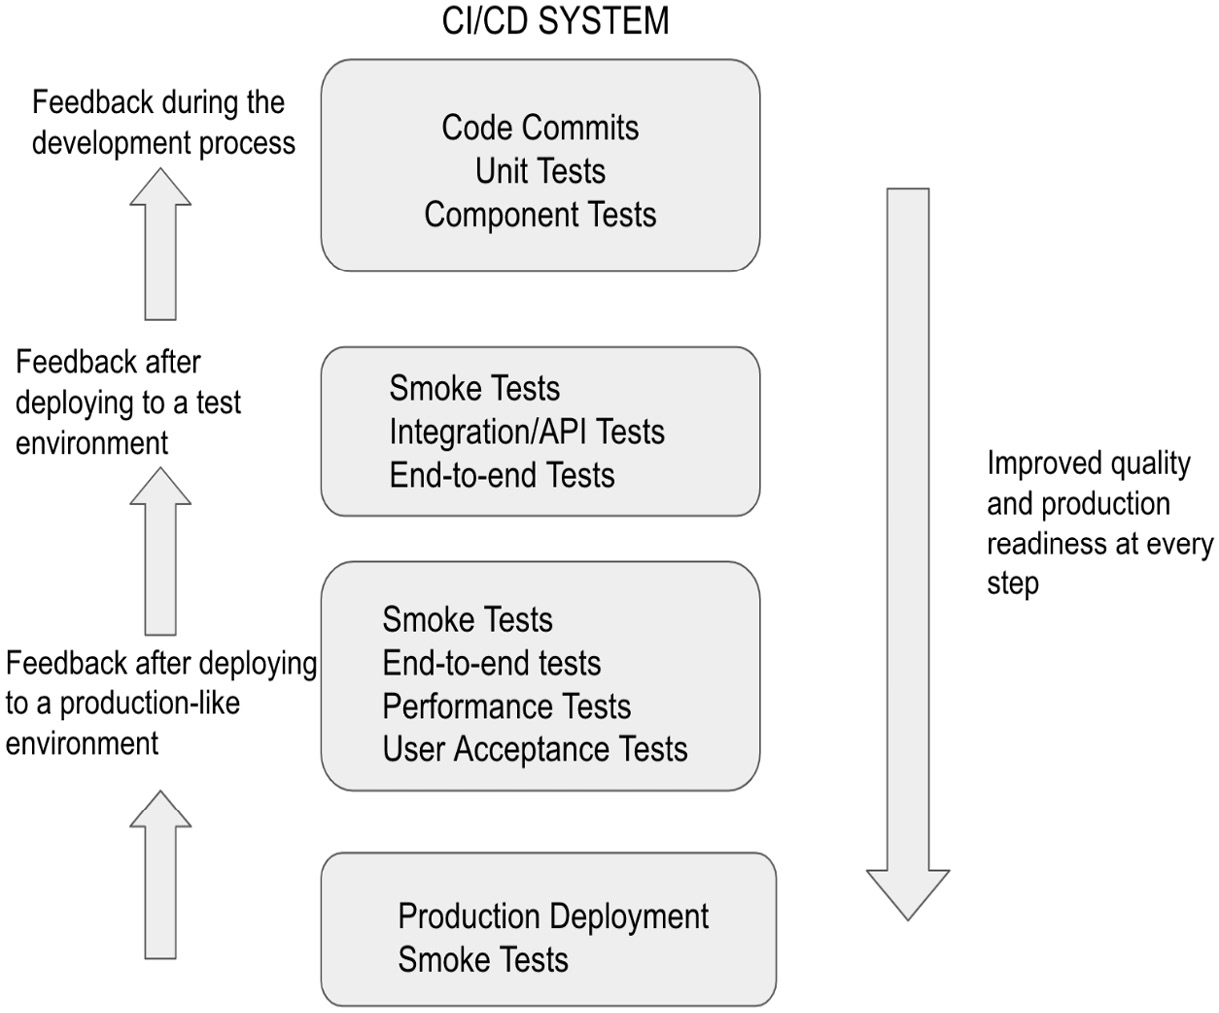
Figure 9.4 – Feedback loop in a CI/CD system
Next, let us review some tips on how to address test failures in a CI pipeline.
Addressing test failures
Persistent test failures can occur within a well-organized CI pipeline. It is critical to identify and address the root cause as quickly as possible. Consistent test failures render the CI/CD process ineffective, and hence measures should be taken to improve the success rates of the pipeline.
Some common causes of the failure of a pipeline are as follows:
- Interactions between the test framework and the CI system are not well defined
- The test suite running on the pipeline is too big
- Insufficient test reporting
- Lack of collaboration between quality engineers, software engineers, and infrastructure teams
Quality engineers should examine the pipeline frequently and always have a backlog of improvement items lined up. Optimizations to the CI pipeline from a test automation perspective can be made by consistent refactoring of tests to reduce flakiness. Long-running tests should be set up for parallel execution wherever possible. There can be instances where the same tests are being run at the same time in multiple pipelines. Data setup and teardown steps for each test should be built into the test to account for such cases. CI/CD systems store a lot of pipeline-related data that can be used to generate reliable metrics such as production deployment frequency, test runtime, test failure rate, and so on. These metrics provide helpful insights to improve overall product delivery times.
So far in this chapter, we have looked at the core CI/CD concepts and theoretically understood how test automation can be accommodated in our CI pipeline. In the next section, let us acquire hands-on experience of implementing one such pipeline using GitHub Actions.
GitHub Actions CI/CD
GitHub Actions is a CI/CD platform that enables the automation of building, testing, and deployment of application code. It is the built-in CI/CD tool for GitHub. In this section, let us go over all the concepts we need to know to understand the GitHub Actions workflow. We will also learn to implement a GitHub action to run syntax checks against our code to make sure it meets specific criteria. Let us start with the necessary terms to help us understand the GitHub Actions workflow file.
The workflow .yaml file contains all the information used to initiate and drive the CI pipeline to completion. YAML is a data-serialization language commonly used for building configuration files. It is in human-readable format and compatible with all the major programming languages. The workflow .yaml file at a high level specifies the following:
- Events: An event is a trigger for a workflow
- Jobs: Jobs are high-level actions performed as part of the workflow
- Runners: A runner is a platform where the action is performed
- Steps: A job can be broken down into multiple steps
- Actions: Each step performs a specific action in an automated fashion
For illustration, we will be using code commits and merges, which are common events that occur in every repository. In this example, we will be configuring our workflow file to be triggered when someone pushes code to our repository. When this push event occurs, all jobs within the workflow will be run. This is demonstrated by the YAML code snippet shown next. In this configuration file, we use the on parameter to specify the trigger for the workflow. When the push event occurs, it will run all jobs within this workflow. We have a single job here that comprises multiple steps and actions. Under the steps, two actions will be run in this case. The first action will check out the latest version of our code from the main/master branch, and the next one will run the super-linter against it. Linters are tools to evaluate that our code conforms to certain standards. The super-linter supports multiple languages and automatically understands and checks any code in the specified repository. The runs-on parameter is used to specify the runner. This is the container environment where GitHub will run this job. There are additional options to host your own container; however, we will be sticking to the default container offered by GitHub in this case:
name: Packt CICD Linter Demo
on: [push]
jobs:
super-lint:
name: Packt CICD Lint Job
runs-on: ubuntu-latest
steps:
- name: Checkout Code
uses: actions/checkout@v3
- name: Lint Code Base
uses: github/super-linter@v4
env:
DEFAULT_BRANCH: main
GITHUB_TOKEN: ${{ secrets.GITHUB_TOKEN }}Let us now go to GitHub to set up a workflow in our repository (https://github.com/PacktPublishing/B19046_Test-Automation-Engineering-Handbook). First, we create the right folder structure for our workflow file. We use the Add File option on the home page of our repository. We create a linter_demo.yml file with a .github/workflows structure under the root folder of the project and copy the code into the editor below, as shown in Figure 9.5. Then, this file can be committed through a new branch or to the main branch directly. It is mandatory to follow this folder structure to save the workflow file:
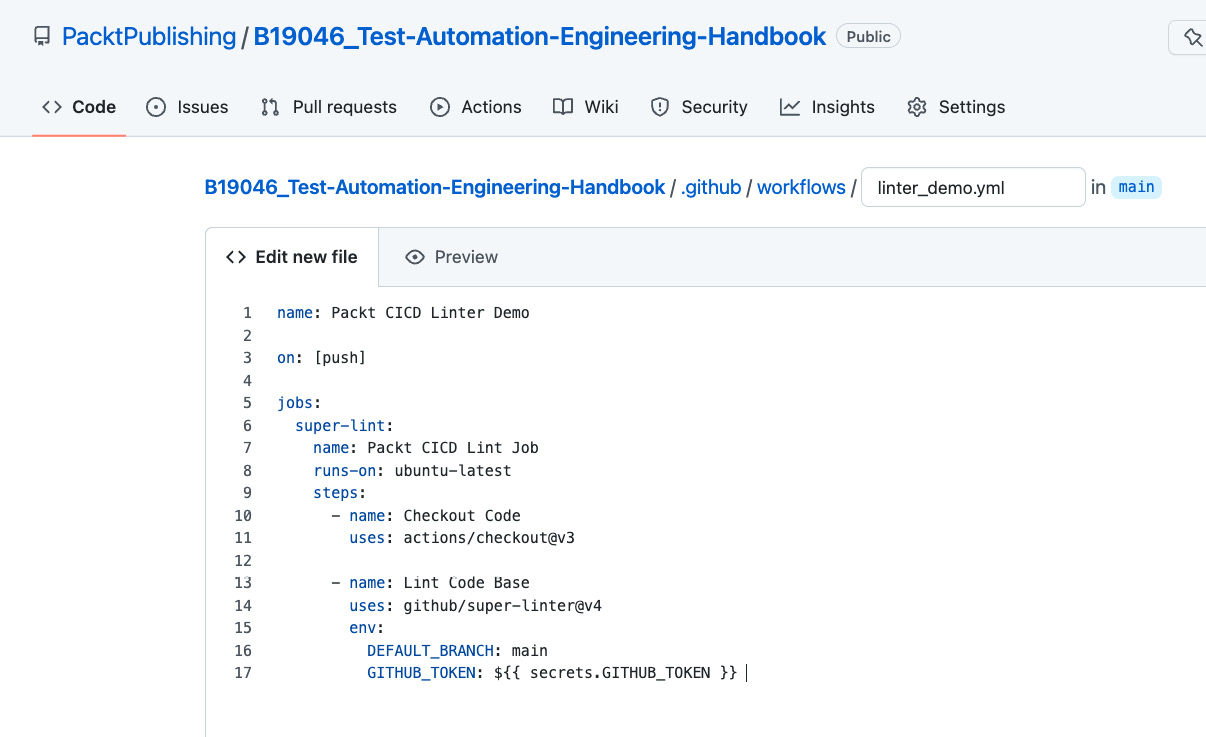
Figure 9.5 – Creating a GitHub workflow file
On navigating back to the home page of the repository, we notice a yellow status icon now, as shown in Figure 9.6. This signifies that the workflow is being run now and the code is being checked. This status icon turns green or red based on whether the checks pass or fail. This is particularly helpful when you are viewing a new repository and it aids to know that the repository is in a healthy state with all the tests passing. The results of the workflow can be viewed by clicking on the status icon or visiting the Actions tab:
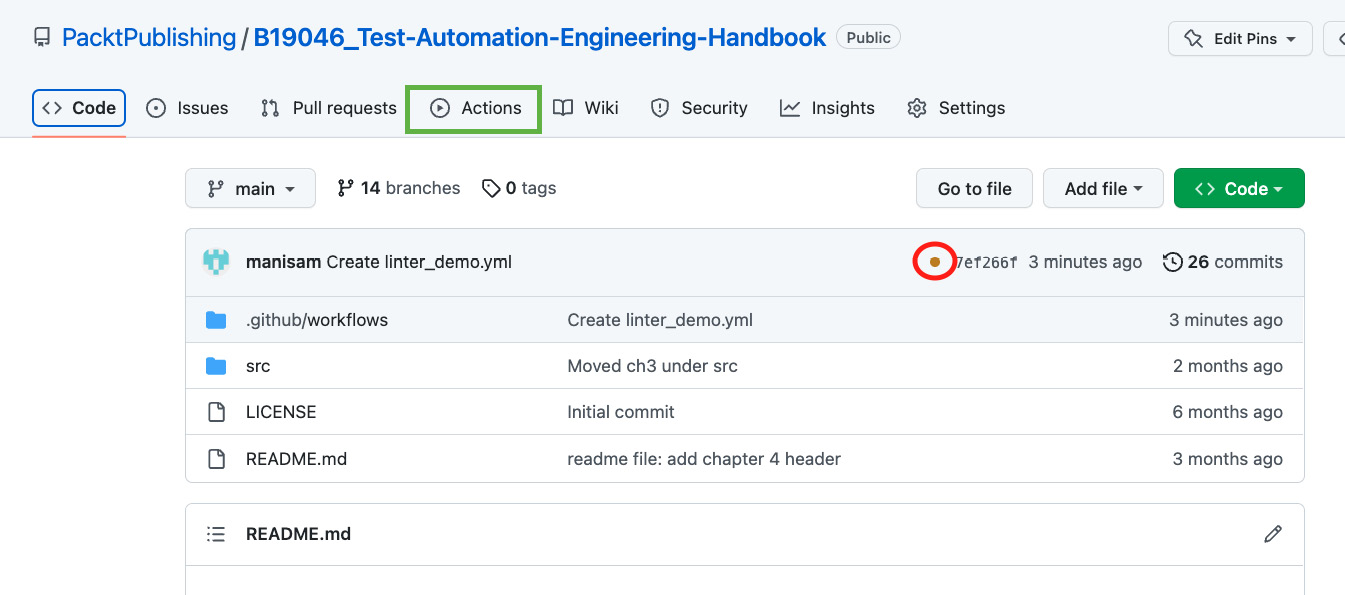
Figure 9.6 – Workflow status
We can view the execution results of a specific job by following the link within the Actions tab. This provides a neat breakdown of the steps executed within the job and how long each one took. You could open each step to view the run logs. Figure 9.7 shows the view for a failed job and its individual steps executed as part of the workflow:
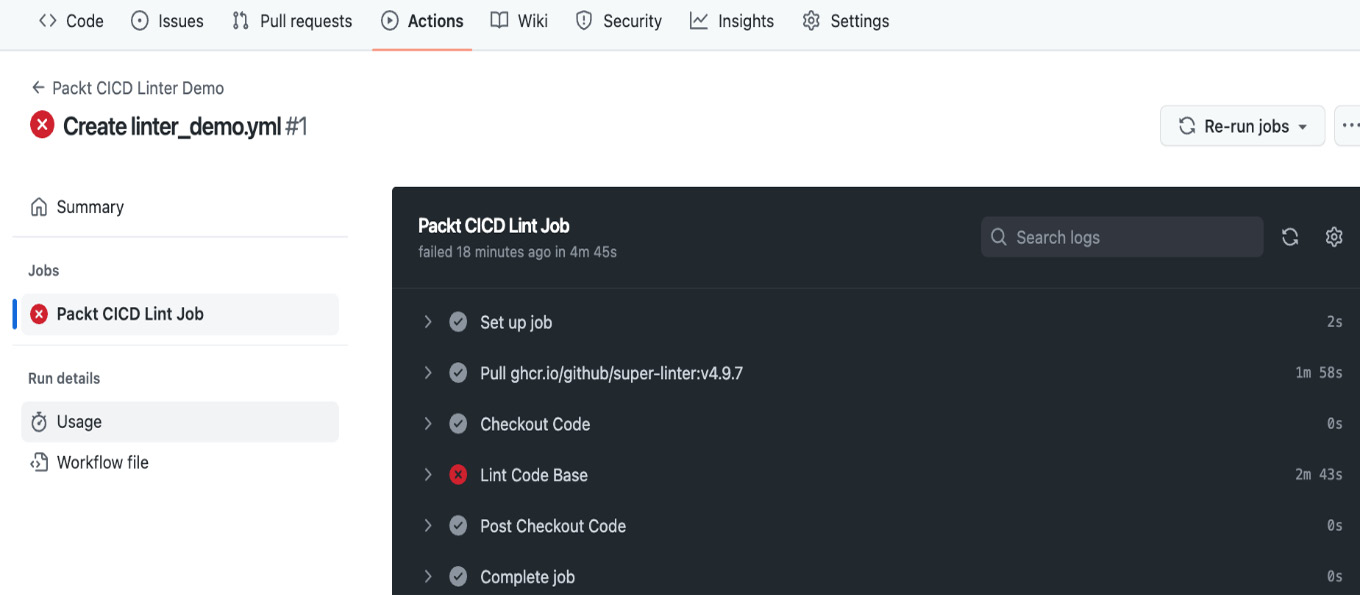
Figure 9.7 – Workflow results
The Actions tab is where all the CI/CD information is shown within a GitHub repository. It shows a history of all our workflow jobs and their statuses, with options to look through each one further in detail. We can have as many workflows as we need within a single hub repository. For example, we could have one workflow that runs only Cypress tests and another to lint the entire code repository.
On fixing the suggestions from the linter and pushing the code to the repository, the CI job should automatically be triggered based on our setting in our workflow file.
The following is a sample snippet to invoke Cypress tests for reference. Placing these contents in a workflow file at the root of the project under the recommended directory structure triggers Cypress tests on every commit to the repository:
name: Packt Cypress Tests
on: [push]
jobs:
cypress-run:
name: Packt Cypress CI/CD Demo
runs-on: ubuntu-latest
steps:
- name: Checkout Code
uses: actions/checkout@v3
- name: Cypress.io
uses: cypress-io/[email protected]
env:
DEFAULT_BRANCH: main
GITHUB_TOKEN: ${{ secrets.GITHUB_TOKEN }}GitHub has an extensive marketplace (https://github.com/marketplace) where you can grab pre-written workflows for different use cases. We can download and modify them to use in our repository. Readers are advised to take a look at these extensions to get an idea of the tremendous community surrounding CI/CD systems.
This brings us to the end of this chapter. In the next section, let us quickly summarize what we learned in this chapter and peek into our explorations in the final chapter of this book.
Summary
We commenced this chapter by understanding what a CI/CD system entails and the processes involved. We then dived deep into CI and CD individually to achieve a better understanding. Then, we took up test automation strategy considerations with respect to CI/CD processes. In the last section, we did a hands-on exercise to create a CI job using the GitHub Actions tool. In the next chapter, we will be learning about the common issues and pitfalls when working with test automation.
Questions
- What is CI/CD and why is it necessary?
- How is a CI process triggered?
- What does a CI server do?
- What are the aspects involved in CD?
- How often should E2E tests be run in the CI pipeline?
- What is GitHub Actions and what is it used for?