
8
Test Doubles – Stubs and Mocks
In this chapter, we’re going to solve a common testing challenge. How do you test an object that depends on another object? What do we do if that collaborator is difficult to set up with test data? Several techniques are available to help us with this and they build on the SOLID principles we learned previously. We can use the idea of dependency injection to enable us to replace collaborating objects with ones specially written to help us write our test.
These new objects are called test doubles, and we will learn about two important kinds of test double in this chapter. We will learn when to apply each kind of test double and then learn two ways of creating them in Java – both by writing the code ourselves and by using the popular library Mockito. By the end of the chapter, we will have techniques that allow us to write tests for objects where it is difficult or impossible to test them with the real collaborating objects in place. This allows us to use TDD with complex systems.
In this chapter, we’re going to cover the following main topics:
- The problems of testing collaborators
- The purpose of test doubles
- Using stubs for pre-canned results
- Using mocks to verify interactions
- Understanding when test doubles are appropriate
- Working with Mockito – a popular mocking library
- Driving error handling code using stubs
- Testing an error condition in Wordz
Technical requirements
The code for this chapter can be found at https://github.com/PacktPublishing/Test-Driven-Development-with-Java/tree/main/chapter08.
The problems collaborators present for testing
In this section, we will understand the challenges that arise as we grow our software into a larger code base. We will review what is meant by a collaborating object, then we will take a look at two examples of collaborations that are challenging to test.
As we grow our software system, we will soon outgrow what can go in a single class (or function, for that matter). We will split our code into multiple parts. If we pick a single object as our subject under test, any other object that it depends on is a collaborator. Our TDD tests must account for the presence of these collaborators. Sometimes, this is straightforward, as we’ve seen in earlier chapters.
Unfortunately, things aren’t always that simple. Some collaborations make tests difficult – or impossible – to write. These kinds of collaborators introduce either unrepeatable behaviors that we must contend with or present errors that are difficult to trigger.
Let’s review these challenges with some short examples. We’ll start with a common problem: a collaborator that exhibits unrepeatable behavior.
The challenges of testing unrepeatable behavior
We’ve learned that the basic steps of a TDD test are Arrange, Act, and Assert. We ask the object to act and then assert that an expected outcome happens. But what happens when that outcome is unpredictable?
To illustrate, let’s review a class that rolls a die and presents a text string to say what we rolled:
package examples;
import java.util.random.RandomGenerator;
public class DiceRoll {
    private final int NUMBER_OF_SIDES = 6;
    private final RandomGenerator rnd =
                       RandomGenerator.getDefault();
    public String asText() {
        int rolled = rnd.nextInt(NUMBER_OF_SIDES) + 1;
        return String.format("You rolled a %d", rolled);
    }
}
This is simple enough code, with only a handful of executable lines in it. Sadly, simple to write is not always simple to test. How would we write a test for this? Specifically – how would we write the assert? In previous tests, we’ve always known exactly what to expect in the assertion. Here, the assertion will be some fixed text plus a random number. We don’t know in advance what that random number will be.
The challenges of testing error handling
Testing code that handles error conditions is another challenge. The difficulty here lies not in asserting that the error was handled, but rather the challenge is how to trigger that error to happen inside the collaborating object.
To illustrate, let’s imagine a code to warn us when the battery in our portable device is getting low:
public class BatteryMonitor {
    public void warnWhenBatteryPowerLow() {
        if (DeviceApi.getBatteryPercentage() < 10) {
            System.out.println("Warning - Battery low");
        }
    }
}
The preceding code in BatteryMonitor features a DeviceApi class, which is a library class that lets us read how much battery we have left on our phone. It provides a static method to do this, called getBatteryPercentage(). This will return an integer in the range 0 to 100 percent. The code that we want to write a TDD test for calls getBatteryPercentage() and will display a warning message if it is less than 10 percent. But there’s a problem writing this test: how can we force the getBatteryPercentage() method to return a number less than 10 as part of our Arrange step? Would we discharge the battery somehow? How would we do this?
BatteryMonitor provides an example of code that collaborates with another object, where it is impossible to force a known response from that collaborator. We have no way to change the value that getBatteryPercentage() will return. We would literally have to wait until the battery had discharged before this test could pass. That’s not what TDD is about.
Understanding why these collaborations are challenging
When doing TDD, we want fast and repeatable tests. Any scenario that involves unpredictable behavior or requires us to control a situation that we have no control over clearly causes problems for TDD.
The best way to write tests in these cases is by eliminating the cause of the difficulty. Fortunately, a simple solution exists. We can apply the Dependency Injection Principle we learned about in the previous chapter, along with one new idea – the test double. We will review test doubles in the next section.
The purpose of test doubles
In this section, we’re going to learn techniques that allow us to test these challenging collaborations. We will introduce the idea of test doubles. We will learn how to apply the SOLID principles to design code flexible enough to use these test doubles.
The challenges of the previous section are solved by using test doubles. A test double replaces one of the collaborating objects in our test. By design, this test double avoids the difficulties of the replaced object. Think of them as the stunt doubles in movies, replacing the real actors to help safely get an action shot.
A software test double is an object we have written specifically to be easy to use in our unit test. In the test, we inject our test double into the SUT in the Arrange step. In production code, we inject in the production object that our test double had replaced.
Let’s reconsider our DiceRoll example earlier. How would we refactor that code to make it easier to test?
- Create an interface that abstracts the source of random numbers:
interface RandomNumbers {int nextInt(int upperBoundExclusive);
}
- Apply the Dependency Inversion Principle to class DiceRoll to make use of this abstraction:
package examples;
import java.util.random.RandomGenerator;
public class DiceRoll {private final int NUMBER_OF_SIDES = 6;
private final RandomNumbers rnd ;
public DiceRoll( RandomNumbers r ) {this.rnd = r;
}
public String asText() {int rolled = rnd.nextInt(NUMBER_OF_SIDES) + 1;
return String.format("You rolled a %d",rolled);
}
}
We have inverted the dependency on the random number generator by replacing it with the RandomNumbers interface. We added a constructor that allows a suitable RandomNumbers implementation to be injected. We assign that to the rnd field. The asText() method now calls the nextInt() method on whatever object we passed to the constructor.
- Write a test, using a test double to replace the RandomNumbers source:
package examples;
import org.junit.jupiter.api.Test;
import static org.assertj.core.api.Assertions.assertThat;
class DiceRollTest {@Test
void producesMessage() {var stub = new StubRandomNumbers();
var roll = new DiceRoll(stub);
var actual = roll.asText();
assertThat(actual).isEqualTo("You rolled a5");
}
}
We see the usual Arrange, Act, and Assert sections in this test. The new idea here is class StubRandomNumbers. Let’s look at the stub code:
package examples;
public class StubRandomNumbers implements RandomNumbers {
    @Override
    public int nextInt(int upperBoundExclusive) {
        return 4;  // @see https://xkcd.com/221
    }
}
There are a few things to notice about this stub. Firstly, it implements our RandomNumbers interface, making it an LSP-compliant substitute for that interface. This allows us to inject it into the constructor of DiceRoll, our SUT. The second most important aspect is that every call to nextInt() will return the same number.
By replacing the real RandomNumbers source with a stub that delivers a known value, we have made our test assertion easy to write. The stub eliminates the problem of unrepeatable values from the random generator.
We can now see how the DiceRollTest works. We supply a test double to our SUT. The test double always returns the same value. As a result, we can assert against a known outcome.
Making the production version of the code
To make class DiceRoll work properly in production, we would need to inject a genuine source of random numbers. A suitable class would be the following:
public class RandomlyGeneratedNumbers implements RandomNumbers {
    private final RandomGenerator rnd =
                       RandomGenerator.getDefault();
    @Override
    public int nextInt(int upperBoundExclusive) {
        return rnd.nextInt(upperBoundExclusive);
    }
}
There isn’t much work to do here – the preceding code simply implements the nextInt() method using the RandomGenerator library class built into Java.
We can now use this to create our production version of the code. We already changed our DiceRoll class to allow us to inject in any suitable implementation of the RandomNumbers interface. For our test code, we injected in a test double – an instance of the StubRandomNumbers class. For our production code, we will instead inject in an instance of the RandomlyGeneratedNumbers class. The production code will use that object to create real random numbers – and there will be no code changes inside the DiceRoll class. We have used the Dependency Inversion Principle to make class DiceRoll configurable by dependency injection. This means that class DiceRoll now follows the Open/Closed Principle – it is open to new kinds of random number generation behavior but closed to code changes inside the class itself.
Dependency inversion, dependency injection, and inversion of control
The preceding example shows these three ideas in action. Dependency inversion is the design technique where we create an abstraction in our code. Dependency injection is the runtime technique where we supply an implementation of that abstraction to code that depends on it. Together, these ideas are often termed Inversion of Control (IoC). Frameworks such as Spring are sometimes called IoC containers because they provide tools to help you manage creating and injecting dependencies in an application.
The following code is an example of how we would use DiceRoll and RandomlyGeneratedNumbers in production:
public class DiceRollApp {
    public static void main(String[] args) {
        new DiceRollApp().run();
    }
    private void run() {
        var rnd = new RandomlyGeneratedNumbers();
        var roll = new DiceRoll(rnd);
        System.out.println(roll.asText());
    }
}
You can see in the previous code that we inject an instance of the production-version RandomlyGeneratedNumbers class into the DiceRoll class. This process of creating and injecting objects is often termed object wiring. Frameworks such as Spring (https://spring.io/), Google Guice (https://github.com/google/guice), and the built-in Java CDI (https://docs.oracle.com/javaee/6/tutorial/doc/giwhl.html) provide ways to minimize the boilerplate of creating dependencies and wiring them up, using annotations.
Using DIP to swap a production object for a test double is a very powerful technique. This test double is an example of a kind of double known as a stub. We’ll cover what a stub is along with when to use one in the next section.
Using stubs for pre-canned results
The previous section explained that test doubles were a kind of object that could stand in for a production object so that we could write a test more easily. In this section, we will take a closer look at that test double and generalize it.
In the preceding DiceRoll example, the test was simpler to write because we replaced the random number generation with a known, fixed value. Our genuine random number generator made it difficult to write an assertion, as we were never sure what the expected random number should be. Our test double was an object that instead supplied a well-known value. We can then work out the expected value for our assertion, making our test easy to write.
A test double that supplies values like this is called a stub. Stubs always replace an object that we cannot control with a test-only version that we can control. They always produce known data values for our code under test to consume. Graphically, a stub looks like this:
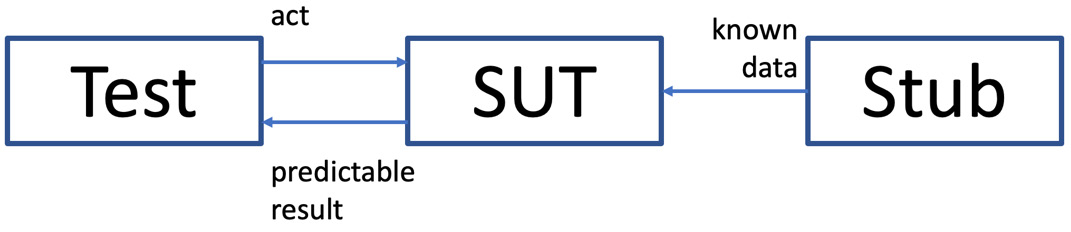
Figure 8.1 – Replacing a collaborator with a stub
In the diagram, our test class is responsible for wiring up our SUT to an appropriate stub object in the Arrange step. When the Act step asks our SUT to execute the code we want to test, that code will pull the known data values from the stub. The Assert step can be written based on the expected behavior that these known data values will cause.
It is important to note why this works. One objection to this arrangement is that we are not testing the real system. Our SUT is wired up to some object that will never be part of our production system. That is true. But this works because our test is only testing the logic within the SUT. This test is not testing the behavior of the dependencies themselves. Indeed, it must not attempt to do that. Testing the test double is a classic anti-pattern for unit tests.
Our SUT has used the Dependency Inversion Principle to fully isolate itself from the object the stub is standing in for. It makes no difference to the SUT how it gets its data from its collaborator. That’s why this testing approach is valid.
When to use stub objects
Stubs are useful whenever our SUT uses a pull model of collaborating with a dependency. Some examples of when using stubs makes sense are as follows:
- Stubbing a repository interface/database: Using a stub instead of calling to a real database for data access code
- Stubbing reference data sources: Replacing properties files or web services containing reference data with stub data
- Providing application objects to code that converts to HTML or JSON formats: When testing code that converts to HTML or JSON, supply input data with a stub
- Stubbing the system clock to test time-dependent behavior: To get repeatable behavior out of a time call, stub the call with known times
- Stubbing random number generators to create predictability: Replace a call to a random number generator with a call to a stub
- Stubbing authentication systems to always allow a test user to log in: Replace calls to authentication systems with simple “login succeeded” stubs
- Stubbing responses from a third-party web service such as a payment provider: Replace real calls to third-party services with calls to a stub
- Stubbing a call to an operating system command: Replace a call to the OS to, for example, list a directory with pre-canned stub data
In this section, we have seen how using stubs allows us to control data that gets supplied to an SUT. It supports a pull model of fetching objects from elsewhere. But that’s not the only mechanism by which objects can collaborate. Some objects use a push model. In this case, when we call a method on our SUT, we expect it to call another method on some other object. Our test must confirm that this method call actually took place. This is something that stubs cannot help with and needs a different approach. We will cover this approach in the next section.
Using mocks to verify interactions
In this section, we’ll take a look at another important kind of test double: the mock object. Mock objects solve a slightly different problem than stub objects do, as we shall see in this section.
Mock objects are a kind of test double that record interactions. Unlike stubs, which supply well-known objects to the SUT, a mock will simply record interactions that the SUT has with the mock. It is the perfect tool to answer the question, “Did the SUT call the method correctly?” This solves the problem of push model interactions between the SUT and its collaborator. The SUT commands the collaborator to do something rather than requesting something from it. A mock provides a way to verify that it issued that command, along with any necessary parameters.
The following UML object diagram shows the general arrangement:

Figure 8.2 – Replace collaborator with mock
We see our test code wiring up a mock object to the SUT. The Act step will make the SUT execute code that we expect to interact with its collaborator. We have swapped out that collaborator for a mock, which will record the fact that a certain method was called on it.
Let’s look at a concrete example to make this easier to understand. Suppose our SUT is expected to send an email to a user. Once again, we will use the Dependency Inversion Principle to create an abstraction of our mail server as an interface:
public interface MailServer {
    void sendEmail(String recipient, String subject,
                   String text);
}
The preceding code shows a simplified interface only suitable for sending a short text email. It is good enough for our purposes. To test the SUT that called the sendEmail() method on this interface, we would write a MockMailServer class:
public class MockMailServer implements MailServer {
    boolean wasCalled;
    String actualRecipient;
    String actualSubject;
    String actualText;
    @Override
    public void sendEmail(String recipient, String subject,
                          String text) {
        wasCalled = true;
        actualRecipient = recipient;
        actualSubject = subject;
        actualText = text;
    }
}
The preceding MockMailServer class implements the MailServer interface. It has a single responsibility – to record the fact that the sendEmail() method was called and to capture the actual parameter values sent to that method. It exposes these as simple fields with package-public visibility. Our test code can use these fields to form the assertion. Our test simply has to wire up this mock object to the SUT, cause the SUT to execute code that we expect to call the sendEmail() method, and then check that it did do that:
@Test
public void sendsWelcomeEmail() {
    var mailServer = new MockMailServer();
    var notifications = new UserNotifications(mailServer);
    notifications.welcomeNewUser();
    assertThat(mailServer.wasCalled).isTrue();
    assertThat(mailServer.actualRecipient)
         .isEqualTo("[email protected]");
    assertThat(mailServer.actualSubject)
         .isEqualTo("Welcome!");
    assertThat(mailServer.actualText)
         .contains("Welcome to your account");
}
We can see that this test wires up the mock to our SUT, then causes the SUT to execute the welcomeNewUser() method. We expect this method to call the sendEmail() method on the MailServer object. Then, we need to write assertions to confirm that call was made with the correct parameter values passed. We’re using the idea of four assert statements logically here and testing one idea – effectively a single assert.
The power of mock objects is that we can record interactions with objects that are difficult to control. In the case of a mail server, such as the one seen in the preceding code block, we would not want to be sending actual emails to anybody. We also would not want to write a test that waited around monitoring the mailbox of a test user. Not only is this slow and can be unreliable, but it is also not what we intend to test. The SUT only has the responsibility of making the call to sendEmail() – what happens after that is out of the scope of the SUT. It is, therefore, out of scope for this test.
As in the previous examples with other test doubles, the fact that we have used the Dependency Inversion Principle means our production code is easy enough to create. We simply need to create an implementation of MailServer that uses the SMTP protocol to talk to a real mail server. We would most likely search for a library class that does that for us already, then we would need to make a very simple adapter object that binds that library code to our interface.
This section has covered two common kinds of test double, stubs, and mocks. But test doubles are not always appropriate to use. In the next section, we’ll discuss some issues to be aware of when using test doubles.
Understanding when test doubles are appropriate
Mock objects are a useful kind of test double, as we have seen. But they are not always the right approach. There are some situations where we should actively avoid using mocks. These situations include over-using mocks, using mocks for code you don’t own, and mocking value objects. We’ll look at these situations next. Then, we’ll recap with general advice for where mocks are typically useful. Let’s start by considering the problems caused when we overuse mock objects.
Avoiding the overuse of mock objects
At a first glance, using mock objects seems to solve a number of problems for us. Yet if used without care, we can end up with very poor-quality tests. To understand why, let’s go back to our basic definition of a TDD test. It is a test that verifies behaviors and is independent of implementations. If we use a mock object to stand in for a genuine abstraction, then we are complying with that.
The potential problem happens because it is all too easy to create a mock object for an implementation detail, not an abstraction. If we do this, we end up locking our code into a specific implementation and structure. Once a test is coupled to a specific implementation detail, then changing that implementation requires a change to the test. If the new implementation has the same outcomes as the old one, the test really should still pass. Tests that depend on specific implementation details or code structures actively impede refactoring and adding new features.
Don’t mock code you don’t own
Another area where mocks should not be used is as a stand-in for a concrete class written outside of your team. Suppose we are using a class called PdfGenerator from a library to create a PDF document. Our code would call methods on the PdfGenerator class. We might think it would be easy to test our code if we use a mock object to stand in for the PdfGenerator class.
This approach has a problem that will only arise in the future. The class in the external library will quite likely change. Let’s say that the PdfGenerator class removes one of the methods our code is calling. We will be forced to update the library version at some point as part of our security policy if nothing else. When we pull in the new version, our code will no longer compile against this changed class – but our tests will still pass because the mock object still has the old method in it. This is a subtle trap that we have laid for future maintainers of the code. It is best avoided. A reasonable approach is to wrap the third-party library, and ideally place it behind an interface to invert the dependency on it, isolating it fully.
Don’t mock value objects
A value object is an object that has no specific identity, it is defined only by the data it contains. Some examples would include an integer or a string object. We consider two strings to be the same if they contain the same text. They might be two separate string objects in memory, but if they hold the same value, we consider them to be equal.
The clue that something is a value object in Java is the presence of a customized equals() and hashCode() method. By default, Java compares the equality of two objects using their identity – it checks that two object references are referring to the same object instance in memory. We must override the equals() and hashCode() methods to provide the correct behavior for value objects, based on their content.
A value object is a simple thing. It may have some complex behaviors inside its methods but, in principle, value objects should be easy to create. There is no benefit in creating a mock object to stand in for one of these value objects. Instead, create the value object and use it in your test.
You can’t mock without dependency injection
Test doubles can only be used where we can inject them. This is not always possible. If the code we want to test creates a concrete class using the new keyword, then we cannot replace it with a double:
package examples;
public class UserGreeting {
    private final UserProfiles profiles
        = new UserProfilesPostgres();
    public String formatGreeting(UserId id) {
        return String.format("Hello and welcome, %s",
                profiles.fetchNicknameFor(id));
    }
}
We see that the profiles field has been initialized using a concrete class UserProfilesPostgres(). There is no direct way to inject a test double with this design. We could attempt to get around this, using Java Reflection, but it is best to consider this as TDD feedback on a limitation of our design. The solution is to allow the dependency to be injected, as we have seen in previous examples.
This is often a problem with legacy code, which is simply code that has been written before we work on it. If this code has created concrete objects – and the code cannot be changed – then we cannot apply a test double.
Don’t test the mock
Testing the mock is a phrase used to describe a test with too many assumptions built into a test double. Suppose we write a stub that stands in for some database access, but that stub contains hundreds of lines of code to emulate detailed specific queries to that database. When we write the test assertions, they will all be based on those detailed queries that we emulated in the stub.
That approach will prove that the SUT logic responds to those queries. But our stub now assumes a great deal about how the real data access code will work. The stub code and the real data access code can quickly get out of step. This results in an invalid unit test that passes but with stubbed responses that can no longer happen in reality.
When to use mock objects
Mocks are useful whenever our SUT is using a push model and requesting an action from some other component, where there is no obvious response such as the following:
- Requesting an action from a remote service, such as sending an email to a mail server
- Inserting or deleting data from a database
- Sending a command over a TCP socket or serial interface
- Invalidating a cache
- Writing logging information either to a log file or distributing logging endpoint
We’ve learned some techniques in this section that allow us to verify that an action was requested. We have seen how we can use the Dependency Inversion Principle once again to allow us to inject a test double which we can query. We’ve also seen an example of hand-written code to do this. But must we always write test doubles by hand? In the next section, we will cover a very useful library that does most of the work for us.
Working with Mockito – a popular mocking library
The previous sections have shown examples of using stubs and mocks to test code. We have been writing these test doubles by hand. It’s obviously quite repetitive and time-consuming to do this. It begs the question of if this repetitive boilerplate code can be automated away. Thankfully for us, it can. This section will review the help available in the popular Mockito library.
Mockito is a free-of-charge open source library under the MIT license. This license means we can use this for commercial development work, subject to agreement by those we work for. Mockito provides a large range of features aimed at creating test doubles with very little code. The Mockito website can be found at https://site.mockito.org/.
Getting started with Mockito
Getting started with Mockito is straightforward. We pull in the Mockito library and an extension library in our Gradle file. The extension library allows Mockito to integrate closely with JUnit5.
The excerpt of build.gradle looks like this:
dependencies {
    testImplementation 'org.junit.jupiter:junit-jupiter-api:5.8.2'
    testRuntimeOnly 'org.junit.jupiter:junit-jupiter-engine:5.8.2'
    testImplementation 'org.assertj:assertj-core:3.22.0'
    testImplementation 'org.mockito:mockito-core:4.8.0'
    testImplementation 'org.mockito:mockito-junit-jupiter:4.8.0'
}
Writing a stub with Mockito
Let’s see how Mockito helps us create a stub object. We’ll use TDD to create a UserGreeting class that delivers a personalized greeting, after fetching our nickname from interface UserProfiles.
Let’s write this using small steps, to see how TDD and Mockito work together:
- Write the basic JUnit5 test class and integrate it with Mockito:
package examples
import org.junit.jupiter.api.extension.ExtendWith;
import org.mockito.junit.jupiter.MockitoExtension;
@ExtendWith(MockitoExtension.class)
public class UserGreetingTest {}
@ExtendWith(MockitoExtension.class) marks this test as using Mockito. When we run this JUnit5 test, the annotation ensures that the Mockito library code is run.
- Add a test confirming the expected behavior. We will capture this in an assertion:
package examples;
import org.junit.jupiter.api.Test;
import org.junit.jupiter.api.extension.ExtendWith;
import org.mockito.junit.jupiter.MockitoExtension;
import static org.assertj.core.api.Assertions.assertThat;
@ExtendWith(MockitoExtension.class)
public class UserGreetingTest {@Test
void formatsGreetingWithName() {String actual = «»;
assertThat(actual)
.isEqualTo("Hello and welcome, Alan");}
}
This is standard usage of the JUnit and AssertJ frameworks as we have seen before. If we run the test now, it will fail.
- Drive out our SUT – the class we want to write – with an Act step:
package examples;
import org.junit.jupiter.api.Test;
import org.junit.jupiter.api.extension.ExtendWith;
import org.mockito.junit.jupiter.MockitoExtension;
import static org.assertj.core.api.Assertions.assertThat;
@ExtendWith(MockitoExtension.class)
public class UserGreetingTest {private static final UserId USER_ID
= new UserId("1234");@Test
void formatsGreetingWithName() {var greeting = new UserGreeting();
String actual =
greeting.formatGreeting(USER_ID);
assertThat(actual)
.isEqualTo("Hello and welcome, Alan");}
}
This step drives out the two new production code classes, as shown in the following steps.
- Add a class UserGreeting skeleton:
package examples;
public class UserGreeting {public String formatGreeting(UserId id) {throw new UnsupportedOperationException();
}
}
As usual, we add no code beyond what is required to make our test compile. The design decision captured here shows that our behavior is provided by a formatGreeting()method, which identifies a user by a UserId class.
- Add a class UserId skeleton:
package examples;
public class UserId {public UserId(String id) {}
}
Again, we get an empty shell just to get the test to compile. Then, we run the test and it still fails:
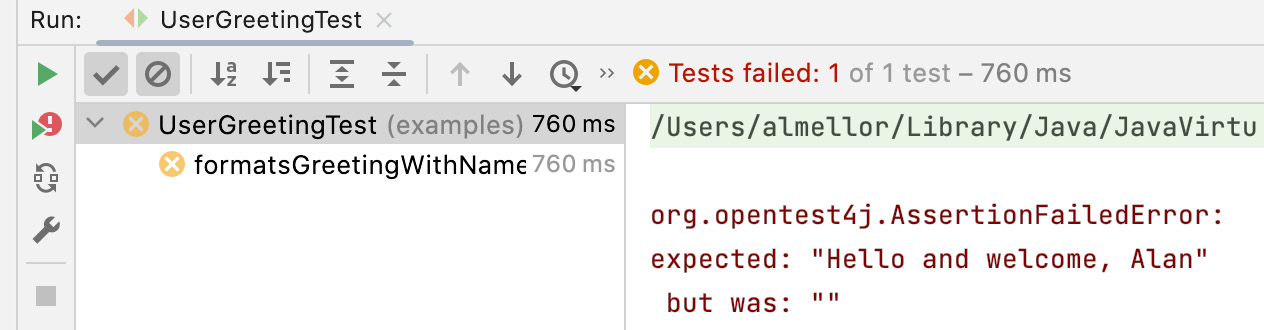
Figure 8.3 – Test failure
- Another design decision to capture is that the UserGreeting class will depend on a UserProfiles interface. We need to create a field, create the interface skeleton, and inject the field in a new constructor for the SUT:
package examples;
import org.junit.jupiter.api.Test;
import org.junit.jupiter.api.extension.ExtendWith;
import org.mockito.junit.jupiter.MockitoExtension;
import static org.assertj.core.api.Assertions.assertThat;
@ExtendWith(MockitoExtension.class)
public class UserGreetingTest {private static final UserId USER_ID
= new UserId("1234");private UserProfiles profiles;
@Test
void formatsGreetingWithName() {var greeting
= new UserGreeting(profiles);
String actual =
greeting.formatGreeting(USER_ID);
assertThat(actual)
.isEqualTo("Hello and welcome, Alan");}
}
We continue by adding the bare minimum code to get the test to compile. If we run the test, it will still fail. But we’ve progressed further so the failure is now an UnsupportedOperationException error. This confirms that formatGreeting() has been called:

Figure 8.4 – Failure confirms method call
- Add behavior to the formatGreeting() method:
package examples;
public class UserGreeting {private final UserProfiles profiles;
public UserGreeting(UserProfiles profiles) {this.profiles = profiles;
}
public String formatGreeting(UserId id) {return String.format("Hello and Welcome, %s",profiles.fetchNicknameFor(id));
}
}
- Add fetchNicknameFor() to the UserProfiles interface:
package examples;
public interface UserProfiles {String fetchNicknameFor(UserId id);
}
- Run the test. It will fail with a null exception:

Figure 8.5 – Null exception failure
The test fails because we passed the profiles field as a dependency into our SUT, but that field has never been initialized. This is where Mockito comes into play (finally).
- Add the @Mock annotation to the profiles field:
package examples;
import org.junit.jupiter.api.Test;
import org.junit.jupiter.api.extension.ExtendWith;
import org.mockito.Mock;
import org.mockito.junit.jupiter.MockitoExtension;
import static org.assertj.core.api.Assertions.assertThat;
@ExtendWith(MockitoExtension.class)
public class UserGreetingTest {private static final UserId USER_ID = new UserId("1234");@Mock
private UserProfiles profiles;
@Test
void formatsGreetingWithName() {var greeting = new UserGreeting(profiles);
String actual =
greeting.formatGreeting(USER_ID);
assertThat(actual)
.isEqualTo("Hello and welcome, Alan");}
}
Running the test now produces a different failure, as we have not yet configured the Mockito mock:

Figure 8.6 – Added mock, not configured
- Configure @Mock to return the correct stub data for our test:
package examples;
import org.junit.jupiter.api.Test;
import org.junit.jupiter.api.extension.ExtendWith;
import org.mockito.Mock;
import org.mockito.Mockito;
import org.mockito.junit.jupiter.MockitoExtension;
import static org.assertj.core.api.Assertions.assertThat;
import static org.mockito.Mockito.*;
@ExtendWith(MockitoExtension.class)
public class UserGreetingTest {private static final UserId USER_ID = new UserId("1234");@Mock
private UserProfiles profiles;
@Test
void formatsGreetingWithName() {when(profiles.fetchNicknameFor(USER_ID))
.thenReturn("Alan");var greeting = new UserGreeting(profiles);
String actual =
greeting.formatGreeting(USER_ID);
assertThat(actual)
.isEqualTo("Hello and welcome, Alan");}
}
- If you run the test again, it will fail due to a mistake in the greeting text. Fix this and then re-run the test, and it will pass:

Figure 8.7 – Test pass
We’ve just created class UserGreeting, which accesses some stored nicknames for the user, via interface UserProfiles. That interface used DIP to isolate UserGreeting from any implementation details of that store. We used a stub implementation to write the test. We’ve followed TDD and leveraged Mockito to write that stub for us.
You’ll also notice that the test failed in the final step. I expected that step to pass. It didn’t because I had typed the greeting message incorrectly. Once again, TDD came to my rescue.
Writing a mock with Mockito
Mockito can create mock objects just as easily as stubs. We can still use the @Mock annotation on a field we wish to become a mock – perhaps making sense of the annotation, at last. We use the Mockito verify() method to check that our SUT called an expected method on a collaborator.
Let’s look at how a mock is used. We’ll write a test for some SUT code that we expect to send an email via MailServer:
@ExtendWith(MockitoExtension.class)
class WelcomeEmailTest {
    @Mock
    private MailServer mailServer;
    @Test
    public void sendsWelcomeEmail() {
        var notifications
                 = new UserNotifications( mailServer );
        notifications.welcomeNewUser("[email protected]");
        verify(mailServer).sendEmail("[email protected]",
                "Welcome!",
                "Welcome to your account");
    }
}
In this test, we see the @ExtendWith(MockitoExtension.class) annotation to initialize Mockito, and the familiar Arrange, Act and Assert format of our test method. The new idea here is in the assertion. We use the verify() method from the Mockito library to check that the sendEmail() method was called correctly by our SUT. The check also verifies that it was called with the correct parameter values.
Mockito uses code generation to achieve all this. It wraps the interface we labeled with the @Mock annotation and intercepts each and every call. It stores parameter values for each call. When we come to using the verify() method to confirm that the method was called correctly, Mockito has all the data it needs to do this.
Beware Mockito’s when() and verify() syntax!
Mockito has subtly different syntax for when() and verify():
* when(object.method()).thenReturn(expected value);
* verify(object).method();
Blurring the distinction between stubs and mocks
One thing to note about Mockito terminology is that it blurs the distinction between a stub and a mock object. In Mockito, we create test doubles that are labeled as mock objects. But in our test, we can use these doubles as either a stub, a mock, or even a mixture of both.
Setting up a test double to be both a stub and a mock is a test code smell. It’s not wrong, but it’s worth a pause for thought. We should consider if the collaborator that we are both mocking and stubbing has mixed up some responsibilities. It may be beneficial to split that object up.
Argument matchers – customizing behavior of test doubles
So far, we have configured Mockito test doubles to respond to very specific inputs to the methods they replace. The previous MailServer example checked for three specific parameter values being passed to the sendEmail() method call. But we sometimes want more flexibility in our test doubles.
Mockito provides library methods called argument matchers. These are static methods that are used inside when() and verify() statements. Argument matchers are used to instruct Mockito to respond to a range of parameter values – including nulls and unknown values – that might get passed into a method under test.
The following test uses an argument matcher that accepts any value of UserId:
package examples2;
import examples.UserGreeting;
import examples.UserId;
import examples.UserProfiles;
import org.junit.jupiter.api.Test;
import org.junit.jupiter.api.extension.ExtendWith;
import org.mockito.Mock;
import org.mockito.junit.jupiter.MockitoExtension;
import static org.assertj.core.api.Assertions.assertThat;
import static org.mockito.ArgumentMatchers.any;
import static org.mockito.Mockito.when;
@ExtendWith(MockitoExtension.class)
public class UserGreetingTest {
    @Mock
    private UserProfiles profiles;
    @Test
    void formatsGreetingWithName() {
      when(profiles.fetchNicknameFor(any()))
          .thenReturn("Alan");
        var greeting = new UserGreeting(profiles);
        String actual =
          greeting.formatGreeting(new UserId(""));
        assertThat(actual)
          .isEqualTo("Hello and welcome, Alan");
    }
}
We’ve added an any() argument matcher to the stubbing of the fetchNicknameFor() method. This instructs Mockito to return the expected value Alan no matter what parameter value is passed into fetchNicknameFor(). This is useful when writing tests to guide our readers and help them to understand what is important and what is not for a particular test.
Mockito offers a number of argument matchers, described in the Mockito official documentation. These argument matchers are especially useful when creating a stub to simulate an error condition. This is the subject of the next section.
Driving error handling code with tests
In this section, we’re going to look into a great use of stub objects, which is their role in testing error conditions.
As we create our code, we need to ensure that it handles error conditions well. Some error conditions are easy to test. An example might be a user input validator. To test that it handles the error caused by invalid data, we simply write a test that feeds it invalid data and then write an assertion to check it successfully reported the data was invalid. But what about the code that uses it?
If our SUT is code that responds to an error condition raised by one of its collaborators, we need to test that error response. How we test it depends on the mechanism we chose to report that error. We may be using a simple status code, in which case returning that error code from a stub will work very well.
We may also have chosen to use Java exceptions to report this error. Exceptions are controversial. If misused, they can lead to very unclear control flow in your code. We need to know how to test them, however, as they appear in several Java libraries and in-house coding styles. Fortunately, there’s nothing difficult about writing the test for exception-handling code.
We start with creating a stub, using any of the approaches covered in this chapter. We then need to arrange for the stub to throw the appropriate exception when we call a method. Mockito has a nice feature to do this, so let’s see an example Mockito test that uses exceptions:
    @Test
    public void rejectsInvalidEmailRecipient() {
        doThrow(new IllegalArgumentException())
            .when(mailServer).sendEmail(any(),any(),any());
        var notifications
            = new UserNotifications( mailServer );
        assertThatExceptionOfType(NotificationFailureException.class)
                .isThrownBy(()->notifications
                    .welcomeNewUser("not-an-email-address"));
    }
At the start of this test, we use Mockito doThrow() to configure our mock object. This configures the Mockito mock object mailServer to throw IllegalArgumentException whenever we call sendEmail(), no matter what parameter values we send. This reflects a design decision to make sendEmail() throw that exception as a mechanism to report that the email address was not valid. When our SUT calls mailServer.sendEmail(), that method will throw IllegalArgumentExeption. We can exercise the code that handles this.
For this example, we decided to make the SUT wrap and rethrow IllegalArgumentException. We choose to create a new exception that relates to the responsibility of user notifications. We will call it NotificationFailureException. The assertion step of the test then uses the AssertJ library feature assertThatExceptionOfType(). This performs the Act and Assert steps together. We call our SUT welcomeNewUser() method and assert that it throws our NotificationFailureException error.
We can see how this is enough to trigger the exception-handling response in our SUT code. This means we can write our test and then drive out the required code. The code we write will include a catch handler for InvalidArgumentException. In this case, all the new code has to do is throw a NotificationFailureException error. This is a new class that we will create that extends RuntimeException. We do this to report that something went wrong by sending a notification. As part of normal system layering considerations, we want to replace the original exception with a more general one, which is better suited to this layer of code.
This section has examined features of Mockito and AssertJ libraries that help us use TDD to drive out exception-handling behavior. In the next section, let’s apply this to an error in our Wordz application.
Testing an error condition in Wordz
In this section, we will apply what we’ve learned by writing a test for a class that will choose a random word for the player to guess, from a stored set of words. We will create an interface called WordRepository to access stored words. We will do this through a fetchWordByNumber(wordNumber) method, where wordNumber identifies a word. The design decision here is that every word is stored with a sequential number starting from 1 to help us pick one at random.
We will be writing a WordSelection class, which is responsible for picking a random number and using that to fetch a word from storage that is tagged with that number. We will be using our RandomNumbers interface from earlier. For this example, our test will cover the case where we attempt to fetch a word from the WordRepository interface, but for some reason, it isn’t there.
We can write the test as follows:
@ExtendWith(MockitoExtension.class)
public class WordSelectionTest {
    @Mock
    private WordRepository repository;
    @Mock
    private RandomNumbers random;
    @Test
    public void reportsWordNotFound() {
        doThrow(new WordRepositoryException())
                .when(repository)
                  .fetchWordByNumber(anyInt());
        var selection = new WordSelection(repository,
                                          random);
        assertThatExceptionOfType(WordSelectionException.class)
                .isThrownBy(
                        ()->selection.getRandomWord());
    }
}
The test captures a few more design decisions relating to how we intend WordRepository and WordSelection to work. Our fetchWordByNumber(wordNumber) repository method will throw WordRepositoryException if there are any problems retrieving the word. Our intention is to make WordSelection throw its own custom exception to report that it cannot complete the getRandomWord() request.
To set this situation up in the test, we first arrange for the repository to throw. This is done using the Mockito doThrow() feature. Whenever the fetchWordByNumber() method is called, whatever parameter we pass into it Mockito will throw the exception we asked it to throw, which is WordRepositoryException. This allows us to drive out the code that handles this error condition.
Our Arrange step is completed by creating the WordSelection SUT class. We pass in two collaborators to the constructor: the WordRepository instance and a RandomNumbers instance. We have asked Mockito to create stubs for both interfaces by adding the @Mock annotation to test double the repository and random fields.
With the SUT now properly constructed, we are ready to write the Act and Assert steps of the test. We are testing that an exception is thrown, so we need to use the assertThatExceptionOfType() AssertJ facility to do this. We can pass in the class of the exception that we are expecting to be thrown, which is WordSelectionException. We chain the isThrownBy() method to perform the Act step and make our SUT code run. This is provided as a Java lambda function as a parameter to the isThrownBy() method. This will call the getRandomWord() method, which we intend to fail and throw an exception. The assertion will confirm that this has happened and that the expected kind of exception class has been thrown. We will run the test, see it fail, and then add the necessary logic to make the test pass.
The test code shows us that we can use test doubles and verification of error conditions with test-first TDD. It also shows that tests can become easily coupled to a specific implementation of a solution. There are a lot of design decisions in this test about which exceptions happen and where they are used. These decisions even include the fact that exceptions are being used at all to report errors. All that said, this is still a reasonable way to split responsibilities and define contracts between components. It is all captured in the test.
Summary
In this chapter, we’ve looked at how to solve the problem of testing problematic collaborators. We have learned how to use stand-in objects for collaborators called test doubles. We’ve learned that this gives us simple control over what those collaborators do inside our test code.
Two kinds of test double are especially useful to us: the stub and the mock. Stubs return data. Mocks verify that methods were called. We’ve learned how to use the Mockito library to create stubs and mocks for us.
We’ve used AssertJ to verify the SUT behaved correctly under the various conditions of our test doubles. We’ve learned how to test error conditions that throw exceptions.
These techniques have expanded our toolkit for writing tests.
In the next chapter, we are going to cover a very useful system design technique that allows us to get most of our code under FIRST unit test, and at the same time avoid the problems of testing collaborations with external systems that we cannot control.
Questions and answers
- Are the terms stub and mock used interchangeably?
Yes, even though they have different meanings. In normal conversation, we tend to trade precision for fluency, and that’s okay. It’s important to understand the different uses that each kind of test double has. When speaking, it’s usually better to not be pedantic whenever a group of people knows what is meant. So long as we stay aware that a test double is the proper general term and that the specific types of doubles have different roles, all will be well.
- What is the problem known as “testing the mock”?
This happens when the SUT has no real logic in it, yet we try to write a unit test anyway. We wire up a test double to the SUT and write the test. What we will find is that the assertions only check that the test double-returned the right data. It’s an indication that we have tested at the wrong level. This kind of error can be driven by setting unwise code coverage targets or forcing an equally unwise test-per-method rule. This test adds no value and should be removed.
- Can test doubles be used anywhere?
No. This only works if you have designed your code using the Dependency Inversion Principle so that a test double can be swapped in place of a production object. Using TDD certainly forces us to think about this kind of design issue early.
Writing tests later is made more difficult if there is insufficient access to inject test doubles where they are needed. Legacy code is particularly difficult in this respect, and I recommend reading the book Working Effectively with Legacy Code by Michael Feathers for techniques to aid in adding tests to code that lacks the necessary test access points. (See the Further reading list.)
Further reading
Mockito library home page
- Working Effectively with Legacy Code, Michael C. Feathers ISBN 978-0131177055
This book explains how you can work with legacy code written without Dependency Inversion access points for test doubles. It shows a range of techniques to safely rework the legacy code so that test doubles can be introduced.