
8
Streamlining with the Cloud
Software development for Cortex-M microcontrollers is steadily moving to the cloud. In this chapter, we will look at several current topics related to software development using the cloud. Historically, embedded software has lagged behind general-purpose software development when it comes to the adoption of new tools and methodologies. One cause is the conservative nature of embedded developers, which is understandable given the long life span of products requiring some stability. Another reason is that embedded software runs on microcontrollers that are not available in the cloud. Unlike general-purpose software, microcontroller software cannot run on general-purpose computers. Even with these limitations, the benefits of cloud development are becoming compelling for embedded Cortex-M projects.
The cloud is a common slang term referring to remote servers available over the internet and located in data centers around the world. With cloud computing, users don’t purchase and manage physical servers. Instead, they rent servers using a variety of business models based on the pay-for-what-you-use concept. There are multiple cloud providers and hundreds of different services available for software developers to use during the creation and testing of software, as well as in the deployment of software products. In this chapter, we will focus on the embedded software developer and the services that contribute to the improved efficiency of development.
AWS was the early pioneer in cloud services, but similar features are available from other cloud providers such as Microsoft, Google, and Oracle. Much of what we will cover can be translated to other cloud providers, but we use AWS most of the time. This chapter will cover how to use virtual machines, the fundamental unit of cloud computing, as remote computers for development. Development containers are also an important technology used for remote and local development. We will cover cloud services that allow developers to code, compile, run, and debug within a browser without installing any software on their computers.
For modern embedded developers, it’s not enough to only learn about embedded programming. It’s also essential to understand cloud concepts, containers, and automated building and testing. In this chapter and in Chapter 9, Implementing Continuous Integration, we will review the ways embedded development projects take advantage of the cloud to automate, simplify, and improve productivity.
For now, in a nutshell, this chapter will cover the following:
- The fundamentals of cloud development
- Coding and containers in the cloud
- A crash course on containers
- Executing software and debugging in the cloud
- Running and debugging
- Getting to know Keil Studio Cloud
- Other cloud development possibilities
The fundamentals of cloud development
Source code creation and management is the fundamental activity of software development. In the past, source code was managed inside a corporate network on a shared server using one of many version control systems. While at the office, developers accessed the source code, and when they traveled or went home, the source code could be accessed using a VPN.
Gradually, the number of version control systems shrank, and developers consolidated on Git, an open source, distributed version control system. Along the way, services such as GitHub started offering a place to store source code and collaborate with other developers.
Today, tens of millions of developers use GitHub to share code and work on software products. In recent developer surveys, more than 90% of all software developers have used GitHub on a project, revealing its ubiquity in software development. In this chapter, we will use GitHub as a starting point for exploring additional ideas in software development. Other platforms, such as GitLab and Bitbucket, are available, which do similar things. Moving your version control system to the cloud is the first step toward cloud development. It’s an easy step that saves developers from having to maintain servers, worry about data backups and power outages, and make sure there is enough storage. GitHub facilitates public and private projects and includes options for sharing projects with other GitHub users when needed.
Storing source code in a service such as GitHub enables additional features that developers can use to take advantage of cloud resources. If you are not familiar with Git or GitHub, there are numerous tutorials, videos, and books to learn how they work. Take some time to learn – it’s worth it.
An editor, such as a text editor or an integrated development environment (IDE), is the second fundamental tool for developers. As source code managers have come and gone, so have editors and IDEs. In the past few years, the developer community has consolidated on Visual Studio Code (VS Code). It has become a popular tool for software development – and for good reason. It supports many languages, runs fast, works on many computers (including Arm computers), and has a strong ecosystem of extensions. VS Code strikes the right mix of being better than a plain editor without having the complexity and specificity of an IDE.
Let’s take the dot product example introduced in Chapter 5, Optimizing Performance, and experiment with some cloud-based development possibilities.
Coding and containers in the cloud
To replicate the example in this section, you will be using the following:
|
Platform |
Raspberry Pi Pico |
|
Software |
Dot product |
|
Environment |
Gitpod |
|
Host OS |
Linux (Ubuntu) |
|
Compiler |
GCC |
|
IDE |
VS Code |
The source code for the dot product example is stored in GitHub and is the same code that we used in Chapter 5, Optimizing Performance. Here’s the link for your reference: https://github.com/PacktPublishing/The-Insiders-Guide-to-Arm-Cortex-M-Development/tree/main/chapter-5/dotprod-pico.
In Chapter 4, Booting to Main, we demonstrated how to clone the GitHub repository on a host machine, install the Pico C/C++ SDK, compile the code, and run it on the Pico. We showed how to do this on a Raspberry Pi 4, but this is possible on other host machines too. This local style of development makes all aspects of software development possible, including coding, compiling, running, and debugging.
Let’s see what else is possible with cloud development.
GitHub makes it easy to look at the code from a browser. Developers often spend time on GitHub just looking at the code, reviewing it, or quickly checking something. This is very convenient, as it can be done from any browser. There is an edit button to make changes to files in GitHub, but it’s a text box, which is not good for programming. It works well for small changes to things such as README files, but not for coding.
GitHub (and other companies) have been introducing features to make coding in the cloud more and more like local software development. This is generally done in a browser. Let’s look at some coding in the browser alternatives.
Using VS Code via github.dev
The first capability to code in the browser is to open VS Code. This can be done from a GitHub repository in two different ways:
- Change the GitHub URL from github.com/some-repo to github.dev/some-repo
- Press the period or full-stop (.) key to jump straight into VS Code
Visit the dot product repository link provided earlier and use one of the preceding methods to open VS Code. It is very smooth. There is no need to clone the repository and nothing is downloaded to your computer. It simply works on any machine with a browser, including a tablet or phone.
Settings, such as the color theme, are saved in your GitHub account and can be used regardless of the computer you use. Some extensions can be installed as well. After a few minutes, you will realize that you can edit code and commit changes, but there is no other storage. Extensions that do things such as formatting, key binding, and implementing themes and views work fine. For example, the vim extension works well. Extensions that need a computer to run something such as compiling code cannot be used. This is confirmed by the fact that there is no terminal available on this github.dev VS Code site!
The next level of cloud development is based on the concept of a development container (dev container). Let’s look at how to build and do development using containers.
Dev containers
Containers have become very popular for deploying web applications, such as websites or web-based services. Applications consist of (and depend on) many types of files. Applications are a mix of binary executables, scripts, libraries, and related programs provided by an operating system. Without containers, it can be difficult to confirm whether a particular computer has the required software an application depends on. Containers make it easy to package software in a reproducible way that includes everything an application needs—and only what the application needs.
This means the entire filesystem that an application requires can be bundled together. It also means all the files the application doesn’t need don’t need to be included because deployment containers are constructed to do one thing – run the application. This keeps containers lightweight and robust at the same time.
Docker is a container build and runtime tool for software developers. There are others, but Docker is the most popular and is the easiest place to start when learning. Docker containers can be thought about in a few ways. One way is that Docker enables building and running an application-specific filesystem. Another way is that Docker is a solution for the "it works on my machine" problem, as containers avoid issues such as missing files and different versions of software that cause applications to fail.
If you are not familiar with containers and Docker, look at any of the numerous tutorials available online. There are free, complete courses on YouTube about Docker to quickly get you up to speed. Here is one example that is long but simple to follow and engaging: https://www.youtube.com/watch?v=3c-iBn73dDE. Whatever your learning style is, chances are a free tutorial exists in that format.
Dev containers use the container concept. Instead of web application deployment, however, these containers are used primarily to create consistent developer environments. When starting a new project, the first step is to get a new computer, install some software, get the project source code, and try to build and run it. This can take quite some time and it may be difficult to get a working machine for a very complex project. Dev containers aim to avoid this by doing the development in a container that includes all the required software. The new developer is immediately able to start working on the project, only requiring the dev container (and ideally some documentation!).
Now that we understand the difference between dev containers and deployment containers, let’s see how they can be used for the Raspberry Pi Pico example.
Dev container services
Multiple services allow dev containers to be used immediately in a browser. These services are amazingly simple but powerful. They use a combination of VS Code and a container in the browser for software development. This addresses the lack of compute we observed with github.dev previously.
There are two ways to use dev containers:
- Start from a ready-to-use container that is provided by the service
- Bring your own container with your favorite (or required) software included
Many projects don’t require custom containers. This is true if the majority of the software is available in a ready-to-use container and the missing items can easily be added using the Linux package manager or by fetching and installing software from the internet. On the other hand, if the required software is more complex to install, difficult to automate, or available behind a login, then making a custom container is the way to go. We will cover both options.
Two popular dev container services are GitHub Codespaces and Gitpod. GitHub Codespaces is part of GitHub whereas Gitpod is another service that provides dev containers in the cloud for GitHub projects. This example will highlight how to use Gitpod.
Initializing Gitpod
There are two easy ways to open a GitHub repository in Gitpod:
- Install the Gitpod extension in your browser and use the button in GitHub that opens the project
- Add the gitpod.io# prefix to the URL for the GitHub project and Gitpod will open the project
In either case, there is no need to create a new Gitpod account – simply use your GitHub credentials to log in and get started. Open the dot product project for the Raspberry Pi Pico using either method described previously. The following screenshot shows the GitHub repository with the Gitpod button displayed after downloading the Chrome browser extension found here:
https://chrome.google.com/webstore/detail/gitpod-always-ready-to-co/dodmmooeoklaejobgleioelladacbeki
To try out GitPod, use the GitHub site for this book:
https://github.com/PacktPublishing/The-Insiders-Guide-to-Arm-Cortex-M-Development
If you visit GitHub and have the browser extension installed, click the Gitpod button.
The direct link to open Gitpod is here:
https://gitpod.io/#https://github.com/PacktPublishing/The-Insiders-Guide-to-Arm-Cortex-M-Development

Figure 8.1 – A GitHub project with the Gitpod button
Opening the GitHub site using the preceding link sets up all of the needed tools for the Raspberry Pi Pico dot product example. This is done using the .gitpod.yml file at the top level of the GitHub repository.
To instruct Gitpod to install and build the SDK when creating a workspace, look at the .gitpod.yml file. It is a hidden file and may not be viewable in the Gitpod space but can be seen in GitHub at the top of the files listed. Gitpod reads this file when a new workspace opens. Here are the .gitpod.yml file contents:
tasks:
- name: build sdk
init: |
pushd /workspace
sudo apt purge -y --auto-remove cmake
wget -O - https://apt.kitware.com/keys/kitware-archive-latest.asc 2>/dev/null | gpg --dearmor - | sudo tee /etc/apt/trusted.gpg.d/kitware.gpg >/dev/null
sudo apt-add-repository 'deb https://apt.kitware.com/ubuntu/ focal main'
sudo apt update
sudo apt install -y cmake
pushd ~/
wget https://github.com/ARM-software/CMSIS_5/archive/refs/tags/5.9.0.zip && unzip 5.9.0.zip && rm 5.9.0.zip && ln -s CMSIS_5-5.9.0 CMSIS_5
popd
wget https://raw.githubusercontent.com/raspberrypi/pico-setup/master/pico_setup.sh
chmod +x /workspace/pico_setup.sh
SKIP_VSCODE=1 SKIP_UART=1 ./pico_setup.sh
popd
source ~/.bashrc
cd chapter-5/dotprod-pico
There are different types of tasks that can be defined; building the SDK is a one-time event for each new workspace, so it uses the init tag and only runs on workspace initialization. There is also a command tag that runs each time a workspace is opened. This example only contains initialization tags to set up the SDK, and when the project opens, the commands in .gitpod.yml will be processed. There are some operating system updates and then the SDK is installed and compiled.
Every time a new workspace is created you will see the system updates and SDK installation happening in the terminal. After a few minutes, the SDK is set up and ready to use. The following screenshot shows a fresh workspace being created with these defined tasks automatically running:

Figure 8.2 – The Gitpod workspace
At this point, the dot product example project from Chapter 5, Optimizing Performance, is ready to compile. Note that by default, Gitpod clones repositories into the /workspace directory, where the GitHub repository is now located.
These are the steps to build the project after the automatic workspace initialization is complete:
mkdir build ; cd build
cmake ..
make
Now, the dot product software is built and ready to be loaded onto the Pico board. Later in the chapter, we will cover how to connect our Pico board (on our desk) to this Gitpod workspace (in the cloud) to actually run and debug our software interactively. First, let’s look into more details on the Gitpod workspace and how to get more value from it via customization.
Workspace images
Gitpod uses a default container for the workspace called workspace-full. The description of this container is available on GitHub, alongside other container options. Here is the workspace-full description: https://github.com/gitpod-io/workspace-images.
One of the drawbacks of the demonstrated approach using Gitpod is that the SDK needs to be installed each time a new workspace is created. This workflow is good if the SDK is frequently changed and you want to use the latest version. The workflow can be improved if the SDK (or other dependencies in your project) is fixed for the length of the project. Also notice that pico_setup.sh is installing additional Linux packages. This means the Linux packages will be installed every time a new workspace is created.
The solution to re-installing software for each new workspace is to create a custom container image with the required software. It also solves the problem of installing software that is not easy to automatically download and install. An example is software that requires a browser login to download.
Creating a custom Docker image with the SDK and other Linux packages already installed saves developer time (assuming Gitpod can start a custom container faster than the prebuilds take to run). Now, when the workspace is started, the dev container will have everything initialized and ready to go.
Before we deal with creating a custom container for our example Gitpod project, let’s take a step back and look at containers in general. We will show how to create a dev container for the Pico project that can be run on any computer with Docker installed, including Windows, macOS, and Linux. After that, we will make a custom dev container for Gitpod and see how to use it in Gitpod to save setup time.
A crash course on containers
Creating a dev container for the Pico project gives developers the freedom to work on any computer with Docker installed. This can be Windows, macOS, and Linux. The same container will run the same regardless of the operating system it is used on.
Installing Docker is a straightforward process on any operating system, so refer to the main Docker documentation for the most up-to-date instructions for whatever operating system you are using locally to test this concept. Here is a link to the instructions: https://docs.docker.com/engine/install/.
Windows and macOS users can easily install Docker Desktop by downloading and running the installer.
Installing Docker on Ubuntu Linux is straightforward and can be done from the command line. Use the following instructions to download, install, and run an example Docker container, hello-world, to validate that it is working as expected:
sudo apt update
sudo apt upgrade -y
curl -fsSL get.docker.com -o get-docker.sh && sh get-docker.sh
sudo usermod -aG docker $USER ; newgrp docker
docker run hello-world
Creating a Dockerfile
We are going to create two dev containers for the Pico SDK to use for development. First, we will create a base container with the Pico SDK and other software needed to build the dot product example. From the first container, we will then add a VS Code server, so we can use it from a browser to edit files. This is optional for developers who want to have VS Code built into the dev container and accessible from a browser. Developers who prefer to attach their own VS Code or use the command line can use the first container.
Dev container creation starts from a Dockerfile. This file contains all the commands needed to create the content of the container. The first step is to select a base container, which generally means selecting the base filesystem. This can be an operating system such as Debian or Ubuntu or a runtime such as Python. This first line of the Dockerfile sets the initial filesystem, which will be in the container. Everything after that is an addition to the filesystem needed to run the desired development tools and application.
For this project, we are going to use Ubuntu 22.04 as the base image. The Pico SDK requires a Debian-based distribution because the pico_setup.sh script uses apt commands to install extra software. The Pico SDK also requires a pretty new version of cmake, so I selected Ubuntu 22.04 to get a new-enough version of cmake for the SDK to work.
We will review the commands listed in the Pico dev container Dockerfile, which you can review here in detail: https://github.com/PacktPublishing/The-Insiders-Guide-to-Arm-Cortex-M-Development/tree/main/chapter-8/pico-dev-container.
The first line of the Docker file is as follows:
FROM ubuntu:22.04 as base
This FROM line also uses as base, which allows us to reference this container when we build the second container. Building two containers from one Dockerfile is called a multi-stage build since we are going to build two containers and the second one will add on or take content from the first. This is common practice when building applications. The first container builds the software and the second container copies the build results to the second container. This makes it possible to just include the needed runtime files and leave all the intermediate build files behind.
Farther down in the Dockerfile, we use the following:
FROM base as vscode
This creates the second image, which has a target name of vscode and inherits from the first image, named base.
The remainder of the Dockerfile consists of commands to add more files to the container.
There are a few statement types in the Dockerfile. The statements are also known as instructions. The details of each instruction type are in the Docker documentation and covered by tutorials. Here is a short summary of each:
- RUN will execute the commands that follow and save the resulting image.
- ENV is an environment variable that can be used during build and run. ENV values can also be overridden (or changed) during future runs.
- ARG is like an environment variable, but is only used during the build stage and doesn’t persist in the final image. ARG values are good for specifying things during the build.
- WORKDIR sets the working directory for future RUN (and other) commands.
- USER sets the Linux username of the user that will run the future RUN commands.
- EXPOSE informs Docker to listen on a specified port at runtime.
- ENTRYPOINT is an instruction to start a program automatically when the container is run.
- The # symbol is a command in a Dockerfile.
With that background information in hand, and an overview of the Dockerfile creating our base and vscode images, let’s build it.
Building and storing the containers
The docker build command is used to turn the Dockerfile into a container image.
The build command needs a few things to run:
- The name of the Dockerfile
- The name of the image to create
- Any additional arguments, such as values for the ARG variables in the Dockerfile
- The stage to build if the Dockerfile has multiple stages
Take a look at the build.sh script in the pico-dev-container project.
The first container is built using a command:
docker build --build-arg "CMSIS_5=5.9.0" -t pico-dev:latest --target base -f Dockerfile .
It specifies the name of the container and which target in the Dockerfile to build. The last part specifies to use the Dockerfile from the current directory.
The second container is very similar. There are several additional build arguments for the version, files, and paths of VS Code, so please use the build.sh script in the GitHub repository to build it.
The container name is made of two parts. The first part is pico-dev in both cases. The second part after the colon is the tag. I think of it more like the version. In this case, both images can have the same name but are differentiated by the tag. When they are stored in a container repository, they can be managed together in one repository.
Docker images make it easy to transfer the dev containers from one machine to another. Instead of having to copy files across machines, container repositories provide storage. Containers can be built on a computer and transferred to a repository to be stored. This is known as a push. Then, another computer can download the same container image and immediately run it. This is known as a pull. Many repositories store images, and you can even create your own, but the most common is Docker Hub. To learn now to push and pull images, create an account on https://hub.docker.com and look over their documentation. Using Docker Hub for storage is much easier than copying files directly from computer to computer.
Building arguments and multi-architecture support
If you study the build.sh file closely, you will notice two other details. First, the build arguments are passed to docker build using --build-arg. This allows the ARG values in the Dockerfile to be set when docker build is run. The ARG values specify the versions of software to use in the build and filename, which may change as newer versions become available. In the Dockerfile, we have the version of the CMSIS software to use and the file to use for the VS Code server. This way, when versions change, the build.sh script can be updated and the same Dockerfile continues to work.
The second thing to notice is the multi-architecture support. Historically, desktop and laptop computers, as well as servers, used Intel or AMD processors. The architecture may be called x86, x64, or amd64. More recently, the Arm architecture has gained market share in laptops and servers. When the architecture (or instruction set) is different, the software compiled must be compiled for the architecture of the computer. We want this dev container to work on both architectures so developers can select the computer they want to use and it will just work. The pico-dev containers work on any computer: a Raspberry Pi 4, a macOS laptop, a Windows computer with either architecture, or a Linux server with either architecture.
There are numerous ways to create multi-architecture containers. The most common is the docker buildx command. If you are interested in buildx, there are numerous tutorials on how to use it with either instruction set emulation or multiple computers to build for each architecture.
To keep things easy for our example, I (Jason) commonly use another technique to create the multi-architecture container: the docker manifest command. You will see the build.sh file that the architecture of the computer is detected using the uname command and that is added to the tag. For example, see the following:
-t pico-dev:latest-$(arch)
There is a script named push.sh that uploads the two container images for that computer to Docker Hub with the architecture in the tag name. When both the x86_64 and the aarch64 images are uploaded, the docker manifest command joins them into a single image without the architecture in the tag name. This image is a multi-architecture image. When the image is retrieved using docker pull or docker run, the downloaded image is correct for the architecture of the computer.
Look at the join.sh script to see how it combines the images for each architecture into a single multi-architecture image. There is a create command to join them:
docker manifest create jasonrandrews/pico-dev:latest
--amend jasonrandrews/pico-dev:latest-aarch64
--amend jasonrandrews/pico-dev:latest-x86_64
There is also a push command to send to Docker Hub:
docker manifest push --purge jasonrandrews/pico-dev:latest
To see this working in action you can use docker pull on any computer to download the pico-dev:latest image with this command:
docker pull jasonrandrews/pico-dev:latest
Docker will automatically know which image is the right one for the computer and download that one. This is the benefit of the multi-architecture image. The same commands can be used on a computer of either architecture and Docker knows to retrieve the correct one.
Running the dev containers
The docker run command is used to run a container on any computer which has Docker installed. Images already on the computer can be run or images can be automatically downloaded from Docker Hub as needed.
To run the base container on any computer you are using (with Docker), simply run the following command:
docker run -it jasonrandrews/pico-dev:latest
Putting my (Jason’s) Docker Hub username on the front of the image name tells Docker to download it from Hub and run it. If you have a local image on your computer, it may not have the username in front of it. You can refer to the push.sh script to see how the docker tag command was used to add the username of the Hub account before uploading it and can customize it to your own account if desired.
When pico-dev:latest is run, you will come to a Linux shell prompt:
ubuntu@b75cfd449087:~$ ls
CMSIS_5 CMSIS_5-5.9.0 pico pico_setup.sh
Clone the dot product project from GitHub:
git clone https://github.com/PacktPublishing/The-Insiders-Guide-to-Arm-Cortex-M-Development
Now, follow the same process we used in Chapter 6, Optimizing Performance, to build the dot product example:
cd The-Insiders-Guide-to-Arm-Cortex-M-Development/chapter-5/dotprod-pico
mkdir build ; cd build
cmake ..
make
Over the past few sections, we have demonstrated how to use a dev container to build our provided dot product example. Within a few minutes, anybody can download the container to any computer with Docker installed, clone the dot product repository, and build it. There is no need to install operating system packages, run the pico_setup.sh script, or install CMSIS_5 source code. This ease of use is central to the value that working with the cloud offers.
Integrating dev containers with VS Code
There are multiple ways to edit the code in the dev container. Certainly, vim can be used in the terminal to edit code, but let’s look at a few ways to use VS Code with the pico-dev:latest container:
- VS Code outside the dev container
- Run the dev container from the previous section (if it’s not already running):
docker run -it jasonrandrews/pico-dev:latest
Separately, open VS Code locally on your computer. Install the Docker extension. Using that Docker extension, find the running container. Now, use the VS Code remote explorer to connect to the running container. You can find detailed instructions on this process in the VS Code documentation on containers: https://code.visualstudio.com/docs/containers/overview.
Once connected, open the dotprod-pico/ folder. Now, VS Code can be used to edit, compile, and access the terminal of the container. While it looks and feels as though you are developing inside a local machine, you are actually working inside of the dev container.
- VS Code inside the dev container:
Recall that we previously built two dev containers. The second one has the vscode tag and includes a VS Code server inside of it. This is what we will demonstrate now. Run it with this command:
docker run -it -p 3000:3000 jasonrandrews/pico-dev:vscode
Notice the extra -p argument to open port 3000 for the browser connection to the VS Code server. When the dev container starts, you will see a message:
Web UI available at http://localhost:3000/
[02:47:37] Extension host agent started.
Using a browser, connect to the VS Code server at http://localhost:3000, and you should see VS Code in the browser. The dotprod-pico repository is already there because we installed it into the dev container. Look back at the Dockerfile if needed. Open the dotprod-pico folder – you can now edit the source code again and use the terminal to build the application. Note that this port forwarding method does not create a secure connection, but it can be leveraged to communicate across multiple machines. To create a secure connection, a reverse proxy such as nginx can be used, but this is beyond the scope of this book. If interested, you can Google nginx reverse proxy docker and look into some recently published instructions.
- VS Code inside the dev container from another machine:
If the dev container is running on another machine, such as a Raspberry Pi 4 on my network with the IP address 192.168.68.96, I can still use the browser to connect. Use ssh to connect to the Pi with port forwarding, use http://localhost:3000 again, and see the VS Code open. Now, I’m working on the dev container on my Raspberry Pi 4, but the container is exactly the same.
Here is the ssh command with port forwarding:
ssh -L 3000:localhost:3000 192.168.68.96
We now have some good experience building and running dev containers on different types of computers. To reiterate, the pico-dev container can be run on any machine with Docker, from the Raspberry Pi 4 to a cloud server. The machines can have Arm or x86 architecture.
Now, let’s circle back to Gitpod and see how to make a custom Docker image for use in Gitpod.
Executing software and debugging in the cloud
Making a custom docker image for Gitpod is not much different from the generic dev container. The main difference is the starting point for the image. Instead of starting from Ubuntu, we start from the Gitpod base container, gitpod/workspace-base. The second difference is the username. We created the ubuntu user previously, but with the Gitpod container, the username is already set to gitpod. The final difference is that the package installation requires sudo in front of the commands because everything in the Dockerfile is run by the gitpod user.
Creating a custom Gitpod image
Take a look at the Dockerfile in the pico-dev-container GitHub repository (https://github.com/PacktPublishing/The-Insiders-Guide-to-Arm-Cortex-M-Development/tree/main/chapter-8/pico-dev-container) to see the differences in the Dockerfile intended for Gitpod. Gitpod is only available for the x86 architecture, so there is no aarch64 image for Gitpod. Maybe someday, we hope, Gitpod will add support for the Arm architecture.
The Gitpod container is on Docker Hub with the other dev containers we have used in this chapter. It uses the jasonrandrews/pico-dev:gitpod Gitpod tag.
To configure Gitpod to use the custom container, add it to .gitpod.yml for any GitHub project. We have done this in the provided .gitpod.yml at the top of the GitHub project for the book.
The first line changes from using the tasks discussed in the previous section to using a custom container image. This is the only line needed for the custom container image.
image: jasonrandrews/pico-dev:gitpod
Edit the .gitpod.yml file and remove the # symbol from the first line and comment (using #) or delete the remainder of the file. The easiest way is to fork the book repository into your own GitHub account, edit the .gitpod.yml file, and launch Gitpod.
With the custom container in use, the previous commands present in the .gitpod.yml file that install the Pico SDK, add CMSIS_5, and change the version of cmake are not needed! You can comment out all these tasks by adding a # symbol in front of the lines if desired; the only line necessary in.gitpod.yml now is for referencing the pico-dev:gitpod container image.
If you make this .gitpod.yml file change and start a new Gitpod workspace, the new Gitpod workspace is ready to work right at startup and requires no additional tool installation. Either strategy (the custom container or the init commands in .gitpod.yml) can work. You will have to decide which approach works best for your specific project.
With a custom container in place, we have all the tools to build, run, and debug the dot product application.
Running and debugging
Gitpod works well for coding and building microcontroller software, but what about running and debugging it? This is more complex by nature since the Raspberry Pi Pico is on our desk and not physically attached to the Gitpod cloud instance.
Let’s take the scenario where the Raspberry Pi Pico is on my desk and connected to the Raspberry Pi 4. In Chapter 4, Booting to Main, we reviewed how to use openocd and gdb to connect, load, and run the hello world program on the Pico. We will use some of these concepts here as we work in Gitpod and use gdb to connect to and debug the dot product application. Review Chapter 4, if needed when following the next few steps:
- First, return to your Gitpod workspace – created either from the custom container image or the initialization commands – and build the application with debug settings:
mkdir build ; cd build
cmake -DCMAKE_BUILD_TYPE=Debug ..
make
- From a terminal on your local Raspberry Pi 4, use ssh connect to the Gitpod workspace. There are multiple ways to do this: you can add your own public ssh key or use an access token. The second method is easiest to implement on the first try. To do so, go to the gitpod.io dashboard by clicking on the three lines on the top-left-hand side of the Gitpod VS Code workspace and selecting Gitpod: Open Dashboard. In the gitpod.io dashboard, click on the three dots on the right-hand side of the workspace and select Connect via SSH:

Figure 8.3 – The Gitpod workspace list
- Click on the Access Token tab and copy the given command. Paste this command into a terminal on your Raspberry Pi 4. The only necessary addition is to set up reverse port mapping for port 3333. This provides the gdb to the openocd connection.
The command will look as follows (with your access token values between the quotations):
ssh -R 3333:localhost:3333 'jasonrandre-dotprodpico-rsucr78p74a#WSC41GSOcCnRh_2IfRrk8nYWtTEIDwCY@jasonrandre-dotprodpico-rsucr78p74a.ssh.ws-us54.gitpod.io'
Notice -R 3333:localhost:3333 is the required added part of the command enabling reverse port mapping.
- Now, run the command in the debug.sh file (available in the same example on GitHub) from the chapter-5/dotprod-pico/ directory on the Raspberry Pi 4. openocd will sit waiting for a gdb connection now.
- Make the gdb connection from Gitpod using the same gdb command sequence from Chapter 4. This time, however, Gitpod will automatically connect back to your local Raspberry Pi 4 and debug the code on the Pico. The final command of just the letter c will continue running the application until any specified breakpoints – in this case, at the main function:
gdb-multiarch build/dotprod.elf
(gdb) target remote localhost:3333
(gdb) load
(gdb) b main
(gdb) c
In summary, Gitpod offers a very powerful environment to code, compile, and debug in the cloud. It can also be somewhat complex for non-Linux users, as you may have noticed along the way. Many of the operations require command-line knowledge that does not overlap too much with the traditional required embedded development skills, operating from a straightforward GUI-based IDE that simplifies this complexity for you.
In the next section, we look at Keil Studio Cloud, a cloud-based IDE that offers GitHub integration, debugging features, and support for many Cortex-M development boards. It provides a simplified alternative to the highly customizable Gitpod flow we have explored already. Keil Studio Cloud also provides a built-in compiler service and improved debugging experience, which is attractive to many developers.
Getting to know Keil Studio Cloud
To replicate the example in this section, you will be using the following:
|
Platform |
NXP LPC55S69-EVK |
|
Software |
Blinky |
|
Environment |
Keil Studio Cloud |
|
Host OS |
Any |
|
Compiler |
Arm Compiler for Embedded |
|
IDE |
Keil Studio Cloud |
For this section, we take a break from the Raspberry Pi Pico and go back to the NXP LPC55S69-EVK which uses the Cortex-M33 processor.
To get started with Keil Studio Cloud, visit https://keil.arm.com. Select the Find your Hardware button and search for 55S69. The LPCXpresso55S69 will show up, as shown in the following screenshot:
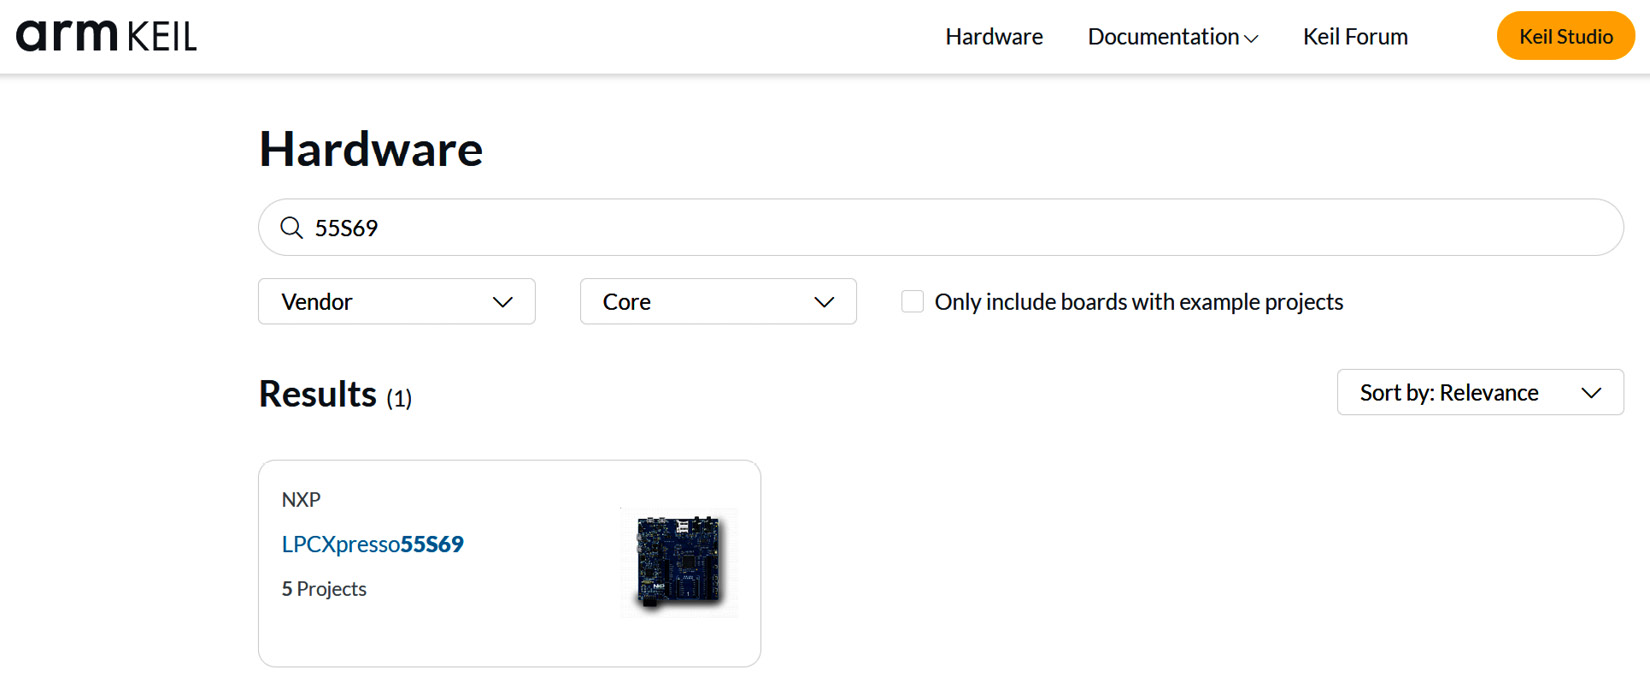
Figure 8.4 – Hardware selection on Keil Studio Cloud
After selecting this board, you can choose the Blinky simple example and open it in Keil Studio by selecting the Open in Keil Studio button. You will be redirected to studio.keil.arm.com with this example project ready to edit. You may need to create an account to continue, which is free.
It provides a browser-based editor, built-in compiler service, and debugger for building and deploying your embedded software projects. It also provides source control integration with Git, so you can easily perform common Git actions and push your project directly from the Keil Studio IDE to GitHub.
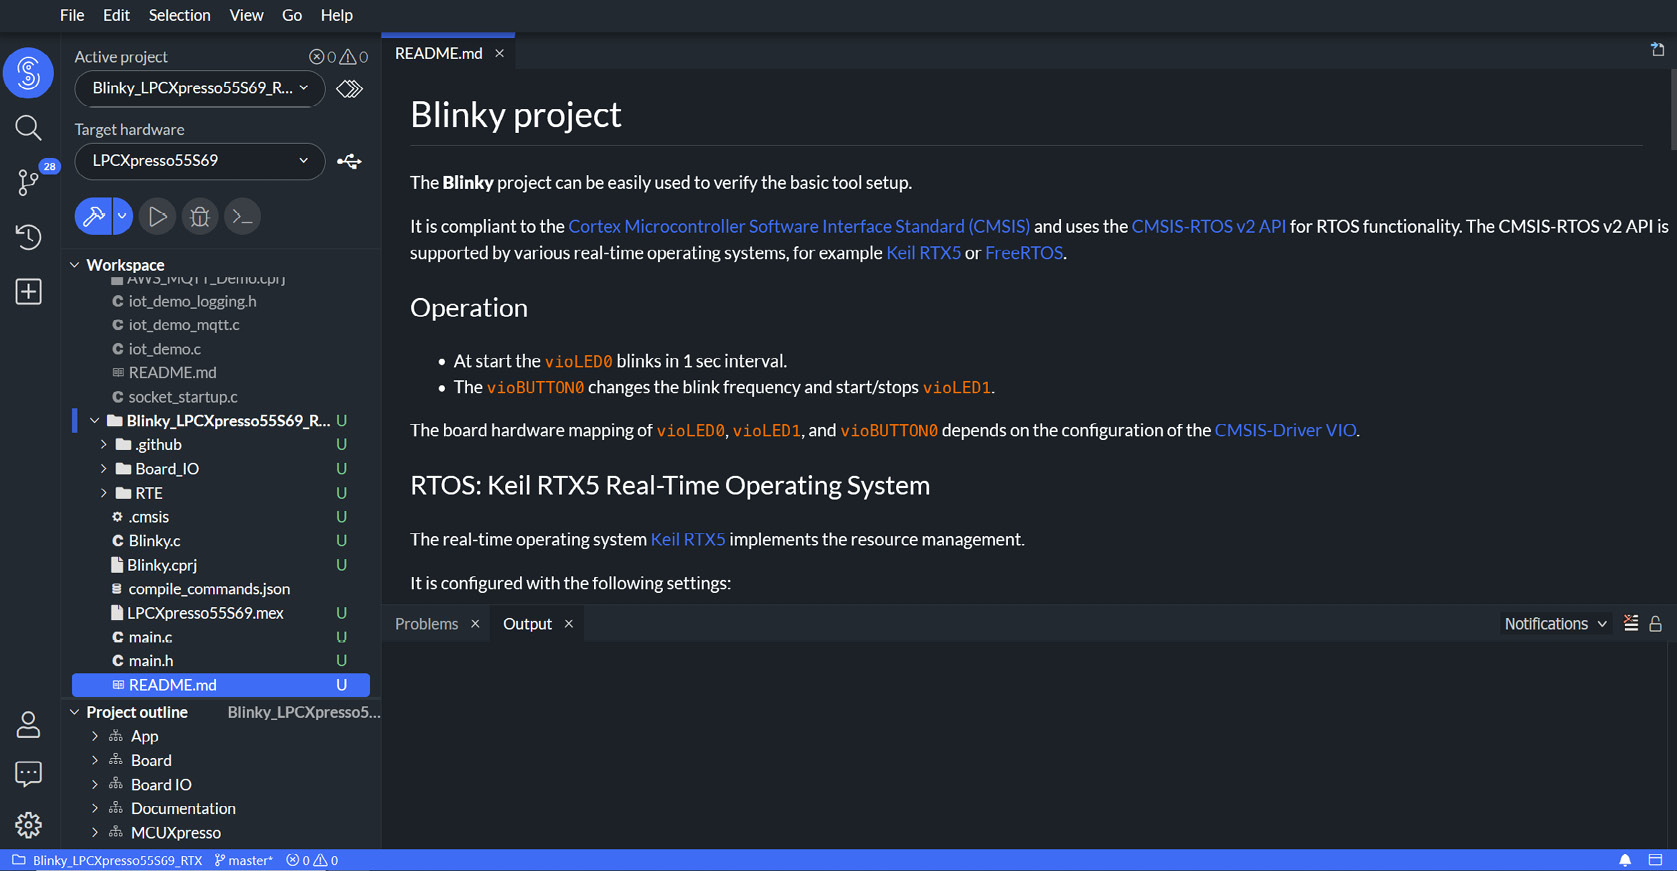
Figure 8.5 – The Keil Studio Cloud user interface
On opening the Blinky project in Keil Studio, your workspace on the left-hand side gets populated with the project source files and you can view or make changes to them using the built-in editor.
Next, onto building your software for the NXP LPCXpresso55S69 target. This leverages the hosted compiler service and builds your binary image using the Arm Compiler for Embedded toolchain. To load the binary and either run or debug it on the board, first, connect your board to the machine running Keil Studio Cloud, and then from the browser, select the USB icon next to the target hardware. If you have problems pairing to CMSIS-DAPLink, likely, the CMSIS-DAP firmware for the debug unit that connects the Debug Port to USB needs to be updated. Follow the steps outlined here to update the DAP firmware: https://os.mbed.com/teams/NXP/wiki/Updating-LPCXpresso-firmware#binary-downloads.
When your board is successfully connected, the USB icon will turn green, and if you hit the Run button, your compiled binary is downloaded onto your board, and you should see the blinking LED. The debug option is simple and gives you the basic features to step through your code, set breakpoints, and understand program flow execution.
It is exciting to see new tools such as this where you can just launch a browser, develop your microcontroller code, and flash it to the board on your desk.
Other cloud development possibilities
There are other tools and environments possible to leverage in cloud-based development. This section covers some other options that you may want to consider for your projects, or at least be aware of.
Cloud virtual machines
Another way to develop in the cloud is by using virtual machines. We saw in Chapter 4 and Chapter 5 how to use an Amazon Machine Image (AMI) from AWS Marketplace for development. We learned how to use ssh to connect to the AWS EC2 instance and run applications such as the machine learning examples on the Corstone-300 Fixed Virtual Platform.
One thing we didn’t cover is using VS Code in the AMI for development work. There are two common ways to use VS Code with a virtual machine.
One way is to use an ssh connection. The VS Code Remote SSH extension can make the connection to a remote virtual machine. Various articles for connecting VS Code to a remote machine via ssh are available, and we recommend searching for ssh to remote machine VS Code for the most recent information. There are pointers to resources in the Further reading section of this chapter as well.
A second way to use VS Code in the Arm Virtual Hardware AMI is to use the built-in VS Code server. Add port forwarding for port 8080 to the ssh command and the VS Code server is available via the browser.
Use this command to use ssh to connect from your local machine to the EC2 instance with port 8080 forwarded:
ssh -i <your-private-key>.pem -L 8080:localhost:8080 ubuntu@<your-ec2-IP-address>
Once in the EC2 instance, use a browser on your local computer and connect to http://localhost:8080:

Figure 8.6 – VS Code with a ssh connection
You will see a fresh VS Code in the browser, ready to be configured. You can use it to develop code directly on the EC2 image.
Virtual desktop in VM
Sometimes, graphical tools are required for development and a Linux desktop is helpful or required. The Arm Virtual Hardware AMI also provides a virtual desktop via Virtual Network Computing (VNC). We will start the EC2 instance again and connect to it using ssh, but this time, forward port 5901. Use this command to connect using ssh and forward port 5901:
ssh -i <your-private-key>.pem -L 5901:localhost:5901 ubuntu@<your-ec2-IP-address>
After connecting, run these commands (you will have to set a password for VNC after running the first command):
vncpasswd
sudo systemctl start [email protected]
The second command will start the VNC server on the EC2 instance. To connect to this server, you can install a VNC client on your local computer (we recommend TigerVNC or TightVNC) and connect to localhost:5901 with the VNC client:

Figure 8.7 – Making a VNC connection
Your virtual desktop from the AMI should then appear. With VNC running, you can install VS Code and any other graphical applications on the virtual machine and run them:

Figure 8.8 – A Linux desktop using VNC
Cloud virtual machines can be used in multiple ways. We have demonstrated ssh, VS Code in the browser, and VNC for a Linux desktop. Projects may use one or more of these depending on the tools required.
Summary
This chapter walked you through the various ways that cloud services can streamline Cortex-M software development. We investigated how to effectively use a virtual machine in the cloud as a remote computer with offerings such as Gitpod and EC2 instances. VS Code was highlighted as the emergent cloud-based IDE, compatible across various virtual machine solutions.
Next, we reviewed how to make environment and code sharing easier and more consistent through dev containers. Docker containers are the most popular technology, and an example of how to build, share, and run a Docker container was presented. We further analyzed how to create multi-architecture containers that can run seamlessly across any architecture and operating system that can run Docker.
Finally, we showcased an example cloud-based development process that still ran and debugged code on a local embedded board. The presented tools and methodologies in this chapter unlocked the advantages of cloud-based development, such as environment consistency and ease of use, for embedded projects.
New cloud services continue to come out every year and these rapid iterations are likely to continue. While this chapter provided an overview of how to leverage existing services, more possibilities to increase development efficiency are certain to emerge. The last chapter of this book, Chapter 10, Looking Ahead, presents some nascent cloud technologies at the time of publication in 2022. Becoming comfortable with developing embedded software in the cloud is a surefire way to add value to your future projects.
Another methodology that has steadily become the best practice for software development is automatic software testing. This practice is referred to as continuous integration, which can drastically increase software quality and reduce development time when implemented correctly. The next chapter describes the basics of continuous integration and details several ways to implement it effectively in embedded projects.
Further reading
To learn more about the topics that were covered in this chapter, take a look at the following resources:
- Gitpod getting started guide: https://www.gitpod.io/docs/getting-started
- An overview of Docker: https://docs.docker.com/get-started/overview/
- Docker reference documentation: https://docs.docker.com/reference/
- Docker general cheat sheet: https://dockerlabs.collabnix.com/docker/cheatsheet/
- Dockerfile instructions cheat sheet: https://devhints.io/dockerfile
- An overview of GitHub Codespaces: https://docs.github.com/en/codespaces/overview.
- An overview of the Gitpod .yml file, to learn how to initialize Gitpod environments: https://www.gitpod.io/docs/config-gitpod-file
- An overview of Docker Hub: https://docs.docker.com/docker-hub/
- Multi-architecture building with docker manifest and buildx: https://www.docker.com/blog/multi-arch-build-and-images-the-simple-way/
- An overview of VS Code remote development over SSH: https://code.visualstudio.com/docs/remote/ssh-tutorial
- An overview of TigerVNC: https://tigervnc.org/