
9 Hex dumper
I’ve looked with my own eyes and I just can’t see files stored on media. This task was easier in the old days, when you could pop out a floppy disk and see the actual media. The data on the media, however, remains encoded as teensy electronic particles, invisible to the naked eye—or even to an eye with clothes on. No, the only way to peer into a file’s raw contents is to use a utility, something like hexdump.
Yes, hexdump is a Linux utility, available as part of the default installation. It’s quite capable and popular among the nerds. There’s no need to re-create it—unless you want to improve upon it. Or perhaps you want to expand your knowledge of programming and learn a few tricks along the way, such as:
The goal of this chapter isn’t to ape the hexdump utility but rather to see how much you can understand what it does and appreciate it more by doing it yourself. Along the way, you’ll discover more about writing such utilities and how to hone your own programs to work the way you prefer.
9.1 Bytes and data
Computers know nothing of bytes. Digital information is stored in bits—bit is a collision of the words binary and digit. Binary digits are 1 and 0, and a bit is either 1 or 0. Bytes cluster bits into convenient, happy groups, where they represent larger numbers.
One question raised from the early days of computing is how many bits pack into a byte? If the techies wanted to do so, a computer’s entire storage space could be a single byte that is billions of bits long. Such length would be painfully impractical. So, the nerds organized bits into smaller chunks, with byte sizes ranging from a few bits to over a dozen bits per byte.
Today the standard is eight bits per byte. But even then, larger-capacity storage is necessary when dealing with information in a computer.
9.1.1 Reviewing storage units and size mayhem
Way back when computer nerds sported slicked-back hair, skinny black ties, horn-rimmed glasses, and prized pocket protectors—yes, even the women—a byte, or syllable, as it was known, was composed of any number of bits, depending on the system hardware. I remember using mainframes with 12-bit bytes. I know of smaller, custom systems that used 6-bit bytes. When the microcomputer craze transformed these machines into the must-have-computers-for-business craze in the early 1980s, the computer world settled on 8-bit bytes.
In C, the 8-bit byte corresponds directly to the char data type. Although you won’t find any of the C grand poohbahs who openly admit that, yes, “a byte is a char,” it’s pretty much true. (Even so, be aware that data types are implementation-dependent in C.)
Computers deal with larger values than bytes, which requires their organization into chunks called words (16-bit), doublewords (32-bit), quadwords (64-bits), and double-quad words (128-bits). This word-jumble-worthy mayhem is summarized in table 9.1, minus the double-quad word because its values can’t fit in the table.
Table 9.1 Bit width descriptions and details
Values shown in table 9.1 are related to the data chunk’s bit width. For example, the range of a doubleword is from -231 to 231 - 1. If a 128-bit integer were available in C (and some language extensions offer it), its signed value would range from -2127 to 2127 - 1. Were this book’s margins wide enough, I’d write out the specific values in full. Or—better—if this book had a centerfold, I’m sure that the value 2127 - 1 printed out would be appealing to some programmers.
You can quickly cobble together a C program that reveals the values of the various data types and their bit widths. To do so, you need to know the size of each data type. For example, use this expression to obtain the size of a byte in bits:
unsigned long byte = sizeof(char)*8;
The sizeof operator returns the number of bytes used by a specific C language data type, char, described earlier. This value is multiplied by eight to obtain the number of bits. The result is stored in unsigned long variable byte; the sizeof operator returns an unsigned long value. Similar statements are used for word/short, doubleword/int, and quadword/long variables and data types.
Use this printf() statement to output the values:
printf("%11s %2lu bits %21.f
",
        "Byte",
        byte,
        pow(2,byte)
      );
The printf() function’s format string ensures that values output are spaced properly, formatted for a table. Several statement output details for each data type, resulting in a table that lists the data size, the number of bits, and then the decimal size value. The pow() function raises the power of two to the number of bits pow(2,byte). The pow() function requires inclusion of the math.h header file.
The source code file containing all the printf() statements to output a data type table is available in this book’s online archive as byte_sizes.c. It requires you to link the math library: in Linux, ensure that you specify the -lm switch as the compiler’s final command-line option to link in the math (m) library. Here is sample output:
       Byte  8 bits                   256
       Word 16 bits                 65536
 Doubleword 32 bits            4294967296
   Quadword 64 bits  18446744073709551616
You don’t need to perform the math and overhead used in the byte_sizes.c code. The reason is that the compiler itself has a limit. Specifically, the limit values are set as defined constants in the appropriately named limits.h header file.
The next listing outputs the popular constants defined in limits.h. Run this code on your system to see what the values and ranges are, though for most programmers these values align with those shown back in table 9.1. The key to the code is identifying the defined constants in limits.h. These defined constants appear here.
Listing 9.1 Source code for limits.c
#include <stdio.h>
#include <limits.h>

int main()
{
    printf("Char:
");
    printf("	Number of bits: %d
",CHAR_BIT);       ❶
    printf("	Signed minimum: %d
",SCHAR_MIN);      ❷
    printf("	Signed maximum: %d
",SCHAR_MAX);      ❸
    printf("	Unsigned max: %d
",UCHAR_MAX);        ❹

    printf("Short:
");
    printf("	Signed minimum: %d
",SHRT_MIN);
    printf("	Signed maximum: %d
",SHRT_MAX);
    >printf("	Unsigned max: %d
",USHRT_MAX);

    printf("Int:
");
    printf("	Signed minimum: %d
",INT_MIN);
    printf("	Signed maximum: %d
",INT_MAX);
    printf("	Unsigned max: %u
",UINT_MAX);         ❺

    printf("Long:
");
    printf("	Signed minimum: %ld
",LONG_MIN);      ❻
    printf("	Signed maximum: %ld
",LONG_MAX);
    printf("	Unsigned max: %lu
",ULONG_MAX);       ❼

    printf("Long long:
");
    printf("	Signed minimum: %lld
",LLONG_MIN);    ❽
    printf("	Signed maximum: %lld
",LLONG_MAX);
    printf("	Unsigned max: %llu
",ULLONG_MAX);     ❾

    return(0);
}
❶ The char type is the only one that seems to have the “BIT” defined constant.
❹ Unsigned char maximum; zero is minimum.
❺ Unsigned integer max uses the %u placeholder.
❻ Long integers require the %ld placeholder.
❼ Unsigned long requires %lu placeholder.
❾ The double-unsigned long placeholder is %llu.
The output appears here, though the point of the exercise is that these minimum and maximum values can be obtained from the constants defined in the limits.h header file; your code need not do the math:
Char:
    Number of bits: 8
    Signed minimum: -128
    Signed maximum: 127
    Unsigned max: 255
Short:
    Signed minimum: -32768
    Signed maximum: 32767
    Unsigned max: 65535
Int:
    Signed minimum: -2147483648
    Signed maximum: 2147483647
    Unsigned max: 4294967295
Long:
    Signed minimum: -9223372036854775808
    Signed maximum: 9223372036854775807
    Unsigned max: 18446744073709551615
Long long:
    Signed minimum: -9223372036854775808
    Signed maximum: 9223372036854775807
    Unsigned max: 18446744073709551615
When you desire a specific size integer, it’s best to use the specific integer type variables. The following types are available:
Variables declared with these types are always at the specific width indicated. These typedef values (which is what the _t suffix indicates) are defined in the stdint.h header file, which is automatically included in stdio.h for most C compilers. So, feel free to use these data type definitions to utilize an integer value of a specific width.
The reason for these exact integer width types is historical. When I first learned to program C, the int data type was 16 bits wide. Today, it’s 32. Yet the int16_t and int32_t types are always set to the width indicated.
Given the variety of integer widths, a byte is still the basic counting unit in a computer. Memory capacity, media storage, file size—all these quantities are measured in 8-bit bytes, char values. This yardstick gives rise to two systems for counting bytes: one based on the powers of two (binary), the other on the powers of 10 (decimal).
The traditional way to count bytes, what I grew up with, is the kilobyte system: when I was a proto-nerd, 1 K was one kilobyte of data, or 1024 bytes. The value 1,024 is 210, which seemed good enough for computer nerds; 1,024 is close enough to 1,000 for digital accounting purposes, with the extra 24 bytes often taken away by the government in the form of taxes. It was proper in the day to tell beginners that 1 K was “about 1,000 bytes.” Alas, this logical, binary definition no longer holds.
Today, 1,024 bytes is known as a kibibyte. If you refer to a kilobyte, the experts now claim this value is 1,000 bytes.
The reason for the change is that the terms kilo, mega, giga, and so on mean one thousand, one million, and one billion exactly when describing quantities in the noncomputer world: a kilometer is 1,000 meters, not 1,024 meters. For consistency, our digital overlords decreed that the term kilobyte must also mean exactly 1,000 bytes. The traditional value of 1,024 bytes, or 210, is demoted to the silly term kibibyte, which sounds like a dog food.
Other values to annoy me include mebibyte (MiB) for 220 or 1,048,576, and gibibyte (GiB) for 230 or 1,073,741,824. To me, these are still megabyte (MB) and gigabyte (GB). Anything else is just foolhardy conformist insanity.
9.1.2 Outputting byte values
Forget those wishy-washy C overlords, and in this section accept that a byte is the same size as a character. When you allocate 1 K of memory, you’re setting aside 1,024 (yes) char-sized pieces of memory as a single chunk. Output a value in the range from 0 to 255, and you’re outputting a byte. To deal with memory, you deal with bytes, char-sized chunks. This information is common; nerds everywhere accept it.
Write code that outputs char values from 0 to 255. Each value is output on a line by itself. This exercise may seem mindlessly simple, but I strongly urge you to try it. Come on! It’s just a few lines of code. Save your solution as byte_values01.c.
Here is the output from my solution, minus a long chunk of numbers in the middle:
0
1
2
3
...
253
254
255
Without peeking ahead at my solution, did you try a for loop? Did you first attempt the solution by using a char variable and then attempt with unsigned char? Did you force the output using a technique that didn’t seem obvious at first?
Seriously: if you haven’t attempted to code a solution, do so now.
My solution appears in the next listing. It uses an endless while loop, carefully constructed so that the loop terminates when the value of variable a is equal to 255.
Listing 9.2 Source code for byte_values01.c
#include <stdio.h>

int main()
{
    unsigned char a;         ❶

    a = 0;
    while( 1 )               ❷
    {
        printf("%d
",a);    ❸
        if( a==255 )         ❹
            break;
        a++;                 ❺
    }

    return(0);
}
❶ The range for unsigned char is from 0 to 255.
❹ Once the value hits 255, breaks the loop
❺ Otherwise, increments variable a
The solution shown in listing 9.2 isn’t my first attempt. No, like you (if you actually completed the exercise), I started with a for loop:
for( a=0; a<=255; a++ )
    printf("%d
",a);
This for loop never terminates. The compiler may warn, but the loop has no end. Even though the maximum value for an unsigned char is 255 and it seems like the condition is met, it never will be: The value of variable a wraps from 255 down to 0 again and again.
Further, if you want to examine bytes, output them, or otherwise deal with their values, you must use the int data type. All char or byte-size values easily fit within an integer-sized chunk. The int data type avoids any wrapping that occurs with a char, which is probably one reason why functions like getchar() and putchar() use integers instead of char types.
The next listing modifies the source code from listing 9.2 by storing the 256 char values in a char array, data[]. Two for loops process the array, the first to fill it and the second to output its values. Though the array stores only byte values, int variable b is used to store the values.
Listing 9.3 Source code for byte_values02.c
#include <stdio.h>

int main()
{
    unsigned char data[256];    ❶
    int b;

    for( b=0; b<256; b++ )      ❷
        data[b] = b;

    for( b=0; b<256; b++ )      ❸
        printf("%d
",data[b]);

    return(0);
}
❶ Room for the full variety of byte values
❷ Fills the array with values 0 through 255
❸ Outputs the array, with each value on a line by itself
The output from byte_values02.c is identical to the first program, but the new format, with an array holding the values, allows for modifications and manipulations to be made to the stored data. The goal is to accurately present the data in a readable format. The inelegant term for doing so is dump.
9.1.3 Dumping data
Dump is both a noun and a verb, neither of which is flattering. Case in point: no type of food preparation uses the word dump. The term is inelegant and crude, and what’s being dumped isn’t considered useful—unless it’s data.
In the digital realm, a dump is the movement of data from one place to another. You may be familiar with the notorious term core dump, which is what happens when your program horrifically screws up and the operating system barfs memory and processor content in the vain hope that you’ll examine the data to determine what’s wrong. Don’t worry—you won’t.
Computer hobbyists from the early days may remember the term screen dump. It was a copy of all the text on the screen sent to a printer. IBM curtailed the term’s use when they added the Print Screen key to their first PC’s keyboard. Suddenly the screen dump became a “print screen,” though pressing the key still dumped all text from the screen to the printer.
To dump data in C, you copy it from one location to another. You can dump a chunk of memory, though only the memory the program has access to. More frequently, you dump the contents of a file as hexadecimal output on the screen. A programmer can examine the raw data and hopefully gain insight into what’s going on or glean some other useful tidbit of information. I’ve experienced many “aha!” moments while examining file dumps.
To dump data from memory, you can modify the existing source code file byte_values01.c. The first change is to dump the data in hexadecimal. Decimal byte values are familiar to humans, but hex digits for values 0 through 255 all neatly pack into two-digit sequences. Further, most nerds recognize hex values and their binary equivalents. This relationship makes it easy to troubleshoot. For non-nerd reference, table 9.2 lists hex values and their relationship to binary with decimal thrown in just because.
Table 9.2 Decimal, hexadecimal, and binary values
Hex dumps are brief and useful. After all, a nerd who may not understand “01001000 01100101 01101100 01101100 01101111 00101100 00100000 01101110 01100101 01110010 01100100 00100001” certainly understands “48 65 6C 6F 2C 20 6E 65 72 64 21”.
To output hex, line 12 in the source code for byte_values02.c is altered: the %d placeholder is replaced by %02X to output a 2-digit uppercase hex value with a leading zero when necessary:
printf("%02X
",data[b]);
The updated code’s output now ranges from 00 through FF, the full spectrum of byte values. But it’s all still output in a single column, which isn’t efficient.
The second change pads each byte value output with a leading space and eliminates the newline:
printf(" %02X",data[b]);To keep output clean, a putchar() statement is added after the second for loop:
putchar('
');
The code’s output now appears all on one screen, but inelegantly:
 00 01 02 03 04 05 06 07 08 09 0A 0B 0C 0D 0E 0F 10 11 12 13 14 15 16 17 18 19 1
A 1B 1C 1D 1E 1F 20 21 22 23 24 25 26 27 28 29 2A 2B 2C 2D 2E 2F 30 31 32 33 34
35 36 37 38 39 3A 3B 3C 3D 3E 3F 40 41 42 43 44 45 46 47 48 49 4A 4B 4C 4D 4E 4F
 50 51 52 53 54 55 56 57 58 59 5A 5B 5C 5D 5E 5F 60 61 62 63 64 65 66 67 68 69 6
A 6B 6C 6D 6E 6F 70 71 72 73 74 75 76 77 78 79 7A 7B 7C 7D 7E 7F 80 81 82 83 84
85 86 87 88 89 8A 8B 8C 8D 8E 8F 90 91 92 93 94 95 96 97 98 99 9A 9B 9C 9D 9E 9F
 A0 A1 A2 A3 A4 A5 A6 A7 A8 A9 AA AB AC AD AE AF B0 B1 B2 B3 B4 B5 B6 B7 B8 B9 B
A BB BC BD BE BF C0 C1 C2 C3 C4 C5 C6 C7 C8 C9 CA CB CC CD CE CF D0 D1 D2 D3 D4
D5 D6 D7 D8 D9 DA DB DC DD DE DF E0 E1 E2 E3 E4 E5 E6 E7 E8 E9 EA EB EC ED EE EF
 F0 F1 F2 F3 F4 F5 F6 F7 F8 F9 FA FB FC FD FE FF
To improve the code further, a newline is output every 16 bytes, because 16 is a happy value for hexadecimal. The following modification to the code’s second for loop adds the newline, which incorporates the recently added putchar() statement:
for( b=0; b<256; b++ )
{
    printf(" %02X",data[b]);
    if( (b+1)%16==0 )
        putchar('
');
}
The if test uses variable b’s value to determine when to add a newline. One is added to the value of b, (b+1), to avoid a newline popping out after the first value (zero). Otherwise, each time the value of b is evenly divisible by 16, a newline is output. Here is the result:
 00 01 02 03 04 05 06 07 08 09 0A 0B 0C 0D 0E 0F
 10 11 12 13 14 15 16 17 18 19 1A 1B 1C 1D 1E 1F
 20 21 22 23 24 25 26 27 28 29 2A 2B 2C 2D 2E 2F
 30 31 32 33 34 35 36 37 38 39 3A 3B 3C 3D 3E 3F
 40 41 42 43 44 45 46 47 48 49 4A 4B 4C 4D 4E 4F
 50 51 52 53 54 55 56 57 58 59 5A 5B 5C 5D 5E 5F
 60 61 62 63 64 65 66 67 68 69 6A 6B 6C 6D 6E 6F
 70 71 72 73 74 75 76 77 78 79 7A 7B 7C 7D 7E 7F
 80 81 82 83 84 85 86 87 88 89 8A 8B 8C 8D 8E 8F
 90 91 92 93 94 95 96 97 98 99 9A 9B 9C 9D 9E 9F
 A0 A1 A2 A3 A4 A5 A6 A7 A8 A9 AA AB AC AD AE AF
 B0 B1 B2 B3 B4 B5 B6 B7 B8 B9 BA BB BC BD BE BF
 C0 C1 C2 C3 C4 C5 C6 C7 C8 C9 CA CB CC CD CE CF
 D0 D1 D2 D3 D4 D5 D6 D7 D8 D9 DA DB DC DD DE DF
 E0 E1 E2 E3 E4 E5 E6 E7 E8 E9 EA EB EC ED EE EF
 F0 F1 F2 F3 F4 F5 F6 F7 F8 F9 FA FB FC FD FE FF
The full source code file is available as byte_values03.c in the online repository. The output is better, but it could still use some improvement. Because the data dump is sequential, it’s easy to see patterns and reference rows and columns. However, data won’t always look so pretty.
Improve the code in byte_values03.c in two stages. First, add an initial column showing the byte values’ offset. Output this value as a 5-digit hexadecimal number. Then output the row of 16 bytes.
Second, add an extra space to separate the eighth and ninth byte columns. This space makes the rows and columns more readable.
The output from my solution, byte_values04.c, is shown here:
00000  00 01 02 03 04 05 06 07  08 09 0A 0B 0C 0D 0E 0F
00010  10 11 12 13 14 15 16 17  18 19 1A 1B 1C 1D 1E 1F
00020  20 21 22 23 24 25 26 27  28 29 2A 2B 2C 2D 2E 2F
00030  30 31 32 33 34 35 36 37  38 39 3A 3B 3C 3D 3E 3F
00040  40 41 42 43 44 45 46 47  48 49 4A 4B 4C 4D 4E 4F
00050  50 51 52 53 54 55 56 57  58 59 5A 5B 5C 5D 5E 5F
00060  60 61 62 63 64 65 66 67  68 69 6A 6B 6C 6D 6E 6F
00070  70 71 72 73 74 75 76 77  78 79 7A 7B 7C 7D 7E 7F
00080  80 81 82 83 84 85 86 87  88 89 8A 8B 8C 8D 8E 8F
00090  90 91 92 93 94 95 96 97  98 99 9A 9B 9C 9D 9E 9F
000A0  A0 A1 A2 A3 A4 A5 A6 A7  A8 A9 AA AB AC AD AE AF
000B0  B0 B1 B2 B3 B4 B5 B6 B7  B8 B9 BA BB BC BD BE BF
000C0  C0 C1 C2 C3 C4 C5 C6 C7  C8 C9 CA CB CC CD CE CF
000D0  D0 D1 D2 D3 D4 D5 D6 D7  D8 D9 DA DB DC DD DE DF
000E0  E0 E1 E2 E3 E4 E5 E6 E7  E8 E9 EA EB EC ED EE EF
000F0  F0 F1 F2 F3 F4 F5 F6 F7  F8 F9 FA FB FC FD FE FF
The hex display reads better after you’ve completed exercise 9.2.
A final improvement is to add a third ASCII column after the byte values. This additional information cross-references the hex bytes of displayable ASCII text, providing a handy way for humans to quickly scan the dump for relevant information.
The ordeal of adding an ASCII column to the output is complicated due to stream output. Each row must be processed sequentially: 16 bytes are output as hex values, and then the same bytes are output as printable ASCII characters. To resolve this issue, I concocted the line_out() function, which is found in the source code file byte_values05.c, available in the online repository.
The line_out() function features three arguments, as shown in the next listing: an offset representing a byte count, the length of the data chunk, and the data itself as an unsigned char pointer. Most of the code is yanked from the earlier byte_values04.c source code, though variable a tracks progress in the for loops, and is used with the data pointer to fetch specific byte values: *(data+a). This function outputs a single row of the dump, so it’s called from the main() function to output all the data.
Listing 9.4 The line_out() function
void line_out(int offset, int length, unsigned char *data)
{
    int a;

    printf("%05X ",offset);                        ❶

    for( a=0; a<length; a++ )                      ❷
    {
        printf(" %02X",*(data+a));                 ❸
        if( (a+1)%8==0 )                           ❹
            putchar(' ');
    }

    putchar(' ');                                  ❺
    for( a=0; a<length; a++ )                      ❻
    {
        if( *(data+a)>=' ' && *(data+a)<='~' )     ❼
            putchar( *(data+a) );                  ❽
        else
            putchar(' ');                          ❾
    }

    putchar('
');
}❷ The first loop outputs the hex values.
❸ The hex value calculation is based on the start of the data plus the looping value.
❹ After the eighth hex byte output, adds an extra space for readability
❺ Adds another space after the hex columns
❻ The second loop outputs the ASCII values—if any.
❼ Checks the printable character range
❽ Outputs a printable character
The line_out() function isn’t perfect, which I discuss in a later section, but it works for now. Here is some sample output:
00000  00 01 02 03 04 05 06 07  08 09 0A 0B 0C 0D 0E 0F
00010  10 11 12 13 14 15 16 17  18 19 1A 1B 1C 1D 1E 1F
00020  20 21 22 23 24 25 26 27  28 29 2A 2B 2C 2D 2E 2F  !"#$%&'()*+,-./
00030  30 31 32 33 34 35 36 37  38 39 3A 3B 3C 3D 3E 3F 0123456789:;<=>?
00040  40 41 42 43 44 45 46 47  48 49 4A 4B 4C 4D 4E 4F @ABCDEFGHIJKLMNO
00050  50 51 52 53 54 55 56 57  58 59 5A 5B 5C 5D 5E 5F PQRSTUVWXYZ[]^_
00060  60 61 62 63 64 65 66 67  68 69 6A 6B 6C 6D 6E 6F `abcdefghijklmno
00070  70 71 72 73 74 75 76 77  78 79 7A 7B 7C 7D 7E 7F pqrstuvwxyz{|}~
00080  80 81 82 83 84 85 86 87  88 89 8A 8B 8C 8D 8E 8F
00090  90 91 92 93 94 95 96 97  98 99 9A 9B 9C 9D 9E 9F
000A0  A0 A1 A2 A3 A4 A5 A6 A7  A8 A9 AA AB AC AD AE AF
000B0  B0 B1 B2 B3 B4 B5 B6 B7  B8 B9 BA BB BC BD BE BF
000C0  C0 C1 C2 C3 C4 C5 C6 C7  C8 C9 CA CB CC CD CE CF
000D0  D0 D1 D2 D3 D4 D5 D6 D7  D8 D9 DA DB DC DD DE DF
000E0  E0 E1 E2 E3 E4 E5 E6 E7  E8 E9 EA EB EC ED EE EF
000F0  F0 F1 F2 F3 F4 F5 F6 F7  F8 F9 FA FB FC FD FE FF
The ASCII column appears on the far right, reflecting the printable character values from the hex bytes shown in the center columns. Nonprintable characters appear as spaces.
Sadly, the sample output from the byte_values series of programs is predictable—a swath of 256-byte values from 0x00 through 0xFF. Why not spice things up a bit and repopulate the data[] buffer with random values?
Modify the source code for byte_values05.c into a new source code file, byte_ values 06.c. Have the main() function fill the data[] array with 256 random values, each in the range of 0 through 255. Run the program a few times to confirm that the program properly interprets the hexadecimal and ASCII values of the bytes stored.
9.2 Dump that file!
A dump utility is designed to peer into a file’s data. Well, a file dump utility. This detail is something that the operating system doesn’t supply at a glance. No, you can tell a file’s name, size, and date from a directory listing. The file type is based on the filename extension, so it could be misleading. No, the only way to peer into a file and examine its brooding data is to dump.
The Linux hexdump utility performs the file dumping task quite well. So, this chapter is over.
Seriously, using the utility doesn’t help you learn how to write your own file utilities, customized the way you like. I call this new utility dumpfile. It works like hexdump, but it works the way I like it to.
9.2.1 Reading file data
A dumpfile utility could be written as a filter, just like Linux’s hexdump. As a filter, hexdump chews through all input whether it originates from a file or is the output from some program. If you’re interested in such a task, review chapter 4 for information on filters in the Linux environment. You can adapt the dumpfile code presented in this chapter as a filter, though I prefer that dumpfile work as a traditional command-line utility.
Utilities that read data from a file use two approaches. The first is to specify the filename at the command prompt—usually, as the first (and often only) argument. The second way is to prompt for a filename after the utility starts, or to prompt for the filename if it’s missing as a command-line argument. For now, I assume that the filename argument is supplied as a command-line argument. Therefore, the utility must check for such an argument. This confirmation requires that the main() function specify and use its arguments:
int main(int argc, char *argv[])
The value of argc is always at least 1, which is the program’s filename. If the user types any arguments, the value of argc is greater than 1. The program first confirms that an argument is present. If not, a warning message is sent to the standard error device (stderr) and the program terminates:
if( argc<2 )
{
    fprintf(stderr,"Format: dumpfile filename
");
    exit(1);
}
The exit() function requires that the stdlib.h header file be included. Otherwise, you could use return(1) to exit the main() function at this point in the code. I prefer exit() in that it can be used in any function to terminate a program, plus it’s tied into other functions such as atexit() or on_exit(), which gives using exit() a strategic advantage over the return keyword. Also, it’s shorter to type.
After the argument count is confirmed, the string held in argv[1] is used in the fopen() function to read the file’s data. This step not only opens the file but also, upon success, determines whether the file is present. I use the char pointer filename to reference the string in argv[1], which aids readability:
filename = argv[1];
fp = fopen(filename,"r");
if( fp==NULL )
{
    fprintf(stderr,"Unable to open file '%s'
",filename);
    exit(1);
}
My first choice for processing a file’s data was to use the fgets() function to read in 16 bytes at a time; 16 is the number of hex bytes in a row of output. But if I want to use my existing line_out() function as is, I can’t have the 16th byte in the data be the null character. This byte is what the fgets() function adds to the buffer it reads, unless a newline is encountered first.
My second choice was to use fread(). Where fgets() is a string-reading function, fread() consumes data in a given chunk size. It could easily fill a 16-byte buffer with raw data, which is what I want. Even so, I opted instead to use the fgetc() function, which reads one character a time. Set in a while loop, this function gobbles characters, adding them to a 16-byte buffer and handling the EOF condition when it’s encountered.
The following listing shows the core of the main() function from the source code file dumpfile01.c. The while loop repeats until the end of file (EOF) is found for FILE pointer fp. Byte value ch is fetched from the file and immediately tested for the EOF marker. After the EOF is detected, the value of variable index is tested against zero, meaning the buffer still has data to print. If so, the line_out() function is called. Otherwise, the file still has data to read, and character ch is stored in the buffer. Once the buffer is full (index==length), the line_out() function is called. The full code can be found in the online repository as dumpfile01.c.
Listing 9.5 The character-reading loop from dumpfile01.c
while( !feof(fp) )                             ❶
{
    ch = fgetc(fp);                            ❷
    if( ch==EOF )                              ❸
    {
        if( index != 0 )                       ❹
            line_out(offset,index,buffer);     ❺
        break;                                 ❻
    }
    buffer[index] = ch;                        ❼
    index++;                                   ❽
    if( index==length )                        ❾
    {
        line_out(offset,length,buffer);        ❿
        offset+=length;                        ⓫
        index = 0;                             ⓬
    }
}
❶ Loops until the end of file is encountered
❸ Immediately tests for the end of file
❹ If the index is zero, the buffer is empty; otherwise . . .
❺ . . . it outputs the final line of the hex dump.
❽ Increments the index into the buffer
❾ If the buffer is full, outputs a row of the hex dump
⓬ Resets the index to start reading the next length (16) bytes
After reading all bytes from the file, and the while loop has terminated, the file is closed and the program finishes.
I’ve created a test data file to read, bytes.dat. It’s available in the online repository along with all this chapter’s source code files. This file contains sequential byte values from 0x00 through 0xFF, which I used to test and debug the program created from the dumpfile01.c source code file. Here is some sample output:
00000  00 01 02 03 04 05 06 07  08 09 0A 0B 0C 0D 0E 0F
00010  10 11 12 13 14 15 16 17  18 19 1A 1B 1C 1D 1E 1F
00020  20 21 22 23 24 25 26 27  28 29 2A 2B 2C 2D 2E 2F   !"#$%&'()*+,-./
00030  30 31 32 33 34 35 36 37  38 39 3A 3B 3C 3D 3E 3F  0123456789:;<=>?
00040  40 41 42 43 44 45 46 47  48 49 4A 4B 4C 4D 4E 4F  @ABCDEFGHIJKLMNO
00050  50 51 52 53 54 55 56 57  58 59 5A 5B 5C 5D 5E 5F  PQRSTUVWXYZ[]^_
00060  60 61 62 63 64 65 66 67  68 69 6A 6B 6C 6D 6E 6F  `abcdefghijklmno
00070  70 71 72 73 74 75 76 77  78 79 7A 7B 7C 7D 7E 7F  pqrstuvwxyz{|}~
00080  80 81 82 83 84 85 86 87  88 89 8A 8B 8C 8D 8E 8F
00090  90 91 92 93 94 95 96 97  98 99 9A 9B 9C 9D 9E 9F
000A0  A0 A1 A2 A3 A4 A5 A6 A7  A8 A9 AA AB AC AD AE AF
000B0  B0 B1 B2 B3 B4 B5 B6 B7  B8 B9 BA BB BC BD BE BF
000C0  C0 C1 C2 C3 C4 C5 C6 C7  C8 C9 CA CB CC CD CE CF
000D0  D0 D1 D2 D3 D4 D5 D6 D7  D8 D9 DA DB DC DD DE DF
000E0  E0 E1 E2 E3 E4 E5 E6 E7  E8 E9 EA EB EC ED EE EF
000F0  F0 F1 F2 F3 F4 F5 F6 F7  F8 F9 FA FB FC FD FE FF
9.2.2 Fixing uneven output
Only a few files in the digital realm have sizes of a value evenly divided by 16. For these files, the dumpfile program works perfectly. True, the program can handle reading bytes from any file size, but when the file size isn’t exactly divisible by 16, it has an ugly effect on the output.
Here you see the tail end of the dumpfile utility’s output applied to the text of Shakespeare’s 18th Sonnet:
....
00230  72 65 61 74 68 65 20 6F  72 20 65 79 65 73 20 63  reathe or eyes c
00240  61 6E 20 73 65 65 2C 0A  53 6F 20 6C 6F 6E 67 20  an see, So long
00250  6C 69 76 65 73 20 74 68  69 73 2C 20 61 6E 64 20  lives this, and
00260  74 68 69 73 20 67 69 76  65 73 20 6C 69 66 65 20  this gives life
00270  74 6F 20 74 68 65 65 2E  0A to thee.
At offset 0x00270 (the last line), you see the file’s final byte, 0A, immediately followed by the line’s ASCII column. The text “to thee” is several spaces to the left of where it should line up—if the file ended exactly at a 16-byte boundary.
To resolve this problem, the line_out() function must be modified. It must know when a line of output doesn’t match the default output length of 16 bytes. Speaking of which, in all the code presented so far, the output width is consistently 16 bytes. This specifies this value as a constant in the main() function:
const int length = 16;
Defined here, the constant’s value is seen only inside the main() function. Because this value is also now relevant to the line_out() functions, I’ve reestablished it as a defined constant. The following preprocessor directive creates it:
#define SIZE 16
This change is found in the updated source code file, dumpfile02.c.
In the next listing, you see how defined constant SIZE is used in the line_out() function to help test when the final line of output is shorter than 16 bytes. This change requires the addition of an if statement between the two existing for loops. The if decision helps to balance out the remainder of the last row of output so that the ASCII column lines up.
Listing 9.6 Updating the line_out() function to account for a short, final line
if( length<SIZE )              ❶
{
    for( ; a<SIZE; a++ )       ❷
    {
        printf("   ");         ❸
        if( (a+1)%8==0 )       ❹
            putchar(' ');
    }
}
❶ If the row has fewer than SIZE (16) bytes . . .
❷ Continues the loop using variable a
❹ Adds an extra space after the 8th and 16th bytes
The for loop (refer to listing 9.6) lacks an initializing condition, as it just continues with the current value of variable a as it left the preceding loop. The loop outputs a set of three spaces to balance out any missing hex byte values. The if( (a+1)%8==0 ) test accounts for the extra space added after every eight bytes, which separates the two hex columns.
The full source code is available in the repository as dumpfile02.c. Here is the output using the same file used earlier, but improved now over the first version of the code:
...
00230  72 65 61 74 68 65 20 6F  72 20 65 79 65 73 20 63  reathe or eyes c
00240  61 6E 20 73 65 65 2C 0A  53 6F 20 6C 6F 6E 67 20  an see, So long
00250  6C 69 76 65 73 20 74 68  69 73 2C 20 61 6E 64 20  lives this, and
00260  74 68 69 73 20 67 69 76  65 73 20 6C 69 66 65 20  this gives life
00270  74 6F 20 74 68 65 65 2E  0A                       to thee.
Is programming ever done? To further update the source code for dumpfile02.c, modify the main() function so that if the filename argument is missing, the program prompts for it.
It’s important that your code identify when the user just presses Enter or otherwise dismisses the filename prompt. There’s no point in the program attempting to open a NULL string filename. Beyond this requirement, you don’t need to otherwise validate the filename, because the fopen() statement does so automatically. My solution is available in the online repository as dumpfile03.c.
9.3 Command-line options
What can you add to the dumpfile program? For starters, how about abbreviated output, showing only the hex bytes? Or for you old timers, how about adding an option to display the bytes in octal, base 8? You can probably think of more features to add, perhaps color-coded output? Obviously, such complications would require a Help system to provide some documentation. Oh, I could go on!
As a command-line utility, options and features are controlled by switches—additional command-line arguments that activate, deactivate, or specify quantities and limits. In Linux, these switches have a format: -a, where a letter is preceded by a dash or hyphen. (Windows uses the slash character (/), which was a dumb decision Microsoft made years ago, before Bill Gates was eligible to vote.)
In Linux, you can specify multiple switches:
dumpfile -a -b -c
These can be bunched together:
dumpfile -abc
And some switches can have options:
dumpfile -q:5
You could toil with tests and loops to examine the switches. Or you can take advantage of a handy C library feature: the getopt() function. It helps your program process switches so that you don’t have to write the code.
9.3.1 Using the getopt() function
The getopt() function helps your code process command-line switches. I’m certain it’s used by just about every Linux command-line utility in existence, including several from the multiverse. Here is its man page format:
int getopt(int argc, char * const argv[], const char *optstring);
The first two arguments are identical to the main() function’s argc and *argv[] arguments. The final argument, optstring, is a list of valid switch characters. For example:
getopt(argc,argv,"abc");
Valid switches here are -a, -b, and -c. The function is called repeatedly, each time returning the ASCII code for a valid character (an int value), the character '?' for an unknown option, or -1 when the function has exhausted all command-line options.
The companion getopt_long() function handles full word switches, though for this chapter I explore only the getopt() function to handle the traditional, single-character switches.
Both getopt() and getopt_long() require that the unistd.h header file be included in your code.
Listing 9.7 shows code I used as a test before adding the getopt() function to my dumpfile code. Global variable opterr is set to zero to ensure that getopt() doesn’t output its own error messages. The getopt() function itself resides inside a while loop’s condition. The function’s return value is compared with -1, meaning that all command-line arguments have been examined, which stops the loop. Otherwise, the value returned in variable r is used in a switch-case structure to indicate which option is set. This setup is how the getopt() function is typically implemented.
Listing 9.7 Source code for options01.c
#include <stdio.h>
#include <unistd.h>                                  ❶

int main(int argc, char *argv[])
{
    int r;

    opterr = 0;                                      ❷
    while( (r=getopt(argc,argv,"abc")) != -1 )       ❸
    {
        switch(r)                                    ❹
        {
            case 'a':                                ❺
                puts("alfa option set");
                break;
            case 'b':
                puts("bravo option set");
                break;
            case 'c':
                puts("charlie option set");
                break;
            case '?':                                ❻
                printf("Switch '%c' is invalid
",optopt);
                break;
            default:                                 ❼
                puts("Unknown option");
        }
    }

    return(0);
}
❶ The unistd.h header file is required for the getopt() function.
❷ Suppresses error output from getopt()
❸ Scans the arguments, repeating the loop until every argument is processed
❹ Examines the character returned
❺ The case statements examine each valid option letter.
❻ A question mark is returned for unknown/invalid options.
❼ I doubt the default condition is ever met.
The fun comes when testing the program built from the options01.c source code. First, try no options:
$ ./options
All options are specified here:
$ ./options -a -b -c
alfa option set
bravo option set
charlie option set
And they can be specified in any order:
$ ./options -c -a -b
charlie option set
alfa option set
bravo option set
Or a single pair, but bunched together:
$ ./options -cb
charlie option set
bravo option set
The getopt() function allows you all the flexibility to read options in this manner without having to code the complex comparisons and processing yourself. Of course, the code so far does nothing with the options. The next step is to add variables that represent on-off switches for what the options attempt to accomplish.
In my update from options01.c to options02.c, I add three int variables: alfa, bravo, and charlie. Each is initialized before the getopt() statement in the while loop:
alfa = 0;
bravo = 0;
charlie = 0;
In the switch-case structure, remove the puts() statements and replace them with statements that set the variables value to 1 (TRUE) for active:
alfa = 1;
Next, after the while loop, add a series of if statements to output the results:
if( alfa ) puts("alfa option set");
if( bravo ) puts("bravo option set");
if( charlie ) puts("charlie option set");
if( alfa+bravo+charlie==0 ) puts("No options set");
The final if statement displays a message when no options are set.
The source code for options02.c is found in this book’s online repository. Here are some sample runs:
$ ./options
No options set
Because the switches can be examined in this new code, a lack of options is easily identified.
The output for setting all options is the same as with the first version of the code:
$ ./options -a -b -c
alfa option set
bravo option set
charlie option set
The remaining variations for the switches have the same output as the original program. The difference is that the program is now aware of the settings and can examine the variables to perform whatever magic is requested.
9.3.2 Updating the dumpfile program code
To add command-line options to a utility, you must know what the options do. Then you use a function like getopt() to scan for and set the options. Finally, the options must be implemented in code.
For the dumpfile program, here are options I’m presenting:
These switches can be processed as shown earlier with the options series of source code files. With the dumpfile program, however, the first argument is a filename. In fact, it must be a filename: to help process command-line switches, the program can no longer prompt for a filename if one is missing (if you completed exercise 9.4). Further, the filename must always be the first argument, argv[1]. (Technically, it’s the second argument, because the program filename is first or argv[0].)
The first step to adding and processing arguments is to modify the main() function. If a prompt for a missing filename was added in exercise 9.4, it’s now removed. The code is honed to assume that the first argument is a filename. The following statements are added before the while loop in the main() function:
if( argc<2 )
{
    puts("Format: dumpfile filename [options]");
    exit(1);
}
If the program survives this if test, the next new chunk of code checks to see whether the -h “help” switch is specified first. If not, the program may attempt to open the file -h. So, a quick comparison is made for -h as the first argument. If found, the help() function is called:
filename = argv[1];

if( strcmp(filename,"-h")==0 )
    help();
Because the program assumes the first argument is a filename, this step is necessary even if you use the getopt() function elsewhere in the code to look for the -h switch. In fact, this type of comparison is how I would test for switches if the getopt() function were unavailable. If the -h switch is the first argument, the help() function is called and helpful text is output. The program ends. Otherwise, the program can continue testing options.
To process the rest of the switches, I use a single int variable options. This variable is declared externally—a global variable, which gives all functions access to its value:
int options;
As with the options series of programs, in the updated code for dumpfile each of the three valid switches—-a, -o, and -h—are tested for in a while loop, shown in the following listing. I use only one variable, the external integer options, to track the settings. It’s initialized to zero, along with other variables used elsewhere in the main() function. For two of the switches, a macro alters the value of variable options: set_abbr() for -a and set_oct() for -o. If the help switch is specified, the help() function is called where text is output and the program terminates.
Listing 9.8 The while loop inside the main() function, in dumpfile04.c
offset = index = options = 0;               ❶
while( (r=getopt(argc,argv,"aosh")) != -1 ) ❷
{
    switch(r)
    {
        case 'a':
            set_abbr();                     ❸
            break;
        case 'o':
            set_oct();                      ❹
            break;
        case 'h':
            help();                         ❺
        case '?':
            printf("Switch '%c' is invalid
",optopt);
            break;
        default:
            puts("Unknown option");
    }
}
❶ Variables offset and index are used elsewhere in the main() function.
❷ Valid switches are a, o, s, and h.
❸ For the -a switch, the set_abbr() macro modifies variable options.
❹ For the -o switch, the set_oct() macro modifies variable options.
❺ For -h, the help() function is called and the program quits.
By making variable options external, the line_out() function need not be modified. Otherwise, I’d have to add another argument to the list, one to accept the variable options to examine the command-line switches. Having a single variable options also avoids adding even more arguments to the line_out() function. Its declaration would eventually become a mess. No, this situation is one of those rare times a global variable is an effective solution to a problem.
The macros set_abbr() and set_oct() allow the code to modify variable options by setting specific bits. Each of the set macros has a companion test macro that can be used in the line_out() function. The test macro returns TRUE (1) when the option is set, which allows the macro to be used as an if condition to activate a feature.
The next listing shows the macros as they’re defined at the start of the source code file. First, the options variable is declared, and then binary values are assigned for the options, ABBR and OCT. Finally, the set and test macros are defined, using bitwise logic to set and evaluate the bits in variable options.
Listing 9.9 Creating macros to modify and test variable options
int options;                                   ❶

#define SIZE 16                                ❷
#define ABBR 1                                 ❸
#define OCT 2                                  ❹
#define set_abbr() options|=ABBR               ❺
#define test_abbr() ((options&ABBR)==ABBR)     ❻
#define set_oct() options|=OCT                 ❼
#define test_oct() ((options&OCT)==OCT)        ❽
❶ Declares the external variable before it’s used
❷ Size value is used elsewhere in the code, 16 bytes per line.
❸ Abbreviation status is bit 1.
❹ Octal output status is bit 2.
❺ Uses the bitwise logical OR to set bit 1 (ABBR) in variable options
❻ Uses the bitwise logical AND to test bit 1 (ABBR) in variable options
❼ Uses the bitwise logical OR to set bit 2 (OCT) in variable options
❽ Uses the bitwise logical AND to test bit 2 (OCT) in variable options
The defined constants ABBR and OCT represent bit positions in the variable options that don’t overlap. Each bit can be set or examined without changing the other bits. This approach allows for more options to be added in the same manner, on up to the full bit width of an int variable.
The macros add to readability, but more important, by creating a macro, I make updating the code easier. For example, changing an option is done in one location as opposed to fishing around the code for everywhere it’s referenced.
The full code for the modified dumpfile program is available in the online repository as dumpfile04.c. The only item I haven’t discussed is the help() function. It’s shown here. The next few sections cover the code required to implement the -a and -o switches.
Listing 9.10 The help() function from dumpfile04.c
void help(void)
{
    puts("dumpfile - output a file's raw data");
    puts("Format: dumpfile filename [options]");
    puts("Options:");
    puts("-a abbreviated output ");
    puts("-o output octal instead of hex");
    puts("-h display this text");
    exit(1);
}
9.3.3 Setting abbreviated output
The dumpfile program’s current output is good for nerds who want to examine bytes in files. It shows an offset column, hex bytes, and then character representation of ASCII codes. This presentation is what I prefer, though at times all that’s needed is just the byte dump. To accomplish this goal, users can specify the -a switch for abbreviated program output.
The mechanics behind the -a switch are already present in the dumpfile04.c source code. All that’s required is implementing the on-off portions of the code: with abbreviated output active, some items in the line_out() function are suppressed. For these items, an if statement is added with the test_abbr() macro as its condition. The result is a toggle that activates portions of the output only when the -a switch isn’t specified.
Modifications must be made at three points in the line_out() function. The first is for the initial column, which outputs the offset. The printf() statement is executed only when the test_abbr() macro returns zero. The not operator (!) is used to negate the macro:
if( !test_abbr() )
{
    printf("%05X ",offset);
}
If the -a switch is specified, the printf() statement is skipped. Otherwise, for normal output, it’s executed.
Next, in the for loop that outputs the hex bytes, the existing code adds an extra space for readability:
if( (a+1)%8==0 )
    putchar(' ');
This space isn’t needed for a plain hex dump. Again, the test_abbr() macro is added to the if condition to disable the space output when the -a switch is specified. Here is the modification:
if( (a+1)%8==0 && !test_abbr() )
    putchar(' ');
Another space is added when the line length is less than the LENGTH constant. This statement (at line 37 in the dumpfile05.c source code file) need not be modified because the ASCII column is also suppressed.
Finally, the last part of the line_out() function to be modified is the for loop that outputs the ASCII column. This chunk of code is enclosed in an if test like the first column:
if( !test_abbr() )
{
    putchar(' ');
    for( a=0; a<length; a++ )
    {
        if( *(data+a)>=' ' && *(data+a)<='~' )
            putchar( *(data+a) );
        else
            putchar(' ');
    }
}
Each time the test_abbr() macro is used, it’s prefixed with the not (!) operator. This may cause you to think about rewriting the macro so that its evaluation is reversed. You could do so, though I chose to be consistent with both macros in that they return 1 when the switch is active.
The full source code for adding the -a switch is available in the online repository as dumpfile05.c. Here is a sample run on the bytes.dat file, which contains sequential value 0 through 255:
$ ./dumpfile bytes.dat -a
 00 01 02 03 04 05 06 07 08 09 0A 0B 0C 0D 0E 0F
 10 11 12 13 14 15 16 17 18 19 1A 1B 1C 1D 1E 1F
 20 21 22 23 24 25 26 27 28 29 2A 2B 2C 2D 2E 2F
 30 31 32 33 34 35 36 37 38 39 3A 3B 3C 3D 3E 3F
 40 41 42 43 44 45 46 47 48 49 4A 4B 4C 4D 4E 4F
 50 51 52 53 54 55 56 57 58 59 5A 5B 5C 5D 5E 5F
 60 61 62 63 64 65 66 67 68 69 6A 6B 6C 6D 6E 6F
 70 71 72 73 74 75 76 77 78 79 7A 7B 7C 7D 7E 7F
 80 81 82 83 84 85 86 87 88 89 8A 8B 8C 8D 8E 8F
 90 91 92 93 94 95 96 97 98 99 9A 9B 9C 9D 9E 9F
 A0 A1 A2 A3 A4 A5 A6 A7 A8 A9 AA AB AC AD AE AF
 B0 B1 B2 B3 B4 B5 B6 B7 B8 B9 BA BB BC BD BE BF
 C0 C1 C2 C3 C4 C5 C6 C7 C8 C9 CA CB CC CD CE CF
 D0 D1 D2 D3 D4 D5 D6 D7 D8 D9 DA DB DC DD DE DF
 E0 E1 E2 E3 E4 E5 E6 E7 E8 E9 EA EB EC ED EE EF
 F0 F1 F2 F3 F4 F5 F6 F7 F8 F9 FA FB FC FD FE FF
9.3.4 Activating octal output
Older programmers have more of an attraction to octal than younger coders. I’m on the cusp, at the age where octal was introduced to me as a young coder, but we never got a chance to date.
Octal is the base-8 counting system, which fits in nicely with three bits of data. Before the microcomputer era, this counting base was commonly used on mainframes and in programming. You still see vestiges of octal, primarily in file permission bits in a Linux directory listing. The octal counting base is shown in table 9.3.
Table 9.3 Octal, decimal, and hexadecimal values
Like many programming languages, C deftly handles octal values. To specify octal, you use the zero prefix: 01 is octal 1, 010 is octal 10 (decimal 8), and so on. Your source code editor may be wise enough to pick up on octal values and highlight them accordingly.
The printf() and scanf() placeholder for octal values is %o. Like other placeholders, it features width values and zero-padding.
For the sake of the old timers, I added an octal output switch to the dumpfile program. This switch required several updates to the code, for not only octal output but also spacing and alignment in the program’s output.
Three changes are required to activate the -o switch, updating the dumpfile05.c source code file to its next iteration, dumpfile06.c. Each of these changes is found in the line_out() function. The test_oct() macro is used as an if condition, which returns TRUE when the -o switch has been specified.
When the octal switch is active, the first column needs to output octal values instead of hex. This decision is in addition to whether the column is output when test_abbr() macro is true (or false). An if-else structure handles the differing output:
if( !test_abbr() )
{
    if( test_oct() )
        printf("%05o ",offset);
    else
        printf("%05X ",offset);
}
The %05o placeholder outputs the value of variable offset as an octal number five digits wide with zeros padded on the left.
The next change takes place in the fo loop that outputs the bytes. It’s pretty much the same type of decision: when the test_oct() macro returns TRUE, octal values are output instead of decimal:
if( test_oct() )
    printf(" %03o",*(data+a));
else
    printf(" %02X",*(data+a));
The placeholder %03o outputs an octal value three digits wide with zeros padded on the left. The effect on the output is that each line of bytes is now wider than a typical 80-column screen. Still, if the user wants octal output, the program provides.
The final change is made when the last line of output is shorter than 16 bytes. Because the octal values are output three characters wide instead of two, four spaces are needed for each missing byte to line up the ASCII column:
if( test_oct() )
    printf("    ");
else
    printf("   ");
These changes are included in the source code file dumpfile06.c, available in this book’s online repository. Here is output from the dumpfile program on the bytes.dat file with both the -a and -o switches specified:
 000 001 002 003 004 005 006 007 010 011 012 013 014 015 016 017
 020 021 022 023 024 025 026 027 030 031 032 033 034 035 036 037
 040 041 042 043 044 045 046 047 050 051 052 053 054 055 056 057
 060 061 062 063 064 065 066 067 070 071 072 073 074 075 076 077
 100 101 102 103 104 105 106 107 110 111 112 113 114 115 116 117
 120 121 122 123 124 125 126 127 130 131 132 133 134 135 136 137
 140 141 142 143 144 145 146 147 150 151 152 153 154 155 156 157
 160 161 162 163 164 165 166 167 170 171 172 173 174 175 176 177
 200 201 202 203 204 205 206 207 210 211 212 213 214 215 216 217
 220 221 222 223 224 225 226 227 230 231 232 233 234 235 236 237
 240 241 242 243 244 245 246 247 250 251 252 253 254 255 256 257
 260 261 262 263 264 265 266 267 270 271 272 273 274 275 276 277
 300 301 302 303 304 305 306 307 310 311 312 313 314 315 316 317
 320 321 322 323 324 325 326 327 330 331 332 333 334 335 336 337
 340 341 342 343 344 345 346 347 350 351 352 353 354 355 356 357
 360 361 362 363 364 365 366 367 370 371 372 373 374 375 376 377
Output with the -o switch alone is too wide to show as text. Figure 9.1 illustrates how the output looks in a terminal window with the dimensions 100 columns by 24 rows.
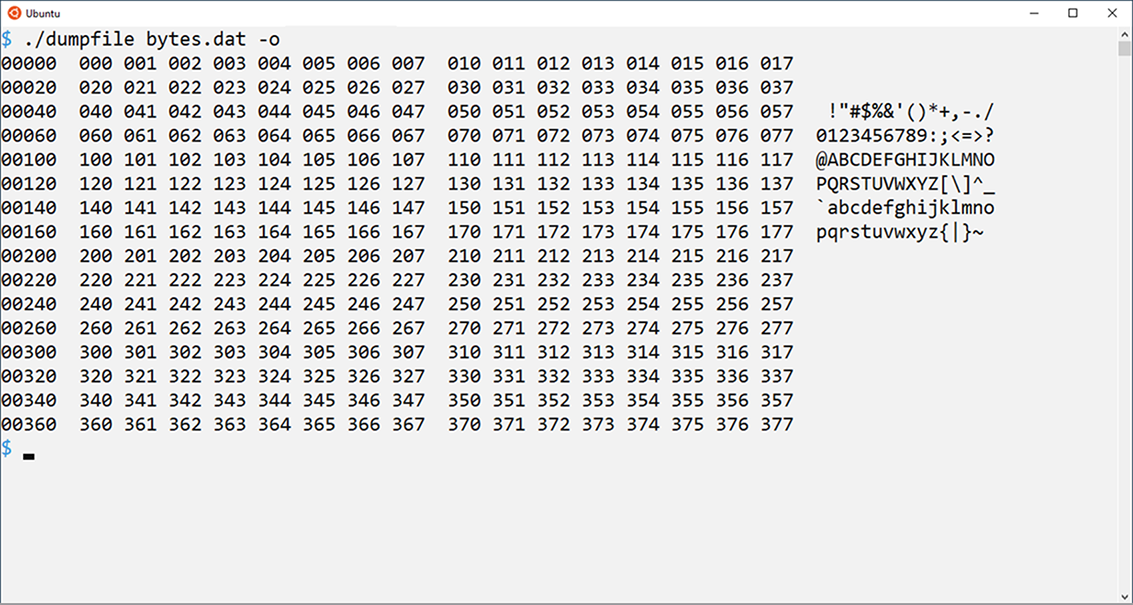
Figure 9.1 Output from the dumpfile program with the -o switch is kinda wide.
How about adding one more switch to the dumpfile program? The -v switch is commonly used to output the program’s version number. I would recommend setting these values as defined constants: separate major and minor version numbers, or a complete version number string.
Add both the -v switch as well as the code (the version() function) to output the version number. The program can quit after performing this task. And remember that some users may use the -v switch as the program’s only argument. My solution to this exercise is found in the online repository as dumpfile07.c.