
The framework that we just reviewed is nothing more than this. It provides us with all the functionality we need to make a tree, but we have to make the actual tree ourselves. For the purposes of this book, a somewhat manually constructed tree is provided.
Before we set up our tree, let's look at what we're trying to accomplish. It is often helpful to visualize a tree before implementing it. Our tree will count up from zero to a specified value. Along the way, it will check whether certain conditions are met for that value and report its state accordingly. The following diagram illustrates the basic hierarchy for our tree:

For our tests, we will use a three-tier tree, including the root node:
- Node 1: This is our root node. It has children, and we want to be able to return a success if any of the children is a success, so we'll implement it as a selector.
- Node 2a: We'll implement this node using an
ActionNode. - Node 2b: We'll use this node to demonstrate how our inverter works.
- Node 2c: We'll run the same
ActionNodefrom node 2a again, and see how that affects our tree's evaluation. - Node 3: Node 3 happens to be the lone node in the third tier of the tree. It is the child of the 2b decorator node. This means that if it reports
SUCCESS, 2b will report aFAILURE, and vice versa.
At this point, we're still a bit vague on the implementation details, but the preceding diagram will help us to visualize our tree as we implement it in code. Keep it handy for reference as we go through the code.
We've now looked at the basic structure of our tree, and before we jump in and dig into the actual code implementation, let's look at our scene setup. The following screenshot shows our hierarchy; the nodes are highlighted for emphasis:
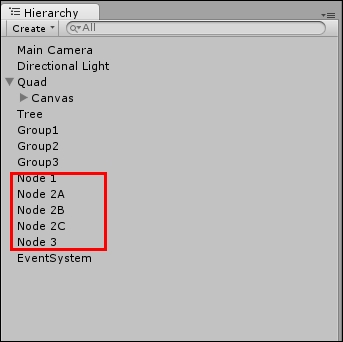
The setup is quite simple. There is a quad with a world-space canvas, which is simply to display some information during the test. The nodes highlighted in the preceding screenshot will be referenced in the code later, and we'll be using them to visualize the status of each individual node. The actual scene looks something like the following screenshot:

Our actual layout mimics the diagram we created earlier
As you can see, we have one node or box representing each one of the nodes that we laid out in our planning phase. These are referenced in the actual test code and will be changing colors according to the state that is returned.
Without further ado, let's have a look at the code driving our test. This is MathTree.cs:
using UnityEngine;
using UnityEngine.UI;
using System.Collections;
using System.Collections.Generic;

public class MathTree : MonoBehaviour {
    public Color m_evaluating;
    public Color m_succeeded;
    public Color m_failed;

    public Selector m_rootNode;

    public ActionNode m_node2A;
    public Inverter m_node2B;
    public ActionNode m_node2C;
    public ActionNode m_node3;

    public GameObject m_rootNodeBox;
    public GameObject m_node2aBox;
    public GameObject m_node2bBox;
    public GameObject m_node2cBox;
    public GameObject m_node3Box;

    public  int m_targetValue = 20;
    private int m_currentValue = 0;

    [SerializeField]
    private Text m_valueLabel;
The first few variables are simply used for debugging. The three color variables are the colors we'll be assigning to our node boxes to visualize their state. By default, RUNNING is yellow, SUCCESS is green, and FAILED is red. This is pretty standard stuff; let's move along.
We then declare our actual nodes. As you can see, m_rootNode is a selector as we mentioned earlier. Notice that we do not assign any of the node variables yet, since we have to pass in some data to their constructors.
We then have the references to the boxes we saw in our scene. These are just GameObjects that we drag-and-drop into the inspector (we'll have a look at that after we inspect the code).
We then have a couple of int values, which will make more sense as we look at the logic, so we'll skip over these. Lastly, we have a unity UI Text variable that will display some values for us during the test.
Let's get into the initialization of our actual nodes:
    /* We instantiate our nodes from the bottom up, and assign the children
     * in that order */
   void Start () {
        /** The deepest-level node is Node 3, which has no children. */
        m_node3 = new ActionNode(NotEqualToTarget);

        /** Next up, we create the level 2 nodes. */
        m_node2A = new ActionNode(AddTen);

        /** Node 2B is a selector which has node 3 as a child, so we'll pass
         * node 3 to the constructor */
        m_node2B = new Inverter(m_node3);

        m_node2C = new ActionNode(AddTen);

        /** Lastly, we have our root node. First, we prepare our list of children
         * nodes to pass in */
        List<Node> rootChildren = new List<Node>();
        rootChildren.Add(m_node2A);
        rootChildren.Add(m_node2B);
        rootChildren.Add(m_node2C);

        /** Then we create our root node object and pass in the list */
        m_rootNode = new Selector(rootChildren);

        m_valueLabel.text = m_currentValue.ToString();

        m_rootNode.Evaluate();

        UpdateBoxes();
   }
For the sake of organization, we declare our nodes from the bottom of the tree to the top of the tree, or the root node. We do this because we cannot instantiate a parent without passing in its child nodes, so we have to instantiate the child nodes first. Notice that m_node2A, m_node2C, and m_node3 are action nodes, so we pass in delegates (we'll look at these methods next). Then, m_node2B, being a selector, takes in a node as a child, in this case, m_node3. After we've declared these tiers, we throw all the tier 2 nodes into a list because our tier 1 node, the root node, is a selector that requires a list of children to be instantiated.
After we've instantiated all of our nodes, we kick off the process and begin evaluating our root node using its Evaluate() method. The UpdateBoxes() method simply updates the box game objects that we declared earlier with the appropriate colors; we'll look at that up ahead in this section:
private void UpdateBoxes() {
        /** Update root node box */
        if (m_rootNode.nodeState == NodeStates.SUCCESS) {
            SetSucceeded(m_rootNodeBox);
        } else if (m_rootNode.nodeState == NodeStates.FAILURE) {
            SetFailed(m_rootNodeBox);
        }

        /** Update 2A node box */
        if (m_node2A.nodeState == NodeStates.SUCCESS) {
            SetSucceeded(m_node2aBox);
        } else if (m_node2A.nodeState == NodeStates.FAILURE) {
            SetFailed(m_node2aBox);
        }

        /** Update 2B node box */
        if (m_node2B.nodeState == NodeStates.SUCCESS) {
            SetSucceeded(m_node2bBox);
        } else if (m_node2B.nodeState == NodeStates.FAILURE) {
            SetFailed(m_node2bBox);
        }

        /** Update 2C node box */
        if (m_node2C.nodeState == NodeStates.SUCCESS) {
            SetSucceeded(m_node2cBox);
        } else if (m_node2C.nodeState == NodeStates.FAILURE) {
            SetFailed(m_node2cBox);
        }

        /** Update 3 node box */
        if (m_node3.nodeState == NodeStates.SUCCESS) {
            SetSucceeded(m_node3Box);
        } else if (m_node3.nodeState == NodeStates.FAILURE) {
            SetFailed(m_node3Box);
        }
    }
There is not a whole lot to discuss here. Do notice that because we set this tree up manually, we check each node individually and get its
nodeState and set the colors using the SetSucceeded and SetFailed methods. Let's move on to the meaty part of the class:
private NodeStates NotEqualToTarget() {
        if (m_currentValue != m_targetValue) {
            return NodeStates.SUCCESS;
        } else {
            return NodeStates.FAILURE;
        }
    }

    private NodeStates AddTen() {
        m_currentValue += 10;
        m_valueLabel.text = m_currentValue.ToString();
        if (m_currentValue == m_targetValue) {
            return NodeStates.SUCCESS;
        } else {
            return NodeStates.FAILURE;
        }
    }
First, we have NotEqualToTarget(), which is the method we passed into our decorator's child action node. We're essentially setting ourselves up for a double negative here, so try to follow along. This method returns a success if the current value is not equal to the target value, and returns false otherwise. The parent inverter decorator will then evaluate to the opposite of what this node returns. So, if the value is not equal, the inverter node will fail; otherwise, it will succeed. If you're feeling a bit lost at this point, don't worry. It will all make sense when we see this in action.
The next method is the AddTen() method, which is the method passed into our other two action nodes. It does exactly what the name implies—it adds 10 to our m_currentValue variable, then checks if it's equal to our m_targetValue, and evaluates as SUCCESS if so, and FAILURE, if not.
The last few methods are self-explanatory so we will not go over them.
Now that we have a pretty good idea of how the code works, let's see it in action. First thing first, however. Let's make sure our component is properly setup. Select the Tree game object from the hierarchy, and its inspector should look similar to this:

The default settings for the component
As you can see, the state colors and box references have already been assigned for you, as well as the m_valueLabel variable. The m_targetValue variable has also been assigned for you via code. Make sure to leave it at (or set it to) 20 before you hit play. Play the scene, and you'll see your boxes lit up, as shown in the following screenshot:
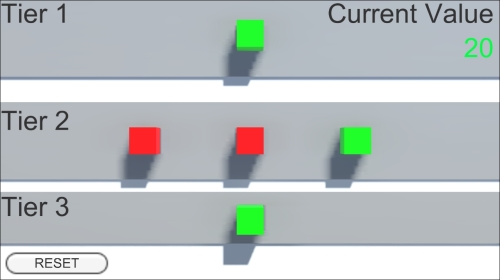
The boxes lit up, indicating the result of each node's evaluation
As we can see, our root node evaluated to SUCCESS, which is what we intended, but let's examine why, one step at a time, starting at tier 2:
- Node 2A: We started with
m_currentValueat0, so upon adding10to it, it's still not equal to ourm_targetValue(20) and it fails. Thus, it is red. - Node 2B: As it evaluates its child, once again,
m_currentValueandm_targetValueare not equal. This returnsSUCCESS. Then, the inverter logic kicks in and reverses this response so that it reportsFAILUREfor itself. So, we move on to the last node. - Node 2C: Once again, we add
10tom_currentValue. It then becomes20, which is equal tom_targetValue, and evaluates asSUCCESS, so our root node is successful as result.
The test is simple, but it illustrates the concepts clearly. Before we consider the test a success, let's run it one more time, but change m_targetValue first. Set it to 30 in the inspector, as shown in the following screenshot:

The updated value is highlighted
A small change to be sure, but it will change how the entire tree evaluates. Play the scene again, and we will end up with the set of nodes lit up, as shown in the following screenshot:

A clearly different from our first test
As you can see, all but one of the child nodes of our root failed, so it reports FAILURE for itself. Let's look at why:
- Node 2A: Nothing really changes here from our original example. Our
m_currentValuevariable starts at0and ends up at10, which is not equal to ourm_targetValueof30, so it fails. - Node 2B: This evaluates its child once more, and because the child node reports
SUCCESS, it reportsFAILUREfor itself, and we move on to the next node. - Node 2C: Once again, we add
10to ourm_currentValuevariable, adding up to20, which, after having changed them_targetValuevariable, no longer evaluates toSUCCESS.
The current implementation of the nodes will have unevaluated nodes default to SUCCESS. This is because of our enum order, as you can see in NodeState.cs:
public enum NodeStates {
    SUCCESS,
    FAILURE,
    RUNNING,
}
In our enum, SUCCESS is the first enumeration, so if a node never gets evaluated, the default value is never changed. If you were to change the m_targetValue variable to 10, for example, all the nodes would light up to green. This is simply a by-product of our test implementation and doesn't actually reflect any design issues with our nodes. Our UpdateBoxes() method updates all the boxes whether they were evaluated or not. In this example, node 2A would immediately evaluate as SUCCESS, which, in turn, would cause the root node to report SUCCESS, and neither nodes 2B, 2C, nor 3 would be evaluated at all, having no effect on the evaluation of the tree as a whole.
You are highly encouraged to play with this test. Change the root node implementation from a selector to a sequence, for example. By simply changing public Selector m_rootNode; to public Sequence m_rootNode; and m_rootNode = new Selector(rootChildren); to m_rootNode = new Sequence(rootChildren);, you can test a completely different set of functionality.