
In the sample project for this chapter, you'll find a Tower prefab in the Prefabs folder. The tower itself is quite simple; it's just a group of primitives arranged to look like a cannon, as you can see in the following screenshot:

Our beautiful primitive shape tower
The barrel of the gun is affixed to the spherical part of the tower. The gun can rotate freely on its axis when tracking the player so that it can fire in the direction of its target, but it is immobile in any other way. Once the tank gets far enough away, the tower cannot chase it or reposition itself.
In the sample scene, there are several towers placed throughout the level. As they are prefabbed, it's very easy to duplicate towers, move them around, and reuse them between the levels. Their setup is not terribly complicated either. Their hierarchy looks similar to the following screenshot:
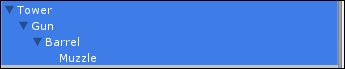
The Tower hierarchy in the inspector
The breakdown of the hierarchy is as follows:
Tower: Technically, this is the base of the tower—the cylinder that holds the rest of it up. This serves no function but to hold the rest of the parts.Gun: The gun is where most of the magic happens. It is the sphere mounted on the tower with the barrel on it. This is the part of the tower that moves and tracks the player.BarrelandMuzzle: The muzzle is located at the tip of the barrel. This is used as the spawn point for the bullets that come out of the gun.
We mentioned that the gun is where the business happens for the tower, so let's dig in a bit deeper. The inspector with the gun selected looks similar to the following screenshot:

The inspector for the gun
There is quite a bit going on in the inspector here. Let's look at each of the components that affect the logic:
- Sphere Collider: This is essentially the tower's range. When the tank enters this sphere, the tower can detect it and will lock on to it to begin shooting at it. This is our implementation of perception for the tower. Notice that the radius is set to
7. The value can be changed to whatever you liked, but 7 seems to be a fair value. Also, note that we set the Is Trigger checkbox to true. We don't want this sphere to actually cause collisions, just to fire trigger events. - Rigidbody: This component is required for the collider to actually work properly whether objects are moving or not. This is because Unity does not send collision or trigger events to game objects that are not moving, unless they have a rigid body component.
- Tower: This is the logic script for the tower. It works in tandem with the state machine and the state machine behavior, but we'll look at these components more in depth shortly.
- Animator: This is our tower's state machine. It doesn't actually handle animation.
Before we look at the code that drives the tower, let's take a brief look at the state machine. It's not terribly complicated, as you can see in the following screenshot:

The state machine for the tower
There are two states that we care about: Idle (the default state) and LockedOn. The transition from Idle to LockedOn happens when the TankInRange bool is set to true, and the reverse transition happens when the bool is set to false.
The LockedOn state has a StateMachineBehaviour class attached to it, which we'll look at next:
using UnityEngine;
using System.Collections;

public class LockedOnState : StateMachineBehaviour {

    GameObject player;
    Tower tower;

   // OnStateEnter is called when a transition starts and the state machine starts to evaluate this state
    override public void OnStateEnter(Animator animator, AnimatorStateInfo stateInfo, int layerIndex) {
        player = GameObject.FindWithTag("Player");
        tower = animator.gameObject.GetComponent<Tower>();
        tower.LockedOn = true;
    }

     //OnStateUpdate is called on each Update frame between OnStateEnter and OnStateExit callbacks
  override public void OnStateUpdate(Animator animator, AnimatorStateInfo stateInfo, int layerIndex) {
        animator.gameObject.transform.LookAt(player.transform);
  }

  // OnStateExit is called when a transition ends and the state machine finishes evaluating this state
    override public void OnStateExit(Animator animator, AnimatorStateInfo stateInfo, int layerIndex) {
        animator.gameObject.transform.rotation = Quaternion.identity;
        tower.LockedOn = false;
    }
}
When we enter the state and OnStateEnter is called, we find a reference to our player. In the provided example, the player is tagged as "Player" so that we are able to get a reference to it using GameObject.FindWithTag. Next, we fetch a reference to the Tower component attached to our tower prefab and set its LockedOn bool to true.
As long as we're in the state, OnStateUpdate gets called on each frame. Inside this method, we get a reference to the Gun
GameObject (which the Tower component is attached to) via the provided Animator reference. We use this reference to the gun to have it track the tank using Transform.LookAt.
Lastly, as we exit the state, OnStateExit gets called. We use this method to do a little cleanup. We reset the rotation of our gun to indicate that it is no longer tracking the player, and we set the Tower's LockedOn bool back to false.
As we can see, this StateMachineBehaviour interacts with the Tower.cs script, so let's look at Tower.cs next for a bit more context as to what's happening:
using UnityEngine;
using System.Collections;

public class Tower : MonoBehaviour {
    [SerializeField]
    private Animator animator;

    [SerializeField]
    private float fireSpeed = 3f;
    private float fireCounter = 0f;
    private bool canFire = true;

    [SerializeField]
    private Transform muzzle;
    [SerializeField]
    private GameObject projectile;

    private bool isLockedOn = false;

    public bool LockedOn {
        get { return isLockedOn; }
        set { isLockedOn = value; }
    }
First up, we declare our variables and properties.
We need a reference to our state machine; this is where the Animator variable comes in. The next three variables, fireSpeed, fireCounter, and canFire all relate to our tower's shooting logic. We'll see how that works up later.
As we mentioned earlier, the muzzle is the location the bullets will spawn from when shooting. The projectile is the prefab we're going to instantiate.
Lastly, isLockedOn is get and set via LockedOn. While this book, in general, strays away from enforcing any particular coding convention, it's generally a good idea to keep values private unless explicitly required to be public, so instead of making isLockedOn public, we provide a property for it to access it remotely (in this case, from the LockedOnSate behavior):
private void Update() {
        if (LockedOn && canFire) {
            StartCoroutine(Fire());
        }
    }

    private void OnTriggerEnter(Collider other) {
        if (other.tag == "Player") {
            animator.SetBool("TankInRange", true);
        }
    }

    private void OnTriggerExit(Collider other) {
        if (other.tag == "Player") {
            animator.SetBool("TankInRange", false);
        }
    }

    private void FireProjectile() {
        GameObject bullet = Instantiate(projectile, muzzle.position, muzzle.rotation) as GameObject;
        bullet.GetComponent<Rigidbody>().AddForce(muzzle.forward * 300);
    }

    private IEnumerator Fire() {
        canFire = false;
        FireProjectile();
        while (fireCounter < fireSpeed) {
            fireCounter += Time.deltaTime;
            yield return null;
        }
        canFire = true;
        fireCounter = 0f;
    }
}
Next up, we have all our methods, and the meat and potatoes of the tower logic. Inside the Update loop, we check for two things: are we locked on and can we fire? If both are true, we fire off our Fire() coroutine. We'll look at why Fire() is a coroutine before coming back to the OnTrigger messages.
Tip
Coroutines can be a tricky concept to grasp if you're not already familiar with them. For more information on how to use them, check out Unity's documentation at http://docs.unity3d.com/Manual/Coroutines.html.
As we don't want our tower to be able to constantly shoot projectiles at the tank like a projectile-crazy death machine, we use the variables that we defined earlier to create a cushion between each shot. After we call FireProjectile() and set canFire to false, we start a counter from 0 up to fireSpeed, before we set canFire to true again. The FireProjectile() method handles the instantiation of the projectile and shoots it out toward the direction the gun is pointing to using Rigidbody.AddForce. The actual bullet logic is handled elsewhere, but we'll look at that later.
Lastly, we have our two
OnTrigger events—one for when something enters the trigger attached to this component and another for when an object leaves said trigger. Remember the TankInRange bool that drives the transitions for our state machine? This variable gets set to true here when we enter the trigger and back to false as we exit. Essentially, when the tank enters the gun's sphere of "vision", it instantly locks on to the tank, and the lock is released when the tank leaves the sphere.
If we look back at our Tower component in the inspector, you'll notice that a prefab named bullet is assigned to the projectile variable. This prefab can be found in the Prefabs folder of the sample project. The prefab looks similar to the following screenshot:

The bullet prefab
The bullet game object is nothing fancy; it's just a bright yellow orb. There is a sphere collider attached to it, and once again, we must make sure that IsTrigger is set to true and it has a Rigidbody (with gravity turned off) attached to it. We also have a Projectile component attached to the bullet prefab. This handles the collision logic. Let's take a look at the code:
using UnityEngine;
using System.Collections;

public class Projectile : MonoBehaviour {

    [SerializeField]
    private GameObject explosionPrefab;

  void Start () {  }

    private void OnTriggerEnter(Collider other) {
        if (other.tag == "Player" || other.tag == "Environment") {
            if (explosionPrefab == null) {
                return;
            }
            GameObject explosion = Instantiate(explosionPrefab, transform.position, Quaternion.identity) as GameObject;
            Destroy(this.gameObject);
        }
    }
}
We have a fairly straightforward script here. In our level, we have all of the floor and walls tagged as "Environment", so in our OnTriggerEnter method, we check that the trigger this projectile is colliding with is either the player or the environment. If it is, we instantiate an explosion prefab and destroy the projectile. Let's take a look at the explosion prefab, which looks similar to this:

Inspector with the explosion prefab selected
As we can see, there is a very similar game object here; we have a sphere collider with IsTrigger set to true. The main difference is an animator component. When this explosion is instantiated, it expands as an explosion would, then we use the state machine to destroy the instance when it transitions out of its explosion state. The animation controller looks similar to the following screenshot:

The animation controller driving the explosion prefab
You'll notice the explode state has a behavior attached to it. The code inside this behavior is fairly simple:
// OnStateExit is called when a transition ends and the state machine finishes evaluating this state
    override public void OnStateExit(Animator animator, AnimatorStateInfo stateInfo, int layerIndex) {
        Destroy(animator.gameObject, 0.1f);
    }
All we're doing here is destroying the instance of the object when we exit the state, which occurs when the animation ends.