The Microsoft .NET Framework includes a rich set of classes for creating traditional Windows-based applications in the System.Windows.Forms namespace. These range from basic controls such as the TextBox, Button, and MainMenu classes to specialized controls such as TreeView, LinkLabel, and NotifyIcon. In addition, you will find all the tools you need to manage multiple document interface (MDI) applications, integrate context-sensitive help, and even create multilingual user interfaces—all without needing to resort to the complexities of the Win32 API.
Most C# developers quickly find themselves at home with the Windows Forms programming model, and despite the arrival of Windows Presentation Foundation (discussed in Chapter 17) as an alternative thick-client development technology, Windows Forms is still the best choice for many types of applications.
Note
Most of the recipes in this chapter use control classes, which are defined in the System.Windows.Forms namespace. When introducing these classes, the full namespace name is not indicated, and System.Windows.Forms is assumed.
The recipes in this chapter describe how to do the following:
Add controls to a form programmatically at runtime so that you can build forms dynamically instead of only building static forms in the Visual Studio forms designer (recipe 7-1)
Link arbitrary data objects to controls to provide an easy way to associate data with a control without the need to maintain additional data structures (recipe 7-2)
Process all the controls on a form in a generic way (recipe 7-3)
Track all the forms and MDI forms in an application (recipes 7-4 and 7-5)
Save user-based and computer-based configuration information for Windows Forms applications using the mechanisms built into the .NET Framework and Windows (recipe 7-6)
Force a list box to always display the most recently added item, so that users do not need to scroll up and down to find it (recipe 7-7)
Assist input validation by restricting what data a user can enter into a text box, and implement a component-based mechanism for validating user input and reporting errors (recipes 7-8 and 7-17)
Implement a custom autocomplete combo box so that you can make suggestions for completing words as users type data (recipe 7-9)
Allow users to sort a list view based on the values in any column (recipe 7-10)
Avoid the need to explicitly lay out controls on a form by using the Windows Forms layout controls (recipe 7-11)
Use part of a main menu in a context menu (recipe 7-12)
Provide multilingual support in your Windows Forms application (recipe 7-13)
Create forms that cannot be moved and create borderless forms that can be moved (recipes 7-14 and 7-15)
Create an animated system tray icon for your application (recipe 7-16)
Support drag-and-drop functionality in your Windows Forms application (recipe 7-18)
Correctly update the user interface in a multithreaded application (recipe 7-19)
Display web-based information within your Windows application and allow users to browse the Web from within your application (recipe 7-20)
Display WPF windows in a Windows Forms application (recipe 7-21)
Display WPF controls in a Windows Forms application (recipe 7-22)
Note
Visual Studio, with its advanced design and editing capabilities, provides the easiest and most productive way to develop Windows Forms applications. Therefore, the sample code projects for the recipes in this chapter—unlike those in most other chapters—rely heavily on the use of Visual Studio. Instead of focusing on the library classes that provide the required functionality, or looking at the code generated by Visual Studio, these recipes focus on how to achieve the recipe's goal using the Visual Studio user interface and the code that you must write manually to complete the required functionality. The separation of generated and manual code is particularly elegant in Visual Studio 2005 and later versions due to the extensive use of partial types.
Create an instance of the appropriate control class. Then add the control object to a form or a container control by calling Controls.Add on the container. (The container's Controls property returns a ControlCollection instance.)
In a .NET form-based application, there is really no difference between creating a control at design time and creating it at runtime. When you create controls at design time, Visual Studio generates code to instantiate the desired control and places the code in a special method named InitializeComponent, which is called from your form's constructor. Visual Studio makes use of the partial class functionality of C# to keep the bulk of the code it generates in a separate file with the extension Designer.cs.
If you want to create a control at runtime, just follow these steps:
Create an instance of the appropriate control class.
Configure the control properties accordingly (particularly the size and position coordinates).
Add the control to the form or another container. Every control implements a read-only
Controlsproperty that references aControlCollectioncontaining references to all of its child controls. To add a child control, invoke theControlCollection.Addmethod.If you need to handle the events for the new control, you can wire them up to existing methods.
If you need to add multiple controls to a form or container, you should call SuspendLayout on the parent control before dynamically adding the new controls, and then call ResumeLayout once you have finished. This temporarily disables the layout logic used to position controls and will allow you to avoid significant performance overheads and weird flickering if you are adding many controls at once.
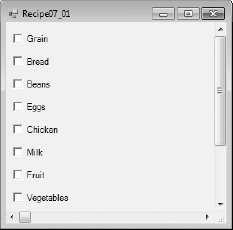
The following example demonstrates the dynamic creation of a list of check boxes. One check box is added for each item in a string array. All the check boxes are added to a panel that has its AutoScroll property set to true, which gives basic scrolling support to the check box list (see Figure 7-1).
using System;
using System.Windows.Forms;

namespace Apress.VisualCSharpRecipes.Chapter07
{
    public partial class Recipe07_01 : Form
    {
        public Recipe07_01()
        {
            // Initialization code is designer generated and contained
            // in a separate file named Recipe07-01.Designer.cs.
            InitializeComponent();
        }

        protected override void OnLoad(EventArgs e)
        {
            // Call the OnLoad method of the base class to ensure the Load
            // event is raised correctly.
            base.OnLoad(e);

            // Create an array of strings to use as the labels for
            // the dynamic check boxes.
            string[] foods = {"Grain", "Bread", "Beans", "Eggs",
                                "Chicken", "Milk", "Fruit", "Vegetables",
                                "Pasta", "Rice", "Fish", "Beef"};

            // Suspend the form's layout logic while multiple controls
            // are added.
            this.SuspendLayout();

            // Specify the Y coordinate of the topmost check box in the list.
            int topPosition = 10;

            // Create one new check box for each name in the list of
            // food types.
            foreach (string food in foods)
            {
                // Create a new check box.
                CheckBox checkBox = new CheckBox();

                // Configure the new check box.
                checkBox.Top = topPosition;
                checkBox.Left = 10;
                checkBox.Text = food;

                // Set the Y coordinate of the next check box.
                topPosition += 30;

                // Add the check box to the panel contained by the form.
                panel1.Controls.Add(checkBox);
            }
// Resume the form's layout logic now that all controls
// have been added.
this.ResumeLayout();
}
[STAThread]
public static void Main(string[] args)
{
Application.Run(new Recipe07_01());
}
}
}
You need a simple way to store data associated with a control (perhaps to store some arbitrary information that relates to a given display item).
Every class that derives from Control inherits a Tag property. The Tag property is not used by the control or the .NET Framework. Instead, it's reserved as a convenient storage place for application-specific data. In addition, some other classes not derived from Control also provide a Tag property. Useful examples include the ListViewItem, TreeNode, and MenuItem classes.
Because the Tag property is defined as an Object type, you can use it to store any value type or reference type, from a simple number or string to a custom object you have defined. When retrieving data from the Tag property, you must cast the Object to the correct type before use.
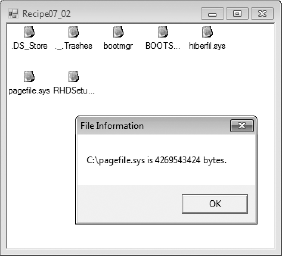
The following example, shown in Figure 7-2, adds a list of file names (as ListViewItem objects) to a ListView control. The corresponding System.IO.FileInfo object for each file is stored in the Tag property of its respective ListViewItem. When a user double-clicks one of the file names, the listView1_ItemActive event handler is called, which retrieves the FileInfo object from the Tag property and displays the file name and size using the MessageBox static method Show. In the example, the listView1_ItemActive event handler is wired to the ItemActivate event of the listView1 control through the listView1 control's properties in Visual Studio, meaning the generated code is contained in the file Recipe07-02.Designer.cs.
using System;
using System.IO;
using System.Windows.Forms;

namespace Apress.VisualCSharpRecipes.Chapter07
{
    public partial class Recipe07_02 : Form
    {
        public Recipe07_02()
        {
            // Initialization code is designer generated and contained
            // in a separate file named Recipe07-02.Designer.cs.
            InitializeComponent();
        }

        protected override void OnLoad(EventArgs e)
        {
            // Call the OnLoad method of the base class to ensure the Load
            // event is raised correctly.
            base.OnLoad(e);

            // Get all the files in the root directory.
            DirectoryInfo directory = new DirectoryInfo(@"C:");
            FileInfo[] files = directory.GetFiles();

            // Display the name of each file in the ListView.
            foreach (FileInfo file in files)
            {
ListViewItem item = listView1.Items.Add(file.Name);
item.ImageIndex = 0;
// Associate each FileInfo object with its ListViewItem.
item.Tag = file;
}
}
private void listView1_ItemActivate(object sender, EventArgs e)
{
// Get information from the linked FileInfo object and display
// it using MessageBox.
ListViewItem item = ((ListView)sender).SelectedItems[0];
FileInfo file = (FileInfo)item.Tag;
string info = file.FullName + " is " + file.Length + " bytes.";
MessageBox.Show(info, "File Information");
}
[STAThread]
public static void Main(string[] args)
{
Application.Run(new Recipe07_02());
}
}
}
You need to perform a generic task with all the controls on the form. For example, you may need to retrieve or clear their Text property, change their color, or resize them.
Iterate recursively through the collection of controls. Interact with each control using the properties and methods of the base Control class.
You can iterate through the controls on a form using the Control.ControlCollection object obtained from the Form.Controls property. The ControlCollection includes all the controls that are placed directly on the form surface. However, if any of these controls are container controls (such as GroupBox, Panel, or TabPage), they might contain more controls. Thus, it's necessary to use recursive logic that searches the Controls collection of every control on the form.
The following example demonstrates the use of recursive logic to find every TextBox on a form and clears the text they contain. The example form contains a number of TextBox controls contained within nested GroupBox containers. When a button is clicked, the code tests each control in the form's ControlCollection to determine whether it is a TextBox by using the is operator.
using System;
using System.Windows.Forms;

namespace Apress.VisualCSharpRecipes.Chapter07
{
    public partial class Recipe07_03 : Form
    {
        public Recipe07_03()
        {
            // Initialization code is designer generated and contained
            // in a separate file named Recipe07-03.Designer.cs.
            InitializeComponent();
        }

        // The event handler for the button click event.
        private void cmdProcessAll_Click(object sender, System.EventArgs e)
        {
            ProcessControls(this);
        }
private void ProcessControls(Control ctrl)
{
// Ignore the control unless it's a text box.
if (ctrl is TextBox)
{
ctrl.Text = "";
}
// Process controls recursively.
// This is required if controls contain other controls
// (for example, if you use panels, group boxes, or other
// container controls).
foreach (Control ctrlChild in ctrl.Controls)
{
ProcessControls(ctrlChild);
}
}
[STAThread]
public static void Main(string[] args)
{
Application.Run(new Recipe07_03());
}
}
}Iterate through the FormCollection object that you get from the static property OpenForms of the Application object.
Windows Forms applications automatically keep track of the open forms that they own. This information is accessed through the Application.OpenForms property, which returns a FormCollection object containing a Form object for each form the application owns. You can iterate through the FormCollection to access all Form objects or obtain a single Form object using its name (Form.Name) or its position in the FormCollection as an index.
The following example demonstrates the use of the Application.OpenForms property and the FormCollection it contains to manage the active forms in an application. The example allows you to create new forms with specified names. A list of active forms is displayed when you click the Refresh List button. When you click the name of a form in the list, it is made the active form.
Because of the way the FormCollection works, more than one form may have the same name. If duplicate forms have the same name, the first one found will be activated. If you try to retrieve a Form using a name that does not exist, null is returned. The following is the code for the application's main form:
using System;
using System.Windows.Forms;

namespace Apress.VisualCSharpRecipes.Chapter07
{
    public partial class Recipe07_04 : Form
    {
        public Recipe07_04()
        {
            // Initialization code is designer generated and contained
            // in a separate file named Recipe07-04.Designer.cs.
            InitializeComponent ();
        }

        // Override the OnLoad method to show the initial list of forms.
        protected override void OnLoad(EventArgs e)
        {
            // Call the OnLoad method of the base class to ensure the Load
            // event is raised correctly.
            base.OnLoad(e);

            // Refresh the list to display the initial set of forms.
            this.RefreshForms();
        }

        // A button click event handler to create a new child form.
        private void btnNewForm_Click(object sender, EventArgs e)
        {
            // Create a new child form and set its name as specified.
            // If no name is specified, use a default name.
            Recipe07_04Child child = new Recipe07_04Child();

            if (this.txtFormName.Text == String.Empty)
            {
                child.Name = "Child Form";
            }
            else
            {
                child.Name = this.txtFormName.Text;
            }
// Show the new child form.
child.Show();
}
// List selection event handler to activate the selected form based on
// its name.
private void listForms_SelectedIndexChanged(object sender, EventArgs e)
{
// Activate the selected form using its name as the index into the
// collection of active forms. If there are duplicate forms with the
// same name, the first one found will be activated.
Form form = Application.OpenForms[this.listForms.Text];
// If the form has been closed, using its name as an index into the
// FormCollection will return null. In this instance, update the
// list of forms.
if (form != null)
{
// Activate the selected form.
form.Activate();
}
else
{
// Display a message and refresh the form list.
MessageBox.Show("Form closed; refreshing list...",
"Form Closed");
this.RefreshForms();
}
}
// A button click event handler to initiate a refresh of the list of
// active forms.
private void btnRefresh_Click(object sender, EventArgs e)
{
RefreshForms();
}
// A method to perform a refresh of the list of active forms.
private void RefreshForms()
{
// Clear the list and repopulate from the Application.OpenForms
// property.
this.listForms.Items.Clear();
foreach (Form f in Application.OpenForms)
{
this.listForms.Items.Add(f.Name);
}
}[STAThread]
public static void Main(string[] args)
{
Application.Run(new Recipe07_04());
}
}
}The following is the code for the child forms you create by clicking the New Form button:
using System;
using System.Windows.Forms;

namespace Apress.VisualCSharpRecipes.Chapter07
{
    public partial class Recipe07_04Child : Form
    {
        public Recipe07_04Child()
        {
            // Initialization code is designer generated and contained
            // in a separate file named Recipe07-04Child.Designer.cs.
            InitializeComponent();
        }

        // Override the OnPaint method to correctly display the name of the
        // form.
        protected override void OnPaint(PaintEventArgs e)
        {
            // Call the OnPaint method of the base class to ensure the Paint
            // event is raised correctly.
            base.OnPaint(e);

            // Display the name of the form.
            this.lblFormName.Text = this.Name;
        }

        // A button click event handler to close the child form.
        private void btnClose_Click(object sender, EventArgs e)
        {
            this.Close();
        }
    }
}Versions 1.0 and 1.1 of the .NET Framework do not provide any way of determining which forms are currently owned by an application. (The one exception is MDI applications, as described in recipe 7-5.) If you want to determine which forms exist or which forms are displayed, or you want one form to call the methods or set the properties of another form, you will need to keep track of form instances on your own.
For tracking small numbers of forms, one useful approach is to create a static class consisting of static members. Each static member holds a reference to a specific Form. If you have many forms you need to track, such as in a document-based application where the user can create multiple instances of the same form, one per document, a generic collection such as a System.Collections.Generic.Dictionary<string, Form> is very useful. This lets you map a Form object to a name.
Whichever approach you take, each Form object should register itself with the tracker class when it is first created. A logical place to put this code is in the Form.OnLoad method. Conversely, when the Form object is closed, it should deregister itself with the tracker class. Deregistration should occur in the OnClosing or OnClosed method of the Form class.
Using either of these approaches, any code that requires access to a Form object can obtain a reference to it from the members of the tracker class, and even invoke operations on the Form instance directly through the tracker class if you are sure the Form object exists.
Iterate through the forms returned by the MdiChildren collection property of the MDI parent.
The .NET Framework includes two convenient shortcuts for managing the forms open in MDI applications: the MdiChildren and the MdiParent properties of the Form class. The MdiParent property of any MDI child returns a Form representing the containing parent window. The MdiChildren property returns an array containing all of the MDI child forms.
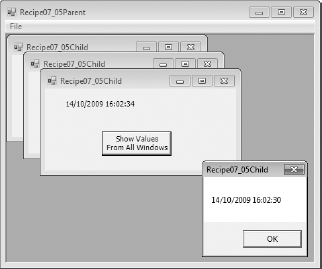
The following example presents an MDI parent window that allows you to create new MDI children by clicking the New item on the File menu. As shown in Figure 7-3, each child window contains a label, which displays the date and time when the MDI child was created, and a button. When the button is clicked, the event handler walks through all the MDI child windows and displays the label text that each one contains. Notice that when the example enumerates the collection of MDI child forms, it converts the generic Form reference to the derived Recipe07-05Child form class so that it can use the LabelText property. The following is the Recipe07-05Parent class:
using System;
using System.Windows.Forms;

namespace Apress.VisualCSharpRecipes.Chapter07
{
    // An MDI parent form.
    public partial class Recipe07_05Parent : Form
    {
        public Recipe07_05Parent()
        {
            // Initialization code is designer generated and contained
            // in a separate file named Recipe07-05Parent.Designer.cs.
            InitializeComponent();
        }

        // When the New menu item is clicked, create a new MDI child.
        private void mnuNew_Click(object sender, EventArgs e)
        {
            Recipe07_05Child frm = new Recipe07_05Child();
            frm.MdiParent = this;
            frm.Show();
        }

        [STAThread]
        public static void Main(string[] args)
        {
            Application.Run(new Recipe07_05Parent());
        }
    }
}
The following is the Recipe07-05Child class:
using System;
using System.Windows.Forms;

namespace Apress.VisualCSharpRecipes.Chapter07
{
    // An MDI child form.
    public partial class Recipe07_05Child : Form
    {
        public Recipe07_05Child()
        {
            // Initialization code is designer generated and contained
            // in a separate file named Recipe07-05Child.Designer.cs.
            InitializeComponent();
        }
// When a button on any of the MDI child forms is clicked, display the
// contents of each form by enumerating the MdiChildren collection.
private void cmdShowAllWindows_Click(object sender, EventArgs e)
{
foreach (Form frm in this.MdiParent.MdiChildren)
{
// Cast the generic Form to the Recipe07_05Child derived class
// type.
Recipe07_05Child child = (Recipe07_05Child)frm;
MessageBox.Show(child.LabelText, frm.Text);
}
}
// On load, set the MDI child form's label to the current date/time.
protected override void OnLoad(EventArgs e)
{
// Call the OnLoad method of the base class to ensure the Load
// event is raised correctly.
base.OnLoad(e);
label.Text = DateTime.Now.ToString();
}
// A property to provide easy access to the label data.
public string LabelText
{
get { return label.Text; }
}
}
}
You need to store configuration settings for a form so that they are remembered the next time that the form is shown.
Use the .NET Framework Application Settings functionality, which is configurable at design time in Visual Studio.
The Application Settings functionality included in the .NET Framework provides an easy-to-use mechanism through which you can save application and user settings used to customize the appearance and operation of a Windows Forms application. You configure Application Settings through the Properties panel of each Windows control (including the main Windows Form) in your application (see Figure 7-4 for an example). By expanding the ApplicationSettings property (item 1 in Figure 7-4) and clicking the ellipsis (three dots) to the right of (PropertyBinding), you can review application settings for each property of the active control (item 2 in Figure 7-4). When you configure a new application setting for a control's property, you must assign it a name, a default value, and a scope (item 3).
The name allows you to both access the setting programmatically and reuse the application setting across multiple controls.
The default value is used if the application cannot obtain a value from a configuration file at runtime.
The scope is either User or Application.
Settings with an Application scope are stored in the application's configuration file (usually located in the same folder as the application assembly) and are read-only. The benefit of an Application scope is that you can change configuration settings by editing the configuration file without needing to recompile the application. Settings with a User scope are read-write by default and are stored as part of the user's Windows profile in a file named after the executing assembly.
When you configure your application to use application settings, Visual Studio actually autogenerates a wrapper class that provides access to the configuration file information, regardless of whether it is scoped as Application or User. The class is named Settings and implements the singleton pattern (discussed in recipe 13-10); the singleton instance is accessed through Settings.Default. This class contains properties with names matching each of the application setting names you configured for your controls' properties. The controls will automatically read their configuration at startup, but you should store configuration changes prior to terminating your application by calling the Settings.Default.Save method.
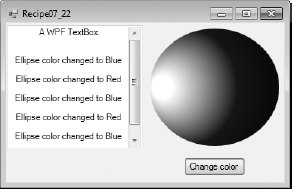
The following example, shown in Figure 7-4, displays a simple Form containing a TextBox. Using Visual Studio, the application is configured to store the location of the Form and the background color of the TextBox. The sample also programmatically records the size of the Form.
using System;
using System.ComponentModel;
using System.Windows.Forms;
using Apress.VisualCSharpRecipes.Chapter07.Properties;

namespace Apress.VisualCSharpRecipes.Chapter07
{
    public partial class Recipe07_06 : Form
    {
        public Recipe07_06()
        {
            // Initialization code is designer generated and contained
            // in a separate file named Recipe07-06.Designer.cs.
            InitializeComponent();
        }

        private void Button_Click(object sender, EventArgs e)
        {
            // Change the color of the text box depending on which button
            // was pressed.
            Button btn = sender as Button;

            if (btn != null)
            {
                // Set the background color of the text box.
                textBox1.BackColor = btn.ForeColor;

                // Update the application settings with the new value.
                Settings.Default.Color = textBox1.BackColor;
            }
        }

        protected override void OnClosing(CancelEventArgs e)
        {
            // Call the OnClosing method of the base class to ensure the
            // FormClosing event is raised correctly.
            base.OnClosing(e);

            // Update the application settings for Form.
            Settings.Default.Size = this.Size;

            // Store all application settings.
            Settings.Default.Save();
        }
[STAThread]
public static void Main(string[] args)
{
Application.Run(new Recipe07_06());
}
}
}
In some cases, you might have a list box that stores a significant amount of information or one that you add information to periodically. Often, the most recent information, which is added at the end of the list, is more important than the information at the top of the list. One solution is to scroll the list box so that recently added items are visible. The ListBox.TopIndex property enables you to do this by allowing you to specify which item is visible at the top of the list.
The following sample form includes a list box and a button. Each time the button is clicked, 20 items are added to the list box. Each time new items are added, the code sets the ListBox.TopIndex property and forces the list box to display the most recently added items. To provide better feedback, the same line is also selected.
The example uses an unsorted ListBox, which means that new items are added to the end of the ListBox. If you set ListBox.Sorted to true, the ListBox will sort the items it contains alphabetically. In this case, new items added to the ListBox will be inserted at the appropriate point in the list and the ListBox.Add method returns an int containing the zero-based index of where the new item was inserted. You can assign this value to the ListBox.TopIndex property and force a sorted list box to display the most recently added item.
using System;
using System.Windows.Forms;

namespace Apress.VisualCSharpRecipes.Chapter07
{
    public partial class Recipe07_07 : Form
    {
        // A counter to keep track of the number of items added
        // to the ListBox.
        private int counter = 0;
public Recipe07_07()
{
// Initialization code is designer generated and contained
// in a separate file named Recipe07-07.Designer.cs.
InitializeComponent();
}
// Button click event handler adds 20 new items to the ListBox.
private void cmdTest_Click(object sender, EventArgs e)
{
// Add 20 items.
for (int i = 0; i < 20; i++)
{
counter++;
listBox1.Items.Add("Item " + counter.ToString());
}
// Set the TopIndex property of the ListBox to ensure the
// most recently added items are visible.
listBox1.TopIndex = listBox1.Items.Count - 1;
listBox1.SelectedIndex = listBox1.Items.Count - 1;
}
[STAThread]
public static void Main(string[] args)
{
Application.Run(new Recipe07_07());
}
}
}Use the MaskedTextBox control and set the Mask property to configure the input that is acceptable.
One way to ensure user input is valid is to prevent invalid data from being entered in the first place. The MaskedTextBox control facilitates this approach. The MaskedTextBox.Mask property takes a string that specifies the input mask for the control. This mask determines what type of input a user can enter at each point in the control's text area. If the user enters an incorrect character, the control will beep if the BeepOnError property is true, and the MaskInputRejected event will be raised so that you can customize the handling of incorrect input.
Note
The MaskedTextBox control will not solve all your user input validation problems. While it does make some types of validation easy to implement, without customization it will not ensure some common validation requirements are met. For example, you can specify that only numeric digits can be input, but you cannot specify that they must be less than a specific value, nor can you control the overall characteristics of the input value. Recipe 2-5 discusses regular expressions which provide a great deal of flexibility when testing whether text meets complex formatting requirements.
The following example demonstrates the use of the MaskedTextBox control. A series of buttons allows you to change the active mask on the MaskedTextBox control and experiment with the various masks. Notice that the control tries to accommodate existing content with the new mask when the mask is changed. If the content is not allowed with the new mask, the control is cleared.
using System;
using System.Threading;
using System.Windows.Forms;

namespace Apress.VisualCSharpRecipes.Chapter07
{
    public partial class Recipe07_08 : Form
    {

        public Recipe07_08()
        {
            // Initialization code is designer generated and contained
            // in a separate file named Recipe07-08.Designer.cs.
            InitializeComponent();
        }

        private void btnTime_Click(object sender, EventArgs e)
        {
            // Set the input mask to that of a short time.
            this.mskTextBox.UseSystemPasswordChar = false;
            this.mskTextBox.Mask = "00:00";
            this.lblActiveMask.Text = this.mskTextBox.Mask;
            this.mskTextBox.Focus();
        }
private void btnUSZip_Click(object sender, EventArgs e)
{
// Set the input mask to that of a US ZIP code.
this.mskTextBox.UseSystemPasswordChar = false;
this.mskTextBox.Mask = "00000-9999";
this.lblActiveMask.Text = this.mskTextBox.Mask;
this.mskTextBox.Focus();
}
private void btnUKPost_Click(object sender, EventArgs e)
{
// Set the input mask to that of a UK postcode.
this.mskTextBox.UseSystemPasswordChar = false;
this.mskTextBox.Mask = ">LCCC 9LL";
this.lblActiveMask.Text = this.mskTextBox.Mask;
this.mskTextBox.Focus();
}
private void btnCurrency_Click(object sender, EventArgs e)
{
// Set the input mask to that of a currency.
this.mskTextBox.UseSystemPasswordChar = false;
this.mskTextBox.Mask = "$999,999.00";
this.lblActiveMask.Text = this.mskTextBox.Mask;
this.mskTextBox.Focus();
}
private void btnDate_Click(object sender, EventArgs e)
{
// Set the input mask to that of a short date.
this.mskTextBox.UseSystemPasswordChar = false;
this.mskTextBox.Mask = "00/00/0000";
this.lblActiveMask.Text = this.mskTextBox.Mask;
this.mskTextBox.Focus();
}
private void btnSecret_Click(object sender, EventArgs e)
{
// Set the input mask to that of a secret PIN.
this.mskTextBox.UseSystemPasswordChar = true;
this.mskTextBox.Mask = "0000";
this.lblActiveMask.Text = this.mskTextBox.Mask;
this.mskTextBox.Focus();
}[STAThread]
public static void Main(string[] args)
{
Application.Run(new Recipe07_08());
}
}
}The MaskedTextBox used in this recipe was introduced in the .NET Framework 2.0. In previous versions of the .NET Framework, one approach was to use a standard TextBox control and handle the KeyPress events it raises. The KeyPress event is raised after each keystroke has been received but before it is displayed. You can use the KeyPressEventArgs event parameter to effectively cancel an invalid keystroke by setting its Handled property to true.
For example, to allow only numeric input, you must allow a keystroke only if it corresponds to a number (0 through 9) or a special control key (such as Delete or the arrow keys). The keystroke character is provided to the KeyPress event through the KeyPressEventArgs.KeyChar property. You can use two static methods of the System.Char class—IsDigit and IsControl—to quickly test the character.
You want to display a combo box or text box that automatically completes what the user is typing based on a list of predefined items.
Configure the autocomplete features of the standard .NET ComboBox or TextBox control. The AutoCompleteMode property controls the autocompletion behavior, and the AutoCompleteSource property allows you to specify the source of the autocomplete data.
Note
Prior to the addition of the autocomplete functionality to the ComboBox and TextBox controls in the .NET Framework 2.0, to implement autocomplete functionality it was necessary to create a custom control that inherited from ComboBox or TextBox and overrode the inherited OnKeyPress and OnTextChanged methods.
Autocomplete functionality is common and comes in many different variations. For example, a control may fill in values based on a list of recent selections (as Microsoft Excel does when you are entering cell values), or the control might display a drop-down list of near matches (as Microsoft Internet Explorer does when you are typing a URL). The AutoCompleteMode takes one of the following values, which define how the control's autocomplete behavior works:
None: Autocomplete is disabled. This is the default behavior forComboBoxandTextBox.Suggest: This displays suggestions as a drop-down list.Append: This appends the remainder of the most likely suggestion to the end of the text as the user enters it.SuggestAppend: This combines the functionality of bothSuggestandAppend.
The AutoCompleteSource property defines where the ComboBox or TextBox control sources the autocomplete suggestions it presents to the user. It is possible to make use of various system-level data sources like the file system or URL histories. The most commonly used values for the AutoCompleteSource property are ListItems, where the ComboBox uses its current content and CustomSource. If you specify CustomSource, you must populate the AutoCompleteCustomSource property of the ComboBox or TextBox with the set of strings you want to use as autocomplete suggestions.
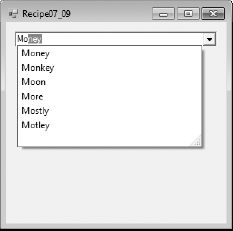
The following example enables autocomplete on a ComboBox and populates it with a list of values using a custom source. Figure 7-5 shows how the control offers suggestions to the user when AutoCompleteMode is set to the value SuggestAppend.
using System;
using System.IO;
using System.Drawing;
using System.Windows.Forms;

namespace Apress.VisualCSharpRecipes.Chapter07
{
    public partial class Recipe07_09 : Form
    {
        public Recipe07_09()
        {
            // Initialization code is designer generated and contained
            // in a separate file named Recipe07-09.Designer.cs.
            InitializeComponent();

            // Configure ComboBox1 to make its autocomplete
            // suggestions from a custom source.
            this.comboBox1.AutoCompleteCustomSource.AddRange(
                new string[] { "Man", "Mark", "Money", "Motley",
                    "Mostly", "Mint", "Minion", "Milk", "Mist",
                    "Mush", "More", "Map", "Moon", "Monkey"});
this.comboBox1.AutoCompleteMode
= AutoCompleteMode.SuggestAppend;
this.comboBox1.AutoCompleteSource
= AutoCompleteSource.CustomSource;
// Configure ComboBox2 to make its autocomplete
// suggestions from its current contents.
this.comboBox2.Items.AddRange(
new string[] { "Man", "Mark", "Money", "Motley",
"Mostly", "Mint", "Minion", "Milk", "Mist",
"Mush", "More", "Map", "Moon", "Monkey"});
this.comboBox2.AutoCompleteMode
= AutoCompleteMode.SuggestAppend;
this.comboBox2.AutoCompleteSource
= AutoCompleteSource.ListItems;
// Configure ComboBox3 to make its autocomplete
// suggestions from the system's URL history.
this.comboBox3.AutoCompleteMode
= AutoCompleteMode.SuggestAppend;
this.comboBox3.AutoCompleteSource
= AutoCompleteSource.AllUrl;
}
[STAThread]
public static void Main(string[] args)
{
Application.Run(new Recipe07_09());
}
}
}
You need to sort a list view, but the built-in ListView.Sort method sorts based on only the first column.
Create a type that implements the System.Collections.IComparer interface and can sort ListViewItem objects. The IComparer type can sort based on any ListViewItem criteria you specify. Set the ListView.ListViewItemSorter property with an instance of the IComparer type before calling the ListView.Sort method.
The ListView control provides a Sort method that orders items alphabetically based on the text in the first column. If you want to sort based on other column values or order items numerically, you need to create a custom implementation of the IComparer interface that can perform the work. The IComparer interface defines a single method named Compare, which takes two object arguments and determines which one should be ordered first. Full details of how to implement the IComparer interface are available in recipe 13-3.
The following example demonstrates the creation of an IComparer implementation named ListViewItemComparer. The ListViewItemComparer class also implements two additional properties: Column and Numeric. The Column property identifies the column that should be used for sorting. The Numeric property is a Boolean flag that can be set to true if you want to perform number-based comparisons instead of alphabetic comparisons.
When the user clicks a column heading, the example creates a ListViewItemComparer instance, configures the column to use for sorting, and assigns the ListViewItemComparer instance to the ListView.ListViewItemSorter property before calling the ListView.Sort method.
using System;
using System.Collections;
using System.Windows.Forms;

namespace Apress.VisualCSharpRecipes.Chapter07
{
    public partial class Recipe07_10 : Form
    {
        public Recipe07_10()
        {
// Initialization code is designer generated and contained
// in a separate file named Recipe07-10.Designer.cs.
InitializeComponent();
}
// Event handler to handle user clicks on column headings.
private void listView1_ColumnClick(object sender, ColumnClickEventArgs e)
{
// Create and/or configure the ListViewItemComparer to sort based on
// the column that was clicked.
ListViewItemComparer sorter =
listView1.ListViewItemSorter as ListViewItemComparer;
if (sorter == null)
{
// Create a new ListViewItemComparer.
sorter = new ListViewItemComparer(e.Column);
listView1.ListViewItemSorter = sorter;
}
else
{
// Configure the existing ListViewItemComparer.
sorter.Column = e.Column;
}
// Sort the ListView.
listView1.Sort();
}
[STAThread]
public static void Main(string[] args)
{
Application.Run(new Recipe07_10());
}
}
public class ListViewItemComparer : IComparer
{
// Property to get/set the column to use for comparison.
public int Column { get; set; }
// Property to get/set whether numeric comparison is required
// as opposed to the standard alphabetic comparison.
public bool Numeric { get; set; }
public ListViewItemComparer(int columnIndex)
{
Column = columnIndex;
}public int Compare(object x, object y)
{
// Convert the arguments to ListViewItem objects.
ListViewItem itemX = x as ListViewItem;
ListViewItem itemY = y as ListViewItem;
// Handle logic for null reference as dictated by the
// IComparer interface; null is considered less than
// any other value.
if (itemX == null && itemY == null) return 0;
else if (itemX == null) return −1;
else if (itemY == null) return 1;
// Short-circuit condition where the items are references
// to the same object.
if (itemX == itemY) return 0;
// Determine if numeric comparison is required.
if (Numeric)
{
// Convert column text to numbers before comparing.
// If the conversion fails, just use the value 0.
decimal itemXVal, itemYVal;
if (!Decimal.TryParse(itemX.SubItems[Column].Text, out itemXVal))
{
itemXVal = 0;
}
if (!Decimal.TryParse(itemY.SubItems[Column].Text, out itemYVal))
{
itemYVal = 0;
}
return Decimal.Compare(itemXVal, itemYVal);
}
else
{
// Keep the column text in its native string format
// and perform an alphabetic comparison.
string itemXText = itemX.SubItems[Column].Text;
string itemYText = itemY.SubItems[Column].Text;
return String.Compare(itemXText, itemYText);
}
}
}
}Use the FlowLayoutPanel container to dynamically arrange the controls using a horizontal or vertical flow, or use the TableLayoutPanel container to dynamically arrange the controls in a grid.
The FlowLayoutPanel and TableLayoutPanel containers simplify the design-time and runtime layout of the controls they contain. At both design time and runtime, as you add controls to one of these panels, the panel's logic determines where the control should be positioned, so you do not need to determine the exact location.
With the FlowLayoutPanel container, the FlowDirection and WrapContents properties determine where controls are positioned. FlowDirection controls the order and location of controls, and it can be set to LeftToRight, TopDown, RightToLeft, or BottomUp. The WrapContents property controls whether controls run off the edge of the panel or wrap around to form a new line of controls.
With the TableLayoutPanel container, the RowCount and ColumnCount properties control how many rows and columns are currently in the panel's grid. The GrowStyle property determines how the grid grows to accommodate more controls once it is full, and it can be set to AddRows, AddColumns, or FixedSize (which means the grid cannot grow).
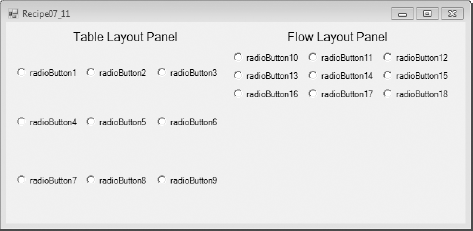
Figure 7-6 shows the design-time appearance of both a TableLayoutPanel container and a FlowLayoutPanel container. The TableLayoutPanel panel is configured with three rows and three columns. The FlowLayoutPanel panel is configured to wrap contents and use left-to-right flow direction.
You need to create a context menu that shows the same menu items as those displayed as part of an application's main menu.
Use the CloneMenu method of the MenuItem class to duplicate the required portion of the main menu.
In many applications, a control's context-sensitive menu duplicates a portion of the main menu. However, .NET does not allow you to create a MenuItem instance that is contained in more than one menu at a time.
The solution is to make a duplicate copy of a portion of the menu using the CloneMenu method. The CloneMenu method not only copies the appropriate MenuItem items (and any contained submenus), but also registers each MenuItem object with the same event handlers. Thus, when a user clicks a cloned menu item in a context menu, the event handler will be triggered as if the user had clicked the duplicate menu item in the main menu.
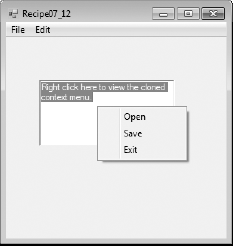
The following example uses the CloneMenu method to configure the context menu for a TextBox to be a duplicate of the File menu. Figure 7-7 shows how the example will look when run.
using System;
using System.Drawing;
using System.Windows.Forms;

namespace Apress.VisualCSharpRecipes.Chapter07
{
    public partial class Recipe07_12 : Form
    {
        public Recipe07_12()
        {
            // Initialization code is designer generated and contained
            // in a separate file named Recipe07-12.Designer.cs.
            InitializeComponent();
        }

        // As the main form loads, clone the required section of the main
        // menu and assign it to the ContextMenu property of the TextBox.
        protected override void OnLoad(EventArgs e)
        {
// Call the OnLoad method of the base class to ensure the Load
// event is raised correctly.
base.OnLoad(e);
ContextMenu mnuContext = new ContextMenu();
// Copy the menu items from the File menu into a context menu.
foreach (MenuItem mnuItem in mnuFile.MenuItems)
{
mnuContext.MenuItems.Add(mnuItem.CloneMenu());
}
// Attach the cloned menu to the TextBox.
TextBox1.ContextMenu = mnuContext;
}
// Event handler to display the ContextMenu for the ListBox.
private void TextBox1_MouseDown(object sender, MouseEventArgs e)
{
if (e.Button == MouseButtons.Right)
{
TextBox1.ContextMenu.Show(TextBox1, new Point(e.X, e.Y));
}
}
// Event handler to process clicks on File/Open menu item.
// For the purpose of the example, simply show a message box.
private void mnuOpen_Click(object sender, EventArgs e)
{
MessageBox.Show("This is the event handler for Open.","Recipe07-12");
}
// Event handler to process clicks on File/Save menu item.
// For the purpose of the example, simply show a message box.
private void mnuSave_Click(object sender, EventArgs e)
{
MessageBox.Show("This is the event handler for Save.","Recipe07-12");
}
// Event handler to process clicks on File/Exit menu item.
// For the purpose of the example, simply show a message box.
private void mnuExit_Click(object sender, EventArgs e)
{
MessageBox.Show("This is the event handler for Exit.","Recipe07-12");
}public static void Main(string[] args)
{
Application.Run(new Recipe07_12());
}
}
}
Store all locale-specific information in resource files, which are compiled into satellite assemblies.
The .NET Framework includes built-in support for localization through its use of resource files. The basic idea is to store information that is locale-specific (for example, button text) in a resource file. You can create resource files for each culture you need to support and compile them into satellite assemblies. When you run the application, .NET will automatically use the correct satellite assembly based on the locale settings of the current user/computer.
You can read to and write from resource files manually; they are XML files. However, Visual Studio also includes extensive design-time support for localized forms. It works like this:
Set the
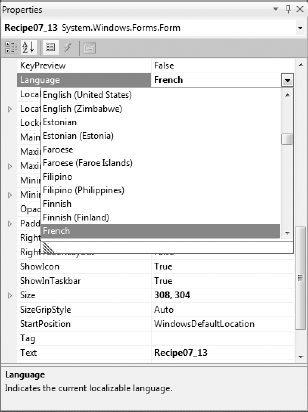
Localizableproperty of aFormtotrueusing the Properties window.Set the
Languageproperty of the form to the locale for which you would like to enter information (see Figure 7-8). Then configure the localizable properties of all the controls on the form. Instead of storing your changes in the designer-generated code for the form, Visual Studio will actually create a new resource file to hold your data.Repeat step 2 for each language that you want to support. Each time you enter a new locale for the form's
Languageproperty, a new resource file will be generated. If you change theLanguageproperty to a locale you have already configured, your previous settings will reappear, and you will be able to modify them.
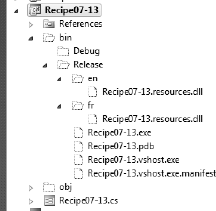
You can now compile and test your application on differently localized systems. Visual Studio will create a separate directory and satellite assembly for each resource file in the project. You can select Project/Show All Files from the Visual Studio menu to see how these files are arranged, as shown in Figure 7-9.
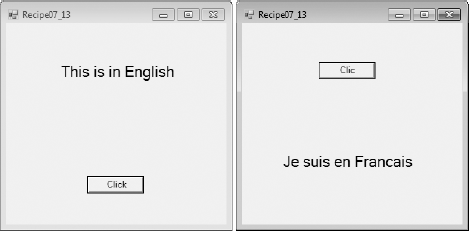
Although you do not need to manually code any of the localization functionality, as a testing shortcut you can force your application to adopt a specific culture by modifying the Thread.CurrentUICulture property of the application thread. However, you must modify this property before the form has loaded. Figure 7-10 shows both the English and French versions of the form.
using System;
using System.Threading;
using System.Globalization;
using System.Windows.Forms;

namespace Apress.VisualCSharpRecipes.Chapter07
{
    public partial class Recipe07_13 : Form
    {
        public Recipe07_13()
        {
            // Initialization code is designer generated and contained
            // in a separate file named Recipe07-13.Designer.cs.
            InitializeComponent();
        }

        [STAThread]
        public static void Main(string[] args)
        {
            Thread.CurrentThread.CurrentUICulture = new CultureInfo("fr");
            Application.Run(new Recipe07_13());
        }
    }
}
Make a borderless form by setting the FormBorderStyle property of the Form class to the value FormBorderStyle.None.
You can create a borderless form by setting the FormBorderStyle property of a Form to None. Borderless forms cannot be moved. However, as their name implies, they also lack any kind of border. If you want the customary blue border, you will need to add it yourself, either with manual drawing code or by using a background image.
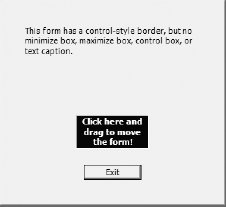
One other approach to creating an immovable form does provide a basic control-style border. First, set the ControlBox, MinimizeBox, and MaximizeBox properties of the form to false. Then set the Text property to an empty string. To ensure the user cannot resize the form, set the FormBorderStyle property to the value FixedSingle.
The following example shows how to create immovable forms using both approaches just described:
using System;
using System.Windows.Forms;

namespace Apress.VisualCSharpRecipes.Chapter07
{
    public partial class Recipe07_14 : Form
    {
        public Recipe07_14()
        {
            // Initialization code is designer generated and contained
            // in a separate file named Recipe07-14.cs.
            InitializeComponent();
        }

        private void button1_Click(object sender, EventArgs e)
        {
            Form form = new Form();
            form.FormBorderStyle = FormBorderStyle.None;
            form.Show();
        }

        private void button2_Click(object sender, EventArgs e)
        {
            Form form = new Form();
            form.ControlBox = false;
            form.MinimizeBox = false;
            form.MaximizeBox = false;
            form.FormBorderStyle = FormBorderStyle.FixedSingle;
            form.Text = String.Empty;
            form.Show();
        }

        private void button3_Click(object sender, EventArgs e)
        {
            Application.Exit();
        }

        [STAThread]
        public static void Main(string[] args)
        {
            Application.Run(new Recipe07_14());
        }
    }
}You need to create a borderless form that can be moved. This might be the case if you are creating a custom window that has a unique look (e.g., for a visually rich application such as a game or a media player).
Create another control that responds to the MouseDown, MouseUp, and MouseMove events and programmatically moves the form.
Borderless forms omit a title bar, which makes it impossible for a user to move them. You can compensate for this shortcoming by adding a control to the form that serves the same purpose. For example, Figure 7-11 shows a form that includes a label to support dragging. The user can click this label and then drag the form to a new location on the screen while holding down the mouse button. As the user moves the mouse, the form moves correspondingly, as though it were "attached" to the mouse pointer.
To implement this solution, take the following steps:
Create a form-level Boolean variable that tracks whether or not the form is currently being dragged.
When the label is clicked, the code sets the flag to indicate that the form is in drag mode. At the same time, the current mouse position is recorded. You add this logic to the event handler for the
Label.MouseDownevent.When the user moves the mouse over the label, the form is moved correspondingly, so that the position of the mouse over the label is unchanged. You add this logic to the event handler for the
Label.MouseMoveevent.When the user releases the mouse button, the dragging mode is switched off. You add this logic to the event handler for the
Label.MouseUpevent.
The following example creates a borderless form that a user can move by clicking a form control and dragging the form:
using System;
using System.Drawing;
using System.Windows.Forms;

namespace Apress.VisualCSharpRecipes.Chapter07
{
    public partial class Recipe07_15 : Form
    {
        // Boolean member tracks whether the form is in drag mode. If it is,
        // mouse movements over the label will be translated into form movements.
        private bool dragging;

        // Stores the offset where the label is clicked.
        private Point pointClicked;

        public Recipe07_15()
        {
            // Initialization code is designer generated and contained
            // in a separate file named Recipe07-15.Designer.cs.
            InitializeComponent();
        }

        // MouseDown event handler for the label initiates the dragging process.
        private void lblDrag_MouseDown(object sender, MouseEventArgs e)
        {
if (e.Button == MouseButtons.Left)
{
// Turn drag mode on and store the point clicked.
dragging = true;
pointClicked = new Point(e.X, e.Y);
}
else
{
dragging = false;
}
}
// MouseMove event handler for the label processes dragging movements if
// the form is in drag mode.
private void lblDrag_MouseMove(object sender, MouseEventArgs e)
{
if (dragging)
{
Point pointMoveTo;
// Find the current mouse position in screen coordinates.
pointMoveTo = this.PointToScreen(new Point(e.X, e.Y));
// Compensate for the position the control was clicked.
pointMoveTo.Offset(-pointClicked.X, -pointClicked.Y);
// Move the form.
this.Location = pointMoveTo;
}
}
// MouseUp event handler for the label switches off drag mode.
private void lblDrag_MouseUp(object sender, MouseEventArgs e)
{
dragging = false;
}
private void cmdClose_Click(object sender, EventArgs e)
{
this.Close();
}
[STAThread]
public static void Main(string[] args)
{
Application.Run(new Recipe07_15());
}
}
}You need to create an animated system tray icon (perhaps to indicate the status of a long-running task).
Create and show a NotifyIcon control. Use a timer that fires periodically (every second or so) and updates the NotifyIcon.Icon property.
The .NET Framework makes it easy to show a system tray icon with the NotifyIcon component. You simply need to add this component to a form and supply an icon by setting the Icon property. You can animate a system tray icon by swapping the icon periodically. Optionally, you can add a linked context menu to the NotifyIcon through the ContextMenuStrip property. The NotifyIcon component automatically displays its context menu when it's right-clicked.
The following example uses eight icons, each of which shows a moon graphic in a different stage of fullness. By moving from one image to another, the illusion of animation is created.
using System;
using System.Drawing;
using System.Windows.Forms;

namespace Apress.VisualCSharpRecipes.Chapter07
{
    public partial class Recipe07_16 : Form
    {
        // An array to hold the set of icons used to create the
        // animation effect.
        private Icon[] images = new Icon[8];

        // An integer to identify the current icon to display.
        int offset = 0;

        public Recipe07_16()
        {
            // Initialization code is designer generated and contained
            // in a separate file named Recipe07-16.Designer.cs.
            InitializeComponent();
// Declare a ContextMenuStrip for use by the NotifyIcon.
ContextMenuStrip contextMenuStrip = new ContextMenuStrip();
contextMenuStrip.Items.Add(new ToolStripMenuItem("About..."));
contextMenuStrip.Items.Add(new ToolStripSeparator());
contextMenuStrip.Items.Add(new ToolStripMenuItem("Exit"));
// Assign the ContextMenuStrip to the NotifyIcon.
notifyIcon.ContextMenuStrip = contextMenuStrip;
}
protected override void OnLoad(EventArgs e)
{
// Call the OnLoad method of the base class to ensure the Load
// event is raised correctly.
base.OnLoad(e);
// Load the basic set of eight icons.
images[0] = new Icon("moon01.ico");
images[1] = new Icon("moon02.ico");
images[2] = new Icon("moon03.ico");
images[3] = new Icon("moon04.ico");
images[4] = new Icon("moon05.ico");
images[5] = new Icon("moon06.ico");
images[6] = new Icon("moon07.ico");
images[7] = new Icon("moon08.ico");
}
private void timer_Elapsed(object sender, System.Timers.ElapsedEventArgs e)
{
// Change the icon. This event handler fires once every second
// (1000 ms).
notifyIcon.Icon = images[offset];
offset++;
if (offset > 7) offset = 0;
}
[STAThread]
public static void Main(string[] args)
{
Application.Run(new Recipe07_16());
}
}
}Use the ErrorProvider component to display an error icon next to the offending control. Check for errors before allowing the user to continue.
You can perform validation in a Windows-based application in a number of ways. One approach is to refuse any invalid character as the user presses a key, by using a MaskedTextBox control, as shown in recipe 7-8. Another approach is to respond to control validation events and prevent users from changing focus from one control to another if an error exists. A less invasive approach is to simply flag the offending control in some way so that the user can review all the errors at once. You can use this approach by adding the ErrorProvider component to your form.
The ErrorProvider is a special property extender component that displays error icons next to invalid controls. You show the error icon next to a control by using the ErrorProvider.SetError method and specifying the appropriate control and a string error message. The ErrorProvider will then show a warning icon to the right of the control. When the user hovers the mouse above the warning icon, the detailed message appears.
You need to add only one ErrorProvider component to your form, and you can use it to display an error icon next to any control. To add the ErrorProvider, drag it on the form or into the component tray or create it manually in code.
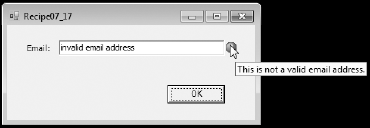
The following example checks the value that a user has entered into a text box whenever the text box loses focus. The code validates this text box using a regular expression that checks to see if the value corresponds to the format of a valid e-mail address (see recipe 2-5 for more details on regular expressions). If validation fails, the ErrorProvider is used to display an error message. If the text is valid, any existing error message is cleared from the ErrorProvider.
Finally, the Click event handler for the OK button steps through all the controls on the form and verifies that none of them have errors before allowing the example to continue. In this example, an empty text box is allowed, although it would be a simple matter to perform additional checks when the OK button is pressed for situations where empty text boxes are not acceptable. Figure 7-12 shows how the ErrorProvider control indicates an input error for the TextBox control when Recipe07-17 is run.
using System;
using System.Windows.Forms;
using System.Text.RegularExpressions;

namespace Apress.VisualCSharpRecipes.Chapter07
{
    public partial class Recipe07_17 : Form
    {
        public Recipe07_17()
        {
            // Initialization code is designer generated and contained
            // in a separate file named Recipe07-17.Designer.cs.
            InitializeComponent();
        }

        // Button click event handler ensures the ErrorProvider is not
        // reporting any error for each control before proceeding.
        private void Button1_Click(object sender, EventArgs e)
        {
            string errorText = "";
            bool invalidInput = false;

            foreach (Control ctrl in this.Controls)
            {
                if (errProvider.GetError(ctrl) != "")
                {
                    errorText += "   * " + errProvider.GetError(ctrl) + "
";
                    invalidInput = true;
                }
            }

            if (invalidInput)
            {
                MessageBox.Show(
                    "The form contains the following unresolved errors:

" +
                    errorText, "Invalid Input", MessageBoxButtons.OK,
                    MessageBoxIcon.Warning);
            }
            else
            {
                this.Close();
            }
        }

        // When the TextBox loses focus, check that the contents are a valid
        // e-mail address.
        private void txtEmail_Leave(object sender, EventArgs e)
        {
            // Create a regular expression to check for valid e-mail addresses.
            Regex regex = new Regex(@"^[w-]+@([w-]+.)+[w-]+$");
// Validate the text from the control that raised the event.
Control ctrl = (Control)sender;
if (String. IsNullOrEmpty(ctrl.Text) || regex.IsMatch(ctrl.Text))
{
errProvider.SetError(ctrl, "");
}
else
{
errProvider.SetError(ctrl, "This is not a valid email address.");
}
}
[STAThread]
public static void Main(string[] args)
{
Application.Run(new Recipe07_17());
}
}
}
You need to use the drag-and-drop feature to exchange information between two controls (possibly in separate windows or separate applications).
Start a drag-and-drop operation using the DoDragDrop method of the Control class, and then respond to the DragEnter and DragDrop events in the target control.
A drag-and-drop operation allows the user to transfer information from one place to another by clicking an item and dragging it to another location. A drag-and-drop operation consists of the following three basic steps:
The user clicks a control, holds down the mouse button, and begins dragging. If the control supports the drag-and-drop feature, it sets aside some information.
The user drags the mouse over another control. If this control accepts the dragged type of content, the mouse cursor changes to the special drag-and-drop icon (arrow and page). Otherwise, the mouse cursor becomes a circle with a line drawn through it.
When the user releases the mouse button, the data is sent to the control, which can then process it appropriately.
To support drag-and-drop functionality, you must handle the DragEnter, DragDrop, and (typically) MouseDown events. To start a drag-and-drop operation, you call the source control's DoDragDrop method. At this point, you submit the data and specify the type of operations that will be supported (copying, moving, and so on). Controls that can receive dragged data must have the AllowDrop property set to true. These controls will receive a DragEnter event when the mouse drags the data over them. At this point, you can examine the data that is being dragged, decide whether the control can accept the drop, and set the DragEventArgs.Effect property accordingly. The final step is to respond to the DragDrop event, which occurs when the user releases the mouse button.
Note
It is very important that the Main method of your Windows application be annotated with the STAThread attribute if your application will provide drag-and-drop functionality.
The following example allows you to drag content between a RichTextBox and a standard TextBox control. Using the standard TextBox, it is not possible to drag only the currently selected text because as soon as you click the selected text to initiate a drag operation, the selection is cleared. Even handling the MouseDown event will not allow you to work around this because the selected text is already cleared by the event is raised.
However, the RichTextBox leaves the selection in place, avoiding the problem. Unfortunately, the RichTextBox has quirks of its own. To drop successfully onto a RichTextBox, you must be holding down the Ctrl key when you let go of the mouse button. You can also use the example with other applications that support text drag-and-drop operations.
using System;
using System.Drawing;
using System.Windows.Forms;

namespace Apress.VisualCSharpRecipes.Chapter07
{
    public partial class Recipe07_18 : Form
    {
        public Recipe07_18()
        {
            // Initialization code is designer generated and contained
            // in a separate file named Recipe07-18.Designer.cs.
            InitializeComponent();

            this.richTextBox1.AllowDrop = true;
            this.richTextBox1.EnableAutoDragDrop = false;
            this.richTextBox1.DragDrop
                += new System.Windows.Forms.DragEventHandler
                    (this.RichTextBox_DragDrop);
            this.richTextBox1.DragEnter
                += new System.Windows.Forms.DragEventHandler
                    (this.RichTextBox_DragEnter);
        }

        private void RichTextBox_DragDrop(object sender, DragEventArgs e)
        {
            RichTextBox txt = sender as RichTextBox;

            if (txt != null)
            {
                // Insert the dragged text.
                int pos = txt.SelectionStart;
                string newText = txt.Text.Substring(0, pos)
                    + e.Data.GetData(DataFormats.Text).ToString()
                    + txt.Text.Substring(pos);

                txt.Text = newText;
            }
        }

        private void RichTextBox_DragEnter(object sender, DragEventArgs e)
        {
            if (e.Data.GetDataPresent(DataFormats.Text))
            {
                e.Effect = DragDropEffects.Copy;
            }
else
{
e.Effect = DragDropEffects.None;
}
}
private void RichTextBox_MouseDown(object sender, MouseEventArgs e)
{
RichTextBox txt = sender as RichTextBox;
// If the left mouse button is pressed and text is selected,
// this is a possible drag event.
if (sender != null && txt.SelectionLength > 0
&& Form.MouseButtons == MouseButtons.Left)
{
// Only initiate a drag if the cursor is currently inside
// the region of selected text.
int pos = txt.GetCharIndexFromPosition(e.Location);
if (pos >= txt.SelectionStart
&& pos <= (txt.SelectionStart + txt.SelectionLength))
{
txt.DoDragDrop(txt.SelectedText, DragDropEffects.Copy);
}
}
}
private void TextBox_DragDrop(object sender, DragEventArgs e)
{
TextBox txt = sender as TextBox;
if (txt != null)
{
txt.Text = (string)e.Data.GetData(DataFormats.Text);
}
}
private void TextBox_DragEnter(object sender, DragEventArgs e)
{
if (e.Data.GetDataPresent(DataFormats.Text))
{
e.Effect = DragDropEffects.Copy;
}
else
{
e.Effect = DragDropEffects.None;
}
}private void TextBox_MouseDown(object sender, MouseEventArgs e)
{
TextBox txt = sender as TextBox;
if (txt != null && Form.MouseButtons == MouseButtons.Left)
{
txt.SelectAll();
txt.DoDragDrop(txt.Text, DragDropEffects.Copy);
}
}
[STAThread]
public static void Main(string[] args)
{
Application.Run(new Recipe07_18());
}
}
}You need to ensure a Windows Forms user interface is updated correctly in a multithreaded application.
Ensure all interaction with a control is performed on the thread that initially created the control. When calling operations on controls from a thread that did not create the control, make the call using the control's Invoke or BeginInvoke methods and pass in a delegate to the code you want executed.
Windows Forms is not inherently thread safe, meaning you are not free to interact with controls from just any thread. Instead, you must marshal all calls to a control onto the thread that owns the message queue for that control (i.e., the thread that created the control).
You can determine if the executing thread can call a control directly by testing the control's InvokeRequired property. If the value is false, then the currently executing thread can interact with the control directly; otherwise, you must marshal any interaction back onto the correct thread. This potentially difficult task is made trivial through the use of the Invoke and BeginInvoke methods implemented by the Control base class.
Both methods take a delegate (or an equivalent anonymous method or lambda expression) and invoke the specified method on the control using the correct thread. Invoke executes the delegate synchronously and BeginInvoke executes the delegate asynchronously. To complete an asynchronous operation initiated using BeginInvoke, you call the Control.EndInvoke method. The BeginInvoke and EndInvoke methods make up a common asynchronous execution pattern known as the Classic Async pattern. The details of this pattern and the options you have available for handling method completion are discussed in recipe 4-2.
The following example shows how to update a Windows Forms control from multiple threads. The example uses two timers that fire at differing intervals to change the color of a Button control between red and green. The code shows how to use both an anonymous method and a lambda expression with the Invoke call. Both approaches use System.Action, a delegate type that can encapsulate any method that returns void and takes no arguments.
using System;
using System.Collections.Generic;
using System.ComponentModel;
using System.Data;
using System.Drawing;
using System.Text;
using System.Windows.Forms;

namespace Apress.VisualCSharpRecipes.Chapter07
{
    public partial class Recipe07_19 : Form
    {
        // Declare timers that change the button color.
        System.Timers.Timer greenTimer;
        System.Timers.Timer redTimer;

        public Recipe07_19()
        {
            // Initialization code is designer generated and contained
            // in a separate file named Recipe07-19.Designer.cs.
            InitializeComponent();

            // Create autoreset timers that fire at varying intervals
            // to change the color of the button on the form.
            greenTimer = new System.Timers.Timer(3000);
            greenTimer.Elapsed +=
                new System.Timers.ElapsedEventHandler(greenTimer_Elapsed);
            greenTimer.Start();

            redTimer = new System.Timers.Timer(5000);
            redTimer.Elapsed +=
                new System.Timers.ElapsedEventHandler(redTimer_Elapsed);
            redTimer.Start();
        }
void redTimer_Elapsed(object sender, System.Timers.ElapsedEventArgs e)
{
// Use an anonymous method to set the button color to red.
button1.Invoke((Action)delegate {button1.BackColor = Color.Red;});
}
void greenTimer_Elapsed(object sender, System.Timers.ElapsedEventArgs e)
{
// Use a lambda expression to set the button color to green.
button1.Invoke(new Action(() => button1.BackColor = Color.Green));
}
private void button1_Click(object sender, EventArgs e)
{
Application.Exit();
}
[STAThread]
public static void Main(string[] args)
{
Application.Run(new Recipe07_19());
}
}
}You want to display a web page and provide web-navigation capabilities within your Windows Forms application.
Use the WebBrowser control to display the web page and other standard controls like buttons and text boxes to allow the user to control the operation of the WebBrowser.
Warning
The WebBrowser control is a managed wrapper around the WebBrowser ActiveX control. This means that you must ensure you annotate the Main method of your Windows application with the STAThread attribute and that you dispose of the WebBrowser control (by calling the WebBrowser.Dispose method) when it is no longer required.
The WebBrowser control makes it a trivial task to embed highly functional web browser capabilities into your Windows applications. The WebBrowser control is responsible for the display of web pages and maintaining page history, but it does not provide any controls for user interaction. Instead, the WebBrowser control exposes properties and events that you can manipulate programmatically to control the operation of the WebBrowser. This approach makes the WebBrowser control highly flexible and adaptable to most common browsing requirements. Table 7-1 summarizes some of the WebBrowser members related to web navigation that you will find particularly useful.
Table 7.1. Commonly Used Members of the WebBrowser Control
Member | Description |
|---|---|
Property | |
| Controls whether the |
| Indicates whether the |
| Indicates whether the |
| Indicates whether the |
| Holds the URL of the currently displayed/downloading page |
Method | |
| Displays the previous page in the page history |
| Displays the next page in the page history |
| Displays the home page of the current user as configured in Windows |
| Displays the web page at the specified URL |
| Stops the current |
Event | |
| Signals that the active download has completed and the document is displayed in the |
You can also use the WebBrowser.DocumentText property to set (or get) the currently displayed HTML contents of the WebBrowser. To manipulate the contents using the Document Object Model (DOM), get an HtmlDocument instance via the Document property.
The following example uses the WebBrowser control to allow users to navigate to a web page whose address is entered into a TextBox. Buttons also allow users to move forward and backward through page history and navigate directly to their personal home page.
using System;
using System.Windows.Forms;

namespace Apress.VisualCSharpRecipes.Chapter07
{
    public partial class Recipe07_20 : Form
    {
        public Recipe07_20()
        {
            // Initialization code is designer generated and contained
            // in a separate file named Recipe07-20.Designer.cs.
            InitializeComponent();
        }

        private void goButton_Click(object sender, EventArgs e)
        {
            // Navigate to the URL specified in the text box.
            webBrowser1.Navigate(textURL.Text);
        }

        private void homeButton_Click(object sender, EventArgs e)
        {
            // Navigate to the current user's home page.
            webBrowser1.GoHome();
        }
        protected override void OnLoad(EventArgs e)
        {
            // Call the OnLoad method of the base class to ensure the Load
            // event is raised correctly.
            base.OnLoad(e);

            // Navigate to the Apress home page when the application first
            // loads.
            webBrowser1.Navigate("http://www.apress.com");
        }
private void backButton_Click(object sender, EventArgs e)
{
// Go to the previous page in the WebBrowser history.
webBrowser1.GoBack();
}
private void forwarButton_Click(object sender, EventArgs e)
{
// Go to the next page in the WebBrowser history.
webBrowser1.GoForward();
}
// Event handler to perform general interface maintenance once a document
// has been loaded into the WebBrowser.
private void webBrowser1_DocumentCompleted(object sender,
WebBrowserDocumentCompletedEventArgs e)
{
// Update the content of the TextBox to reflect the current URL.
textURL.Text = webBrowser1.Url.ToString();
// Enable or disable the Back button depending on whether the
// WebBrowser has back history.
if (webBrowser1.CanGoBack)
{
backButton.Enabled = true;
}
else
{
backButton.Enabled = false;
}
// Enable or disable the Forward button depending on whether the
// WebBrowser has forward history.
if (webBrowser1.CanGoForward)
{
forwarButton.Enabled = true;
}
else
{
forwarButton.Enabled = false;
}
}
[STAThread]
public static void Main(string[] args)
{
Application.Run(new Recipe07_20());
}
}
}Create an instance of the WPF window (System.Windows.Window) you want to display in your Windows Forms code. Call Window.ShowDialog to display a modal window, or call Window.Show to display a modeless window.
The trickiest thing about displaying a WPF window in a Windows Forms application is actually integrating the WPF source code into your project correctly if you are using Visual Studio. There is no option in your Windows Forms project to add a WPF Window when you select Add New Item in Solution Explorer.
The easiest way around this is to import an existing WPF Window using the Add Existing option in Solution Explorer. This will set everything up appropriately (adding the necessary assembly references), and you can then edit the WPF Window as you would when creating a WPF application. Alternatively, Visual Studio will allow you to add a new WPF user control to your Windows Forms application. You can use that option and then change the XAML and code-behind as required.
Once you have a WPF Window declared, you can reference and instantiate the class the same as you would any other class. Calling Window.ShowDialog will display the window modally, meaning that the user can interact with only that window and must close it before they can interact again with the rest of the application. Calling Window.Show will display a modeless window, allowing the user to interact with the new window as well as the rest of the application.
The following example (shown running in Figure 7-13) displays a Windows Form with two buttons. The left button opens and closes a modeless WPF window, and the right button opens a modal window. When the example creates the modeless window, it subscribes an event handler to the Window.Closing event so that the application can update the button state should the user choose to close the window directly instead of using the button. The following code is the code-behind for the main Windows Form:
using System;
using System.ComponentModel;
using System.Windows.Forms;

namespace Apress.VisualCSharpRecipes.Chapter07
{
    public partial class Recipe07_21 : Form
    {
        private Window1 modelessWindow;
private CancelEventHandler modelessWindowCloseHandler;
public Recipe07_21()
{
// Initialization code is designer generated and contained
// in a separate file named Recipe07-21.Designer.cs.
InitializeComponent();
modelessWindowCloseHandler = new CancelEventHandler(Window_Closing);
}
// Handles the button click event to open and close the modeless
// WPF window.
private void OpenModeless_Click(object sender, EventArgs e)
{
if (modelessWindow == null)
{
modelessWindow = new Window1();
// Add an event handler to get notification when the window
// is closing.
modelessWindow.Closing += modelessWindowCloseHandler;
// Change the button text.
btnOpenModeless.Text = "Close Modeless Window";
// Show the Windows Form.
modelessWindow.Show();
}
else
{
modelessWindow.Close();
}
}
// Handles the button click event to open the modal WPF Window.
private void OpenModal_Click(object sender, EventArgs e)
{
// Create and display the modal window.
Window1 window = new Window1();
window.ShowDialog();
}
// Handles the WPF Window's Closing event for the modeless window.
private void Window_Closing(object sender, CancelEventArgs e)
{
// Remove the event handler reference.
modelessWindow.Closing -= modelessWindowCloseHandler;
modelessWindow = null;// Change the button text.
btnOpenModeless.Text = "Open Modeless Window";
}
}
}The following XAML provides the declaration of the WPF Window that is opened when the user clicks either of the buttons on the Windows Forms application:
<Window x:Class="Apress.VisualCSharpRecipes.Chapter07.Window1"
    xmlns="http://schemas.microsoft.com/winfx/2006/xaml/presentation"
    xmlns:x="http://schemas.microsoft.com/winfx/2006/xaml"
    Title="Recipe07_21" Height="200" Width="300">
    <StackPanel Margin="20">
        <TextBlock FontSize="20" Text="A WPF Window" TextAlignment="Center"/>
        <Button Click="btnClose_Click" Content="Close" Margin="50"
                MaxWidth="50" Name="btnClose" />
    </StackPanel>
</Window>
The following is the code-behind for the WPF Window that allows the user to close the window by clicking the Close button:
using System.Windows;
using System.Windows.Forms;

namespace Apress.VisualCSharpRecipes.Chapter07
{
    /// <summary>
    /// Interaction logic for Window1.xaml
    /// </summary>
    public partial class Window1 : Window
    {
        public Window1()
        {
            InitializeComponent();
        }

        private void btnClose_Click(object sender, RoutedEventArgs e)
        {
            this.Close();
        }
    }
}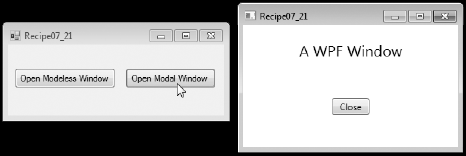
Use a System.Windows.Forms.Integration.ElementHost control on your Windows Form, and host the WPF control inside it.
The ElementHost control is a Windows Forms control that allows you to host WPF controls in Windows Forms. The ElementHost control makes integrating WPF controls into your Windows Forms application relatively simple and even provides some limited visual design-time support.
The ElementHost can contain a single WPF element that inherits from System.Windows.UIElement. The element can be one of the layout containers discussed in Chapter 17, which allows you to create rich, structured WPF content within the ElementHost control. Often, the WPF element you place in the ElementHost control will be a WPF user control (see Chapter 17), but can also be any common WPF control.
To use the ElementHost control in Visual Studio's graphical design environment, open the toolbox and browse to the WPF Interoperability category. Drag the ElementHost control and drop it on the Windows Form as you would with any other control. Using the ElementHost Tasks window, you can then select any WPF user control currently in your project to place in the ElementHost control (see Figure 7-14).
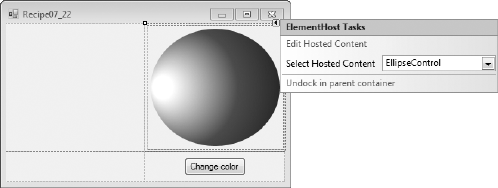
If you do not want to use a user control, then you will need to populate the ElementHost control programmatically by assigning the desired WPF element to the Child property of the ElementHost control.
The following example demonstrates how to integrate WPF controls into a Windows Forms application. The example (shown in Figure 7-15) uses a simple WPF user control consisting of a System.Windows.Shapes.Ellipse that can change between red and blue color gradients. This EllipseControl is assigned to one ElementHost using the Visual Studio form builder. Another ElementHost is populated programmatically with a System.Windows.Controls.TextBox. A standard Windows Forms button triggers the EllipseControl to change color, and then writes a log entry to the TextBox. Here is the XAML for the WPF user control:
<UserControl x:Class="Apress.VisualCSharpRecipes.Chapter07.EllipseControl"
    xmlns="http://schemas.microsoft.com/winfx/2006/xaml/presentation"
    xmlns:x="http://schemas.microsoft.com/winfx/2006/xaml"
    Height="300" Width="300">
    <Grid x:Name="Grid1">
        <Grid.Resources>
            <RadialGradientBrush x:Key="RedBrush" RadiusX=".8" RadiusY="1"
                                 Center="0.5,0.5" GradientOrigin="0.05,0.5">
                <GradientStop Color="#ffffff" Offset="0.1" />
                <GradientStop Color="#ff0000" Offset="0.5" />
                <GradientStop Color="#880000" Offset="0.8" />
            </RadialGradientBrush>
            <RadialGradientBrush x:Key="BlueBrush" RadiusX=".8" RadiusY="1"
                                 Center="0.5,0.5" GradientOrigin="0.05,0.5">
                <GradientStop Color="#ffffff" Offset="0.1" />
                <GradientStop Color="#0000ff" Offset="0.5" />
                <GradientStop Color="#000088" Offset="0.8" />
            </RadialGradientBrush>
        </Grid.Resources>
<Ellipse Margin="5" Name="Ellipse1" ToolTip="A WPF Ellipse."
Fill="{StaticResource RedBrush}">
</Ellipse>
</Grid>
</UserControl>Here is the code-behind for the EllipseControl, which is used to control and query its current color gradient:
using System.Windows.Controls;
using System.Windows.Media;

namespace Apress.VisualCSharpRecipes.Chapter07
{
    /// <summary>
    /// Interaction logic for EllipseControl.xaml
    /// </summary>
    public partial class EllipseControl : UserControl
    {
        public EllipseControl()
        {
            // Initialization code is designer generated and contained
            // in a separate file named Recipe07-22.Designer.cs.
            InitializeComponent();
        }

        // Gets the name of the current color.
        public string Color
        {
            get
            {
                if (Ellipse1.Fill == (Brush)Grid1.Resources["RedBrush"])
                {
                    return "Red";
                }
                else
                {
                    return "Blue";
                }
            }
        }

        // Switch the fill to the red gradient.
        public void ChangeColor()
        {
            // Check the current fill of the ellipse.
            if (Ellipse1.Fill == (Brush)Grid1.Resources["RedBrush"])
            {
                // Ellipse is red, change to blue.
                Ellipse1.Fill = (Brush)Grid1.Resources["BlueBrush"];
            }
else
{
// Ellipse is blue, change to red.
Ellipse1.Fill = (Brush)Grid1.Resources["RedBrush"];
}
}
}
}The following is the code-behind for the main Windows Forms form. The form constructor demonstrates the programmatic creation and configuration of an ElementHost control to display a standard WPF TextBox control. The button1_Click method is invoked when the user clicks the button, and it changes the color of the ellipse and appends a message to the content of the TextBox. The rest of the application code generated by Visual Studio is not shown here, but is provided in the sample code (available on the book's page on the Apress web site, www.apress.com).
using System;
using System.Windows;
using System.Windows.Forms;
using WPFControls=System.Windows.Controls;
using System.Windows.Forms.Integration;

namespace Apress.VisualCSharpRecipes.Chapter07
{
    public partial class Recipe07_22: Form
    {
        WPFControls.TextBox textBox;

        public Recipe07_22 ()
        {
            InitializeComponent();

            // Create a new WPF TextBox control.
            textBox = new WPFControls.TextBox();
            textBox.Text = "A WPF TextBox


";
            textBox.TextAlignment = TextAlignment.Center;
            textBox.VerticalAlignment = VerticalAlignment.Center;
            textBox.VerticalScrollBarVisibility =
                WPFControls.ScrollBarVisibility.Auto;
            textBox.IsReadOnly = true;

            // Create a new ElementHost to host the WPF TextBox.
            ElementHost elementHost2 = new ElementHost();
            elementHost2.Name = "elementHost2";
            elementHost2.Dock = DockStyle.Fill;
            elementHost2.Child = textBox;
            elementHost2.Size = new System.Drawing.Size(156, 253);
            elementHost2.RightToLeft = RightToLeft.No;
// Place the new ElementHost in the bottom-left table cell.
tableLayoutPanel1.Controls.Add(elementHost2, 1, 0);
}
private void button1_Click(object sender, EventArgs e)
{
// Change the ellipse color.
ellipseControl1.ChangeColor();
// Get the current ellipse color and append to TextBox.
textBox.Text +=
String.Format("Ellipse color changed to {0}
",
ellipseControl1.Color);
textBox.ScrollToEnd();
}
}
}