Dogwood

The flowering dogwood tree is widely known for its showy white and pink flowers, which are not actually flowers. The dogwood petals are modified leaves called bracts that surround a cluster of tiny flowers. The flowers bloom in the spring for about two months out of the year, and then in the fall the trees produce small red berries that wildlife considers a delicacy.
How to Paint a Dogwood Flower
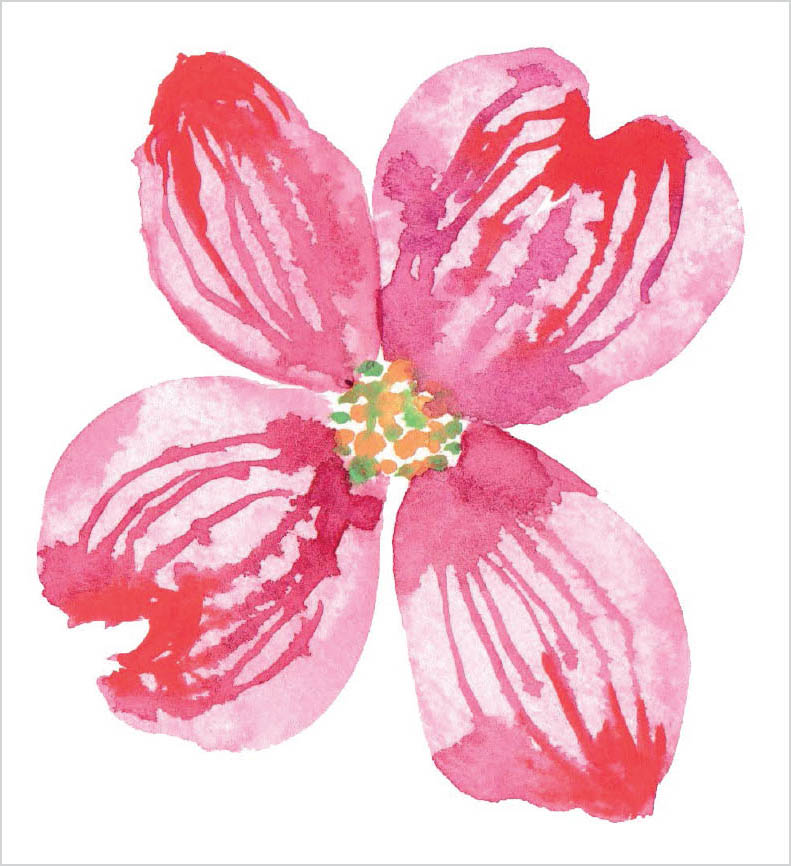
The dogwood flower has beautiful petals. The details are important when painting this petal. In the finished piece, study the line work that is painted over the top of the light pink petals and the contrasting coral reds. The petals are large and there are just four petals per flower. Even with four petals you need to focus on making each one unique in shape, size, and color bleeding.

STEP 1
Starting with the center of the flower, use the tip of your round brush loaded with a deep yellow and create a group of dots that will make up one large circle. You don’t want to make the circles perfect, and you want to vary their sizes throughout. While the yellow is still wet, add some celadon-green dots, overlapping some of the yellow dots. You want to fill in some of the white space with green but still leave some peeks of white. Before the green dries, use a paper towel to lift out some of the color in the center. The center should have lighter shades and the edges should be darker, making the center appear more dimensional.

STEP 2
Next, you want to create the petals that surround the center. Create the first petal with a magenta color. Using your round brush, you will paint the petal with a combination of four brush strokes. For my example, I used two brush strokes on each side of the petal creating a heart-like shape. Be conscious of keeping the white sliver that goes partially down the middle of the petal. After you have painted the petal with the magenta immediately dab the color out of the whole petal to lighten it to a pale pink. Go back with your brush over the slightly moist petal and add some touches of the magenta along some of the edges for a shadow. If the added magenta bleeds too much into the pale pink, just lift it out.


Now that you have painted the base color of the petal, it’s time to add some detail to it. The line work is painted on top of the petal while it is barely wet but still has some moisture. It is a fine line between wet and dry. The reason for this is so the lines do not bleed so much that they lose their shape, but you want some softness to them. Use the tip of your brush with a Crimson Lake-Aubergine blend, and paint a line down the middle of the petal. Then add several curved lines on either side of the center line, leaving space in between. There should be a slight bleed. If there is no bleed and you like the look of it with no bleed, then keep it. Otherwise dab out the color, layer in a little bit of water, wait for it to absorb, and then go back and create the lines. Make sure that some of the color bleeds into the base of the petal, to create shadow.
Immediately after adding the line work load your brush with Coral Red, with barely any water mixed in, and layer it at the top of the petal where the notch is. The coral should bleed into the purple but shouldn’t cover it completely. If it does, lift out the color, reapply the purple, and then use even less water when adding in the coral.
STEP 3
Yay! You have created your first petal! The next petal you will paint is longer and has more of a point. Notice how there are two different shapes of petals that make up this flower. One is like the heart shape you just painted and the other one has more of a pointed end. We will alternate between these two shapes on our flower. This does not mean your petals have to be the same size and exactly the same shape. Study the final image and you will get an idea of the possible variations.

Use a light magenta to create the outline for the second petal. To get a thicker outline use the side of your brush.
Fill in the petal completely with the same light magenta color.
To achieve the linework, use the same method from Step 2 above. Notice in my example, there is a deeper color bleed at the base of the petal. This is intentional because there is naturally more shadow closer to the core of the flower.
To finish the layer, paint in the coral at the tip of the petal.
Note: Paint will appear darker when it is wet so if it dries too light, layer in more color.

STEP 4
To finish off the flower, add another heart-shaped petal and then the final pointed petal. In total, you will have four marvelous petals.
Paint a grouping of flowers with some being layered behind others to make the grouping appear like it is more from nature.
For the greenery, use Celadon mixed with Prussian Blue to achieve a blue-green stem and leaf combination. The leaves are small and thin and should peek from behind the flowers.
