CHAPTER ONE
Let’s Talk Materials
As with any craft you start to learn, it is importand to have the right materials. I by no means consider myself to be a materials snob. Don’t get me wrong, I love some of the high-end materials, but for everyday practice a $50 paint brush is not necessary, especially if you’re just starting out. You will not believe the amount of watercolor paper you will go through as you practice your craft, so having good quality but affordable materials is necessary. I suggest that as you improve your skills and develop your style, treat yourself to a new paint color or new brush: This way you can slowly build up your art kit. When your new art materials arrive in your mailbox it feels like Christmas morning. It’s so exciting!
Affordability does not necessarily equate to poor quality, but believe me, there are a lot of low-grade materials out there, so do not fall victim to them just because of their attractive prices. You can get away with spending $40 to $50 on some good basic watercolor materials. Taking pride in your materials will make you that much more dedicated to your art.
Paint
Watercolor paints come in two types: pans and tubes. When picking out pan watercolors, one thing you want to avoid is a completely dry cake of paint. If you are going to get a pan set, make sure it is semi moist. Moistness is not always indicated on the packaging, so look for a slight gloss to the surface of the paint. Pan paints that are not semi moist will leave a chalky film on top of your painting once it dries, so this is a good indicator that it is a low-quality paint.
I prefer tubed watercolor paints, and I create my own palettes, but as a beginner this can be intimidating. Therefore, if a premade pan set is better for you, go ahead and use one. If you are looking to build a palette, I suggest finding a palette with a cover, so you can cover it when you are no longer painting, which will help keep the paint from drying out. I can’t tell you how often I have forgotten to cover my paint palette and then I have to rewet may paints to reactivate them. As far as colors go, I suggest buying red, yellow, blue, green, orange, and purple. These are the primary and secondary colors, and you can mix them in various ways to create so many other colors. As you expand on your skills, treat yourself to new paint colors.

© Lauren Peachie
In this book I use watercolor and gouache paint. Watercolor is a paint that is made up of water soluble materials that Is then thinned out with water to create transparency. Gouache is an opaque watercolor, which means there is more pigment in the paint, making it less transparent straight out of the paint tube. Many artists, such as myself, use gouache because of its high pigment content. You can achieve very bold colors with gouache but also airy, whimsical, transparent colors as well. I use gouache the same way I use watercolor paint, but I can get my gouache paint tubes to last a little longer because of the high pigment content.
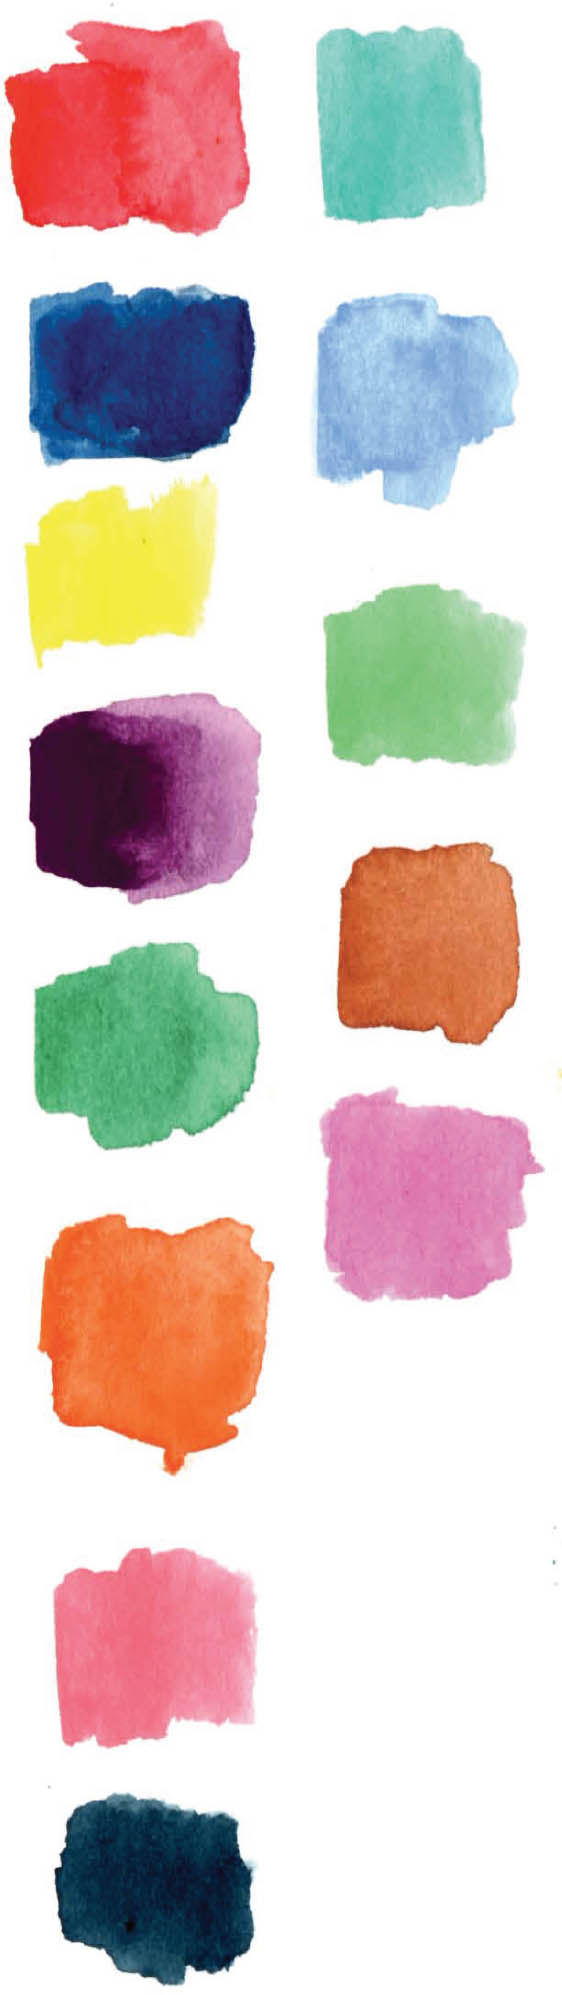
For this book I use the brands Turner Design Gouache, Holbein Artists’ Watercolor, Winsor & Newton Cotman Watercolours and Dr. Ph. Martin’s Iridescent ink. At the beginning of each lesson you’ll find color swatches showing color names and an initial, which indicates the brand of paint I used for that specific lesson. Think of it as a color key.
If you don’t have the specific paint colors I use, you can adapt the colors you do have to each lesson. I just want to give you the opportunity to know exactly what I used in each lesson, but feel free to improvise. For example, a lesson may call for a scarlet red color. You can substitute the red you have for the particlar red I used and still end up with a beautiful painting. Don’t limit yourself because you don’t have the exact color I used in the book. If you use colors within the same color family, you will end up with paintings that are very similar to the paintings in the book.

© Lauren Peachie
T stands for Turner Design Gouache, WN stands for Winsor & Newton Cotman Watercolours, H stands for Holbein Artist’s Watercolor and Dr. PH. stands for Dr. Ph. Martin’s Iridescent ink.
Here is a list of all the colors I use In this book:
Aubergine (T)
Brilliant Pink (H)
Brilliant Red (T)
Brilliant Red Violet (T)
Bronze Ink (Dr. PH.)
Cadmium Green Deep (H)
Celadon (T)
Chinese White (WN)
Cobalt Green (T)
Compose Green (H)
Coral Red (T)
Crimson Lake (H)
Deep Purple (T)
Emerald Green (T)
Green Grey (H)
Hooker’s Green Light (WN)
Indigo (T)
Indigo (WN)
Ivy Green (T)
Jewel Red (T)
Lavender (H)
Light Blue (T)
Lilac (T)
Magenta (T)
Naples Yellow (T)
Opera (H)
Perm. Lemon (T)
Perm. Orange (T)
Perm. Yellow (T)
Perm. Yellow Deep (T)
Permanent Yellow Green (T)
Permanent Yellow Orange (T)
Prussian Blue (T)
Raw Sienna (T)
Rose (T)
Rose Madder (T)
Sky Blue (T)
Turquoise (T)
Ultramarine Deep (T)
Viridian Hue (WN)
Paper
Watercolor paper is different from your average paper, and because you are painting with water the paper needs to have some heft to it. If you have ever tried to paint on copy paper, you know that it wrinkles and cannot withstand the water. Watercolor paper is measured in pounds that typically range from 90 to 300 lbs. When practicing, I suggest using a 140 lb paper as anything heavier is not necessary. Keep in mind that, usually, the heavier the paper the more expensive it will be. You can also use 140 lb paper for your final pieces, as well as the heavier 300 lb paper.
Watercolor paper comes in three different textures: hot press, cold press, and rough. Hot press is a smooth paper with no texture. Cold press has a medium texture that works beautifully for absorbing color bleeds. Rough paper is just how it sounds, having the most texture with a very obvious grain. Because we will be painting wet-on-wet (more on this later) the best paper to use is a cold press paper. Cold press paper is also the most popular and versatile among the three paper types. For brands, I like to use Strathmore Vision and Legion Watercolor papers.
As far as size goes, it’s good to have a variety of watercolor paper pads. Start out with a 6×9, a 9×12, and an 11×14 pad because, as you practice, you will get a better idea of how small or large you paint and then you can buy more paper to adapt to your style.

© Lauren Peachie
Brushes
Your brush is so important! As you grow your skills, you will end up with many different sizes and shapes of brushes, but to start with let’s keep it simple. You want to start with an everyday brush. For this book I suggest a number eight round brush. As you learn your style, you may find that you paint really large so the number eight will be too small and you may need a number thirty. You are probably thinking, “Hold on Rachel, what do these numbers mean?” The lower the number the thinner the brush, and when I say “thinner” I mean the bristles of the brush. In addition to the number eight round, you will also need a brush for painting fine details. For this, I suggest buying a number three round brush, as it will allow for the most control when doing delicate detail work or when creating a controlled color bleed.
You may be thinking, “Are there only round brushes?” No, there are many types of brush shapes, but the round brush is the most versatile. Some other brush types are a flat brush and an oval brush. I use a flat brush to create color wash backgrounds because as it allows me to quickly fill the space. An oval brush is wonderful for creating round-tipped petals and leaves, but you can create the same shapes with a round brush, it just takes extra brushstrokes. For specific brush brands, I use Polar-Flo and Ebony Splendor by Creative Mark.

© Lauren Peachie
Additional Materials
Paint, paper, and brushes are your main materials, but you need a few more items to complete your basic watercolor kit. A paper towel is a great tool for not only setting your brush on, but also to absorb excess color or water from your paper. As you follow the lessons in this book you’ll learn to use paper towels to lift color out of your paintings to reveal a lighter shade of paint. I have tried to be more eco-friendly by using a rag but have found that a rag does not lift color very well.

© Lauren Peachie
For your water vessel just use an old spaghetti or pickle jar. There is no need to spend money where it is not necessary. I believe it’s important to see the color of your water so a clear vessel works best. I paint using two jars at the same time, because I like to rinse my lighter colors in one and my darker colors in the other. This allows for a longer painting session before I have to get up and clean out my water.

© Lauren Peachie
Artist tape is important to use when working on final pieces that you plan to keep or sell. Artist tape has low-tack adhesive so you can use it on watercolor paper to attach it to a rigid backing board. When painting with water, depending on how much is used, it can warp the paper and the paper will dry with a bend or bubble. Taping down the paper to a hard board and letting it dry completely before removing the tape will prevent the paper from warping. Be light when attaching the tape to your paper and do not use your nail or a coin to press it down hard. You want to barely attach the tape so there is no chance of ripping the paper when you remove it. Believe me, this has happened to me many times. Beware of masking tape (which is not the same as artist’s tape) as it is sure to tear your paper when removed.
Whether you use tube or pan watercolor paints, I suggest that you get a palette that has wells, a flat space to mix the paint, and a cover. Also, having a disposable sheet palette is very helpful. Even though it is called a disposable palette, I actually reuse the sheets constantly.

© Lauren Peachie
There are many extra specialized materials for watercolor painting, but start simple and the more you commit to your practice, the more you can add to your materials collection.