
CHAPTER
3
Building the Front-End Layer

The front-end layer spans multiple components. It includes the client (usually a web browser), network components between the client and your data center, and parts of your data center that respond directly to clients’ connections. The front end is your first line of defense, and its components are the ones receiving the most traffic. Every user interaction, every connection, and every response has to go through the front-end layer in one form or another. This in turn causes the front-end layer to have the highest throughput and concurrency rate demands, making its scalability critical. Luckily, a well-designed front end scales relatively easily, and it is also where caching can give you the highest returns.
Front-end applications built with scale in mind are mostly stateless; they depend heavily on caching; and, most importantly, they allow horizontal scalability by simply adding more hardware.
Before we dive in, it’s important to understand the different approaches to building web applications. Most of today’s websites are built as traditional multipage web applications, single-page applications (SPAs), or hybrids of these two approaches.
![]() Traditional multipage web applications These are websites where clicking a link or a button initiates a new web request and results in the browser reloading an entire page with the response received from the server. This was the model used when the World Wide Web was created and when there was no JavaScript, no AJAX, and no HTML5. Despite the fact that this model is two decades old, you could still build scalable websites using it (mainly for its simplicity).
Traditional multipage web applications These are websites where clicking a link or a button initiates a new web request and results in the browser reloading an entire page with the response received from the server. This was the model used when the World Wide Web was created and when there was no JavaScript, no AJAX, and no HTML5. Despite the fact that this model is two decades old, you could still build scalable websites using it (mainly for its simplicity).
![]() Single-page applications (SPAs) These execute the most business logic in the browser, more so than either hybrid or traditional applications. These applications are built mainly in JavaScript, with web servers often reduced to providing a data application programming interface (API) and a security layer. In this model, any time you perform an action in the user interface (like clicking a link or typing some text), JavaScript code may initiate asynchronous calls to the server to load/save data. Based on the response received, JavaScript code replaces parts of the user interface. The SPA model has become more popular in recent years with frameworks like AngularJS and mobile app frameworks like Sencha Touch and Ionic, but it is still much less popular than the hybrid model. The main benefit of SPAs is a richer user interface, but users may also benefit from a smaller network footprint and lower latencies between user interactions.
Single-page applications (SPAs) These execute the most business logic in the browser, more so than either hybrid or traditional applications. These applications are built mainly in JavaScript, with web servers often reduced to providing a data application programming interface (API) and a security layer. In this model, any time you perform an action in the user interface (like clicking a link or typing some text), JavaScript code may initiate asynchronous calls to the server to load/save data. Based on the response received, JavaScript code replaces parts of the user interface. The SPA model has become more popular in recent years with frameworks like AngularJS and mobile app frameworks like Sencha Touch and Ionic, but it is still much less popular than the hybrid model. The main benefit of SPAs is a richer user interface, but users may also benefit from a smaller network footprint and lower latencies between user interactions.
![]() Hybrid applications This is the way most of the modern web applications are built. As the name implies, these applications are a hybrid of traditional multipage web applications and SPAs. Some interactions cause a full page load, and others initiate only partial view updates using AJAX. Adopting AJAX and keeping the overarching multipage structure give developers a lot of flexibility. This allows building a rich user interface, but at the same time provides search engine optimization (SEO) friendliness, deep linking, and relative simplicity.
Hybrid applications This is the way most of the modern web applications are built. As the name implies, these applications are a hybrid of traditional multipage web applications and SPAs. Some interactions cause a full page load, and others initiate only partial view updates using AJAX. Adopting AJAX and keeping the overarching multipage structure give developers a lot of flexibility. This allows building a rich user interface, but at the same time provides search engine optimization (SEO) friendliness, deep linking, and relative simplicity.
Most of the recommendations and components presented in this chapter are applicable to all three models, but we’ll focus primarily on the common hybrid and traditional models. If you decide to develop a pure SPA, you may have significantly different deployment and caching needs, which are beyond the scope of this book.
Managing State
“The key to efficiently utilizing resources is stateless autonomous compute nodes.”
–Bill Wilder
Carefully managing state is the most important aspect of scaling the front end of your web application. If you lay a good foundation by removing all of the state from your front-end servers, you will be able to scale your front-end layer by simply adding more clones. We’ll first look at the differences between stateless and stateful services and then briefly discuss how to deal with different types of state.
Statelessness is a property of a service, server, or object indicating that it does not hold any data (state). As a consequence, statelessness makes instances of the same type interchangeable, allowing better scalability. By not having any data, service instances are identical from the client’s point of view. Instead of holding data themselves, stateless services delegate to external services any time that client’s state needs to be accessed.
Figure 3-1 shows an abstract diagram of a stateful web application server. Server instance A holds information that other instances (B and C) cannot access. It could be user session data, local files, local memory state, or even locks. In the context of stateful vs. stateless, state is any information that would have to be synchronized between servers to make them identical. Let’s consider Figure 3-2 to see how a stateless server could handle a client’s state. In this case, servers A, B, and C are identical, and all of the state is kept outside of their boundaries. They are interchangeable because they are all capable of reaching the client’s data.
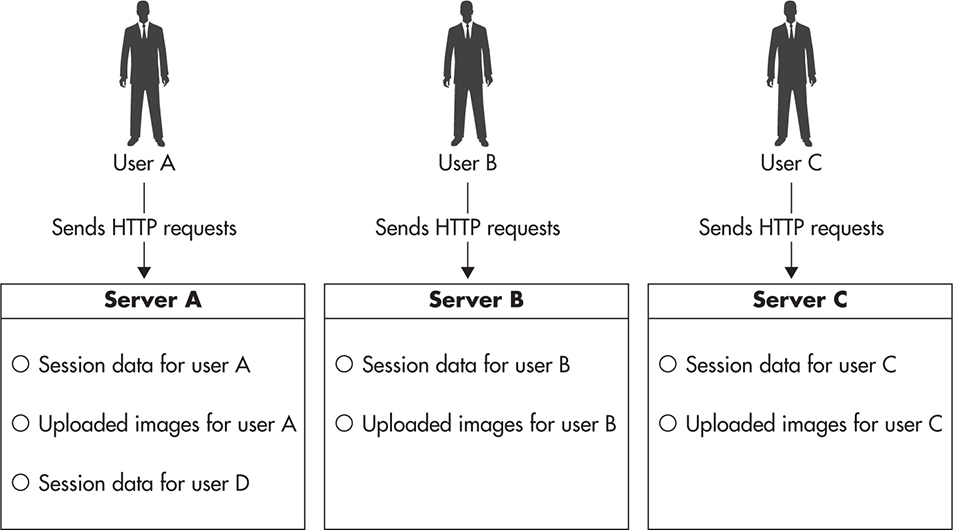
Figure 3-1 Stateful server
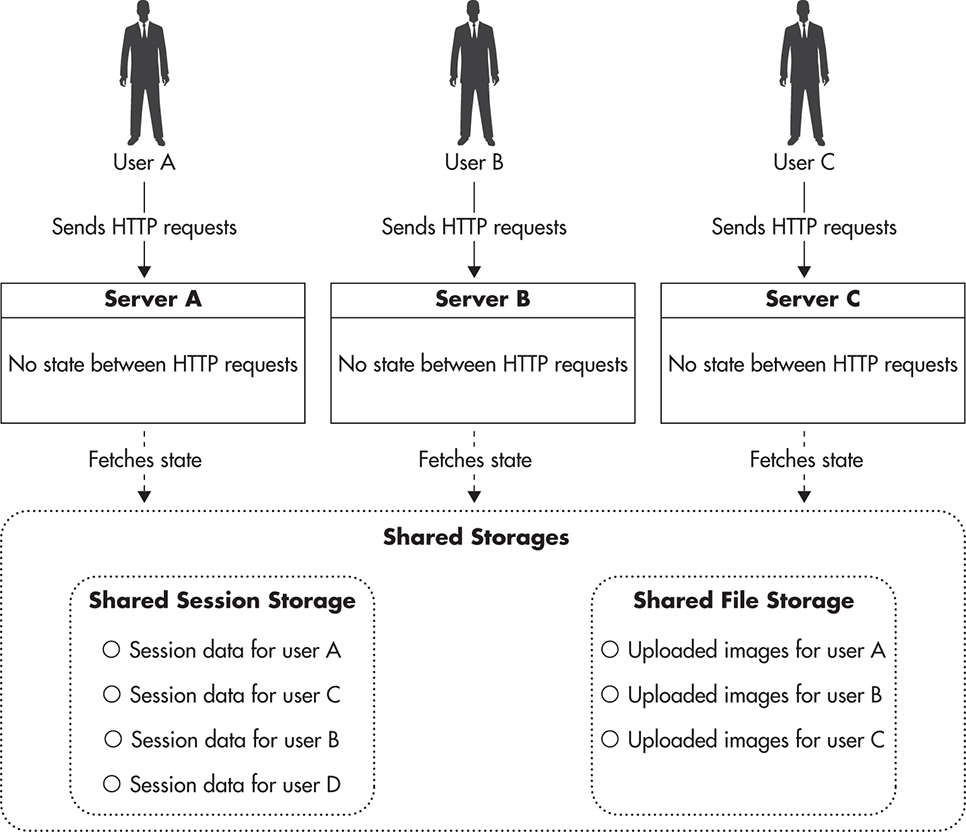
Figure 3-2 Stateless server
To better understand the difference between stateful and stateless service, let’s consider an analogy to different ways you can order drinks in a pub. When you go to a large pub, it is common to see multiple bars located on different floors or in different corners of the pub. In this analogy, a pub is a website, a bar is a server, and an act of ordering a drink is a web request.
If you pay with cash, you can walk up to any of the bars, order a drink, pay, and simply walk away. There are no additional steps necessary to perform this transaction. The bartender does not need to know who you are, and you can enjoy the services of any bartender at any one of the bars. From the bartender’s point of view, it also does not matter how many people are in the pub at the same time, as it does not affect the process of serving drinks. He or she may get more orders, but orders do not affect each other. This is how you would interact with a stateless service.
If you decide to put your drinks on a tab, your transactions look very different. First, you need to initiate your tab by giving a bartender your credit card. Then, any time you want to order a drink, you need to go to the bar where your credit card is and ask for the drink to be put on your tab. You do not have the freedom of moving around the pub and using other bars, as they do not know who you are. You also need to remember to collect your card at the end of the night. From a bartender’s point of view, putting drinks on a tab is also more challenging, as the bartender needs to locate the correct tab for each order. The more open tabs he or she has, the more challenging it becomes to find the right tab for each order. This is how you interact with a stateful service.
The key difference between stateful and stateless services is that instances of a stateless service are fully interchangeable and clients can use any of the instances without seeing any difference in behavior. Stateful services, on the other hand, keep some “knowledge” between requests, which is not available to every instance of the service. Whenever clients want to use a stateful service, they need to stick to the selected instance to prevent any side effects.
Let’s now have a look at the most common types of state stored in the front-end layer and how to deal with them.
Managing HTTP Sessions
Hypertext Transfer Protocol (HTTP) sessions are used all over the Web. In fact, when you visit a website, your requests will typically be part of an HTTP session. Since the HTTP protocol is stateless itself, web applications developed techniques to create a concept of a session on top of HTTP so that servers could recognize multiple requests from the same user as parts of a more complex and longer lasting sequence (the user session).
From a technical point of view, sessions are implemented using cookies. Figure 3-3 shows a simplified sequence of events. When a user sends a request to the web server without a session cookie, the server can decide to start a new session by sending a response with a new session cookie header. The HTTP contract says that all cookies that are still active need to be included in all consecutive calls.
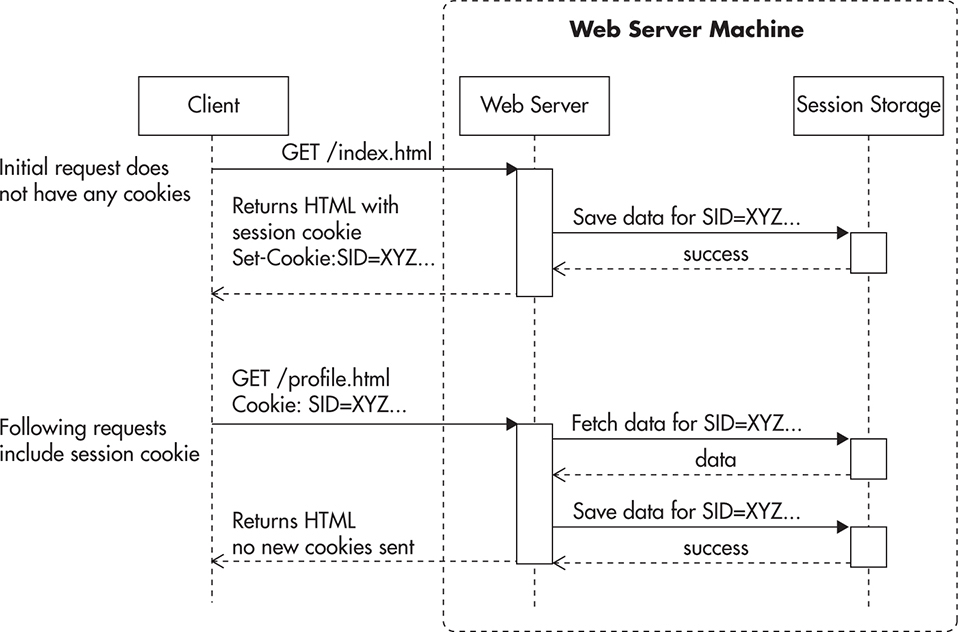
Figure 3-3 Establishing an HTTP session
By using cookies, the server can now recognize which requests are part of the same sequence of events. Even if multiple browsers connected to the web server from the same IP address, cookies allow the web server to figure out which requests belong to a particular user. This in turn allows implementation of user login functionality and other similar features.
When you log in to a website, a web application would usually store your user identifier and additional data in the web session scope. The web framework or the application container would then be responsible for storing the web session scope “somewhere” so that data stored in the web session scope would be available to the web application on each HTTP request. In the case of Java, a web session scope would usually be stored in the memory of the web application container; in the case of PHP, it would use files stored on the web server by default. The key thing to observe here is that any data you put into the session should be stored outside of the web server itself to be available from any web server. There are three common ways to solve this problem:
![]() Store session state in cookies
Store session state in cookies
![]() Delegate the session storage to an external data store
Delegate the session storage to an external data store
![]() Use a load balancer that supports sticky sessions
Use a load balancer that supports sticky sessions
If you decide to store session data in cookies, the situation is fairly simple. In your application, use session scope as normal; then just before sending a response to the client, your framework serializes the session data, encrypts it, and includes it in the response headers as a new value of the session data cookie. The main advantage in this approach is that you do not have to store the session state anywhere in your data center. The entire session state is being handed to your web servers with every web request, thus making your application stateless in the context of the HTTP session. Figure 3-4 shows how session data is passed around in this case.
The only practical challenge that you face when using cookies for session storage is that session storage becomes expensive. Cookies are sent by the browser with every single request, regardless of the type of resource being requested. As a result, all requests within the same cookie domain will have session storage appended as part of the request. Browsers will have to include entire session data, even when downloading images or Cascading Style Sheet (CSS) files, or sending AJAX requests.
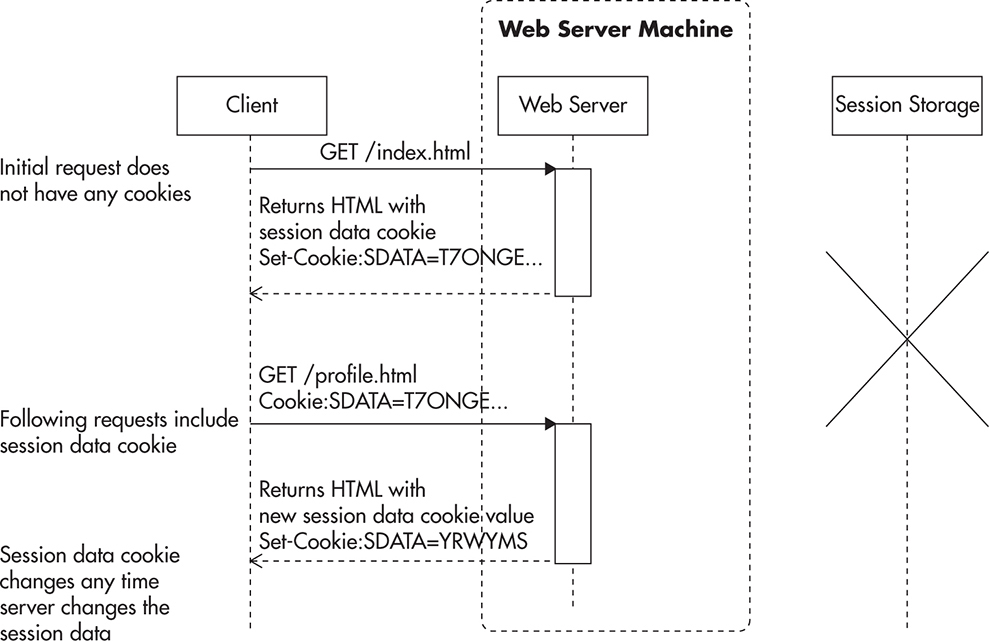
Figure 3-4 Session data stored in cookies
Using cookies for session data storage works very well as long as you can keep your data minimal. If all you need to keep in session scope is user ID or some security token, you will benefit from the simplicity and speed of this solution. Unfortunately, if you are not careful, adding more data to the session scope can quickly grow into kilobytes, making web requests much slower, especially on mobile devices. The cost of cookie-based session storage is also amplified by the fact that encrypting serialized data and then Base64 encoding increases the overall byte count by one third, so that 1KB of session scope data becomes 1.3KB of additional data transferred with each web request and each web response.
The second alternative approach is to store session data in a dedicated data store. In this case, your web application would take the session identifier from the web request and then load session data from an external data store. At the end of the web request life cycle, just before a response is sent back to the user, the application would serialize the session data and save it back in the data store. In this model, the web server does not hold any of the session data between web requests, which makes it stateless in the context of an HTTP session. Figure 3-5 shows how session data is stored in this scenario.
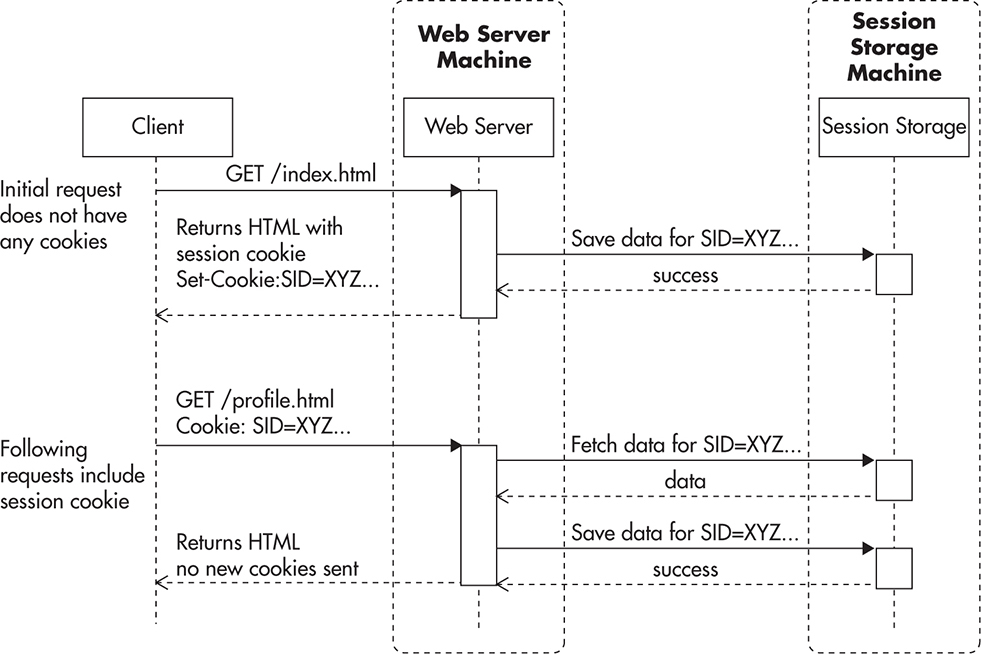
Figure 3-5 Session data stored in distributed data store
Many data stores are suitable for this use case, for example, Memcached, Redis, DynamoDB, or Cassandra. The only requirement here is to have very low latency on get-by-key and put-by-key operations. It is best if your data store provides automatic scalability, but even if you had to do data partitioning yourself in the application layer, it is not a problem, as sessions can be partitioned by the session ID itself. We’ll look further at data partitioning in Chapter 5, but for now, let’s assume that the horizontal scalability of session storage is not a difficult problem, and it can be solved by the data store itself or by simple data partitioning.
If you are developing your front-end web application in Java JVM–based languages (Groovy, Scala, Java), you also have the alternative of using object-clustering technologies like Teracotta for your session storage. Terracotta allows for transparent object access from multiple machines by introducing synchronization, distributed locking, and consistency guarantees. From the front-end scalability point of view, it is just another means to the same end—you need to make all of your web servers identical to allow auto-scaling and horizontal scalability by adding clones.
Finally, you can handle session state by doing nothing in the application layer and pushing the responsibility onto the load balancer. In this model, the load balancer needs to be able to inspect the headers of the request to make sure that requests with the same session cookie always go to the server that initially issued the cookie. Figure 3-6 shows one possible implementation of sticky session.L18–L19 In this case, any time a new client sends a request, the load balancer assigns the client to a particular web server and injects a new load balancer cookie into the response, allowing the load balancer to keep track of which user is assigned to which server.

Figure 3-6 Sticky session based on an additional cookie
Even if it may seem like a good solution, sticky sessions break the fundamental principle of statelessness, and I recommend avoiding them. Once you allow your web servers to be unique, by storing any local state, you lose flexibility. You will not be able to restart, decommission, or safely auto-scale web servers without braking users’ sessions because their session data will be bound to a single physical machine. In addition, you create a dangerous precedence with sticky sessions. If it is okay to store session data on web servers, maybe it is also okay to store some other state there? If you can do one, you can do the other. Sticky session support of a load balancer can then hide underlying design issues rather than helping you scale your application. Instead, keep all session scope data in cookies or store session data in a shared object store accessible from all web server instances.
Managing Files
The second most common type of state in web applications for front-end servers is file storage. There are two types of files to pay attention to:
![]() User-generated content being uploaded to your servers
User-generated content being uploaded to your servers
![]() Files generated by your system that need to be downloaded by the user
Files generated by your system that need to be downloaded by the user
The most common use case is to allow users to upload files and then share or access them. A decade ago, websites rarely allowed users to upload images, but the norm has shifted as people share more images and videos and engage with media-rich social profiles, forcing more and more web applications to manage user-generated files without sacrificing scalability. The flip side of this use case is letting users download files generated by your system. Whether reports, invoices, videos, or images, your system may need to create files for your users and generate uniform resource locators (URLs) to download them. In some cases, you can get away with generating files on the fly and avoid storing them, but in many cases, you will need to store the files in their exact form to ensure they will never change. For example, you don’t want the contents of an invoice to change once you release a new version of your code.
Each of these use cases may require files to be available publicly or privately by selected users. Public files are like photos on social media—anyone can download them. Private files, on the other hand, are like invoices, reports, or private messages—they should be accessible only by selected users.
Whether you are hosting your application on Amazon or not, you can consider using Simple Storage Service (S3) or Azure Blob Storage as the distributed file storage for your files. They are relatively cheap and a good fit in the early stages of development, when it may not make sense to store all files internally on your own infrastructure. No matter how you store your files, you should always try to use a content delivery network (CDN) provider to deliver public files to your end users. By setting a long expiration policy on public files, you will allow CDN to cache them effectively forever. This way, the original servers hosting these files will receive less traffic, thereby making them easier to scale. Figure 3-7 shows how public files can be stored and accessed via CDN.

Figure 3-7 Distributed storage and delivery of public files
If your user-uploaded content is not meant to be publicly available, all file download requests will have to go to your front-end web application servers rather than being served directly by CDN. Figure 3-8 shows an example of such configuration. A web request for a file is sent to one of the front-end web application servers; the application checks a user’s permissions and either allows or denies access to the file. If access is granted, the application downloads the file from the shared file storage and sends it to the client.

Figure 3-8 Storage and delivery of private files
If you are hosting your application on the Amazon infrastructure, there is no better solution than uploading files to Amazon S3. Whether you are serving public or private files, you can store them in S3 to make sure your front-end servers are stateless. S3 supports the concept of private and public buckets so that files may be accessible publicly or they may be available only to your application servers.
When you need to serve public files, you simply put them into a public S3 bucket. In such case, S3 provides transparent high availability and scalability, and you do not have to worry about anything; it scales for you. You simply have to upload user files to S3 and keep reference to the public URL and file location in your database in case you needed to delete or update it in the future.
When you need to serve private files, you still store them in S3, but you use a private bucket. A private bucket has the same high-availability and high-scalability capabilities, but it is not open to public access. If you want to serve a private file, you will need to download it to your front-end web application server, as in Figure 3-8.
If you are unable to use cloud-based file storage like S3 or Azure Blob Storage, you will have to build your own file storage and delivery solution. You could look for open-source components, but you will most likely need to build and integrate the system yourself, which can be a considerable amount of work. If you need to store a lot of files but you do not need a lot of throughput, you can use regular file servers with Redundant Array of Independent Disks (RAID) controllers used for redundancy and distribute files among your file servers. Depending on the configuration, each of your file servers may have from a few terabytes to as much as a few dozen terabytes of storage space. You will then also need to think about high-availability issues, as redundancy on a drive level may not satisfy your needs (to achieve true high availability, you need to store each file on multiple physical servers to be able to survive certain types of server failures). The situation becomes even more complex if you need to perform a lot of concurrent reads and writes on the same files. Then you may need to partition a larger number of smaller file servers or use solid-state disks (SSDs) to provide higher throughput and lower random access times.
If you need to scale the file storage yourself, consider partitioning your files by uploading them to a randomly selected server and then storing the location of the file in the metadata database. As you need more servers, you can then use weighted random server selection, which allows you to specify the percentage of new files written to each node. High availability can be achieved by hardware RAID controllers, or if you need higher redundancy levels, by simple file replication. You can either make your application copy each file to two servers at the same time or use something as simple as rsync to keep each of your “master” file servers in sync with the slave.
Building simple file storage is relatively easy, but making it truly scalable and highly available is a much more complex task requiring both time and money. Instead of doing it all by yourself, try to opt for an “out of the box,” open-source data store to store your files. For example, MongoDB allows you to store files within a MongoDB cluster by using GridFS. GridFS is an extension built into MongoDB that splits files into smaller chunks and stores them inside MongoDB collections as if they were regular documents. The benefit of such an approach is that you only need to scale one system, and you can leverage partitioning and replication provided by MongoDB instead of implementing your own. You can find similar solutions for other NoSQL data stores, like Astyanax Chunked Object Store released as open source by Netflix. It uses Cassandra as the underlying data store, which allows you to leverage Cassandra’s core features like transparent partitioning, redundancy, and failover. It then adds file storage–specific features on top of Cassandra’s data model. For example, it optimizes access by randomizing the download order of chunks to avoid hotspots within your cluster.
HINT
Remember that distributed file storage is a complex problem. Where possible, stick with a third-party provider like S3 first. When cloud-based storage is not an option, opt for a data store as a relatively cheap alternative. It may add some performance overhead, but it allows you to build your application faster and reduce the maintenance cost. Only when none of these options work should you consider building a file service from scratch. If you decide to build, be sure to learn more about distributed file systems like Google File System (GFS),w44 Hadoop Distributed File System (HDFS),w58 ClusterFS,w61,L15 and fully distributed and fault-tolerant design.
Managing Other Types of State
A few more types of state can sneak into your application and prevent you from scaling, including local server cache, application in-memory state, and resource locks. Front-end applications often need to cache data to increase performance and reduce load on web services and the data layer. I will discuss caching in more detail in Chapter 6.
A good example of an application that could be sensitive to cache inconsistencies is a real-time bidding application. If you were building an e-commerce website showing auctions in real time and you wanted to cache auction data to improve performance, you could be required to invalidate all of the copies of the cached auction object any time the price changes. If you stored these cache objects in the memory of your web servers, it could become extremely difficult to coordinate such cache invalidation. In such cases, you should cache objects using a shared object cache so there is only one copy of each object and it could be invalidated more easily.
Figure 3-9 shows a scenario where multiple servers end up having different versions of the same object, leading to dangerous pricing inconsistencies. Luckily, not all use cases are sensitive to cache inconsistency. For example, if you were building an online blogging platform like tumblr.com, you could cache user names and their follower counts on web servers to speed up the rendering time of their posts. In such a case, users might see different follower counts based on which web server they access, but it would not be a problem if your business was happy to accept such a minor data inconsistency.
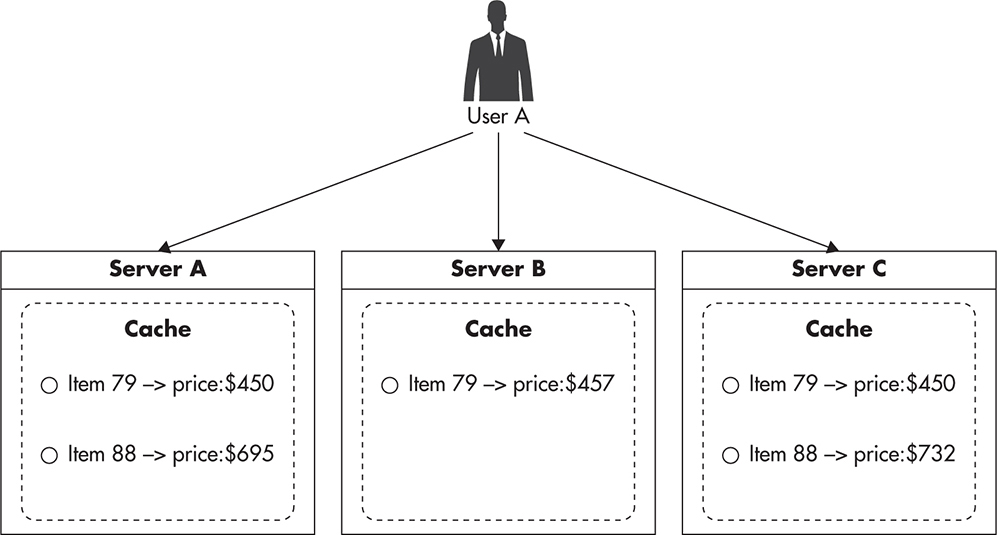
Figure 3-9 Multiple copies of the same cached object
The last common example of server state is resource locks. Locks are used to prevent race conditions and to synchronize access to shared resources. In some cases, people would use locks in the front-end layer to guarantee exclusive access to some resources. Unfortunately, for this to work you need to use a distributed locks system. Throughout the years I have seen a few applications that were supposed to be horizontally scalable, but used local locks to synchronize access to shared resources. Unfortunately, this could never work correctly, as locks would be locked independently on each web server without any synchronization. Instead of trying to share locks on web servers, you should “push” the state out of the application servers similar to the way you did it for HTTP session data and file storage.
To show how local locks could prevent you from scaling out, let’s consider a web application that manages users’ eBay bids. If you developed it to run on a single web server, you could use local locks to synchronize the bidding of each auction. This way, only one thread/process would ever work on a single auction at the same time. Figure 3-10 shows how such a deployment might look.
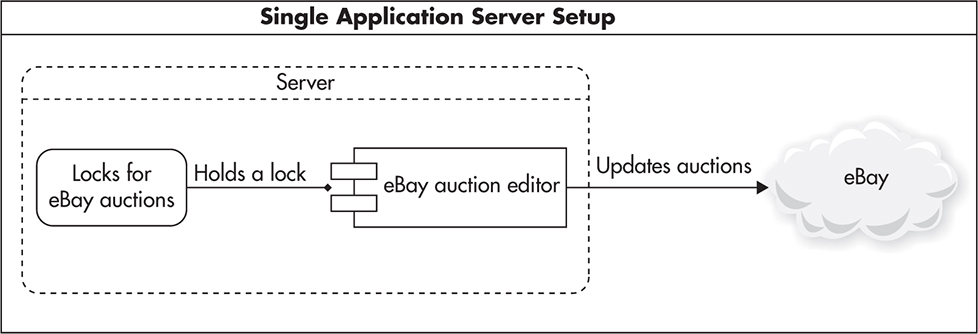
Figure 3-10 Single server using local resource locks
If you then tried to clone your server and run two independent instances, you would end up with a deployment similar to that shown in Figure 3-11. In this case, locks would not work as expected, as you could have two concurrently running threads, one on Server A and another on Server B, both modifying the same eBay auction without ever realizing that there was another process working on the same data.
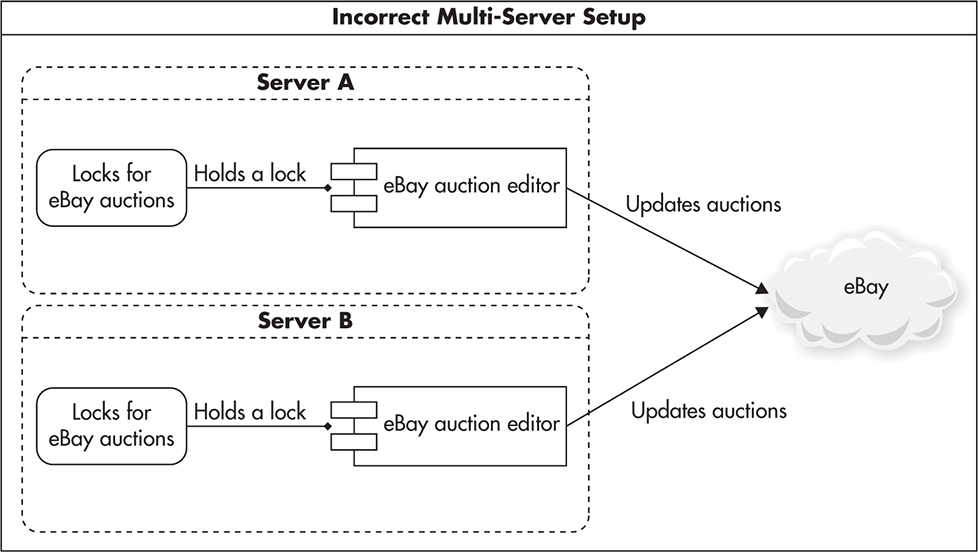
Figure 3-11 Two clones using local/independent locks
To avoid this issue you can use a combination of functional partitioning and scaling out using clones. First, you remove locking functionality from the application code and create an independent service from it. Then, use your new shared lock service on all of your web application servers to share locks globally. This way, your web servers do not hold local state (in the context of locks) and can be cloned, replaced, or shut down independently. Figure 3-12 shows how such a deployment might look.
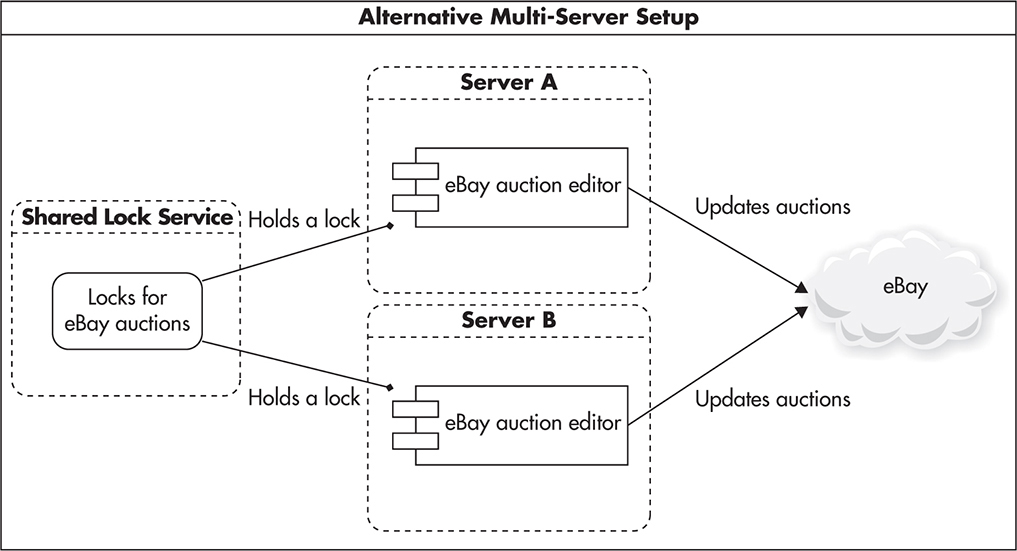
Figure 3-12 All clones using shared lock management service
This is actually a common way of scaling out. You isolate a piece of functionality that requires a globally available state, remove it from the application, and create a new independent service encapsulating this functionality. Since the functionality is much more narrow and specialized, it is usually easier to scale out, and it also hides the shared state behind a layer of abstraction from the rest of the system.
The potential downside of this approach is increased latency, as the application needs to perform remote calls to accomplish what used to be a local operation. It can also lead to increased complexity as you end up with more components to manage, scale, and maintain.
The way you implement distributed locking depends mainly on the programming language you choose. If you are developing in Java, I would recommend using Zookeeper with Curator library developed by Netflix.47,L16–L17 Zookeeper is often used for distributed locking, application configuration management, leader election, and run-time cluster membership information.
If you are using scripting languages like PHP or Ruby, you may want to use a simpler lock implementation based on atomic operations of NoSQL data stores. For example, locks can be easily implemented using an add operation in Memcached (an in-memory cache engine). Listing 3-1 shows a draft of such simple distributed locking logic. It is not as sophisticated as Zookeeper, as you can’t get notifications when a lock gets released, but it is often a good enough solution that can be scaled with ease. Other storage engines usually provide similar atomic primitives, and I have seen locks implemented using Redis, Memcached, and SQL databases like MySQL and PostgreSQL.
Listing 3-1 Draft of a simple distributed lock implementation using Memcached

In short, keep all your web servers stateless, both front-end web and web service servers. Keeping servers stateless will let you scale them easily by adding more clones. In the next section, we will explore each front-end component in detail, see their impact on scalability, and discuss how to leverage statelessness of front-end servers to scale them automatically.
Components of the Scalable Front End
Let’s now look at the scalability impact of each component on the front-end infrastructure and see what technologies can be used in each area. Figure 3-13 shows a high-level overview of the key components most commonly found in the front-end layer.
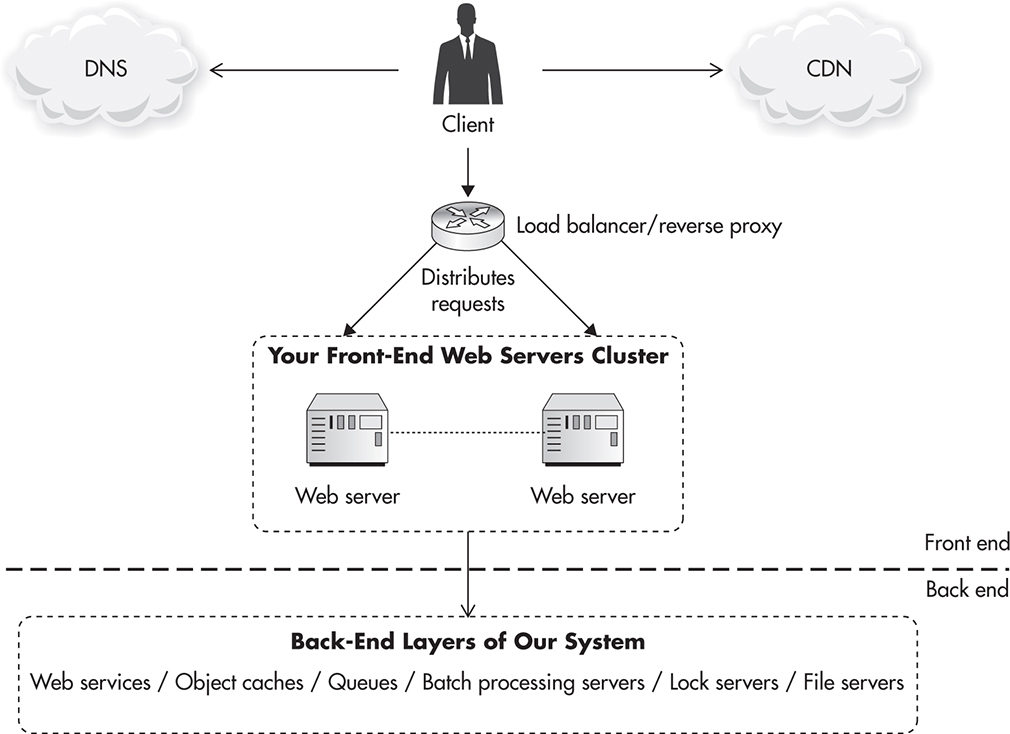
Figure 3-13 Detailed front-end infrastructure
As seen in Figure 3-13, the front-end layer includes components like web servers, load balancers, Domain Name System (DNS), reverse proxies, and CDN. Components in the front-end layer are mainly responsible for rendering the user interface and handling connections initiated directly by the user. Let’s discuss each component in more detail.
DNS
Domain Name System (DNS) is the first component that your clients talk to when they want to visit your website. No matter if you are hosting a website or a web service (for example, for your mobile app), your clients need to find your server’s IP address before they can connect to it. In essence, DNS is used to resolve domain names like ejsmont.org to IP addresses like 173.236.152.169.
In almost all cases, I would recommend using a third-party hosted service instead of deploying your own DNS infrastructure. I would consider hosting my own DNS servers only if I had extremely specialized needs. For example, if I worked for a web hosting company and I needed to support DNS entries for thousands of domains, I might consider hosting my own DNS servers to gain flexibility and save money on the hosted service itself. There are dozens of large DNS hosting companies, which are cheap, reliable, and scale well, so finding a good provider should not be a problem.
If you are hosting your system on Amazon, the best choice is to use Amazon Route 53 service, which is a hosted DNS service integrated closely with other Amazon services. The main advantage of using Route 53 is that it is seamlessly integrated with the Amazon ecosystem. You can easily configure it using the same user interface that you use for other Amazon services. It integrates with other key components, such as an Elastic Load Balancer, and you can configure it entirely using a remote web service API.
If your startup grows much larger, you can also use latency-based routing of Route 53 to direct your clients to the “closest” data center. If you were hosting your servers in multiple Amazon regions (multiple data centers), your clients would actually benefit from establishing a connection to a region that is closer to their location. Route 53 allows you to do that easily using latency-based routing.L20–L21 It works similar to geoDNS mentioned in Chapter 1, but the data center is selected based on the latency measurement rather than location of the client. When you think about it, this technique is even more robust than geoDNS, as measurements can change over time depending on network congestion, outages, and routing patterns.
Any time a client tries to resolve a domain name to an IP address, it connects to a Route 53 DNS server near its location (Amazon has over 50 edge locations all over the worldL22). Then, based on the lowest network latency, the Route 53 server responds with an IP address of one of your load balancers (depending on which region is “closer” to the user). Figure 3-14 shows how such routing is performed. You can see in this diagram that the application has been deployed in two Amazon regions: one in Europe and another in North America. In such a setup, clients connecting from Cuba would get the IP address of either the European region or North American region, depending on the network latency to each of them.

Figure 3-14 Route 53 latency-based routing
If you are not hosting your servers on Amazon, there are plenty of providers from which to choose, including easydns.com, dnsmadeeasy.com, dnsimple.com, and dyn.com. Each offers a similar level of service, latencies, and uptime guarantees,L23–L24 and switching to a different provider is usually an easy task, so selecting a DNS provider should not be a major concern.
Load Balancers
Once your clients resolve your domain name to an IP address using a DNS service, they will need to connect to that IP to request the page or web service endpoint. I strongly recommend using load balancers as the entry point to your data center, as they will allow you to scale more easily and make changes to your infrastructure without negatively affecting your customers.
In the old days, when load balancers were less common and more expensive, DNS was sometimes used to distribute traffic over more than one web server. Figure 3-15 shows how such a round-robin DNS setup might look like.
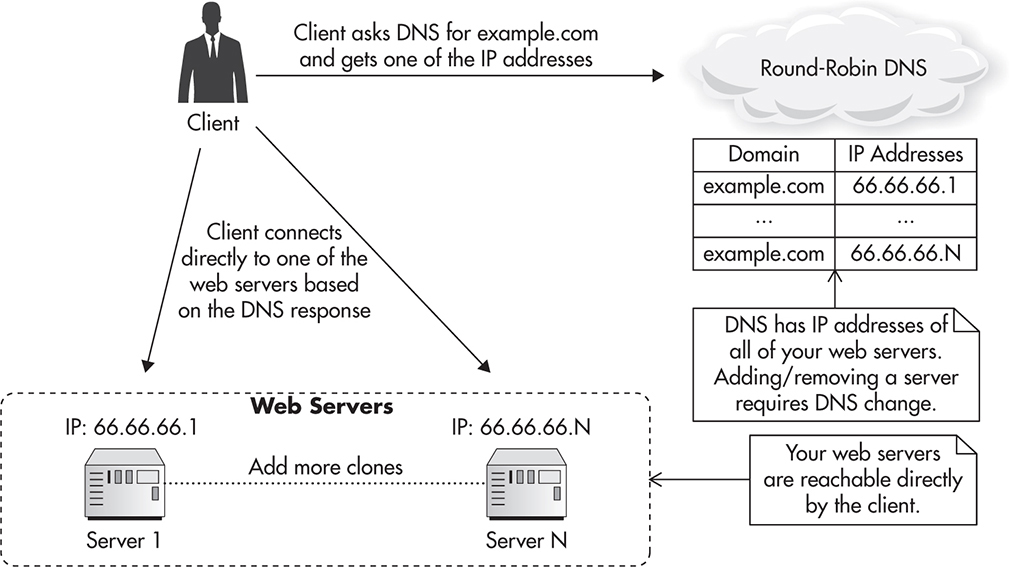
Figure 3-15 DNS round-robin–based load balancing
There are a few problems with the round-robin DNS approach, with the biggest issue being that it is not transparent to the clients. You cannot remove a server out of rotation because clients might have its IP address cached. You cannot add a server to increase capacity either, because clients who already have resolved the domain name will keep connecting to the same server (they can cache your DNS records for as long as the Time to Live policy allows). Using round-robin DNS to distribute traffic directly to your web servers makes server management and failure recovery much more complicated, and I would advise against using this strategy in production.
Instead, put a load balancer between your web servers and their clients, as shown in Figure 3-16. In this configuration, all the traffic between web servers and their clients is routed through the load balancer. By doing so, the structure of your data center and current server responsibilities are hidden from your clients.

Figure 3-16 Deployment with a load balancer
There are some important benefits to using a load balancer:
![]() Hidden server maintenance You can take a web server out or the load balancer pool, wait for all active connections to “drain,” and then safely shut down the web server without affecting even a single client. You can use this method to perform “rolling updates” and deploy new software across the cluster without any downtime.
Hidden server maintenance You can take a web server out or the load balancer pool, wait for all active connections to “drain,” and then safely shut down the web server without affecting even a single client. You can use this method to perform “rolling updates” and deploy new software across the cluster without any downtime.
![]() Seamlessly increase capacity You can add more web servers at any time without your clients ever realizing it. As soon as you add a new server, it can start receiving connections; there is no propagation delay as when you use DNS-based load balancing.
Seamlessly increase capacity You can add more web servers at any time without your clients ever realizing it. As soon as you add a new server, it can start receiving connections; there is no propagation delay as when you use DNS-based load balancing.
![]() Efficient failure management Web server failures can be handled quickly by simply taking a faulty web server out of the load balancer pool. Even if provisioning a new web server takes time, you can quickly remove a broken instance out of the load balancer pool, so that new connections would not be distributed to that faulty machine.
Efficient failure management Web server failures can be handled quickly by simply taking a faulty web server out of the load balancer pool. Even if provisioning a new web server takes time, you can quickly remove a broken instance out of the load balancer pool, so that new connections would not be distributed to that faulty machine.
![]() Automated scaling If you are on cloud-based hosting with the ability to configure auto-scaling (like Amazon, Open Stack, or Rackspace), you can add and remove web servers throughout the day to best adapt to the traffic. By having a load balancer, you can do it automatically, without causing any downtime or negatively impacting your customers. I will explain auto-scaling later in this chapter.
Automated scaling If you are on cloud-based hosting with the ability to configure auto-scaling (like Amazon, Open Stack, or Rackspace), you can add and remove web servers throughout the day to best adapt to the traffic. By having a load balancer, you can do it automatically, without causing any downtime or negatively impacting your customers. I will explain auto-scaling later in this chapter.
![]() Effective resource management You can use Secure Sockets Layer (SSL) offloading to reduce the resources your web servers need. SSL offloading, sometimes also called SSL termination, is a load balancer feature allowing you to handle all SSL encryption/decryption work on the load balancer and use unencrypted connections internally. I recommend using SSL offloading any time you can get away with it from a security compliance point of view.
Effective resource management You can use Secure Sockets Layer (SSL) offloading to reduce the resources your web servers need. SSL offloading, sometimes also called SSL termination, is a load balancer feature allowing you to handle all SSL encryption/decryption work on the load balancer and use unencrypted connections internally. I recommend using SSL offloading any time you can get away with it from a security compliance point of view.
As you can see, using a load balancer as the entry point to your data center has a lot of benefits. Load balancers are popular, and there are many good options from which to choose. Because every system is different, it is hard to recommend a particular technology without knowing the details of the application, but there are three broad solution types that fit most of today’s systems. Let’s quickly go through each of these options and discuss available technologies.
Load Balancer as a Hosted Service
If, as with many startups, you are hosting your application on Amazon EC2 or Azure, I strongly recommend using their hosted load balancer services rather than deploying your own load balancers. One example of such a service is Elastic Load Balancer (ELB) offered by Amazon. ELB is a “load balancer as a service,” which is hosted, scaled, and managed by Amazon. All you have to do to start using it is to configure it via the web console and point it to a group of EC2 instances. Some benefits of ELB include the following:
![]() ELB is the cheapest and simplest solution to start with, as you have one fewer component to manage and scale.
ELB is the cheapest and simplest solution to start with, as you have one fewer component to manage and scale.
![]() ELB scales transparently, so you do not have to worry about the load balancer becoming the bottleneck.
ELB scales transparently, so you do not have to worry about the load balancer becoming the bottleneck.
![]() ELB has built-in high availability, so you do not have to worry about ELB becoming a single point of failure. If you decide to install your own load balancers, make sure that you have automatic failover and a hot standby load balancer ready to pick up the load in case the primary load balancer fails.
ELB has built-in high availability, so you do not have to worry about ELB becoming a single point of failure. If you decide to install your own load balancers, make sure that you have automatic failover and a hot standby load balancer ready to pick up the load in case the primary load balancer fails.
![]() ELB is cost effective with minimal up-front costs. You pay for what you use, and there is no initial charge for setting up an ELB instance.
ELB is cost effective with minimal up-front costs. You pay for what you use, and there is no initial charge for setting up an ELB instance.
![]() ELB integrates with auto-scaling and allows for automatic EC2 instance replacement in case of web server failures. I will describe auto-scaling groups later in this section.
ELB integrates with auto-scaling and allows for automatic EC2 instance replacement in case of web server failures. I will describe auto-scaling groups later in this section.
![]() ELB can perform SSL termination, so connections coming from ELB to your web servers are HTTP, not HTTPS (Hypertext Transfer Protocol over SSL). This can significantly reduce the resources needed by your EC2 instances, as you would not need to run the SSL web server at all.
ELB can perform SSL termination, so connections coming from ELB to your web servers are HTTP, not HTTPS (Hypertext Transfer Protocol over SSL). This can significantly reduce the resources needed by your EC2 instances, as you would not need to run the SSL web server at all.
![]() ELB supports graceful back-end server termination by use of the connection draining feature. This lets you take a web server out of the load balancer pool without terminating existing connections. You can take the server out of the pool, wait for existing clients to disconnect, and safely shut down the instance without ever affecting any of the clients.
ELB supports graceful back-end server termination by use of the connection draining feature. This lets you take a web server out of the load balancer pool without terminating existing connections. You can take the server out of the pool, wait for existing clients to disconnect, and safely shut down the instance without ever affecting any of the clients.
![]() ELB can be fully managed using Amazon SDK so that you can automate load balancer configuration changes any way you wish. For example, you can automate deployments across multiple machines so that instances are automatically taken out of the load balancer pool during code deployment.
ELB can be fully managed using Amazon SDK so that you can automate load balancer configuration changes any way you wish. For example, you can automate deployments across multiple machines so that instances are automatically taken out of the load balancer pool during code deployment.
As you can see, ELB is a strong candidate. Amazon managed to build a lot of features into ELB over the years, making it even more attractive than it used to be. There is only one significant reason why ELB may not be suitable for your application:
![]() ELB needs some time to “warm up” and scale out. If you get sudden spikes in traffic that require doubling capacity in a matter of seconds or minutes, ELB may be too slow for you. ELB is great at auto-scaling itself, but if your traffic spikes are sudden, it may not be able to scale fast enough. In such cases, some of your clients may receive HTTP 503 error responses until ELB scales out to be able to handle the incoming traffic.
ELB needs some time to “warm up” and scale out. If you get sudden spikes in traffic that require doubling capacity in a matter of seconds or minutes, ELB may be too slow for you. ELB is great at auto-scaling itself, but if your traffic spikes are sudden, it may not be able to scale fast enough. In such cases, some of your clients may receive HTTP 503 error responses until ELB scales out to be able to handle the incoming traffic.
In addition to publicly facing load balancers, some cloud providers, like Amazon and Azure, allow you to configure their load balancers internally as well. Figure 3-17 shows an example of an internal load balancer. In this deployment scenario you put a load balancer between your front-end servers and your internal services. If all web service requests sent from front-end servers go through an internal load balancer, you gain all the benefits of a load balancer deeper in your stack. You can easily add servers to increase capacity, you can remove machines from the load balancer during maintenance, you can distribute requests among multiple machines, and you can provide automatic failure recovery because the load balancer can remove broken hosts from the pool automatically.
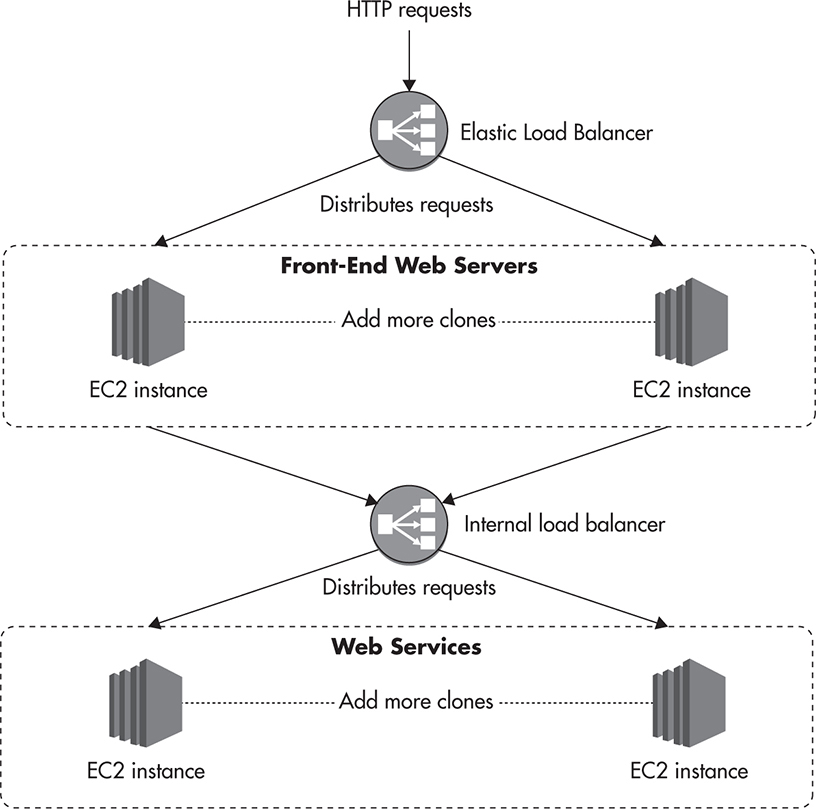
Figure 3-17 Internal load balancer
Self-Managed Software-Based Load Balancer
If you are hosted on a cloud provider that does not have a load balancer service or does not meet your requirements, you may want to use one of the open-source (software-based) load balancers. You can use either a reverse proxy like Nginx or a specialized open-source load balancer product like HAProxy. More options are available on the market, but these two are by far the most popular.
The main advantage of Nginx is that it is also a reverse HTTP proxy, so it can cache HTTP responses from your servers. This quality makes it a great candidate for an internal web service load balancer, as shown in Figure 3-17. Not only can you scale out your web service layer by adding more servers to the Nginx pool, but you can also benefit greatly from its caching capabilities, reducing the resources needed on the web services layer. I will talk more about these benefits in Chapter 4 and Chapter 6. For now, just know that Nginx is a very good candidate for a reverse proxy/load balancer.
HAProxy, on the other hand, is simpler in design than Nginx, as it is just a load balancer. It can be configured as either a layer 4 or layer 7 load balancer. When HAProxy is set up to be a layer 4 proxy, it does not inspect higher-level protocols and it depends solely on TCP/IP headers to distribute the traffic. This, in turn, allows HAProxy to be a load balancer for any protocol, not just HTTP/HTTPS. You can use HAProxy to distribute traffic for services like cache servers, message queues, or databases. HAProxy can also be configured as a layer 7 proxy, in which case it supports sticky sessions and SSL termination, but needs more resources to be able to inspect and track HTTP-specific information. The fact that HAProxy is simpler in design makes it perform slightly better than Nginx, especially when configured as a layer 4 load balancer. Finally, HAProxy has built-in high-availability support (HAProxy stands for High Availability Proxy), which makes it more resilient to failures and simplifies failure recovery.
In both cases, whether you use Nginx or HAProxy, you will need to scale the load balancer yourself. You are most likely going to reach the capacity limit by having too many concurrent connections or by having too many requests per second being sent to the load balancer. Luckily, both Nginx and HAProxy can forward thousands of requests per second for thousands of concurrent clients before reaching the capacity limit. This should be enough for most applications, so you should be able to run your web application on a single load balancer (with a hot standby) for a long time.
When you do reach the limits of your load balancer capacity, you can scale out by deploying multiple load balancers under distinct public IP addresses and distributing traffic among them via a round-robin DNS. Figure 3-18 shows how you could scale software-based load balancers beyond a single machine using this technique.

Figure 3-18 Multiple load balancers
As you can see, there is nothing complicated about this approach. As long as your load balancers are interchangeable and your web servers are stateless, you can keep adding more load balancers to scale horizontally. Having multiple load balancers is more complex to manage, as deployments and configuration changes may need to span multiple load balancers, but it is still a relatively simple way to scale out.
It is acceptable to use round-robin DNS pointing to multiple load balancers (rather than web servers) because you will never have any business logic on your load balancers. You will not have to redeploy or upgrade your load balancers as often as you would with your web servers, and load balancers are much less likely to fail due to a bug.
Hardware Load Balancer
Finally, on the high end of the scale, you have hardware load balancers. If you are hosting a high-traffic website in your own physical data center, you should consider a dedicated hardware load balancer. Devices like Big-IP from F5 or Netscaler from Citrix support very rich feature sets and provide much higher capacity than software-based load balancers. By having hardware load balancers, you mainly benefit from high throughput, extremely low latencies, and consistent performance. Hardware load balancers are highly optimized to do their job, and having them installed over a low-latency network makes a big difference. They can often handle hundreds of thousands or even millions of concurrent clients, making it much easier to scale vertically.L25–L26
The obvious downside of hardware load balancers is their high purchase cost. Hardware load balancer prices start from a few thousand dollars (for a very low-end device) and go as high as over 100,000 dollars per device. Another challenge with hardware load balancers is that they usually require specialized training, and it is harder to find people with the work experience necessary to operate them. Nonetheless, if you are hosting a high-traffic website on your own hardware and you can afford it, a hardware load balancer is the best way to go.
I believe that load balancer as a service will become more popular in the coming years. It is a fairly generic solution, and it is needed by most web infrastructures, so cloud hosting platforms will not be complete without offering a load balancing service anymore. In fact, hosting providers other than Amazon already offer load balancing as a service; you have Azure Load Balancer with support of both internal and external load balancing, Cloud Load Balancers at Rackspace, and LbaaS at Open Stack. So even if you are not hosting your infrastructure on Amazon, it is worth checking whether your hosting provider has a load balancer as a service solution. Scaling through their service might be cheaper and simpler to start with. As your company grows, or when you have specialized use cases, you can switch to your own solution.
Web Servers
As I mentioned before, front-end servers should not have much business logic and they should be treated as a presentation and web service results aggregation layer rather than the core of your system. I will talk more about the benefits of having web services in Chapter 4, but for now let’s assume that front-end web servers should not contain business logic, but delegate to web services to perform the actual work.
Because the front end is mainly about handling user interactions, rendering views, and processing user input, it makes sense to use technologies that are good at these tasks. I would recommend dynamic languages like PHP, Python, Groovy, Ruby, or even JavaScript (Node.js) for the front-end web application development, rather than using pure Java or C or a constraining framework like Java EE, JSF, or CGI. You want your technology stack to make common front-end problems simple to solve. For example, you need to make it cheap and easy to take care of SEO, AJAX, internationalization, and daily template changes. It is beneficial to have the same technology stack across all of your layers, as it allows for easier code reuse and requires your team to master fewer technologies. Having said that, it is not uncommon to see different technologies used on the front-end servers and back-end servers of the same system, as different layers may face different challenges and may benefit from a different architectural style.
Once you select your language and framework, you will need to select the actual web server on which to run your application. Luckily, from the scalability point of view, it does not matter much which language you choose and which web server are you running on. As long as your front-end web servers are truly stateless, you can always scale out horizontally by simply adding more servers.
Node.js is a run-time environment and a set of components allowing developers to use JavaScript on the web server side. It is a fairly new technology (development began in 2009) and it is surrounded by a lot of buzz due to some exciting concepts used in Node.js that help maximize throughout. It performs exceptionally well in use cases where the web application needs to maintain open connections with tens or hundreds of thousands of concurrent clients without much communication happening for long periods of time, or with small packets of data exchanged between the client and server. In such applications, a single machine running a Node.js server may support orders of magnitude more clients than other technologies might be able to.
Some will argue that web server choice makes a big difference and that Node.js can handle hundreds of thousands of concurrent connections, whereas Apache will crash and burn on a couple thousand. My answer to that is yes and no. Yes, it is true that for some use cases one technology may scale much better than another, but on the other hand, it does not matter in the end, as I am talking about horizontal scalability of the entire cluster rather than vertical scalability of a single machine. Worry more about big-picture horizontal scaling from day one rather than focusing on specialized use cases. For some applications, like a chat room, instant notification feature, or a back end for an interactive multiplayer game, it makes more sense to use Node.js rather than Apache or Tomcat, but for the other 98 percent of the use cases, it may be simpler and cheaper to develop in Groovy, Python, PHP, or Ruby, as they have much larger and more mature ecosystems built around them.
There are simply too many choices on the market to fully recommend a particular web server or development stack. It all comes down to the experience you have within the team and personal preferences. Do some research before committing to a particular stack and a web server, but as I mentioned before, no matter what web server you choose, the most important thing for your scalability is to keep your front-end machines stateless.
When doing research before choosing your stack, steer away from assumptions and take all benchmarks with a grain of salt. Benchmarks are like political polls; their results always depend on who prepared them. Always assume that there was some agenda behind a benchmark. To gain value from a benchmark, understand what was measured, how was it done, and under what conditions. Finally, pay attention to the graphs, as there are surprisingly many ways in which we may be deceived.L27–L28
Caching
Caching is one of the most important techniques when it comes to scaling the front end of your web application. Instead of trying to add more servers or make them respond faster to clients’ requests, use caching to avoid having to serve these requests in the first place. In fact, caching is so critical to the scalability of web applications that Chapter 6 is dedicated to it. To avoid repeating parts of that deeper dive, let’s just highlight a few components relevant to the front-end layer of your application here.
One of the first things you should do is integrate a CDN. We’ll cover the details of setup in Chapter 6. On a high level, you can use a CDN to proxy all of the web requests coming to your web servers, or you can use it solely for static files like images, CSS, and JavaScript files.
If you decide to serve all of your traffic via the CDN, you may be able to leverage it to cache entire pages and even AJAX responses. For some web application types, you can serve most of your traffic from the CDN cache, resulting in less load on your servers and better response times.
Unfortunately, not all web applications can use CDN to effectively cache entire pages. The more personalized your content is and the more dynamic the nature of your web application, the harder it becomes to cache entire HTTP responses. In such cases, you may be better off deploying your own reverse proxy servers to gain more control over what is cached and for how long. Most common alternatives for it are reverse proxies like Varnish and Nginx, which we’ll cover in Chapter 6.
Another way to use caching in the front-end layer is to store data directly in the browser. Modern browsers supporting the web storage specification let you store significant amounts of data (megabytes). This is especially useful when developing web applications for mobile clients or SPAs, as you want to minimize the number of web requests necessary to update the user interface. By using local browser storage from your JavaScript code, you can provide a much smoother user experience, reducing the load on your web servers at the same time.
Finally, if requests cannot be satisfied from the browser caches or reverse proxies, your web servers will need to serve them and generate the responses. In such cases, you may still be able to cache fragments of your responses in an object cache. Most web applications can benefit from a shared object cache like Redis or Memcached. In fact, many startups managed to scale to millions of daily users by beefing up their Memcached clusters. Some of the best examples of scaling using Memcached are Facebook,w62 Pinterest,L31 Reddit,L32 and Tumblr.L33
Auto-Scaling
Auto-scaling is a technique of automating your infrastructure so that new virtual servers would be added or removed from your clusters depending on the volume of traffic and server load. Scalability is not just about scaling out; it is also about the ability to scale down, mainly to save cost. Auto-scaling is a technique rather than a component of your front-end infrastructure, but it brings great benefits and is especially easy to implement in the front-end layer of a web stack.
To better understand why it is important to automate scaling of your stack, look at Figure 3-19. It is not important here what metric is shown in the graph, but what the weekly pattern of the load put on the infrastructure is (the graph shows data from a free ISP monitoring tool). The key feature is that traffic changes significantly throughout the day, and it may also be significantly different on the weekends. Rather than having to add and remove virtual machines manually, it is better to automate the process so that your system “knows” how to monitor its own condition and scale up or down respectively. Depending on your traffic patterns, using auto-scaling can save you as much as 25 percent or even 50 percent of your overall web server hosting costs. It can also help you handle unexpected spikes in traffic without any human interaction.
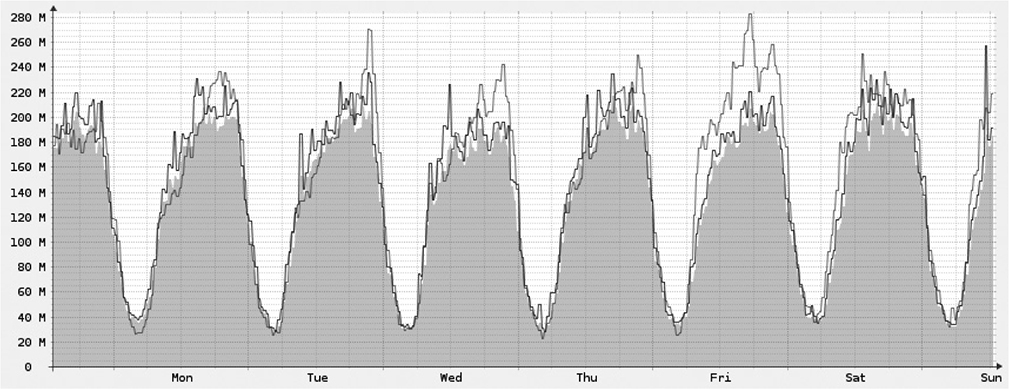
Figure 3-19 Common infrastructure utilization pattern
The easiest way to implement auto-scaling is to use the hosting provider’s auto-scaling tools. Check whether your hosting provider offers auto-scaling functionality before trying to implement your own. Amazon was the first cloud hosting company that implemented auto-scaling as a service, and they are still the leader in that area, but other providers like Rackspace and Azure now provide auto-scaling functionality as part of their cloud hosting suite as well. To better understand how auto-scaling works and what components are involved, let’s have a look at an example using Amazon.
First, to be able to configure auto-scaling, you will need to use Amazon EC2 (Elastic Compute Cloud) instances for your web servers. When you use auto-scaling, servers may be added or removed at any time of the day. Auto-scaling can take out any instance at any point in time, so you cannot store any data on your web servers, or at least make sure that any data stored on web servers is disposable (like a cache). Shutting down a web server should not cause any users to be logged out or receive a broken user experience.
Before you can create EC2 instances automatically, you will have to create a web server image (Amazon Machine Image [AMI]) and configure it to be able to bootstrap itself and join the cluster automatically. To do so, everything that is needed for a new EC2 instance to become a fully functional web server must be in the AMI file itself, passed in by AMI launch parameters, or fetched from a remote data store. Amazon allows server images to take bootstrap parameters so you can create a new instance and tell it what cluster it belongs to or what the role of the server is. You can also use Amazon storage services, like SimpleDB, to store bootstrap configuration for EC2 instances, so any time a new EC2 instance is started using a particular AMI image, it will be able to load the necessary configuration from the shared data store and configure itself to become a fully functional web server.
Next, you can create an auto-scaling group to define scaling policies. An auto-scaling group is the logical representation of your web server cluster and it can have policies like “add 2 servers when CPU utilization is over 80 percent” or “set minimum server count to 4 every day at 9 a.m.” Amazon has a powerful policy framework, allowing you to schedule scaling events and set multiple thresholds for different system metrics collected by Cloud Watch (a hosted service used to gather system-level metrics).
When you create an auto-scaling group, you can also decide to use Amazon ELB. If you decide to do that, new instances added to the auto-scaling group will be automatically added to the load balancer pool as soon as they complete bootstrapping. This way, Amazon auto-scaling can launch new instances, add them to the load balancer, monitor cluster metrics coming from Cloud Watch, and based on the policies, add or remove further server instances. Figure 3-20 shows how Amazon auto-scaling works. Auto-scaling controls all of the instances within the auto-scaling group and updates ELB any time servers are added or removed from the cluster.

Figure 3-20 Amazon auto-scaling
Auto-scaling is in some ways similar to self-healing, explained in Chapter 2, as you make your system handle difficulties without human interaction. No matter how many servers you have or when traffic spikes occur, your network engineers will not have to monitor the load or react to changing conditions. Your system will able to adjust its infrastructure depending on the current conditions and provide a good user experience (peak) in a cost-effective manner (trough).
Deployment Examples
Finally, let’s put it all together and see two different deployment scenarios: a web application hosted entirely on Amazon and one hosted in a private data center on dedicated hardware. Naturally, these are just blueprints and many of the components included here are optional and may be scaled down depending on your particular system needs.
AWS Scenario
There is a lot of value in additional services provided by Amazon. If your company is a young startup, you really need to be able to get up and running fast. For young startups, every day may be the difference between success and failure, as uncertainty is colossal and resources are sparse. Figure 3-21 shows a blueprint of a typical Amazon web application deployment with web services and data storage layers removed for simplicity.

Figure 3-21 Amazon deployment example
Just by looking at the diagram, you can see that Amazon is a full stack-hosting company. They thought of pretty much everything a scalable web application might need. As a result, the only components that you are responsible for in Figure 3-21 are your EC2 instances. Even there, however, Amazon can detect EC2 instance failures, shut down the broken servers, and create a new one based on the auto-scaling needs.
In the example in Figure 3-21, the application uses Route 53 as the DNS. Since Route 53 provides high availability and scalability out of the box, you will not need to worry about managing or scaling the DNS. Further down the stack, web requests hit the ELB, where you can implement SSL offloading and round-robin traffic distribution to your auto-scaling group. In this case, you do not have to worry about scalability or high availability of the load balancer either, as ELB provides them out of the box.
When requests finally hit your web servers (EC2 instances), web servers use the web services layer, caches, queues, and shared data stores to render the response. To avoid storing any local state, all files (public and private) are stored in S3. Public files are served directly from S3, and private files are returned by your web servers, but they are still stored on S3 for scalability and high availability.
On its way back to the client, responses may be cached in CloudFront. Since not every application would benefit from CloudFront, this component is optional. You could deliver public content directly from S3 without going through CloudFront with a similar effect. S3 and CloudFront both provide high scalability and high availability as part of the service. In addition, they also speed up your response times by having edge servers hosted all around the world.
As you can see, there are a lot of components in this deployment, but most of them are hosted services. When you think of it, that is a huge amount of features and a load off your mind. Just ten years ago, I wouldn’t have dreamed of being able to scale, deploy, and develop so quickly simply by using third-party platforms.
If you are a small startup on its way up, consider leveraging Amazon to help you scale. You should be able to use it at least until you get your product right and enough cash in the bank to be able to afford building custom solutions for all these problems. Amazon is very cost efficient for small companies that need to deal with a lot of uncertainty, as there is virtually no up-front cost. As you become larger and richer, priorities often change and it may become much more attractive to host your systems on your own hardware.
Private Data Center
The second deployment scenario is based on dedicated hardware in a physical data center. In this configuration, the only services that you could easily offload to third parties are DNS and CDN. Some people use Amazon S3 for file storage even when hosting on their own infrastructure, but it is not a very common practice.
Even though hosting on bare metal forces you to manage much more yourself, there are considerable benefits of dedicated hardware. The most significant reasons for hosting on your own hardware are
![]() You may require more predictable latencies and throughput. Hosting on your own hardware lets you achieve submillisecond server-to-server round trips.
You may require more predictable latencies and throughput. Hosting on your own hardware lets you achieve submillisecond server-to-server round trips.
![]() Hardware servers are much more powerful than virtual servers. You will need many fewer machines when migrating from the cloud to bare hardware.
Hardware servers are much more powerful than virtual servers. You will need many fewer machines when migrating from the cloud to bare hardware.
![]() Buying servers up front is expensive when you are a small company, but once your network engineering team grows and you are managing over a hundred servers, it may become cheaper to have your own servers rather than renting “compute units.” Some things, like random access memory (RAM), input-output (I/O) operation, and SSD drives, are still very expensive in the cloud when compared to regular servers. In general, vertical scaling is more effective when done using your own hardware.
Buying servers up front is expensive when you are a small company, but once your network engineering team grows and you are managing over a hundred servers, it may become cheaper to have your own servers rather than renting “compute units.” Some things, like random access memory (RAM), input-output (I/O) operation, and SSD drives, are still very expensive in the cloud when compared to regular servers. In general, vertical scaling is more effective when done using your own hardware.
![]() Some companies need to conform to strict security or legal requirements. For example, some gambling jurisdictions require companies to host all of their servers within a particular location—in such a case, hardware is a necessity, not an option.
Some companies need to conform to strict security or legal requirements. For example, some gambling jurisdictions require companies to host all of their servers within a particular location—in such a case, hardware is a necessity, not an option.
Figure 3-22 shows an example of a private data center deployment. I would still recommend using third-party DNS and CND providers, but the rest of the stack would have to be managed by your own team.

Figure 3-22 Private data center deployment
In similar fashion to Amazon deployment, requests first hit the load balancer; in this case it would be a hardware device: HAProxy or Nginx. If you decide that you need another layer of caching, you may use Nginx as the load balancer or put a layer of reverse proxy servers between your load balancer and your web servers. This way, you can cache entire HTTP responses. The only thing inhibiting vertical scaling for your load balancer is the price per device. In such a case, you may implement the round-robin solution to distribute traffic over multiple load balancers.
Since you cannot provision hardware servers on demand, you would not be able to implement auto-scaling and you would need to coordinate and plan scale-out events more carefully. Adding hardware can take weeks, or in some bureaucratic companies even months, so plan your capacity carefully, as you will not be able to handle traffic spikes by adding new machines with the click of a button. Even when you host on your own hardware, I would still strongly recommend building your web applications in a stateless fashion. This way, even if you cannot automate the scaling process, you can still perform it quickly and avoid horizontal scalability roadblocks.
When hosting on your own hardware, you will also need to choose how to deploy your shared file storage. The file store solution depends mainly on the throughput and data size, and I already presented a few options earlier in this chapter. I prefer solutions where the application does not have to know how files are stored and replicated. Depending on the budget and requirements, you can use anything from a simple File Transfer Protocol (FTP) server to a more sophisticated solution like Storage Area Network (SAN) or NoSQL data stores.
No matter which file storage solution you choose, you will need to be able to serve these files via a CDN. When hosting on S3, public buckets become automatically available over HTTP, so you can just point the CDN to them. In case of a private data center, you will need to put a layer of web servers in front of your file storage to allow public access to your files via the CDN.
As you can see, the components of the infrastructure and underlying principles of the architecture remain the same—the only pieces that change are the technologies used to achieve the same goals. I believe that it is much cheaper and quicker to get started by hosting on the cloud, and then once you grow large enough you can consider moving to a private data center.
Summary
The front end is usually one of the key areas requiring high scalability, as it needs to sustain the highest levels of concurrency and request rates. Luckily, if designed well, it can be a relatively easy area to scale, as it has the least amount of state that needs to be managed (replicated or synchronized).
I would strongly recommend reading some more books and articles focusing on the technologies mentioned in this chapter. There are some great books on caching, load balancers, and general front-end optimization techniques.8,48–49 I would also recommend reading a little bit on modern web frameworks like Spring14 or Grails,22,34 as they promote good web application architecture. Finally, I would recommend getting more familiar with cloud hosting.29,w34–w36,w38