
7. Manage network and storage resources
Practice files
For this chapter, use the Win10SBSCh07 practice files folder. For practice file download instructions, see the introduction.
In the early days of Microsoft, Bill Gates envisioned a future with “a computer on every desk and in every home.” Today, the business world couldn’t function without computers, and terms such as “information worker” have popped up to describe people who spend most of the day working on computers. Computers make it possible for an increasing number of people to successfully run small businesses with large presences, to maximize productivity by working from home, to have learning resources at their fingertips (literally), and to stay connected to information all the time, from any location.
As more apps become available as online services, an Internet connection is increasingly important to the computing experience. Your computer connects to the Internet through a network that provides and safeguards the connection. Windows 10 uses network connection security profiles to govern the way your computer interacts with other computers and devices on the network. On a local network, you can connect directly to other computers or manage the connection through a homegroup—a password-protected security group that defines the sharing of specific information and devices with other homegroup member computers.
This chapter guides you through procedures related to managing network connections, managing homegroup connections, and sharing files on your network.
Manage network connections
A network is a group of computers that communicate with each other through a wired or wireless connection. A network can be as small as two computers or as large as the Internet. In the context of this book, we primarily use the term network to mean the connection between computers in one physical location that are connected to each other, and to the Internet, through a network router.
 Important
This chapter assumes that you are connecting to an existing, functioning network. This chapter does not include instructions for setting up or configuring networking hardware. When setting up a network infrastructure, be sure to follow the instructions provided by the hardware manufacturer.
Connect to a network
If your computer is a desktop computer, you’ll probably connect it to only one network: your home or office network. However, you might connect a laptop computer or mobile devices to networks in many locations for the purpose of connecting to the Internet: at home, at work, at a friend’s or relative’s house, at a public library, at a coffee shop—some highway rest areas even offer free Internet access! You can’t connect a computer directly to the Internet, so wherever you want to connect to the Internet you will first need to connect to a network.
Connecting your computer to a network requires two things:
![]() Your computer must have an active network adapter. This is usually in the form of a network interface card that is part of the internal workings of the computer, but you can purchase external network adapters that connect to a USB port on your computer. A network adapter can be for a wired network or a wireless network. Many laptop and desktop computers have both. If a computer has a wired network adapter, it has an external Ethernet port that the cable connector fits into. This looks a bit like a wide telephone cable port.
Your computer must have an active network adapter. This is usually in the form of a network interface card that is part of the internal workings of the computer, but you can purchase external network adapters that connect to a USB port on your computer. A network adapter can be for a wired network or a wireless network. Many laptop and desktop computers have both. If a computer has a wired network adapter, it has an external Ethernet port that the cable connector fits into. This looks a bit like a wide telephone cable port.
![]() The environment you’re in must have a network. This could be a wired network that you connect to directly or through a switch box, a wireless network that you connect to through a router, or a wireless network connection that you share from a phone or other device that connects to a cellular network.
The environment you’re in must have a network. This could be a wired network that you connect to directly or through a switch box, a wireless network that you connect to through a router, or a wireless network connection that you share from a phone or other device that connects to a cellular network.
If your computer has an enabled network adapter, whether or not it is actively connected to a network, a connection icon appears in the notification area at the right end of the Windows Taskbar. The connection icon indicates whether your network adapter is an Ethernet adapter or a wireless adapter.
The connection icon indicates the adapter type and connection status
The bars on the wireless connection icon indicate the strength of the wireless network signal that the computer is currently connected to. When the computer is configured for a connection but not connected to a network, different versions of the basic network connection icon indicate the network status, as follows:
![]() A white starburst indicates that a connection is available.
A white starburst indicates that a connection is available.
![]() A white X on a red background indicates that no network is available.
A white X on a red background indicates that no network is available.
Clicking the network connection icon displays information about the current network connection status and any available networks.

The pane lists any available wireless networks, wired networks, and VPN connections
Each network connection has a name; it might be a generic name provided by the network router or a specific name assigned by the network owner. The icon to the left of the network name indicates the connection type and, for wireless connections, the signal strength. The word or words below the network name provide additional information about the network.
Right-clicking the connection icon in the notification area displays a shortcut menu of commands that you can use to open the Network And Sharing Center and diagnose network connection problems.
When you physically connect your computer to a network by using an Ethernet cable, Windows 10 automatically creates the network connection. To connect to a wireless network for the first time, you need to make the connection.
The purpose of connecting a computer to a network is usually to connect beyond the network to the Internet, but it might also be for the purpose of accessing devices (such as printers) or information (such as files) on other computers that are connected to the same network. On a computer running Windows 10, connecting a computer to a network doesn’t automatically allow users to access folders on other computers on the network. If you want to do so, you must first turn on network discovery. The network discovery feature enables the computer to “see and be seen by” other computers on the network that also have this feature turned on. Simply turning on network discovery doesn’t automatically expose the information stored on your computer to other computers; you configure the sharing of specific folders and of Public folders individually on each computer. This helps to ensure that you don’t accidentally share information that you don’t want to.
 See Also
For information about sharing folders and Public folders, see “Share files on your network” later in this chapter.
To connect to an available wired network
1. Plug one end of an Ethernet cable into the port on the network router or a switch box that is connected to the router.
2. Plug the other end of the cable into the Ethernet port on your computer.
To connect to an available wireless network
1. In the notification area of the taskbar, click the wireless connection icon to display a list of available connections.
2. In the connection list, click the network you want to connect to.

Connection options
3. If you want the computer to automatically connect to this network when it’s available, select the Connect automatically check box.
![]() Tip
Tip
Automatic connection is appropriate when connecting to a home network or another network that you trust. It works less well when connecting to a public network that has a gateway access page. If your computer establishes a connection, it might appear that you have Internet access when you actually don’t. And you might not realize that you don’t have a connection until you notice a dozen unsent messages in your email outbox.
4. Click the Connect button. If the network prompts you to enter credentials or a password (such as a WEP encryption key or WPA password) do so.
![]() Tip
Tip
Wired Equivalent Privacy (WEP), Wi-Fi Protected Access (WPA), and Wi-Fi Protected Access II (WPA2) are security protocols that govern the credentials passed from a computer to a wireless network when establishing a connection. WPA2 is the most current of these.
To turn on network discovery
1. Open File Explorer.
2. In the Navigation pane, click Network. If network discovery is turned off, Windows displays this information on a banner below the ribbon.

The Network list is empty until you turn on network discovery
3. Click the banner to display the Network Discovery And File Sharing message box. Because Windows 10 automatically designates new connections as Public networks, you must specify whether to permit network discovery on all Public networks.

Important
You almost certainly do NOT want to click the Yes option in this dialog box. Doing so would keep the network connection Public and allow computers on other Public network connections to gain access to your computer.
4. Unless you specifically want to allow computers on Public networks to connect to your computer, click No, make the network that I am connected to a private network to change the network connection type to Private and turn on network sharing.
To disconnect from a wired network
1. Do either of the following:
• Remove the cable from the Ethernet port on your computer or from the network connection point.
• Disable the network adapter.
See Also
For information about disabling network adapters, see “Troubleshoot network connections” later in this topic.
To disconnect from a wireless network
1. In the notification area of the taskbar, click the wireless connection icon.
2. At the top of the list of network connections, click the network that is designated as Connected.

3. Click the Disconnect button.
![]() Tip
Tip
Unless you’re connecting to a wireless network that is accessing the Internet over a cellular network, moving out of range of the network broadcast will automatically disconnect you.
Display information about networks and connections
After you connect to a network, you can display information such as which computers, printers, and other devices are connected to it. In File Explorer, the Network window displays the devices on your network that the current Public or Private security profile settings allow the computer to detect, and the devices that support the network infrastructure, such as the network router.

The Network window displays computers and devices that are directly connected to the network
Your Network window will show the devices on your network rather than those shown in the images in this book.
From the Network window, you can access information and devices in different ways. For example:
![]() In the Computer list, double-click a computer to display the folders that are shared with you on that computer. Right-click a computer to display the shortcut menu, which has options for displaying content or starting a Remote Desktop Connection session.
In the Computer list, double-click a computer to display the folders that are shared with you on that computer. Right-click a computer to display the shortcut menu, which has options for displaying content or starting a Remote Desktop Connection session.
See Also
For information about sharing files and folders on a network, see “Share files on your network” later in this chapter.
![]() In the Media Devices list, double-click a device to display the default media interface for that device, which might be Windows Media Player or a proprietary app for the operating system that is installed on the device.
In the Media Devices list, double-click a device to display the default media interface for that device, which might be Windows Media Player or a proprietary app for the operating system that is installed on the device.
![]() In the Network Infrastructure list, double-click a router to display its web management interface in your default web browser.
In the Network Infrastructure list, double-click a router to display its web management interface in your default web browser.
![]() In the Other Devices list, double-click a device to display properties such as the manufacturer, model, webpage, serial number, media access control (MAC) address, GUID, and IP address.
In the Other Devices list, double-click a device to display properties such as the manufacturer, model, webpage, serial number, media access control (MAC) address, GUID, and IP address.
![]() In the Printers or Scanners list, double-click a device to display its web management interface, if it has one, in your default web browser.
In the Printers or Scanners list, double-click a device to display its web management interface, if it has one, in your default web browser.
Most of the device shortcut menus include options for displaying device webpages or properties. You can change the display of devices in the Network window from the View tab. In Details view, you can display properties such as the discovery method, MAC address, and IP address.
See Also
For more information about working with File Explorer views, see “Change the File Explorer display options” in Chapter 3, “Manage folders and files.”
In Control Panel, the Network And Sharing Center displays information about the network (or networks) your computer is connected to, and the Internet status of each connection.

The Network And Sharing Center has links to tools you can use to manage network connections
Beyond the general network connection information, you can also display useful information about the connection speed and the data transfer to and from the computer. Each connection is linked to a network adapter, so you display the connection information by displaying the adapter information.

The speed varies with the signal quality, but also depends on other factors
New information sources in Windows 10 include information about the amount of data transfer by each app on the computer in the past 30 days.

The Usage Details pane shows usage by individual apps and by the operating system
To display network device information in the Network window
1. Start File Explorer.
2. In the Navigation pane, click Network.
![]() Tip
Tip
If network discovery is off, an error message appears when you click Network. For information about this, see “Configure network connection security” later in this topic.
To display network connection information in the Network And Sharing Center
1. Do any of the following:
• In the notification area of the taskbar, right-click the network icon, and then click Open Network and Sharing center.
• In the network connections pane, click Network settings. Scroll to the bottom of the pane that opens, and then click Network and Sharing Center.
• Open Control Panel in Category view. In the Network and Internet category, click View network status and tasks.
• Open Control Panel in Icons view, and then click Network and Sharing Center.
To display the status of all network adapters in the Network Connections window
1. Right-click the Start button, and then on the Quick Links menu, click Network Connections.
Or
1. Open the Network And Sharing Center.
2. In the left pane of the Network And Sharing Center, click Change adapter settings.
Or
1. Open the Settings window.
2. Display the Network & Internet category, and then either the Wi-Fi pane or the Ethernet pane.
3. Scroll to the bottom of the pane. In the Related settings section, click Change adapter options to open the Network Connections window.
To display network connection speed and data transfer information
1. Open the Network And Sharing Center.
2. In the View your active networks section, to the right of Connections, click the network adapter name.
Or
1. Open the Network Connections window.
2. Do one of the following:
• Double-click the network adapter you want to display information for.
• Click the network adapter to activate the toolbar buttons. Then, on the toolbar, click View status of this connection.
![]() Tip
Tip
If the Network Connections window isn’t wide enough to display all the buttons related to a selected adapter on the toolbar, chevrons appear at the right end of the toolbar. Click the chevrons to display the remaining commands.
To display data usage by app
1. In the Settings window, click Network & Internet.
2. Click Data usage to display the total amount of data transferred in the past 30 days, broken down by connection type.
3. In the Data usage pane, click Usage details to display the amount of data transferred by each app.
Configure network connection security
Each time you connect your computer to a network that you haven’t previously connected to, Windows 10 associates the network connection with one of two security profiles, Private or Public, and then assigns the security settings configured for that profile to the network connection.
![]() Tip
Tip
Previous versions of Windows prompted you to designate whether the network was at work, at home, or in a public place for the purpose of configuring appropriate security settings for the environment. Windows 10 has only Private and Public network security profiles.
The network security profiles include the following settings:
![]() Network discovery Determines whether the computer can see and be seen by other computers connected to the network.
Network discovery Determines whether the computer can see and be seen by other computers connected to the network.
![]() File and printer sharing Determines whether network users can access folders and printers that you configure for sharing from the computer.
File and printer sharing Determines whether network users can access folders and printers that you configure for sharing from the computer.
![]() HomeGroup connections Determines whether user account credentials are necessary to connect to computers that are joined to your homegroup. Available only for the Private network security profile.
HomeGroup connections Determines whether user account credentials are necessary to connect to computers that are joined to your homegroup. Available only for the Private network security profile.
![]() Public folder sharing Determines whether network users can access files that are stored in the Public account folders on your computer.
Public folder sharing Determines whether network users can access files that are stored in the Public account folders on your computer.
![]() Media streaming Determines whether network users can access music, videos, and pictures that are stored in your media library.
Media streaming Determines whether network users can access music, videos, and pictures that are stored in your media library.
![]() File sharing connections Determines the security requirements for devices that connect to your computer’s file sharing connections.
File sharing connections Determines the security requirements for devices that connect to your computer’s file sharing connections.
![]() Password-protected sharing Determines whether shared files are available to any network user or only to those users with user accounts on your computer.
Password-protected sharing Determines whether shared files are available to any network user or only to those users with user accounts on your computer.
You can review and configure the settings for the individual security profiles and the security settings that apply to all network connections in the Advanced Sharing Settings window. The window has three sections of settings: Private, Guest Or Public, and All Networks. You can expand or hide each section separately.

You can configure the settings for each network profile
The settings that are applied to all network connections are available in the All Networks section at the bottom of the window. These include settings for sharing Public folders, streaming media, protecting file-sharing connections, and specifying the type of credentials that are required to access the computer from another computer on the network.

You can configure the settings for all networks you connect to
The settings that are applied to Guest or Public networks are intended for the types of networks that you might connect to in a public place, such as an airport or coffee shop, only for the purpose of connecting your computer to the Internet. You don’t have a need to access information on other computers that are connected to a Public network, and it isn’t a good idea to allow those other computers to access information on your computer. When you connect to any network that you don’t explicitly trust, configure the connection as a Public network to protect your privacy.

The Public network profile connects your computer to the network without exposing it to other network users
Windows 10 assumes that every network you connect to is Public until you tell it otherwise. Before you can access network resources from or on the computer, over the network, you must either change the network connection type from Public to Private, and turn on network discovery or create a homegroup.
See Also
For more information about homegroups, see “Manage homegroup connections” later in this chapter.
The settings that are applied to Private networks are intended for networks such as the network in your home or small business. If you connect computers and devices that only you use and control to the network and want to share information among the computers (for example, if you want to insert a picture stored on one computer into a document you’re creating on a different computer) then the Private network security profile is the one for you.

If you share your network credentials with people who visit your home so that they can connect their laptops or mobile devices to the Internet through your network, be aware that assigning the Private network security profile to a computer will expose any information you choose to share from that computer with anyone you provide the network credentials to, should they choose to look for it.
See Also
For more information about sharing network resources with other people, see the sidebar “Wireless network security” later in this topic.
The Private network security profile connects your computer to the network and configures the network profile to include network discovery, file and printer sharing, Public folder sharing, media streaming, and password-protected sharing. Your computer is visible to other computers on the network. You don’t necessarily have permission to access these computers or devices, but you know they’re connected to the network, and other network members know that your computer is also connected.
Many of the network configuration controls are available from the Settings window, but at the time of the Anniversary Update release, some are still in Control Panel. We expect that these will continue to transition to the Settings window with future releases.
If you’re running Windows 10 on a computer in an enterprise environment, the computer and its network settings are likely managed by the IT department, and you won’t have to concern yourself with these settings. You’re more likely to encounter this situation when connecting a laptop computer or mobile device to a network, or if you have multiple computers on a home network.
You can change the settings for the Private security profile, the Public security profile, or all connections. When you do so, Windows automatically applies the new settings to all network connections.
Network discovery is controlled by the network security profile—it is off for Public networks and on for Private networks. In the Settings window, you can change the security profile for a specific network that you’re connected to. The heading and text that precede the toggle button don’t explain this clearly, but the toggle button changes the security profile rather than simply turning network discovery on or off.

Change a network from Public to Private
There will be instances in which you want to change the security profile that is assigned to a specific network connection. For example, if you connect to a wireless network at a friend’s house and want to allow your friend to copy files from your computer over the network, you can change the network connection from Public to Private. (And when you finish, you can change it back so that the next time you connect to the network, your shared folders are protected.)
If you have a wireless network router, it is important that you secure the network properly to prevent unauthorized users from connecting to it and gaining access to the computers on your network.
When you set up your wireless router, be sure to follow the instructions that come with it. For the initial setup, you’ll usually be required to connect the router directly to a computer (by using an Ethernet cable) and run a setup program. After the router is set up, you can usually connect to it wirelessly by using its IP address on your network. During the setup process, you can do several things to increase the security of your wireless network, such as:
![]() Change the administrative password from the default password shared by all routers of that type to a unique, strong password. (Some manufacturers use the same password for all routers and some use blank passwords.)
Change the administrative password from the default password shared by all routers of that type to a unique, strong password. (Some manufacturers use the same password for all routers and some use blank passwords.)
![]() Secure the network with an appropriate level of encryption. Establish a WEP key or WPA password to prevent unauthorized users from connecting to your wireless network.
Secure the network with an appropriate level of encryption. Establish a WEP key or WPA password to prevent unauthorized users from connecting to your wireless network.
Your router configuration might offer multiple levels of WEP encryption, controlled by the length of the WEP key. A 10-character WEP key provides 64-bit encryption, and a 26-character key provides 128-bit encryption.
WPA encryption is a far more secure encryption standard than WEP encryption. If you have a gigabit network router (which transmits data at 1,000 kilobytes per second (KBps), as opposed to the standard 100 KBps), you should use WPA encryption. WPA encryption supports gigabit data transmission; WEP encryption does not.
When creating a security key or password, use a combination of letters and numbers that you can remember—for example, a series of birthdays, or your street address. If the key is particularly long or difficult, you might want to keep a printed copy of it handy for when visitors want to connect their mobile computers to your wireless network. Better yet, set up a Guest network that is isolated from the network that you connect your computers to. Guests can then access the Internet without also being able to locate or attempt to access the computers on your regular network.
To open the Advanced Sharing Settings window
1. Open the Network And Sharing Center.
2. In the left pane, click Change advanced sharing settings.
Or
1. Open the Settings window.
2. Display the Network & Internet category, and then display either the Wi-Fi pane or the Ethernet pane.
3. Scroll to the bottom of the pane. In the Related settings section, click Change advanced sharing options to open the Network Connections window.
To identify the security profile assigned to the current connection
1. Open the Advanced Sharing Settings window.
2. Review the three security profile headings. The phrase current profile appears in parentheses after the name of the active security profile.
To display or hide settings for a specific security profile
1. Click the chevron at the right end of the security profile heading.
The chevron reverses direction when the profile is expanded
To modify the settings for a network security profile
1. Open the Advanced Sharing Settings window.
2. Expand the security profile that you want to change.
3. Make your changes and then, at the bottom of the window, click the Save changes button. If you’re signed in with a standard user account, Windows prompts you to provide administrative credentials.
4. If the User Account Control dialog box opens, select an administrative user account and enter its password, or have the person who owns the account do it for you.
To change the security profile assigned to a network connection
1. Open the Settings window.
2. Display the Network & Internet category, and then display the pane for the adapter that you want to configure.
3. Scroll to the bottom of the pane, and then click Advanced options.
4. In the Make This PC Discoverable section of the pane, click the toggle button to turn the setting on or off.
![]() Tip
Tip
Computers running Windows 10 can easily coexist on a network with computers running earlier versions of Windows. Other computers and devices on the network do not affect the available network security profiles or their settings. However, network security profiles and homegroups aren’t available on a computer running a version of Windows earlier than Windows 7.
Troubleshoot network connections
A network of any size includes several components that affect the network connection. Your network might include one or more wired routers, wireless routers, hubs, or switches. These hardware devices, the cables that connect them, and the external connection to your Internet service provider (ISP) can all develop problems or entirely quit functioning. A large organization usually has one or more network technicians (if not an entire IT department) who maintain the organization’s hardware and keep the internal and external network connections running smoothly. In a small to medium organization, or in a household, it helps if you know enough about your network to be able to function as your own network technician. In this book, we provide information specifically about managing the network connections on a Windows 10 computer.
As mentioned earlier in this topic, the network adapter is the hardware on your computer’s end of a network connection. A computer typically has one or two network adapters. You can monitor and manage network adapters and their current connections from the Network Connections window of Control Panel. This window displays connectivity information for each network adapter and for each dial-up or virtual private network (VPN) connection on your computer. A red X on an adapter icon indicates that the adapter is disabled or disconnected.

Select an adapter to display the applicable commands on the toolbar
If you experience connectivity issues, fixing them can be as simple as resetting the adapter.
When you experience a network or Internet connection problem, first determine whether the problem occurs only on your computer, or also on other computers on your network. You can frequently resolve connection issues by taking one of these simple actions:
![]() If the problem occurs on only one computer, reset the network adapter or restart the computer.
If the problem occurs on only one computer, reset the network adapter or restart the computer.
![]() If computers can connect to the network but not to the Internet, restart the router that connects your network to your ISP.
If computers can connect to the network but not to the Internet, restart the router that connects your network to your ISP.
When you experience a connection problem beyond these simple issues, either when connecting to the Internet or when connecting to another computer on your network, you can use one of the handy troubleshooting tools included with Windows 10. These troubleshooting tools (referred to as Troubleshooters) can help you identify and resolve problems. Troubleshooters are available from Control Panel. Links to specific categories of Troubleshooters are available in the locations you’re likely to be working when you experience problems.

Important
The following procedures require administrative permission.
To disable a network adapter
1. Open the Network Connections window.
2. Click the adapter you want to disable.
3. On the toolbar, click Disable this network device. The icon and words that represent the disabled adapter change from color to grayscale, and the word Disabled appears below the adapter name.

A disabled network adapter
To enable a network adapter
1. In the Network Connections window, click the adapter you want to enable.
2. On the toolbar, click Enable this network device. The icon and words that represent the disabled adapter change from grayscale to color. If the adapter is configured to automatically connect to a network, it does so.
1. In the Network Connections window, disable the adapter.
2. After the process of disabling the adapter completes, enable the adapter.
To display network troubleshooting tools
1. Open the Network And Sharing Center.
2. At the bottom of the right pane, click the Troubleshoot problems link to display the Troubleshoot problems – Network and Internet page of Control Panel.
To run a Troubleshooter
1. On the relevant Troubleshoot problems page, click the Troubleshooter you want to run, and then click Next. The Troubleshooter starts, scans your system, and then leads you through a diagnostic process.
If the Troubleshooter finds an issue, it applies known fixes for the problem and reports its progress.

Troubleshooters identify and fix issues or offer additional resources
If the Troubleshooter doesn’t identify any specific issues, it offers you the option to explore additional options.
2. Click Close the troubleshooter to quit the process, or click Explore additional options to display a list of pertinent resources.

Additional Information pages are specific to the type of Troubleshooter
Manage homegroup connections
When your computer is connected to a Private network, computer users can connect to resources on other computers either through the network or through a homegroup. You can think of a homegroup as a private network that allows secure access to specific resources, such as files and printers, stored on the computers that are joined to it. Only one homegroup can exist on a local network; it exists as long as it has at least one member. (If your environment has multiple networks, each can have one homegroup.) The homegroup doesn’t have a name, a designated administrator, or a management interface.
Homegroups were introduced in Windows 7 and are not accessible to computers running earlier versions of Windows or a non-Windows operating system.
When a homegroup exists on a Private network, other computers on that network can join the homegroup. The only information you need to join the homegroup is the homegroup password, which Windows generates randomly when the homegroup is created. If the homegroup password isn’t readily available, it’s quite simple to locate.

You can change the random password to something that is easier to remember
If you want to change the password, it’s best to do so immediately after you create the homegroup because changing the password immediately disconnects any computers that joined by using the original password. Alternatively, you can have Windows validate your identity when joining multiple computers to the homegroup by using your user account credentials.
You can create and manage homegroup connections from two separate places:
![]() The HomeGroup window of Control Panel, which displays commands as links
The HomeGroup window of Control Panel, which displays commands as links
![]() The Homegroup node in File Explorer, which displays commands on a ribbon
The Homegroup node in File Explorer, which displays commands on a ribbon
You can create or join a computer to a homegroup when signed in with a Standard or Administrator user account. When you start the process of connecting a computer to a homegroup, Windows 10 tells you whether a homegroup already exists on the network.
Homegroup membership is on a per-computer basis, not a per-user basis. (In other words, the computer joins the homegroup, not the user.) When any user of a computer that has multiple user accounts joins the computer to a homegroup, the computer is joined to the homegroup on behalf of all its users. However, each user has control over the resources that he or she shares with other homegroup members.

By default, all libraries other than the Documents library are selected for sharing
See Also
For information about libraries, see “Understand files, folders, and libraries” in Chapter 3, “Manage folders and files.” For information about changing the resources shared with your homegroup, see “Share files on your network” later in this chapter.
On a multiple-user computer, if another user joins your computer to a homegroup, it doesn’t share any of your user account folders. You can specify your homegroup resource sharing settings at any time from either homegroup window. When another user has shared the computer, a message appears in the homegroup window.

Each user sets individual sharing settings
The only resource sharing setting that is common to all user accounts of a homegroup member computer is the Printers & Devices setting, which controls access to the Devices And Printers folder. When any user shares or excludes this folder from the shared homegroup resources, the printer is shared or excluded on behalf of the computer rather than the user.
If at any time you decide that you no longer want to share resources with other homegroup members, you can remove your computer from the homegroup with no adverse effects. It is not necessary to disconnect from the network. If you have any problems with the homegroup, Windows 10 has a built-in troubleshooting tool that can help you to diagnose and fix homegroup problems.
See Also
For more information about Troubleshooters, see “Troubleshoot network connections” earlier in this chapter.
To open the Homegroup window in File Explorer
1. In the Navigation pane of File Explorer, click the Homegroup node. If a homegroup already exists on the network, the window contains a Join now button. If no homegroup exists, the window contains a Create a homegroup button.

The Homegroup window in File Explorer
To open the HomeGroup window of Control Panel
1. Do any of the following:
• In Category view of Control Panel, under Network and Internet, click Choose homegroup and sharing options.
• In Large Icons view or Small Icons view of Control Panel, click Homegroup.
• In File Explorer, right-click the Homegroup node, and then click Change HomeGroup settings.
• In File Explorer, open the Homegroup window. Then on the HomeGroup tab, click Change homegroup settings.
If a homegroup already exists on the network, the window contains a Join now button. If no homegroup exists, the window contains a Create a homegroup button.

The HomeGroup window of Control Panel
To create a homegroup
1. Open the HomeGroup window of Control Panel or the Homegroup window in File Explorer.
2. Click the Create a homegroup button to start the Create a Homegroup wizard. On the first page of the wizard, click Next.
3. On the Share with other homegroup members page of the wizard, do the following for each folder or library:
• If you want to share the resource, click Shared in the Permissions list adjacent to it.
• If you want to keep the resource private, click Not shared in the Permissions list adjacent to it.
See Also
For information about changing the resources you’ve shared through a homegroup, see “Share files on your network” later in this chapter.
4. Click Next to create the homegroup and display the homegroup password.
5. If you want to print the password, do the following:
a. On the Use this password to add other computers to your homegroup page of the wizard, click Print password and instructions.
b. On the View and print your homegroup password page of the wizard, click the Print this page button.
c. In the Print dialog box, select a printer, and then click Print.
6. If you don’t want to print the password, manually record it in a convenient location (write it down or save a screen clipping in OneNote).
7. Click Finish to display your homegroup resource sharing settings and options for working with the homegroup.
To display the password for an existing homegroup
1. Sign in to any computer that is joined to the homegroup.
![]() Tip
Tip
You might have to ask another person to sign in to a computer that is connected to the homegroup and retrieve the password for you.
2. Do any of the following:
• Open the HomeGroup window of Control Panel, and then click the View or print the homegroup password link.
• In File Explorer, right-click the Homegroup node, and then click View the HomeGroup password.
• In File Explorer, open the Homegroup window. Then on the HomeGroup tab, click the View password button.
Important
You can perform the following procedure only if you have multiple computers on a Private network and a homegroup has been created from another computer on the network.
To discard the password requirement for a homegroup
1. Open the Network And Sharing Center.
2. In the left pane, click Change advanced sharing settings.
3. In the Advanced sharing settings window, expand the Private security profile.
4. In the HomeGroup connections section of the profile, click Use user accounts and passwords to connect to other computers.

5. Click Save changes, and then sign out of Windows to apply your changes to the homegroup.
To join a computer to an existing homegroup
1. If you haven’t already joined a computer to the homegroup when logged in with the current user account, obtain the homegroup password.
![]() Tip
Tip
The homegroup doesn’t require an existing user to enter the password when joining additional computers to the homegroup.
2. Do either of the following:
• Open the HomeGroup window of Control Panel.
• Open the Homegroup window in File Explorer.
3. Click the Join now button to start the Join a Homegroup wizard. On the first page of the wizard, click Next.
4. On the Share with other homegroup members page, designate each folder or library as Shared or Not shared, and then click Next.
See Also
For information about changing the resources you’ve shared through a homegroup, see “Share files on your network” later in this chapter.
5. If the wizard displays the Type the homegroup password page, enter the password you obtained in step 1, and then click Next.
6. On the You have joined the homegroup page of the wizard, click Finish.
To connect to homegroup resources
1. In the Navigation pane of File Explorer, expand the Homegroup node to display the user accounts that have shared resources through the homegroup.
2. Expand each user account to display the computers or devices the user has shared resources from.
3. Expand each computer or device to display the specific shared folders, libraries, and devices. Devices that are offline or sleeping aren’t shown.

Directory of Homegroup users and computers
4. Click any user account, device, or shared item to display its contents in File Explorer.
To disconnect all other computers from a homegroup
1. Change the homegroup password.
To change a homegroup password
1. In the HomeGroup window of Control Panel, in the Other homegroup actions section, click Change the password to start the Change your Homegroup Password wizard. If you’re logged in as a Standard user, provide the credentials of an Administrator account when prompted to do so.
![]() Tip
Tip
You can’t change the password from the Homegroup window in File Explorer.
2. On the Changing the homegroup password will disconnect everyone page of the wizard, read and heed the warning. Then when you’ve prepared the homegroup-joined computers, click Change the password.
3. On the Type a new password for your homegroup page of the wizard, enter the new password (or accept the new randomly generated password), and then click Next.
4. On the Your homegroup password was successfully changed page of the wizard, click Finish.
To reconnect computers to a homegroup after changing the password
1. On each computer, display the HomeGroup window of Control Panel or the Homegroup window in File Explorer.
2. Click the Type new password button to start the Update Your Homegroup Password wizard.
3. Enter the new password, click Next, and then click Finish.
To remove a computer from a homegroup
1. Open the Network And Sharing Center.
2. In the Change your networking settings section, click Choose homegroup and sharing options.
The Choose Homegroup And Sharing Options link is available only when the computer is joined to a homegroup.
3. In the HomeGroup window of Control Panel, click Leave the homegroup to start the Leave the Homegroup wizard.
4. On the first page of the wizard, click Leave the homegroup.
5. When the wizard confirms that the computer has successfully been removed from the homegroup, click Finish.
![]() Tip
Tip
Changing the network security profile for a connection from Private to Public also removes a computer from a homegroup. If you use this method and then later change the connection type back to Private, your computer will automatically rejoin the homegroup.
To delete a homegroup
1. Remove each member computer from the homegroup.
To run the HomeGroup troubleshooter
1. Do any of the following:
• Open the HomeGroup window of Control Panel and then, in the Other homegroup actions section, click the Start the HomeGroup troubleshooter link.
• In File Explorer, right-click the Homegroup node, and then click Start the HomeGroup troubleshooter.
• In File Explorer, open the Homegroup window. Then on the HomeGroup tab, click the Start troubleshooter button.
Share files on your network
If you have more than one computer in your organization, you might find it convenient to share files and file storage locations with other people on your network. And if you have more than one computer in your household, you might want to share resources with family members, whether or not your computer is joined to a homegroup. For example, you might:
![]() Share project-related files with specific team members.
Share project-related files with specific team members.
![]() From your laptop computer, work on a file that is stored on your desktop computer.
From your laptop computer, work on a file that is stored on your desktop computer.
![]() Share household management documents with your family members.
Share household management documents with your family members.
![]() Collect all your family photos in one place by having all your family members save their digital photos to a shared external hard drive.
Collect all your family photos in one place by having all your family members save their digital photos to a shared external hard drive.
There are several ways to share files with users (including yourself) who are logged on to other computers in your network. To share files by using any of these methods, you must first make sure network discovery and file and printer sharing are turned on so that your computer and any resources you choose to share are visible to other network computers and devices. Network discovery and file and printer sharing are turned on by default for Private network connections.
![]() Tip
Tip
When network discovery is on, your computer is visible in the Navigation pane of File Explorer and in the Network window. When file and printer sharing is on, any resources you choose to share from the computer are also visible in the Network window.
You can configure file sharing options only when network discovery, file sharing, and printer sharing are turned on.
When you share a folder, you can specify the people (in the form of user accounts or groups of users) you are sharing the folder with and what each person (or group) can do with the folder contents. The permission level options are:
![]() Read The user can open a file from the shared folder but cannot save any changes to the file in the shared folder.
Read The user can open a file from the shared folder but cannot save any changes to the file in the shared folder.
![]() Read/Write The user can open and edit a file and save changes to the file in the shared folder.
Read/Write The user can open and edit a file and save changes to the file in the shared folder.
The default permission level is Read. If you want to allow a network user or group of users to modify shared files, you must explicitly assign the Read/Write permission level.
![]() Tip
Tip
Files and printers that you share are available only when your computer is on, and not when it is in Sleep mode.
Files that you store in the Public folders (Public Documents, Public Downloads, Public Music, Public Pictures, and Public Videos) are accessible to any user logged on to your computer. If you choose to share the Public folders on your computer with other computers on your network, their contents are visible to any user connected to your network. Public folder sharing with other network computer users is turned on by default for Private and Public network connections.
If you frequently connect to public networks, consider carefully whether you want to share the contents of your computer’s Public folders with strangers. If not, you can easily turn off this feature to safeguard your privacy.
When your computer is a member of a homegroup, you can share files with other homegroup members while still keeping the files hidden from computers that aren’t homegroup members. (Remember that computers, rather than users, are the homegroup members.) When you first create or join your computer to a homegroup, you have the option of sharing the built-in Documents, Pictures, Music, and/or Videos libraries. The choices you make at that time are not binding; you can change the library selections at any time. You can add or remove libraries from the shared homegroup resources at any time. Files that you store in a library that you share with your homegroup, whether in your personal folders or the Public folders, are accessible to any user logged on to a computer that is a member of the homegroup.
Regardless of whether your computer is a member of a homegroup, you can share a folder, or a built-in or custom library with users of other computers on your network. You can control access to the shared folder or library by specifying the user accounts or groups of users who can access the shared resource and assigning a specific level of access for each user account or group.
You can share an entire storage drive—either a disk drive that is built in to your computer, or an internal or external storage device such as a freestanding storage disk or a USB flash drive. For example, you might share an internal hard disk drive on which you store only project-related resources with all the computers on your work network so that your co-workers have access to them, or you might share an external hard disk drive with all the computers on your home network so that all your family members can save digital photos in one place for safekeeping.
To configure your computer to share files with other network computer users
1. Open the Network And Sharing Center.
2. In the left pane, click Change advanced sharing settings.
3. In the Advanced sharing settings window, expand the Private profile, and then do the following:
• In the Network discovery section, click Turn on network discovery.
• In the File and printer sharing section, click Turn on file and printer sharing.

The settings required to share files and printers with other network computer users
4. At the bottom of the Advanced sharing settings window, click Save changes. (If you didn’t make any changes, click Cancel.)
To prevent network users from accessing your Public folders
1. In the left pane of the Network And Sharing Center, click Change advanced sharing settings.
2. In the Advanced Sharing Settings window, expand the All Networks profile.
3. In the Public folder sharing section of the profile, click Turn off Public folder sharing.

With this setting off, the Public account folders on your computer can be accessed only from your computer, and not from the network
4. At the bottom of the Advanced Sharing Settings window, click Save changes.
See Also
For more information about Public folders, see Chapter 3, “Manage folders and files.” For information about the Network And Sharing Center, see the “Connect to a network” section in the topic “Manage network connections” earlier in this chapter.
To change the resources that you’re sharing with a homegroup
1. Do either of the following to start the Change Homegroup Sharing Settings wizard:
• Display the HomeGroup window of Control Panel, and then click Change what you’re sharing with the homegroup.
• Display the Homegroup window in File Explorer. On the HomeGroup tab, click the Share libraries and devices button.
2. On the Share with other homegroup members page of the wizard, do the following for each folder or library, and then click Next:
• If you want to share the resource, click Shared in the Permissions list adjacent to it.
• If you want to keep the resource private, click Not shared in the Permissions list adjacent to it.
3. On the Your sharing settings have been updated page of the wizard, click Finish.
See Also
For more information about homegroups, see “Manage homegroup connections” earlier in this chapter.
![]() Tip
Tip
Custom libraries that you create on your computer aren’t among those listed in the wizard. You can share a custom library by following the procedure for sharing individual folders and libraries.
To share a folder or library through a homegroup
1. Do one of the following to display a menu of user accounts on network-connected computers, and other sharing options:
• In File Explorer, right-click the folder or library you want to share, and then click Share with.

Sharing options from the folder shortcut menu
• In File Explorer, display the folder or library you want to share. On the Share tab, click the More button at the bottom of the Share with gallery scroll bar.

Sharing options from the ribbon
![]() Tip
Tip
If the computer is not joined to a homegroup, the Share With menu has a Create Or Join A Homegroup option instead of the Homegroup options.
2. In the Share with gallery, do one of the following to select the level of access that users of homegroup-joined computers will have to the folder:
• To allow homegroup users to display the folder and open (but not edit) files stored in the folder, click Homegroup (view).
• To allow homegroup users to edit files stored in the folder, click Homegroup (view and edit).
If the folder you share that requires administrator permission to access, or contains a subfolder that requires administrator permissions, Windows prompts you to confirm that you want to share the restricted items.

3. In the File Sharing dialog box, do one of the following:
• To share the folder and all its contents, click Yes, share the items.
• To share only the unrestricted items in the folder, click No, don’t share the items.
• To cancel the sharing process so you can review the restricted items, click the Cancel button.
To share a folder or library with one person
1. Display the Share with menu for the folder, and then click the user account name or email address of the person you want to share the folder with.
To share a folder or library with everyone on your network
1. Display the Share with menu for the folder, and then click Specific people… to open the File Sharing window.
2. In the File Sharing window, click the chevron at the right end of the empty box to display a list that includes of people and groups you can share the folder with.

Share the folder with a specific person or group
3. In the list, click Everyone. Then click the Add button.
4. If you want to allow network users to edit files stored in the folder, click the arrow in the Permission Level column adjacent to Everyone, and then click Read/Write.
5. In the File Sharing window, click the Share button. After sharing the folder, the window displays the shared folder’s information.

You can quickly share a link to the folder with other people
![]() Tip
Tip
When you select a shared file or folder in File Explorer, the Details pane displays a list of the people or groups the folder is shared with.
To stop sharing a folder or library
1. Do one of the following:
• In File Explorer, right-click the folder, click Share with, and then click Stop sharing.
• In File Explorer, display the folder or library you want to stop sharing. On the Share tab, in the Share with group, click the Stop sharing button.
To make shared resources available to people who don’t have user accounts on your computer
1. In the left pane of the Network And Sharing Center, click Change advanced sharing settings.
2. In the Advanced sharing settings window, expand the All Networks profile.
3. In the Password protected sharing section, click Turn off password protected sharing.

Turn this setting off to allow any network user to access your shared files and printers
4. At the bottom of the Advanced Sharing Settings window, click the Save changes button.
![]() Tip
Tip
If you collaborate with a team of people on a document, working with the document in a shared folder entails the risk of one person overwriting another person’s changes, even if you restrict access to the folder. To eliminate this risk, you need to use a system with version control. If your organization uses SharePoint, you can store the document in a document library so that only one person at a time can check out and work on the document.
To share a drive
1. In File Explorer, do one of the following:
• Display the drive you want to share. On the Share tab, in the Share with gallery, click Advanced sharing….
• Right-click the drive you want to share, and then click Properties.
• Right-click the drive you want to share, click Share with, and then click Advanced sharing….

![]() Tip
Tip
Remember that if the shared drive is removable, it is shared only until it is removed.
2. In the Properties dialog box for the drive, click the Sharing tab, and then click the Advanced Sharing button. If Windows prompts you to enter administrator credentials, do so.
3. In the Advanced Sharing dialog box, select the Share this folder check box.
4. The Share name box displays the drive letter of the drive you’re sharing. If you want to replace the drive letter with a more user-friendly name to distinguish it from other network drives, enter the name in this box.

You can identify a shared drive by its drive letter or you can assign it a name
5. Click the Permissions button to display the share permissions for the drive.
6. If the group or user name you want to share with is not listed in the Group or user names box, click the Add button, and then do the following:
a. In the Select Users or Groups dialog box, enter the name of the user account, group, or computer you want to share the drive with, and then click the Check Names button.

You can enter multiple names, separated by semicolons
![]() Tip
Tip
To display a list of valid users and groups, click the Advanced button and then, in the secondary Select Users Or Groups dialog box that opens, click Find Now.
b. After Windows indicates a valid name by underlining it, click OK to return to the Permissions dialog box.
7. In the Group or user names box, select the user account or group you want to share the drive with.
8. In the Permissions for list, select the check boxes of the permission levels you want to grant to the user account or group.

9. In the Permissions dialog box, click Apply to apply the selected permissions.
10. Click OK in the Permissions dialog box and in the Advanced Sharing dialog box. Then close the drive’s Properties dialog box.
Skills review
In this chapter, you learned how to:
When your computer was initially set up by the original equipment manufacturer (OEM) it was assigned a default name, probably based on its make or model. The name might be one that helps you to identify the computer, such as ACER or DELL, or something less obvious such as FVPAD89. When network discovery is turned on, the computer name is displayed in the Network node of File Explorer and to other network users.
The name isn’t really important, as long as it is unique within your local network. However, you might want to assign a name that makes it easier for you and other network users to identify it—such as OfficePC, GuestLaptop, or GamingPC—or that follows a themed naming convention you have for your network—such as Hibiscus, Plumeria, and Palm on a network named Paradise.
IMPORTANT You must be signed in with an Administrator account to rename your computer.
To rename your computer, follow these steps:
1. In the Settings window, click System, and then click About. The About pane displays your current computer name, organization association, operating system version and product ID, and hardware information.
2. In the About pane, below your current computer name, click the Rename PC button to open the Rename your PC dialog box.
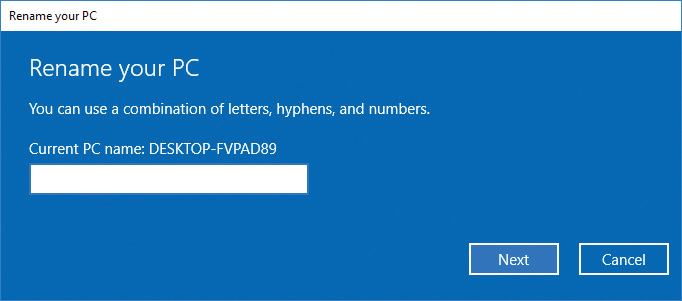
Rename your PC
3. In the input box below your current computer name, enter the new name. The name can include uppercase and lowercase letters, numbers (0-9), and hyphens, but no other symbols. Then click Next.
IMPORTANT Clicking Next commits you to the selected name. You can’t change the name again until after you restart the computer.
After a short process, the dialog box displays a restart notice. You can restart the computer now or later; the name change takes effect after the restart. Until then, the PC name in the About pane of the Settings window reflects the planned change.

The About windows shows the original and new names until the computer restarts
 Practice tasks
The practice file for these tasks is the Win10SBSCh07 folder. Some of the practice tasks require that you have access to and any credentials required for a network connection.
Manage network connections
Complete the following tasks:
1. In the notification area of the taskbar, point to the network icon to display information about your current network connection status.
2. Click the network icon to display a list of available networks.
3. If your computer is not currently connected to a network and one is available, click that network name, and connect to it.
4. Right-click the network icon, and then click Network and Sharing Center.
5. In the Network and Sharing Center, review the information about your active network connection.
6. Click the connection name to display its status. Notice the information about the connection speed, duration, and activity. Then close the Status dialog box.
7. In the left pane, click Change adapter settings to display the network adapters available on your computer. Notice the adapter types that are available and whether each is enabled, disabled, or connected.
8. Click any adapter to select it. Notice the toolbar buttons that become active. Note that you can enable or disable the adapters and diagnose, rename, or change the settings of the current connection.
9. Return to the Network and Sharing Center. In the left pane, click Change advanced sharing settings to display the sharing options for the different network profiles.
10. Note the type of network that your computer is currently connected to. Review the settings for that network security profile.
11. Return to the Network and Sharing Center. Click the Troubleshoot problems link to display the network troubleshooting tools. Run any troubleshooter that interests you.
12. On the Start menu, click Settings to open the Settings window. Click the Network & Internet category, and then display the Data usage pane.
13. Review the historical information about data transfers by connection type.
14. In the Data usage pane, click Usage details to display the amount of data transferred by each app.
15. When you finish, close the open windows.
Manage homegroup connections
Complete the following tasks:
1. Open the HomeGroup window of Control Panel.
2. Determine whether your computer is currently part of a homegroup. If it isn’t, determine whether a homegroup is available to join.
3. If your computer is not connected to a homegroup, do either of the following:
• If no homegroup is available, create a homegroup.
• If a homegroup is available, join the homegroup.
Or
If your computer is connected to a homegroup, do any of the following that interest you:
• Display the homegroup password.
• Display the homegroup resources in File Explorer.
• Disconnect from the homegroup.
Share files on your network
Complete the following tasks:
1. Display the Network and Sharing Center, and then open the Advanced sharing settings window.
2. Review the Private network security profile settings, and verify that network discovery and file and printer sharing are turned on, so that your computer can detect and connect to other computers on private networks.
3. In the Advanced Sharing Settings window, expand the All Networks profile.
4. In the Public folder sharing section of the profile, turn on or off the sharing of Public folders from your computer. (Choose the option you want.)
5. Save your changes and close the Advanced sharing settings window.
6. Start File Explorer and locate the practice file folder for this book.
7. Click the Ch07 folder to select it. On the Share tab, notice your options for sharing the folder with other people. If you want to, follow the procedure for sharing the folder with everyone on your network.
8. If you have access to another computer on the network, verify that the folder is available from that computer.
9. On your computer, stop sharing the Ch07 folder.
10. When you’re done, close the File Explorer window.