
1. Get started using Windows 10
Practice files
No practice files are necessary to complete the practice tasks in this chapter.
If you’re reading this book, we assume that you already have a Windows 10 computer or plan to acquire one, and want to know what to expect. This chapter will help you quickly come up to speed with the basic elements of the Windows 10 user experience and environment. Some familiar concepts have changed. We point out some of the changes from earlier versions of Windows, but concentrate on describing how things are now.
 See Also
If you haven’t yet installed Windows 10, see Appendix A, “Install or upgrade to Windows 10,” for relevant information.
Windows 10 combines popular elements of Windows 7 and Windows 8 with impressive new technology. Windows 10 is designed to work not only on desktop and laptop computers, but also on smaller mobile devices such as tablets and phones. The user interface is clean and simple, and if you’re an experienced Windows user, many parts of it will be familiar to you. The technical changes implemented in this version of Windows are significant, but when you’re familiar with the concepts that govern the structure and navigation of the operating system, we think you’ll find it to be both powerful and easy to use.
This chapter guides you through procedures related to signing in to Windows, exploring the user interface and new Settings window, updating system files, managing windows, and ending a computing session.
Start a computing session
To start a Windows 10 computing session, you sign in to Windows with a user account that is registered on that computer. Your user account can be a Microsoft account that connects to all the resources associated with that account, or it can be a local account that exists only on your computer and provides access to shared and private files on the computer.
During the process of installing Windows 10 or the first time you sign in to a new Windows 10 computer, a wizard guides you through the processes of configuring your regional, personalization, location, connectivity, error reporting, browser, protection, and update settings; connecting to the Internet; and connecting to or setting up a computer user account. The user account can be linked to a pre-existing Microsoft account or a new Microsoft account that you create as part of the user account setup process, or it can be a local user account that exists only on one computer.
Microsoft encourages you to use a Microsoft account rather than a local account to sign in. The advantages of signing in to Windows 10 by using a Microsoft account include the following:
![]() You can easily share files among the other computers you sign in to by using that account because the computers have the same sign-in credentials.
You can easily share files among the other computers you sign in to by using that account because the computers have the same sign-in credentials.
![]() You can selectively synchronize settings such as the computer theme, web browser settings, passwords, language preferences, and Ease of Access settings among the computers you sign in to by using the same account.
You can selectively synchronize settings such as the computer theme, web browser settings, passwords, language preferences, and Ease of Access settings among the computers you sign in to by using the same account.
![]() You can access other Microsoft services that require you to sign in.
You can access other Microsoft services that require you to sign in.
![]() You have access to 15 gigabytes (GB) or more of free OneDrive online storage, and 30 GB or more with an Office 365 subscription.
You have access to 15 gigabytes (GB) or more of free OneDrive online storage, and 30 GB or more with an Office 365 subscription.
When your computer first starts or has been idle for a while, it displays the Lock screen. As the name indicates, the Lock screen is a security layer between the world outside the computer and the information on the computer. The Lock screen displays a background picture (or a slideshow of pictures), and it can display information from some of the core Windows 10 apps, including Alarms & Clock, Calendar, Mail, Messaging, Phone, Skype, Store, Weather, and Xbox. The Lock screen doesn’t display any user account information or specific message content that you might not want to share with people who happen to walk past the computer.

The Lock screen displays current information from Windows 10 apps
Windows 10 comes with a set of attractive water-related Lock screen images. You can choose a static background from among those, enjoy the daily Windows spotlight photos, or choose a specific picture or set of pictures that you have access to from your computer.
See Also
For information about specifying the image and app information that appear on the Lock screen, see “Customize the Lock screen” in Chapter 10, “Manage power and access options.”
The Lock screen remains in place until you dismiss it (or the computer goes to sleep). When you dismiss the Lock screen, the Welcome screen appears. The Welcome screen displays a list of the user accounts that are registered on the computer in the lower-left corner and the image and password entry box or Sign In button for the most recent user in the center.

The Welcome screen displays links to the user accounts that are registered on the computer
![]() Tip
Tip
This book contains many images of the Windows 10 user interface elements (such as the Lock screen, Welcome screen, desktop, taskbar, Start menu, and Settings window) that you’ll work with while performing tasks on a computer running Windows 10. Unless we’re demonstrating an alternative view of content, the screenshots shown in this book were captured on a horizontally oriented display at a screen resolution of 1920 × 1080 and a magnification of 100 percent. If your settings are different, user interface elements on your screen might not look the same as those shown in this book.
From the Welcome screen, you sign in to Windows with your user account to begin or return to your computing session.
The first time you sign in to a computer by using a new user account, Windows sets up the user account–specific folders and settings, and synchronizes settings with other computers that your Microsoft account is configured on, if you’ve chosen that option. While Windows goes through this process (which takes about two minutes), it displays a series of reassuring messages on the screen. At the end of this initial setup process, your personal Windows desktop appears.
See Also
For information about synchronizing system settings on multiple computers, see “Customize your sign-in options” in Chapter 8, “Manage user accounts and settings.”
Depending on the processes that are configured to run when you sign in, there could be some activity, such as windows opening and closing, as various apps start. Some of these will be apps that you want to interact with—for example, you might want a communication app such as Skype or Skype for Business to start automatically. Others will be utilities that support the apps that are installed on your computer. For example, installing an app such as Adobe Acrobat or Apple iTunes also installs a utility that checks the Internet for updates to the app each time you start a new computing session. (This is usually for the purpose of increasing app security rather than adding new functionality.)
![]() Tip
Tip
Some apps, utilities, and services start automatically when any user signs in to Windows, and others run specifically when you sign in. You can review a list of apps that start automatically and remove apps from the list to conserve startup resources. For more information, see “Manage app startup” in Chapter 4, “Work with apps and notifications.”
To dismiss the Lock screen
1. Use any of these methods:
• Click a blank area of the screen.
• Flick the screen upward by using your finger.
• Press any key on the keyboard.
1. Dismiss the Lock screen.
If the computer has multiple user accounts, the Welcome screen displays a link to each account in the lower-left corner.
2. If your account isn’t already selected, click it in the lower-left corner of the Welcome screen to display your user account picture and name in the center of the screen.
3. Do one of the following:
• If your account doesn’t have a password, click the Sign In button below your account name.
• If your account has a password, enter the password in the box below your account name, and then press Enter or click the Submit button.
See Also
For information about signing in to Windows from within an existing Windows session, see “Explore the Start screen and Start menu” later in this chapter. For information about configuring and signing in by using PINs, picture passwords, and biometric recognition, see “Customize your sign-in options” in Chapter 8, “Manage user accounts and settings.”
Explore the desktop
Each time you sign in to Windows, one of two user interfaces appears: the desktop or the Start screen. The default Windows 10 startup user interface is the desktop, which we discuss here.
![]() Tip
Tip
Many Windows 8 users became accustomed to the clean interface provided by the Start screen in that version of Windows. You can change your settings to display the Windows 10 version of the full-screen Start screen instead of the desktop when you sign in to Windows. For more information, see “Configure the Start screen and Start menu” in Chapter 2, “Personalize your working environment.”
The Windows 10 desktop is similar to the desktop in previous versions of Windows: it has a background that fills your screen, hosts Windows utilities such as the Recycle Bin, and might have app shortcuts, folders, and files stored on it. The standard Windows 10 desktop background depicts the same dramatic interpretation of the familiar Windows logo that is on the Welcome screen.

The desktop consists of a background for folders, files, apps, and shortcuts; and a taskbar that provides access to the computer content and functionality
![]() Tip
Tip
When you buy a new computer, you might be surprised at how cluttered your brand-new desktop is. You can delete the desktop shortcuts to tidy it up, but that won’t uninstall the apps that the shortcuts link to. Computer manufacturers or resellers frequently install trial versions of apps on a computer in hopes that you will assume you have to use those apps instead of others that are available to you. The most concerning of these is a well-known antivirus app that provides a short “free trial” and then prompts you to pay for a subscription. This app can actually interfere with the Windows Defender security system that is built into Windows 10 (for free). For information about cleaning up desktop shortcuts and uninstalling apps, see Chapter 2, “Personalize your working environment” and Chapter 4, “Work with apps and notifications.”
The initial desktop background picture is set when you install Windows. If you upgrade from another version of Windows and choose to keep your personal settings, your desktop background won’t change. If you purchase a computer that has Windows 10 preinstalled on it, it will probably feature a background specific to the computer manufacturer or model.
The only icon that is typically displayed by default with a clean installation is the one for the Recycle Bin, which usually appears in the upper-left corner. Apps that you install later might place (or offer to place) shortcuts on the desktop to provide a quick way to start them. You can place app shortcuts on the desktop yourself, too. Most computer manufacturers also preinstall apps from companies they have alliances with, and place shortcuts to these apps on the desktop. The appearance of your desktop might be different from the one shown in this book, but the functionality will be the same.

The Recycle Bin is a temporary storage folder for deleted files
See Also
For information about creating shortcuts on the desktop, Start screen, and taskbar, see Chapter 4, “Work with apps and notifications.”
The desktop itself is really just a background for the display of items that are stored in a folder (named Desktop) that is part of your user account or in a Public Desktop folder that is shared by all users who sign in to the computer. Some people like to save files or folders to their desktops for easy access.
See Also
For information about configuring Windows to display content on two (or more) screens, see “Display your desktop on multiple screens” in Chapter 6, “Manage peripheral devices.”
Explore the taskbar
The bar across the bottom of the desktop is the Windows taskbar. The taskbar provides access to all the apps, files, settings, and information on the computer. The fixed tools are on the left and right ends of the taskbar.
The default Windows 10 taskbar
![]() Tip
Tip
By default, the taskbar is displayed at the bottom of your primary display, but you can move it to the top or one of the sides, or hide it until you need it to provide additional screen space. For more information, see Chapter 2, “Personalize your working environment.”
The Windows 10 taskbar looks very similar to the taskbar in earlier versions of Windows, but there are some pleasant surprises here.

You can search for information, settings, apps, and files from the search box
The Start button, search box, and Task View button are located at the left end of the taskbar. Each of these has an important function, as described here:
![]() Clicking the Start button displays the Start menu and Start screen, the primary locations from which you access apps and settings. The Start menu and Start screen both have new functionality in Windows 10. We discuss this at length in the next topic.
Clicking the Start button displays the Start menu and Start screen, the primary locations from which you access apps and settings. The Start menu and Start screen both have new functionality in Windows 10. We discuss this at length in the next topic.
![]() Right-clicking the Start button displays the Quick Link menu of frequently accessed computer administration functions and commands.
Right-clicking the Start button displays the Quick Link menu of frequently accessed computer administration functions and commands.

![]() Tip
Tip
A menu that appears when you right-click a button, file, folder, or other item is referred to as a shortcut menu. Most shortcut menus don’t have names, but this is the Quick Link menu. You can display it by right-clicking the Start button or by pressing Win+X.
![]() Entering a term in the search box displays relevant apps, files, and settings stored on your computer and, when you have an active Internet connection, relevant online information.
Entering a term in the search box displays relevant apps, files, and settings stored on your computer and, when you have an active Internet connection, relevant online information.

The icons to the left of the search results represent the app or system area of each result. An app icon indicates the default app for that file type; a folder indicates a folder; a gear indicates a Settings page, pane, or setting; and a control panel indicates a Control Panel setting.
![]() Tip
Tip
The search box is also your interaction point with Cortana, your “personal assistant” on any Windows device. After you initially configure Cortana, the service will alert you to upcoming appointments; help you check in for flights or track packages; provide information about local restaurants, traffic conditions, and investment performance; and much more.
![]() The Task View button is new in Windows 10. It provides you with a large thumbnail view of all the open windows and running apps on your desktop so you can easily switch among them.
The Task View button is new in Windows 10. It provides you with a large thumbnail view of all the open windows and running apps on your desktop so you can easily switch among them.
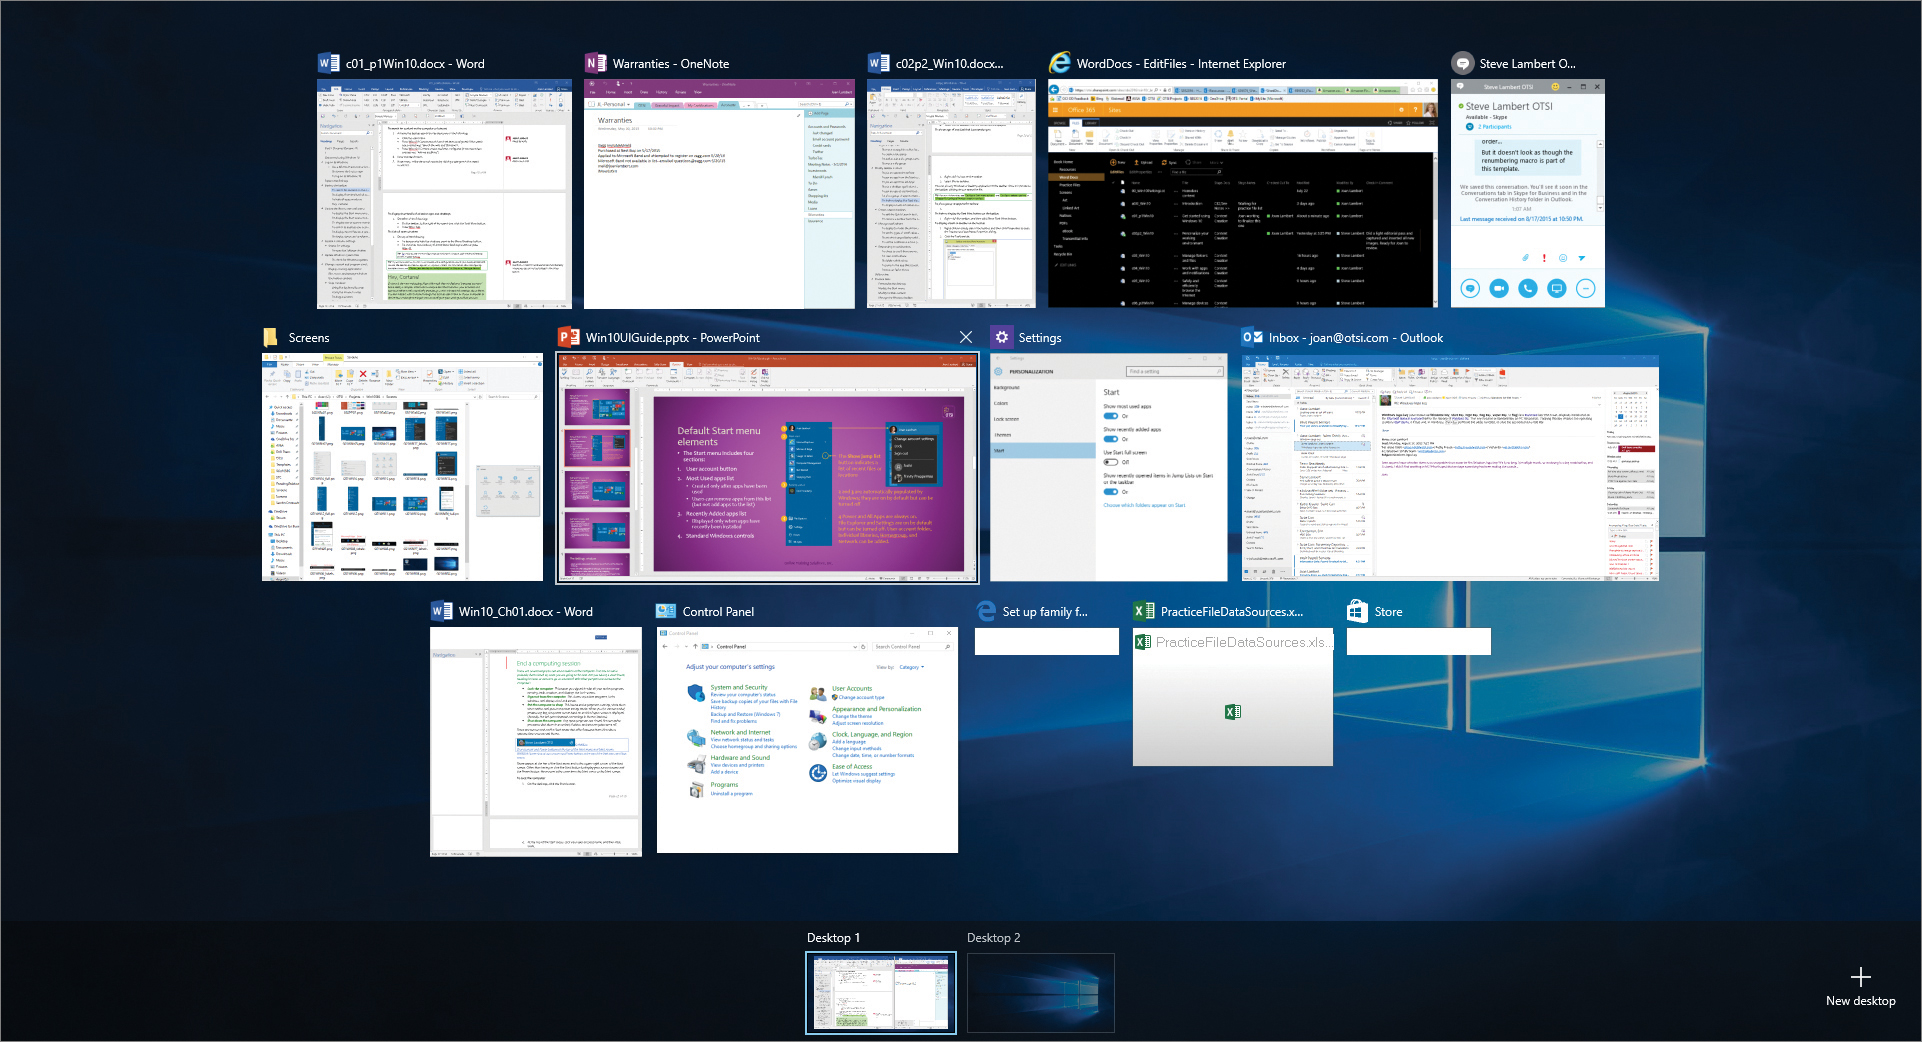
You can switch to or close windows from Task view
From Task view, you can also create virtual desktops, which are secondary instances of the Windows desktop. When you create one or more virtual desktops, you can organize the windows of running apps, files, and folders across them.
See Also
For information about virtual desktops, see “Organize apps on multiple desktops” in Chapter 11, “Work more efficiently.”
The center area of the taskbar between the Task View button and the Show Hidden Icons button can display shortcut buttons and toolbars. In a default installation of Windows 10, shortcuts to the Microsoft Edge web browser, File Explorer, and the Windows Store are pinned here. You can move or delete these and pin additional items that you want quick access to.

You can easily add and remove taskbar buttons
For information about pinning apps to the taskbar, see “Manage app shortcuts” in Chapter 4, “Work with apps and notifications.”
The right end of the taskbar is the notification area. The icons displayed here represent apps that run on your computer that might need to notify you of events. You can choose which apps appear in the notification area, and set them either to always be displayed or to only display an alert if something happens. You can also click or right-click notification area icons to interact with the underlying apps in various ways.

The right end of the taskbar provides access to notifications and information about system status
The notification area contains the following items:
![]() The Show Hidden Icons button displays a pane of notification icons that are for apps rather than for Windows functions. You can access app-management commands from these icons.
The Show Hidden Icons button displays a pane of notification icons that are for apps rather than for Windows functions. You can access app-management commands from these icons.
![]() The standard Windows notification icons provide access to network and sound settings, app and operating system notifications, and other tools. The specific icons depend on your computer configuration.
The standard Windows notification icons provide access to network and sound settings, app and operating system notifications, and other tools. The specific icons depend on your computer configuration.
The Action Center icon is new in Windows 10. When you have unread communications from apps (such as Microsoft Mail or Outlook), Windows, and other sources, the icon is filled, and when you have no unread notifications, it is hollow.

The Action Center icon is white when you have new notifications
The Action Center icon provides quick access to the Action Center. You can access messages directly from this pane, and also access many interesting settings, some of which are new in Windows 10.

The Action Center gives you direct access to multiple communication apps and settings
![]() The time and date displayed on the taskbar also provide access to configure the time and date settings on your computer.
The time and date displayed on the taskbar also provide access to configure the time and date settings on your computer.
![]() The narrow bar at the rightmost end of the taskbar is the Show Desktop button, which you can use to hide or minimize all open windows (and thereby display the desktop).
The narrow bar at the rightmost end of the taskbar is the Show Desktop button, which you can use to hide or minimize all open windows (and thereby display the desktop).
Cortana is the new technology from Microsoft that is described as a “personal assistant,” but is really a complex information-analysis tool that monitors your activities and communications and proactively provides you with relevant information about them. You can interact with Cortana through the taskbar search box, or if your computer or device has a microphone input you can configure your settings so that you can activate it by saying “Hey, Cortana.” Configuring Cortana changes the taskbar search box prompt from “Search the web and Windows” to “Ask me anything” preceded by the Cortana symbol.
A microphone in the search box indicates that Cortana is configured for verbal input
Cortana can provide information about local restaurants and events, specific stocks you want to track, traffic, public transit options, appointments and meetings, movies, television shows, news, sports, and weather—and the list is sure to grow. You can indicate the types of information you want Cortana to provide.
The concept of being monitored can take some getting used to, but in trade you’ll get proactive reminders and relevant information that Cortana locates just for you. You can ask Cortana to record notes and set reminders for you (or you can do it yourself by typing and clicking in the interface).
The same functionality is available on Windows phones and the data is available to you on any device that you sign in to with your Microsoft account.

Cortana monitors your computer activity and provides useful information
SEE ALSO For more information, see “Get assistance from Cortana” in Chapter 11, “Work more efficiently.”
To search for content on the computer or Internet
1. Activate the taskbar search box by doing any of the following:
• Click the search box.
• Press Win+S.
![]() Tip
Tip
We abbreviate the Windows logo key name as “Win” in keyboard shortcuts so that it’s easier to read.
• If Cortana search has been configured (if the search box prompt says “Ask me anything”) press Win+Q.
2. Enter the search term.
3. If necessary, refine the search results by clicking a category in the search results list.
To display the Task view of all active apps and desktops
1. Do any of the following:
• On the taskbar, to the right of the search box, click the Task View button.
• Press Win+Tab.
To manage windows in Task view
1. Do any of the following:
• To close a file or app, point to the thumbnail, and then click the Close button (the X) in the upper-right corner.
• To switch to a specific window, click the window thumbnail (not the window title).
• On a touchscreen device, swipe in from the left edge of the screen.
To display app-management icons and commands
1. At the left end of the notification area of the taskbar, click the Show hidden icons button.
2. In the icon pane, right-click the icon of the app you want to display commands for.
To display recent, unread messages from Windows and communication apps
1. Near the right end of the taskbar, click the Action Center icon.
To manage messages in the Action Center
1. Do any of the following:
• To preview message content, click the arrow to the right of the message subject.
• To remove a message from the Action Center (but not from the messaging app), point to the message header and then click the X that appears in its upper-right corner.
• To open a message in its app, click the message header.
See Also
For information about managing settings from the Action Center, see “Manage app notifications” in Chapter 4, “Work with apps and notifications.”
To hide all open windows
1. Do any of the following:
• To temporarily hide the windows, point to the Show Desktop button.
• To minimize the windows, click the Show Desktop button or press Win+D. Use the same technique to restore the minimized windows.
See Also
For information about other techniques for minimizing, maximizing, and restoring windows, see “Manage content and app windows” later in this chapter.
Explore the Start screen and Start menu
Windows 8 replaced the previous Start menu with a Start screen that hosted app tiles, including “live tiles” that display up-to-date information from apps. Live tiles are a nifty feature, but the removal of the Start menu was a very big change. Although this change was made with the best of intentions and was well received by some people, it met with strong disapproval from other people. Windows 10 offers the best of both worlds—a combination of the traditional Start menu and the tile-based Start screen.

You can configure the content of the Start screen however you want by adding, removing, resizing, and grouping tiles. As previously mentioned, you can opt to display a full-screen Start screen instead of the partial-screen Start screen. On the full-screen Start screen, the Start menu is minimized, but you can open it whenever you want to access its content.

The full-screen Start screen with the Start menu displayed
For information about adding content to the Start screen and switching to the full-screen Start screen, see “Configure the Start screen and Start menu” in Chapter 2, “Personalize your working environment.”
Regardless of the Start screen configuration, the Start menu is located on the left side and contains specific content sections. As with nearly all areas of Windows 10, you have control over the content that appears on the Start screen. By default, the categories are Most Used Apps, Recently Added Apps, and user account folders. The Settings button and the All Apps button are at the bottom of the Start menu (and also available directly from the full-screen Start screen).

The Start menu with the default categories and folders
Your user account information is at the top of the Start menu and is actually a button label. Clicking the user account button displays a list of options. You can access your user account settings, lock the computer, or sign out of Windows from this menu. (You can also do all those things from other places.) If multiple user accounts are configured on your computer, they appear at the bottom of this menu, and you can switch to those accounts without signing out of your current Windows session. (For example, if your home computer has user accounts configured on it for other family members or guests, and you want to let one of those people use the computer without ending your computer session, or if you have a user account that is linked to your Microsoft account and a local user account that isn’t.)

You can quickly lock the computer, sign out, or switch to another user account
If the other user account is already signed in to Windows, this is indicated by the words “Signed in” under the user account name. Switching to an account that has an active Windows session resumes that Windows session; otherwise, switching to the account starts a new Windows session. Either way, when you switch accounts Windows displays the Welcome screen, so you can either sign in to Windows with the other user account credentials (including the account password, if it has one) or sign in to the existing Windows session.
You can choose whether to display the Most Used and Recently Added sections on the Start menu, but Windows populates these sections automatically based on your computer usage and displays the section headings only when it also displays apps in those sections. Apps that you use more than others stay on the Most Used list until others take their place. Newly installed apps stay on the Recently Added list for about a day.

The purpose of the Most Used and Recently Added sections seems to be to make your life easier by providing quick access to apps that you use frequently or that you just installed. At the time of this writing, unfortunately, that purpose isn’t fulfilled because the sections display only apps that are not pinned to the Start screen. (Apps that are pinned to the taskbar do stay on the list.)
One good reason to display the Most Used Start menu section is so that you can quickly access jump lists of recent files. Jump lists are a marvelous time-saving feature introduced in a previous version of Windows and, happily, they’re back with the Windows 10 Start menu.

Display frequently accessed files or locations and common tasks by right-clicking an app
Different jump lists display different entries. Most display recent files or locations. The File Explorer jump list displays the entries that are pinned to the Quick Access section of the File Explorer Navigation pane, which we investigate in Chapter 3, “Manage folders and files.” You can unpin items from either location.
To display the Start menu and screen (default configuration)
1. Do any of the following:
• Click the Start button.
• Press the Windows logo key.
• Press Ctrl+Esc.
To display the Start menu on the full-screen Start screen
1. In the upper-left corner of the Start screen, click the menu button.

The menu button, sometimes referred to as “the hamburger menu”
To display user account controls
1. At the top of the Start menu, click the user account button.
To switch to another user account
1. On the Start menu, click the user account button, and then click the account you want to switch to.
2. On the Welcome screen, do one of the following:
• If the account has a password, enter the password in the box below the account name, and then press Enter or click the Submit button.
• If the account doesn’t have a password, click the Sign In button below the account name.
To display recent files for a specific app
1. On the Start menu, in the Most Used list or All Apps list, right-click the app name.
To display items you’ve selected for quick access
1. On the left side of the Start menu, right-click the File Explorer button.
For information about the Quick Access menu in File Explorer, see Chapter 3, “Manage folders and files.”
Explore computer settings
In past versions of Windows, the various settings that controlled the behavior of the computer were available from an interface named Control Panel. Navigating through the Control Panel screens could be somewhat tricky. Control Panel still exists in Windows 10, but many of the settings have been moved from Control Panel to a much simpler interface: the Settings window. (We assume that future Windows 10 updates will result in the migration of more Control Panel content to Settings.)

In the default configuration, the Settings window displays iconic representations of the setting categories
The Settings window is an example of the type of changes Microsoft made in Windows 10 so that the operating system can run on devices of any size, from desktop computers to smartphones. (In fact, the narrow Settings window content will look familiar to Windows phone users.) As the window width decreases, the icons become smaller and move to a list format. Regardless of the format, each category icon and name is accompanied by a short (and by no means complete) list of settings available in that category.

The Settings window content remains the same but its appearance changes to fit the window width
One of the benefits of the Settings window over Control Panel is that each category is only one level deep, so it’s relatively easy to locate the feature or setting you want to configure. In the standard (wider) Settings window configuration, each category page displays a list of features in the left pane; clicking any feature displays the settings for that feature in the right pane.

When the Settings window is narrower, clicking a category name displays only the feature list, and then clicking a feature displays that pane of settings.
The following table lists the features you can configure settings for in each of the nine categories, so you don’t have to guess.

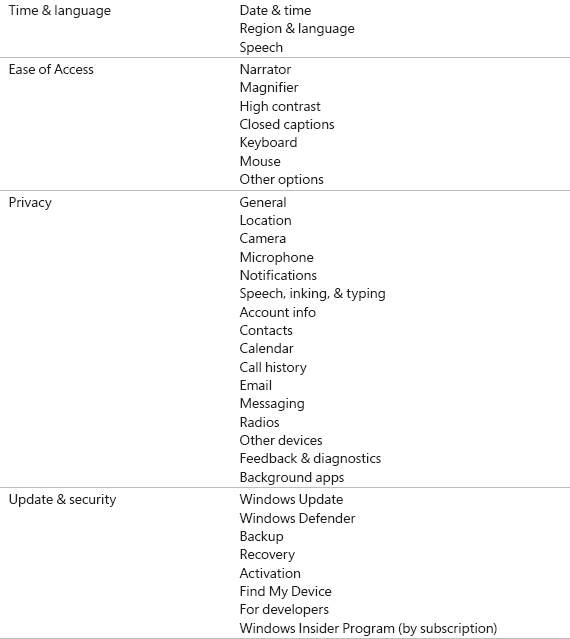
You can locate the configuration options for a specific feature by clicking the category and then the feature, or by searching from the Settings window search box or the taskbar search box.
At the time of this writing, the Settings window search box returns some false results that don’t lead anywhere; we assume these are placeholders for configuration options that will be migrated to the Settings window with future Windows updates. In the meantime, if you don’t like navigating through the categories, you can get more-dependable results from the taskbar search box.
When you configure settings in the Settings window, your changes are implemented as soon as you make them; it isn’t necessary to save your changes, and it’s not possible to undo your changes other than by manually reversing each change. If you ever need to identify the default settings for a feature, one way to do so is to create a new user account, switch to that user account, and then check the settings in that account.
See Also
For information about creating new user accounts, see “Create and manage user accounts” in Chapter 8, “Manage user accounts and settings.” For information about switching accounts, see “Explore the Start screen and Start menu” earlier in this chapter.
As previously mentioned, Control Panel still exists and you can configure many of the less frequently used settings there. The standard Control Panel configuration displays category names followed by tasks you can perform in the categories.

Category view of Control Panel
Alternatively, you can display features instead of categories by switching to Icon view, where you have the choice of displaying large or small icons. The content in both views is the same, but it can be much simpler to navigate through Control Panel in Icon view than in Category view. In either view, a search box is located in the upper-right corner of the window. Searching from this box returns results only from Control Panel.

Small Icons view of Control Panel
You can access the settings in Control Panel directly (by navigating or searching in Control Panel or from the taskbar search results list), by clicking links on the Quick Link menu, and also by clicking links in the feature settings panes. Links that lead from the Settings window panes to Control Panel are located at the bottom of the panes after the settings you can configure in the pane, and are often labeled as advanced or additional settings. (For example, “Advanced sizing of text” and “Additional power settings.”)
We’ll work with individual settings in later chapters of this book. In this first chapter, we’re just making you aware of them in case you want to investigate them on your own or need to configure something before you get to the relevant topics.
1. Do any of the following:
• Near the bottom of the Start menu, click Settings.
• Press Win+I.
• In the taskbar search box, enter settings, and then in the search results list, click Settings.
• Near the right end of the taskbar, click the Action Center icon and then, near the bottom of the Action Center pane, click the All settings button.
To display a category of settings
1. In the Settings window, click the category you want to display.
To display settings for a specific feature
1. From the Settings window, display the category page.
2. On the category page, click the feature you want to configure.
![]() Tip
Tip
If the category page has two columns, the features are listed in the left column and the settings in the right.
To display the Quick Link menu
1. Do either of the following:
• Right-click the Start button.
• Press Win+X.
To display the Control Panel home page
1. Do any of the following:
• On the Quick Link menu, click Control Panel.
• In the taskbar search box, enter control, and then in the search results list, click Control Panel.
• On the All Apps menu, click any index letter. In the alphabetic index, click W, expand the Windows System folder, and then click Control Panel.
Update Windows system files
The code behind operating systems is usually in a constant state of change. This might be to resolve internal or external issues—for example, threats from new viruses or the need to improve drivers for the devices you can connect to your computer. Microsoft has stated that Windows 10 will be the last version of Windows (a great reason to buy this book!), but the actual meaning of that statement is that the company plans to maintain and update this version of Windows for the foreseeable future rather than to immediately begin the development of a new version. This is in part a reflection of the agile software development methodology that Microsoft has embraced, which involves multiple function-specific teams completing rapid, collaborative development cycles and continually refining processes, rather than one long-term development process driven by management.
Windows 10 checks for updates during the installation process, but quite a bit of time might pass between the installation of the operating system on your computer and the time you first use it. Therefore, it’s a very good idea to check for updates after you install or activate the operating system.

The Windows Update pane
Windows Update is part of the Update & Security category of settings. Windows Update automatically checks for, downloads, and installs updates to the operating system (including the built-in Windows Defender security software), and related files, such as device drivers, on a regular basis. If your computer is turned off or is offline when the time comes to check, you might not get an update when it first becomes available to you, but you can manually check for updates. If Windows Update locates available updates, it starts the process of downloading and installing them. Sometimes Windows Update delays certain update processes until a time that you’re not using your computer. You can choose to run those processes immediately if you want to.
You have some options for the types of updates you get and the way they’re delivered to your computer. For example, Windows Update can also check for updates to other Microsoft products (such as Word, Outlook, and Skype) that are installed on your computer, and can optimize the delivery of updates by downloading them to your computer through other computers that your computer is connected to by a local network or Internet connection. We delve into those options in Chapter 12, “Protect your computer and data.”
To check for Windows updates
1. Open the Settings window, and click Update & security.
2. If the window is in single-pane format, click Windows Update to display that pane.
3. In the Windows Update pane, click Check for updates.
![]() Tip
Tip
If the Windows Update pane indicates that updates are available to download, waiting to install, or require that you restart your computer, you can click the relevant link to start that process.
To view your update history
1. Display the Update & security category of settings.
2. Display the Windows Update pane.
3. At the bottom of the Windows Update pane, click Advanced options.
4. In the Advanced options pane, click View your update history.
Manage content and app windows
As the name of the Windows 10 operating system indicates, most of the information you view on your computer is displayed in a window—a rectangular content frame. (One obvious exception to that is Start screen tiles.) Files open in app windows, folders open in File Explorer windows, and operating system elements open in system windows. Regardless of the content they display, all windows share certain common characteristics and can be manipulated in the same ways.
In this topic, we discuss managing windows on the desktop.
Resize, hide, and close windows
A window can either fill the entire screen or occupy only part of the screen. You can open and close a window, move a window, and change the size of a window. (These features help us to differentiate a window from another user interface element such as a pane or dialog box.)
Windows have common features. Depending on which system or app generates the window, its controls might be or look slightly different, but in general, a window has a title bar at the top that has a title in the middle and window-sizing buttons on the right side.
The three buttons on the right end of the title bar are:
![]() Minimize Minimizing a window doesn’t close the file or app in the window, but closes the window on the screen. You can reopen the window by clicking the corresponding taskbar button.
Minimize Minimizing a window doesn’t close the file or app in the window, but closes the window on the screen. You can reopen the window by clicking the corresponding taskbar button.
![]() Maximize/Restore When a window fills only part of the screen, maximizing it increases it to full-screen size. When a window is maximized, restoring it returns it to its previous part-screen size.
Maximize/Restore When a window fills only part of the screen, maximizing it increases it to full-screen size. When a window is maximized, restoring it returns it to its previous part-screen size.
![]() Close Closing a window also closes the file or app that the window contains.
Close Closing a window also closes the file or app that the window contains.
Pointing to (hovering over) the controls displays ScreenTips to help you identify them.

Word, Settings, and File Explorer windows feature the same basic controls in the upper-right corner
You can use the title bar at the top of a window or the window frame to manage the window size.
To resize a window
1. Do any of the following:
• To change only the window height, double-click or drag the top or bottom of the window frame.
• To change only the window width, drag the left or right side of the window frame.
• To change the window size in any direction, point to a corner of the window frame, and when the pointer changes to a diagonal arrow, drag the arrow.
You cannot resize a maximized window by dragging its frame; you must first restore the window to a non-maximized state.
To maximize a window
1. Do any of the following:
• Double-click the window title bar.
• At the right end of the title bar, click the Maximize button.
• Drag the window by its title bar to the top of the screen, and then release it.
• Press Win+Up Arrow to maximize a non-snapped window.
See Also
For information about snapping windows, see the “Move and arrange windows” section of this topic.
To restore a maximized window
1. Do any of the following:
• Double-click the window title bar.
• At the right end of the title bar, click the Restore button.
• Drag the window by its title bar away from the top of the screen, and then release it.
• Press Win+Up Arrow or Win+Down Arrow to restore a non-snapped window.
To minimize the active window
1. Do any of the following:
• At the right end of the title bar, click the Minimize button.
• Press Win+Down Arrow to minimize a non-snapped window.
To minimize all windows other than the active window
1. Do any of the following:
• Press Win+Home.
• Shake (rapidly wiggle) the active window by its title bar.
To minimize all windows
1. Press Win+M.
To restore minimized windows
1. Do any of the following:
• Press Win+Shift+M.
• Press Alt+Tab to cycle through thumbnails of windows; release the Alt key to open the window of the selected thumbnail.
• Press Win+[a number from 0 to 9] to open the first instance of the first through tenth active app on the taskbar. (The first app is the one to the right of the Task View button.)
To close a window
1. At the right end of the title bar, click the Close button.
Move and arrange windows
Some people might never open more than one window at a time. But most people have at least a few windows open at the same time, and a business computer user could easily have a dozen or more windows open on a single screen, multiple monitors, or multiple desktops.
Earlier in this chapter we looked at Task view, in which you can display a tiled view of thumbnails of all your open windows at the same time, and switch to or close individual windows. In this section, we discuss managing windows on the desktop.
You can move and arrange windows by dragging them around the screen, by using keyboard shortcuts, or by using commands on the taskbar shortcut menu.
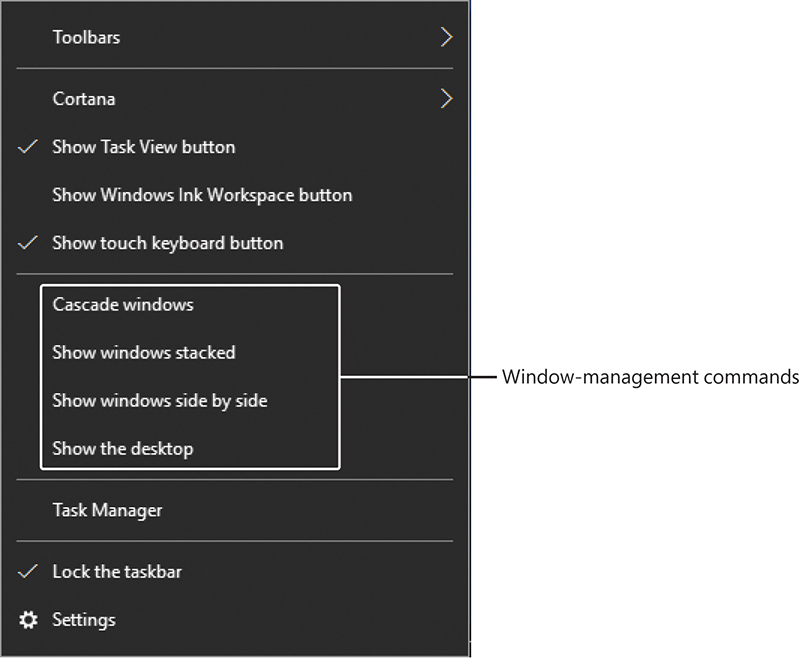
You can arrange open windows in traditional cascaded, stacked, and side-by-side arrangements or by snapping them to a half or quarter of the screen. Cascading and snapping windows also changes the window sizes.

Cascading windows resizes them and arranges them neatly on the desktop
Snapping a window is a technique that sizes and positions a window to occupy the left or right portion of the screen or one corner of the screen. Snapping a window to the left or right side of the screen in Windows 10 doesn’t automatically resize it at half width—if another maximum height window is docked to a screen edge, snapping a window to the opposite screen edge fills the available space.
To drag a window
1. Press and hold the window title bar by using the primary mouse button, your finger, or a stylus.
2. Move the pointing device until the contact point touches the intended destination.
To move a window
1. Do either of the following:
• Drag the window by its title bar to the new position.
• Press Win+Left Arrow or Win+Right Arrow to cycle the window through the left, right, and center of each screen.
To cascade all open windows
1. Right-click the taskbar.
2. On the taskbar shortcut menu, click Cascade windows.
To arrange all open windows in a grid
1. Right-click the taskbar.
2. On the taskbar shortcut menu, click Show windows stacked or Show windows side by side.
To restore cascaded, stacked, or side-by-side windows
1. Right-click the taskbar.
2. On the taskbar shortcut menu, click the relevant Undo command.
To snap a window to the left or right side of a screen
1. Do any of the following:
• Drag the window until the pointer touches the left or right edge of the display area (the contact point will flash briefly), and then release it.
• Activate the window, and then press Win+Left Arrow or Win+Right Arrow to cycle the window through the left, right, and center of each screen.
![]() Tip
Tip
If you have multiple monitors (as opposed to virtual desktops) pressing the right or left arrow keyboard shortcut repeatedly acts on the window on the current monitor, then moves it to the next monitor and cycles through the possibilities there. This is true whether the monitors are arranged horizontally or vertically.
2. Click the thumbnail of the window you want to display in the remaining space, or press Esc or click the taskbar to close the thumbnail view.
To snap a window to a quarter screen
1. Do any of the following:
• Drag the window until the pointer touches a corner of the display area, and then release it.
• Press Win+Up Arrow or Win+Down Arrow to snap a half-screen window to the upper or lower corner.
• Press Win+Left Arrow or Win+Right Arrow to move a quarter-screen window to another corner.
2. Click the thumbnail of the window you want to display in the remaining space, or press Esc or click the taskbar to close the thumbnail view.
End a computing session
If you’re going to stop working with your computer for any length of time, you can use one of these four options to leave the Windows session:
![]() Lock the computer This leaves your Windows computing session active, saves the state of any running apps and open files, and displays the Lock screen. Signing in to Windows resumes your computing session.
Lock the computer This leaves your Windows computing session active, saves the state of any running apps and open files, and displays the Lock screen. Signing in to Windows resumes your computing session.
![]() Sign out of Windows This exits any running apps, ends your Windows computing session, and displays the Lock screen. Signing in to Windows starts a new computing session.
Sign out of Windows This exits any running apps, ends your Windows computing session, and displays the Lock screen. Signing in to Windows starts a new computing session.
![]() Put the computer to sleep This leaves your Windows computing session active, saves the state of any running apps and open files, turns off the monitor, and puts the computer into a power-saving mode. When you wake the computer up, the monitor turns on, the Lock screen appears, and signing in to Windows resumes your computing session.
Put the computer to sleep This leaves your Windows computing session active, saves the state of any running apps and open files, turns off the monitor, and puts the computer into a power-saving mode. When you wake the computer up, the monitor turns on, the Lock screen appears, and signing in to Windows resumes your computing session.
![]() Shut down the computer This signs all active users out of Windows, shuts down the computer processes in an orderly fashion, and turns off the computer.
Shut down the computer This signs all active users out of Windows, shuts down the computer processes in an orderly fashion, and turns off the computer.
You can perform these processes from the Power button on the Start menu or full-screen Start screen, or from the Quick Link menu.
You can identify the Power button in any location by its icon
The other available Power option is to restart the computer. When you do so, Windows shuts down the computer, and then starts it again. Restarting is sometimes necessary after installing an update that needs to update files that the system is using. It can also magically fix things if your computer is overtaxed with too many processes and begins to run slowly.
If apps are running when you sign out of Windows or shut down or restart the computer, Windows manages the process of exiting the apps. If files are open that have unsaved changes, Windows halts the sign-out process and prompts you to save the files. At that point, you have the option of canceling the sign-out process and returning to your Windows session.
1. Display the Start menu.
2. At the top of the Start menu, click the user account button, and then click Lock.
Or
1. Press Win+L.
To sign out of Windows
1. Do any of the following:
• Display the Start menu, click the user account button, and then click Sign out.
• Display the Quick Link menu, click Shut down or sign out, and then click Sign out.
2. Respond if Windows asks whether to save unsaved changes to specific files or apps.
![]() Tip
Tip
Watch the taskbar for flashing buttons that indicate an app that needs attention. Click any button to activate the app, and then provide any necessary feedback. Sometimes the notifications don’t end up on top of other on-screen processes.
To put the computer to sleep
1. From within an active computing session, do either of the following:
• Display the Start menu or full-screen Start screen. In the lower-left corner of the menu or screen, click the Power button, and then click Sleep.
• On the Quick Link menu, click Shut down or sign out, and then click Sleep.
Or
1. In the lower-right corner of the Welcome screen, click the Power button, and then click Sleep.
1. From within an active computing session, do either of the following:
• In the lower-left corner of the Start menu or full-screen Start screen, click the Power button, and then click Shut down.
• On the Quick Link menu, click Shut down or sign out, and then click Shut down.
Or
1. In the lower-right corner of the Welcome screen, click the Power button, and then click Shut down.
To restart the computer
1. From within an active computing session, do either of the following:
• In the lower-left corner of the Start menu or full-screen Start screen, click the Power button, and then click Restart.
• On the Quick Link menu, click Shut down or sign out, and then click Restart.
Or
1. In the lower-right corner of the Welcome screen, click the Power button, and then click Restart.
Skills review
In this chapter, you learned how to:
![]() Explore the Start screen and Start menu
Explore the Start screen and Start menu
![]() Manage content and app windows
Manage content and app windows

Start a computing session
Perform the following tasks:
1. Start your Windows 10 computer.
2. Dismiss the Lock screen, and then sign in to Windows 10.
Explore the desktop
There are no practice tasks for this topic.
Explore the taskbar
Sign in to Windows, and then perform the following tasks:
1. From the taskbar search box, search for desktop. Filter the search results list to display only folders, and then open the Desktop folder for your user account.
2. Search for taskbar. Filter the search results list to display only settings. Then display the Settings window pane from which you can select which icons appear on the taskbar.
3. Display Task view of all active apps and desktops in your computing session. In Task view, close the Desktop folder window, and then open the Settings window.
4. Display the hidden icons in the notification area of the taskbar. Point to each icon in the window to display a ScreenTip that identifies the app. Then right-click any icon to display the available commands for that app.
5. From the notification area of the taskbar, display the Action Center.
6. If the Action Center contains messages, preview the content of a message, and then remove that message from the Action Center.
7. Hide all open windows.
1. Display the Start menu, and then display your user account menu.
2. From the user account menu, lock the computer. Then sign in to Windows again.
3. Display the Start menu. Examine the Most Used list for apps that display Show jump list buttons. Click each button to display recent files and common actions for the app.
4. Near the bottom of the Start menu, click the File Explorer Show jump list button to display the folders, locations, and items that are currently on your File Explorer Quick Access list.
Explore computer settings
Perform the following tasks:
1. Open the Settings window and display its home page.
2. Display any category of settings that interests you.
3. Within the selected category, display the settings for a specific feature.
4. Display the Control Panel home page.
5. Leave the Settings window and Control Panel open for later use.
Update Windows system files
Perform the following tasks:
1. Display the Updates & security category of settings.
2. From the Windows Updates pane, check for Windows updates.
3. If you have pending updates, view the details and install the updates.
4. View your update history.
Manage content and app windows
Ensure that the Settings window and Control Panel are open, and then perform the following tasks:
1. Activate the Settings window. Change only the width of the window so it is approximately half the width of the screen. Then drag the window to the approximate center of the screen.
2. Use the mouse or pointer to resize the Settings window in the following ways:
a. Maximize the window height without changing its width.
b. Maximize the window to fill the screen.
c. Snap the window to the left side of the screen, and select Control Panel to fill the right side of the screen.
3. Activate Control Panel, and then use keyboard shortcuts to resize it in the following ways:
a. Snap the window to the upper-right quadrant of the screen.
b. Move the window to the left side of the screen.
4. Temporarily hide all the open windows to display the desktop.
5. Stack the open windows.
6. Minimize all the active windows, and then restore them.
7. Activate the Settings window, and then minimize all windows other than the active window.
8. Close the Settings window. Then activate and close Control Panel.
End a computing session
Sign in to Windows, and then perform the following tasks:
1. From the user account menu at the top of the Start menu, lock the computer. Then sign in to Windows again.
2. From the Power button at the bottom of the Start menu, put the computer to sleep. Then sign in to Windows again.
3. From the Start shortcut menu, sign out of Windows to end your computing session.