
10. Manage power and access options
Practice files
For this chapter, use the practice files from the Win10SBSCh10 folder. For practice file download instructions, see the introduction.
Your power settings determine how long your computer will sit idle before reducing power consumption by turning off the screen or going into sleep mode. You can manage these settings independently or as part of a power plan.
When your computer comes out of sleep mode (and between computing sessions), Windows displays the lock screen. By default, the lock screen displays the current time, date, network connection status and battery charge (for devices running on battery power). However, it can be configured to display much more information, including status updates from up to eight apps. It can also double as an electronic picture frame, and display a slide show of pictures stored in multiple folders on your computer and in the cloud.
Microsoft takes accessibility seriously, and this is apparent in the company’s early and continued commitment to the Windows Ease of Access features that provide alternative methods for information input and output. Anyone can use these features to enhance their computing experience.
This chapter guides you through procedures related to configuring power options for desktop and portable computers, customizing the lock screen, and configuring Windows accessibility features.
Configure power options
Reducing power consumption is obviously of higher priority if your device is running on battery power. On battery-powered devices, such as laptop computers, you can configure settings that are in effect when the device is plugged in and other settings that are in effect when the device runs on battery power.
The screen brightness can have a significant effect on the length of time a battery charge powers a computer. You can manage the screen brightness as part of a power plan, or adjust it independently at any time. (For example, if you’re working in a dark room, a brighter screen can cause more eyestrain than a dimmer screen.)
Each Windows 10 computer has a set of built-in power plans that define three settings:
![]() When to turn off the display
When to turn off the display
![]() When to put the computer to sleep
When to put the computer to sleep
![]() How bright to make the display
How bright to make the display
The built-in power plans vary based on the computer type and manufacturer, but usually include the following:
![]() Power Saver This power plan prioritizes power conservation over performance. The screen is less bright and computer processes turn off earlier.
Power Saver This power plan prioritizes power conservation over performance. The screen is less bright and computer processes turn off earlier.
![]() High Performance This power plan prioritizes the user experience over power conservation. The screen is brighter and processes turn off after a longer idle time.
High Performance This power plan prioritizes the user experience over power conservation. The screen is brighter and processes turn off after a longer idle time.
![]() Balanced This power plan is less power efficient than High Performance and has higher performance values than Power Saver.
Balanced This power plan is less power efficient than High Performance and has higher performance values than Power Saver.
You can choose a preconfigured power plan, modify individual elements of a power plan, or even create your own. Creating a custom plan is similar to editing an existing plan, but you name and save it so you can easily apply it at any time. If you decide you no longer need a custom power plan, you can delete it.
To change the screen brightness without affecting the power management settings
1. Display the Action Pane by doing either of the following:
• Near the right end of the taskbar, click the Action Pane icon.
• Press Win+A.
2. If all the setting buttons aren’t visible at the bottom of the Action Pane, click Expand to display them. The Brightness button has a sun in its upper-left corner.

Setting buttons vary by system
3. Click the Brightness button to cycle through screen brightness settings.
Or
1. Open the Settings window. Click System, and then click Display.
2. In the Display settings pane, move the Brightness level slider to adjust the screen brightness. Changes are effective immediately; it isn’t necessary to click Apply.
To configure the power management settings
1. Open the Settings window. Click System, and then click Power & sleep. The Power & Sleep pane displays the current length of inactive time you want the computer to wait before it turns off the screen and then goes to sleep.

Separate time options are available for each available power source
2. In the Screen section of the Power & sleep pane, click each available list, and then click a time from 1 minute to 5 hours, or Never, to indicate the period of inactivity after which you want the screen to turn off (but the computer to continue running).
![]() Tip
Tip
It might be necessary to move the cursor away from the list to display its scroll bar.
3. In the Sleep section of the Power & sleep pane, click each available list, and then click a time from 1 minute to 5 hours, or Never, to indicate the period of inactivity after which you want the computer to enter Sleep mode.
The Sleep timeout must be equal to or greater than the Screen timeout. Setting the Sleep value to less time than the Screen value lowers the Screen value to match; setting the Screen value to more time than the Sleep value raises the Sleep value to match.
The power setting changes take effect immediately.
To choose a standard power-management plan
1. Display the Power & sleep settings pane.
2. In the Related settings section of the pane, click Additional power settings to open the Power Options window of Control Panel.
3. If Show additional plans appears below the plan descriptions, click it to display hidden power plans.

The available power plans vary by computer manufacturer and type
4. To compare plan settings, click the Change plan settings link to the right of each plan name, peruse the settings, and then click the Back button to return to the Power Options window.
5. In the Power Options window, click the preconfigured power option you want.
To modify an existing power plan
1. Open the Power Options window of Control Panel.
2. Click Change plan settings to the right of the plan that you want to modify, to open the Edit Plan Settings window for the plan.

Desktop computers have only the Plugged In settings
3. For each available power source, do the following:
• To the right of Turn off the display, select a time from 1 minute to 5 hours, or Never, to indicate the period of inactivity after which you want to turn off the screen when the computer is running on that power source.
• To the right of Put the computer to sleep, select a time from 1 minute to 5 hours, or Never, to indicate the period of inactivity after which you want the computer to enter Sleep mode when it is running on that power source.
• To the right of Adjust plan brightness, move the slider to indicate how bright you want the screen to be when the computer is running on that power source.
4. In the Edit Plan Settings window, click Save changes to apply your changes to the power plan and return to the Power Options window. If you modified the currently active plan, changes to the brightness are immediately apparent.
If you decide you don’t like the screen brightness you set, you can change it at the bottom of the Power Options window. The change will be applied to the current plan and automatically saved with it.
To create a custom power plan
1. Open the Power Options window of Control Panel.
2. In the left pane, click Create a power plan to open the Create a Power Plan window.

Custom plans are based on existing plans
3. Select one of the default plans as the starting point for your new plan, and provide a name for it. Then click Next to display the Edit Plan Settings window.
4. For each available power source, do the following:
• To the right of Turn off the display, select a time from 1 minute to 5 hours, or Never, to indicate the period of inactivity after which you want to turn off the screen when the computer is running on that power source.
• To the right of Put the computer to sleep, select a time from 1 minute to 5 hours, or Never, to indicate the period of inactivity after which you want the computer to enter Sleep mode when it is running on that power source.
• To the right of Adjust plan brightness, move the slider to indicate how bright you want the screen to be when the computer is running on that power source.
5. In the Edit Plan Settings window, click Create to create the custom power plan and return to the Power Options window.
To edit advanced settings of an existing power plan
1. Open the Power Options window of Control Panel.
2. Click Change plan settings to the right of the plan that you want to modify.
3. At the bottom of the Edit Plan Settings window, click Change advanced power settings to open the Power Options dialog box.
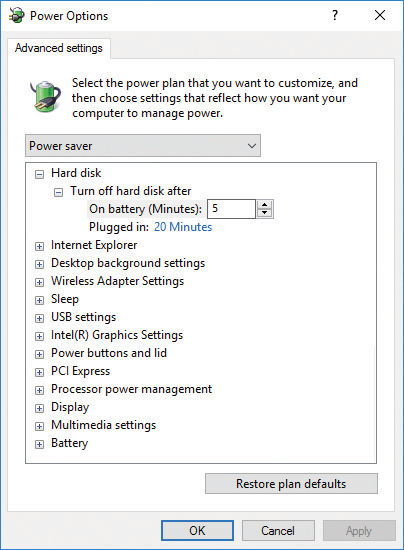
You can individually configure a variety of power options
4. If the plan shown at the top of the Power Options dialog box is not the one you want to modify, click the current plan and then, in the list, click the plan you want to customize.
5. Scroll through the available settings and click the expand button (+) to expand any category of interest.
6. If the settings you want to change are disabled (dimmed), you can click the Change settings that are currently unavailable link above the list and provide administrator permission, if necessary, to make the changes.
7. If you change settings, click Apply or OK to apply the changes.
To reset a power plan to its defaults
1. Open the Power Options window of Control Panel.
2. Click Change plan settings to the right of the plan that you want to restore.
3. At the bottom of the Edit Plan Settings window, click the Restore default settings for this plan link, and then click Yes in the Power Options message box that opens.
To delete a custom power plan
1. Open the Power Options window of Control Panel.
2. Apply any power plan other than the one you want to delete.
3. Click Change plan settings to the right of the plan that you want to delete.
4. At the bottom of the Edit Plan Settings window, click the Delete this plan link, and then click OK in the Power Options message box that opens.
![]() Tip
Tip
You can delete only custom power plans. You can’t delete built-in power plans.
Windows 10 has default behaviors for entering sleep mode, waking up, and shutting down. If you find that these defaults aren’t working for you, you can change the options. (Changes require approval from an Administrator account.)
There are three sets of settings that you can change:
![]() Shutdown action triggers These settings are related to the Power and Sleep buttons (the physical buttons) on your computer. Not all computers have Sleep buttons, but many do; they’re usually located on the keyboard and labeled with something that indicates sleep such as “zzz” or a moon. On a laptop, you can also specify what happens when you close the lid. The following table describes the shutdown actions that can occur when you press the Power or Sleep button, or close the laptop lid.
Shutdown action triggers These settings are related to the Power and Sleep buttons (the physical buttons) on your computer. Not all computers have Sleep buttons, but many do; they’re usually located on the keyboard and labeled with something that indicates sleep such as “zzz” or a moon. On a laptop, you can also specify what happens when you close the lid. The following table describes the shutdown actions that can occur when you press the Power or Sleep button, or close the laptop lid.

![]() Password requirement By default, when your computer comes out of sleep mode, Windows displays the lock screen. Users whose accounts are protected by passwords must enter their passwords to sign in. You can turn off this requirement.
Password requirement By default, when your computer comes out of sleep mode, Windows displays the lock screen. Users whose accounts are protected by passwords must enter their passwords to sign in. You can turn off this requirement.
![]() Shutdown settings This category is a bit of a catchall. You can control whether the Power menu includes the Sleep and Hibernate commands, and whether the user account menu includes the Lock command.
Shutdown settings This category is a bit of a catchall. You can control whether the Power menu includes the Sleep and Hibernate commands, and whether the user account menu includes the Lock command.
In general, if things are working well for you, it’s best to leave them as they are. But if you do want to make changes, you can do so from the System Settings page of Control Panel. In Category view, click Hardware and Sound, and then in the Power Options group, click Change What The Power Buttons Do. Most of the options are unavailable to change until you click Change Settings That Are Currently Unavailable and provide Administrator account credentials.
The Battery Saver feature is new for Windows 10 and available only on battery-powered devices (such as laptop computers). Battery Saver conserves battery power (and thereby extends battery life) by regulating background activity and hardware settings. Windows automatically turns the Battery Saver feature on when the battery charge falls below 20%, but you also have the option of turning it on whenever the device is running on battery power.
To display current battery life information, open the Settings window, click System, and then click Battery Saver.
TIP The Battery Saver pane is visible only on battery-powered devices.

Battery life estimates
To manually start Battery Saver, display the Battery Saver pane, and then set the Battery Saver Status Until Next Charge toggle button to On.
To modify the battery charge level at which Battery Saver turns on, or the actions permitted while Battery Saver is running, display the Battery Saver pane, click the Battery Saver Settings link, and then configure the settings.

Battery Saver options
Customize the lock screen
By default, the lock screen is displayed when you start or lock your computer, and when the computer comes out of sleep mode.
The lock screen has three primary purposes:
![]() Display information from selected apps when the computer session isn’t active.
Display information from selected apps when the computer session isn’t active.
![]() Display a single photo, or one or more folders of photos. (Windows 10 can display photos from multiple folders.)
Display a single photo, or one or more folders of photos. (Windows 10 can display photos from multiple folders.)
![]() Deter accidental sign-in on a touch device.
Deter accidental sign-in on a touch device.
For most of us, the lock screen is just a short pause on the way to the sign-in screen, but it can double as an electronic picture frame, and you can also display some useful information on it.
The lock screen always displays the date, the time, and the network icon. If your device operates on battery power, then the lock screen also displays the battery icon so you can see the remaining charge at a glance.
Set the lock screen background
On a clean installation of Windows 10, the lock screen is configured to display one of the Windows 10 theme images. You can choose any photo or a slideshow of photos that are contained in one or more folders. The latter option displays more than a simple slideshow; it displays from one to five images at a time and mixes photos from the selected folders.
If your computer is running Windows 10 Home, you also have options to display the following:
![]() A Windows Spotlight lock screen background featuring beautiful bing.com images and information about Windows 10
A Windows Spotlight lock screen background featuring beautiful bing.com images and information about Windows 10
![]() Windows tips and tricks
Windows tips and tricks
![]() Tip
Tip
It is possible to disable the lock screen by editing the registry or Group Policies, but these activities shouldn’t be undertaken lightly and are beyond the scope of a Step by Step book.
To display one image on the lock screen
1. Open the Settings window.
2. Click Personalization, and then click Lock screen. The Preview section of the Lock Screen settings pane displays your current lock screen background.
If the current background is a single picture, the pane shows thumbnails of other recent picture backgrounds (or background options from the current theme) for quick selection. If the background is a slideshow, the pane shows the folders that contain the slideshow photos.

The pane content varies based on the current selection
3. In the Lock screen pane, click the Background list, and then click Picture.
4. Select the background picture by doing either of the following:
• If the Choose your picture section includes a thumbnail of the picture you want to use, click the thumbnail.
• If the Choose your picture section doesn’t show the picture you want to use, click the Browse button. In the Open dialog box, browse to the picture you want to use, and then click the Choose picture button.
The pretty pictures provided with Windows 10 are stored in C:WindowsWebScreen and also provided as part of the Windows 10 theme. You can download similar artwork from windows.microsoft.com/en-US/windows/wallpaper.
Your selection is shown in the Preview section. If the picture you select doesn’t have the same aspect ratio as the screen, Windows fills the screen with the picture, which might cut off part of what you want to see.
5. Press Win+L to lock the computer and verify that the background looks the way you want it.
Or
1. Start the Photos app.
2. Locate the photo that you want to display on the lock screen, and open it for editing.
3. At the right end of the Photos menu bar, click the See more button (…), and then click Set as lock screen.
To display a series of images on the lock screen
1. Identify one or more folders that contain pictures you want to display as a slideshow. If you want to use only some of the photos from each folder, create a new folder and copy the photos to it.
2. Display the Lock screen settings pane.
3. In the Background list, click Slideshow. The Choose Albums For Your Slideshow section displays your Pictures folder or any folders that were previously selected for a slideshow.
![]() Tip
Tip
The advanced slideshow settings can be configured to include Camera Roll folders from your computer and OneDrive, without displaying those folders in the Choose Albums section, and to include pictures that don’t entirely fit on the screen. It’s a good idea to specifically configure those settings the way you want them.
4. Do either of the following:
• To add a folder to the slideshow album, click the Add a folder button, browse to the folder you want to add, select the folder, and then click the Choose this folder button.
• To remove a folder from the slideshow album, click the folder to display its controls, and then click the Remove button.

To display the Windows Spotlight lock screen
1. Display the Lock screen settings pane.
2. In the Background list, click Windows spotlight. A preview of the current Spotlight background appears at the top of the Lock Screen pane.
![]() Tip
Tip
On the Windows Spotlight lock screen, you can vote for the backgrounds you like, and Windows 10 will select future backgrounds that reflect your preferences. To vote for or against a background, click Like What You See? and then click I like it! or Not a fan.
To display tips and tricks on the lock screen
1. Configure the lock screen to display a picture or slideshow.
2. On the Lock screen settings pane, below the Choose your picture or Choose an album section, set the Get fun facts, tips, tricks, and more from Windows and Cortana on your lock screen toggle button to On.
To configure advanced slideshow settings
1. Display the Lock screen settings pane.
2. Below the Choose your picture or Choose albums section, click the Advanced slideshow settings link to display the Advanced slideshow settings pane.

Advanced slideshow settings for the lock screen
3. Configure the advanced settings the way you want them for your slideshow.
Display app status information on the lock screen
In addition to the background photo or photos and the time, date, network, and battery information, you can choose to display detailed status information from one Store app that supports this feature, and quick status information from up to seven Store apps. The additional apps don’t display as tiles with the usual live content; they display as an icon with very terse text. The primary purpose of this display is to provide you with quick but basic information about something, such as the number of new emails or an upcoming meeting.
The apps that are available to you depend on the apps that are installed on your computer. Run each app at least once to configure any required settings (for example, to specify the location you want the Weather app to monitor), so it can display updates at the bottom of the lock screen.
To display app information on the lock screen
1. Open the Settings window.
2. Click Personalization, and then click Lock screen. The controls to set lock screen apps are below the background settings.
3. In the Choose an app to show detailed status section, click the box to display a list of apps that can display status information on the lock screen.

Get information updates directly on your lock screen
4. In the app list, click one app to display detailed status updates on the lock screen.
5. In the Choose apps to show quick status section, click any box, and then click an app in the list. Repeat this process to select up to seven apps.
![]() Tip
Tip
The order of the app icons determines the order of status updates on the lock screen. An empty icon space displays a gap between the other status updates.
Screen savers are blank screens or moving images that appear on your screen after some period of inactivity. Originally, screen savers were used to prevent screens from being permanently “imprinted” with a static image that remained on the screen for too long. (This was back in the dark ages of computer history, when monitors fired a stream of electrons at the back of a CRT (cathode ray tube) or plasma screen to create little white dots that combined to display text you could read from the front side of the screen.) Modern monitors are not susceptible to this kind of damage, so screen savers are now primarily for visual entertainment.
The original screen saver was a simple app that made the screen blank after a period of inactivity. It was created by John Socha, and its code was published in the December 1983 issue of the Softalk magazine.
Windows 10 has six built-in screen saver options:
![]() 3D Text Displays a rotating version of the text you specify. If you don’t specify text, it displays “Windows 10.”
3D Text Displays a rotating version of the text you specify. If you don’t specify text, it displays “Windows 10.”
![]() Blank Clears the screen of content.
Blank Clears the screen of content.
![]() Bubbles Displays colorful round bubbles that bounce around the screen.
Bubbles Displays colorful round bubbles that bounce around the screen.
![]() Mystify Displays colorful repeating lines in geometric and curving patterns.
Mystify Displays colorful repeating lines in geometric and curving patterns.
![]() Photos Displays a slideshow of the files in any folder that you specify. If you don’t specify a folder, it displays the content of your Pictures folder.
Photos Displays a slideshow of the files in any folder that you specify. If you don’t specify a folder, it displays the content of your Pictures folder.
![]() Ribbons Displays ribbons of color that dance across the screen.
Ribbons Displays ribbons of color that dance across the screen.
When you select a screen saver, you can preview the effect, set the interval of inactivity before it will be displayed, and specify whether a password is required to stop the screen saver after it is set in motion. For some screen savers, you can set options such as size, motion pattern, and style.
To configure a screen saver, follow these steps:
1. Open the Settings window, click Personalization, and then click Lock screen.
2. At the bottom of the Lock screen settings pane, click Screen saver settings to open the Screen Saver Settings dialog box.
3. In the Screen saver list, click the screen saver you want to use. The dialog box displays a preview of the screen saver.
4. If the screen saver you select has options, the Settings button becomes active. To configure nondefault options, click the Settings button and provide the requested information.
5. If you want to preview the screen saver at full size on your screen, click the Preview button. The preview ends as soon as you move the mouse or take some similar action.
6. In the Wait box, set the number of minutes of inactivity after which you want the screen saver to start.
7. If you want Windows to display the lock screen when the screen saver stops, select the On resume, display logon screen check box.
TIP The term “logon screen” in the Screen Saver Settings dialog box is left over from a previous version of Windows, but refers to the Windows 10 lock screen.
8. In the Screen Saver Settings dialog box, click OK.
Configure Windows accessibility features
Are the words on the screen too small to read easily? Do you wish the icons were larger? Does it take you a while to locate the insertion point because it is so skinny? Windows 10 has accessibility features that make it easier for you to get information from the computer (output features), and other features that make it easier for you to provide information to the computer (input features).
Windows 10 includes a group of utilities (collectively known as Ease of Access features) that are specifically designed to help people interact with the computer by making content easier to access or providing alternative input and output methods. The utilities include the following:
![]() Closed captions Text narrations of audio content that display as videos play.
Closed captions Text narrations of audio content that display as videos play.
![]() High Contrast Color schemes that make individual user interface elements stand out on the screen.
High Contrast Color schemes that make individual user interface elements stand out on the screen.
 See Also
For information about high-contrast themes, see “Apply and manage themes” in Chapter 2, “Personalize your working environment.”
![]() Magnifier A panel that magnifies the screen under the mouse pointer up to nine times. You can move and resize the magnification panel.
Magnifier A panel that magnifies the screen under the mouse pointer up to nine times. You can move and resize the magnification panel.
![]() Narrator A text-to-speech tool that reads menu commands, dialog box options, and other screen features out loud, telling you what options are available and how to use them. It also reads your keystrokes to you as you type them, and tells you the pointer location on the screen as you move the mouse.
Narrator A text-to-speech tool that reads menu commands, dialog box options, and other screen features out loud, telling you what options are available and how to use them. It also reads your keystrokes to you as you type them, and tells you the pointer location on the screen as you move the mouse.
See Also
For information about using keyboard shortcuts, see Appendix B, “Keyboard shortcuts and touchscreen tips.”
You can turn on the High Contrast, Magnifier, Narrator, On-Screen Keyboard, Sticky Keys, or Filter Keys features from the Welcome screen, before you sign in to Windows. When you’re signed in to Windows 10, you can manage most of the accessibility features from the Ease Of Access category page of the Settings window.

Accessibility features are also still available from the Ease Of Access Center in Control Panel. If you’re unsure which features would be helpful to you, you can answer a series of questions, and Windows will recommend accessibility settings based on your answers.
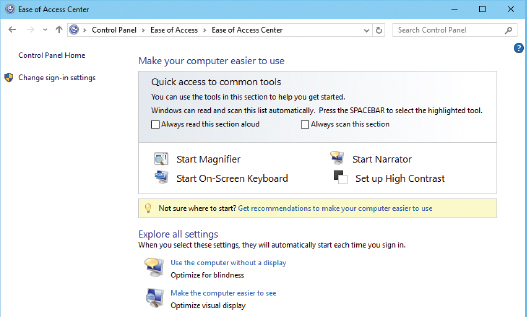
Some of the setting interfaces available in the Ease Of Access Center
When you turn on an accessibility feature, it remains on until you turn it off.
If you sign in to multiple computers by using your Microsoft account credentials, you can configure the accessibility settings on one computer, and then have Windows 10 synchronize the settings across all computers.
See Also
For information about synchronizing Ease Of Access settings across devices, see “Customize your sign-in options” in Chapter 8, “Manage user accounts and settings.”
Many of the accessibility features have keyboard shortcuts, but those aren’t of much use when you’re working on a device that doesn’t have an external keyboard. To simplify the process for users of tablets and other handheld Windows 10 devices, you can configure Windows 10 to launch Magnifier, Narrator, or the On-Screen Keyboard when you press the external Windows button and Volume Up button on those devices.
To display Ease of Access settings
1. To display the Ease Of Access settings category page, open the Settings window, and then click Ease of Access.
2. To display the Ease Of Access Center, do either of the following:
• Display Control Panel in category view, click Ease of Access, and then click Ease of Access Center.
• Press Win+U.
To get accessibility setting recommendations from Windows
1. Display the Ease Of Access Center.
2. Click the Get recommendations to make your computer easier to use link.
3. On the Eyesight, Dexterity, Hearing, Speech, and Reasoning pages, select the check box for each statement that applies to you, and then click Next.
4. On the Recommended settings page, review the accessibility options that Windows recommended in response to your selections. Select or clear any additional check boxes that you want to, and then click Apply or OK to apply your changes.
To configure a device hardware shortcut for an accessibility tool
1. Display the Ease Of Access Center.
2. In the Explore All Settings section, click Make touch and tablets easier to use.
3. In the Launching common tools section, click the drop-down list, and then click the accessibility tool that you want to start when you press the Windows button and Volume Up button on your device.
4. In the Make touch and tablets easier to use window, click Apply or OK to implement the change.
High-contrast settings
A high-contrast theme displays text and background colors that might be easier to see and cause less eyestrain. When you apply a high-contrast theme, it affects all the content that you display on your screen. Some content, such as a busy webpage image, is not visible when a high-contrast theme is applied.

A screen with the High Contrast #2 theme applied
Windows comes with four high-contrast themes, which we introduced in “Apply and manage themes” in Chapter 2, “Personalize your working environment.”
It takes Windows a bit longer (about 10 seconds) to apply a high-contrast theme than it does to make other changes. Windows displays a Please wait screen while it applies the theme.
To apply a high-contrast theme
1. Do either of the following:
• Open the Personalization window of Control Panel. In the High Contrast Themes section of the Personalization window, click the high-contrast theme you want to apply.
• To reapply the most recent high-contrast theme (or to apply High Contrast #1 if you haven’t yet applied a high-contrast theme), press left Alt+left Shift+Print Screen, and then click Yes in the message box that appears.
Or
1. On the Ease of Access settings category page, click High contrast.
2. In the High contrast settings pane, click the box under Choose a theme, and then click one of the four high-contrast themes to preview the theme colors that are assigned to the background, text, hyperlinks, disabled text, selected text, and button text.

You can preview all the high-contrast themes before you apply one
3. When you identify the theme you want, select that theme in the list, and then click the Apply button to apply the theme to the computer.
To revert to a regular contrast theme
1. Do one of the following:
• Press left Alt+left Shift+Print Screen.
• In the High Contrast settings pane, click None in the Choose a theme list, and then click Apply.
• Open the Personalization window of Control Panel, and click the theme you want to apply.
Windows displays a Please wait screen while it applies the theme.
Magnifier settings
You can use the Magnifier tool to make on-screen elements such as text and icons a larger-than-usual size so they’re easier to see. When you first turn on Magnifier, it is in full-screen mode and doesn’t focus on a specific area of the screen or apply any specific magnification. You must choose a magnification, and you can also choose a view.
Magnifier has three magnification views:
![]() Full Screen view Magnifies the entire screen
Full Screen view Magnifies the entire screen
![]() Lens view Magnifies a rectangular portion of the screen that is under the cursor
Lens view Magnifies a rectangular portion of the screen that is under the cursor
![]() Docked view Magnifies the content that is under the cursor in a separate pane that is docked to one edge of the screen
Docked view Magnifies the content that is under the cursor in a separate pane that is docked to one edge of the screen

You can set the size of the Lens and move it around the screen
When you use full-screen mode, click the Views menu and then click Preview Full Screen to locate the cursor or change its location.
When Magnifier is running, you control its settings from the Magnifier window that appears when you click the magnifying glass.
To turn on Magnifier
1. Do one of the following:
• Press Win+Plus Sign.
• On the Ease of Access settings category page, click Magnifier. Then in the Magnifier settings pane, set the Magnifier toggle button to On.
• In the Ease Of Access Center, in the Quick access to common tools section, click Start Magnifier.
A magnifying glass that represents the Magnifier window appears on the screen.

A magnifying glass conceals the Magnifier window
To change the magnified screen area
1. Point to the magnifying glass. When chevrons appear on it, click it to display the Magnifier menu bar.

The Magnifier commands are available from this menu bar
2. On the Magnifier menu bar, click Views, and then click Full Screen, Lens, or Docked.
Press any of the following keyboard shortcuts:
• To display the Full Screen view of Magnifier, press Ctrl+Alt+F.
• To display the Lens view of Magnifier, press Ctrl+Alt+L.
• To display the Docked view of Magnifier, press Ctrl+Alt+D.
To change the level of magnification
1. Turn on Magnifier, and then do either of the following:
• Press Win+Plus Sign or Windows logo key+Minus Sign.
• On the Magnifier menu bar, click the Plus Sign (+) or Minus Sign (-).
The magnification changes in the increments that are set in the Magnifier Options dialog box.
To configure Magnifier options
1. On the Magnifier menu bar, click the Options button to open the Magnifier Options dialog box.

The options in the dialog box vary based on the current Magnifier view
• Set the increments of magnification on the slider within a range from 25 percent to 400 percent.
• To invert the colors within the magnified area, select the Turn on color inversion check box.
• If Magnifier is currently in Lens view, set the Magnifier Lens size to a height and width that are a proportion of the screen size.
• If Magnifier is currently in Full Screen or Docked view, select the tracking option you want.
3. Click OK to close the dialog box and apply the changes.
Or
1. In the Magnifier settings pane, set any of the following toggle buttons:
• To invert the colors within the magnified area, set the Invert colors toggle button to On.
• In the Tracking section of the pane, set the tracking options you want.
To invert the colors of the magnified area to their color spectrum opposites
1. Do either of the following:
• Open the Magnifier Options dialog box, select the Turn on color inversion check box, and then click OK.
• In the Magnifier settings pane, set the Invert colors toggle button to On.
To turn off Magnifier
1. Do either of the following:
• Press Win+Esc.
• In the Magnifier settings pane, set the Magnifier toggle button to Off.
Narrator and Audio Description settings
Windows 10 includes two utilities that can provide descriptions of visual content: Narrator and Audio Descriptions.
Narrator reads out loud the labels, descriptions, and instructions for on-screen elements. For example, when you select a category in the Settings window, Narrator might tell you the name of the category, how many category options there are, and that you can double-click to open the category. You can select from multiple Narrator voices and adjust the speed of the voice to match your listening speed. You can also specify the interface items that you want Narrator to identify for you.
For those people who sign in to multiple computers with Microsoft accounts, and synchronize settings across those computers, here’s a warning: turning on Narrator on one computer turns on Narrator on all the computers, and you’ll have to turn it off individually on each computer. This might be exactly what you want, but be prepared, if you’re signed in to four separate computers around the house, that things can get a bit noisy. If you want to turn on Narrator (or any of the Ease Of Access tools) on only one computer, turn off the synchronization of Ease Of Access settings on that computer first.
See Also
For more information about synchronizing settings among computers, see “Customize your sign-in options” in Chapter 8, “Manage user accounts and settings.”
Audio Descriptions are spoken descriptions of video content that are provided with the video. In the television and movie industries, these supplemental audio tracks (also referred to as video descriptions) are often provided with special versions of films that are called Descriptive Video Service (DVS) versions. Sometimes the audio is provided by professional voiceover performers reading scripted descriptions of the film activity, and other times it’s simply a recording of the actors and director watching the film and talking about it.
In Windows 10, you can turn on the Audio Description feature, and if a video has an audio description, it will play with the video. No additional configuration is possible.
1. On the Ease of Access settings category page, click Narrator.
2. In the Narrator settings pane, set the Narrator toggle button to On.
3. In the Ease Of Access Center, click the Make the computer easier to see link. Then in the Hear text and descriptions read aloud section, select the Turn on Narrator check box. A blue box appears on the screen. Narrator reads the content that is in the box.
4. In the Voice section of the Narrator pane, select the voice that you want to represent Narrator. Then set the voice speed and pitch.
![]() Tip
Tip
You configure the Narrator voice separately from the text-to-speech voice, so changing one doesn’t change the other. For information about configuring text-to-speech settings, see “Manage speech settings” in Chapter 9, “Manage computer settings.”
Or
1. In the Ease Of Access Center, in the Quick access to common tools section, click Start Narrator.
To configure audio narration options
1. Display the Narrator settings pane, and scroll to the Sounds you hear section.

You control which elements Narrator reads aloud
2. Set the toggle button to On for the features you want Narrator to read aloud.
To configure visual narration options
1. Display the Narrator settings pane, and scroll to the Cursor and keys section.
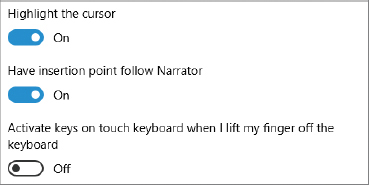
Make the cursor, insertion point, and touch keyboard easier to access
2. Set the toggle button to On for the features you want Narrator to display.
To turn on Audio Description
1. In the Ease Of Access Center, click the Make the computer easier to see link.
2. In the Hear text and descriptions read aloud section, select the Turn on Audio Description check box. Then click Apply or OK to apply the change.
Keyboard and mouse settings
The traditional method of entering text into an app or other computer interface is by typing it on an external keyboard. However, mobility problems can make typing difficult. Windows 10 includes a variety of tools to help with entering text, including the following:
![]() Filter Keys Causes Windows to ignore brief or repeated keystrokes, or slows the repeat rate.
Filter Keys Causes Windows to ignore brief or repeated keystrokes, or slows the repeat rate.
![]() Mouse Keys Enables you to move the cursor around the screen by pressing the arrow keys on the numeric keypad.
Mouse Keys Enables you to move the cursor around the screen by pressing the arrow keys on the numeric keypad.
![]() On-Screen Keyboard Displays a visual representation of a keyboard on which you can tap individual keys by using your finger, tablet pen, or other pointing device.
On-Screen Keyboard Displays a visual representation of a keyboard on which you can tap individual keys by using your finger, tablet pen, or other pointing device.
![]() Speech Recognition Allows you to control Windows, control running apps, and dictate text by speaking into a microphone.
Speech Recognition Allows you to control Windows, control running apps, and dictate text by speaking into a microphone.
For information about speech recognition, see “Manage speech settings” in Chapter 9, “Manage computer settings.”
![]() Sticky Keys Makes it easier to use the keyboard with one hand by making the Ctrl, Shift, and Alt keys “stick down” until you press the next key.
Sticky Keys Makes it easier to use the keyboard with one hand by making the Ctrl, Shift, and Alt keys “stick down” until you press the next key.
![]() Toggle Keys Sounds an audio signal when you press the Caps Lock, Num Lock, or Scroll Lock key. A high-pitched sound plays when the keys are activated, and a low-pitched sound plays when the keys are deactivated.
Toggle Keys Sounds an audio signal when you press the Caps Lock, Num Lock, or Scroll Lock key. A high-pitched sound plays when the keys are activated, and a low-pitched sound plays when the keys are deactivated.
The mouse is an integral part of most desktop computer experiences. By default, the mouse pointer is represented by a small arrow that moves around the screen as quickly as you move the mouse, and sometimes fades out of sight when the mouse is still. It can be difficult not only to find the pointer, but also to track its progress across the screen. If you’re working in a screen-presenting situation—for example, sharing your screen in an online meeting, or presenting content on a large screen in a conference room, it is even more difficult for your audience members to follow the mouse movements because they aren’t controlling the mouse.
You can simplify things for yourself and for other people by enlarging the pointer and changing its color. If you have difficulty moving the mouse, you can opt to control it by using the numeric keypad.
In addition to these Ease of Access features, you can configure other useful mouse features such as “mouse trails” that can be very helpful. For information about keyboard and mouse configuration options that aren’t related to the Ease of Access features, see Chapter 6, “Manage peripheral devices.”
To turn on keyboard accessibility features
1. In the Settings window, click Ease of Access, and then click Keyboard.
2. In the Keyboard settings pane, set the toggle button to On for any of the following options:
• On-Screen Keyboard
• Sticky Keys
• Toggle Keys
• Filter Keys
You can also display a taskbar icon for the on-screen keyboard by right-clicking an empty area in the taskbar and clicking Show Touch Keyboard Button. You can then click that icon to display the keyboard when you need it.
3. In the Other Settings section of the Keyboard pane, set the toggle buttons that control accessibility options for keyboard shortcuts.

Options in the Other Settings section of the Keyboard settings pane
To configure mouse accessibility features
1. In the Settings window, click Ease of Access, and then click Mouse.
2. In the Mouse settings pane, do the following to immediately implement the changes:
• Click the pointer size you want.
• Click the pointer color you want.
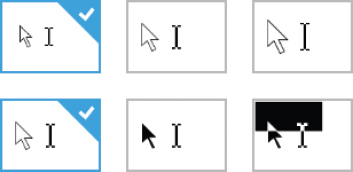
Pointer size and color options
3. To turn on Mouse Keys, set the Use numeric keypad to move mouse around the screen toggle button to On.
4. When Mouse Keys is turned on, set the Hold down Ctrl to speed up and Shift to slow down and Use mouse keys when Num Lock is on options to On or Off.

The Mouse Keys options for ease of access
Skills review
In this chapter, you learned how to:
![]() Configure Windows accessibility features
Configure Windows accessibility features

Configure power options
Perform the following tasks:
1. Display the Action Pane, and then cycle through your brightness changes.
2. Display the Power & sleep settings pane, and configure the screen and sleep times as you want them. If your computer is running on battery power, configure the settings for when the computer is plugged in and when it is running on battery power.
3. Open the Power Options window of Control Panel. If Show additional plans appears near the bottom of the window, click it to display any hidden power-management plans.
4. Display the settings for each plan on your computer, and consider which is best for you.
5. Modify a standard power plan. Then reset the plan to its defaults.
6. If none of the power-management plans fits your needs, create a custom plan. Otherwise, apply a standard plan.
Customize the lock screen
![]() Tip
Tip
If you don’t download the practice files, use any folder of your own pictures to complete this practice task.
Display the Lock Screen setting window, and then perform the following tasks:
1. Configure the lock screen to display a slideshow of the pictures from the practice file folder.
2. Lock your computer and observe the slideshow. Notice that the picture layout changes from a single photo to multiple photos.
3. Unlock your computer, and then display the advanced slideshow settings. Turn on the option to display photos from the Camera Roll folders on your computer and on OneDrive. Then lock your computer and note any changes from the previous lock screen slideshow.
4. Unlock your computer, and then configure the lock screen to display any one image from the practice file folder. If the Lock screen settings pane includes the option to display tips and tricks, select that option.
5. Lock your computer and observe the lock screen.
6. Unlock your computer. If the lock screen background options include Windows Spotlight, select that as the lock screen background.
7. Select one app to display detailed information on the lock screen, and at least one app to display quick status information. If you haven’t yet done so, start and configure each of the selected apps. Then lock your computer and observe the lock screen. Take note of the app information at the bottom of the screen. If you have the option to do so, indicate whether you like or dislike the current Windows Spotlight background.
8. Unlock your computer, and then configure the lock screen to display the information you want.
Configure Windows accessibility features
Display the Ease Of Access settings pane, and then perform the following tasks:
1. Complete the Get recommendations to make your computer easier to use wizard to familiarize yourself with the situations in which you might benefit from using the various accessibility tools.
2. Locate a webpage that contains text and graphic elements, and display it in your default Internet browser.
3. Apply a high contrast theme. Look for differences in the user interface elements and in the webpage content.
4. Start Narrator, and then configure Narrator to use the voice and speech cadence that you prefer.
5. Display the webpage, the Start screen, the Settings window, any category page, and then any apps or files you want, to gain experience with the information Narrator provides. (Wait each time as Narrator provides you with information.)
 Important
To click a button when Narrator is on, you must first click once to read the description, and then twice to invoke the click event.
6. Exit Narrator, and return to the Ease Of Access Center.
7. Start Magnifier, and experiment with using it to view different screens and documents. Then exit Magnifier.
8. Display the touch keyboard, and experiment with navigating around Windows and entering text without using an external keyboard. Then close the touch keyboard.
9. Display the Ease Of Access Center, and explore other settings that interest you. Click the links, and try out these features:
• Turn on Sticky Keys, and experiment with using it to enter text that contains capital letters.
• Turn on Mouse Keys, and practice using it to move the cursor around on the screen.
• Turn on Filter Keys, and try using it with an app of your choice.