
In this chapter, we'll provide a brief overview of Microsoft® Visual Studio® 2005. We'll show you some of the features of the integrated development environment (IDE) to provide some context for the extensibility and customization discussion throughout the rest of the book. And finally, we'll discuss the extensibility features that make Visual Studio 2005 an extremely attractive tool for programmers who are looking to customize and extend their development environment.
Visual Studio 2005 is the latest version of Microsoft's Visual Studio line of development tools. Visual Studio 2005 has a long lineage, running from its early roots as the IDE that hundreds of thousands of Microsoft Visual Basic® developers used on Microsoft Windows® starting in the early 1990s. A second ancestor, Microsoft Visual C++® 1.0, was released in 1993 and became the standard platform for C++ developers worldwide. These two IDEs were finally united in Microsoft Visual Studio .NET 2002 and Visual Studio .NET 2003. Visual Studio .NET 2002 was the first IDE for the Microsoft .NET platform and was used to develop applications for the 1.0 version of that product. Visual Studio .NET 2003 was used to build .NET Framework 1.1 applications and added a number of enhancements to the original product.
Visual Studio 2005 uses the .NET Framework 2.0 as the class library and runtime for applications built in the managed languages that ship with the IDE. These languages include Visual Basic 2005, Microsoft Visual C#® 2005, Visual C++ 2005, and Microsoft Visual J#® 2005. In the case of Visual Basic, Visual C#, and Visual J#, all applications built with Visual Studio 2005 require the .NET Framework 2.0 common language runtime (CLR), though it is possible to target an application to a previous version of the CLR. Visual C++ 2005 can be compiled as a managed .NET Framework application, requiring the CLR, or it can be compiled as a native application, meaning that no runtime is required for the application to run in Windows.
The .NET Framework and the CLR offer a number of features that developers can take advantage of when building programs. These include an extremely large and rich class library from which you can build applications, a runtime that takes care of memory management through efficient garbage collection, and a flexible security model that allows administrators to control the execution of code deployed to corporate networks and the Internet.
One purpose of the .NET Framework is to simplify application development and deployment. This extends to applications that are run locally or remotely or that are distributed over the Internet. This simplification is achieved through a CLR that provides a managed execution environment available to any language that targets the runtime. The functionality this execution environment provides is made available to these languages through the .NET Framework class library.
The Common Language Specification (CLS) specifies what a .NET-compliant language must provide to the system. The common type system (CTS) ensures that any types created by a language conforming to the CLS can be consumed by any other CLS-compliant language.
Languages that target the CLR are compiled to Microsoft intermediate language (MSIL). These applications are compiled as PE (portable executable) files and DLLs, so to users they look just like any Windows-based applications. The MSIL code in these files is then JIT-compiled to machine instructions locally at run time. All of this means that any CLS-compliant language that targets the CLR will look like any other language to the runtime and can act and be treated as a first-class citizen. For example, a Visual Basic program will have the same base functionality as a Visual C# program or even a managed C++ program.
Tip
For a detailed look at the architecture of .NET, take a look at Applied Microsoft .NET Framework Programming by Jeffrey Richter (Microsoft Press®, 2002).
The managed CLR environment provides some other significant advantages. It's designed to help eliminate versioning conflicts. It's designed to provide an environment that ensures that code is executed safely. And finally, it's designed with an API that is targetable from both Windows-based and Web-based applications.
You don't need to think about the .NET Framework as a monolithic virtual machine that requires constant care and feeding. The .NET Framework provides an environment that can be hosted by unmanaged components. The unmanaged components (such as Microsoft Internet Explorer and the Microsoft ASP.NET runtime) load the CLR and execute the managed code. The managed CLR provides garbage-collection services and security on a number of levels.
For corporate developers, this runtime solves a huge problem. In many shops, the Visual Basic programmers, the C/C++ programmers, and the COBOL programmers are all segregated. They meet to figure out how to functionally interoperate, but in a number of ways they work as individual teams inside the same space. In a shop that targets the CLR, development becomes a little more manageable. The same .NET Framework class library is available across languages. The CTS in the class library ensures that components can be easily shared between .NET languages, as shown in Figure 1-1. These components can even be exposed as Web services.
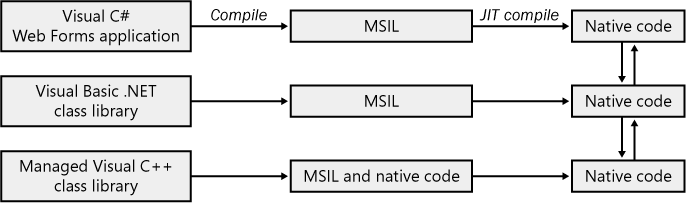
Figure 1-1. .NET allows different languages to target a managed environment and to interoperate securely and efficiently.
The CLR provides a target that's available from most of the major programming languages used today. Visual Studio 2005 allows you to build .NET applications in the languages mentioned previously. You can also add support for a number of languages that are available from third-party software vendors, including COBOL, Eiffel, Python, and Perl.
In addition to building top-of-the-line .NET Framework applications, Visual Studio 2005 ships with arguably the best C++ compiler in the world. The compiler allows developers to build high-performance native applications that can take advantage of the latest hardware features shipping today. Most native applications on Windows are built using the C++ libraries in addition to the system libraries in Windows. Native applications are often built using the Microsoft Foundation Classes (MFC) and the Abstract Template Library classes (ATL). In Visual Studio 2005, these libraries are version 8.0 and are compiled using the updated security and performance features of the Visual C++ compiler.
.NET Framework and native describe only the base functionality of the applications that you can build using Visual Studio 2005. In either case, you can create running applications with Notepad and the Command Window. The power of Visual Studio 2005 lies in its ability to empower users to build, test, and debug powerful applications quickly and easily.
In this section, we'll present an overview of the Visual Studio 2005 feature set. We'll look at some of these features in more detail in the next few chapters of the book. Here we'll define some common terms that we can use to describe the different parts of the IDE. Visual Studio 2005 is a fairly large and complex product. The terms used to describe the IDE are helpful for developers who are working to understand the tool and, perhaps more important, for developers who will eventually extend the IDE through macros and add-ins.
The windows in the Visual Studio 2005 IDE fall into two major groups. Document windows are windows that usually appear tabbed in the center of the IDE and that contain editors, designers, Web pages, or Help topics. Tool windows are windows in the IDE that present utility functions to the programmer. The tool windows include Solution Explorer, the Class View window, and the Properties window. Tool windows are distinct from editors and designers in the way they dock around the sides of the IDE.
Note
The extensibility API built into Visual Studio 2005 allows programmers to create tool windows for use with language packages installed into the IDE. The editors and designers in the IDE can be accessed through this API, but the extensibility model doesn't allow the creation of new document window types. For that you'll need to look into the Visual Studio software development kit (SDK), which we'll describe at the end of this chapter.
Figure 1-2 shows a typical developer setup.
Note
All of the managed languages that ship with Visual Studio 2005 feature designer support in the IDE.
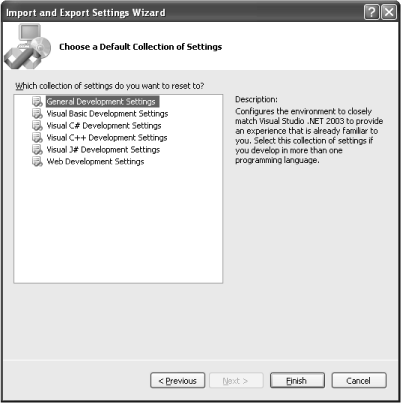
The first time you run Visual Studio 2005, you're presented with a Start Page, which contains links to previously opened projects and information relevant to the preferred collection of settings for the developer type chosen the first time the IDE is opened. A settings collection is a window, keyboard, and Help layout that's tailored to a specific type of programmer. You're presented with a choice of settings when you first run Visual Studio 2005. You can change the settings that you want to run under by opening the Import and Export Settings Wizard, available from the Tools menu. This wizard allows you to back up and to transfer your settings and customization between computers. You can use this wizard to reset your settings by choosing Reset All Settings, as shown in Figure 1-3.

Figure 1-4 shows the initial settings you can choose from in Visual Studio 2005.
In Chapter 6, we'll discuss customizing the IDE and saving your settings as a backup or for reuse on other computers.
In talking with members of the team that developed the base editor in Visual Studio 2005, it's clear that they understand that programmers live in the editor. It's where the most important programming work is done. To this end, the Visual Studio team has continued to work hard to create a code editor that's one of the best available today. To a great extent, they have succeeded in this goal, largely because of enhancements to the extensibility features of the IDE. These enhancements include an extremely powerful extensibility programming model, a macro recording facility, and a dedicated Macros IDE. The Visual Studio 2005 extensibility model is a major focus of the book because it's what we use to customize and to add functionality to the IDE.
Other features in the editor include code snippets, smart tags, change tracking, outlining, line numbering, and a really outstanding search-and-replace facility, all of which are discussed in detail in Chapter 3.
A new feature in Visual Studio 2005 allows you to tab through your open documents and tool windows by pressing Ctrl+Tab. In Figure 1-5 you can see the dialog box that appears when you press this combination. You can use the arrow keys or the Tab key to move through the listed windows as you hold down the Ctrl key.
Visual Studio 2005 offers four major types of designers: Windows Forms designers, which let you create Windows Forms applications visually; Web Forms designers, which help you create WYSIWYG ASP.NET Web Forms applications; the Component Designer, which is used to build server-side components for enterprise solutions; and the XML Designer, which makes it easy for programmers to work with XML Schema Definition files.
In Visual Studio 2005, all languages provide designers for .NET application creation. This means that you can design your Windows Forms and Web Forms in the same language you use to write your most important algorithms. In the past, it was common for developers to create the front end of their applications by using a visual tool such as Visual Basic and to write the back end in Visual C++. Because of the way that .NET assemblies interoperate, you're still free to do your forms layout and library writing in different languages, but you're no longer forced to work that way.
Tool windows are the nondocument windows in the IDE that provide you with information and utility functionality as you work. The IDE has a large number of tool windows, and you can access them easily using keyboard shortcuts, the Command Window, and menu commands. The following are the most commonly used tool windows in Visual Studio 2005. These tool windows are presented with their associated default keyboard shortcuts.
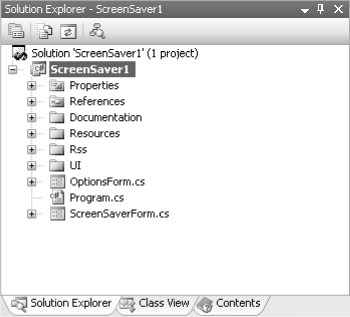
Solution Explorer (Ctrl+Alt+L) The Solution Explorer window is arguably the most important tool window in Visual Studio 2005. In Visual Studio 2005, nearly all the work done by a programmer revolves around a solution. A solution is a collection of projects, which are themselves collections of files. It's through Solution Explorer that you'll get access to the files in your projects. Here you'll add new classes and files to projects and even new projects to larger solutions. Figure 1-6 shows a project in the Solution Explorer tool window.
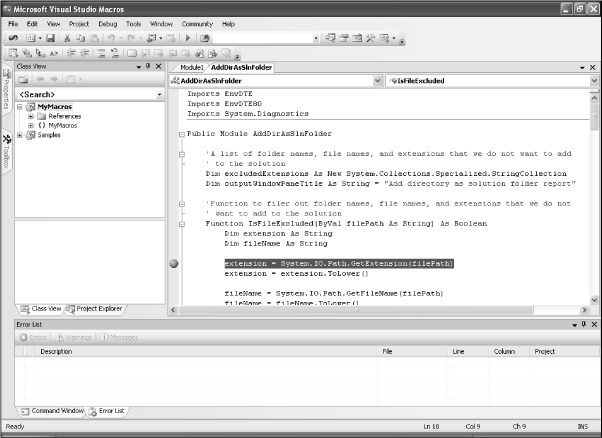
Class View (Ctrl+Shift+C) The Class View window provides you with a logical view of the classes in your solution. If you're working with larger projects, you might find it easier to navigate through your solutions by using Class View than by using Solution Explorer. Figure 1-7 shows the solution from Figure 1-6 in Class View.

Properties (F4) In the Properties window, you can get and set properties for the user interface items that you add to Windows Forms and Web Forms applications. You can also use this window to set properties for solutions, projects, and files that you have selected in Solution Explorer. Figure 1-8 shows the Properties window for a project.

Figure 1-8. You can use the Properties window to set properties of components, projects, and solutions.
Server Explorer (Ctrl+Alt+S) You use the Server Explorer window to access data sources and information on your local machine and on remote servers. Through this window, you can make data connections, access performance counters and event logs, and even manage system services. Even when used locally, this tool can save you a great deal of time, letting you easily start and stop system services that you're testing and access system logs. In Figure 1-9 you can see two machines available in Server Explorer. The first machine is a remote test server. The second machine is the local machine on which Visual Studio 2005 is running.
Note
Keep in mind that you'll need the proper level of access on a particular server to access system information.
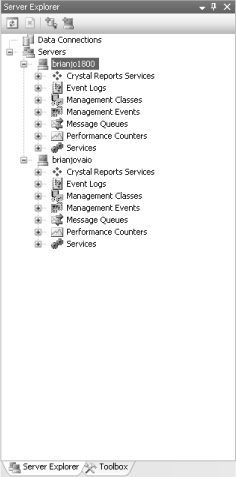
Figure 1-9. The Server Explorer window provides you with remote access to the machines you're working with.
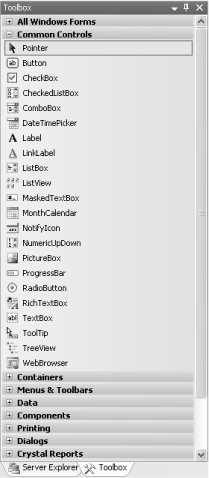
Toolbox (Ctrl+Alt+X) The Visual Studio 2005 Toolbox window is used to hold the controls that you add to your Windows Forms and Web Forms applications. You can see the Common Controls in the Toolbox in Figure 1-10.
Command Window (Ctrl+Alt+A) The Command Window combines some of the best features of the Immediate window from Visual Basic 6 with the power of a command line. Chapter 2 covers the Command Window in detail. You use the Command Window to enter and execute named commands directly in Visual Studio 2005. A named command is essentially any IDE command that you can run through a menu, toolbar button, or shortcut. Many of the named commands in Visual Studio 2005 aren't mapped to a keystroke or available through a menu by default. The only way to access these commands without mapping them or adding them to a toolbar is to type them directly into the Command Window.
In Visual Studio 2003, the Command Window had two modes of operation. In Command mode, the window acts as a command-line tool. In Immediate mode, the Command Window is used for debugging. In Immediate mode, you can execute statements, change variables and print their values, and evaluate expressions. In Visual Studio 2005, these two modes are broken into separate tool windows, making it very easy to switch between the two. To get to the Immediate mode tab from Command mode, type immed. This will open an Immediate Window tab, allowing you to execute debugging statements. To get back to the Command mode tab from Immediate mode, type >cmd.
Tip
In Command mode, the > prompt will be visible on the line where you're typing your commands. Immediate mode shows no prompt.
Figure 1-11 shows the Command Window.

Figure 1-11. The Command Window in Visual Studio 2005 provides easy access to named commands in the IDE.
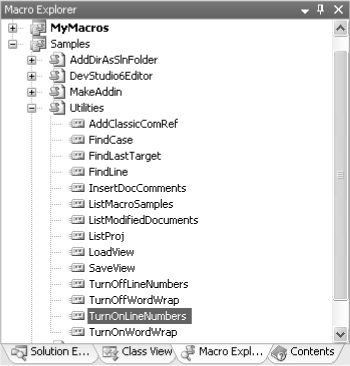
Macro Explorer (Alt+F8) The Macro Explorer window provides a view of the macro projects that are currently loaded in the IDE. Keep in mind that a macro project needs to be loaded in order for the macros in the project to be available for use or for editing in the Macros IDE.
When you record a temporary macro by pressing Ctrl+Shift+R, that macro becomes available through the MyMacrosRecording ModuleTemporaryMacro item in Macro Explorer. You can rename the temporary macro to save it, or you can copy the code from the macro into another module in the Macros IDE. We'll discuss using recorded macros in more detail in Chapter 5. The Macro Explorer window is shown in Figure 1-12.
The IDE has a number of other important windows, which we'll talk about more fully in the next couple of chapters. Among these are the various debugging windows, the Help windows, and the Object Browser.
In this section, we'll tell you a little bit about where Visual Studio 2005 places its important files. We'll cover this subject in more detail throughout the book, where it applies, but for now you should be aware of the locations of the files that you can manipulate to enhance the IDE and make automation a bit easier. The default base folder for the Visual Studio 2005 installation is Program FilesMicrosoft Visual Studio 8. Most of the folders we'll talk about in this section are subfolders under the Microsoft Visual Studio 8 folder (unless we provide the full path).
Installing Visual Studio 2005 also installs the .NET Framework SDK in the SDKv2.0 subfolder. All the .NET Framework tools and samples are available in this folder, so it's a good place to start digging around if you're just getting to know .NET. Check out the StartHere.htm file in the SDKv2.0 folder for the full story on the .NET Framework SDK.
The various languages that ship with Visual Studio 2005 all have their own subfolders that contain the project and solution templates for their respective project types. These folders are all named appropriately. Visual C++–specific files are found in VC, C#-specific files are in VC#, and Visual Basic 2005 files are in VB. In Visual Studio 2003, we used these folders to create and add custom projects to the various languages in the IDE. In Visual Studio 2005, you can store your templates in the My DocumentsVisual Studio 2005 folder. This makes it much easier for you to find and extend these project types in addion to making it easier to run as a non-administrator on your workstation.
Tip
You'll notice a file named Samples.vsmacros in the Common7IDE folder. The sample macros for Visual Studio 2005 that run in your IDE are actually stored in your My Documents Visual Studio ProjectsVSMacros80 folder. The version in the IDE folder is a backup copy. You can edit the Samples.vsmacros file in your My DocumentsVisual StudioProjects VSMacros80Samples folder, but try to keep the version in your IDE folder clean. If you ever run into a macro corruption problem, you can usually copy the Samples.vsmacros file from your IDE folder to your VSMacros folder to get rid of the problem.
The IDE executable itself is Devenv.exe. This file is also available in the Common7IDE subfolder. The IDE folder contains a number of subfolders that you'll be using throughout the book. These folders include the PublicAssemblies and PrivateAssemblies folders, which you'll use to add custom assemblies that are available to macros in the IDE. You'll use the HTML folder to customize the Start Page. The templates for the macro projects are stored in the MacroProjectItems and MacroProjects folders. Generic item templates (those not associated with a particular project type) are stored in the NewFileItems and NewScriptItems folders.
If you do command-line builds or if you simply like to work from the command line, you'll want to set environmental variables for Visual Studio 2005 when you launch Cmd.exe. You have a couple of options for setting these variables. First, you can simply open the Start menu and choose the Visual Studio 2005 Command Prompt. You'll find that command prompt in the Visual Studio 2005 Tools folder, which is in the Microsoft Visual Studio 8 folder.
Tip
We suggest pinning the Visual Studio 2005 Command Prompt link to the Start menu so that you'll have easy access to it as your primary command prompt.
The Visual Studio environmental variables are available in a file named vsvars32.bat, which is in the Common7Tools subfolder. If you want access to these variables from every instance of Cmd.exe on your machine, you can add C:Program FilesMicrosoft Visual Studio 8Common7Tools to your system path. (Alternatively, you can copy this file to a folder in your path.) Then you can just type vsvars32 from any command prompt and you'll have a Visual Studio 2005 working environment from your current command prompt.
You can take this one step further by creating a Command item on the Tools menu. You create a new menu item from the External Tools dialog box by clicking Add, making the Title of the new item Command Prompt, and making the Command item cmd.exe. If you want, you can set the Initial Directory box to $(ProjectDir). Setting the Initial Directory to your project directory will open the command prompt to that directory. This can make it very convenient to work with your project files from the command line.
Finally, consider adding the Common7IDE path to your system variables. The full path is C:Program FilesMicrosoft Visual Studio 8Common7IDE. This will make Devenv.exe available from any command prompt on your system. This path is added by the vsvars32.bat command, but sometimes you need access just to Devenv.exe.
Visual Studio 2005 builds on an extensibility model that was first developed for Visual C++ 5. In Visual Studio 2005, the DTE object—DTE in this context stands for Development Tools Extensibility—sits at the top level of an automation model that features nearly 200 objects.
The functionality provided by the DTE object model can be described as user-defined customization. The DTE API is available to developers who are programming macros, wizards, and add-ins. Even more functionality is exposed to commercial-language developers who use the Visual Studio SDK to add custom languages and designer support to the IDE.
The following sections describe the automation mechanisms available to developers who are customizing Visual Studio 2005.
The macros facility in Visual Studio 2005 provides programmers with easy access to the features available through the automation APIs. The macros facility features its own Macro Explorer tool window (described earlier in the chapter), an extremely powerful macro recording facility, and a full-blown Macros IDE that is itself extensible through the DTE object model and that allows you to debug your macros. We'll use macros to illustrate concepts relating to extensibility throughout the book. Chapter 5 covers creating and editing macros in the Macros IDE in detail.
Macros in Visual Studio 2005 are written in Visual Basic. Because the macros facility takes advantage of the .NET Framework, macro programmers have access to the entire .NET Framework base class library as well as to functionality exposed by custom assemblies built in any other .NET language.
To open the Macros IDE, just press Alt+F11 from inside Visual Studio. The Macros IDE will open in a new window. The first thing you'll notice about the Macros IDE is that its layout is extremely similar to the layout of Visual Studio 2005. In fact, you'll find that most of the features available to you as a Visual Studio 2005 programmer are available to you as a macro programmer.
Figure 1-13 shows the Macros IDE in its default layout. This layout features a Project Explorer window that shows all of your currently loaded macro projects.
Add-ins allow developers to create extensions to the Visual Studio IDE and to the Macros IDE. In general, compiled add-ins provide better performance than Visual Studio macros. Add-ins also provide functionality that integrates seamlessly into the environment. Independent software vendors (ISVs) and individual programmers can extend the IDE through add-ins in a way that makes the use of the add-in look just like a built-in part of the IDE.
Add-ins can be written in any .NET language, or they can be written as native COM components in unmanaged Visual C++. Add-ins are required to implement the IDTExtensibility2 interface. Most of the add-in samples in this book will be shown in Visual C#.
Microsoft makes available a number of add-in samples that you can use to explore the extensibility object model or simply to add functionality to your Visual Studio 2005 IDE. Samples and more information are available at http://msdn.microsoft.com/vstudio/extend/. We'll use a few of these add-ins in the early chapters of the book to add specific features to Visual Studio. In Chapter 6, we'll provide all the details you need to build your own custom add-ins.
Visual Studio wizards are similar to add-ins, but they are created using the IDTWizard interface. Wizards are fairly simple constructions that are designed to take a user step by step through a specific task.
Wizards are used in Visual Studio for a variety of purposes. Project wizards help get you started on a particular type of Visual Studio project, as shown in Figure 1-14. Other wizards in the IDE walk you through adding code to an existing project.

Starter kits are a new type of project template that lets you take an existing project and then supply it to others as an installable package. In Chapter 4, we'll show you how to create your own starter kits so that you can share extendable projects with the developer community.
The Visual Studio SDK provides hooks into the IDE that allow developers to add their own languages and designers to Visual Studio. Developers can use these hooks to integrate new .NET languages and high-end tools into the IDE. Because developing with the SDK is fairly complicated, we didn't think that we could do it justice in this edition of the book. You can find out more about it through the Visual Studio Developer Center at http://msdn.microsoft.com/vstudio.
In Chapter 2, we'll continue our discussion of Visual Studio 2005, focusing on the project management facilities of the IDE. The chapter will provide some insight into one of the great strengths of Visual Studio 2005: the ability to host projects based on different programming languages in a single solution.