
You learned in Chapter 5 that macros provide a convenient way to automate tasks within Microsoft® Visual Studio®, and we encourage you to write macros first when customizing the integrated development environment (IDE). But for some purposes, such as writing commercial software, you might find that macros are a poor choice in terms of performance and protection of intellectual property. In such cases, the appropriate vehicle is an add-in, which is a compiled dynamic-link library (DLL) (providing increased protection) that runs within the IDE (providing increased performance).
The quickest way to get started as an add-in programmer is through the Add-in Wizard, which makes creating add-ins easy—just choose a few options, and the wizard generates an add-in that is ready for the IDE. Of course, you won't accomplish much if you don't know how to control and customize the add-in, so in the first half of this chapter, we'll show you how the different parts of an add-in act together to make it work.
The second half of this chapter covers the details of add-in architecture. In this part of the chapter, we'll hold to the ideal that wizards are tools, not crutches, and that you should use them as a convenience only after you're capable of writing the equivalent code. Of course, we don't expect you to reach that goal without a little help, so we'll teach you everything you need to know to write the equivalent of a wizard add-in.
When you choose File | New | Project, Visual Studio offers its selection of project types in the New Project dialog box. By expanding the Other Projects node and selecting Extensibility, you'll find the Visual Studio Add-in template shown in Figure 6-1; double-click its icon to launch the Add-in Wizard.

The six pages of the Add-in Wizard collect your choices about the final form of your add-in. The wizard gives you control over the following areas:
Programming language The Add-in Wizard generates the add-in source code in one of four programming languages—Microsoft Visual C#®, Microsoft Visual Basic® .NET, Microsoft Visual J#®, or Microsoft Visual C++® (by using either Managed C++ or the Active Template Library [ATL]). Of course, you're not restricted to these languages when you write add-ins by hand.
Application host Add-ins can run in the Visual Studio IDE, the Macros IDE, or both. With few exceptions, the rules that apply to an add-in running in the Visual Studio IDE also apply to an add-in running in the Macros IDE. (We'll point out differences between the two hosts when appropriate.)
Name and description These settings let you associate a meaningful name and description with your add-in.
Menu command The Add-in Wizard can generate code that creates a new menu item for your add-in, giving users a convenient way to load your add-in and execute a command.
Command-line build support You can mark your add-in as being safe for use with unattended builds. Such an add-in promises that it won't display user interface elements that require user intervention (such as modal dialog boxes).
Load at startup Add-ins can request that they be loaded automatically when Visual Studio starts up.
About box information You can provide support information for your add-in that Visual Studio will display in its About dialog box.
When the Add-in Wizard finishes, it generates an add-in project that builds the add-in DLL.
Add-ins are DLLs, so the Add-in Wizard creates a Class Library project for your add-in. This project contains a source file named Connect, which defines the add-in class, also named Connect. The Connect class implements the IDTExtensibility2 interface, which serves as the main conduit for add-in/IDE communication. (Connect also implements IDTCommandTarget if you select the user interface option in the Add-in Wizard.) Table 6-1 lists the five methods of the IDTExtensibility2 interface.
Table 6-1. IDTExtensibility2 Interface Methods
Method | Description |
|---|---|
OnConnection | Called when the add-in is loaded |
OnStartupComplete | Called when Visual Studio finishes loading |
OnAddInsUpdate | Called whenever an add-in is loaded or unloaded from Visual Studio |
OnBeginShutdown | Called when Visual Studio is closed |
OnDisconnection | Called when the add-in is unloaded |
The Connect.cs file in Example 6-1 shows the code (minus some comments) that the Add-in Wizard generates for a typical C# add-in with a menu command. We'll walk through the source code, pointing out any interesting features along the way.
Example 6-1. Connect.cs, the add-in source code generated by the Add-in Wizard
using System;
using Extensibility;
using EnvDTE;
using EnvDTE80;
using Microsoft.VisualStudio.CommandBars;
using System.Resources;
using System.Reflection;
using System.Globalization;

public class Connect : Object, IDTExtensibility2, IDTCommandTarget
{
    public Connect()
    {
    }

    public void OnConnection(object application,
        ext_ConnectMode connectMode, object addInInst,
        ref Array custom)
    {
        _applicationObject =   (DTE2)application;
        _addInInstance =  (AddIn)addInInst;
        if(connectMode == ext_ConnectMode.ext_cm_UISetup)
        {
            // Generate the add-in's menu item...
        }
        }

        public void OnDisconnection(ext_DisconnectMode disconnectMode,
            ref Array custom)
        {
        }

        public void OnAddInsUpdate(ref Array custom)
        {
        }

        public void OnStartupComplete(ref Array custom)
        {
        }

        public void OnBeginShutdown(ref Array custom)
        {
        }

        public void QueryStatus(string commandName,
            vsCommandStatusTextWanted neededText, ref vsCommandStatus status,
            ref object commandText)
        {
            if(neededText ==
                vsCommandStatusTextWanted.vsCommandStatusTextWantedNone)
            {
                if(commandName == "MyAddin1.Connect.MyAddin1")
                {
                   status = (vsCommandStatus)
                       vsCommandStatus.vsCommandStatusSupported |
                       vsCommandStatus.vsCommandStatusEnabled;
                }
            }
        }

        public void Exec(string commandName, vsCommandExecOption executeOption,
            ref object varIn, ref object varOut, ref bool handled)
        {
            handled = false;
            if(executeOption ==
                vsCommandExecOption.vsCommandExecOptionDoDefault)
            {
                if(commandName == "MyAddin1.Connect.MyAddin1")
                {
                    handled = true;
                    return;
                }
            }
        }
        private DTE2 _applicationObject;
        private AddIn _addInInstance;
   }
At the top of the listing, you'll see that the Add-in Wizard generates a set of using statements for the programmer's convenience. The three most important namespaces in the using statements are Extensibility, EnvDTE, and EnvDTE80; the first namespace defines the types used by IDTExtensibility2, and the latter two define the types in the automation object model.
The first method in the listing, OnConnection, wins the prize for "most important add-in method." Visual Studio calls this method when it loads the add-in, and it passes the add-in a reference to the root object of the automation object model through the application parameter. The code generated by the Add-in Wizard casts the application parameter to the EnvDTE80.DTE2 type and stores the result in a private variable named applicationObject. All further interaction between the add-in and the automation object model takes place through the applicationObject variable.
Visual Studio also passes the add-in a reference to its corresponding AddIn object through the addInInst parameter; the add-in stores this reference in a private variable named addInInstance.
The rest of the code in OnConnection creates an add-in menu command on the Tools menu. (This code is absent if you forgo the user interface option in the Add-in Wizard.) The menu-creation code executes conditionally, depending on the following if statement:
if (connectMode == ext_ConnectMode.ext_cm_UISetup)
The connectMode parameter holds a value that describes how the add-in was loaded. For add-ins that create a menu command, Visual Studio passes in the Extensibility.ext_ConnectMode. ext_cm_UISetup value the first time the add-in loads after being installed, which signals to the add-in that this is a good time to add its commands to the IDE.
The Add-in Wizard doesn't generate any code in the bodies of the other four IDTExtensibility2 methods: OnStartupComplete, OnAddinsUpdate, OnBeginShutdown, and OnDisconnection. The two IDTCommandTarget methods, QueryStatus and Exec, have some boilerplate code that helps manage the add-in's menu command and menu command clicks, respectively. To handle menu command clicks, you add code to the Exec method in the second if statement, which begins with
if (commandName == "MyAddin1.Connect.MyAddin1")
There isn't much code in Connect.cs, even if you've selected every option in the Add-in Wizard, but the code that's there creates a fully functional add-in that you can build on.
After you build the add-in, you need to load it into Visual Studio. The method you use to load the add-in can vary, depending in part on the options you selected in the Add-in Wizard. If you chose to have your add-in load on startup, Visual Studio will load the add-in automatically each time it runs. If you chose to have a user interface item for your add-in, the next time Visual Studio runs, you'll be able to load the add-in by choosing its command from the Tools menu, as shown in Figure 6-2.

If you didn't choose either of these options, you can load the add-in by choosing Tools | Add-in Manager, which launches the Add-in Manager (shown in Figure 6-3). The Add-in Manager gives you control over all the registered add-ins, allowing you to load them, unload them, and mark them to load on startup and during command-line builds.

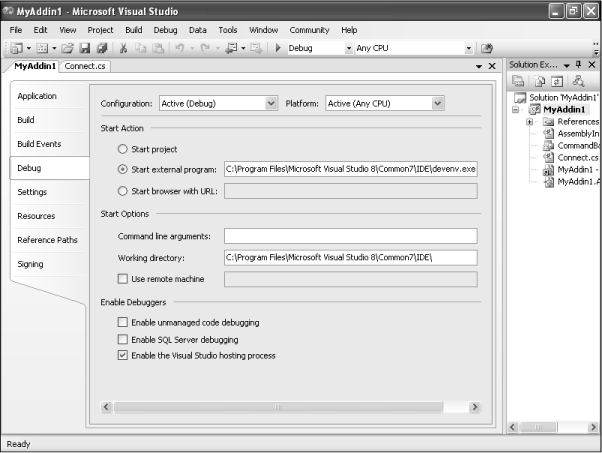
An add-in is just a DLL, so debugging an add-in project is no different from debugging any other Class Library project. Because a DLL can't run on its own, it needs a host application. For an add-in, that host is Visual Studio (devenv.exe) or the Macros IDE (vsaenv.exe). The Add-in Wizard sets the debugging properties of the add-in project so that Visual Studio is the host. You can examine and modify the project's debugging properties by right-clicking the add-in project in Solution Explorer, choosing Properties from the shortcut menu, and selecting Debug in the Project Designer window shown in Figure 6-4. For most purposes, however, the default settings work just fine.
In a typical debugging session, you open the add-in project in Visual Studio, set breakpoints in the add-in source code, and then start the debugger by choosing Start from the Debug menu (or pressing F5). The debugger, in turn, launches a second instance of Visual Studio and attaches itself to this new process. You load the add-in to be debugged in the second instance of Visual Studio, and when the add-in code hits a breakpoint, execution passes to the debugger running in the first instance of Visual Studio. From there you can step through the code, examine the contents of variables and registers, and perform other sundry debugging tasks.
Debugging add-ins in the Macros IDE is almost as easy as debugging add-ins in Visual Studio. The one difference is that you can't simply open the Macros IDE from an instance of Visual Studio and then attach the debugger from that instance to the Macros IDE. Why not? Because the two processes will deadlock if Visual Studio fires a macro event while execution is stopped in the debugger. Instead, the recommended way to debug add-ins in the Macros IDE is similar to the way you debug add-ins in Visual Studio:
Open the add-in project in Visual Studio.
Start a second instance of Visual Studio.
Open the Macros IDE from the second instance of Visual Studio.
Attach the debugger from the first instance of Visual Studio to the Macros IDE process. To do so, choose Debug | Attach To Process, select vsaenv.exe in the Attach To Process dialog box, and then click Attach.
Load the add-in in the Macros IDE, and then debug as normal.
Finally, you shouldn't feel obligated to run the Visual Studio debugger if you have a favorite debugger you'd rather use. Any debugger that can handle delay-load DLLs will do.
You've learned that the easiest way to create an add-in is by running the Add-in Wizard included with Microsoft Visual Studio. The easiest way isn't always the best way, however, especially when you're trying to learn an unfamiliar technology. It's time to close your IDE and open up a Command Window. In the next section, you'll learn the fundamentals of add-in construction by writing add-ins the old-fashioned way—by hand, from scratch.
Example 6-2 shows the source code for our handwritten add-in named Basic. You can think of Basic as the smallest possible add-in that still does something useful. And as you can see from the listing, the smallest possible add-in is small indeed. That's because add-ins have one requirement only: a public class that implements the Extensibility.IDTExtensibility2 interface. Basic.cs satisfies this requirement by defining a single public class named Basic that implements the IDTExtensibility2 interface's five methods—OnConnection, OnStartupComplete, OnAddInsUpdate, OnBeginShutdown, and OnDisconnection. There's no Main method because Basic, as with all add-ins, is destined to become a DLL. Instead, the OnConnection method serves as the add-in's entry point, and the Basic add-in implements that method by displaying its own name in a message box.
Example 6-2. Basic.cs, the Basic add-in source code
using System;
using System.Windows.Forms;
using Extensibility;

public class Basic : IDTExtensibility2
{
    public void OnConnection(object application,
        ext_ConnectMode connectMode,
        object addInInst,
        ref Array custom)
    {
        MessageBox.Show("Basic Add-in");
    }

    public void OnStartupComplete(ref Array custom)
    {
    }

    public void OnAddInsUpdate(ref Array custom)
    {
    }

    public void OnBeginShutdown(ref Array custom)
    {
    }

    public void OnDisconnection(ext_DisconnectMode removeMode,
        ref Array custom)
    {
    }
}If you add the source code in Example 6-2 to a text file named Basic.cs, you can compile the Basic add-in from the command line by using the following command:
csc /t:library /r:"c:program filescommon filesmicrosoft
sharedmsenvpublicassembliesextensibility.dll" basic.cs
The /t:library flag directs the C# compiler to create a DLL (Basic.dll) from the source file, and the /r:"c:program filescommon filesmicrosoft sharedmsenvpublicassembliesextensibility.dll" flag points the compiler to the assembly that contains the Extensibility namespace (Extensibility.dll). The Extensibility namespace defines three types, which all add-ins use: the IDTExtensibility2 interface and the ext_ConnectMode and ext_DisconnectMode enumerations, which define values passed to the OnConnection and OnDisconnection methods, respectively.
Tip
Typing long references at the command line invites both carpal tunnel syndrome and boredom. As an alternative, you can add a reference to the list of default references in the global CSC.rsp file, located at <WinDir>Microsoft.NETFramework<Version>CSC.rsp. For example, if you add /r: "c:program filescommon filesmicrosoft sharedmsenvpublic-assembliesextensibility.dll" to the global CSC.rsp file, you can compile the Basic add-in with the following command:
csc /t:library basic.cs
Basic.dll is a fully functional add-in, but Visual Studio won't have the information that Basic. dll is in existence by this point. Add-ins signal their availability to the Visual Studio IDE through an XML file with an extension of .addin. Example 6-3 shows the minimal .addin file for the Basic add-in.
Example 6-3. The Basic.addin XML file
<?xml version="1.0" ?>
<Extensibility
  xmlns="http://schemas.microsoft.com/AutomationExtensibility">
    <HostApplication>
        <Name>Microsoft Visual   Studio</Name>
        <Version>8.0</Version>
    </HostApplication>
    <Addin>
        <Assembly>basic.dll</Assembly>
        <FullClassName>Basic</FullClassName>
    </Addin>
</Extensibility>
As you can see from Example 6-3, the Basic.addin file has a simple structure that describes the add-in and its host environment. The <HostApplication> node identifies the Visual Studio IDE as the add-in host; the <Addin> node gives the path to the add-in assembly (relative to the .addin file) and also provides the fully qualified name of the class that implements IDTExtensibility2.
To register the Basic add-in, either copy the Basic.addin and Basic.dll files to a location that's well known to Visual Studio, or point Visual Studio to the location of the two files. To accomplish the latter, run Visual Studio and choose Tools | Options to display the Options dialog box. From there, select the EnvironmentAdd-in/Macros Security node in the tree view, click the Add button, and then select the folder that contains Basic.addin and Basic.dll. Click OK to add the new folder to the list of locations that Visual Studio will load add-ins from, and then click OK to close the Options dialog box.
After you register the Basic add-in, choose Tools | Add-in Manager to display the dialog box shown in Figure 6-5. Notice that the Add-in Manager lists the add-in's name as Basic. By default, the Add-in Manager displays the class name it finds under the <FullClassName> node in the .addin file.
If you select the Basic check box and click OK, Visual Studio loads the add-in. Assuming all goes well, Visual Studio will call Basic's OnConnection method, and you'll see the message box shown in Figure 6-6.
And that's how you create an add-in from scratch. In the next section, we'll examine exactly what happens to an add-in in the Visual Studio environment when the add-in loads, when the add-in unloads, and all the time in between.


Add-ins are event-driven. Most everything an add-in does it does in response to some external prodding, and Visual Studio prods add-ins with the IDTExtensibility2 interface. We'll begin our exploration of add-in events by examining the sequence in which Visual Studio calls the IDTExtensibility2 methods.
Calls to the IDTExtensibility2 methods, which we'll also refer to as events, occur at predictable points in the lifetime of an add-in. Figure 6-7 shows the sequence of events from the time an add-in is loaded to the time it is unloaded.
You can guess the actions that trigger the events just from the events' names, and the events occur pretty much in the order you would expect: OnConnection when an add-in loads, OnDisconnection when an add-in unloads, and so on.
You can get a feel for the add-in event sequence by running the LifeCycle sample add-in. LifeCycle, shown in Example 6-4, handles each IDTExtensibility2 event by displaying the name of the event in the Output window. After you build the LifeCycle add-in, load it into Visual Studio by using the Add-in Manager. Then try to load and unload other add-ins, such as Basic, to trigger the different IDTExtensibility2 events. To fire the OnStartupComplete event, you first need to select the Startup check box for LifeCycle in the Add-in Manager, and then you must restart Visual Studio. To fire the OnBeginShutdown event, close Visual Studio while LifeCycle is loaded.

Example 6-4. LifeCycle.cs, the LifeCycle add-in source code
using EnvDTE;
using EnvDTE80;
using Extensibility;
using System;

public class LifeCycle : IDTExtensibility2
{
    private OutputWindowPane output;
    public void OnConnection(object application,
        ext_ConnectMode connectMode, object addInInst, ref Array custom)
    {
        DTE2 dte = (DTE2)application;

        try
        {

            this.output =
               dte.ToolWindows.OutputWindow.OutputWindowPanes.Item(
               "LifeCycle");
        }
        catch
        {
           this.output =
               dte.ToolWindows.OutputWindow.OutputWindowPanes.Add(
               "LifeCycle");
       }

       this.output.OutputString("OnConnection event fired
");
   }

   public void OnStartupComplete(ref Array custom)
   {
       this.output.OutputString("OnStartupComplete event fired
");
   }

   public void OnAddInsUpdate(ref Array custom)
   {
       this.output.OutputString("OnAddInsUpdate event fired
");
   }

   public void OnBeginShutdown(ref Array custom)
   {
       this.output.OutputString("OnBeginShutdown event fired
");
   }

   public void OnDisconnection(ext_DisconnectMode removeMode,
       ref Array custom)
   {
       this.output.OutputString("OnDisconnection event fired
");
   }
}As you now know, an implementation of IDTExtensibility2 lies at the core of every add-in. Visual Studio calls the methods on this interface whenever it needs to apprise an add-in of important events, such as when another add-in is loaded or unloaded or when Visual Studio is about to shut down. The communication isn't just one way, either: through the IDTExtensibility2 interface, the add-in has access to and control over the entire Visual Studio automation object model.
Before examining the individual IDTExtensibility2 methods, we need to take a quick look at the real objective of add-ins—controlling the objects in the EnvDTE and EnvDTE80 namespaces. The name EnvDTE stands for Environment Development Tools Extensibility, which pretty much describes its purpose: it defines the Visual Studio automation object model. (As you might guess, EnvDTE80 defines the 8.0 version objects in the automation object model.) The Visual Studio documentation includes a chart of the automation object model that displays a hierarchy of more than 170 objects defined by the EnvDTE and EnvDTE80 namespaces. The add-ins in this book will make use of most of those objects, but a few of the objects are of special interest to add-ins:
DTE/DTE2 The root objects of the automation object model
DTE.AddIns/DTE2.AddIns A collection of AddIn objects that includes all add-ins registered with the Visual Studio IDE
DTE.Solution.AddIns/DTE2.Solution.AddIns A collection of AddIn objects associated with a solution
The next several examples will focus on the DTE/DTE2, AddIn, and DTE.AddIns/DTE2.AddIns objects, which collectively give you control over your own add-in and others. We'll cover the DTE.Solution.AddIns object in Chapter 9.
Note
The main purpose of an add-in class is to provide an implementation of IDTExtensibility2, but that doesn't have to be its only purpose. An add-in class is a class, after all, and it can define any number of non-IDTExtensibility2-related methods, properties, and events. The automation object model provides access to your add-in class through the AddIn.Object property, which returns the add-in's IDispatch interface. The following macro code shows how you would call a public method named DisplayMessage on the MyAddIn.Connect add-in class:
Dim dispObj  As Object =  DTE.AddIns.Item("MyAddIn.Connect").Object
dispObj.DisplayMessage("IDispatch a message  to you.")
OnConnection provides an add-in with the main object reference it needs to communicate directly with the IDE. The OnConnection method has the following prototype:
public void OnConnection(object application,
    ext_ConnectMode connectMode,
    object addInInst,
    ref Array custom);
The application parameter holds a reference to the root object of the automation object model. Technically, application holds a reference to an object that implements both the EnvDTE.DTE and EnvDTE80.DTE2 interfaces, so you can cast application to EnvDTE.DTE or EnvDTE80.DTE2, according to your needs. Almost every add-in that does something useful has need of the DTE or DTE2 object, so the first statements in OnConnection typically cache the object in a global variable.
The connectMode parameter tells an add-in the circumstance under which it was loaded. This parameter takes on one of the Extensibility.ext_ConnectMode enumeration values shown in Table 6-2.
Table 6-2. The Extensibility.ext_ConnectMode Enumeration
Constant | Value (Int32) | Description |
|---|---|---|
ext_cm_AfterStartup | 0x00000000 | Loaded after Visual Studio started |
ext_cm_Startup | 0x00000001 | Loaded when Visual Studio started |
ext_cm_External | 0x00000002 | Loaded by an external client (no longer used by Visual Studio) |
ext_cm_CommandLine | 0x00000003 | Loaded from the command line |
ext_cm_Solution | 0x00000004 | Loaded with a solution |
ext_cm_UISetup | 0x00000005 | Loaded for user interface setup |
An add-in can check the connectMode value and alter its behavior accordingly. For example, when an add-in receives the ext_cm_UISetup value, it can add its custom commands to the IDE menus and toolbars. (The Add-in Wizard generates code that handles the ext_cm_UISetup case in this manner.)
The addInInst parameter passes an add-in a reference to its own AddIn instance, which it can store for later use. (The AddIn instance proves invaluable for discovering the add-in's parent collection.) Finally, each of the IDTExtensibility2 methods includes a custom parameter, which allows add-in hosts to pass in an array of host-specific data. Visual Studio always passes an empty array in custom.
The OnStartupComplete event fires only in add-ins that load when Visual Studio starts. The OnStartupComplete prototype looks like this:
public void OnStartupComplete(ref Array custom);
An add-in that loads at startup can't always rely on OnConnection for its initialization—if the add-in arrives too early, it will fail when it tries to access a Visual Studio component that hasn't yet loaded. In such cases, the add-in can use OnStartupComplete to guarantee that Visual Studio is up and running first.
The OnAddInsUpdate event fires when an add-in joins or leaves the Visual Studio environment. An add-in can use this event to enforce dependencies on other add-ins. Here's the OnAddInsUpdate prototype:
public void OnAddInsUpdate(ref Array custom);
The OnAddInsUpdate event doesn't provide you with information about which add-in triggered the event or why. If you need to know the add-in responsible for the event, you have to discover its identity on your own. Fortunately, you have the DTE.AddIns/DTE2.AddIns collection to aid you in your investigation. This collection holds a list of AddIn objects (one for each registered add-in), and each AddIn object has a Connected property that exposes its connection status. You retrieve a specific add-in from the AddIns collection by passing the AddIns.Item method a fully qualified class name or a 1-based index; if the requested index doesn't exist in the collection, the Item method throws an invalid index COMException; otherwise, it returns an AddIn reference. Here's one way to check LifeCycle's connection status:
public void OnAddInsUpdate(ref Array custom)
{
    try
    {
        AddIn addIn = this.dte.AddIns.Item("LifeCycle");

        if (addIn.Connected)
        {
            // LifeCycle is connected
        }
        else
        {
            //  LifeCycle  isn't connected
        }
    }
    catch (COMException)
    {
        //  LifeCycle  isn't a  registered add-in
    }
}
Of course, whether LifeCycle caused the event remains a mystery. The LoadUnload add-in, shown in Example 6-5, does what the previous sample cannot: it deduces which add-in triggers the OnAddInsUpdate event.
Example 6-5. LoadUnload.cs, the LoadUnload source code
namespace LoadUnload
{

    using EnvDTE;
    using EnvDTE80;
    using Extensibility;
    using Microsoft.VisualStudio.CommandBars;
    using System;
    using System.Collections.Generic;

    public class Connect : Object, IDTExtensibility2, IDTCommandTarget
    {

        public Connect()
        {
        }

        public void OnConnection(object application,
            ext_ConnectMode connectMode, object addInInst,
            ref Array custom)
        {
            this.applicationObject = (DTE2)application;
            this.addInInstance = (AddIn)addInInst;
            this.addInsCollection = this.applicationObject.AddIns;
            this.addInsList = new SortedList<string, bool>();

            foreach (AddIn addIn in this.addInsCollection)
                this.addInsList[addIn.ProgID] = addIn.Connected;

            OutputWindow win =
                this.applicationObject.ToolWindows.OutputWindow;

            try
            {
                this.output = win.OutputWindowPanes.Item("LoadUnload");
            }
            catch
            {
                this.output = win.OutputWindowPanes.Add("LoadUnload");
            }
                .
                .
                .
            }

            public void OnAddInsUpdate(ref Array custom)
            {
                this.addInsCollection.Update();

                foreach (AddIn addIn in this.addInsCollection)
                {
                    string action = addIn.ProgID + " was ";

                    if (this.addInsList.ContainsKey(addIn.ProgID))
                    {
                        if (addIn.Connected != this.addInsList[addIn.ProgID])
                        {
                            action += addIn.Connected ? "loaded" : "unloaded";

                            this.output.OutputString(action + "
");
                         }
                     }

                     else
                     {
                        action += "added" +
                            (addIn.Connected ? " and loaded" : "");

                        this.output.OutputString(action + "
");
                     }

                     this.addInsList[addIn.ProgID] = addIn.Connected;
                 }

             }
                 .
                 .
                 .
             private DTE2 applicationObject;
             private AddIn addInInstance;
             private AddIns addInsCollection;
             private SortedList<string, bool> addInsList;
             private OutputWindowPane output;
     }
}
LoadUnload maintains a running list of add-ins and their connection statuses in its addInsList variable, which is declared as type SortedList<string, bool>. When OnAddInsUpdate fires, LoadUnload compares the connection statuses of the add-ins in its internal list with the connection statuses of the add-ins in the DTE2.AddIns collection—if it finds a discrepancy, it knows which add-in to blame for the event. Here's the first part of the main loop from Example 6-5:
this.addInsCollection.Update();

foreach (AddIn addIn in this.addInsCollection)
{
    string action = addIn.ProgID + " was ";

    if (this.addInsList.ContainsKey(addIn.ProgID))
    {
        if (addIn.Connected != this.addInsList[addIn.ProgID])
        {
            action += addIn.Connected ? "loaded" : "unloaded";

            this.output.OutputString(action + "
");
        }
    }
§
The addInsCollection variable holds a reference to the DTE2.AddIns collection, and the call to Update synchronizes the collection with the registry so that any newly created add-ins are included. (The Add-in Manager performs the equivalent of Update each time it runs.) After the call to Update, the main loop iterates through the current add-ins in addInsCollection and checks whether each add-in already exists in its internal list. If so, the Connected property of the add-in is compared with the corresponding value stored in the internal list; if they differ, the Connected property determines whether the add-in was loaded (true) or unloaded (false).
If the current add-in doesn't exist in addInsList, the add-in was registered some time between the previous OnAddInsUpdate event and this OnAddInsUpdate event. Here's the second part of the main loop, which handles new add-ins:
§
  else
  {

      action += "added" +
          (addIn.Connected ? " and loaded" : "");

      this.output.OutputString(action + "
");
  }

  this.addInsList[addIn.ProgID] = addIn.Connected;
}
The last statement either writes the current Connected value to an existing entry or creates a fresh entry for a newly registered add-in.
LoadUnload isn't foolproof—for example, add-ins loaded by commands arrive and leave unannounced—but it works well enough for demonstration purposes.
Here's the prototype for OnBeginShutdown:
public void OnBeginShutdown(ref Array custom);
This event fires only when the IDE shuts down while an add-in is running. Although an IDE shutdown might get canceled along the way, OnBeginShutdown doesn't provide a cancellation mechanism, so an add-in should assume that shutdown is inevitable and perform its cleanup routines accordingly. An add-in that manipulates IDE state might use this event to restore the original IDE settings.
This event is similar to OnBeginShutdown in that it signals the end of an add-in's life; it differs from OnBeginShutdown in that the IDE isn't necessarily about to shut down. OnDisconnection also provides more information to an add-in than OnBeginShutdown does. OnDisconnection's prototype looks like this:
public void OnDisconnection(ext_DisconnectMode removeMode,
    ref Array custom);
The removeMode parameter passes in an IDTExtensibility2.ext_Disconnect Mode enumeration value that tells an add-in why it was unloaded. Table 6-3 lists the ext_DisconnectMode values.
The ext_DisconnectMode enumeration serves a purpose similar to ext_ConnectMode: it allows an add-in to alter its behavior to suit its current circumstances. For example, an add-in that receives ext_dm_UISetupComplete probably would bypass its cleanup routines because it was loaded for initialization purposes only.
As you learned earlier in this chapter, an add-in makes itself known to Visual Studio by registering an XML file with an .addin extension. The following sections explore the structure of this file in greater detail.
The .addin file can specify any number of host applications by including a <HostApplication> element for each supported host. The <HostApplication> element contains two child elements: <Name> and <Version>, in that order. For Visual Studio add-ins, the <Name> value is either Microsoft Visual Studio to specify the main IDE as the host or Microsoft Visual Studio Macros to specify the Macros IDE as the host. The <Version> value identifies the version of Visual Studio that supports this add-in, such as 7.1 or 8.0, or you can use a wildcard value of * to indicate that any version of Visual Studio will work.
The following (slightly contrived) example shows how to specify that a particular add-in works in all versions of the Macros IDE but only in the two most recent versions of the Visual Studio IDE:
<HostApplication>
    <Name>Microsoft Visual Studio Macros</Name>
    <Version>*</Version>
</HostApplication>
<HostApplication>
    <Name>Microsoft Visual Studio</Name>
    <Version>7.1</Version>
</HostApplication>
<HostApplication>
    <Name>Microsoft Visual Studio</Name>
    <Version>8.0</Version>
</HostApplication>
Practically speaking, specifying a version earlier than 8.0 makes little sense because previous versions of Visual Studio don't use .addin files for add-in registration.
The next element in the .addin file—the <Addin> element—specifies the add-in itself, and the children of this element allow you to fine-tune the add-in's behavior. In order, the <Addin> element has the following child elements:
<FriendlyName> (optional)
<Description> (optional)
<AboutBoxDetails> (optional)
<AboutIconData> (optional)
<Assembly> (required)
<FullClassName> (required)
<LoadBehavior> (optional)
<CommandPreload> (optional)
<CommandLineSafe> (optional)
The following several sections cover these elements and describe the effects that their values produce.
<FriendlyName> and <Description> The <FriendlyName> and <Description> elements allow you to apply a meaningful name and a short description to your add-in. An example of an application that uses these values is the Add-in Manager, which populates its add-in list with <FriendlyName> values and displays the <Description> value of the selected add-in in its Description box.
<FriendlyName> and <Description> each stores either a human-readable string or the ID of a string resource in the add-in's satellite DLL (in the form @<resource ID>).
<AboutBoxDetails> and <AboutIconData> The <AboutBoxDetails> and <AboutIconData> elements create space for your add-in on the Visual Studio About dialog box, as shown in Figure 6-8. The About dialog box displays <FriendlyName> values in the Installed Products list; when a user selects an add-in from this list, the dialog box displays both the icon in the <AboutIconData> element and the information in the <AboutBoxDetails> element in the Product Details list.
The format of the <AboutBoxDetails> value is the same as that of the <FriendlyName> and <Description> values—a string that holds either a short description or the ID of a string resource in the add-in's satellite DLL (in the form @<resource ID>). The <AboutIconData> value stores the binary data of an icon as an array of hexadecimal characters.

<LoadBehavior> The <LoadBehavior> value controls how an add-in is loaded by Visual Studio. Table 6-4 lists the possible <LoadBehavior> values. These values are bit flags, so you can combine them to create your own custom load settings.
Table 6-4. <LoadBehavior> Values
Value | Description |
|---|---|
0x0 | Add-in currently is unloaded. |
0x1 | Add-in loads at startup. |
0x2 | Add-in currently is loaded. |
0x4 | Add-in loads during command-line builds. |
The 0x0 and 0x2 values no longer serve a useful purpose. Use the AddIn.Connected property instead to discover the load state of an add-in.
A value of 0x1 tells Visual Studio to load the add-in when the IDE starts up. Add-ins that monitor IDE events, in particular, need to be up and running from the beginning—otherwise, they might miss some of the action. Add-ins that don't monitor IDE events can omit this flag and wait to be loaded on demand.
A value of 0x4 signals that an add-in should be loaded during command-line builds.
<CommandPreload> Many add-ins expose their functionality through menu items and toolbar buttons in the IDE—when selected or clicked, these user interface items load the add-in and pass along the appropriate command for processing. Of course, the user interface items don't appear magically; an add-in creates them and adds them to the IDE the first time that the add-in loads. But without user intervention, how does an add-in first get loaded in order to create the user interface item to load it? The solution to this problem begins with the <CommandPreload> value and ends with the PreloadAddinStateManaged registry key. An add-in sets its <CommandPreload> value to 0x1 to tell Visual Studio that it wants to be loaded once, the next time the IDE starts up, for the purpose of adding its user interface items to the IDE (a process known as preloading).
Note
Actually, there is no requirement for preloaded add-ins to create user interface items; they're free to perform any kind of initialization they need, such as creating data files and adding custom registry entries.
At startup, Visual Studio examines every .addin file and preloads each add-in that has a <CommandPreload> value of 0x1, but only if the add-in hasn't yet been preloaded. Visual Studio determines that an add-in hasn't been preloaded by searching the HKEY_CURRENT_USERSoftwareMicrosoftVisualStudio8.0PreloadAddinStateManaged registry key, which holds a list of already preloaded add-ins. If the PreloadAddinStateManaged key is missing or the add-in isn't on the list, Visual Studio has the information that the add-in hasn't yet been preloaded.
For each add-in that needs to be preloaded, Visual Studio loads the add-in, passing it the ext_cm_UISetup value in its OnConnection event, and then unloads it immediately after OnConnection returns, passing it the ext_dm_UISetupComplete value in its OnDisconnection event. After preloading an add-in, Visual Studio creates the PreloadAddinStateManaged key, if necessary, and sets the add-in's value to 0x2.
<CommandLineSafe> The optional <CommandLineSafe> named value is supposed to work closely with the <LoadBehavior> value to ensure the success of unattended builds. A <CommandLineSafe> value of 0x1 indicates that the add-in won't display a user interface that requires human interaction—at least not when a build is started from the command line. A missing <CommandLineSafe> element or a <CommandLineSafe> value of 0x0 marks the add-in as unsuited for command-line builds. Currently, the <CommandLineSafe> value doesn't affect whether Visual Studio loads the add-in—the value is for informational purposes only.
If you want to distribute your add-in internationally, you need to pay attention to the problem of localization. A worldly add-in doesn't force a particular language on its users—instead, it communicates with each user in his or her native tongue. Of course, a standalone add-in can't possibly accommodate every language; instead, an add-in that supports localization stores its localizable resources in satellite DLLs. At run time, the add-in searches for the satellite DLL that corresponds to the current locale and uses the localized resources from that DLL to populate its user interface. In this way, the same add-in can support any number of languages simply by providing a localized satellite DLL for each locale.
Each localized satellite DLL exists in its own folder under the add-in's root folder, and the name of the folder is the culture name that the DLL supports. For example, the culture name for U.S. English is en-US, so the U.S. English satellite DLL is found at <add-in install path>en-US<add-in name>.resources.dll. At run time, you can locate an add-in's satellite DLL for the current culture by using either the AddIn.SatelliteDllPath property or the DTE. SatelliteDllPath method. (For more information about creating and using satellite DLLs, see the "Walkthrough: Creating Managed Satellite DLLs" and "How To: Access Resources in Satellite DLLs" Help topics.)
The next chapter is for that little bit of drill instructor inside all of us—the part that wants to hear others shout "HOW HIGH?" when we say "JUMP!" As you'll soon learn, macros, add-ins, and Visual Studio make the most loyal and obedient of soldiers, always at the ready and eager to do your bidding: all you have to do is give the right commands. If you turn the page, we'll show you how…"NOW!"