
The editor is the heart of any development environment. In this chapter, we'll take a close look at the editing tools built into Microsoft® Visual Studio®. Whether you're a new or experienced programmer, the information in this chapter will help you become even more productive in Visual Studio 2005. We'll show you how to access editor features that make your job easier, and we'll describe some of the features of the integrated development environment (IDE) that make working in Visual Studio 2005 a real pleasure.
In Visual Studio, everything you do revolves around the solution and the projects in the solution. In that way, Visual Studio becomes your project management tool. What you're managing, for the most part, are the source documents that comprise your solution. To create and edit these documents, you use the Code Editor and the designers in the IDE. The source files you're editing show up in windows that open to the center of the IDE and become part of the tabbed view. The windows that contain these files are known collectively as document windows, and they can be designers, editors, a Web browser, and Help windows.
All these features can be accessed by using named commands either from the Visual Studio Command Window (Ctrl+Alt+A) or through menu commands or keyboard shortcuts. Master these commands and you master Visual Studio 2005.
The place where you write your code in Visual Studio goes by one of two names, depending on the context of the file being edited. When you're working on a file that's been saved as a programming language type recognized by Visual Studio, the editor you're working in is called the Code Editor. The functionality that you'll find attached to the Code Editor will depend on how your language was integrated into the IDE. When you're working on a text file or a file type that's not been recognized by the IDE, the editor is called the Text Editor. This editor has less functionality than the Code Editor, but it's still fairly powerful. It's important to note that you can run macros in either editor, although the Code Editor hosts a much larger feature set. For the most part, we'll refer to these editors collectively as the Code Editor, but we'll make a distinction where appropriate.
Figure 3-1 shows the various parts of the Code Editor in the IDE. Take a look at the names used in the figure. The parts are probably familiar to you from a usage standpoint, but you might not be aware of their names. Depending on which language you're using, you might find some slight naming differences in the Code Editor, but the functionality is fairly consistent between languages.

The Code Editor is where you type in code and text. You can click and drag just above the scroll bar on the right side of the Code Editor to break the view into two separate Code Panes. By using multiple Code Panes with a single file, you can look at different parts of your code concurrently. You can also open a new window on your code by typing Window.NewWindow from the Command Window.
The Navigation Bar contains the two boxes at the top of the Code Editor. In Microsoft Visual C#®, these are the Types and the Members drop-down lists. In Microsoft Visual Basic®, these boxes are called the Class Name and Method Name combo boxes. In Microsoft Visual C++®, they are called the Scopes and Members boxes, and in a Web project, these are called the Object and Event boxes. You can use the Navigation Bar to jump quickly to various parts of your code. In Visual Basic, you can also use these boxes to add methods to the current source file.
The light vertical line to the left of the code is the outlining indicator. By clicking the + and - boxes along this line, you can show and hide blocks of code, respectively, within a source file.
Lines of code that changed in the current editing sessions are marked in yellow and green in the Indicator Margin. Changes that have been saved are marked in green, and changes that have yet to be saved are marked in yellow.
The area between the rightmost part of the outlining indicator and the Indicator Margin is the Selector Margin. Clicking in the Selector Margin selects the adjacent line of code. When your mouse pointer is in the area of the Selector Margin, it changes from an arrow pointing to the top left to one that's pointing to the top right. By clicking and dragging down or up in this area, you can select complete blocks of code, as shown in Figure 3-2. The benefit is that you end up selecting the same amount of white space in each line of code, giving you a nice, clean block.

The Indicator Margin is a tool that serves many purposes. It's used to set and delete breakpoints in your code, to indicate bookmarks in code, and to hold Task List shortcuts. During debugging, you'll see an indicator in this margin. When a breakpoint is hit, the breakpoint indicator will contain a yellow arrow that points to the current line of code. This line of code is highlighted in yellow by default. As you step through the code, the yellow indicator shows you where you are in the code, and that statement is highlighted in the Code Editor. You'll also see a Current Line indicator in this margin as you search and navigate your source code.
Notice the tab at the top of the Code Editor window. These tabs let you navigate easily between multiple source files and forms in your project. If you prefer working with multiple document interface (MDI) windows, such as the ones in Visual Studio 6, you can turn off the tabs in the Options dialog box.
Now that we've reviewed the Code Editor window, let's take a look at the kinds of things we can do inside the Code Editor to make programming and editing tasks easier.
Two of the most important characteristics of a good editor are efficient typing and text manipulation. If you're new to programming, you might not be aware of the ferocious battles being fought in chat rooms, newsgroups, and Web sites between factions of programmers who prefer one editor over another and who will argue incessantly about what makes their editor better than another.
So what is it about text editing that causes such a strong reaction among programmers? I think it has to do with the idea that programmers like to find the most efficient way to do anything, and if a specific editor allows them to accomplish their goals, they become very attached to that editor. A secondary reason is that it takes some time to master an editor, and, once a programmer does so, he's less likely to want to learn things all over again unless a better editor comes along.
The sections that follow are designed to show you how Visual Studio can work for a programmer who likes to keep her hands on the keyboard. I've noticed that many of the most productive programmers I work with rarely take their hands off the keyboard to perform routine tasks that less experienced programmers use the mouse to perform. The idea behind these shortcuts is to improve your speed in the IDE, and they take some time and practice to learn.
Applications written for Microsoft Windows® use a number of standard keyboard shortcuts that you're probably familiar with. These shortcuts are known as Common User Accessibility (CUA) shortcuts and are based on work done at IBM that has standardized shortcuts across a number of platforms. The biggest advantage of using this particular set of shortcuts is that once you learn them, you can apply them in almost any Windows application, including Microsoft Office. These shortcuts have also been labeled on a number of popular keyboards, including most of the Microsoft keyboards.
Tip
For more information about Windows keyboard shortcuts, see the book Microsoft Windows User Experience (Microsoft Press®, 1999), which details how shortcuts such as these should be used in Windows applications.
The tables that follow group the common editing shortcuts for Visual Studio based on function and when you're likely to use them in an editing session. Table 3-1 lists the file shortcuts. You'll use these to open new files or existing files and to save files as you work.
Table 3-1. Common File Shortcuts
Command | Keystroke | Named Command |
|---|---|---|
New | Ctrl+N | File.NewFile |
Open | Ctrl+O | File.OpenFile |
Save | Ctrl+S | File.SaveSelectedItems |
Save All | Ctrl+Shift+S | File.SaveAll |
Ctrl+P | File.Print |
You'll notice that you're presented with a New File dialog box when you try to create a new file in Visual Studio. This might take a little getting used to if you prefer to see a new text document appear immediately. By selecting a specific file type when you create the new file, you enable much of the functionality associated with a particular language before you save the file. You can save some time when creating a new file by using the Command Window and adding the name and extension of the file you want to create. For example, if you want to create a file named UserMotion.cpp, press Ctrl+Alt+A to open the Command Window and then type File.NewFile UserMotion.cpp. Later in this chapter, in the section Using the Command Window, we'll show you how to alias commands such as this one so that you can easily create the files you use most often.
Navigating in a document by using keystrokes is one of those skills you tend to learn without actually picking up a book or reading an article. We'll review the common navigation and selection keys and shortcuts here. They are listed in Table 3-2. Notice that selection involves holding down the Shift key and that moving to a larger selection for a particular key usually involves holding down the Ctrl key.
Table 3-2. Common Navigation and Selection Shortcuts
Movement | Movement Keystroke(s) | Selection Keystroke |
|---|---|---|
Character |
Left Arrow | Shift+Right Arrow Shift+Left Arrow |
Word | Ctrl+Right Arrow Ctrl+Left Arrow | Ctrl+Shift+Right Arrow Ctrl+Shift+Left Arrow |
Line | End Home Down Arrow Up Arrow | Shift+End Shift+Home Shift+Down Arrow Shift+Up Arrow |
Code Pane | Page Down Page Up | Shift+Page Down Shift+Page Up |
Document | Ctrl+End Ctrl+Home | Ctrl+Shift+End Ctrl+Shift+Home |
Once you've selected text, you can copy or cut it to the Clipboard, and then you can paste it back into the Code Editor. The common editing shortcuts are listed in Table 3-3.
Table 3-3. Common Editing Shortcuts
Command | Keystroke | Named Command |
|---|---|---|
Cut | Ctrl+X | Edit.Cut |
Copy | Ctrl+C | Edit.Copy |
Paste | Ctrl+V | Edit.Paste |
Undo | Ctrl+Z | Edit.Undo |
Redo | Ctrl+Y | Edit.Redo |
Select current word | Ctrl+W | Edit.SelectCurrentWord |
Select all | Ctrl+A | Edit.SelectAll |
Finally, let's take a look at the shortcuts that you can use to transpose letters, words, and lines. You can use the shortcuts shown in Table 3-4 to swap the position of two items in the Code Editor. For example, if the cursor is positioned before the letters AB, pressing Ctrl+T will cause the letters to switch their order to BA. Typing Ctrl+Shift+T with the cursor adjacent to or in the word go in the string go boldly will result in a transposition to boldly go. The most useful shortcut in this group runs the command Edit.LineTranspose. Using the shortcut Alt+Shift+T swaps the line where the cursor is located with the next line, making it really easy to move a line of code down the page.
These shortcuts should provide you with the functionality you need to perform a fair number of editing tasks without the mouse if you choose to work that way. There's nothing wrong with using the mouse for editing. It's not really much slower to use the mouse than to use shortcuts, but the extra second or two that it takes to go to the mouse can take you out of that creative groove you can get into when you're editing. For me, transitioning from using a mouse back to the keyboard takes a little more time than using a shortcut, so I try to use shortcuts whenever possible.
Earlier we talked about toggling a window's Dockable state to add it to the center of the IDE. There's no shortcut assigned by default to the Window.Dockable command, but you might find that adding one would be handy for making a very data-heavy window easier to read.
To create a new shortcut in the IDE, press Ctrl+Alt+A to open the Command Window and type Tools.Options. This will bring up the Options dialog box (shown in Figure 3-3). Click the Keyboard item in the Environment folder to bring up the Keyboard page. This page lets you do a number of things with shortcuts in the IDE, such as create and edit shortcut keys, change the keyboard mapping scheme, and save a custom mapping scheme. The first time you add a custom shortcut to the IDE, you'll be prompted to save your mapping scheme with a custom name.
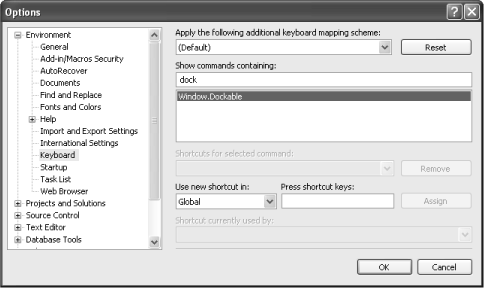
To find the command you want to assign the new shortcut to, type part of the command name in the Show Commands Containing box. In this case, type dock, and Window. Dockable will show up in the command list.
Here's the tricky part. Nearly every possible keystroke shortcut has been taken in Visual Studio. You can overwrite keystrokes that you think you'll never use, but that isn't always the most satisfactory solution. For one thing, if you go to work on a different machine and you haven't updated the shortcuts, you might end up keying the wrong command, which can be both annoying and potentially harmful to whatever you're typing at the moment. Your best bet is to find an available keystroke and take maximum advantage of it.
Visual Studio allows you to create keystroke sequence shortcuts. To start a sequence, you hold down the Ctrl key and press another key. The IDE then waits for another stroke to determine which command to execute. I've found that Ctrl+0 (Ctrl+zero) hasn't been taken in Visual Studio by default. So I can chord all my personal commands based on this key sequence and assign the second key sequence to one that matches the command I'm trying to execute. For the Window.Dockable command, I assign the sequence Ctrl+0, Ctrl+D (Ctrl+zero, Ctrl+D) by typing that combination in the Press Shortcut Key(s) box. Be sure to save the new shortcut by clicking the Assign button.
While I have the Options dialog box open, I can add a keystroke shortcut for the Options dialog box itself by typing Tools.Options in the Show Commands Containing box and assigning the keystroke Ctrl+0, Ctrl+O. Now I can open the Options dialog box quickly at any time to customize my IDE.
You can assign keystroke shortcuts to named commands in the IDE, to add-ins that you create or install, and to macros that you create and save.
In addition to the keyboard shortcuts mentioned here, Visual Studio 2005 provides a number of other keyboard shortcut mappings for you to choose from. To select a new scheme, go to the Options dialog box (Tools.Options) and look on the Keyboard page where we earlier assigned some keyboard shortcuts. At the top of the page, you'll see a drop-down list that allows you to choose from a number of different keyboard mappings. These mappings include Visual C++ 2.0, Visual Studio 6, Emacs, and Brief. To use one of these mappings, select the one you want from the list and click OK. These mapping schemes are designed to make it easy for programmers to move from their preferred editor to Visual Studio 2005. For more information on this feature, see the Shortcut Keys topic in Visual Studio Help.
Code formatting is another one of those issues that developers tend to feel strongly about. When it comes to code formatting, the bottom line for most organizations is that some sort of standard should exist. The formatting options for each of the languages supported in the Visual Studio IDE are set in the Text Editor node of the Options dialog box. When you set options for All Languages, as shown in Figure 3-4 you override the settings for each individual language listed in the Text Editor folder.

As you can see in the figure, you can set Indenting to None, Block, or Smart. The behavior of these options is determined by the language and the Tabs settings below them. When None is the selected Indenting type, pressing Enter at the end of a line will start the next line at the leftmost space in the Code Editor. Block indenting sets the indent to the same space as the first character in the current line. This is a common generic setting that lets you indent manually but doesn't force you to key a lot of extra tabs to get to where you want to be. The Smart setting applies an indent by context. For example, pressing Enter after an open brace ({) in C# will automatically indent the next line.
The choice between using spaces or tab characters for indenting is usually a matter of personal preference or of the coding standard you want to apply. If you prefer that all the code you deal with consists of spaces rather than tabs, you can set that option globally when you customize your IDE. If you prefer spaces to tabs, keep in mind that Visual C# specifies tabs for indentation by default. You can view the white space in the document by using the Edit.ViewWhitespace command (Ctrl+R, Ctrl+W). Figure 3-5 shows a document in which the white space is visible. If you use tab characters in your source code, they will show up as right arrows. If you use spaces in your code, a single dot will show up for every space.
If you want to convert existing files from tabs to spaces or vice versa, select the desired option on the Tabs page of the Options dialog box and then click OK to close the dialog box. Then simply press Ctrl+K, Ctrl+D to apply the new formatting to the whole document.
The Formatting page of the Options dialog box, shown in Figure 3-6 controls a number of characteristics of code typed into a Code Pane. This page is available for most of the major languages supported in the IDE, but under Basic, the VB Specific subpage handles the customizations. The page in the figure shows the C/C++ formatting options.
Different options are available for different languages. Notice the Indent Braces check box in Figure 3-6. In C++, this check box is clear by default. This setting forces curly braces that enclose functions to be indented by one tab or by four spaces, depending on how you have your spaces and tabs configured. You can change the formatting of an entire document by setting this preference and pressing the Ctrl+A then Ctrl+K, Ctrl+F keystrokes that we used earlier.


Editing in Visual Studio 2005 is much easier thanks to a number of new and updated features that have been added to the IDE since Visual Studio 2003. Among these are Code Snippets, refactoring, the Code Definition Window, and the Call Browser.
Code Snippets is a feature added for Visual Basic, Visual C#, Microsoft Visual J#®, and XML that allows a programmer to insert commonly used snippets of code into a project. You can insert a snippet by right-clicking in the Code Editor in a supported project type and clicking Insert Snippet. Figure 3-7 shows you how this looks in Visual Basic. You can insert a small amount of code or a significant block, depending on the functionality that you're adding. This can be a real timesaver as you work on your projects.

Snippets are managed through the Code Snippets Manager. You can create your own snippets in XML. The Code Snippets Manager, available from the Tools menu, allows you to import XML files with your own code snippets.
Refactoring allows you to improve your code after you've written it by providing tools for automatically updating the structure of the code without making any changes to the functionality. This means that you can write a bit of code and then later use the tools in Visual Studio 2005 to change that code to improve the structure of your functions or to better encapsulate them for re-use. For example, by extracting an algorithm from a button_click event, you make it much easier to access the product of that algorithm from a different part of your application.
The Code Definition Window is a new tool in Visual Studio 2005 for Visual C++, Visual C#, and Visual J#. This window shows the definition of a selected symbol in the IDE. You can use the Code Definition Window to view the code definition file for the particular symbol if it's available. This window is dynamic, and it changes when you select various symbols in a source file. The Code Definition Window is available from the View menu or by using the View.CodeDefinitionWindow command in the Command Window.
The Call Browser is an interesting tool in that it lets you see calls to specific functions by displaying a Callers Graph that contains links to those places in the project from which the function is being called. This can be very useful when you want to see exactly who is calling your function. When a function is analyzed in the IDE, the title of the Call Browser window changes to Callers Graph and presents you with a tree that you can use to navigate your code.
None of what we're talking about in this chapter has anything to do with what happens when you build your applications. Depending on the language you use, compilers remove formatting and white space when a file is processed. At the editor level, however, even the small features provided in the IDE can have a profound effect on your productivity and comfort when you're working with code.
You can set line numbering on the General page for any of the languages available in the Text Editor folder in the Options dialog box. You can set this option for any specific language, or you can set it for all languages. You can toggle this setting in the Options dialog box, but there is no named command associated with this setting.
To toggle this setting without opening the Options dialog box, you have to run a macro or an add-in to automate that functionality. Two of the macros that are part of the Samples macros set included with Visual Studio were designed to turn line numbering on and off. You can customize these macros yourself, or you can use them from the Command Window, from shortcuts, or by creating new menu commands or toolbar buttons.
The line-numbering macros are Macros.Samples.Utilities.TurnOnLineNumbers and Macros.Samples.Utilities.TurnOffLineNumbers. Either of these can be a finger buster to type into the Command Window, even with the aid of IntelliSense®, so we'll create an alias for each of these commands. An alias is a short command name that's used to represent a longer command in the Command Window. To create an alias for the TurnOnLineNumbers macro, open the Command Window by pressing Ctrl+Alt+A and type the following command:
>alias lnon Macros.Samples.Utilities.TurnOnLineNumbers
Now when you type lnon, line numbering will be turned on (if it's currently off). To turn line numbering off, we'll create an alias for the TurnOffLineNumbers macro by typing the following into the Command Window:
>alias lnoff Macros.Samples.Utilities.TurnOffLineNumbers
The TurnOffLineNumbers macro is now mapped to lnoff.
Suppose you now want to map these macros to keyboard shortcuts. That's not a problem—you can just search for the word Numbers on the Keyboard page in the Environment folder of the Options dialog box, as we did earlier. Select the macro that you want to map to a keystroke, type your keystroke, and then click the Assign button. We use the following mapping for the line-numbering macros. For TurnOnLineNumbers, we map the keys Ctrl+0, Ctrl+N. (The N stands for numbering.) We've mapped the TurnOffLineNumbers macro to Ctrl+0, Ctrl+Shift+N. Figure 3-8 shows how that shortcut looks after we've assigned it to the macro.

Setting up line numbering is fairly straightforward, but will we want to toggle line numbering often enough to justify the brain cells it'll take to remember the aliases and the shortcuts we just created? Maybe. But if not, we can store these commands on a menu and then find them there when we need them. To add these macros to a menu, right-click on a toolbar in Visual Studio and choose Customize. On the Commands tab of the Customize dialog box, you'll find a Macros category. With Macros selected, scroll through the Commands list until you find Samples.Utilities.TurnOnLineNumbers. Choose that command and drag it to a menu. The menu you drag it to will expand, and you can place your selected command precisely where you want it.
To customize the new menu command, right-click on it to bring up a shortcut menu. (The Customize dialog box must remain open.) You can rename the new command Turn On Line Numbers to make it a little more readable. Do the same with the TurnOffLineNumbers macro, as shown in Figure 3-9.

You can add a macro such as this one to a toolbar in just the same way. In that case, you'll probably want to specify a button image to use with the macro that you're adding.
The Visual Studio outlining feature is probably familiar to programmers who've used other advanced editors. The idea is to group code by functionality to make it easier to navigate the code in the Code Editor. Figure 3-10 shows a code file in which the outline has been collapsed to the methods in the file. At the end of each collapsed line, you'll see a box with an ellipsis in it. Hover your mouse pointer over that box to display a ToolTip that shows some of what's in the collapsed node.

You can turn off outlining by pressing Ctrl+M, Ctrl+P (Edit.StopOutlining). Turning off outlining makes the outlining indicators along the side of the Code Editor disappear completely. You can restart outlining by pressing Ctrl+M, Ctrl+O (Edit.CollapsetoDefinitions). The CollapsetoDefinitions command will restart outlining in the Code Editor and will collapse each code block in the file. Pressing Ctrl+M, Ctrl+L (Edit.ToggleAllOutlining) will open all the collapsed blocks in the Code Editor. You can also type Edit.StartAutomaticOutlining from the Command Window to restart outlining.
In addition to hiding logical code blocks in the Text Editor, you can collapse an arbitrary selection in Visual C++ by selecting some text and pressing Ctrl+M, Ctrl+H (Edit.HideSelection). This function can be very handy for collapsing some code between two distant points in a code file, and it even works to collapse lines in a plain-text file. If you want to expand the collapsed selection, press Ctrl+M, Ctrl+U (Edit.StopHidingCurrent).
Table 3-5 lists the shortcuts associated with outlining in the Text Editor.
A number of features in the IDE make it easier for programmers to write code. You should be familiar with Help in the IDE, so we won't talk too much about it. Help in Visual Studio is very simple—you just select what you don't understand and press F1. You almost always get what you're looking for. In this section, we'll go over some of the features of the IDE that you've probably used but that you might not be so familiar with.
IntelliSense is one of those features that you start to rely on heavily as a programmer. It's a timesaving feature that can really help you do the right thing when you're typing code into the IDE. IntelliSense provides statement completion in the form of context-sensitive member lists that appear automatically as you type code into the Code Editor. These lists can save you a great deal of time when you're programming an unfamiliar API, and they can help you reduce errors that would normally be caught only at build time.
IntelliSense works by parsing the code you type into the Code Editor based on the project type context. This means that your source file needs to be part of a project or a solution before IntelliSense kicks in. IntelliSense is mostly automatic. It works on code that's part of the .NET Framework, and it works on external methods from references you've added to your project. It even works on XML Web services references that have been added to a project.
IntelliSense provides four major types of functionality when you're working with a supported language. Most programmers will use these four features—statement completion, parameter information, word completion, and code comments—in their automatic form; that is, they'll take the information as presented in the IDE without thinking too much about what's being shown. That's an absolutely valid way to use the technology. If this approach works for you and doesn't get in your way, IntelliSense is doing exactly what it's designed to do. You can also employ IntelliSense more deliberately by using the shortcuts associated with displaying IntelliSense information.
You might want to turn statement completion and parameter information off if you find them distracting, in which case you'll need to use the shortcuts, named commands, or toolbar buttons associated with the various IntelliSense features to display this information. To turn off statement completion in the Code Editor, go to the Text Editor folder in the Options dialog box. Select the language you want to apply your changes to, or select All Languages if you want to apply your changes universally. Open the General page, and, in the Statement Completion section, clear the Auto List Members check box. You can also toggle the Parameter Information setting from this page.
Note
You can increase the number of options returned in a member list by clearing Hide Advanced Members. Hide Advanced Members is the default setting for Visual Basic, so you might be missing a number of possible completions if you leave that setting cleared.
With statement completion turned on, IntelliSense presents you with information as soon as you type an operator as part of a statement. If you have statement completion turned off or if you want to display this information immediately, press Ctrl+J. The result is shown in Figure 3-11.
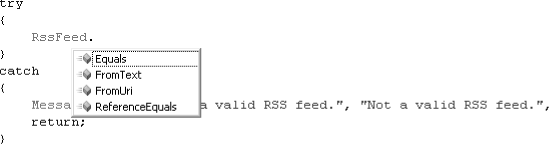
To select an entry to complete a statement, use the up and down arrow keys to navigate to the desired completion and then press Tab.
To force parameter information like that shown in Figure 3-12, press Ctrl+Shift+Spacebar. This gives you a list of the parameter overloads you can choose from for a particular method. With the parameter information showing, use your up and down arrow keys to view the available parameters.

Use the parameter information provided by selecting the item that best suits your needs and then type the parameters into your method. You'll notice that after you type each parameter, the next parameter in the list appears in bold. Watching for this pattern helps ensure that every parameter in the list is entered correctly.
You might not be too familiar with the word completion feature if you're used to using IntelliSense automatically. Word completion lets you type in a few characters of a particular statement and get a list of possible completions for that statement. This functionality is a bit different from statement completion, which gives you a member list based on context. Word completion simply gives you a list of all the possible completions for the letters you've typed in. The shortcut for word completion is Alt+Right Arrow, but the statement completion shortcut (Ctrl+J) also works.
Finally, you might have noticed that when you hold your mouse pointer over an identifier in the Code Editor, ToolTip information appears. This ToolTip information is part of the Quick Info feature of IntelliSense, which contains the declaration for the identifier and any associated code comments. You can force this information by using Ctrl+K, Ctrl+I. You can add code comments to any method in Visual C# by typing /// (three forward slashes) on the line directly above the method definition. Even if you're not going to create documentation for your methods, IntelliSense makes code comments such as these helpful for letting another developer figure out how to use your code.
Automatic brace matching is an IntelliSense feature that helps you determine whether braces in your code are matched properly. There are two types of brace matching in Visual Studio 2005. Rectangle brace matching happens when the cursor is next to the brace. Highlight brace matching works in Visual Basic, Visual C#, and Visual C++ and goes into effect when you type a closing brace into the Code Editor. The brace types affected include parentheses (), brackets [], and braces {}. In addition, the conditional macro expressions #if, #else, and #endif are matched as you type the closing expression, and quotation marks are matched when you type the closing set.
If you've used a modal editor such as Vim (Vi improved) for a number of years and are used to typing editor commands at a command line, the Command Window in Visual Studio will come as a welcome surprise. I've already referred to using the Visual Studio Command Window a number of times (in both Chapters Chapter 1 and Chapter 2), but it's worth considering the various ways you can use this tool in your everyday work.
As you've probably noticed by now, the named commands in Visual Studio generally map to menu commands in the IDE. So if you want to use a named command from the Command Window, all you usually need to do is to type the name of the menu containing the command and then the dot operator and the name of the command. For example, if you want to search by using the Command Window, you first bring the window to the front by pressing Ctrl+Alt+A. To open the Find dialog box, type Edit.QuickFind in the Command Window. You'll notice that some commands, such as the Edit.QuickFind command, can take arguments. This means that you can search from the Command Window without having to deal with a dialog box. Whether or not you find this approach better is a matter of personal preference.
There are two ways to get to a command prompt in Visual Studio. The way that we've described in the book so far is to open the Command Window by using the Ctrl+Alt+A shortcut. You can also type commands into the Find combo box on the Standard toolbar by pressing Ctrl+D (Edit.GoToFindCombo). Normally, typing text in the Find combo box simply gives you a quick way to search the currently open document for a term or phrase. When you type a > (greater than) character into the box, the box changes to one capable of taking commands. You can then type named commands in the box that you would usually type in the Command Window. Because both the Command Window and the Find combo box support IntelliSense, you can simply type a named command to see all the possible completions for the command. You can see the list of completions in Figure 3-13.

If you can't easily search for and replace text in your editor, you're probably not working with a very good editor. It's great to be able to type in code easily, but finding and fixing code problems are tasks you must do often as a programmer, and the search functions built into the editor are what make that work easy (or difficult). Visual Studio offers a number of ways to search in the Text Editor, and it offers a powerful regular expressions facility that allows you to perform extremely complex searches.
First let's take a look at the named commands and shortcuts associated with the Find and Replace operations in Visual Studio. These might be familiar to you because they're mapped to the Common User Accessibility (CUA) shortcuts that you might have used in Windows or in Office.
To bring up the Find and Replace dialog box, press Ctrl+F. You can click the plus button to expand the Find Options area in the dialog box, as shown in Figure 3-14. The options in this dialog box are fairly straightforward. You can specify case (Match Case), whole-word searches (Match Whole Word), and the direction of your search (Search Up). An interesting option on this dialog box is Search Hidden Text. When this check box is left cleared, text that is hidden in a collapsed node of an outline won't be searched.

The Find and Replace dialog box in Visual Studio is actually a tool window, so you can dock it in the IDE or even toggle the Dockable option on the shortcut menu available from the title bar to make it a tabbed window in the center of the IDE.
You can dock the Find and Replace dialog box by dragging it to a side of the IDE. But making it a floating dialog box might be preferable because it's easy to accidentally dock the window when you're trying to get it out of your way. You can turn off docking by choosing Floating on the shortcut menu for the dialog box. (Right-click on the Close button on a dialog box to open its shortcut menu.) Doing so will let you drag the Find dialog box around the screen with impunity.
You can bring up the Find and Replace dialog box in Quick Replace mode by pressing Ctrl+H. This dialog box contains a combo box for the Replace With text. Using the Find and Replace dialog box is straightforward. Especially handy are the Search options, which let you choose between the current document, all open documents, the current project, and specific selections or blocks in the editor.
Using the Find In Files option in the Find and Replace dialog box (Ctrl+Shift+F for Find or Ctrl+Shift+H for Replace), shown in Figure 3-15, make it fairly easy to find text within a project or a directory structure. Setting up these file searches takes a little more work than performing a standard Find command. You can type the path you want to search in the Look In field or you can click the … button, which opens the Look In dialog box. You can use this dialog box to narrow your search to your project or to a directory structure on your machine. The output from the Find In Files search is sent to the Find Results window by default.

The Visual Studio Find and Replace shortcuts are listed in Table 3-6.
Table 3-6. Common Search Shortcuts
Command | Keystroke | Named Command |
|---|---|---|
Find | Ctrl+F | Edit.QuickFind |
Replace | Ctrl+H | Edit.QuickReplace |
Find In Files | Ctrl+Shift+F | Edit.FindinFiles |
Replace In Files | Ctrl+Shift+H | File.ReplaceinFiles |
Incremental searching is a feature of Visual Studio that's a real timesaver. An incremental search is performed one character at a time, matching each word in the search string from the position of the cursor. You can start an incremental search by pressing Ctrl+I. You'll see the mouse pointer transform into a down arrow like the one shown in Figure 3-16.

With the down arrow showing, start typing the term you want to search for. As you type, words that match the letters are matched starting from the top. When you've completed the pattern you want to search for, press Ctrl+I again to move to the next match. You can continue to press Ctrl+I until you reach the end of the document to match every instance of the term you're searching for. If you want to search upward, just press Ctrl+Shift+I. It works in the same way. You can exit the incremental search by pressing Enter or Esc.
This chapter has given you a pretty good idea of how named commands apply to the Code Editor in the IDE and how you can customize the IDE by using alias commands in the Command Window, through keyboard shortcuts, and by adding menu items associated with named commands and macros. In Chapter 4, we'll tell you about some of the community features in the IDE.