Special Files in Builds
There are a handful of special files and file types whose very presence affects the build or behavior of the resulting application. One example is entitlements files, which grant permission for potentially insecure actions, and which will be covered further in Chapter 9, Security.
The Launch Screen Storyboard

By default, iOS app projects have a LaunchScreen.storyboard file. This is used when animating the launch from the app’s icon into the first screen of the app. It also has a stealth purpose: if it’s absent, iOS assumes you haven’t accounted for different device sizes, so your app is shown with black bars at the top and bottom of the screen on iPhones bigger than the original 3.5-inch iPhone, as seen in the figure.
What iOS actually looks for is an entry in the Info.plist called “Launch screen interface file base name”, which defaults to LaunchScreen; if you wanted to rename the storyboard file, you’d need to change this entry too.
At any rate, you want to keep the launch storyboard as simple as possible: you can use Auto Layout constraints to adapt its contents to different sizes or orientations (size classes really help here), but you shouldn’t back it with a custom view controller and try to do work at launch-time, because you’ll just slow the rest of your app down. Often, a single UIImageView, possibly with size-class-specific images, is the way to go. Apple has further advice for launch screens in their Human Interface Guidelines.[8]
Launch Screen Madness | |
|---|---|
|
|
The launch storyboard replaces earlier schemes where you’d have to include PNG files of every screen size and orientation you wanted to have a launch screen for. With the proliferation of device sizes over the years, that became impractical. Another change is that Apple originally suggested you replicate the first screen of your app with a static launch image, to conceal how slow app-launching was on the original iPhone. Now that iPhones are faster than many desktop computers, that’s no longer a concern. |
Settings Bundles
On iOS, Settings.bundle is another file that causes interesting side effects just by being present. This file adds an entry for your app in the main Settings app. Apple used to recommend that all apps put their settings here, but that guidance has been relaxed and now apps tend to put frequently changed settings in the app itself, and infrequently changed stuff in the Settings app.
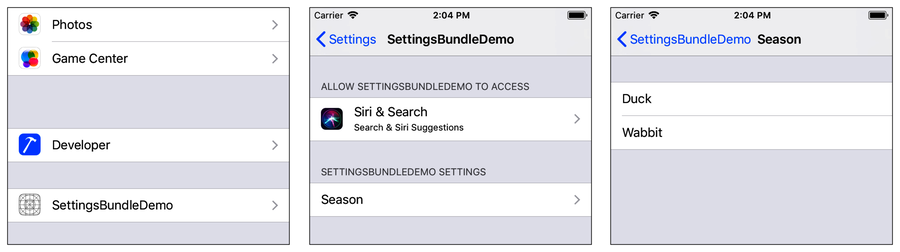
To add an entry to the Settings app, use File->New->File… to add a file to the top level of your app target, and choose the “Settings bundle” bundle template, as seen in the following figure (the filename will default to Settings.bundle, and you should not change it):

The settings bundle is a folder containing localization folders and a Root.plist property list file with a default group of settings specifiers for the first page in the Settings app. The default settings show a few simple examples for things like buttons and text entry. There are more component types available, as well as the ability to create several pages of settings by using multiple plist files — see Apple’s “Preferences and Settings Programming Guide” for details and syntax of every option. For a simple example, consider the following figure, which offers a choice between two mutually exclusive options for cartoon hunting season—Duck and Wabbit:

By just including this in the app bundle, the SettingsBundleDemo app gets an entry in the Settings app, as shown in the three successive drill-down screenshots shown here:
The choices the user makes in the Settings app are communicated via the UserDefaults class (NSUserDefaults in Objective-C). In this example, the value uses the key com.pragprog.caxcode.season.
However, the default value won’t be picked up from the settings bundle alone. For that, you need to register a set of defaults when the app starts up:
| | UserDefaults.standard.register(defaults: |
| | ["com.pragprog.caxcode.season" : Int(1)] |
| | ) |
Now, whether the preference has been set with these initial defaults or the Settings app, you can read the value from UserDefaults:
| | let defaultSeasonValue = UserDefaults.standard.integer( |
| | forKey: "com.pragprog.caxcode.season") |
If your app has its own UI for setting this preference, then just set it on UserDefaults to update the stored value:
| | UserDefaults.standard.set(Int(season.rawValue), |
| | forKey: "com.pragprog.caxcode.season") |
The other thing to watch for is the possibility of the user switching out of your app and changing a default in the Settings app, while your app is still running. Fortunately, in this case, there’s a Notification you can observe:
| | notificationObserver = |
| | NotificationCenter.default.addObserver( |
| | forName: UserDefaults.didChangeNotification, |
| | object: nil, |
| | queue: nil) { notification in |
| | let season = self.fetchDefaultSeason() |
| | self.updateSeasonLabel(season) |
| | } |
Depending on other system features enabled by your app, the Settings app will be the place the user goes to enable or disable things like push notifications or microphone and camera access. They’ll see your settings while they’re there, so using a setting bundle is sometimes a good companion or even alternative to building an in-app preferences UI.
Bridging Headers
One other important type of file to know about comes up when you’re building mixed-language projects. The bridging header is a file that exposes C functions and Objective-C classes and methods to Swift. Xcode offers to create this file for you the first time you add a file in one of these languages to a Swift project, as seen in the following figure:

In the bridging header file that’s created, do a #import for every h file you want to expose to Swift. You can also be more granular with C functions and just list those functions by themselves.
For example, consider a C function that simply calls the old rand function, which isn’t available in Swift because it’s old and bad and has been replaced by arc4random:
| | int oldRand(void) { |
| | return rand(); |
| | } |
In the bridging header file, you just need to import the C header file that declares the oldRand function:
| | #import "CUtilities.h" |
And with that, you can call your C or Obj-C code directly from Swift:
| | print ("Calling old C rand() function: (oldRand())") |
The bridging header isn’t a magical file: it’s one of your Build Settings, in the “Swift Compiler Settings - General” section, as shown in the figure. Keep this in mind, because if you ever move or rename the bridging header file (or a group that contains it), your build will break until you re-point this setting to the new path.

Calling C++ from Swift | |
|---|---|
|
|
A bridging header won’t let you call C++ directly from Swift. However, you can call C++ from C or Objective-C, so the solution is to just make a wrapper for your C++ code in one of those languages, and expose the wrapper in the bridging header. |