
Chapter 11. The Built-In Apps
Your iPhone comes already loaded with the icons of about 25 apps. Eventually, of course, you’ll fill it up with apps you install yourself, but Apple starts you off with the essentials. They include gateways to the Internet (Safari), communications tools (Phone, Messages, Mail, Contacts), visual records of your life (Photos, Camera), shopping centers (iTunes Store, App Store), and entertainment (Music, TV, Podcasts).
Those core apps get special treatment in the other chapters. This chapter covers the secondary programs, in alphabetical order: Calculator, Calendar, Clock, Compass, Files, Health, Home, iBooks, Maps, News, Notes, Podcasts, Reminders, Stocks, Tips, TV, Voice Memos, Wallet, Watch, and Weather.
TIP
You can open any of these apps by hunting it down and tapping its icon. But it’s usually much faster to tell Siri to do it. Say, “Open Calculator,” for example.
Calculator
The iPhone wouldn’t be much of a computer without a calculator, now, would it? And here it is, your everyday calculator—with a secret twist.
In Calculator’s basic four-function mode, you can tap out equations (like 15.4 × 300 =) to see the answer at the top. (You can paste things you’ve copied into here, too; just hold your finger down until the Paste button appears.) There’s no memory function in the basic calculator, but you do get a +/– button; its function is to change the currently displayed number from positive to negative, or vice versa.
TIP
When you tap one of the operators (like ×, +, –, or ÷) it turns from orange to white to help you remember which operation is in progress. Let’s see an ordinary calculator do that!
Now here’s the twist: If you rotate the iPhone 90 degrees in either direction, the Calculator morphs into a full-blown HP scientific calculator, complete with trigonometry, logarithmic functions, a memory function, exponents, and roots beyond the square root. Go wild, ye engineers and physicists!

If you make a mistake while entering a number, swipe horizontally across the numerical display (either direction). Each swipe backspaces over the rightmost digit. And if you mistakenly touch the wrong operator (× when you meant –, for example), there’s no need to start over. Just tap the correct operator before tapping the number. The app ignores the errant tap.
TIP
You can use the Calculator instantly, at any time, even without waking or unlocking the phone—from the Control Center (“Control Center”). And you can make a calculation without opening the Calculator app at all—by asking Siri to do it for you.
Calendar
The iPhone’s calendar syncs, automatically and wirelessly, with whatever online calendar you keep: iCloud, Google Calendar, a corporate Exchange calendar, and so on. Everything’s kept in sync with your computers and tablets, too. Make a change in one place, and it changes everywhere else. Then again, you can also use Calendar all by itself.
TIP
The Calendar icon on the Home screen shows what looks like one of those paper Page-a-Day calendar pads. But if you look closely, you’ll see a sweet touch: It actually shows today’s day and date.
Day View
When you open Calendar, you see today’s schedule, broken down by time slot (next page, right). You can navigate to other days’ schedules in any of three ways: Swipe horizontally across the Day screen to see the previous or next day. Tap a date at the top to see another day this week. Swipe across the dates at the top to jump to another week. If the date you want to check is further away than a week or two, though, it might make more sense to pop into Month view, described next.
Month View
Month view, of course, shows an entire month at a glance (next page, center). You can scroll the months vertically, thereby scanning the entire year in a few seconds. To get there from Day view, tap the name of the month at the top left.
Of course, your little phone screen is too small to show you what’s written on each calendar square; all you get is a gray dot on any date when you’ve scheduled an appointment. Tap that dot to jump back into Day view and read your schedule.
TIP
If you have an iPhone 6s or later model, a delicious shortcut awaits: Hard-press any gray dot. A pop-up bubble appears, showing you the appointments that day as though it’s a peephole into the Day view. You can then press even harder to open the Day view for that day, or lift your finger away to return to the Month view. You’ve just used peek and pop, described in “Peek and Pop”.

Year View
If you’re in Month view, you can “zoom out” yet another level—to Year view. It’s a simple, vertically scrolling map of the year’s months. Tap the name of the year (top left) to see it. From there, tap a month block to open it back into Month view.
TIP
In all three of these views—Day, Month, Year—you can tap Today (bottom left) to return to today’s date.
The Rotated Calendar
Some cool things happen when you turn the phone into landscape view (facing page, top). You get an interactive, four-day slice of the week: Swipe sideways to move to earlier or later dates. Swipe up or down to move through the hours of the day.

Plus Model Views
If you have a Plus model—one with the Jumbotron screen—then there’s room for extra information (the front illustration above). On a Plus, the Day and Month views offer a split screen, showing the calendar on the left and details on the right. You also get a row of view buttons (Day, Week, Month, Year)—something the owners of puny regular iPhones never see.
Subscribing to Your Online Calendars
To set up real-time, wireless connections to your calendars online, tap your way to Settings → Accounts & Passwords → Add Account. Here you can tap iCloud, Exchange, Google, Yahoo, AOL, or Outlook.com to set up your account. (You can also tap Other → Add CalDAV Account to fill in the details of a less well-known calendar server, or Other → Add Subscribed Calendar to connect to an online calendar subscription service—from TripIt or your favorite sports team, for example.
Making an Appointment (Day or Month View)
Recording an event on this calendar is quite a bit more flexible than entering one on, say, one of those “Hunks of the Midwest Police Stations” paper calendars.
Start by tapping + (top-right corner of the screen). The New Event screen pops up, filled with tappable lines of information. Tap one (like Starts or Repeat) to open a configuration screen for that element.
For example:
Title/Location. Name your appointment here. For example, you might type Fly to Phoenix.
The second line, called Location, makes a lot of sense. If you think about it, almost everyone needs to record where a meeting is to take place. You might type a reminder for yourself like My place, a specific address like 212 East 23rd, a contact phone, or a flight number. Use the keyboard as usual.
Starts/Ends. Tap Starts, and then indicate the starting time for this appointment, using the four spinning dials that appear at the bottom of the screen (below, right). The first sets the date; the second, the hour; the third, the minute; the fourth, AM or PM.

Then tap Ends, and repeat the process to schedule the ending time. (The iPhone helpfully presets the Ends time to one hour later.)
An All-day event, of course, has no specific time of day: a holiday, a birthday, a book deadline. When you turn this option on, the Starts and Ends times disappear. The event appears at the top of the list for that day.
TIP
Calendar can handle multiday appointments, too, like trips away. Turn on All-day—and then use the Starts and Ends controls to specify beginning and ending dates. On the iPhone, you’ll see the appointment as a list item that repeats on every day’s square. Back on your computer, you’ll see it as a banner stretching across the Month view.
Repeat. The screen here contains common options for recurring events: every day, every week, and so on. It starts out saying Never.
Once you tap a selection, you return to the Edit screen. Now you can tap the End Repeat button to specify when this event should stop repeating. If you leave the setting at Never, then you’re stuck seeing this event repeating on your calendar until the end of time (a good choice for recording, say, your anniversary, especially if your spouse might be consulting the same calendar).
In other situations, you may prefer to tap On Date and spin the three dials (month, day, year) to specify an ending date, which is useful for car payments or a season’s worth of soccer games.
Tap New Event to return to the editing screen.
Travel Time. If you turn on this switch, you can indicate how long it’ll take you to get to this appointment.

You get six canned choices, from five minutes to two hours. Or you can tap Starting Location and specify your starting point, and marvel as the iPhone calculates the driving time automatically. (Walking time, too, if it’s close enough.)
Two things then happen. First, the travel time is blocked off on your calendar, so you don’t accidentally schedule things during your driving time. (The travel time is depicted as a dotted extension of the appointment.)
Second, if you’ve set up an alarm reminder, it will go off that much earlier, so you have time to get where you’re going.
Calendar. Tap here to specify which color-coded calendar (category, like Home, Kids, or Work) this appointment belongs to. Turn to “Editing and Rescheduling Events (Fun Way)” for details on the calendar concept.
Inviees. If you have an iCloud, Exchange, or CalDAV account, you can invite people to an event—a meeting, a party, whatever—and track their responses, right there on your phone (or any iCloud gadget). When you tap Invitees, you get an Add Invitees screen, where you can type in the email addresses of your lucky guests. (Or tap
 to choose them from your Contacts list.)
Later, when you tap Done, the phone fires off email invitations to those guests. It contains buttons for them to click: Accept, Decline, and Maybe. You get to see their responses right here in the details of your calendar event.
As icing on the cake, your guests will see a pop-up reminder on their phones when the time comes for the party to get started.
Alert. This screen tells Calendar how to notify you when a certain appointment is about to begin. Calendar can send any of four kinds of flags to get your attention. Tap how much notice you want: 5, 15, or 30 minutes before the big moment; an hour or two before; a day or two before; a week before; or on the day of the event.
NOTE
For all-day events like birthdays, you get a smaller but very useful list of choices: “On day of event (9 AM),” “1 day before (9 AM),” “2 days before (9 AM),” and “1 week before.”
When you tap Add Event and return to the main Add Event screen, you see that a new line, called Second Alert, has sprouted up beneath the first Alert line. This line lets you schedule a second warning for your appointment, which can occur either before or after the first one. Think of it as a backup alarm for events of extra urgency.
Once you’ve scheduled these alerts, you’ll see a message appear on the screen at the appointed time(s). (Even if the phone was asleep, it appears briefly.) You’ll also hear a chirpy alarm sound.
TIP
The iPhone doesn’t play the sound if you turned off Calendar Alerts in Settings → Sounds or Settings → Sounds & Haptics. It also doesn’t play if you’ve silenced the phone with the silencer switch on the side.
Show as. If you work in the business world, it’s courteous to mark your new appointments as either Busy or Free. That way, other people who see your calendar, trying to schedule a meeting when you can attend, will know which events on your calendar are movable and which are nonnegotiable. If you’re just indicating “Keeping Up with the Kardashians TV marathon,” maybe that one should be marked as Free.
URL. Here’s a spot where you can record the web address of some online site that provides more information about this event.
Notes. Here’s your chance to customize your calendar event. You can type any text you want in the Notes area—driving directions, contact phone numbers, a call history, or whatever. Tap Done.
When you’re done filling in all these blanks, tap Add. Your newly scheduled event now shows up on the calendar.
Making an Appointment (Day View, Week View)
As noted earlier, turning the phone 90 degrees opens up a widescreen, scrolling Week view of your life.
In both Day view and Week view, you can hold your finger down on a time slot to add a new, one-hour appointment right there. You’re asked to enter a name and, if you like, location for this new appointment. Tap Add. You can always edit this appointment’s details or duration later, as described next—but this quick-and-dirty technique saves the effort of tapping in Starts and Ends times.
Editing, Rescheduling, Deleting Events (Long Way)
To examine the details of an appointment in the calendar, tap it once. The Event Details screen appears, filled with the details you previously established.
To edit any of these characteristics, tap Edit. You return to what looks like a clone of the New Event screen. Here you can change the name, time, alarm, repeat schedule, calendar category, or any other detail of the event, just the way you set them up to begin with.
This time, there’s a red Delete Event button at the bottom. That’s the only way to erase an appointment from your calendar. (You can’t erase events created by other people—Facebook birthdays, meetings on shared calendars, and so on—only appointments you created.)
Editing and Rescheduling Events (Fun Way)
In Day or Week views, you can drag an appointment’s block to another time slot or even another day. Just hold your finger down on the appointment’s bubble for about a second—until it darkens—before you start to drag. It’s a lot quicker and more fluid than having to edit in a dialog box.
You can also change the duration of an appointment in Day and Week views. Hold your finger down on its colored block for about a second; when you let go, round handles appear.
You can drag those tiny handles up or down to make the block taller or shorter, in effect making it start or end at a different time.
Whether you drag the whole block, the top edge, or the bottom edge, the iPhone thoughtfully displays “:15,” “:30,” or “:45” on the left-side time ruler to let you know where you’ll be when you let go.

The Clendar (Category) Concept
A calendar, in Apple’s somewhat confusing terminology, is a color-coded subset—a category—into which you can place various appointments. They can be anything you like. One person might have calendars called Home, Work, and TV Reminders. Another might have Me, Spouse ’n’ Me, and The Kidz. A small business could have categories called Deductible Travel, R&D, and R&R.
You can create and edit calendar categories right on the iPhone, in your desktop calendar program, or (if you’re an iCloud member) at www.icloud.com when you’re at your computer; all your categories and color-codings show up on the iPhone automatically.
At any time, on the iPhone, you can choose which subset of categories you want to see. Just tap Calendars at the bottom of Day, Month, or Year view. You arrive at the big color-coded list of your categories (below, left). As you can see, it’s subdivided according to your accounts: your Gmail categories, your Yahoo categories, your iCloud categories, and so on. There’s even a Facebook option, if you’ve set up your Facebook account, so that you can see your Facebook calendar entries and friends’ birthdays right on the main calendar.

This screen exists partly as a reference, a cheat sheet to help you remember what color goes with which category, and partly as a tappable subset chooser. That is, you can tap a category’s name to hide or show all of its appointments on the calendar. A checkmark means you’re seeing its appointments. (The All [Account Name] button turns on or off all that account’s categories at once.)
If you tap ![]() next to a calendar’s name, you’re offered a screen where you can change the calendar’s name; list of people who can see it (“Shared With:”); whether or not you get notified when one of those people changes events in this category (Show Changes); what color you want this category’s events to have (“Color”); whether you want to get notifications of items in this calendar (Event Alerts); and if you want other people to be able to see (but not edit) this category (Public Calendar, described in the Tip below).
next to a calendar’s name, you’re offered a screen where you can change the calendar’s name; list of people who can see it (“Shared With:”); whether or not you get notified when one of those people changes events in this category (Show Changes); what color you want this category’s events to have (“Color”); whether you want to get notifications of items in this calendar (Event Alerts); and if you want other people to be able to see (but not edit) this category (Public Calendar, described in the Tip below).
Or scroll all the way down to see the Delete Calendar button.
The Edit Calendars screen also offers an Add Calendar button. It’s the key to creating, naming, and colorizing a new calendar on the phone. (Whatever changes you make to your calendar categories on the phone will be synced back to your Mac or PC.)
TIP
You can share an iCloud calendar with other iCloud members (previous page, right), which is fantastic for families and small businesses who need to coordinate. Tap Calendars, and then tap ![]() next to the calendar’s name. Tap Add Person and enter the person’s name. Your invitees get invitations by email; with one click, they’ve added your appointments to their calendars. They can make changes, too.
next to the calendar’s name. Tap Add Person and enter the person’s name. Your invitees get invitations by email; with one click, they’ve added your appointments to their calendars. They can make changes, too.
You can also share a calendar with anyone (not just iCloud members) in a “Look, don’t touch” condition. Tap Calendars, and then tap ![]() next to the calendar’s name. Turn on Public Calendar; tap Share Link to open the Share sheet for sending the link. The recipients have but to tap that link and then tap Subscribe to see your Public calendar’s events in their own Calendar apps.
next to the calendar’s name. Turn on Public Calendar; tap Share Link to open the Share sheet for sending the link. The recipients have but to tap that link and then tap Subscribe to see your Public calendar’s events in their own Calendar apps.
Search
If you tap ![]() and type into the search box, you pare down the list of all calendar events from all time; only events whose names match what you’ve typed show up. Tap one to jump to its block on the corresponding Day view.
and type into the search box, you pare down the list of all calendar events from all time; only events whose names match what you’ve typed show up. Tap one to jump to its block on the corresponding Day view.
Next time you’re sure you made an appointment with Robin but you can’t remember the date, keep this search feature in mind.
TIP
The iOS calendar is pretty basic. For more features and power, consider calendar apps like Fantastical or BusyCal.
Invitations
Invitations are electronic invitations that coworkers send you from Outlook or other calendar apps. If you click Accept, the meeting gets dropped onto the proper date in your calendar, and your name gets added to the list of attendees maintained by the person who invited you. If you click Maybe, the meeting is flagged that way, on both your calendar and the sender’s.
You’ll know when you have an invite. You get a standard notification, a numbered “badge” on Calendar’s icon on the Home screen, and a similar badge on the Inbox at the lower-right corner. Tapping Inbox shows the Invitations list, which summarizes all invitations you’ve accepted, maybe’d, or not responded to yet.
NOTE
Invitations you haven’t dealt with also show up on the Calendar’s List view or Day view with dotted shading. That’s the iPhone’s clever way of showing you just how severely your workday will be ruined.
You can also generate invitations. When you’re filling out the Info form for a new appointment, tap the field called Invitees; enter the email addresses of the people you’d like to invite. Your invitation will show up in whatever calendar programs your invitees use, and they’ll never know you didn’t send it from some corporate copy of Microsoft Outlook.
Clock
It’s not just a clock—it’s more like a time factory. Hiding behind this icon on the Home screen are five programs: a world clock, an alarm clock, a stopwatch, a countdown timer, and a bedtime-management module.
NOTE
The app icon itself on the Home screen shows the current time! Isn’t that cute?
World Clock
When you tap World Clock on the Clock screen, you start out with only one clock, showing the current time in Apple’s own Cupertino, California.
You can open up several of these clocks and set each one to show the time in a different city. Now you’ll know what time it is in some remote city, so you don’t wake somebody up at what turns out to be 3 a.m.
To specify which city’s time appears on the clock, tap + at the upper-right corner. Scroll to the city you want, or tap its first letter in the index at the right side to save scrolling, or tap in the search box at the top and type the name of a major city. As you type, matching city names appear; tap the one whose time you want to track.
As soon as you tap a city name, you return to the World Clock display.

You can scroll the list of clocks. You’re not limited by the number that fit on your screen at once.
TIP
Only the world’s major cities are in the iPhone’s database. If you’re trying to track the time in Squirrel Cheeks, New Mexico, add a major city in the same time zone instead—like Albuquerque.
To edit the list of clocks, tap Edit. Delete a city clock by tapping ![]() and then Delete, or drag clocks up and down using the
and then Delete, or drag clocks up and down using the ![]() as a handle. Then tap Done.
as a handle. Then tap Done.
Alarm
If you travel much, this feature could turn out to be one of your iPhone’s most useful functions. It’s reliable, it’s programmable, and it even wakes the phone first, if necessary, to wake you.
To set an alarm, tap Alarm at the bottom of the Clock screen. You’re shown the list of alarms you’ve already created (facing page, left), even if none are currently set to go off. You could create a 6:30 a.m. alarm for weekdays and an 11:30 a.m. alarm for weekends.
To create a new alarm, tap + to open the Add Alarm screen.
TIP
But really, you should not bother setting alarms using this manual technique. Instead, you’ll save a lot of time and steps by using Siri. Just say, “Set my alarm for 7:30 a.m.” (or whatever time you want).
And while we’re at it: You can also say, “Change my 7:30 a.m. alarm to 8 a.m.” And if you get really lucky with your life karma, you may even have the opportunity to say the greatest thing you can possibly say to Siri: “Turn off my alarm.”

You have several options here:
Time dials. Spin these three vertical wheels—hour, minute, AM/PM—to specify the time you want the alarm to go off.
Repeat. Tap to specify what days this alarm rings. You can specify, for example, Mondays, Wednesdays, and Fridays by tapping those three buttons. (Tap a day-of-the-week button again to turn off its checkmark.) Tap Back when you’re done. (If you choose Saturdays and Sundays, iOS is smart enough to call that “Weekends.” And it knows that Monday, Tuesday, Wednesday, Thursday, and Friday are “Weekdays.”)
Label. Tap to give this alarm a description, like “Get dressed for wedding.” That message appears on the screen when the alarm goes off.
Sound. Choose what sound you want to ring. You can choose from any of the iPhone’s ringtone sounds, any you’ve added yourself—or, best of all, Pick a Song. That’s right—you can wake to the music of your choice.
Snooze. If this option is on, then at the appointed time the alarm message on the screen offers you a Snooze button. Tap it for nine more minutes of sleep, at which point the iPhone tries again. (If your phone was in Sleep mode, it gives you a countdown to the next rude awakening.)
When you finally tap Save, you return to the Alarm screen, which lists your new alarm. Just tap the on/off switch to cancel an alarm. It stays in the list, though, so you can quickly reactivate it another day, without having to redo the whole thing. You can tap + to set another alarm, if you like.
Now the ![]() icon appears in the status bar at the top of the iPhone screen (or, on the iPhone X, just in the Control Center). That’s your indicator that the alarm is set.
icon appears in the status bar at the top of the iPhone screen (or, on the iPhone X, just in the Control Center). That’s your indicator that the alarm is set.
To delete an alarm, swipe left across its name and then tap Delete. To make changes to the time, name, sound, and so on, tap Edit, and then tap the alarm.
TIP
The iPhone never deletes an alarm after using it; over time, therefore, your list of alarms may grow alarmingly large. Fortunately, you can tell Siri to clean them up for you in one fell swoop. Just say, “Delete all my alarms.”
So what happens when the alarm goes off? The iPhone wakes itself up, if it was asleep. A message appears, identifying the alarm and the time.
And, of course, the sound rings. This alarm is one of the only iPhone sounds that you’ll hear even if the silencer switch is turned on. Apple figures that if you’ve gone to the trouble of setting an alarm, you probably want to know about it, even if you forget to turn the ringer back on.
To stop the alarm, tap Stop or press the home button. To snooze it, tap the Snooze button or press the side button or a volume key. (In other words, in your sleepy haze, just grab the phone with your whole hand and squeeze. You’ll hit something that shuts the thing off.)
Bedtime
Medical research tells us that sleep deprivation and inconsistent sleep schedules take a terrible toll on our health, mood, and productivity. So iOS’s Clock app offers a new Bedtime tab. If you answer a few questions about your sleep habits, the app will attempt to keep your sleep regular—prompting you when it’s time to get ready for bed, waking you at a consistent time, and keeping a graph of your sleep consistency.
The first time you open this panel, the interview begins. On successive screens, it asks: What time would you like to wake up? Which days of the week should the alarm go off? How many hours of sleep do you need each night? When would you like a bedtime reminder? (That is, how many minutes do you need between the reminder and lights out?) What ringtone or sound do you want to hear when you wake up?
TIP
You can change your answers to any of these questions later by tapping Options at top left.
At this point, you see the master Bedtime graph shown below at left. It’s a handy visualization of the mental math millions of people perform every night anyway: “If I go to bed now, I’ll get five hours of sleep!”
The real point of Bedtime, though, is the Sleep Analysis graph below all of this. Your goal is to keep the bars consistent over time—both in length and vertical position. It’s not enough to get enough sleep; you should also try to sleep during the same period each night.
If you care about your health, mood, and productivity, that is.

TIP
The More history button you may see here opens the Health app described later in this chapter. Behind the scenes, the Health app is doing the actual work for the Bedtime module.
Stopwatch
You’ve never met a more beautiful stopwatch than this one. Tap Start to begin timing something: a runner, a train, a person who’s arguing with you.
While the digits are flying by, you can tap Lap as often as you like. Each time, the list at the bottom identifies how much time elapsed since the last time you tapped Lap. It’s a way for you to compare, for example, how much time a runner is spending on each lap around a track. You see the numbered laps and the time for each.
NOTE
If you prefer an old-timey analog stopwatch display, slide the digital readout to the left. Slide right to bring back the digital stopwatch.
You can work in other apps while the stopwatch is counting. In fact, the timer keeps ticking away even when the iPhone is asleep! As a result, you can time long-term events, like how long it takes an ice sculpture to melt, the time it takes for a bean seed to sprout, or the length of a Michael Bay movie.

Tap Stop to freeze the counter; tap Start to resume it. If you tap Reset, you reset the counter to zero and erase all the lap times.
Timer
The fourth Clock mini-app is a countdown timer. You input a starting time, and it counts down to zero. (New—now with seconds!)
Countdown timers are everywhere in life. They measure the periods in sports and games, cooking times in the kitchen, penalties on The Amazing Race. But on the iPhone, the timer has an especially handy function: It can turn off the music or video after a specified amount of time. In short, it’s a sleep timer that plays you to sleep and then shuts off to save power.
To set the timer, open the Clock app and then tap Timer. Spin the three dials to specify the number of hours, minutes, and seconds you want to count down.
Then tap When Timer Ends to set up what happens when the timer reaches 0:00. Most of the options here are ringtone sounds, so you’ll have an audible cue that the time’s up. The last one, though, Stop Playing, is that sleep timer. It stops audio and video playback at the appointed time, so that you (and the iPhone) can sleep. Tap Set.
Finally, tap Start. Big clock digits count down toward zero. While it’s in progress, you can do other things on the iPhone, change the When Timer Ends settings, or just hit Cancel to forget the whole thing.
TIP
It’s much faster and simpler to use Siri to start, pause, and resume the Timer. See ???.
You can also open the Control Center (“Control Center”) and long-press or hard-press the Timer icon. Its shortcut menu offers instant options for 12 increments, from one minute to two hours.
Compass
The iPhone has something very few other phones offer: a magnetic-field sensor known as a magnetometer—even better known as a compass.
When you open the Compass app, you get exactly what you’d expect: a classic Boy Scout wilderness compass that always points north.

Except it does a few things the Boy Scout compasses never did. Like displaying a digital readout of your heading, altitude, city name, and precise geographic coordinates at the bottom. And offering a choice of true north (the “top” point of the Earth’s rotational axis) or magnetic north (the spot that traditional compasses point to, which is about 11 degrees away from true north). You choose in Settings → Compass.
To use the compass, hold it roughly parallel to the ground, and then read it like…a compass. Tap the center of the compass to lock in your current heading; a red strip shows how far you are off course. Tap again to unlock the heading.
TIP
For many people, the real power of the compass is in the Maps app. (You can jump directly from Compass to Maps by tapping the coordinates below the compass dial.)
The compass lets Maps know which way you’re facing. That’s a critical detail when you’re lost in a city, trying to find a new address, or emerging from the subway with no idea which way to walk.
People who write iPhone programs can tap into the compass, too. There’s an “augmented reality” app called New York Nearest Subway, for example. By using the compass, GPS, and tilt-sensor information, it knows where you are and how you’re holding the phone—and so it superimposes arrows that show where to find the nearest subway stop and which line it’s on.
The Carpenter’s Level
The Compass app has a secret identity: It doubles as a carpenter’s level. The next time you need to hang a picture, or prop up a wobbly table, or raise a barn, you’ll now know when you’ve got things perfectly horizontal or vertical.
From the Compass screen, swipe to the left to reveal the level. It measures all three dimensions:
Right/left. Hold the iPhone upright (against a picture you’re hanging, say), and tilt it left and right. When it’s perfectly upright, the readout says 0 degrees and the bottom half of the screen turns green.
Forward/back. Hold the phone upright and tip it away from or toward you. Once again, “0 degrees” and green mean “level.”
Perfectly flat. Hold the phone on its back, screen facing the sky. When the two circles merge (previous page, right), you’ll know you’ve got it perfectly level. You could, for example, put the iPhone on a table you’re trying to adjust, using its gauge to know how close you’re getting as you wedge something under its short leg.
TIP
Level doesn’t have to be the zero point. You can tilt the phone to any angle and declare that to be the zero point—by tapping the screen.
Files
The new Files is one of the most useful new iOS 11 features. But explaining it might take a few paragraphs.
Meet iCloud Drive…
For a few years now, Apple has offered a convenient service called iCloud Drive. Once you’ve switched it on (in Settings → [your name] → iCloud), your phone has a magic folder. Whatever you put into it appears, almost instantly, in the iCloud Drive folders on all your other machines: Macs, iPhones, iPads, and even Windows PCs. In fact, your files are even available at iCloud.com, so you can grab them when you’re stranded on a desert island with nothing but somebody else’s computer. (And Internet access.)
This is an incredibly useful feature. No more emailing files to yourself. No more carrying things around on a flash drive. After working on some document at the office, you can go home and resume from right where you stopped; the same file is waiting for you, exactly as you left it.

The iCloud Drive is a great backup, too, because of its automatic duplication on multiple machines. Even if your phone is stolen or burned to aluminum dust, your iCloud Drive files are safe.
…And Its Rivals
Ah, but iCloud Drive is not the only magic-folder syncing service. There’s also Dropbox, Google Drive, OneDrive (Microsoft), Creative Cloud (Adobe), and Box. They all work essentially alike.
NOTE
For example, they all offer a certain amount of free storage—5 GB, in Apple’s case—and if you outgrow that, you can pay monthly for more room.
So in iOS 11, Apple thought it might be cool to create one single app that can access all of these services. You can search all of them at once, too!
Working with Files
On the Browse tab, tap Locations to hook up your various accounts (Google Drive, Dropbox, and so on). Tap Edit, and then turn on the services you use. Each will require you to log in with your name and password for that service. You can also drag the ![]() handle to rearrange them in the list. Tap Done.
handle to rearrange them in the list. Tap Done.
To see your actual files, tap one of the services’ names—say, iCloud Drive. And boom: You’re looking at a tidy list of all the files and folders on that “drive.” Here’s what you can do with them:
To download a file to your phone, tap its name (or the
 button).
To open a file, tap it. Now, iOS is not macOS or Windows; still, it can open many kinds of documents right on the phone. Graphics, music and video files, Microsoft Office documents, and PDFs all open right up—at least once they’ve been downloaded. Other kinds of computer files may open in their associated apps on the phone—or not at all. In those cases, Files is still useful, though, because it lets you forward those documents by email to a machine that can open them.
TIP
If you’ve opened a photo or PDF file, you can annotate it using the Markup tools described in “Marking Up Your Photos”. Tap the
 .
.To see what’s in a file without fully opening it, use the peek and pop finger-pressure technique described in “Peek and Pop”.
To delete a file or folder, swipe to the left across it, and then tap Delete.
To manipulate a file, lightly touch it for one second. Buttons appear for Copy, Duplicate, Rename, Move, Delete, Share, Tags (or Favorite), and Info.
Those are fairly self-explanatory, but don’t miss the Share feature. It lets you send anyone in the world a copy of anything on any of your virtual drives, just by sending a link to it.
To operate on multiple files simultaneously, tap Select, and then tap the files you want. Now you can use the
 (Share),
  (Duplicate), (Move to different folder), and
  (Delete) buttons at the bottom.
TIP
There’s a second way to select multiple files, in readiness for moving into a folder. It’s tricky, but faster once you get it. Start dragging one file or folder, and then pause. Without releasing your finger, use other fingers to tap other icons. You’ll see those additional icons jump to your original finger, ready to complete the drag into a folder’s icon.
If you tug downward on the display of files and folders, you reveal three new blue controls at the top:
To create a new folder, tap
 at the top-left corner.
To change the sorting order, tap Sorted by at the top; choose Name, Date, Size, or Tags.
To switch from list view to icon view, tap the
 icon at top right.
Tagging Files
The Browse tab also lets you round up all files with a particular tag (a color-coded label that you make up, like Important or Smithers Project). What’s especially powerful is that your tagged files can come from all different services—one from Dropbox, a few from Google Drive, and so on. They all appear in one unified, harmonious “tagged” list, without reference to creed, color, or place of origin.
To apply a tag, select a file, or several. Now tap ![]() (or tap the Share button that appears in the scrollable black command bar when you long-press the icon). Tap +Tag, and then tap the tag name(s) that you want to apply. This, by the way, is your only chance to create a new tag (Add New Tag).
(or tap the Share button that appears in the scrollable black command bar when you long-press the icon). Tap +Tag, and then tap the tag name(s) that you want to apply. This, by the way, is your only chance to create a new tag (Add New Tag).
Thereafter, you can see all the files bearing a certain tag in either of two ways:
On the main Browse screen, tap a tag name to see all the files you’ve tagged that way.
On the Recents screen, scroll down to the tag headings; there are your tagged files. (As you could probably figure out, the Recents screen’s other purpose is to display the icons of files you’ve opened recently.)
(To remove a tag, long-press to select the file or files, and then tap Tags in the black command bar. Tap the tag name to remove the checkmark.)
Favorites Folders
Tags work only on files. What about folders?
For those, Apple has supplied a Favorites feature. Select a folder (or several); then, from the command bar that appears when you long-press an icon, tap Favorite. Those folders now appear beneath the Favorites heading on the main Browse tab, for quick access.
Here again, your Favorites folders can come from all different syncing services. They’re just happy to be your favorites.
TIP
Your iCloud Drive folder contains inner folders named for Apple apps like Pages, Numbers, and so on. Yes, these folders hold the corresponding kinds of documents, for ease of finding later.
But Pages, Keynote, and Numbers offer a new feature in iOS 11: real-time, simultaneous editing across the Internet. You and your colleagues can collaborate on one of these kinds of documents live. (If you’ve ever used Google Docs, you’re familiar with the process.)
There’s a lot of fine print to making this work; fortunately, Apple has created a guide here: https://support.apple.com/en-us/HT206181.
In all these apps, there’s an Open button or icon that presents the iCloud Drive’s contents. In Pages, for example, when you’re viewing your list of documents, tap Locations, and then tap iCloud. There’s the list of folders on your iCloud Drive, corresponding perfectly to what you would have seen on a Mac or a PC. Tap a folder to open it and see what’s in it.
Health
This app is a dashboard for all the health data—activity, sleep, nutrition, relaxation—generated by your fitness apps. But even if you don’t have an app or a band, you have the iPhone itself; unbeknownst to you, it’s been quietly tracking the steps you’ve been taking and the flights of stairs you’ve been climbing, just by measuring the jostling of the phone in your pocket or bag! (If that creeps you out just a bit, you can turn it off in Settings → Privacy → Motion & Fitness.)
Lots of apps and fitness bands share their data with Health: the Apple Watch, MyFitnessPal, Strava, MapMyRun, WebMD, MotionX-24/7, 7 Minute Workout, Nokia Health Mate, Garmin Connect Mobile, Lark, Lose It!, Sleepio, Weight Watchers, and so on. Fitness tracking is a big, big deal these days, now that your phone and/or your fitness band can measure your steps, exercise, and sleep.
TIP
The one fitness brand that’s screamingly missing from this list is Fitbit. Your Fitbit band can’t share its data with the Health app—at least not without the help of a $3 app called Sync Solver or a free one called Power Sync for Fitbit.
If you have one of those bands or apps, you’ll have to fish around in its settings until you find the option to connect with Health. At that point, you must turn on the kinds of data you want it to share with Health.
Now open the Health app. The next bit of setup is to specify what kind of data you want staring you in the face on its Dashboard screen. This is the motivational aspect of Health: The more you’re forced to look at and think about your weight, activity, sleep, or calories, the more likely you are to improve.
The Four Biggies
In Apple’s mind, the Big Four ingredients for health are activity, mindfulness, nutrition, and sleep. Health offers four tabs at the bottom that help you keep tabs on these:
The Today Tab. Here’s a single summary screen of the Big Four, all in one place. You can tap any one of these summary bubbles to view it in more detail—for example, to switch among Day, Week, Month, or Year graphs.
Health Data. An introductory video appears when you tap each of these, explaining with charming British narration the importance of that life factor. On each screen, you can see the latest graphs of your efforts in that category. (For some, like mindfulness, you won’t see anything unless you’ve installed an app that generates that kind of data.)

Below those tiles, you’ll find places to record health data, like your body measurements, electronic medical records, reproductive data, and so on.
Sources. This screen lists all the fitness apps and gadgets you’ve hooked up to Health (including the Apple Watch, if you have one), so that you know where your data is going.
Medical ID. This screen offers a reason to use the Health app even if you don’t use any fitness apps and don’t track any medical statistics. It’s the electronic equivalent of an emergency medical ID bracelet. You can record your name, age, blood type, weight, height, medical conditions, and emergency contact information. This screen also makes it easy to do something noble: to offer to donate your organs after you pass away.
If you tap Edit and turn on Show When Locked, then this information will be available on your phone’s Lock screen. If you pass out, have a seizure, or otherwise become medically inconvenienced, a passerby or medical pro can get that critical information without needing your password (or your awareness).
If that person is technically savvy, that is. Finding the Medical ID screen can be tricky. It’s available on the Enter Passcode screen, for example; tap Emergency; tap Medical ID. It’s also available on the special Emergency shutdown screen (“Widgets on the Home Screen”).
Home
HomeKit is Apple’s home-automation standard. The Home app lets you control any product whose box says “Works with HomeKit”—all those “smart” or “connected” door locks, security cameras, power outlets, thermostats, doorbells, lightbulbs, leak/freeze/temperature/humidity/air-quality sensors, and so on.
Once you’ve installed the gadget, you can turn it on and off, monitor its readouts, or adjust its settings (a thermostat is shown on the next page at right). You can do all of that from the Home app, from the Control Center, or by using Siri voice commands (“Lock the front door,” “Turn on the downstairs lights,” and so on). You can automate those actions based on the time or your location, or hand off control of certain devices to other people’s iPhones.

iBooks
iBooks is Apple’s ebook reading program. It turns the iPhone into a sort of pocket-sized Kindle. With iBooks, you can carry around dozens or hundreds of books in your pocket, which, in the pre-ebook days, would have drawn some funny looks in public.
Most people think of iBooks as a reader for books that Apple sells on its iTunes bookstore—bestsellers and current fiction, for example—and it does that very well. But you can also load it up with your own PDF documents, as well as thousands of free, older, out-of-copyright books.
TIP
iBooks is very cool and all. But, in the interest of fairness, it’s worth noting that Amazon’s free Kindle app, and Barnes & Noble’s free B&N Nook app, are much the same thing—but offer much bigger book libraries at lower prices than Apple’s.
Downloading Books
To shop the iBooks bookstore, open the iBooks app. If this is your first time diving in, you might be offered a selection of free starter books to download right now. Go for it; they’re brand-name books by famous authors.
If, at any time, you want to buy another book—it could happen—well, the icons across the bottom are the literary equivalent of the App Store. Tap Featured to see what Apple is plugging this week; Top Charts to see this week’s bestsellers, including what’s on The New York Times Best Sellers list (note that there’s a special row for free books); Search to search by name; and Purchased to see what you’ve bought.
TIP
Once you’ve bought a book from Apple, you can download it again on other iPhones, iPod Touches, iPads, and Macs. Buy once, read many times. That’s the purpose of the Not on This iPhone tab, which appears when you tap Purchased.
Once you find a book that looks good, you can tap Sample to download a free chapter, read ratings and reviews, or tap the price itself to buy the book and download it straight to the phone.
PDFs and ePub Files
You can also load up your ebook reader from your computer, feeding it with PDF documents and ePub files.
NOTE
ePub is the normal iBooks format. It’s a very popular standard for ebook readers, Apple’s and otherwise. The only difference between the ePub documents you create and the ones Apple sells is that Apple’s are copy-protected.
Your Mac or PC is the most convenient loading dock for files bound for your iPhone. If you have a Mac, open the iBooks program. If not, open iTunes, click your iPhone’s icon at the top (when it’s connected), and then click Books.
Either way, you now see all the books, PDF documents, and ePub files that you’ve slated for transfer. To add to this set, just drag files off your desktop and directly into this window.
And where are you supposed to get all these files? Well, PDF documents are everywhere—people send them as attachments, and you can turn any document into a PDF file. (For example, on the Mac, in any program, choose File → Print; in the resulting dialog box, click PDF → Save as PDF.)
TIP
If you get a PDF document as an email attachment on the phone, then adding it to iBooks is even easier. Tap the attachment to open it; now tap Open in iBooks in the corner of the page.

But free ebooks in ePub format are everywhere, too. There are 33,000 free downloadable books at gutenberg.org, for example, and over a million at books.google.com—oldies, but classic oldies, with lots of Mark Twain, Agatha Christie, Herman Melville, H.G. Wells, and so on. (Lots of these are available in the Free pages of Apple’s own iBooks Store, too.)
TIP
You’ll discover that these freebie books usually come with generic-looking covers. But once you’ve dragged them into iTunes on your computer, it’s easy to add good-looking covers. Use images.google.com to search for the book’s title. Right-click (or Control-click) the cover image in your web browser; from the shortcut menu, choose Copy Image. In iTunes, in Library mode, choose Books from the top-left pop-up menu. Right-click (or Control-click) the generic book; choose Get Info; click Artwork; and paste the cover you copied. Now that cover will sync over to the iPhone along with the book.
Once you’ve got books in iTunes, connect the iPhone, choose its name at top right, click the Books tab at top, and turn on the checkboxes of the books you want to transfer.
Your Library
Once you’ve supplied your iBooks app with some reading material, the fun begins. When you open the app, its My Books tab shows a futuristic, shaded bookshelf with your library represented as little book covers. Mostly what you’ll do here is tap a book to open it. But there are other activities waiting for you:
Tap the
 icon, which switches the book-cover view to a much more boring (but more compact) list view. Buttons at the top let you sort the list by author, title, category, and so on.
Tap Select if you want to delete a book, or a bunch of them. To do that, tap each book thumbnail that you want to target for termination; observe how they sprout
 marks. Then tap Delete. Of course, deleting a book from the phone doesn’t delete your safety copy in iTunes or online.
The Search button at the bottom of the iBooks screen lets you search by author or title—not just your books, but the entire iBooks Store.
When you first start using a new iPhone, iPad, or Mac, your book covers bear the
symbol. It means: “Our records show that you’ve bought this book, but it’s still online, in the great Apple locker in the sky. Tap to download it to your phone so you can start reading.”
Collections
You can create subfolders for your books called collections. You might have one for school and one for work, or one for you and one for somebody who shares your phone, for example.
To switch your view to a different collection, tap the collection’s name. It’s the top-center button, which starts out saying All Books. (If you’ve loaded some PDF documents, then you’ll find a collection called “PDFs,” already set up.) To create a new collection, open that top-center menu and hit New Collection.
And to move a book into a different collection: Tap Select, tap a book (or several), and then tap Move. It opens the Collections screen shown on the next page, so that you can choose a new collection for the selected items.
TIP
You can reorganize your bookshelf in a collection (which you can’t do in the All Books view). Hold down your finger on a book until it swells with pride, and then drag it into a new spot.

Reading
Open the book or PDF by tapping the book cover. Now the book opens, ready for you to read. Looks great, doesn’t it? (If you’re returning to a book you’ve been reading, iBooks remembers your place.)
If the phone detects that it’s nighttime (or just dark where you are), the screen appears with white text against a black background. That’s to prevent the bright white light of your phone from disturbing other people in, for example, the movie theater. (This is the Night theme, and you can turn it off.)
TIP
Turn the phone 90 degrees for a wider column of text.
In general, reading is simple: Just read. Turn the page by tapping the edge of the page—or swiping your finger across the page. (If you swipe slowly, you can actually see the “paper” bending over—in fact, you can see through to the “ink” on the other side of the page! Amaze your friends.) You can tap or swipe the left edge (to go back a page) or the right edge (to go forward).
TIP
This is rotation lock’s big moment. When you want to read lying down, you can prevent the text from rotating 90 degrees using rotation lock (???).
But if you tap a page, a row of additional controls appears:
< takes you back to the bookshelf view.
- opens the table of contents. The chapter or page names are “live”—you can tap one to jump there.
 lets you change the look of the page. For example, this panel offers a screen-brightness slider for the whole phone. (This is the same control you’d find in the Control Center or in Settings.)
The A and
 buttons control the type size—a huge feature for people with tired or over-40 eyes. Tap the larger one repeatedly to enlarge the text; tap the smaller one to shrink it.
The same panel offers a Fonts button, where you can choose from eight typefaces for your book, as well as a Themes button, which lets you specify whether the page itself is White, Sepia (off-white), or Night (black page, white text, for nighttime reading). And there’s an Auto-Night Theme button; if you don’t care for the white-on-black theme, then turn off this switch. Finally, there’s a Scrolling View switch. In scrolling view, you don’t turn book “pages.” Instead, the book scrolls vertically, as though printed on an infinite roll of Charmin.

 lets you search for text within the book you’re reading, which can be extremely useful. As a bonus, there are also Search Web and Search Wikipedia buttons so you can hop online to learn more about something you’ve just read.
 adds a bookmark to the current page. You can flag as many pages, for as many reasons, as you like.
Chaptr slider. At the bottom of the screen, a slider represents the pages of your book. Tap or drag it to jump around in the book; as you drag, a pop-up indicator shows you what chapter and page number you’re scrolling to. (If you’ve magnified the font size, of course, then your book consumes more pages.)
TIP
An iBooks book can include pictures and even videos. Double-tap a picture in a book to zoom in on it.
When you’re reading a PDF document, by the way, you can do something you can’t do when reading regular iBooks titles: zoom in and out using the usual two-finger pinch-and-spread gestures. Very handy indeed.
NOTE
On the other hand, here are some features that don’t work in PDF files (only in ebooks): font and type-size changes, page-turn animations, sepia or black backgrounds, and notes.
And if you want highlights, you’ll have to draw them on manually with the Markup tools (“Marking Up Your Photos”).
Notes, Bookmarks, Highlighting, Dictionary
Here are some more stunts that you’d have trouble pulling off in a printed book. If you double-tap a word, or hold your finger down on a word, you get a bar that offers these options:
Speak reads the highlighted passage aloud. (This button appears only if you’ve turned on Speak Selection in Settings → General → Accessibility → Speech.) Thank you, Siri!
Copy. You can probably guess this one.
Look Up. Opens up a page from iBooks’ built-in dictionary. You know—in the unlikely event that you encounter a word you don’t know.
Highlight. Adds tinted, transparent highlighting, or underlining, to the word you tapped. For best results, don’t tap the Highlight button until you’ve first grabbed the blue-dot handles and dragged them to enclose the entire passage you want highlighted.
Once you tap Highlight, the buttons change into a special Highlight bar (facing page, middle). The first button (
 ) opens a third row of buttons (bottom), so that you can specify which highlight color you want. (The final button in this row designates underlining.)
To remove highlighting, tap
 . The
. The  button adds a note, as described next. The
  button opens the Share sheet, also described momentarily.
Note (
) creates highlighting and opens an empty, colored sticky note so you can type in your own annotations. When you tap Done, your note collapses down to a tiny yellow Post-it peeking out from the right edge of the margin. Tap to reopen it.To delete a note, tap the highlighted text. Tap
.Search opens the same search box that you’d get by tapping the
icon—except this time the highlighted word is already filled in, saving you a bit of typing.Share opens the Share sheet (“The Share Sheet”) so you can send the highlighted material to somebody else, post it to Facebook or Twitter, or copy it to your Clipboard for pasting into another app.
NOTE
If you’ve highlighted a single word, and if you have Speak Selection turned on in Settings → General → Accessibility → Speech, then there’s one more option: Spell. It spells the word aloud for you, one letter at a time.
There are a couple of cool things going on with your bookmarks, notes, and highlighting, by the way. Once you’ve added them to your book, they’re magically and wirelessly synced to any other copies of that book—on other gadgets, like the iPad or iPod Touch, your other iPhones, or even Mac computers running OS X Mavericks or later. Very handy indeed.
Furthermore, if you tap the ![]() to open the Table of Contents, you’ll see the Bookmarks and Notes tabs. Each presents a tidy list of all your bookmarked pages, notes, and highlighted passages. You can tap
to open the Table of Contents, you’ll see the Bookmarks and Notes tabs. Each presents a tidy list of all your bookmarked pages, notes, and highlighted passages. You can tap ![]() (and then Share Notes) to print or email your notes, or tap one of the listings to jump to the relevant page.
(and then Share Notes) to print or email your notes, or tap one of the listings to jump to the relevant page.
BooksThat Read to You

iBooks can actually read to you! It’s a great feature when you’re driving or jogging, when someone’s just learning to read, or when you’re having trouble falling asleep. There’s even a special control panel just for managing your free audiobook reader.
To get started, open Settings → General → Accessibility → Speech. Turn on Speak Screen.
Then open a book in iBooks. Swipe down the page with two fingers to make the iPhone start reading the book to you, out loud, with a synthesized voice. At the same time, a palette appears, offering the speech controls shown on the facing page:
After a few seconds, the palette shrinks into a > button at the edge of the screen—and, after that, it becomes transparent, as though trying to make itself as invisible as possible. You can, of course, tap it to reopen it.
Yes, this is exactly the feature that debuted in the Amazon Kindle and was then removed when publishers screamed bloody murder—but, somehow, so far, Apple has gotten away with it.
iBooks Settings
If you’ve embraced the simple joy of reading electronic books the size of a chalkboard eraser, then you deserve to know where to make settings changes: in Settings → iBooks. Here are the options waiting there:
Use Cellular Data. Do you want to be able to download books using your carrier’s cellular data network (which eats up your monthly data allotment)? If you turn this off, then you can download books only when you’re in a Wi-Fi hotspot.
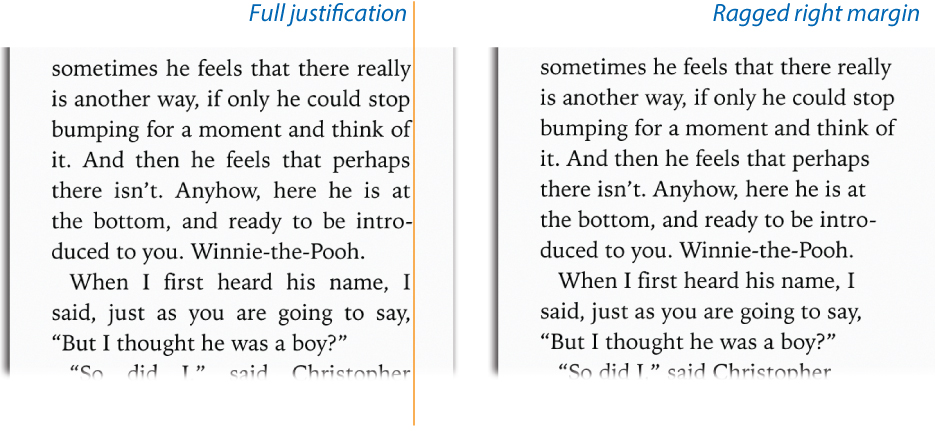
Full Justification. Ordinarily, iBooks presents text with fully justified margins (below, left). Turn this off if you prefer ragged right margins (right).
Auto-hyphenation. Sometimes, typesetting looks better if hyphens allow partial words to appear at the right edge of each line. Especially if you’ve also turned on Full Justification.
Both Margins Advance. Usually, tapping the right edge of the screen turns to the next page, and tapping the left edge turns back a page. If you turn on this option, then tapping either edge of the screen opens the next page. That can be handy if you’re a lefty, for example.
Sync Bookmarks, Sync Collections. Turn these on if you’d like your bookmarks and book collections to be synced with your other Apple gadgets.
Online Content. A few books contain links to video or audio clips online. This option comes set to Off, because video and audio can eat up your monthly cellular data allotment like a hungry teenager.
There are even a couple of controls here that apply to audiobooks. They govern how much time skips when you tap one of the back or forward Skip buttons—15 seconds, for example.
Maps
From its birth in 2007, the iPhone always came with Google Maps—an excellent mapping and navigation app. (Apple wrote it, but Google provided the maps and navigation data.) But in iOS 6, Apple replaced Google Maps with a new mapping system of its own.
Unfortunately, in its initial version, the databases underlying the Maps app had serious errors and problems. Apple promised to keep working on Maps until it was all fixed, but in the meantime, in a remarkable apology letter, CEO Tim Cook recommended using one of Maps’ rivals.
By far the best one is Google Maps. It’s free, it’s amazingly smart (it knows what address you mean after you type only a few letters), it has public-transportation details, live traffic reports, Street View (you can see photos of most addresses, and even “look around” you), and of course Google’s far superior maps and data.
All right—you’ve been warned.
But while Apple’s cartographical elves keep cleaning up the underlying maps, some of its features are pretty great.
Meet Maps
The underlying geographical database may need work, but Maps, the app itself, is a thing of beauty.
It lets you type in any address or point of interest and see it plotted on a map, with turn-by-turn driving directions, just like a $300 windshield GPS unit. It also gives you a live national Yellow Pages business directory and real-time traffic-jam alerts. You can get bus and train schedules for a few U.S. cities. You have a choice of a street-map diagram or actual aerial photos, taken by satellite.
Maps Basics
When you open Maps, a blue dot represents your current location. Tap ![]() to zoom to your current spot. Or, for more controlled zooming, try double-tapping, or “pinching out” with two fingers, or (in iOS 11) double-tapping/dragging with a single finger. (That is, double-tap and, with your finger still down, drag up or down.) Eventually, you zoom in enough to see actual city blocks.
to zoom to your current spot. Or, for more controlled zooming, try double-tapping, or “pinching out” with two fingers, or (in iOS 11) double-tapping/dragging with a single finger. (That is, double-tap and, with your finger still down, drag up or down.) Eventually, you zoom in enough to see actual city blocks.
To zoom out again, you can use the rare two-finger double-tap.
Drag or flick to scroll around the map, or twist two fingers to rotate the map. (A compass icon at top right helps you keep your bearings; you can tap it to restore the map’s usual north-is-up orientation.) And if you drag two fingers up the screen, you tilt the map into 3D view, which makes it look like you’re surveying the map at an angle instead of straight down.

At any time, you can tap ![]() to open a secret panel. Here’s how you switch among Maps’ three views of the world: Map, Transit, or Satellite.
to open a secret panel. Here’s how you switch among Maps’ three views of the world: Map, Transit, or Satellite.
You can set up some preferences, too. Tap Map to decide if you want to see color-coded roads that show the current traffic situation. Tap Satellite to tell Maps whether you want street names and/or traffic colors superimposed on the aerial views.
Each of these tabs offers buttons that let you Mark My Location (drop a pin for your current spot, add it to your Favorites, add it to your Contacts, and so on), Add a Place (record the address and other details of a business, thereby adding it to Apple’s database), and Report an Issue (tell Apple about a bug).
Finding Yourself
If any phone can tell you where you are, it’s the iPhone. It has not one, not two, but three ways to determine your location:
GPS. First, the iPhone contains a traditional GPS chip, of the sort that was found in windshield navigation units of old.
Wi-Fi Positioning System. Metropolitan areas today are blanketed by overlapping Wi-Fi signals. At a typical Manhattan intersection, you might be in range of 20 base stations. Each one broadcasts its own name and unique network address (its MAC address—nothing to do with Mac computers) once every second. A laptop or phone can detect this beacon signal from up to 1,500 feet away.
Imagine if you could correlate all those beacon signals with their physical locations. Why, you’d be able to simulate GPS!
For years, millions of iPhones have been quietly logging all those Wi-Fi signals, noting their network addresses and locations. (The phones never connect to these base stations—they just read the one-way beacon signals.) At this point, Apple’s database knows about millions of hotspots—and the precise longitude and latitude of each.
So, if the iPhone can’t get a fix on GPS, it sniffs for Wi-Fi base stations. If it finds any, it looks up those network addresses and learns the coordinates. This system fails once you’re out of populated areas. On the other hand, it works indoors, which GPS definitely doesn’t.
The cellular triangulation system. As a last resort, the iPhone can check its proximity to the cellphone towers around you. The software works a lot like the Wi-Fi location system, but it relies upon its knowledge of cellular towers’ locations rather than Wi-Fi base stations.
The first Maps trick is to show you where you are: Tap the ![]() at the top of the Maps screen. The button turns solid blue, indicating that the iPhone is consulting its various references to figure out where you are. You show up as a blue dot that moves with you. It keeps tracking until you tap the
at the top of the Maps screen. The button turns solid blue, indicating that the iPhone is consulting its various references to figure out where you are. You show up as a blue dot that moves with you. It keeps tracking until you tap the ![]() enough times to turn it off.
enough times to turn it off.
Orienting Maps
It’s great to see a blue pin on the map, and all—but how do you know which way you’re facing?
Just tap the ![]() until it points straight up. The map spins so that the direction you’re facing is upward, and a “flashlight beam” emanates from your blue dot; its width indicates the iPhone’s degree of confidence. (The narrower the beam, the surer it is.)
until it points straight up. The map spins so that the direction you’re facing is upward, and a “flashlight beam” emanates from your blue dot; its width indicates the iPhone’s degree of confidence. (The narrower the beam, the surer it is.)
Searching Maps
The following paragraphs guide you through using the search box in Maps. But it’s much quicker to use Siri to specify what you want to find.
You can say, for example, “Show me the map of Detroit” or “Show me the closest Starbucks” or “Directions to 200 West 79th Street in New York.” Siri shows you that spot on a map; tap to jump into the Maps app.
If you must use the search box, here’s how it works. It shouldn’t be hard to find, since it opens when you open Maps (below, left).

Business Categories. When you first tap into an empty search box, you get icons for Food, Drinks, Shopping, Travel, Services, Fun, Health, and Transport. Each expands into eight more icons for further refinement (Travel offers Airports, Hotels, Banks & ATMs, and so on). Keep tapping to drill down to the place you want; it’s all designed to save you typing when you’re in a hurry.
TIP
Don’t miss the scrollable list of subcategories or establishments at the very bottom of some of these screens. When you tap Drinks, for example, this ticker may list Sports Bars, Cocktail Bars, Pubs, and so on. Oh—and see the little temperature indicator (previous page, left)? If you press firmly (iPhone 6 or later), it sprouts an hourly weather forecast; press harder to open the Weather app for that place.
Recents. Below the box, there’s a list of searches you’ve recently conducted. You’d be surprised at how often you want to call up the same spot again later—and now you can, just by tapping its name in this list.
TIP
If you swipe a listing to the left, you reveal two buttons: Share (send the location info to someone) and Remove (if you intend to elope and don’t want your parents to find out).
Favorites. One nice thing about Maps is the way it tries to eliminate typing at every step. The Favorites are a great example. They’re addresses you’ve flagged for later use by tapping the
 , an option that appears on every place’s Location card. For sure, you should bookmark your home and workplace. That will make it much easier to request driving directions.
Then, to see your list of favorites, scroll all the way to the bottom of the Recents list and tap Favorites. Tap one to jump to its spot on the map, or swipe to the left to reveal Share, Edit Name, and Remove buttons.
Most people, though, most of the time, wind up typing what they want to find. You can type all kinds of things into the search box:
An adress. You can skip the periods (and usually the commas, too). And you can use abbreviations. Typing 710 w end ave ny ny will find 710 West End Avenue, New York, New York. (In this and any of the other examples, you can type a zip code instead of a city and a state.)
An intersection. Type 57th and lexington, ny ny. Maps finds the spot where East 57th Street crosses Lexington Avenue in New York City.
A city. Type chicago il to see that city. You can zoom in from there.
A zip code or a neighborhood. Type 10014 or greenwich village.
Latitude and longitude coordinates. Type 40.7484° N, 73.9857° W.
A point of interest. Type washington monument or niagara falls.
A business type. Type drugstores in albany ny or hospitals in roanoke va.
A contact’s name. Maps is tied into Contacts, your master address book (“Contacts”). Start typing a person’s name to see the matches.
A business category. Maps is a glorified national Yellow Pages. If you type, for example, pharmacy 60609, then red bubbles show you all the drugstores in that Chicago zip code. It’s a great way to find a gas station, a cash machine, or a hospital in a pinch. Tap a pushpin to see the name of the corresponding business.
As usual, you can tap the map pin’s label bubble to open a details screen. If you’ve searched for a friend, then you see the corresponding Contacts card. If you’ve searched for a business, then you get a screen containing its phone number, address, website, and so on; often, you get a beautiful page of Yelp information (photos, reviews, ratings).
Remember that you can tap a web address to open it or tap a phone number to dial it. (“Hello, what time do you close today?”)
Add a New Place
Once you’ve found something on the map—your current position, say, or something you’ve searched for—you can drop a pin there for future reference. Tap the ![]() button; when the page slides up, tap Mark My Location. A pushpin appears. (If your aim wasn’t exact, you can tap Edit Location and then scroll the map to adjust its position relative to the pin.)
button; when the page slides up, tap Mark My Location. A pushpin appears. (If your aim wasn’t exact, you can tap Edit Location and then scroll the map to adjust its position relative to the pin.)
TIP
You can also drop a pin by holding your finger down on the spot.
Scroll the new place’s “card” to reveal its address, a Share button (so you can let someone else know where you are), an Add to Favorites button, and an option to add this location to somebody’s card in Contacts (or to create a new contact).
The Location Card
Whenever you’ve tapped the name of some place in Apple’s massive database (like a store, restaurant, or point of interest), the bottom part of the screen lists its information screen—its location “card.”

The visible portion of this card already shows the all-important Directions button (above, left). But you can also hide the card by swiping down on it, or expand it to full screen by tapping or swiping up (right).
If this is the location for a restaurant or a business, you might strike gold: The Location page might offer several screens full of useful information, courtesy of Yelp.com. You’ll see the place’s hours of operation, plus one-tap links for placing a phone call to the place or visiting its website. Then there may be customer reviews, photos, delivery and reservation information, and so on.
Links here let you bookmark the spot, get directions, add it to Contacts, or share it with other people (via AirDrop, email, text message, Facebook, or Twitter).
TIP
The Location card for a restaurant may even offer a Reservations button, so that you can book a table on the spot—if, that is, that eatery participates in OpenTable’s online booking system.
Directions
Suppose you’ve just searched for a place. The top part of its location card is open on the screen. At this point, you can tap Directions for instant directions, using four modes of transportation (below, left):
Drive. You’ll get the traditional turn-by-turn driving directions.
Walk. The app will guide you to this place by foot. You get an estimate of the time it’ll take, too.
Transit. This button appears if you’re in one of the 33 major U.S. cities (or 30 overseas cities) for which Apple has public-transportation schedules. More are coming, Apple says.

If you’re lucky enough to be in one of those cities, you’ll discover that the public-transport directions are surprisingly clear and detailed. You even see the color, letter, and number schemes of that city’s bus or rail system right there in the app.
TIP
iOS can warn you when there’s a disruption on your favorite commuter bus or rail system. To tell it which one you want it to monitor, tap
 and then Transit. Tap the map, and then zoom in on the transit line until you can tap its name or number. Its Details screen appears; scroll to the bottom and tap Add to Favorites.
At this point, you can add the Map Transit widget to your Today screen (see “The Today Screen (Widgets)”). Without even unlocking your phone, with one quick swipe, you can see if the train is on time—and if not, what kind of delay you have to look forward to.
Ride means calling an Uber or Lyft driver. (This feature requires that you have the Uber or Lyft app installed and set up.) One tap on Ride shows you the time and price estimates—and offers you a Book button.
In each case, Maps displays an overview of the route you’re about to drive. In fact, it usually proposes several different routes. They’re labeled with little tags that identify how long each will take you: 3 hrs 37 min, 4 hrs 11 min, and 4 hrs 33 min, for example.
If you tap one of these tags, the app lets you know the distance and estimated time for that option and identifies the main roads you’ll be on.
In each case, tap Start to see the first instruction. The map zooms in, and Navigation mode begins.
Navigation Mode
When the iPhone is guiding you to a location, you see a simplified map of the world around you, complete with the outlines of buildings, with huge banners that tell you how to turn next, and onto what street. Siri’s familiar voice speaks the same information at the right times, so you don’t even have to look at the screen.
Even if you hit the side button to lock the phone, the voice guidance continues. (It continues even if you switch to another app; return to Maps by tapping the banner at the top of the screen.)
iPHONE X
Tap the blue button in the left “ear” to return to Maps.
The bottom bar shows your projected arrival time, plus the remaining distance and time. It also offers the End button, which makes the navigation stop.
While Maps is guiding you, you can zoom in and out; you can also pan the map to look ahead at upcoming turns or to inspect alternate routes. You can twist two fingers to turn the map, too.
Once you’ve shifted the view in these ways, a ![]() button appears. Tap it to restore Maps’ usual centered view.
button appears. Tap it to restore Maps’ usual centered view.
While you’re navigating, you can also tap (or swipe up on) the bottom bar to reveal quick-tap buttons like these:
Gas Stations, Lunch, Coffee. Perform instant searches for these frequent-favorite driver stops.
Overview. Your entire planned route shrinks down to fit on a single screen. Now you can see where you’re going—and can zoom, turn, and pan the view. To return to the navigation screen, tap
 .
.Details. Tap to get a written list of turn-by-turn instructions.
Audio. You can adjust the volume of Siri’s speaking voice as she gives you driving directions by tapping here. Choose Low, Medium, or Loud Volume, or turn off her voice prompts altogether with No Voice.
Here, too, is the Pause Spoken Audio switch. It means “When Maps speaks an instruction, momentarily pause playback of any background recordings, like podcasts and audiobooks. Because it’d get really confusing to hear two robo-people speaking at once.”
Tap the screen (or just wait) to hide these additional controls once again.
Directions Between Two Other Points
The redesign of Maps seems to suggest that you’ll always want to navigate somewhere from your current location. And usually, that’s true.
Sometimes, though, you might want directions between two points—when you’re not currently at either one.
First, select your starting point. For example, add a pushpin marker as described in “Add a New Place”, or tap a point-of-interest icon. Tap Directions, and then tap My Location.
Now you can change the From box (where it currently says My Location), using the same address-searching tactics described in “Orienting Maps”. (At this point, you can also swap your start and end points by tapping the double arrow.) Finally, tap Route to see the fastest route and get going.
Night Mode
If the phone’s light sensor decides that it’s dark in your car, it switches to a dimmer, grayer version of the map. It wouldn’t want to distract you, after all. When there’s enough light, it brightens back up again.
Where You Parked
Maps automatically remembers where you parked, and can afterward guide you back to your car.
How does the phone know when you’ve parked? Because it connects wirelessly to your car over Bluetooth or CarPlay. (If your car doesn’t have Bluetooth or CarPlay, then you don’t get this feature.)
When you turn off the car, the phone assumes that you’ve parked it, checks its GPS location, and makes a notification appear to let you know that it’s memorized the spot. (If, that is, this feature is turned on in Settings → Maps → Show Parked Location.)
TIP
If you tap the notification, you get a chance to take a photo of the parking spot or to record notes about it. You also see how long you’ve been parked—handy if you have to feed a meter.

When the time comes to return to your car, the phone makes life as easy as possible. Wake the phone and swipe to the right to view the Maps widget or the Maps Destinations widget. Once you know where you parked, a swipe or a hard-press gets you started finding your way back. (See “The Today Screen (Widgets)” for more on widgets.)
The car’s location also appears in the Maps app itself, right there in the list of recent locations, and as a reminder in the Today tab of the Notification Center. Tap to begin your journey home.
Traffic
How’s this for a cool feature? Free, real-time traffic reporting. Just tap the ![]() button (it’s visible whenever you’re not in Navigation mode), and then turn on Traffic. Now traffic jams appear as red lines on the relevant roads, for your stressing pleasure; less severe slowdowns show up in orange.
button (it’s visible whenever you’re not in Navigation mode), and then turn on Traffic. Now traffic jams appear as red lines on the relevant roads, for your stressing pleasure; less severe slowdowns show up in orange.
Better yet, tiny icons appear, representing accidents, closures, and construction. Tap to see a description bar at the bottom of the screen (like “Accident, Park Ave at State St”); tap that bar to read the details.
If you don’t see any colored lines, it’s either because traffic is moving fine or because Apple doesn’t have any information for those roads. Usually, you get traffic info only for highways, and only in metropolitan areas.
3D Mode
Apple spent two years filming cities in helicopters to create 3D models of major cities and landmarks: San Francisco, New York, Tokyo, London, Paris, Rome, Madrid, Vancouver, San Jose, Cape Town, and Stockholm, for example. Or places like Yosemite National Park, Sydney Opera House, Stonehenge, St. Peter’s Basilica, or the Brooklyn Bridge. These city models are responsible for three cool Maps features: 3D view, Flyover, and Flyover Tours.
When you’ve called up one of these chosen places, a new 3D button appears at top right. Tap it to make the map tilt into a more, yes, 3D view. Now you can go nuts, conducting your own virtual chopper tour of the city. You can look over and around buildings to see what’s behind them, using the usual techniques:
Drag with one finger to move around the map.
Pinch or spread two fingers to zoom out or in.
Drag two fingers up or down to change your camera angle relative to the ground.
Twist two fingers to turn the world before you.
Flyover (iPhone 8, iPhone X)
Flyover is a 3D, augmented-reality, aerial view of the cities and places Apple has scanned as described above. You can use your phone like a viewer, turning your body and moving the phone around in space to change your view.

Wait for a moment as the phone downloads the photographic models. It’s immersing, completely amazing, and very unlikely to make you airsick.
Flyover Tours
Apple wasn’t satisfied with letting you pan around virtual 3D city models using your finger. Now it’s prepared to give you city tours in 3D.
When you tap the search results, a new button appears on the bar at the bottom of the iPhone 8 and X: Flyover. That’s a 360-degree, augmented-reality, aerial view of the city: As you move, lift, and turn the phone, the view moves with you.
At this point on the 8 and X, you get a Start City Tour button. It starts a crazy treat: a fully automated video tour of that city or place. The San Francisco tour shows you the baseball park, the famous Transamerica Pyramid, the Alcatraz prison island, and so on. It’s slow, soothing, cool, and definitely something paper maps never did. Tap the screen to open the Pause Tour button; tap the  to end the tour.
Extensions
There’s one more goody in Maps: Extensions. These are add-on features made by other companies—auto-installed into Maps by their full-blown apps—like Uber, Lyft, Yelp, and OpenTable. The point, of course, is to let you order cars, read restaurant reviews, reserve tables, or buy tickets right from within Maps.
Extensions, for example, are responsible for adding the Ride button described in “Navigation Mode”.
You’ll probably find them quite handy, but maybe not all of them. Fortunately, you can turn off individual extensions in Settings → Maps → Extensions.
News
The News app does just what Apple promises: It “collects all the stories you want to read, from top news sources, based on topics you’re most interested in.”
When you open the News app and tap Customize Your News, the setup process goes like this:
Choose your mags. First, you’re presented with a very tall scrolling list of favorite online publications (The New York Times, Wired, The New Yorker, and hundreds more) and topics (Movie Actors, Science…). You’re supposed to tap the ones you want to use as News fodder. You can search for topics, too.
Notifications. On the next screen, you’re invited to specify which of those publications and topics are allowed to trigger notifications.
Email. The News app is delighted to send you notifications of articles by email, too. Tap Sign Me Up to make it so.
And that’s it: Suddenly, you have a beautiful, infinite, constantly updated, free magazine stand, teeming with stories that have been collated according to your tastes. All of it is free, although you’re not getting the listed publications in full—usually, you’re offered just a few selected stories.
The tabs across the bottom are designed to offer multiple entry points into the eternal tsunami of web news:
For You is the main thing. It’s constantly updated with new articles that Apple’s algorithms think you’ll like, based on (a) your selections the first time you used the app, (b) the stories you favorited by tapping
, (c) the stories you indicated you didn’t like by tapping  , (d) which stories you actually wound up reading, and (e) topics you’ve searched for in Safari.
Spotlight, new in iOS 11, is a deep dive into a story of the day. These news items have been handpicked by human editors.
Following displays the publications and topics you’ve said you’re interested in. Same stories, different starting point.
Search. Oh, yes—you can search for articles by topic or publication. This screen also offers a list of trending topics—subjects other people are making popular.
Saved. Most of the time, you can’t use News without an Internet connection. If you anticipate that you’ll be spending time in the living hell known as Offline mode (like on a subway, sailboat, or airplane), you can save some stories for reading later. To do that, tap
and then Save. You’ll find your saved stories here, on the Saved tab.
TIP
The Saved tab also offers a sub-tab called History. It lets you jump back to an article you’d already read.

Once you’ve tapped to open a story, using News is simplicity itself. Swipe vertically to scroll through an article, or horizontally to pull the next article into view.
Notes
The iPhone has always had a Notes app—great for jotting down (or dictating) lists, reminders, brainstorms, recipes, directions, serial numbers, and so on.
But with each successive version of iOS, this ancient, text-only notepad becomes more complete. A Notes page can now include a checklist of to-dos, a photo, a map, a web link, or a sketch you draw with your finger. You can even share notes wirelessly with another iPhone fan, so that you can collaborate.
In iOS 11, Notes continues its evolution. Now you have full font and paragraph formatting. You can create tables. You can scan documents and then annotate them, right from within a note. And, of course, the powerful new Access Notes from Lock Screen option means that your phone is now ready, at a finger-tap’s notice, to receive your jotted or scanned wisdom—without even having to unlock the phone first. See ???.
As always, any changes you make in Notes are automatically synchronized to all your other Apple gadgets.
NOTE
The first time you open Notes, you may be invited to upgrade your existing notes to the new Notes format. If you don’t, you don’t get any of the new features. But if you do, you can’t open your notes on any gadget that doesn’t have iOS 9 (or later) or OS X El Capitan (or later) for the Mac.
To get started, tap ![]() to start a new blank note. The keyboard appears so you can begin typing.
to start a new blank note. The keyboard appears so you can begin typing.
TIP
You can also send text from other apps into Notes. For example, in Mail, select some text you’ve typed into an outgoing message; in the command bar, tap Share. Similarly, you can tap a Mail attachment’s icon; once again, tap Add to Notes in the Share sheet. In each case, your selection magically appears on a new Notes page.
When you tap Done, the keyboard goes away, and a handy row of icons appears at the bottom of your Notes page. You can trash the note (![]() ); add a checklist to it (
); add a checklist to it (![]() ); add a graphic to it—photo, video, or scanned document (
); add a graphic to it—photo, video, or scanned document (![]() ); add a sketch (
); add a sketch (![]() ); or start a new note (
); or start a new note (![]() ).
).
The Share button is always available too, at the upper right. Tap ![]() to print your note, copy it, or send it to someone by email, text message, AirDrop, and so on. For example, if you tap Mail, the iPhone creates a new outgoing message, pastes the first line of the note into the subject line, and pastes the note’s text into the body. Address the note, edit if necessary, and hit Send. The iPhone returns you to Notes. (See “The Share Sheet” for more on the sharing options.)
to print your note, copy it, or send it to someone by email, text message, AirDrop, and so on. For example, if you tap Mail, the iPhone creates a new outgoing message, pastes the first line of the note into the subject line, and pastes the note’s text into the body. Address the note, edit if necessary, and hit Send. The iPhone returns you to Notes. (See “The Share Sheet” for more on the sharing options.)

Herewith: A tour of the five buttons that appear above the keyboard. They’re your gateway to everything you can put on a note: tables, text and paragraph formatting, lists, photos, sketches, and scanned documents.
Tables
When you tap ![]() , you get a table with two columns and two rows. Tap in a cell and then start typing. To move to the next cell, tap Next on the keyboard (or tap with your finger).
, you get a table with two columns and two rows. Tap in a cell and then start typing. To move to the next cell, tap Next on the keyboard (or tap with your finger).
Poke around long enough, and you can find controls for just about every formatting tool you’d ever need in a table (except the ability to manually adjust column widths and the ability to format the cell borders).
The keys to most of it are the tiny handles (![]() and
and ![]() ) that appear when you tap inside a cell:
) that appear when you tap inside a cell:
Add or delete columns. Tap inside a cell to make the
 and
and  buttons appear. Tap to make the command bar appear, including Add Column and Delete Column; tap to make the Add Row and Delete Row buttons appear. (If you’re typing in the lower-right cell, tapping Return also makes a new row.)
Move a row or column. Tap
or to highlight the corresponding row or column; now you can drag it to a new spot.Copy or paste cells. Double-tap (or hold your finger down on) a cell to make the Select button appear. Once you’ve tapped it, you can drag the selection handles to expand the highlighting. The Cut, Copy, and Paste buttons appear in the command bar, along with the
 (bold, italic, underline) control, Look Up, Spell, and other controls.
Convert text into a table. Select the text, and then tap the table (
 ) button. The selected text winds up in the first column—one cell per paragraph.
Convert table into text. Tap inside a cell, and then tap the
 button. Choose Convert to Text. (This menu also includes Copy Table, Delete Table, and Share Table.)
Text and Paragraph Formatting
As you can see at right on the previous page, a whole new realm of text-formatting options await in the revamped Notes app. Once you’ve tapped Aa to open the formatting panel, you can try out any of these options:
Paragraph styles. Hey, there are style sheets! You can create Titles (big and bold type), Headings (bold), Body text (normal), and Monospaced (every character is the same width, even I and W—useful when you’re trying to line up characters on different rows).
Character formatting. The B, I, U, and S refer to bold, italic, underline, and strikethrough styles.
Lists. The first buttons on the bottom row create dashed lists, auto-numbered lists, and automatically bulleted lists.
Paragraph indentation. The final two buttons move the entire selected paragraph to the right or to the left, indenting or outdenting it.
Checklists
The ![]() button creates a checklist (shown at left in “Tables”). Every paragraph you type sprouts a circle—which is actually a checkbox. Tap it to place a checkmark in there. This feature is fantastic for lists: to-do lists, packing lists, movies to see, gift tracking, party planning, job hunting, homework management, and so on.
button creates a checklist (shown at left in “Tables”). Every paragraph you type sprouts a circle—which is actually a checkbox. Tap it to place a checkmark in there. This feature is fantastic for lists: to-do lists, packing lists, movies to see, gift tracking, party planning, job hunting, homework management, and so on.
Each time you press Return, you create a new checklist item. But you can also select some existing paragraphs and then tap ![]() , turning them into a checklist after the fact.
, turning them into a checklist after the fact.
Scan a Document
Here’s where things get good. You can now use your iPhone as a high-resolution, supersmart document scanner. You can capture a letter, an article, a receipt. If you scan a contract, you can add your signature to it and send it back.
The fun begins when, on any Notes page, you tap the ![]() button. Then:
button. Then:
From the pop-up menu, tap Scan Documents.
The camera springs into action, with the instruction that you should “Position the document in view.”
Tap the
 , and choose the type of scan you want.
Your options are Color, Grayscale (shades of gray), Black & White (no shades of gray), and Photo (a regular snapshot, without any document features). For most printed documents, Grayscale is the cleanest, most space-efficient choice.
Hold the phone up high enough that you can see the entire page.
The document scanner can snap pages of any size, from little receipts to whole newspaper sheets that would be tough to feed into a scanner.
Using yellow highlighting (below, left), the iPhone tries to find the edges of the page. Take a moment to marvel as it automatically straightens the image and fixes any perspective errors. In other words, even if you’re shooting the page at an angle (to avoid shadows, for example), the app is smart enough to produce a perfectly crisp, rectangular page image.
When you’re holding the phone steady, the camera snaps automatically. (If you can’t wait, tap the
 button or press one of the volume keys. The app displays the cropping screen shown below, so that you can adjust the page boundaries yourself.)
The captured image appears briefly, and then shrinks down to the lower-left thumbnail corner—and you’re instantly ready to snap another page. Thanks to the automatic snapping, you can chug through a multipage document pretty quickly.
When you’ve scanned enough, tap Save. Your work here is done.
Or, if you’d like to fine-tune the results, proceed:
Tap the thumbnail (lower-left corner of the screen).
The scanned image opens so that you can make adjustments. For example, the
button lets you change your mind about the decision you made in step 2 (previous page, center). If you tap  , you can use the four round handles to adjust the page boundaries, cropping out more or less background (previous page, right). If you snapped the page at a slight angle, this is your chance to correct the perspective.
Here, too, you can tap
 to rotate the scan 90 degrees—or to delete it. Or tap Retake to reshoot just this page.
Tap Done and then Save. You return to the Note that now contains the scanned images.
If you tap a scanned page thumbnail to open it, you can have endless fun:
Use the
, , , and icons to revisit the choices you made in step 4.Tap + to scan a new page to add to the existing ones.
Tap
and then Markup to annotate the scan (adding your signature or highlighting, for example), using the tools described in “Marking Up Your Photos”.Tap
and then Create PDF to convert the finished scan into a PDF page, ready to send (by tapping again).
Once you’ve given the new Scan feature a try, you may well consider it one of iOS 11’s finest achievements.
Add a Photo to a Note
There are more goodies hiding behind the ![]() button on every Notes page, above the keyboard. The pop-up menu offers Take Photo or Video, which opens the Camera app, and Photo Library, which opens your Photos app. Either way, the resulting photo or video lands right there in the Notes page you’re working on. Incredibly handy. (Try inserting labeled face shots of people whose names you keep forgetting at work!)
button on every Notes page, above the keyboard. The pop-up menu offers Take Photo or Video, which opens the Camera app, and Photo Library, which opens your Photos app. Either way, the resulting photo or video lands right there in the Notes page you’re working on. Incredibly handy. (Try inserting labeled face shots of people whose names you keep forgetting at work!)
TIP
Should new photos and videos you take also wind up in your Photos app? That’s up to you, thanks to the Settings → Notes → Save to Photos option.
Add a Sketch
Sometimes, only a freehand drawing will do—and in Notes, you can draw with your finger!
If you tap the ![]() icon, you wind up in the land of markers, highlighters, and pencils described in “Marking Up Your Photos”, and shown below at left.
icon, you wind up in the land of markers, highlighters, and pencils described in “Marking Up Your Photos”, and shown below at left.
TIP
If you have an iPhone 6s or later model, then all the drawing tools (and the eraser) are pressure-sensitive! They make fatter or darker lines when you press harder with your finger.
But here’s a little secret: For reasons known only to the minds of Apple engineers, there’s a second, more complete set of sketching tools (below, right). It’s hiding behind the ![]() button above the Notes keyboard; tap Add Sketch.
button above the Notes keyboard; tap Add Sketch.

This time, the colored dot opens a much wider palette of color choices (swipe to the right to view additional “pages” of them, including eight shades of gray). You also get a ruler, which is a surprisingly sophisticated tool.
To use it, put two fingers on the “ruler” on the screen, and twist them to the angle you want. (As you twist, the app shows you the current angle off the horizontal.) Then you can “draw against” it for perfect straight lines.
TIP
In Settings → Notes, you can set up a lined background for new sketches. You can ask that they start out with lines (three different spacings) or graph-paper grids (three grid sizes).
Sharing Notes
You and a buddy (or several) can edit a page in Notes simultaneously, over the Internet. It’s great when you and your friends are planning a party and brainstorming about guests and the menu, for example. Also great for adding items to the grocery or to-do list even after your spouse has left the house to get them taken care of.
Just tap ![]() at the top of the screen. On the Add People screen, specify how you want to send the invitation: by message, email, Facebook, Twitter, or whatever.
at the top of the screen. On the Add People screen, specify how you want to send the invitation: by message, email, Facebook, Twitter, or whatever.
Once your collaborators receive and accept the invite, they can begin editing the note as though it’s their own.
The live editing isn’t as animated as it is in, for example, Google Docs—you don’t see letter-by-letter typing—but other peoples’ edits do appear briefly in yellow highlighting.
Once you’ve shared a note, the icon at the top changes to ![]() , and a matching icon appears next to the note’s name in the master list. At any time, you can stop sharing the note—or add more people to its collaboration—by tapping that
, and a matching icon appears next to the note’s name in the master list. At any time, you can stop sharing the note—or add more people to its collaboration—by tapping that ![]() icon again and editing the sharing panel that appears.
icon again and editing the sharing panel that appears.
Locking Notes
You can password-protect individual notes—a great feature, suitable for listing birthday presents you intend to get for your nosy kid, the formula for your top-secret invisibility potion, or your illicit lovers’ names.
Note that you generally hide and show all your locked notes with a single password. You don’t have to make up a different password for every note.
TIP
You can make up multiple passwords, though. Each time you want to start using a new password, open Settings → Notes → Password and tap Reset Password. After supplying your iCloud password, you’re offered the chance to make up a password for any new notes you lock. All existing locked notes are still protected by the previous password.
And if you’ve forgotten the password? Unless you’ve turned on Touch ID or Face ID (you’re asked the first time you try to open a locked note), then all those old notes are locked forever. But you can still make up a new password to protect your latest secrets.
To lock a note, tap ![]() ; on the Share screen, tap Lock Note (below, left). (Why is locking a note sharing it? Never mind.) Make up a password for locking/unlocking all your notes (or, if you’ve done this before, enter the password).
; on the Share screen, tap Lock Note (below, left). (Why is locking a note sharing it? Never mind.) Make up a password for locking/unlocking all your notes (or, if you’ve done this before, enter the password).
Once your locked notes are all unlocked, you can still see and edit them. But when there’s any risk of somebody else coming along and seeing them (on your Mac, iPhone, iPad, or any other synced gadget), click the ![]() to lock all your notes. (They also all lock when the phone goes to sleep.)
to lock all your notes. (They also all lock when the phone goes to sleep.)

Now all you see of the locked notes are their titles. Everything on them is replaced by a “This note is locked” message, as shown on the previous page at right. Tap View Note to unlock them with your fingerprint or password.
TIP
To remove the padlock from a note, tap ![]() and then tap Remove Lock.
and then tap Remove Lock.
Use your power wisely.
The Notes List
As you create more pages, the < iCloud button (top left corner of the screen) becomes more useful. (It may not say “iCloud”; it bears the name of whatever online account stores your notes: Gmail, Exchange, or whatever. Or, if your notes exist only on the phone, you just see an unlabeled < symbol.)
It opens your table of contents for the Notes pad. It’s the only way to jump from one note to another.
TIP
You can swipe rightward to jump from an open note back to the list.
Here’s what this list displays:
The first lines of your notes, along with the time or date you last edited them. If there’s a photo or sketch on a note—an unlocked one, anyway—you see its thumbnail, too (facing page, left).
To open a note, tap its name. To delete a note, swipe across its name in the list, right to left, and then confirm by tapping
 .
.NOTE
On iPhone Plus models, rotating the phone produces a whole new two-column layout. The left column shows your table of contents (first line of every note); the right column shows the selected note itself.
Pinned notes. Ordinarily, your notes appear chronologically, most recent at the top. But in Settings → Notes, you can specify that they be sorted by Date Changed or Title instead.
But you may have a couple of notes—things you refer to a lot—that you want to appear at the top all the time. Passwords, credit card numbers, or frequent-flyer numbers, for example.

That’s why, in iOS 11, you can now pin an individual note to the top of the list, where it won’t move. To do that, swipe across its name in the list, left to right, and then confirm by tapping the
 button.
A search box. Tug down on the list to bring the search box into view. Tap it to open the keyboard. You can now search all your notes instantly—not just their titles, but also the text inside them.
NOTE
Don’t worry about your locked notes. iOS can search their titles, but not their contents—even if the notes are currently unlocked.
 . This is the Attachments Browser. It brings up a tidy display of every photo, sketch, website, audio recording, and document that’s ever been inserted into any of your notes. All in one place (above, right).
The beauty is that you don’t have to remember what you called a note; just tap one of these items to open it. (At that point, you can tap Show in Note to open the note that contains it.)
NOTE
Attachments in locked notes (whether or not they are locked right now) don’t show up here.
Syncing Notes
Notes can synchronize with all kinds of other Apple gear—other iPhones, iPads, iPod Touches, and Macs—so the same notes are waiting for you everywhere you look. Just make sure Notes is turned on in Settings → [your name] → iCloud on each phone or tablet, and in System Preferences → iCloud on your Mac. The rest is automatic—and awesome.
Notes Accounts
Your notes can also sync wirelessly with the Notes modules on Google, Yahoo, AOL, Exchange, or another IMAP email account. To set this up, open Settings → Accounts & Passwords. Tap the account you want (iCloud, Gmail, AOL, or whatever); turn the Notes switch On.
Now your notes are synced nearly instantly, wirelessly, both directions.
NOTE
One catch: Notes that you create at gmail.com, aol.com, or yahoo.com don’t wind up on the phone. Those accounts sync wirelessly in one direction only: from the iPhone to the website, where the notes arrive in a Notes folder. (There’s no problem, however, if you get your AOL or Gmail mail in an email program like Outlook, Entourage, or Apple Mail. Then it’s two-way syncing as usual.)
At this point, a < bracket appears at the top-left corner of the table of contents screen. Tap it to see your note sets from various accounts.
If you’ve created Notes folders on your Mac (Mountain Lion or later), then you see those folders here, too.
TIP
In Settings → Notes, you can specify which of your different Notes accounts you want to be the main one—the one that new notes fall into if you haven’t specified otherwise.
All of this makes life a little more complex, of course. For example, when you create a note, you have to worry about which account it’s about to go into. To do that, be sure to specify an account name (and a folder within it, if necessary) before you create the new note.
TIP
In Settings → Notes, you can turn on the “On My Phone” Account. Any notes you add to this “folder” are super-private. They don’t get synced or sent online, ever.
Podcasts
A podcast is a “radio” show that’s distributed online. Lots of podcasts begin life as actual radio and TV shows; most of NPR’s shows are available as podcasts, for example, so that you can listen to them whenever and wherever you like.
But thousands more are recorded just for downloading. They range from recordings made by professionals in studios to amateurs talking into their phones. Some have thousands of listeners; some have only a handful. One thing’s for sure: There’s a podcast out there that precisely matches whatever weird, narrow interests you have.
The Podcasts app helps you find, subscribe to, organize, and listen to podcasts. It’s designed just like Apple’s online stores for apps, music, movies, and so on. Tap Browse to see recommended podcasts and Top Charts to see what the rest of the world is listening to these days (below, right). Or use Search to look for something specific.

There are video podcasts, too, although they’re much less common. The most popular are clips from network or cable TV shows, but there are plenty of quirky, offbeat, funny video podcasts that will never be seen except on pocket screens.
In any case, once you’ve drilled down to a particular episode that seems worthy, you can listen to it in either of two ways:
Stream it. Tap Play to play it directly from the Internet. It’s never stored on your iPhone and doesn’t take up any space, but it does require an Internet connection. Generally no good for plane rides.
Download it. If you tap
instead, you download it to your phone. It takes up space there (and podcasts can be big)—but you can play it back anytime, anywhere. And, of course, you can delete it when you’re done.
Subscribing
Most podcasts are series. Their creators crank them out every week or whatever. If you find one you love, subscribe to it, so that your phone downloads each new episode automatically. Just tap Subscribe on its details page.
The episodes wind up on the Library screen (previous page, left), under Shows. Tap a podcast’s icon to open the My Episodes screen, where you can find listings for further episodes, controls for deleting an episode or adding them to the playback queue, and sharing links to this podcast by Messages, Mail, Twitter, Facebook, and so on).
Settings
There’s a lot to control when it comes to podcasts. Do you want new episodes downloaded automatically? Do you want them auto-deleted when you’re finished?
You make these choices in Settings → Podcasts. Those are the global setting for podcasts.
But you can also override them for individual shows. On any podcast’s details screen, tap ![]() and then Settings to see those options, and many more. You can limit how many episodes of this show are stored on your phone; specify the playback order—oldest first or newest first; and much more.
and then Settings to see those options, and many more. You can limit how many episodes of this show are stored on your phone; specify the playback order—oldest first or newest first; and much more.
Listening
The Podcasts app offers two ways to dive in. The Listen Now tab shows you the next episode of each podcast series—the one you’re up to. The Library tab offers icons for each podcast, so that you can drill down to a particular episode. Tap the playback strip at the bottom to reveal all the usual audio-playback controls (“Playback Control”)—with the handy addition of a button to toggle the talking speed (½x, 1x, 1½x, or 2x regular speed).
TIP
There are 15-second skip-forward and skip-backward buttons here, too. Handy!
If you press the side button to turn off the screen, the podcast continues playing. And even if the phone is locked, you can open the Control Center (“Control Center”) to access the playback controls.
TIP
Don’t forget to use Siri! You can say things like “Play ‘Fresh Air’ podcast,” “Play my latest podcasts,” “Play my podcast” (to resume what you were listening to last), “Play latest TED podcast,” and so on.
Reminders
Reminders not only records your life’s little tasks, but it also reminds you about them at the right time or right place. For example, it can remind you to water the plants as soon as you get home.
Thanks to iCloud, your reminders sync across all your gadgets. Create or check off a task on your iPhone, and you’ll also find it created or checked off on your iPad, iPod Touch, Mac, PC, and so on.
TIP
Reminders sync wirelessly with anything your iCloud account knows about: Calendar or BusyCal on your Mac, Outlook on the PC, and so on.
Siri and Reminders are a match made in heaven. “Remind me to file the Jenkins report when I get to work.” “Remind me to set the TiVo for tonight at 8.” “Remind me about Timmy’s soccer game a week from Saturday.” “When I get home, remind me to take a shower.”
The List of Lists
When you open Reminders, it’s clear that you can create more than one to-do list, each with its own name: a groceries list, kids’ chores, a running tally of expenses, and so on. It’s a great way to log what you eat if you’re on a diet, or to keep a list of movies people recommend.
They show up as file-folder tabs; tap one to open the to-do list within.
If you have an Exchange account, one of your lists can be synced to your corporate Tasks list. It doesn’t offer all the features of the other lists in Reminders, but at least it’s kept tidy and separate.
TIP
You can use Siri to add things to individual lists by name. You can say, for example, “Add avocados to my Groceries list.” “Add Titanic 2 to my Movies list.”
Siri can also find these reminders, saving you a lot of navigation. You can say, “Find my reminder about dosage instructions,” for example.
Once you’ve created some lists, you can easily switch among them. Just tap an open list’s name to collapse it, returning to the list of lists. At that point you can tap the title of a different list to open it.
TIP
When you’re viewing the list of lists, you can rearrange them by dragging their title bars up or down.
To create a new list, begin at the list of lists (facing page, left). Tap + at the top right. The app asks if you’re trying to create a new Reminder (that is, one To Do item) or a new List; tap List.
If you have multiple accounts that offer reminders, you’re asked to specify which one will receive the new list at this point, too.
Now your jobs begin:
Enter a name for the list. When you tap the light-gray letters New List, the keyboard appears to help you out.
Tap a colored dot. This will be the color of the list’s title font and also of the “checked-off” circles once the list is under way.
Tap Done. Now you can tap the first blank line and enter the first item in the list.
NOTE
After that first line, you can’t create new items in the list by tapping the blank line below the existing items. As you type, tapping the Return key is the only way to move to the next line. (Tap Done when you’re finished adding to the list.)
To delete a list, tap Edit and then tap Delete List.
Later you can assign a task to a different list by tapping List on its Details screen.
To return to the list of lists, tap the current list’s name. Or tap the bottom edge of the screen. Or swipe down from the top of it.

The Scheduled List
If you really do wind up using Reminders as a to-do list, you might be gratified to discover that the app also offers an automatically generated Scheduled list: a consolidated list of every item, from all your lists, to which you’ve given a deadline. It’s always the topmost tab, marked by an alarm-clock icon.
Recording a Reminder
Once you’ve opened a list, here’s how you record a new task the manual way: Tap the blank line beneath your existing reminders. Type your reminder (or dictate it). Tap the ![]() to set up the details, described next; tap Done when you’re finished.
to set up the details, described next; tap Done when you’re finished.
As you go through life completing tasks, tap the circle next to each one. A checked-off to-do remains in place until the next time you visit its list. At that point, it disappears. It’s moved into a separate list called Completed.
But when you want to take pride in how much you’ve accomplished, you can tap Show Completed to bring your checked-off tasks back into view.
Other stuff you can do:
Delete a to-do item altogether, as though it never existed. Swipe leftward across its name; tap Delete to confirm (previous page, right).
Delete a bunch of items in a row. Tap Edit. Tap each
 icon, and then tap Delete to confirm.
Rearrange a list so the items appear in a different order. Tap Edit, and then drag the
 handle up or down.
The Details Screen
If you tap ![]() next to an item’s name, you arrive at the Details screen (below, left). Here you can set up a reminder that will pop up at a certain time or place, create an auto-repeating schedule, file this item into a different to-do list with its own name, add notes to this item, or delete it.
next to an item’s name, you arrive at the Details screen (below, left). Here you can set up a reminder that will pop up at a certain time or place, create an auto-repeating schedule, file this item into a different to-do list with its own name, add notes to this item, or delete it.

Here are your options, one by one:
Remind me on a day. Here you can set up the phone to chime at a certain date and time. Turn on the switch to see two new lines: Alarm and Repeat. Tap Alarm to bring up the “time wheel” for setting the deadline.
Tap Repeat if you want this reminder to appear every day, week, two weeks, month, or year—great for reminding you about things that recur, like quarterly tax payments, haircuts, and anniversaries.
Remind me at a location. If you turn on this amazing feature, then the phone will use its GPS to remind you of this item when you arrive at a certain place or leave a certain place. When you tap the Location line, you’ll see that the phone offers “Current Location”—wherever you are at the moment. That’s handy if, for example, you’re dropping off your dry cleaning and want to remember to pick it up the next time you’re driving by.
But you can also choose Home or Work (your home or work addresses, as you’ve set them up in Contacts). Or you can use the search box at the top, either to type or dictate a street address, or to search your own Contacts list.
NOTE
If you use Bluetooth to pair your phone to your car, you have a couple of other helpful choices: Getting in the car (to get a reminder when the iPhone connects to your car) and Getting out of the car (to get one when it disconnects).
Once you’ve specified an address, the Location screen shows a map (facing page, right). The diameter of the blue circle shows the area where your presence will trigger the appearance of the reminder on your screen.
TIP
You can adjust the size of this “geofence” by dragging the black handle to adjust the circle. In effect, you’re telling the iPhone how close you have to be to the specified address for the reminder to pop up. You can adjust the circle’s radius anywhere from 328 feet (“Remind me when I’m in that store”) to 1,500 miles (“Remind me when I’m in that country”).
The final step here is to tap either When I Leave or When I Arrive.
Later, the phone will remind you at the appointed time or as you approach (or leave) the address, which is fairly mind-blowing the first few times it happens.
NOTE
If you set up both a time reminder and a location reminder, then your iPhone uses whichever event happens first.
Priority. Tap to specify whether this item has low, medium, or high priority—or None. In some of the calendar programs that sync with Reminders, you can sort your task list by priority.
List. Tap to assign this to-do to a different reminder list, if necessary.
Notes. Here’s a handy box where you can record freehand notes about this item: an address, a phone number, details of any kind.
To exit the Details screen, tap Done.
“Remid Me About This”
Here’s a reminder about a fantastic Reminders feature.
When you’re looking at something in one of Apple’s apps, you can tell Siri, “Remind me about this later.” That might be a text message in Messages, a web page in Safari, an email in Mail, a document in Pages, or whatever. (This command works in Calendar, Clock, Contacts, iBooks, Health, Mail, Maps, Messages, Notes, Numbers, Pages, Phone, Podcasts, Reminders, and Safari. Software companies can upgrade their apps to work with “Remind me about this,” too.)
Instantly, Siri creates a new item on your main Reminders list—named for the precise message, location, web page, document, or thing you were looking at—complete with the icon of the app you were using.
Later, you can tap that icon to open the original app—to the exact spot you were at when you issued the command.
You don’t have to be as vague as “later,” either. You can also say things like “Remind me about this tomorrow night at 7” or “Remind me about this when I get home.”
Put it all together, and you’ve got an amazingly effective system for bookmarking your life. Maybe this trick will, once and for all, end the practice of people emailing stuff to themselves, just so they’ll remember it.
Stocks
This one’s for you, big-time day trader. The Stocks app tracks the rise and fall of the stocks in your portfolio by downloading the very latest stock prices.
(All right, maybe not the very latest. The price info may be delayed as much as 20 minutes, which is typical of free stock-info services.)
When you first fire it up, Stocks shows you a handful of sample high-tech stocks—or, rather, their abbreviations. (They stand for the Dow Jones Industrial Average, the NASDAQ Composite Index, the S&P 500 Index, Apple, Google, and Yahoo.)

Next to each, you see its current share price, and next to that, you see how much that price has gone up or down today. As a handy visual gauge to how elated or depressed you should be, this final number appears on a green background if it’s gone up, or a red one if it’s gone down. Tap this number to cycle the display from a percentage to a dollar amount to current market capitalization (“120.3B,” meaning $120.3 billion in total corporate value).
When you tap a stock, the bottom part of the screen shows some handy data. Swipe horizontally to cycle among three different displays:
A table of statistics. A capsule summary of today’s price and volume statistics for this stock.
A graph of the stock’s price. It starts out showing you the graph of the current year. But by tapping the headings above the chart, you can zoom in or out from one day (1D) to three months (3M) to two years (2Y).
A table of relevant headlines, courtesy of Yahoo Finance. Tap a headline to read the article—or tap and hold to add it, or all the articles, to your Safari Reading List (“The Reading List (
 )”).
)”).
Landscape View
If you turn the iPhone sideways, you get a much bigger, more detailed, widescreen graph of the stock in question. (Flick horizontally to view the previous or next stock.)
TIP
On a Plus model, there’s room for both your list of stocks and the graph of the one you’ve tapped, all on the same screen.
Better yet, you can pinch with two fingers or two thumbs to isolate a certain time period; a pop-up label shows you how much of a bath you took (or how much of a windfall you received) during the interval you highlighted. Cool!

Customizing Your Portfolio
It’s fairly unlikely that your stock portfolio contains just Apple, Google, and Yahoo. Fortunately, you can customize the list of stocks to reflect the companies you do own (or want to track).
To edit the list, tap ![]() in the lower-right corner. You arrive at the editing screen (previous page, right), where these choices await:
in the lower-right corner. You arrive at the editing screen (previous page, right), where these choices await:
Delete a stock by tapping the
button and then the Delete confirmation button.Rearrange the list by dragging the grip strips on the right side.
Add a stock by tapping + in the top-left corner; the Add Stock screen and the keyboard appear.
You’re not expected to know every stock-symbol abbreviation. Type in the company’s name, and then tap Search. The iPhone shows you, above the keyboard, a scrolling list of companies with matching names. Tap the one you want to track. You return to the stocks-list editing screen.
Choose Percentage, Price, or Market Cap. By tapping the buttons at the bottom, you can specify how you want to see the changes in stock prices in the far-right column: as percentages (“+0.65%”), as dollar figures (“+2.23”) or as market cap. (Here you’re simply choosing which number starts out appearing on the main stock screen. As noted earlier, you can easily cycle among these three stats by tapping them.)
When you’re finished setting up your stock list, tap Done.
Tips
Hey, check it out—Apple’s getting into the how-to game!
This app is designed to show you tips and tricks for getting the most from your iPhone. Each Collection (Fantastic Photos, Everyday Essentials, and so on) screen offers a set of tips—a paragraph of text apiece—explaining one of iOS’s marvels. Swipe leftward to see the next tip, and the next, and the next.
It’s not exactly, you know, a handsome, printed book. But it’s something.
TV
This app lets you find and play videos from two sources: the iTunes store, and individual video apps. It’s described in “The TV App”.
Voice Memos
This audio app is ideal for recording lectures, musical performances, notes to self, and cute child utterances. You’ll probably be very surprised at how good the microphone is, even from a distance.
The best part: When you sync your iPhone with iTunes on your Mac or PC, all your voice recordings get copied back to the computer automatically. You’ll find them in the iTunes folder called Voice Memos.

Tap ![]() (or click your earbud clicker) to start recording. A little ding signals the start (and stop) of the session—unless you’ve turned the phone’s volume all the way down (you sneak!).
(or click your earbud clicker) to start recording. A little ding signals the start (and stop) of the session—unless you’ve turned the phone’s volume all the way down (you sneak!).
You get to watch the actual sound waves as the recording proceeds (above, left). You can pause at any time by pressing the Stop button (![]() )—and then resume the same recording with another tap on the
)—and then resume the same recording with another tap on the ![]() .
.
TIP
The built-in mike records in mono. But you can record in stereo if you connect a stereo mike (to the headphone jack or charging jack).
You can also switch out of the app to do other work. A red banner across the top of the screen (or, on the iPhone X, the left “ear”) reminds you that you’re still recording. You can even switch the screen off; the recording goes on!
You can make very long recordings with this thing. Let it run all day, if you like. Even your most long-winded friends can be immortalized.
Tap Done when you’re sure the recording session is over. You’re asked to type a name for the new recording (“Baby’s First Words,” “Orch Concert,” whatever); then you can tap Save or, if it wasn’t worth saving, Delete.
Below the recording controls, you see the list of your recordings (facing page, right). When you tap one, a convenient set of controls appears. (They look a lot like the ones that appear when you tap a voicemail message in the Phone app.)
TIP
If you have an iPhone Plus model, you can turn the screen 90 degrees—and see both the list of recordings and the editing screen, in two columns.
Here’s what you can do here:
[Recording name]. Tap the name to edit or rename it.
 . Tap to play the recording. You can pause with the
  button.
TIP
As a recording plays back, you can tap
 at the top of the screen to turn the speaker on or off, so that you don’t have to hold the phone up to your ear.
Rewind, Fast Forward. Drag the little vertical line in the scrubber bar to skip backward or forward in the recording. It’s a great way to skip over the boring pleasantries.
- . Tap to get rid of a recording (you’ll be asked to confirm).
- . Tap to open the standard Share sheet. It gives you the chance to send your recording to someone else by AirDrop, email, or MMS.
Trimming Your Recording
You might not guess that such a tiny, self-effacing app actually offers some basic editing functions, but it does. Tap a recording and then tap Edit to open its Edit screen.
The main thing you’ll do here is trim off the beginning or end of your audio clip. That, of course, is where you’ll usually find “dead air” or microphone fumbling before the good stuff starts playing. (You can’t otherwise edit the sound; for example, you can’t copy or paste bits or cut a chunk out of the middle.)
To trim the bookends of your clip, tap the Trim button (![]() ). At this point, the beginning and end of the recording are marked by vertical red lines; these are your trim points. Drag them inward to isolate the part of the clip you want to keep. The app thoughtfully magnifies the sound waves whenever you’re dragging, to help with precision. Play the sound as necessary to guide you (
). At this point, the beginning and end of the recording are marked by vertical red lines; these are your trim points. Drag them inward to isolate the part of the clip you want to keep. The app thoughtfully magnifies the sound waves whenever you’re dragging, to help with precision. Play the sound as necessary to guide you (![]() ).
).

Tap Trim to lock in your changes. You’ll be asked to tap either Trim Original (meaning “shorten the original clip permanently”) or Save as New Recording (meaning “leave the original untouched, and spin out the shortened version as a separate audio file, just in case”).
Wallet
This app was originally called Passbook. And it was originally designed to store, in one place, every form of ticket that uses a barcode. For most people, that meant airline boarding passes.
Wallet still does that. And, occasionally, you may find a Wallet-compatible theater or sports-admission pass, loyalty card, coupon, movie ticket, and so on. Beats having a separate app for each one of these.
Wallet holds down a second job, too. It’s the key to Apple Pay, the magical “pay by waving your iPhone” feature described in “Apple Pay”.
TIP
You can rearrange the items in Wallet; just hold still briefly before you start moving your finger up or down. (That order syncs to your other iOS gadgets, for what it’s worth.)
What’s cool is that Wallet uses both its own clock and GPS to know when the time and place are right. For example, when you arrive at the airport, a notification appears on your Lock screen. Each time you have to show your boarding pass as you work through the stages of airport security, you can wake your phone and swipe across that notification; your boarding-pass barcode appears instantly. You’re spared having to unlock your phone (enter its password), hunt for the airline app, log in, and fiddle your way to the boarding pass.

The hardest part might be finding things to put into Wallet. You can visit the App Store and search for “passbook” to find apps that work with Wallet—big airlines, Fandango (movie tickets), Starbucks, Walgreens, Ticketmaster, and Major League Baseball are among the compatible apps. In some, you’re supposed to open the app to view the barcode first and put it into Wallet from there. For example, in most airline apps, you call up the boarding-pass screen and then tap Add.
Once your barcodes have successfully landed in Wallet, the rest is pure fun. When you arrive at the theater or stadium or airport, the Lock screen displays an alert. Swipe it to open the barcode in Wallet. You can put the entire phone under the ticket-taker’s scanner.
Tap the ![]() button in the corner to read the details—and to delete a ticket after you’ve used it (tap Remove Pass). That details screen also offers a Show On Lock Screen on/off switch, in case you don’t want Wallet to hand you your ticket as you arrive.
button in the corner to read the details—and to delete a ticket after you’ve used it (tap Remove Pass). That details screen also offers a Show On Lock Screen on/off switch, in case you don’t want Wallet to hand you your ticket as you arrive.
Finally, Wallet is one of the two places you can enter your credit card information for Apple Pay on an iPhone 6 or later model, as described in “Apple Pay”. (Settings is the other.)
Watch
If you own an Apple Watch, you use this little app to set up its settings. (OK, big app—there are 90 screens of settings!)
So why do you have the Watch app on your phone even if you don’t have an Apple Watch? You’ll have to ask someone in Marketing.
If it bugs you, you can get rid of it (“Deleting Apps”).
Weather
This app shows a handy current-conditions display for your city (or any other city). Handy and lovely; the weather display is animated. Clouds drift by, rain falls gently. If it’s nighttime in the city you’re looking up, you might see a beautiful starscape.
The current temperature is shown nice and big; the table below it shows the cloud-versus-sun forecast, as well as the high and low temperatures.
You don’t even have to tell the app what weather you want; it uses your location and assumes you want the local weather forecast.
There are three places you can tap or swipe:
Scroll up to see a table of stats: humidity, chance of rain, sunrise time, wind speed, “feels like” (chill or heat index), and so on.
Swipe horizontally across the hourly forecast to scroll later in the day.
Swipe horizontally anywhere else to view the weather for other cities (if you’ve set them up). The tiny dots beneath the display correspond to the cities you’ve set up—and the white bold one indicates where you are in the sequence.
TIP
The dots are really tiny. Don’t try to aim for a specific one—it’s a lot easier to tap the row of dots on either the right or left side to move backward or forward among the cities.
The first city—the screen at far left—is always the city you’re in right now. The iPhone uses GPS to figure out where you are.
The City List
It’s easy to get the weather for other cities—great if you’re going to be traveling, or if you’re wondering how life is for distant relations.
When you tap ![]() at the lower-right corner (or pinch with two fingers), the screen collapses into a list of your preprogrammed cities (below, right).
at the lower-right corner (or pinch with two fingers), the screen collapses into a list of your preprogrammed cities (below, right).

You can tap one to open its weather screen. You can delete one by swiping leftward across it (and then tapping Delete). You can drag them up or down into a new order (leave your finger down for about a second before each time you drag). You can switch between Celsius and Fahrenheit by tapping the ��C/��F button.
Or you can scroll to the bottom (if necessary) and tap ![]() to enter a new city. Here you’re asked to type a city, a zip code, or an airport abbreviation (like JFK for New York’s John F. Kennedy airport). You can specify any reasonably sized city on earth.
to enter a new city. Here you’re asked to type a city, a zip code, or an airport abbreviation (like JFK for New York’s John F. Kennedy airport). You can specify any reasonably sized city on earth.
When you tap Search, you’re shown a list of matching cities; tap the one you want to track. When you return to the configuration screen, you can also specify whether you prefer degrees Celsius or Fahrenheit. Tap Done.
There’s nothing else to tap here except the Weather Channel icon at the bottom. It fires up the Safari browser, which loads itself with an information page about that city from weather.com.
If you’ve added more than one city to the list, by the way, just flick your finger right or left to flip through the weather screens for the cities.
More Standard Apps
This book describes every app that comes on every iPhone. But Apple has another suite of useful programs for you. And they’re free.
NOTE
If you have an iPhone model with 64 or more gigabytes of storage, then most of these apps come already installed.
To find them, search the App Store app for these goodies: Pages is, believe it or not, a word-processing/page-layout program. Numbers is Apple’s spreadsheet program. Keynote is Apple’s version of PowerPoint. It lets you make slideshow presentations from your iPhone. iMovie is, yes, a video-editing program on your cellphone, with all the basics: rearranging clips; adding music, crossfades, and credits. GarageBand is a pocket music studio. Find My Friends lets you see where your friends and family members are on a map (with their permission, of course). Find My iPhone is useful when you want to find other missing Apple gadgets (Macs, iPads, iPod Touches, iPhones).
NOTE
And where, you may ask, is the iTunes U app?
iTunes U is a catalog of 600,000 free courses by professors at colleges, museums, and libraries all over the world; the dearly departed app let you browse the catalog, and watch and read the course materials.
Those courses are still available—but they’ve been merged into the Podcasts app described earlier in this chapter. You find them by searching for the name of the institution or collection.