
Chapter 2. The Lock Screen & Notifications
The Lock screen—the first thing you see when you wake the iPhone—is more than just a big Do Not Disturb sign. It’s a lively bulletin board for up-to-date information about your life. It’s possible to have complete work sessions right at the Lock screen, without even fully unlocking the iPhone.
For starters, you can use the iPhone as a watch—millions of people do. Just lift the sleeping phone, or press the side button, to consult the Lock screen’s time and date display, and then shove the phone right back into your pocket. The iPhone goes back to sleep after a few seconds.
Better yet, the Lock screen is a handy status screen. Here you see a record of everything that happened while you weren’t paying attention. It’s a list of missed calls, text messages received, notifications from your apps, and other essential information.
Three Swipes, You’re In
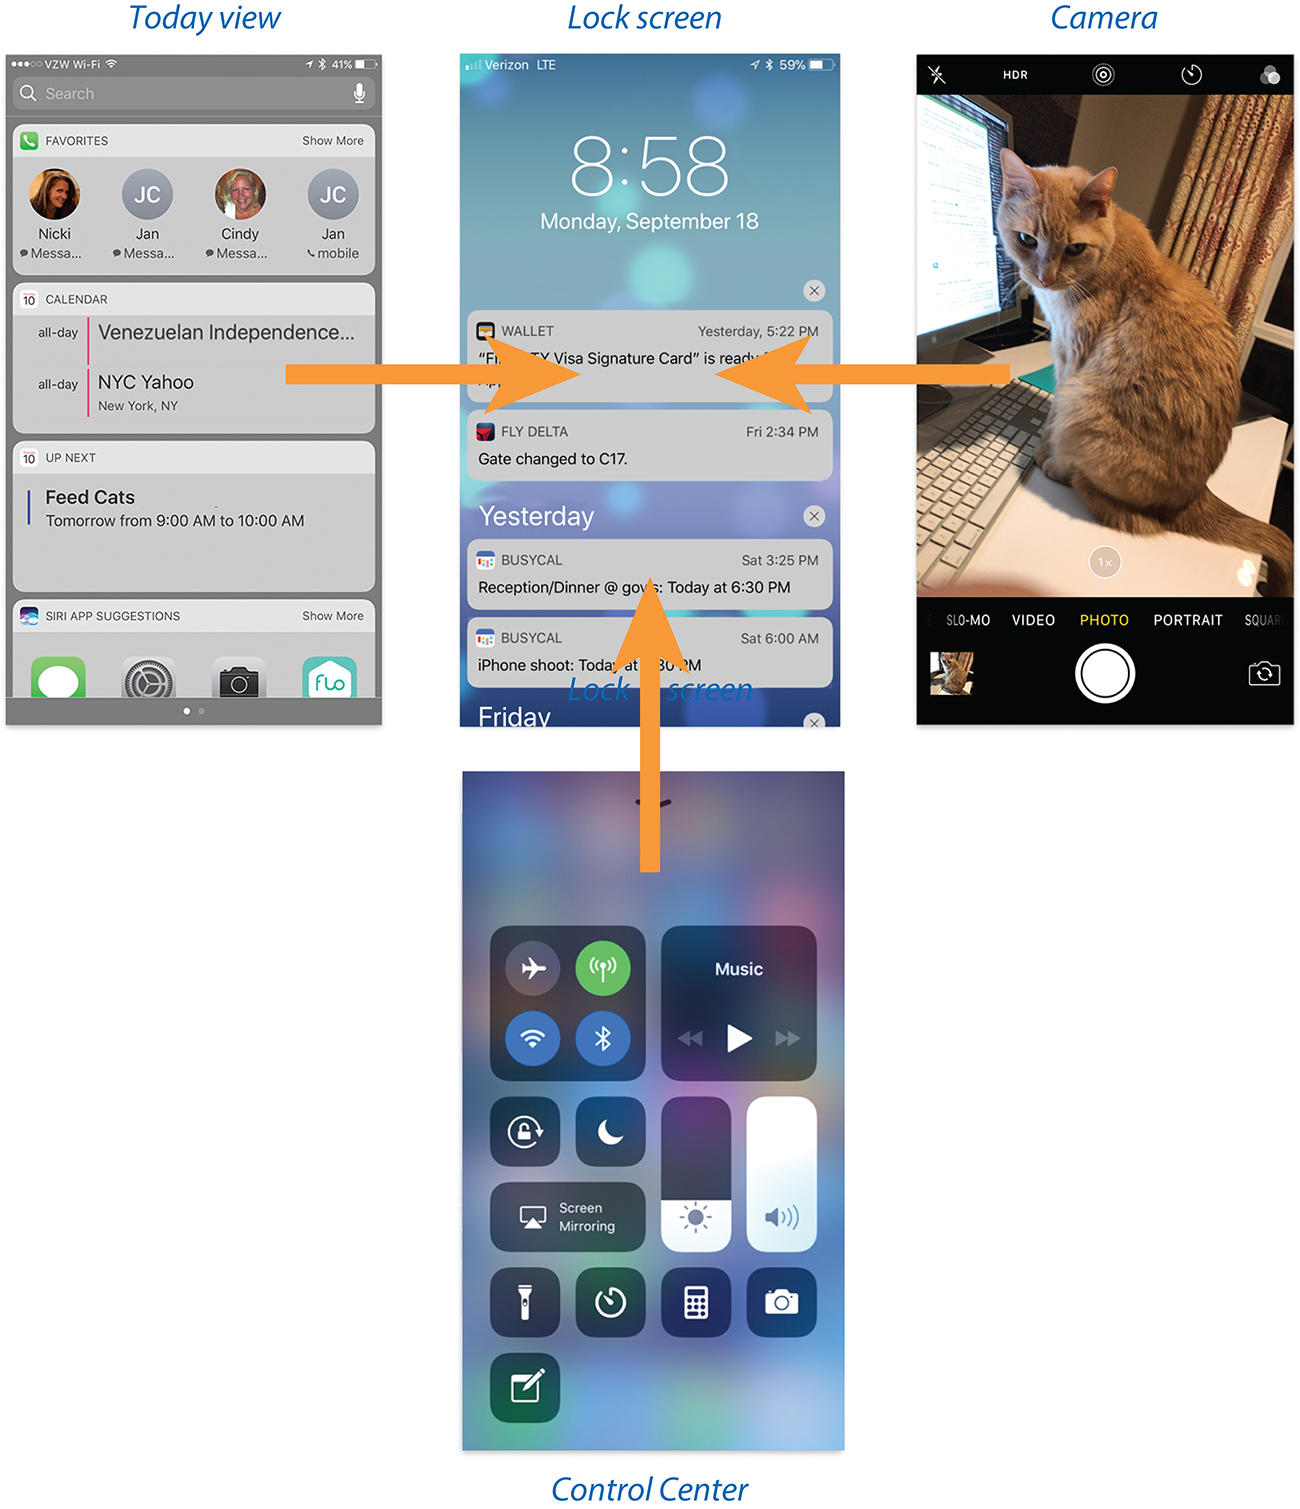
The Lock screen is the centerpiece of three other important screens. You can swipe up, left, or right to bring them into view.
Swipe left to open the Camera app (“The Camera App”).
Swipe right to reveal the Today (Widgets) screen (“The Today Screen (Widgets)”).
Swipe up from the bottom of the screen to open the Control Center shortcuts screen (“Control Center”).
iPHONE X
Swipe down from the upper-right corner for the Control Center.
Keep this map in your head every time you wake your phone:
Notifications
A notification is an update from an app trying to get your attention. You get one every time a text message comes in, an alarm goes off, a calendar appointment is imminent, your battery is running low, and so on. Almost every app can display a notification, if you let it.
In iOS 11, Apple gave notifications a thorough makeover. The old system was pretty complicated—three places to find them, two kinds to deal with. Now things are simpler (mostly). Notifications now appear in only two different places. Maybe 2½:
On your screen, while you’re working. They pop up to get your attention, as shown on the following pages.
On the Lock screen, in a scrolling list of alerts that came in while you were away (below, left). (Unlocking the phone wipes them away. The next time you unlock the phone, that batch will be gone.)
On the pull-down Lock screen. Weirdly enough, if you swipe down from the top of the screen, iOS 11 presents you with—the Lock screen!

Again! Yes, it’s exactly the same thing you see when you unlock your phone, complete with wallpaper, day, and date. You can even swipe left for the Camera, or swipe right for the Today screen!
There’s only one difference: On the pull-down Lock screen (above, right), you see all the notifications that have come in recently, even ones you’ve previously dismissed, even if they’re several days old. (On the actual Lock screen, you have to swipe up to see these older ones.)
To close this screen, just swipe any empty area up and away, or press the home button.
iPHONE X
To reveal the pull-down Lock screen, drag down from the left “ear” or the Notch at the top of the screen. To dismiss it, make a small swipe upward from the very bottom of the screen—the usual home-button gesture.
The following pages tackle these 2½ notification situations one by one.
TIP
There is one potential danger in the fact that the actual Lock screen and the pull-down Lock screen look the same. You might pull down the Lock screen, get distracted, and then set the phone down, thinking that it’s locked, and lose your life and secrets to the next person who walks by.
Don’t do that.
Dealing with Notifications
These days, there’s a lot more you can do with a notification than just read it and nod. Apple has tried to make notifications as productive, customizable, and un-interrupty as possible.
For example, you can deal with one in any of these ways, even if they’re on the Lock screen:
Flick it away. If a notification banner appears while the phone is on, flick it upward to make it disappear.
Answer it in place. You can take direct action on many kinds of notifications—incoming text messages, emails, or calendar invitations, for example. Without leaving the notification banner, you can reply to a text message, delete an email, accept a calendar invitation, see where your Uber car is, mark a Reminder as done, and so on.
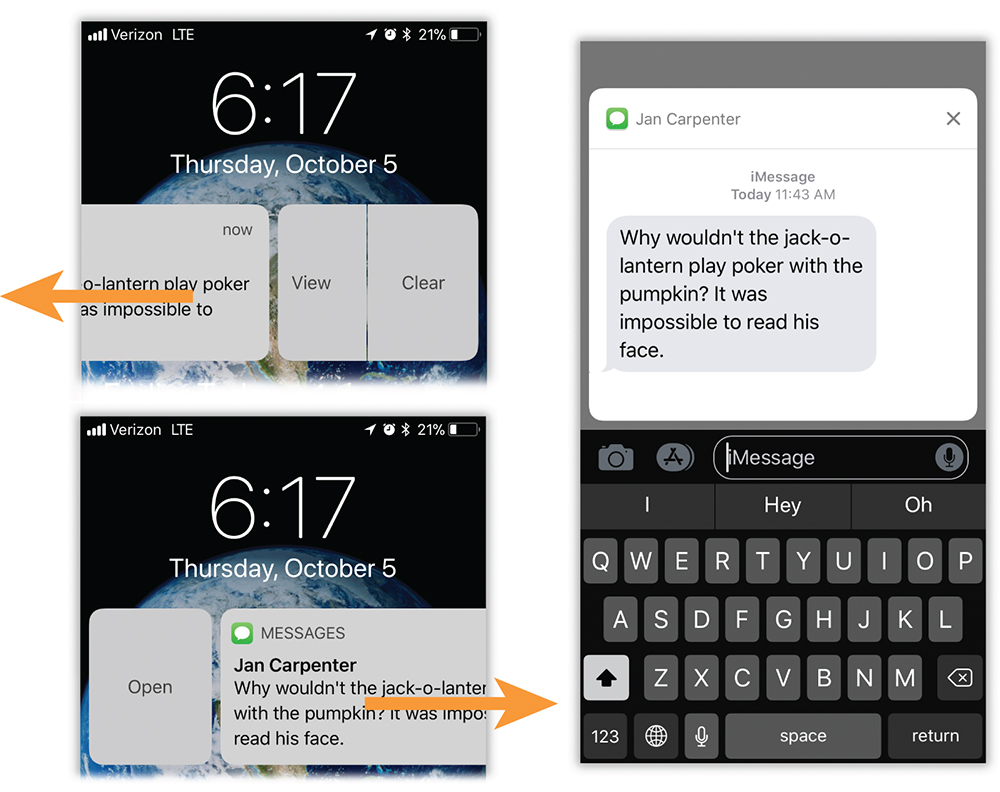
If you have an iPhone 6s or later model, you have 3D Touch (“3D Touch”). Just hard-press on the banner to expand it and see your action options—to reply to a text message, for example (facing page, right).
If you have an earlier model, swipe to the left on the banner to reveal your option buttons. For a text message, they might be View and Clear (facing page, top left); if it’s an email, they say Trash and Mark as Read; and so on.
Open it. Finally, here’s the obvious one: You can tap a notification to open the app it came from. (If the phone is locked, you’ll be asked to unlock it first.) Tap an email notification to open the message in Mail; tap a text-message notification to open it in Messages; and so on. That’s handy when you want to dig in and see the full context of the notification.
(If you’ve broken your tapping finger, there are two other ways to go about it: Swipe to the right to reveal the Open button shown below at bottom left. Either continue swiping, all the way to the edge of the screen, or stop and tap Open. Either way, you open the message in the corresponding app.)
Clear it. Once you’ve tapped a banner to open it, that notification no longer appears on either Lock screen. It’s gone.
You can also dismiss a banner without opening it by swiping all the way to the left (or swiping slightly leftward and tapping Clear).
Dismissing Clumps of Notifications
There’s no way to clear out notifications in a bunch when you’re on the actual Lock screen. On the pull-down Lock screen, though, you can clear all the notifications for an entire listed day by tapping the  next to a day’s name and then tapping Clear.
If you have an iPhone 6s or later, you can also erase your entire list of notifications, like this: Hard-press the next to a day’s name; tap Clear All Notifications. (There’s no Clear All function on older iPhone models.)
Customizing Notifications
You can (and should) specify which apps are allowed to junk up your notification screens. Open Settings → Notifications to see the master list, with one entry for every app that might ever want your attention. (Or just tell Siri, “Open notification settings.”)
You’ll quickly discover that every app thinks it’s important; every app wants its notifications to blast into your face when you’re working.
You, however, may not agree. You may not consider it essential to know when your kid’s Plants vs. Zombies score has changed, for example.
So: Tap an app’s name to open its individual Notifications screen (below—the News app, in this example). Here you’ll find settings that vary by app, but they generally run along these lines:
Allow Notifications. If you don’t want this app to make any notifications pop up at all, turn this off.
Sounds. Some apps try to get your attention with a sound effect when a notification appears. Turn this off if you think your phone makes too many beeps and burbles as it is. (Some apps also let you choose which sound effect plays to get your attention. You can change the sound or choose None.)
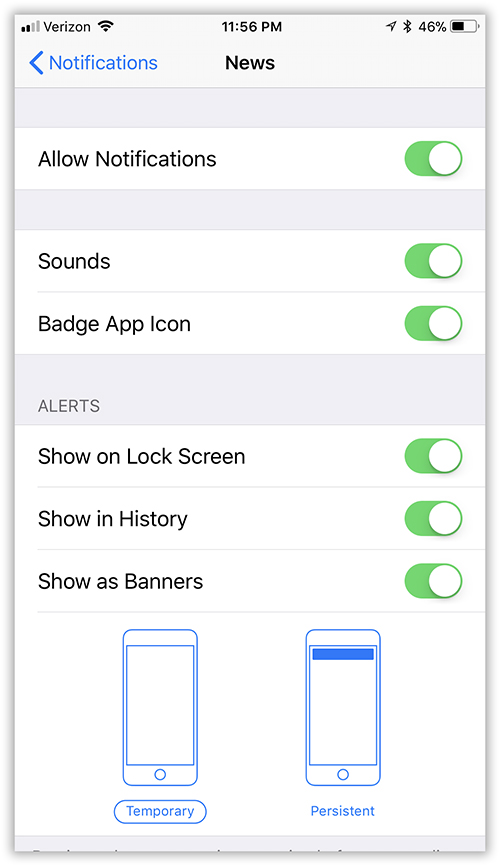
Badge App Icon. A badge is a little red circled number (
 , for example). It appears right on an app’s icon to indicate how many updates are waiting for you. Turn it off if you really don’t need that reminder.
Show on Lock Screen. Here you control whether this app’s banners appear on the actual Lock screen at all. This switch has no effect on the pull-down Lock screen. This app’s banners still show up there, which means that you can set up different sets of banners on each one.
Maybe you want the real Lock screen to show only missed calls, new text messages, and new email—but you’d like the pull-down Lock screen to be fully stocked with Twitter and Facebook updates, for example. Or maybe you’d rather not permit passing evildoers to pick up your phone and see your notifications without even having to unlock it.
That’s why you have this switch. It governs your ability to see this app’s updates on the Lock screen.
Show in History. The History is a list of notifications that in theory you’ve already seen. (On the Lock screen, you swipe up to see them. On the pull-down Lock screen, they’re always visible.)
Once you’ve unlocked your phone, any notifications on its Lock screen get moved into the History list. That is, the next time you look at the Lock screen, you’ll have to swipe up to see them.
Unless, of course, you turn off Show in History for this app. Now, this app’s notifications disappear completely after you unlock the phone.
Show as Banners. In iOS 11, there’s no more choice of banners versus alerts. All notifications look and work alike. The only choice you have to make, for each app, is whether they linger on your screen—or disappear after a moment.
If you turn off Show as Banners, then nothing appears on the screen when an app wants your attention. (You can still direct these alerts to appear on your Lock screen, as described already.)
A Temporary banner appears at the top of the screen, holds still long enough for you to read it, and then goes away after a few seconds. Facebook and Twitter updates and incoming email messages do well as temporary banners.
A Persistent banner stays on your screen until you tap or swipe it. You might use this option for apps whose messages are too important to miss, like alarms, flight updates, or texts.
Show Preview. This is a privacy thing. When someone sends you a text, do you want the notification banner to include the message itself? (That’s the Preview.) Or do you want the banner to indicate only that a person has sent some message, which you then have to tap to read?
And it’s not just texts. Do you want the Uber information to appear in the banner? How about the Facebook status? The name of your alarm or reminder?
You have three choices here: Always (always show the message in the notification banner), When Unlocked (show it only if I’m using the phone—not when it’s locked), and Never.
As you poke around in the Notifications settings, you’ll discover that certain oddball apps offer some options that don’t match up with the settings you see for most apps. Don’t freak out. It’s all part of Apple’s master plan to put controls where it hopes you’ll find them.
Locking Down the Lock Screen
Now, remember: You can enjoy any of these activities, and see any of this information, even before you’ve entered your password or used fingerprint or face recognition. The bad guys don’t need a password to view your Lock screen.
For privacy purposes, therefore, you can turn those features off individually in Settings → Touch ID & Passcode (or Face ID & Passcode). Here you’ll find on/off switches for a whole raft of Lock screen features: the Today View, Recent Notifications, Control Center, Siri, Reply with Message (to text messages), Home Control (of your app-controllable home-automation devices), Wallet (for Apple Pay), and Return Missed Calls (right from the “missed call” notification banner).
NOTE
If you turn off Recent Notifications, you eliminate the sole difference between the actual Lock screen and the pull-down Lock screen: the listing of older notifications. Notifications will appear on the Lock screen as they come in, but you’ll have no way to swipe to see earlier ones you’ve already seen.
There’s no way to block access to the Camera from the Lock screen. (Well, you can open Settings → General → Restrictions and turn off Camera. That step, however, hides the Camera completely—it even disappears from the Home screen.)
The Today Screen (Widgets)
To the left of the Lock screen, you’ll find a motley assortment of panels that Apple calls widgets. Some are quick-access buttons that launch related apps, like quick-dial (or quick-text) buttons for your favorite contacts; others are info-bits that you might want to check throughout the day, like your calendar, news, sports, and weather.
This entire wonderland is available before you’ve even unlocked the phone—quickly. Just swipe right from the Lock screen. Great when you want to check your calendar for your next thing.
It’s also available when you’ve opened the pull-down Lock screen (swipe right, above or below the notification banners), and even when you’re at the Home screen (swipe right).
Truth is, many people don’t even know the Today screen is there; even if they do, most people don’t use it. And sure enough, this feature doesn’t really become useful until you customize it: Rearrange the widgets, remove the ones you’d never touch, and install more useful ones.

The very first time you open the Widgets screen, you see things like the search bar (“Speak!”), Up Next, Siri App Suggestions, and News. (They’re described on these pages.) But the key to the real magic is the Edit button, which is hiding below all the widgets, several scrolls down.
The list you find here has two parts: the widgets that are currently installed and the ones that aren’t. Delete a widget by tapping its ![]() ; add one by tapping its
; add one by tapping its ![]() . Rearrange the installed ones by dragging their
. Rearrange the installed ones by dragging their ![]() handles. When you’re finished, tap Done.
handles. When you’re finished, tap Done.

So what widgets are available? Here’s a rundown:
Up Next. The next couple of things on your calendar. Tap to log in and open the Calendar app, which shows you details of the event.
Siri App Suggestions. This little row of app icons actually have nothing to do with Siri, the voice-controlled assistant. Instead, these are the iPhone’s suggestions of apps you may want to use right now, based on your location, the time of day, and your typical routine. For example, if you open the Music app every evening during your 6:30 p.m. gym workout, then the Music app appears at that time, ready to open. If you check your Fitbit app every morning when you wake, then this screen offers its icon at that time of day. The idea is to save you from having to hunt for these apps when you need them again.
If you find these icons unhelpful, you can turn off this widget (above). You can also prevent certain apps’ icons from appearing here. Open Settings → Siri & Search. Here, if you scroll down, you’ll find the names of all apps that might be inclined to appear as a Siri Suggestion; you can tap them to turn them off, one at a time.
Suggestions in Look Up means, “When I highlight text and tap Look Up, I want to see only its definition or web results—not app suggestions.”
News. Headlines from the News app (“News”).
Weather. You guessed it.
Batteries. Hey, it’s your phone’s current battery charge!
Maps Destinations. If you use Apple’s Maps app, and routinely enter the addresses of your appointments on the Calendar, here’s the payoff: a list of upcoming and predicted destinations, including your next calendar appointment and where you parked your car (“Where You Parked”).
Calendar. Today’s agenda. Tap an appointment to unlock your phone and see its details screen.
Reminders. Your unfinished to-dos. You can mark one as done here, without having to unlock the phone and open the app. That’s a big deal.
Favorites. This is your speed-dial list. The first four people you’ve designated as favorites appear here, for quick speed-dialing.
But it’s not just about phone calls (who does that anymore?). You can also designate a texting or email address, Skype handle, or other communication address as a favorite (“The Favorites List”). Which means that, using this widget, you can insta-text your spouse or your kid without having to open the app, access the address book, choose the person’s name, and so on. Shortcuts, baby!
Files. Here are the most recent files you’ve moved to or from your iCloud Drive (“The Carpenter’s Level”).
Find Friends. This widget shows a map that pinpoints the location of any loved ones you’re tracking (???).
Mail. A speed-dial list of the people you’ve designated as VIPs (“VIPs and Flagged Messages”), for quick emailing.
Maps Nearby. These icons are shortcuts for time-appropriate searches, like coffee in the morning, or nightlife after dark.
Maps Transit. If you use Maps’ public-transportation feature, this widget lets you know about delays and service interruptions.
Music. Playback controls for whatever you were playing last.
Notes. You see the first couple of lines of the Notes page you most recently edited.
Photos. Thumbnails that, after you unlock the phone, open recent Memories (automated slideshows of recent time periods).
Reminders. Here’s where you see to-do items you’ve set up in the Reminders app with a time and date.
Files. This widget shows the icons of any files you’ve recently added to your iCloud Drive (“The Carpenter’s Level”).
TV. Shows any shows you’ve been watching in the TV app (“The TV App”).
Stocks. The latest on whatever stocks you follow (““Remid Me About This””).
Tips. This is the closest Apple comes to offering a manual for iOS 11.
You probably have many other widgets, too, installed by your apps. Waze, Yelp, The New York Times, NPR, Google Maps, Kindle, Evernote, Dropbox, Chrome, Amazon, and many other apps put widgets here for your quick-glancing pleasure.
TIP
Many widgets are expandable. If you see a Show More button on a widget, it means that a larger area, showing more information, is available to you. For example, expanding the Favorites widget shows icons for eight speed-dial people instead of four; expanding the Notes widget shows the three notes you’ve most recently viewed instead of one; and so on.
Widgets on the Home Screen
You don’t have to swipe onto the Today screen to view a widget you need right now. On the recent models, you can hard-press (“3D Touch”) an app’s home-screen icon to view not just its shortcut menu but also its widget, for quick consultation. (This pop-up panel also includes an Add Widget button, should you decide to install it on the Widgets screen.)
In Case of Emergency
In iOS 11, Apple has turned the iPhone into an ingenious, smart emergency beacon. When you’re in trouble—you’re being followed, you’re being attacked, you’ve fallen and you can’t get up—the phone can automatically dial both 911 and send text messages to specified loved ones, letting them know you have an emergency and including your location. (If you move, they get additional texts letting them know where.)
When you need help, trigger the automatic emergency call like this:
iPhone SE, 5s, 6, 6s, 7. Click the side button five times fast.
iPhone 8, X. Hold in the side button and either volume button simultaneously for two seconds.
(Alternatively, press those buttons for a full second and then drag the Emergency SOS slider on the Shut Down screen. But there’s an advantage to doing it the other way: You can do it without looking at the phone, or even taking it out of your pocket.)
TIP
In Settings → Emergency SOS, you’ll find a fascinating option called Also Works with 5 Clicks. If you turn it on, then pressing the side button five times rapidly also works to trigger the emergency dialing, just as it does on older iPhones. In times of danger, this method may be faster than pressing and waiting.
In all cases, a whooping alarm begins, and a big red 3-second countdown starts. At zero, the phone dials 911. (The countdowns are designed to give you a chance to change your mind.) Then, after a 10-second countdown, it sends texts to your designated contacts, accompanied by a little map. “Emergency SOS,” it says. “[Your name] has made an emergency call from this approximate location. You are receiving this message because [your name] has listed you as an emergency contact.”
To set this up, open Settings → Emergency SOS. Here you can turn off the countdown; you can choose who gets notified (tap Set Up Emergency Contacts in Health, and then tap Edit); and you can turn off Auto Call. In that case, there’s no countdown or alarm or auto-dialing. You must swipe your finger across an Emergency SOS slider to place the call, and the call goes to the nearest police office line (not 911).

Help from the Shutdown Screen
To turn your phone fully off, you’re supposed to hold in the side button for a few seconds (“Side Button (On/Off)”). But if you hold in the side button and either of the volume buttons simultaneously, you get new additional sliders:
Medical ID. Swipe to open a screenful of essential medical information about you. And where does the Medical ID screen get this information? You’ve filled it out in the Health app (“Health”).
Emergency SOS. This is the same auto-dialing process described already.
Note that both of these features are available even if the phone is locked. Anyone can hold in those buttons for a couple of seconds and get help on the way.
The “Forcible Unlock” Situation
When the public first heard about Face ID on the iPhone X, there was panic. “Oh, great,” they said. “So now a mugger can force me to unlock the phone by holding it up to my face!” (There were also variants: “So now a cop can force me to unlock the phone by holding it up to my face!”)
Apple has you covered. If anyone demands your phone under threat, bring up the shutdown screen described above. What your antagonist probably doesn’t realize is that once that screen appears, Touch ID and Face ID are turned off. Neither your face nor your fingerprint will unlock the phone at this point—only the passcode will work.
Of course, the mugger or rogue officer could still try to force you to enter your passcode—but now you’ve got bigger problems.