
Chapter 15. Syncing with iTunes
Apple’s iTunes program began life as a loading dock for iPods way back in 2001. Eventually, it became an essential partner for our iPhones; we used iTunes to shop for, organize, and sync movies, photos, apps, ebooks, and music to our phones.
Today, though, it’s perfectly possible to use all of an iPhone’s features without iTunes—and even without a computer. You can download all your apps, music, movies, and books right from the Internet, and you can back up your phone using iCloud (see the next chapter).
In fact, you can’t use iTunes anymore for apps and ringtones. In the latest version, Apple stripped out those functions. (When you first open iTunes 12.7 or later, a message lets you know that “iTunes has been updated to focus on music, movies, TV shows, podcasts, and audiobooks.”)
Why? Because, after years of listening to consumer complaints that iTunes has become too overloaded with functions, Apple felt that this was one task iTunes didn’t need to handle. Today you have to buy and organize apps and ringtones directly from your phone.
TIP
So wait—without iTunes storing app and ringtone backups on your computer, how do you re-download apps and ringtones you’ve bought but don’t currently have on your phone? Like this. On the phone, open the App Store app, and then tap Today → [your icon in the top-right corner] → Purchased → Not on This iPhone.
For ringtones, open Settings → Sounds & Haptics. Tap Ringtone; at the top of the page, tap Download All Purchased Tones. (If you don’t see that button, it’s because you haven’t bought any Apple ringtones, or you’ve already re-downloaded them.)
Still, for managing music and videos, iTunes is an efficient tool. And for backups, it’s nice to know that your stuff is all stored on a machine that’s within your control.
Connecting the iPhone
iTunes is designed to load up, and back up, your iPhone. You can connect it to your computer either wirelessly over Wi-Fi, or wirefully, with the white USB cable that came with the iPhone.
Connecting the phone with a cable. Plug one end of the iPhone’s white charging cable into your computer’s USB jack. Connect the other end to the phone.
NOTE
If you have a 2016-or-later MacBook Pro (which has only USB-C jacks), you’ll need either a USB-C adapter or a USB-C–to–Lightning cable to connect your phone.
Connecting over Wi-Fi. The iPhone can be charging in its bedside alarm clock dock, happily and automatically syncing with your laptop somewhere else in the house. It transfers all the same stuff to and from your computer—apps, music, books, contacts, calendars, movies, photos, ringtones—but through the air instead of a cable.
Your computer has to be on and running iTunes. The phone and the computer have to be on the same Wi-Fi network.
To set up wireless sync, connect the phone using the white USB cable, one last time. Ironic, but true.
Now open iTunes and click the
 (iPhone) button near the top-left corner of the iTunes screen. Now you can look over the iPhone’s contents or sync it (read on).

NOTE
If you have more than one iPhone, and they’re all connected, then this button is a pop-up menu. Choose the name of the one you want to manipulate.
On the Summary tab, scroll down; turn on Sync with this iPhone over Wi-Fi. Click Apply. You can now detach the phone.
From now on, whenever the phone is on the Wi-Fi network, it’s automatically connected to your computer, wirelessly. You don’t even have to think about it. (Well, OK—you have to think about leaving the computer turned on with iTunes open, which is something of a buzzkill.)
All About Syncing
In general, syncing (transferring data between the iPhone and the computer) begins automatically when you connect the phone. The ![]() icon whirls in the top-left corner of the screen, but you’re welcome to keep using your iPhone while it syncs.
icon whirls in the top-left corner of the screen, but you’re welcome to keep using your iPhone while it syncs.
Truth is, most people these days don’t bother with iTunes for syncing; they let the phone sync with their computers wirelessly, via free iCloud accounts.
If you’re a little queasy about letting a third party (Apple) store your personal data, though, you can also do this task manually. You can let the iPhone and computer sync directly—no Internet is involved.
Ordinarily, the iPhone-iTunes relationship is automatic, according to this scheme:
Bidirectional copying (iPhone ↔ computer). Contacts, calendars, and web bookmarks get copied in both directions. After a sync, your computer and phone contain exactly the same information.
One-way sync (computer → iPhone). All of the following gets copied in one direction: computer to phone. Music, TV, movies, ringtones, and ebooks you bought on your computer; photos from your computer; and email account information.
One-way sync (iPhone → computer). Photos and videos taken with the iPhone’s camera; music, videos, apps, ringtones, and ebooks you bought right from the phone—it all gets copied the other way, from the phone to the computer.
A complete backup. iTunes also backs up everything else on your iPhone: settings, text messages, call history, and so on. Details on this backup business are covered starting in “Backing Up the iPhone”.
TIP
If you’re in a hurry, you can skip the time-consuming backup portion of the sync. Just click ![]() at the top of the iTunes window whenever it says “Backing up.” iTunes gets the message and skips right ahead to the next phase of the sync—transferring contacts, calendars, music, and so on.
at the top of the iTunes window whenever it says “Backing up.” iTunes gets the message and skips right ahead to the next phase of the sync—transferring contacts, calendars, music, and so on.
Manual Syncing
OK, but what if you don’t want iTunes to start syncing every time you connect your iPhone? What if, for example, you want to change the assortment of music and video that gets copied to it? Or what if you just want to connect the USB cable to charge the phone, not to sync it?
In that case, you can stop the autosyncing in any of these ways:
Interrupt a sync in progress. Click
 in the iTunes status window.
Stop iTunes from syncing with the iPhone just this time. As you plug in the iPhone’s cable, hold down the Shift+Ctrl keys (Windows) or the
 -Option keys (Mac) until the iPhone pops up in the iTunes window. Now you can see what’s on the iPhone and change what will be synced to it—but no syncing takes place until you command it.
Stop iTunes from auto-syncing with this iPhone. Connect the iPhone. Click
in the upper-left corner of iTunes. On the Summary tab, turn off Automatically sync when this iPhone is connected.Stop iTunes from autosyncing any iPhone, ever. In iTunes, choose Edit → Preferences (Windows) or iTunes → Preferences (Mac). Click the Devices tab and turn on Prevent iPods, iPhones, and iPads from syncing automatically. You can still trigger a sync on command when the iPhone is wired up—by clicking the Sync button.
Of course, you must have turned off autosyncing for a reason. And that reason might be that you want to control what gets copied onto your iPhone. Maybe you’re in a hurry to leave for the airport, and you don’t have time to sit there for an hour while six downloaded movies get copied to it. Maybe you have 50 gigabytes of music but only 16 gigs of iPhone storage.
In any case, here are the two ways you can sync manually:
Use the tabs in iTunes. With the iPhone connected, you can specify exactly what you want copied to it—which songs, which TV shows, which apps, and so on—using the various tabs in iTunes, as described on the following pages. Once you’ve made your selections, click the Summary tab and then click Apply. (The Apply button says Sync instead if you haven’t actually changed any settings.)
Drag files onto the iPhone icon. Once your iPhone is connected to your computer, you can click its icon and then turn on Manually manage music and videos (on the Summary screen). Click Apply.
Now you can drag songs and videos directly onto the iPhone’s icon to copy them there. Wilder yet, you can bypass iTunes entirely by dragging music and video files from your computer’s desktop onto the iPhone’s icon. That’s handy when you’ve just inherited or downloaded a bunch of song files, converted a DVD to the iPhone’s video format, or whatever.
Just two notes of warning here. First, the iPhone accommodates dragged material from a single computer only. Second, if you ever turn off this option, then all those manually dragged songs and videos will disappear from your iPhone at the next sync opportunity.
TIP
Also on the Summary tab, you’ll find the baffling little option called Sync only checked songs and videos. This is a global override—a last-ditch “Keep the embarrassing songs off my iPhone” option.
When this option is turned on, iTunes consults the tiny checkboxes next to every single song and video in your iTunes library. If you turn off a song’s checkbox, it won’t get synced to your iPhone, no matter what—even if you use the Music tab to sync All songs or playlists, or explicitly turn on a playlist that contains this song. If the song’s or video’s checkbox isn’t checked in your Library list, then it will be left behind on your computer.
The Eight Tabs of iTunes
Once your iPhone is connected to the computer, and you’ve clicked its icon in the upper-left corner of iTunes, the left side of the iTunes window reveals a column of word buttons: Summary, Music, Movies, TV Shows, Podcasts, Books, Photos, and Info. Below that is a second, duplicate listing, labeled On My Device. For the most part, these represent the categories of stuff you can sync to your iPhone.
The following pages cover each of these tabs, in sequence, and detail how to sync each kind of iPhone-friendly material.
TIP
At the bottom of the screen, a colorful graph shows you the number and types of files: Audio, Video, Photos, Apps, Books, Documents & Data, and Other (for your personal data). More importantly, it also shows you how much room you have left, so you won’t get overzealous in trying to load the thing up.
Point to each color block without clicking to see how many of each item there are (“2031 photos”) and how much space they take up.
Summary Tab
This screen gives basic stats on your iPhone, like its serial number, capacity, and phone number. Buttons in the middle control how and where the iPhone gets backed up. Checkboxes at the bottom of the screen let you set up manual syncing, as described previously.
Serial Number, UDID
If you click your phone’s serial number, it changes to reveal the unique device identifier (UDID). That’s Apple’s behind-the-scenes ID for your exact product, used primarily by software companies (developers). You may, during times of beta testing a new app or troubleshooting an existing one, be asked to supply your phone’s UDID.

You can click the same label again to see your phone’s Product Type and ECID. Or click your phone number to see your various cellular identifiers like the MEID, IMEI, and ICCID. Or click the iOS version to see your iOS version’s build number.
Right-click (on the Mac, Control-click) any of these numbers to get the Copy command. It copies those long strings of letters and numbers onto your computer’s Clipboard, ready to paste into an email or a text.
Music Tab
Turn on Sync Music. Now decide what music to put on your phone.
NOTE
If you’re using iCloud Music Library (“The Library Tab”), this Music tab appears empty except for a note that you can play all your music wirelessly from the Internet. In other words, since all your music is online, there’s no point in choosing some subset of it to sync to your phone.

If you have a big iPhone and a small music library, you can opt to sync the Entire music library.
If you have a big music collection and a small iPhone, you’ll have to take only some of it along for the iPhone ride. In that case, click Selected playlists, artists, albums, and genres. In the lists below, turn on the checkboxes for the playlists, artists, albums, and music genres you want to transfer. (These are cumulative. If there’s no Electric Light Orchestra in any of your selected playlists, but you turn on ELO in the Artists list, you’ll get all your ELO anyway.)
TIP
Playlists make it fast and easy to sync whole batches of tunes over to your iPhone. But don’t forget that you can add individual songs, too, even if they’re not in any playlist. Just turn on Manually manage music and videos. Now you can drag individual songs and videos from your iTunes library onto the iPhone icon to install them there.
Music videos and voice memos (recorded by the iPhone and now residing on your computer) get their own checkboxes.
Making It All Fit
An iPhone holds a finite amount of music and video. If you turn on Sync All checkboxes, a message may say that it won’t all fit on the iPhone. One solution: Tiptoe through the tabs, turning off checkboxes and trying to sync until the “too much” error message goes away.
If you don’t have quite so much time, turn on Automatically fill free space with songs. It uses artificial intelligence to load up your phone automatically, using your most played and most recent music as a guide. (It does not, in fact, fill the phone completely; it leaves a few hundred megabytes for safety—so you can download more stuff on the road, for example.)
Another helpful approach is to use the smart playlist, a music playlist that assembles itself based on criteria that you supply. For example:
In iTunes, choose Music from the top-left pop-up menu. Choose File → New Smart Playlist. The Smart Playlist dialog box appears.
Specify the category. Use the pop-up menus to choose, for example, a musical genre, songs you’ve played recently, songs you haven’t played recently, or ones you’ve rated highly.
Turn on the “Limit to” checkbox, and set up the constraints. For example, you could limit the amount of music in this playlist to 2 gigabytes, chosen at random. That way, every time you sync, you’ll get a fresh, random supply of songs on your iPhone, with enough room left for some videos.
Click OK. The new Smart Playlist appears in the list of playlists at left; you can rename it. Click it to look it over, if you like. Then, on the Music tab, choose this playlist for syncing to the iPhone.
Movies and TV Shows Tabs
TV shows and movies you’ve bought or rented from the iTunes Store look great on the iPhone. (And if you start watching a rented movie on your computer, the iPhone can begin playing it from right where you left off.)
Syncing TV shows and movies works just like syncing music or podcasts. You can have iTunes copy all your stuff to the iPhone, but video fills up your storage fast. That’s why you can turn on the checkboxes of just the individual movies or shows (either seasons or episodes) you want—or, using the Automatically include pop-up menu, request only the most recent, or the most recent ones you haven’t seen yet.

Podcasts Tab
The iTunes Store lists thousands of free amateur and professional podcasts (“Podcasts”). On this tab, you can choose to sync all episodes, selected shows, all unplayed episodes—or just a certain number of episodes per sync. Checkboxes let you choose which podcast series get to come along for the ride, so you can sync to suit your mood.
This tab also includes your iTunes U recordings (educational seminars that used to get their own tab).
Books Tab
Here are thumbnails of your audiobooks and your ebooks—those you’ve bought from Apple, downloaded from the web, or dragged into iTunes from your desktop (PDF files, for example). You can ask iTunes to send them all to your phone—or only the ones whose checkboxes you turn on.
Photos Tab
If you’ve turned on iCloud Photo Library (“iCloud Photo Library”), this tab appears blank, except for a note that “iCloud Photos is On.” After all, your photos are already syncing. If not…read on.
Syncing Photos and Videos (Computer → iPhone)
iTunes can sync the photos from your hard drive onto your iPhone. You can even select individual albums of images that you’ve already assembled on your computer.
Here are your photo-filling options for the iPhone:
Windows: You can sync with Photoshop Elements, Photoshop Album, or any folder of photos, like Pictures (in Windows).
Mac: You can sync with Photos, iPhoto, or Aperture.
When you’re ready to sync your photos, click the Photos tab in iTunes. Turn on Sync photos from, and then indicate where you’d like to sync them from (Photoshop Elements, the Mac’s program Photos, or whatever).
If you’ve chosen a photo-shoebox program’s name (and not a folder’s name), you can then click Selected albums, Events, and Faces. Turn on the checkboxes of the albums, events, and faces you want synced. (The “faces” option is available only if you’re syncing from Photos or Aperture on the Mac, and only if you’ve used the Faces feature, which groups your photos according to who’s in them.)
This option also offers to tack on recent Events (photos taken the same day). Indicate whether or not you want videos included (Include videos).
Once you make your selections and click Apply, the program computes for a time, “optimizing” copies of your photos to make them look great on the iPhone (for example, downsizing them from 20-megapixel overkill to something more appropriate for a 0.6-megapixel screen), and then ports them over.
After the sync is complete, you’ll be able to wave your iPhone around, and people will beg to see your photos.
Syncing Photos and Videos (iPhone → Computer)
You can go the opposite direction, too: You can send photos and videos you took with the iPhone’s camera to the computer. You can rest easy, knowing that they’re backed up to your computer for safekeeping.
Now, it’s important to understand that iTunes is not involved in this process. It doesn’t know anything about photos or videos from the iPhone.
So what’s handling the iPhone-to-computer transfer? Your operating system. It treats the iPhone as though it’s a digital camera and suggests importing them just as it would from a camera’s memory card.
Here’s how it goes: Plug the iPhone into the computer with the USB cable. What you’ll see is probably something like this:
On the Mac. Photos opens. This free photo-organizing/editing program comes on every Mac. Shortly after the program notices that the iPhone is on the premises, it goes into Import mode. Click Import All, or select some thumbnails from the iPhone and then click Import Selected.
In Windows. When you attach a camera (or an iPhone), a dialog box asks how you want its contents handled. It lists any photo-management program you might have installed (Photoshop Elements, Photoshop Album, and so on), as well as Windows’ own camera-management software. Click the program you want to handle importing the iPhone pictures and videos.
You’ll probably also want to turn on Always do this for this device, so it’ll happen automatically the next time.
Info Tab
This tab is unnecessary if you’re using iCloud (Chapter 16) to sync your phone’s contacts, calendar, email settings, and web bookmarks with your computer. Instead, this tab is exclusively for the six people who still use iTunes to sync these data types with a Windows program like Outlook, Outlook Express, or Windows Mail; a Mac program like Contacts or Entourage/Outlook for Mac; or an online address book like Google Contacts or Yahoo Address Book.
Similarly, you can sync the phone’s calendar with a program like Outlook (for Windows) or Calendar or Outlook (on the Mac).
File Sharing
Some iPhone apps create documents that you can open in similar apps on your computer—and vice versa. You can edit the same iMovie videos on both the Mac and the iPhone. Similarly, scanning apps can share their scanned image files.
This tab lists all iOS apps that can share their documents, and lets you copy them to or from your computer.
NOTE
Actually, though, using the new Files app—and a virtual disk like iCloud Drive or Dropbox—is actually a far simpler, more useful way to move these files back and forth. Why? Because you don’t have to move them back and forth. They’re always available, in their latest versions, to all your machines. See “The Carpenter’s Level”.
If you still decide to use this clunky method, here’s how it goes:
From phone to computer. Click the app’s name. In the rightmost column, drag the files you want out of the iTunes window onto your desktop. (Or click Save To and choose a folder location.)
From computer to phone. Click the app’s name. Drag the files you want out of a desktop window into the rightmost iTunes column. (Or click Add and choose the file manually.)
Next time you sync, those files will move the way you’ve specified.
On My Device
Below those Settings tabs at the left side of the iTunes window, there’s a second, similar set labeled On My Device. It’s a tidy list of everything that is, in fact, on your device, organized by type (Music, Movies, and so on). There’s not really much you can do here—you can get more information about some items by pointing to them—but just seeing your multimedia empire arrayed before you can be very satisfying.
The Purchased category, in particular, can be handy; it shows everything on your phone that you’ve bought with the phone.
One iPhone, Multiple Computers
You can actually sync an iPhone with multiple Macs or PCs. You might want, for example, to fill it up with music and video from a Mac at home; contacts, calendar, ebooks, and iPhone applications from your Windows PC at work; and maybe even the photos from your laptop. All you have to do is set up the tabs of each computer’s copy of iTunes to sync only certain kinds of material.
On the Mac, for example, you’d turn on the Sync checkboxes for only the Music, Podcasts, and Video tabs. Sync away. Next, take the iPhone to the office; on your PC, turn on the Sync checkboxes on only the Info, Books, and Apps tabs. Sync away once more. Then, on the laptop, turn off Sync on all tabs except Photos.
Each time you connect the iPhone to one of the computers, it syncs that data according to the preferences set in that copy of iTunes.
One Computer, Multiple iPhones
It’s fine to sync multiple iPhones with a single computer, too. iTunes cheerfully fills each one up, and can back each one up, as they come. In fact, if you open the Preferences box (in the iTunes menu on the Mac, the Edit menu in Windows), the Devices tab lists all the iPhones that iTunes is tracking (and iPads and iPod Touches).
Backing Up the iPhone
iTunes can back up everything your computer doesn’t already have a copy of: stuff you downloaded straight to the phone (music, ebooks, apps, and so on), plus less visible things, like your iPhone’s mail and network settings, your call history, contact favorites, notes, text messages, and other personal preferences that are hard or impossible to recreate.
TIP
If you turn on Encrypted iPhone Backup, then your backup will also include all your passwords: for Wi-Fi hotspots, websites, email accounts, and so on. That can save you tons of time when you have to restore the phone from the backup. (The one downside: You have to make up a password for the backup itself. Don’t forget it!)
You can create your backups in either of two places:
On your computer. You get a backup every time the iPhone syncs with iTunes. The backup also happens before you install a new iPhone firmware version from Apple or restore your phone.
In iCloud. You can also back up your phone wirelessly and automatically—to iCloud. That kind of backup will be available even if your computer croaks. On the other hand, since your free iCloud storage holds only 5 gigabytes, and your phone holds 16 gigabytes or more, the free iCloud account usually isn’t enough. See the next chapter for details.
You make this choice on the Summary tab.
Using That Backup
Maybe you lost your phone, or maybe you’ve upgraded to a new phone.
To restore your data and settings, connect the iPhone to the computer you normally use to sync with. Click the ![]() (iPhone) button; click the Summary tab; click Restore iPhone.
(iPhone) button; click the Summary tab; click Restore iPhone.
A message announces that you can’t erase the phone without first turning off Find My iPhone. This is a security measure to stop a thief from erasing a stolen phone. He can’t restore the phone without turning off Find My iPhone, which requires your iCloud password. Go to the phone and do that (in Settings→[your name]→iCloud).
Take iTunes up on its offer to restore all your settings and stuff from the backup.
If you see multiple backup files listed from other iPhones (or an iPod Touch), be sure to pick the backup file for your phone. Let the backup restore your phone settings and info. Exhale.
NOTE
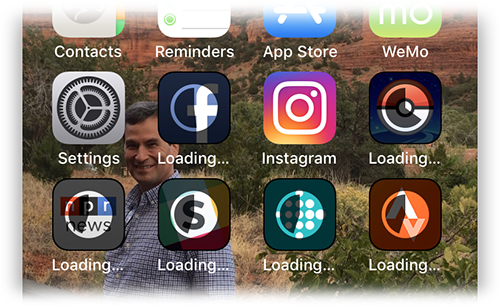
An iPhone backup no longer includes your apps. Instead, the backup remembers which apps you had, and where their icons were on your Home screens—but the actual multi-gigabyte wad of the apps themselves is not part of the backup. That’s why backups take much less time than before, and much less space on your computer.
It does mean, though, that after a restore, you see only dimmed copies of your apps. It takes some time in a Wi-Fi hotspot for iOS to re-download them all. Little pie charts on the icons let you know how it’s doing.
Deleting a Backup File
To save disk space, you can delete old backups (especially for i-gadgets you no longer own). Go to the iTunes preferences (Edit → Preferences in Windows or iTunes → Preferences on the Mac) and click the Devices tab.
Click the dated backup file you don’t want and hit Delete Backup.