
Chapter 1. Overview
Chapter points:
• iPhone Models
• Forensic Examination Approaches
This introductory chapter provides an overview of the iPhone, including a timeline of the events leading up to its development. Apple's strategy in focusing on touch-screen development is discussed, as is the significant growth of the iPhone and the active hacking community responsible for the development of many tools and techniques. Details related to the various models are outlined, including a definition of many of the hardware components that make up the device. Finally, the acquisition of an iPhone device is introduced by defining the various ways in which data can be extracted. Each of these topics is briefly touched on in this chapter and expanded upon in greater detail through the remainder of the book.
Keywords: iPhone models, iOS versions, iPhone hardware components, jailbreaking, iPhone leveling, iPhone acquisition
Introduction
Mobile devices have come a long way over the past few years. For a while, cell phones were simply used for making phone calls. As they continued to mature, the capability to send and receive text messages, create calendar events, and save contacts became readily available. Fast forward to the present day, and mobile devices are now being used extensively and serve many purposes. Around 4.6 billion individuals owned cell phones as of early 2010, and the number was expected to reach 5 billion by the end of the year (CBS, 2010). With this increase in popularity came an enormous demand for mobile forensics.
The iPhone was first released to consumers in June 2007. Ever since the first release, the device has increasingly gained in popularity, partly due to its advanced functionality and usability. With the iPhone, individuals now have the capability to check e-mail, take photos, browse the Internet, and do much more. These activities make the iPhone take the place of personal computers (PCs) and digital cameras. In addition to the standard capabilities that exist in the iPhone, endless applications are also available for download to assist with finances or organization, or simply for entertainment.
In the late 1980s, the Newton platform was the company's main focus. This platform was a personal data assistant (PDA), which never really took off. The project ultimately failed in 1998. One year prior to that, Steve Jobs became the CEO of the company. Before the idea of the iPhone was actually formulated, Jobs decided to have Apple start focusing on the idea of touch-screen development rather than PDAs and tablet PCs. Believing that cellular devices were going to become very popular, the company began developing a mobile device that could display pictures and videos and would ultimately have the capability to sync with iTunes. On November 2006, a patent was granted for the Apple iPhone, and in January 2007 Jobs announced the release of the iPhone at MacWorld (Wired, 2008).
Strategy
Apple's strategy over the past few years has shifted away from traditional computing. New and innovative ideas have been developed, disrupting the existing business model. In the music and video genre, several different applications and devices have been developed including the Apple TV, iTunes, and various iPod devices. The mobile category includes the iPhone, while the class of delivery channel items includes both iTunes for synchronization and downloads and the App Store. Finally, the development of the iPad (and previously the Newton device) falls within the Tablet category.
Many of these newer devices have been consolidated onto the iOS platform, with the exception of the Macintosh workstations, which are running OS X. There has been some debate in the past on whether Mac OS X will transform to iOS or perhaps a platform more similar to iOS. The Mac OS X Lion is to be released in the summer of 2011. This operating system is said to have similar qualities as the iOS devices, with the exception of a touch-screen feature. A Mac App Store was released in January of 2011, which enables Mac users to purchase software straight from their computer, similar to the way applications can be purchased through the iTunes App Store (Apple Inc., 2010).
As of 2009, the iPhone had taken third place in smart phone sales worldwide, which constituted 4.4% of the market share (McGlaun, 2010). During the first quarter of 2010 alone, 8.75 million were sold, which was more than half the number for the same period in 2009. Just prior to the release of the iPhone 4, over 50 million iPhones had been sold, and statistics from Q4 2010 show that Apple controlled 25% of the smart phone market in the United States (Slashdot, 2011). With the extreme popularity of the iPhone and the increasing number of devices sold, this mobile device has become one of the main focal points of many forensic investigations.
Development community
Apart from sales, the iPhone has an active hacking community, which has yielded research and tools that support forensic investigations. Some of these tools and techniques were originally used to assist with forensic imaging and are currently used for testing in order to better understand the device. Cydia is a popular application used for these purposes. It allows users with a modified phone to download and run iPhone or iPad applications that are not available in the App Store. More specifically, applications can be found here that may allow an examiner to better understand the iPhone file system and other data contents, such as Mobile Terminal. Jailbreaking, or modifying an Apple device, is not suggested, as it is not a forensically sound method; however, having the capability to remotely connect to a test device for educational purposes can be an invaluable learning experience for an examiner.
Another technique that is commonly used on the iPhone is referred to as “unlocking.” From 2007 to early 2011, AT&T was the only provider that offered service for the iPhone in the United States. In order to function properly, an AT&T SIM (subscriber identity module) card had to be placed into the device to identify itself on the carrier's network. In February 2011, the iPhone 4 became available through another carrier, Verizon. With the device being so exclusive and only available under these two carriers, many iPhone users search for other options. Unlocking an iPhone is a method that allows the device to be used on alternative networks, and various Apple tutorial sites, such as iClarified, provide steps on how to do this. The process typically involves installing an application, running it, and replacing the AT&T SIM card with that of a different carrier. As Verizon is on the CDMA (code division multiple access) network rather than GSM (global system for mobile communications), its version of the iPhone does not come with a SIM card. For this reason, unlocking the iPhone 4 from Verizon's network is impossible using the current methods. Having said that, the Apple user community will undoubtedly develop an alternative method in the future.
The Apple developer site is another resource that can benefit developers, examiners, or individuals interested in the iOS or OS X environments. Once a registered Apple developer, an individual can download Xcode and the iOS software development kit (SDK) to assist in application development. Included in this development suite are an Xcode integrated development environment (IDE), iOS simulator, and additional tools required for iPhone, iPad, and iPod touch application development.
Once the Xcode and iOS SDK are downloaded, the installer must be run in order to use the tools. Once installed, the tools and files shown in Figure 1.1 can be found in the following path: /Developer/Platforms/iPhoneSimulator.platform

One of the most useful tools within this package is the iOS simulator (as shown in Figure 1.2). This program allows the investigator to select an Apple device and version and use the simulator to test this particular model. For this example, the iPhone running firmware version 4.2 was selected. Among the other options were versions 3.2 (for the iPad) and 4.0.2 and 4.1 (for the iPhone). The software is memory intensive, so one can expect the testing to be a little slow. The simulator starts up with just a few general apps, including Photos, Settings, Game Center, Contacts, and Safari. The user is able to go into these apps, use them as though they were a real device, and even perform additional functions including Toggle In-Call Status Bar, Simulate a Memory Warning, Simulate a Hardware Keyboard, and Lock the device. Lacking from the simulator are some of the more common apps, such as SMS, Calendar, Camera, Notes, and the App Store in order to download additional applications.

The main purpose of the simulator is to be used by application developers in conjunction with Xcode. When Xcode is used to develop an iPhone or iPad application, the code can be tested and run using the simulator on various firmware versions. Testing on the simulator will ensure that the application is performing the way it is expected to.
iPhone models
The original iPhone 2G was released in the United States in June 2007. Simultaneously, iTunes version 7.3 was also released, which would support synchronization with this device. Subsequent models were released in the following years: the 3G in July 2008, 3G(s) in June 2009, and the iPhone 4 in June 2010.
Each device arrives with its own firmware version, which can be found by navigating to Settings > General > About > Version. The purpose of the firmware is to enable certain features, fix bugs or security holes, and assist with the general functioning of the device. Apple will occasionally release new firmware upgrades to resolve some of these issues.
Table 1.1 displays the model number and the initial iOS versions for each device.
| Device | Model | Available iOS Versions |
|---|---|---|
| 2G | A1203 | iOS 1.0 |
| 3G | A1241 | iOS 2.0 |
| 3G(s) | A1303 | iOS 3.0 |
| 4G | A1332 | iOS 4.0 |
In order to identify the device model with the phone powered off, there are a few different things to consider. The first to look for is the model number etched at the back of the casing. Also, the original iPhone had a metal casing, whereas the 3G and 3G(s) had a plastic casing. The 3G(s) has the writings at the back etched in silver to differentiate it from the 3G, which has only the Apple logo in silver. Finally, the iPhone 4 has a unique square design. The corners are less rounded, making it easier to differentiate between the earlier versions. Apple's knowledge base articles can be helpful for this purpose. Details on identifying iPhone models can be found at the following link: http://support.apple.com/kb/HT3939
Table 1.2 shows the specifications and features of each of the models, depending on the storage size (Costello, n.d.).
There were three main differences that separated the 3G from the original iPhone device. One of these features is the addition of the CDMA cellular protocols. W-CDMA is the air interface standard for 3G networks. The intent of adding this protocol was for increased connection speed as well as more efficient support for a greater number of users. The second feature to differentiate the 3G from the 2G is the integrated global positioning system (GPS), which is also found in the 3G(s) and iPhone 4. Finally, the amount of NAND Flash memory increased by a factor of 2 (Semiconductor Insights, n.d.).
iPhone hardware
The iPhone, like most complex electronic devices, is a collection of modules, chips, and other electronic components from many manufacturers. Due to the complex and varied features of the iPhone, the list of hardware is extensive. Table 1.3 consists of a list of many of the components of an iPhone 3G(s), including the manufacturer and model or part number.
The Samsung CPU is an RISC (reduced instruction set computer) processor that runs the core iPhone processes and works in conjunction with the PowerVR co-processor for graphics acceleration. The CPU is underclocked to 412 MHz (from a possible 667 MHz), presumably to extend battery life. Many of the internal components vary depending on the iPhone model. Semiconductor Insights is a significant resource in understanding the inner workings of many different types of devices. Their device library includes many mobile devices, including the iPhone. A report is completed for each device, which includes a description of the product, details on how to disassemble and reassemble the device, tear down photos, hardware components, and much more (Semiconductor Insights, n.d.).
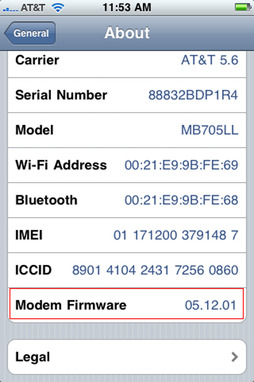
The baseband is another essential component on the iPhone. The baseband manages all the functions that require an antenna, notably all cellular services. Unlocking the device was mentioned earlier. During this process, the baseband is the part of the device that is hacked in order to allow the iPhone to connect to a different cellular network. There are different baseband versions, which is why the unlocking process must constantly be modified. When a new device comes out, such as the iPhone 4, it will arrive with a different baseband version. The baseband version can be found under Settings > General > About > Modem Firmware, as shown in Figure 1.3.
The baseband processor has its own RAM and firmware in NOR Flash, separate from the core resources. It functions as a resource to the main CPU. The Wi-Fi and Bluetooth are managed by the main CPU, although the baseband stores their MAC addresses in its NVRAM.
The images displayed in the next page, courtesy of Semiconductor Insights, were taken after an iPhone 3G(s) was manually dismantled: Figure 1.4 is an image of the top of the device and Figure 1.5 is of the bottom.


Forensic examination approaches
Similar to any forensic investigation, there are several approaches that can be used for the acquisition and analysis of information. A key aspect of any acquisition, arguably the most important, is that the procedure does not modify the source information in any manner. Or, if it is impossible to eliminate all modifications, which is the case with many live systems or mobile devices, the analyst must detail the changes and the reasons why it was necessary. Unlike traditional computer forensics, in the mobile world you cannot simply remove the hard drive, attach it to a write blocker, image, and finally analyze the data. However, the characteristic of NAND memory, the primary storage mechanism, is to retain data on the device, which heightens the forensic value.
As mentioned above, any changes made to the device must be thoroughly understood and documented. As an example, many of the logical acquisition tools write a small amount of data to the device in order to install their software. The program then gathers information from the other applications on the device and transports the data over a physical or wireless connection. Understanding what programs or files are being copied to the device as well as where they are being copied to is vital information for a forensic investigation.
The National Institute of Standards and Technology (NIST) has instituted the Computer Forensic Tool Testing Program. The intent of this project is to ensure scientific reliability and validity across the tools used in computer forensic investigations. Many of these tools are used internationally and are relied upon to provide electronic evidence for criminal cases. Since there are no standards set in the field to test the accuracy of these tools and techniques, NIST has decided to define requirements and test assertions to be used in this manner. Dating back to 2008, several different mobile device acquisition tools have been tested and validated. In Chapter 7, these tools will be discussed in detail and it will also be discussed whether each tool has been validated through NIST's Computer Forensic Tool Testing Program (NIST, 2010).
In addition to NIST, viaForensics has also performed independent testing of each tool that supports the iPhone device. This research reviewed techniques and software for retrieving data from an iPhone 3G device. Involved in this testing were the analysis of the installation process, acquisition of the device, reporting capabilities, and finally accuracy of the data recovered. Much of this information has been incorporated into Chapter 7, which covers the importance of commercial tools testing. In addition to the information found in this book, independent rankings of the tools are also provided in the iPhone Forensics white paper, which can be found at http://viaforensics.com/education/white-papers/iphone-forensics/
iPhone leveling
Understanding the various types of mobile acquisition tools and the data they are capable of recovering is paramount for a mobile forensic examiner. A mobile device forensic tool classification system was developed by Sam Brothers, a computer and mobile forensic examiner and researcher, in 2007. The objective of his classification system is to enable an examiner to place cell phone and GPS forensic tools into a category, depending on the extraction methodology of that tool. This categorization facilitates the comparison between different tools and provides a framework for forensic examiners.
The classification tool is displayed in Figure 1.6. Starting at the bottom and working upward, the methods and tools generally become more technical, invasive, time consuming, forensically sound, and expensive (Brothers, 2007). Level 1 (Manual Extraction) involves simply scrolling through the data on the device as any user does in a traditional manner. Level 2 (Logical Analysis) is used by most investigators today, as it is only mildly technical and requires little training. Level 3 (Hex Dump) is where many forensic examiners have moved over the last 2–3 years, and it has been gaining quickly in popularity and support in the forensics community. Level 4 (Chip-Off) is the “new frontier” for most examiners, as formal training classes teaching this type of analysis have only just become available. Finally, Level 5 is rarely performed and is not well documented at this time, as it is extremely technical, very expensive, and highly time consuming.

It should be noted that there are pros and cons to performing analysis at each layer. The forensics examiner should be aware of these issues and should only proceed with the level of extraction that he/she has been trained to operate at. Evidence can be permanently destroyed if a given method or tool is not properly utilized. This risk increases the higher you move up in the pyramid. Thus, proper training is critical to obtaining the highest success rate in data extraction and proper forensic analysis of these devices (Brothers, 2007).
Each existing mobile forensic tool can be classified under one (or more) of the five levels. The following text contains a detailed description of each level as well as the methods that are used for data extraction at that given level (Brothers, 2007).
• Level 1 –
Manual Extraction: A manual extraction involves viewing the data content on the phone directly as viewed on its screen through the use of the device's keypad. The information discovered is manually documented (generally using a digital camera). At this level, it is impossible to recover deleted information. Some tools have been developed that aid an investigator to easily document a manual extraction. These tools capture what is shown on the device, which is then captured digitally for future reference and storage (Brothers, 2007).
• Level 2 –
Logical Extraction: Connectivity to the mobile device is generally established via a cable to either a piece of forensic hardware or a forensic workstation containing specialized software. The examiner may also choose to use Bluetooth for connectivity instead of a cable. Once connected, the software tool initiates a command to request and then extract allocated files on a given device. As explained by Brothers, the command is initiated by the computer and sent to the device, which is then interpreted by the processor in the device. Next, the requested data is retrieved from the device's memory and sent back to the forensic workstation to be reviewed by the examiner. Most iPhone forensic tools currently available perform at this level of the classification system, and are described further in Chapter 7. It should also be noted that several of these tools are capable of performing an analysis of iPhone backup files saved on a user's computer (Brothers, 2007). This type of extraction is described further in Chapter 5.
• Level 3 –
Hex Dump: A hex dump, more commonly referred to as a “physical extraction,” provides the investigator with more data than was available at the lower levels. To perform this type of extraction, the device is connected to the forensic workstation generally via a cable. Occasionally, this connection to the computer is either through the device's data port, JTAG (an internal test connection), or even via Wi-Fi. Instead of initiating a command, unsigned code is copied to the device (most commonly into memory), instructing the phone to copy user data to the computer. The resulting data is copied, transferred, and stored as a raw disk image. Since the resulting image is in binary format, technical expertise is required for analysis at this level (Brothers, 2007). The currently available tools that will perform this type of acquisition on an iPhone are discussed in detail in Chapter 5.
• Level 4 –
Chip-Off: Chip-off refers to the acquisition of data directly from the device's memory chip, which in the case of the iPhone is the NAND Flash memory. The chip is physically removed from the device and data stored on it is extracted by a chip reader. Brothers points out that this type of acquisition is analogous to imaging a hard drive from a computer or laptop using traditional hard disk imaging techniques. As the pyramid describes, this method is much more technically challenging than the manual, logical, or hex dumping acquisition techniques. The amount of required investigator knowledge greatly increases at this level as does the acquisition time. Some of the aspects that make this technique so advanced include the wide variety of chip types used, the myriad of raw binary data formats, and the risk of causing physical damage to the chip during the extraction process (Brothers, 2007).
• Level 5 –
Micro Read: This process involves manually viewing and interpreting data seen on the memory chip. By analyzing the physical gates on the chip, the examiner can then translate the gate status to 0's and 1's to then determine the resulting ASCII characters. The process is time consuming and costly, and requires extensive knowledge of all aspects of Flash memory and the file system. There are currently no commercial tools available to perform a micro read on an Apple device (Brothers, 2007).
Acquisition types
The following points break down the most commonly used acquisition techniques used on an Apple device. These methods may have some overlap with a couple of the levels discussed in the section on iPhone leveling, but will provide more details on the techniques and how they are used in conjunction with an iPhone.
Backup
One common approach to iPhone forensics is to analyze the backup directory. There is a difference between syncing an iPhone and backing it up. Basically, syncing makes sure that files on your computer and iPhone are in sync and some key information is backed up. On the other hand, a backup will make copies of SMS, Call Logs, Contact, and other application data. For a forensic analyst, the backup information can be very important, especially if he or she does not have access to the iPhone directly.
This procedure for this type of acquisition will read files from the iPhone backup files created through iTunes using Apple's synchronization protocol. The only data that can be acquired using this method are those files that have been explicitly synchronized by the protocol. Backup analysis is beneficial when the device is either unavailable or unable to be imaged for any particular reason.
Many key pieces of information can be retrieved in this way. Common data is stored in SQLite databases and Property List files, which are both supported by the synchronization protocol. Most allocated data or, in other words, data that still remains on the device, can be retrieved through a backup analysis. In addition, by querying the SQLite databases directly, additional data such as deleted SMS, Call Logs, and Contacts can generally be recovered.
Logical
This approach acquires data directly from the iPhone and is preferred over recovering files from the computer the iPhone was synced with. Many of the available commercial tools perform a logical acquisition. However, the forensic analyst must understand how the acquisition occurs, whether the iPhone is modified in any way, and what the procedure is unable to acquire.
Using the logical approach, active files and folders from the iPhone's file system are recovered; however, data contained in unallocated space (or slack space) is not. The following items include some of the common data that can be acquired from a logical acquisition: SMS, Call Logs, Calendar Events, Contacts, Photos, Web history, Synced e-mail accounts, and more. From these files, only data that have not been deleted from the phone can be fully recovered. For certain applications, it is sometimes possible to query the SQLite database file and extract some deleted data. Chapter 3 covers data storage in SQLite database files, and Chapter 6 demonstrates methods of extracting deleted data from these and other files.
Physical
A third method of imaging an iPhone is through a physical acquisition. This process creates a bit-by-bit copy of the file system, similar to the approach taken in most computer forensic investigations. While this approach has the potential for the greatest amount of data recovered (including deleted files), the process is more complicated and requires sophisticated analysis tools and techniques. Any type of data contained on the device can be recovered using this method. Advanced data analysis of the resulting disk image file also has the potential to recover GPS coordinates, cell tower locations, and even deleted text and multimedia messages.
Many times, the metadata extracted from various files can be pieced together in order to produce additional results. An example of this might be to compare the timestamps recovered from a photo taken on the device with the timestamps of an SMS record in order to show which recipient a photo may have been sent to. While this sort of analysis is also possible using information from a backup or logical acquisition, there is greater potential using a physical image since much more data is recovered with this technique.
Nontraditional
There are also some less common, and somewhat controversial, methods that allow an investigator to extract data from an Apple device which otherwise may not be able to be acquired. These methods involve modifying the firmware on the device in order to allow greater functionality.
Jailbreaking is one of these techniques. To jailbreak a device, the firmware partition is replaced with a hacked version. The hacked firmware partition contains an installer package that allows the user to download tools and other programs that are normally not available through the App Store. Apple took the stance that this technique would cause an increase in piracy as well as technical support costs for the company (Moren, 2010). For this reason, any device that has been jailbroken is no longer covered through Apple's manufacturer's warranty and, up until early 2010, was actually illegal.
The Digital Millennium Copyright Act (DMCA) has supported companies like Apple through the contained section regarding anti-circumvention of technology. Created in 1998, the DMCA includes a section on “Circumvention of Technological Protection Measures.” This portion of the document states that circumvention of technology that has been copyrighted is prohibited. Since jailbreaking an Apple device bypasses the standard firmware partition and modifies it to allow increased flexibility on the device, this technique was not exempt from the DMCA for several years (United States Copyright Office, 1998). Every three years, the DMCA is measured and reviewed in order to determine whether specific technologies still apply. With the most recent review, the Library of Congress declared that jailbreaking an Apple device is exempt from the DMCA. This ruling does not force Apple to cover jailbroken devices under the manufacturer's warranty; it simply means that individuals who may decide to modify their device in this manner will not be criminally prosecuted. In addition, any software downloaded on the device must be legally acquired; therefore, pirated software is still illegal under this act (Moren, 2010).
While this book will not delve into the process of jailbreaking any type of Apple device, it should be pointed out that there are methods available for just about any model and firmware version on the market. The Apple hacking community is continually developing new tools and techniques that allow users to have a better control over their device. In fact, recent apps have been released that allow even the Apple TV to be jailbroken. Using this method, an individual can even run applications such as the XBox Media Center on their Apple TV.
As an investigator, working with a jailbroken device for testing purposes can be a highly educational experience. There are applications available, such as Mobile Terminal and OpenSSH, that allow an individual to remotely connect to the device using commonly known commands such as “ssh” or “ftp.” Once connected, the examiner has the capability to browse through the entire file system and understand the variety of files contained on the device. The directory structure is similar to what would be seen in a resulting disk image file after performing a physical acquisition; however, the structure is not exactly the same. Individual files or even the entire file system can be copied from the device to a forensic workstation using these same methods. Chapter 5 guides the examiner through an acquisition of the iPhone's raw disk image using a jailbroken device. Unfortunately, however, hard disk encryption is an issue when trying to acquire the raw disk image through this method on the 3G(s) and iPhone 4.
Forensics with Linux
While many of the commercial tools have been developed for Windows or Mac environments, the Linux platform deserves its own section, as it contains extremely powerful tools that can assist in a forensic investigation. Throughout the book, various hands-on exercises are performed to demonstrate to the user how a certain program or process is run. For example, forensic acquisitions are performed as well as various forensic tools run through a command prompt. Some tools make sense to run on a Mac workstation, while others are better performed on a Linux machine. Depending on the exercise, we will be jumping back and forth between operating systems, so be sure to note which platform is being used prior to following along. If you do not have a Linux or Macintosh workstation available, consider using a virtual machine to simulate the environment (building a Linux virtual machine is covered later in this section).
Introduction to Linux
In order to understand the Linux tools that will be used in Chapter 6, it is important to have an understanding of the Linux operating system as well as some of the basic commands. Linux was originally created by Linus Torvalds, a young student from Finland. The first version of the Linux Kernel (v1.0) was released in 1994, with the latest running version being 2.6. One of the more interesting aspects of the Linux kernel is that it was developed under the GNU General Public License. This means that the source code is freely distributed and available to the general public for use.
In Linux, all files are part of the same file structure, as opposed to a Windows environment, which has separate drives (C:/ - hard disk, D:/ - CD-ROM, etc.). If a user connects a hard drive and a USB drive to a Linux workstation, they will all be part of the same folder structure as shown in the following text:
kstrzempka@linux-001:/$ tree -L 1 /
/
├── bin
├── boot
├── cdrom
├── dev
├── etc
├── home
├── lib
├── lib32
├── lib64 —> /lib
├── lost+found
├── media
├── mnt
├── opt
├── proc
├── root
├── sbin
├── selinux
├── srv
├── sys
├── tmp
├── usr
├── var
In the above code, the “/” signifies the root of the file system. The following describes some of the folders in the root directories and the types of files they might contain:
• /etc: Configuration files for software that was downloaded and installed on the system.
• /home/<users>: Within the home directory, there will be a folder for each of the users on the system. Each user's files will then be stored within his or her particular folder.
• /dev: External devices that have been connected to the machine are listed here. Any SATA/SCSI devices connected over USB or firewire are listed as “/dev/sda,” “/dev/sdb,” etc. They are assigned letters in the order in which they are connected to the machine.
• /var: System log files are stored here.
For each folder or file on a Linux workstation, file permissions are shown for three different types of users: the owner, a group, and the world (others). They are listed as either “r” (read), “w” (write), or “x” (execute). In the following example, the user has read and write permissions, while the group and other have read-only. The “-” at the very beginning of each line signifies that the object is a file. If it were a directory, there would be a “d” in place of the hyphen, or an “l” if it were a link to another file or directory.
kstrzempka@linux-001:~/Desktop/book-screenshots$ ls -l
total 84
-rw-r- -r- - 1 kstrzempka kstrzempka 24655 2010-12-15 17:38 iPhone-connected-DFU.png
-rw--r- -r- - 1 kstrzempka kstrzempka 26203 2010-12-15 17:37 linux-iphone-normal.png
-rw--r- -r- - 1 kstrzempka kstrzempka 27311 2010-12-17 15:15 nano-hosts-file.png
Various commands can be used to modify permissions on a file or folder. To change permissions, it is important to understand the numerical (or “octal”) value for read, write, and execute assignments. Permissions are calculated based on the following values:
• Read = 4
• Write = 2
• Execute = 1
So, if a user, group, or other is assigned a “7,” they would have read, write, and execute permissions. The command to modify permissions as well as a few examples are shown in the “Basic Linux commands” section.
Basic Linux commands
The following sections provide a breakdown of some of the common Linux commands including a description of the command, its general usage, and one or more examples of how the command can be applied. For a reference guide, see Appendix X: Linux Cheat Sheet.
•
manDescription: Pulls up online manuals for the requested command in the terminal window. Within the manual will be a detailed description of the command as well as its usage (including all of the options or “flags” for that command).
$ man [-][-k keywords] commands
In the following examples, the first command lists information on the “mount” command, while the second searches all manuals containing the characters “zip”:
$ man mount
MOUNT(8)
Linux Programmer's Manual
MOUNT(8)
NAME
mount - mount a filesystem
SYNOPSIS
mount [-lhV]
mount -a [-fFnrsvw] [-t vfstype] [-O optlist]
mount [-fnrsvw] [-o option[,option]…] device❘dir
mount [-fnrsvw] [-t vfstype] [-o options] device dir
DESCRIPTION
All files accessible in a Unix system are arranged in one big tree, the file hierarchy, rooted at /. These files can be spread out over seva eral devices. The mount command serves to attach the filesystem found on some device to the big file tree. Conversely, the umount(8) command will detach it again.
The standard form of the mount command is
<snip>
$ man -k zip
Archive::Any::Plugin::Zip (3pm) - Archive::Any wrapper around Archive::Zip
Archive::Zip (3pm)
- Provide an interface to ZIP archive files.
Archive::Zip::FAQ (3pm) - Answers to a few frequently asked questions about Archive::Zip
Archive::Zip::MemberRead (3pm) - A wrapper that lets you read Zip archive members as if they were files.
Archive::Zip::Tree (3pm) - (DEPRECATED) methods for adding/extracting trees using Archive::Zip
bunzip2 (1)
- a block-sorting file compressor, v1.0.4
bzcmp (1)
- compare bzip2 compressed files
bzdiff (1)
- compare bzip2 compressed files
bzegrep (1)
- search possibly bzip2 compressed files for a regular expression
bzfgrep (1)
- search possibly bzip2 compressed files for a regular expression
bzgrep (1)
- search possibly bzip2 compressed files for a regular expression
bzip2 (1)
- a block-sorting file compressor, v1.0.4
bzip2recover (1)
- recovers data from damaged bzip2 files
bzless (1)
- file perusal filter for crt viewing of bzip2 compressed text
bzmore (1)
- file perusal filter for crt viewing of bzip2 compressed text
funzip (1)
- filter for extracting from a ZIP archive in a pipe
gpg-zip (1)
- encrypt or sign files into an archive
gunzip (1)
- compress or expand files
gzip (1)
- compress or expand files
Image::ExifTool::ZIP (3pm) - Read ZIP archive meta information
lz (1)
- gunzips and shows a listing of a gzip'd tar'd archive
mzip (1)
- change protection mode and eject disk on Zip/Jaz drive
prezip-bin (1)
- prefix zip delta word list compressor/decompressor
tgz (1)
- makes a gzip'd tar archive
unzip (1)
- list, test and extract compressed files in a ZIP archive
unzipsfx (1)
- self-extracting stub for prepending to ZIP archives
uz (1)
- gunzips and extracts a gzip'd tar'd archive
zforce (1)
- force a ‘.gz’ extension on all gzip files
zip (1)
- package and compress (archive) files
zipcloak (1)
- encrypt entries in a zipfile
zipgrep (1)
- search files in a ZIP archive for lines matching a pattern
zipinfo (1)
- list detailed information about a ZIP archive
zipnote (1)
- write the comments in zipfile to stdout, edit comments and rename files in zipfile
zipsplit (1)
- split a zipfile into smaller zipfiles
•
helpDescription: Displays information on the requested command, including usage and examples, similar to “man.” Some commands use the - -help notation, while others simply use -h or -help.
$ mount - -help
Usage: mount -V
: print version
mount -h
: print this help
mount
: list mounted filesystems
mount -l
: idem, including volume labels
So far the informational part. Next the mounting.
The command is ‘mount [-t fstype] something somewhere’.
Details found in /etc/fstab may be omitted.
mount -a [-t │-O] …
: mount all stuff from /etc/fstab
mount device
: mount device at the known place
mount directory
: mount known device here
mount -t type dev dir
: ordinary mount command
Note that one does not really mount a device, one mounts a filesystem (of the given type) found on the device.
One can also mount an already visible directory tree elsewhere:
mount - -bind olddir newdir
or move a subtree:
mount - -move olddir newdir
One can change the type of mount containing the directory dir:
mount - -make-shared dir
mount - -make-slave dir
mount - -make-private dir
mount - -make-unbindable dir
One can change the type of all the mounts in a mount subtree
containing the directory dir:
mount - -make-rshared dir
mount - -make-rslave dir
mount - -make-rprivate dir
mount - -make-runbindable dir
A device can be given by name, say /dev/hda1 or /dev/cdrom, or by label, using -L label or by uuid, using -U uuid .
Other options: [-nfFrsvw] [-o options] [-p passwdfd].
For many more details, say man 8 mount .
•
cdDescription: This command is used to change into another directory. In Linux, the special character “~” is used to represent the current user's home directory. For example, the user kstrzempka has a home directory on a Linux system at /home/kstrzempka. From anywhere in the file system, you can use ~ to refer to /home/kstrzempka. This works well for documentation, so throughout this book we refer to ~ and, even if you have set up a different user name, the command will still function as expected.
$ cd ~
(changes into the user's home directory from anywhere)
$ cd
(changes into the user's home directory from anywhere)
$ cd ~/Desktop/Projects
(changes into the “Projects” folder located on the user's Desktop)
$ cd ..
(changes directories up 1 level (back into “Desktop”)
$ cd ../../
(changes directories up 2 levels)
$ cd /
(changes into the root file system folder from anywhere)
•
mkdirDescription: Creates a directory in the current location, unless otherwise specified.
$ mkdir iPhone
(creates the “iPhone” folder in the current directory)
$ mkdir -p ~/iPhone/Forensics/Book (creates the full path of directories even if top levels do not exist)
•
rmdir/rmDescription: Removes existing directories or files based on the flags specified. The “rmdir” command will only remove empty folders. If there are files within the directory, these will first need to be removed prior to running the “rmdir” command. The “rm” command can be used to remove both files and folders and will prompt the user prior to removing. You can override the prompt with the -f option, but use with caution.
$ rmdir Linux
(removes only an empty folder)
$ rmdir -p /Linux/Forensics/Book
(removes each folder within the specified path)
$ rm -r Linux
(removes the specified folder and all of its contents)
$ rm -rf Linux
(removes the specified folder and all of its contents without prompting)
$ rm test.txt
(deletes the specified file)
$ rm *.txt
(deletes all .txt files within the current directory)
$ rm *
(deletes all files within the current directory)
•
pico/nanoDescription: Both pico and nano are CLI text editors that allow the creation and modification of text files. These commands must be run within the directory in which the user wishes to save the file. Pico will be used for this example, but nano is run the same way. To create a file, simply type the command.
$ pico
Typing “pico” will open the text editor within the CLI, allowing the user to enter whatever text he or she wishes (see Figure 1.7).

When the text has been entered, pressing “Ctrl+X” will “exit” the text editor and allow the user to save. As shown in Figure 1.7, this particular file was saved as “Test” and, upon hitting enter, was saved in the user's current directory.
To modify an already existing file, simply follow the command with the file name or full path and file name if the file is in a different directory:
$ pico existing-file.txt
•
lsDescription: Lists files and folders. The “ls” command without any options specified will list the file/folder names only in the current directory. Adding the “-lh” options will provide a long listing with more details on the file, including permissions, ownership, size, and date and timestamps.
kstrzempka@linux-001:~/Desktop/book-screenshots$ ls
iPhone-connected-DFU.png linux-iphone-normal.png nano-hosts-file.png
kstrzempka@linux-001:~/Desktop/book-screenshots$ ls -lh
total 84K
-rw-r- -r- - 1 kstrzempka kstrzempka 25K 2010-12-15 17:38 iPhone-connected-DFU.png
-rw-r- -r- - 1 kstrzempka kstrzempka 26K 2010-12-15 17:37 linux-iphone-normal.png
-rw-r- -r- - 1 kstrzempka kstrzempka 27K 2010-12-17 15:15 nano-hosts-file.png
•
treeDescription: Shows the hierarchy of folders for the directory specified. If no parameters are specified, the current directory will be used. In Linux, the current directory is referred to as a single “.” while one directory up is a double period “..”. In the following output, the current directory is used, which happens to be the current user's home directory. The user can specify how many directory levels he or she wishes to view with the “-L” flag. In the first example, one level is shown, whereas in the second example, two levels of the source directory and files are shown. One must not forget that all the details of a command can be learnt by examining the man page (man tree) or specifying the command's help parameter (tree - -help).
kstrzempka@linux-001:~$ tree -L 1.
├── Desktop
├── Documents
├── Downloads
├── mnt
├── Music
├── Pictures
├── Public
├── sleuthkit-3.1.2
├── Templates
├── Ubuntu One
└── Videos
kstrzempka@linux-001:~$ tree -L 2 Desktop/
Desktop/
├── AutomatedTools
│
├── Linux
│
├── OSX
│
├── README
│
└── README.Multiplatform
├── book-screenshots
│
├── iPhone-connected-DFU.png
│
├── linux-iphone-normal.png
│
└── nano-hosts-file.png
├── Directions for viewing recovered iPhone data.pdf
├── command-output
│
├── 19691231.1910
│
├── 19691231.1920
│
├── 19700105.1955
│
├── 20100817.1145
│
├── 20100817.1149
│
├── 20100903.1146
│
├── 20100907.1118
│
├── 20100907.1126
│
├── 20100909.1034
│
└── 20100919.1031
├── iPhoneapp-mount
├── keychain.png
├── Photos.sqlite
├── plutil.pl
├── python-var-int.png
└── WXP-PRO-OEM.iso
•
lessDescription: Displays specified text one page at a time. This command is commonly used in conjunction with other commands to show output one page at a time. The following command will display the contents of “large-document.pdf” one screen at a time within the terminal window:
$ less large-document.pdf
Once you are in the less utility, there are a few key commands to remember.
• h: access help menu
• q: quit help menu
• spacebar: display one screen/page down
• b: display one screen/page up
• /: search for a pattern
• Enter: move one line down
• y: move one line up
There are many more commands and tricks to this powerful utility, so read the help screens, man page, or simply search the Internet for more helpful tips.
•
catDescription: Outputs the contents of a file to the screen or to a new file if specified (without retaining the format of the file).
kstrzempka@linux-001:~/Desktop$ cat textfile.txt
iphone forensics is so much fun.
This file contains unnecessary information used to display the workings of the “cat” command.
The “cat” command can be used in conjunction with “less” in order to display the contents of a file one page at a time.
This command can also be used to combine files into one (i.e., for split forensic images). This is often referred to as concatenating files.
$ cat file1.txt file2.txt file3.txt > final.txt
•
findDescription: Used to search for files in a directory hierarchy. The following command will list all of the files, including the full path, contained on the specified user's desktop:
$ find /home/kstrzempka/Desktop
The find command can also be used in combination with another command. For example, the following will run the “md5sum” command on the files from the “find” command:
$ find . -type f -exec md5sum {} ; > ~/md5.txt
In this example, the command instructs the computer to find a regular file (-type f) in the current directory (“.”) and execute (-exec) the strings command on all files found ({}). The “;” signifies the end of the -exec command. It then takes that output and redirects it (>) to “md5.txt” in the user's home directory (Grundy, 2008).
If one runs a command against the results of a large number of files, one can run into issues. In those cases, one should research piping the output of the file command to a utility called xargs.
•
chmodDescription: Short for “change mode,” this command changes file or folder permissions, as described in the previous section. Many examples are provided in the following text. Note that these commands must either be run in the directory in which “textfile.txt” is stored, or the full path to the file must be provided.
*Provides details on the file permissions for “textfile.txt”
kstrzempka@linux-001:~/Desktop$ ls -l textfile.txt
-rw-r- -r- - 1 kstrzempka kstrzempka 264 2011-03-01 12:17 textfile.txt
*Gives read, write, and execute permissions for the owner, and read and execute permissions for group and world.
kstrzempka@linux-001:~/Desktop$ chmod 755 textfile.txt
kstrzempka@linux-001:~/Desktop$ ls -l textfile.txt
-rwxr-xr-x 1 kstrzempka kstrzempka 264 2011-03-01 12:17 textfile.txt
*Gives read, write and execute permissions for the owner, and execute permissions for group and world.
kstrzempka@linux-001:~/Desktop$ chmod 711 textfile.txt
kstrzempka@linux-001:~/Desktop$ ls -l textfile.txt
-rwx- -x- -x 1 kstrzempka kstrzempka 264 2011-03-01 12:17 textfile.txt
*Gives read, write and execute permissions for the owner, and read-only permissions for group and world.
kstrzempka@linux-001:~/Desktop$ chmod 744 textfile.txt
kstrzempka@linux-001:~/Desktop$ ls -l textfile.txt
-rwxr- --r- - 1 kstrzempka kstrzempka 264 2011-03-01 12:17 textfile.txt
The “chmod” command can also be run on a group of files or a folder.
$ chmod 755 *
(Changes permissions of all files in the current directory)
$ chmod 444 Files/
(Changes permissions of the “Files” directory and all of the files within it)
•
chownDescription: Changes the owner or group of a specified file. In the following example, the original owner and group of “textfile.txt” was kstrzempka. The chown command changed the owner to “root.” This command required “sudo” (see description for sudo command).
kstrzempka@linux-001:~/Desktop$ ls -l textfile.txt
-rwxr- -r- - 1 kstrzempka kstrzempka 264 2011-03-01 12:17 textfile.txt
kstrzempka@linux-001:~/Desktop$ sudo chown root textfile.txt
[sudo] password for kstrzempka:
kstrzempka@linux-001:~/Desktop$ ls -l textfile.txt
-rwxr- -r- - 1 root kstrzempka 264 2011-03-01 12:17 textfile.txt
•
sudoDescription: Running a command with “sudo” in front of it gives the user elevated permissions, allowing him or her to run a command as a super user or another user. Sudo is required to run certain commands such as apt-get (to install software), chown (to change ownership), and many other commands depending on the files it must access. To use sudo, it is simply added at the beginning of a command and it requires the user to enter his/her password.
$ sudo apt-get install hexedit
[sudo] password for viaForensics:
•
apt-getDescription: The “apt” part of the apt-get command stands for Advanced Packaging Tool (APT) and allows the user to install and uninstall software, upgrade existing software, or even perform system updates. To successfully run this command, sudo is required.
$ sudo apt-get install scalpel
(Installs scalpel software package)
[sudo] password for viaForensics:
$ sudo apt-get remove scalpel
(Uninstalls scalpel software package)
[sudo] password for viaForensics:
$ sudo apt-get update
(Updates the APT package index, which stores packages available for download)
[sudo] password for viaForensics:
$ sudo apt-get upgrade
(Upgrades APT package versions, including security updates; must be run AFTER update)
[sudo] password for viaForensics:
•
grepDescription: Searches through a file or a list of files and folders for a specified phrase. It is equivalent to opening a document and doing a “find” for a certain phrase. The search is case sensitive, so if the user is unsure of whether a letter should be capitalized or lower cased, he or she must specify the “-i” (case insensitive) flag. This option will take longer, depending on the size of the file that is being searched. The general usage is:
$ grep keyword file.doc
The following contains several examples of the usage of “grep:”
$ grep Forensics iPhoneBook.txt
(will search for “forensics” in the specified file)
$ grep -i forensics iPhoneBook.txt
(will search for forensics, case insensitive, in the specified file)
$ grep “Katie Strzempka” iPhoneBook.txt
(will search the specified file for “Katie Strzempka”, case sensitive)
The next command searches the contents of all files on the user's desktop for the word “unnecessary.” The results shown indicate that this word was found in “textfile.txt,” and there are matches for this word in “WXP-PRO-OEM.iso” also. Because this is a binary file, further techniques will need to be used to make the content viewable.
kstrzempka@linux-wks-001:~/Desktop$ grep unnecessary *
textfile.txt:This file contains unnecessary information used to display the workings of the “cat” command.
Binary file WXP-PRO-OEM.iso matches
•
Piping and redirecting files (
│ and >)Description: The pipe character “│” (located above the “Enter” key on most keyboards) allows the output of one command to be sent to another for further processing. Output can also be redirected into another file using “>”.
The following command takes the results of “cat file.txt” and pipes it to the “less” command, allowing the user to view the contents one page at a time.
$ cat file.txt │ less
The next searches for “iPhone” in “book.txt” (using the grep command), then it takes the results and searches again for “iOS.” The final results are then piped through “less” to be displayed one page at a time.
$ grep iPhone book.txt │ grep iOS │ less
Redirecting output from a command can also be helpful. The following command takes the output of book.txt (using the cat command) and copies the output into a file called “newdocument.txt” on the user's desktop:
cat book.txt > ~/Desktop/newdocument.txt
Redirection can be very helpful when running the “strings” command on a particular file, or an entire disk image. This very example is shown in detail in Chapter 6– Data and Application Analysis (“Strings” section).
•
xxdDescription: This tool generates a hex dump of a provided file or disk image. It allows an examiner to view these files in hex format, jump to a specific offset, or even search the file for data. There are other hex editors that can also be used for this purpose; however, xxd is standard within a Linux build. The general usage is as follows:
$ xxd diskimage.dmg
$ xxd sms.db
$ xxd calendar.sqlitedb
The following command displays the Photos.sqlite file from an iPhone file system using xxd. When using xxd, it is better to either pipe it through “less” and view one page at a time, or redirect the output to another file for viewing, as there is a significant amount of data when using this command.
kstrzempka@linux-wks-001:~$ xxd ~/Desktop/Photos.sqlite │ less
0000000: 5351 4c69 7465 2066 6f72 6d61 7420 3300
SQLite format 3.
0000010: 1000 0101 0040 2020 0000 003f 0000 0000
…..@ …?….
0000020: 0000 0028 0000 0002 0000 000c 0000 0001
…(…………
0000030: 0000 0000 0000 0000 0000 0001 0000 0000
…………….
0000040: 0000 0000 0000 0000 0000 0000 0000 0000
…………….
0000050: 0000 0000 0000 0000 0000 0000 0000 0000
…………….
0000060: 0000 0000 0d00 0000 0d07 f400 0f12 0ec0
…………….
0000070: 0dfa 0d5c 0cc7 0b7f 0b17 0a64 09cc 0945
……….d…E
0000080: 08d6 085b 07f4 0000 0000 0000 0000 0000
…[…………
At the beginning of a disk image, database, or other type of file, there are oftentimes a lot of zeros (in other words, no data). The “-a,” or autoskip option, will jump straight to the section of the file that contains actual data:
kstrzempka@linux-wks-001:~$ xxd -a ~/Desktop/Photos.sqlite │ less
0000000: 5351 4c69 7465 2066 6f72 6d61 7420 3300
SQLite format 3.
0000010: 1000 0101 0040 2020 0000 003f 0000 0000
…..@ …?….
0000020: 0000 0028 0000 0002 0000 000c 0000 0001
…(…………
0000030: 0000 0000 0000 0000 0000 0001 0000 0000
…………….
0000040: 0000 0000 0000 0000 0000 0000 0000 0000
…………….
0000050: 0000 0000 0000 0000 0000 0000 0000 0000
…………….
0000060: 0000 0000 0d00 0000 0d07 f400 0f12 0ec0
…………….
0000070: 0dfa 0d5c 0cc7 0b7f 0b17 0a64 09cc 0945
……….d…E
0000080: 08d6 085b 07f4 0000 0000 0000 0000 0000
…[…………
0000090: 0000 0000 0000 0000 0000 0000 0000 0000
…………….
*
00007f0: 0000 0000 650d 0717 391b 0181 0369 6e64 ….e…9….ind
0000800: 6578 476c 6f62 616c 7349 6465 6e74 6966 exGlobalsIdentif
0000810: 6965 7249 6e64 6578 476c 6f62 616c 730e ierIndexGlobals.
0000820: 4352 4541 5445 2049 4e44 4558 2047 6c6f CREATE INDEX Glo
0000830: 6261 6c73 4964 656e 7469 6669 6572 496e balsIdentifierIn
If you really want to get crazy, you can also use the “-b” option to view the image in binary!
kstrzempka@linux-wks-001:~$ xxd -b iPhone.dmg │ less
05843f4: 00000000 01100001 00000000 01110000 00000000 01110000
.a.p.p
05843fa: 00000000 01101100 00000000 01100101 00000000 00101110
.l.e..
0584400: 00000000 01101101 00000000 01101111 00000000 01100010
.m.o.b
0584406: 00000000 01101001 00000000 01101100 00000000 01100101 .i.l.e
058440c: 00000000 01101001 00000000 01110000 00000000 01101111 .i.p.o
Having the ability to view a file or, better yet, a disk image, gives the examiner a significant amount of power. This option is further explored in Chapter 6 within the “Advanced Forensic Analysis” section.
Setting up a Linux virtual machine
In order to install and run the tools listed in the previous section, an examiner must have access to a Linux workstation. It is realized that access to this type of physical machine is not always available. For this reason, it is important to point out that Linux can be run in a virtual environment. In this section, the process of setting up a Linux virtual machine (VM) will be covered.
For this example, VirtualBox is going to be used. VirtualBox is now owned by Oracle and has a free license for academic and personal use. If you are using VirtualBox for commercial work, please ensure you follow all licensing guidelines.
VirtualBox can be downloaded for many operating systems including Microsoft Windows, Mac OS X, and Linux (2.4 and 2.6) at http://www.virtualbox.org/. After VirtualBox has been installed, one will see the Oracle VM VirtualBox manager shown in Figure 1.8, where one can create and manage new virtual machines.

When creating the new VM, one must make sure that one has enough hard drive space (at least 20 GB is recommended) and as much RAM as can be spared.
Using the VirtualBox Manager GUI to create the new VM is straightforward. However, if one has access to an Ubuntu Linux 64-bit workstation or server but not the ability to run desktop applications, here are the steps one can follow to set up, configure, and run the new VM (Virtual Box 3.2.10).
From an SSH session, it is best to use the program screen so that if connection to the server is lost, one's VM remains active. Then, these steps are to be followed:
mkdir -p ~/vbox
cd ~/vbox
wget http://ubuntu.mirrors.pair.com/releases/maverick/ubuntu-10.10-desktop-amd64.iso
VBoxManage createvm -name iphone-book-vm -ostype Ubuntu -register
VBoxManage modifyvm iphone-book-vm - -memory 1536 - -acpi on - -boot1 dvd
- -nic1 bridged - -usb on - -usbehci on - -vrdp on - -vrdpport 3392
- -clipboard bidirectional - -pae on - -hwvirtex on - -hwvirtexexcl on - -vtxvpid on
- -nestedpaging on - -largepages on
VBoxManage modifyvm iphone-book-vm - -bridgeadapter1 eth0
VBoxManage storagectl iphone-book-vm - -name “IDE Controller” --add ide
VBoxManage createvdi - -filename ~/vbox/iphone-book-vm.vdi
- -size 20000 - -register
VBoxManage storageattach iphone-book-vm - -storagectl “IDE Controller”
- -port 0 - -device 0 - -type hdd - -medium ~/vbox/iphone-book-vm.vdi
VBoxManage storageattach iphone-book-vm - -storagectl “IDE Controller”
- -port 1 - -device 0 - -type dvddrive - -medium ~/vbox/ubuntu-10.10-desktop-i386.iso
VBoxHeadless -startvm iphone-book-vm -p 3392 &
#need to eject DVD, the restart
VBoxManage storageattach iphone-book-vm - -storagectl “IDE Controller” - -port 1
- -device 0 - -type dvddrive - -medium none
#restart the virtual machine
VBoxHeadless -startvm iphone-book-vm -p 3392
At this point, the VM will start up and one can access the install using any remote desktop protocol (RDP) viewer such as Remote Desktop Connection on Windows, rdesktop on Linux, or Microsoft's Remote Desktop Connection Client for Mac. To access the above session, one would have to connect to <host server's IP:3392>. From there, the install is followed until it is time to reboot.
If you shutdown or the reboot ends the VBoxHeadless session, you can simply issue the command again to start the server backup. Then, RDP back into the machine and install openssh-server, so we can use ssh instead of the less efficient RDP:
sudo apt-get install openssh-server
Now, the VM's IP address can be found by running ifconfig and looking at the “inet addr” for eth0. One can use one's favorite ssh program (if on Windows, Putty can be tried for a great, free client) and ssh into the virtual machine. At this point, one can download and install any of the forensic tools listed in the previous section. Details on how to install and compile some of these programs, such as scalpel or timeline, can be found in Chapter 6.
Linux forensics tools
There are a number of free, open-source Linux tools that can be used during the forensic examination process. Most of these tools are covered in more detail in later chapters, including Chapter 5 on “Acquisitions” and Chapter 6 on “Data and Application Analysis.”
Linux Forensics Tools
The use of advanced Linux forensic analysis tools can help an examiner locate crucial evidence in a more efficient manner. Some of these tools are extremely powerful and provide the capability to quickly index, search, and extract certain types of files. The Linux Leo website (http://linuxleo.com/) was created as an introduction to Linux for law enforcement officers and forensic examiners. It provides details on the use of the forensic tools discussed in this book as well as many others.
•
Creating a disk image: The “dd” command can be used on a device where the examiner has root access, such as a jailbroken iPhone or iPad. This tool is generally used in forensics to acquire a full disk image of a hard drive, SD card, USB flash drive, or other device. Usage of the dd program on a jailbroken iPhone is described in Chapter 5.
•
Image verification: In digital forensics, examinations are performed on the original media only if absolutely necessary. In most cases, a forensic copy is made of the device, and the examiner will analyze that image, so as to not modify the original media. In order to show that the working copy contains the same data as the original, it has become a best practice to create a unique signature for both the original and the copy by using a hash algorithm. If the values match, this technique shows that the forensic image is in fact a copy of the original. Most commercial tools will report either an MD5 or SHA1 hash value, two different algorithms, both of which are used for the same purpose. Linux commands can also be used to determine either of these values on an image or file.
•
Mounting and unmounting a disk image: In order to view the contents of a file system on a mobile device, the image must be “mounted.” Mounting a file system tells the operating system where in the directory tree the files on the device should appear. If a USB drive or other external device is connected to a computer, more often than not the computer will automatically mount the file system on these drives in order to allow the user to navigate through the files. In forensics, examiners are typically dealing with a disk image file rather than a physical device. Depending on the operating system used on the forensic workstation, various methods can be used to mount this image and view the files. Details relevant to mounting an iOS device image are covered in Chapter 6.
•
File carving: This process scans an entire disk for specified file signatures in order to recover files or file fragments from the disk. Using this method, both deleted and undeleted files can be recovered since the process focuses on the content of the files rather than its metadata. This is a popular technique used in forensic examinations, as it has been largely successful in recovering deleted photos, e-mails, text messages, and other important data. File carving techniques are built into some forensic analysis tools; however, there are open-source Linux tools available that will perform this action as well. These tools can be run via command line against an iPhone, iPad, or other iOS device image in order to recover valuable files.
•
Creating a timeline of events: There are a couple of tools available that are run against a disk image and will list out each and every file within the file system, both allocated and unallocated. From this list, the tool creates a timeline of events that have occurred on the device. This process is typically run against a hard drive, but can also be used on an iPhone, iPad, or another iOS's image file. The resulting timeline will show the file name, whether it was created, modified, or accessed, the date and time this event occurred, and other pieces of information that might be significant to an investigation. There are thousands, and sometimes hundreds of thousands of files on these devices, so having the ability to sort by time is an important step in this process. Timelines are typically the most useful when an investigator has a specific time frame to narrow down the choices. A couple of tools capable of creating the original file listing include The Sleuth Kit's “fls” tool by Brian Carrier and log2timeline by Kristinn Gudjonsson. Another tool within The Sleuth Kit, “mactime,” then takes this file listing and creates a timeline from it.
•
Searching a disk image: Once a physical image of a device is acquired, there are various tools that can be used to further analyze that image and search for specific keywords or other data. One of these methods involves the use of the Linux “strings” command. When run against a file (or even a full disk image), strings will extract printable characters that are at least four characters long. This command can be used against individual database files to potentially view and recover deleted data. Another method that allows the examiner to search for data is the use of a hex editor. By viewing a disk image within a hex editor, the examiner has the ability to jump to a specific area within the image. For example, if a particular e-mail address is of unique interest in a case, this address can be searched across the entire dmg. The examiner can then analyze the surrounding content.
In addition to the tools listed above, one of the most popular physical acquisition tools used on the iPhone, developed by Jonathan Zdziarski, offers the examiner command-line Automated Tools to use on either a Mac workstation or a Linux machine. The Linux-based tools are demonstrated in Chapter 5 and the Linux VM discussed in the previous section can be used to run these tools.
This list barely skims the surface of the variety of forensic methods that are available using a Linux environment. An excellent resource to assist examiners who may wish to incorporate Linux into their investigations is http://linuxleo.com/. The site contains documents, guides, files, and other items which may help introduce individuals to the Linux environment and how it can be used in forensics (Grundy, 2008).
Summary
This chapter was intended to briefly introduce the various iPhone models, Apple's strategy leading up to the development of the iPhone, and the most common resources available for developers as well as mobile examiners interested in new tools and techniques. Some background information was provided on distinguishing between the various iPhone devices that are currently available. Many of the significant hardware components were also discussed, pointing out the type of baseband, processor, NAND Flash memory, and other modules contained within the device.
The next chapter focused more on the acquisition of an iPhone, tools that are capable of performing these acquisitions, and a classification system that groups these tools according to their capabilities. In addition to extracting data through an iTunes backup file, logical acquisition, or physical acquisition, some nontraditional methods were also covered, such as jailbreaking and unlocking an Apple device.
Finally, the integration of Linux within a forensic environment was covered to demonstrate the power of some of these tools. Basic Linux commands as well as the setting up of an Ubuntu VM were covered, concluding with an overview of some of the analysis tools that would be used throughout the remainder of the book.
References
Android Passes iPhone in US Market Share – Slashdot,
Slashdot: News for nerds, stuff that matters,
Retrieved January 14, 2011, fromhttp://mobile.slashdot.org/article.pl?sid=11/01/09/0039211 (
2011, January 8).
Apple Inc,
Mac OS X Lion Sneak Peek. Mac OS X Lion,
Retrieved December 17, 2010, fromwww.apple.com/macosx/lion (
2010).
Brothers, S.,
iPhone tool classification. The Apple examiner,
Retrieved January 14, 2011, fromhttp://www.appleexaminer.com/iPhoneiPad/ToolClassification/ToolClassification.html (
2007).
CBS,
Number of cell phones worldwide hits 4.6B. Breaking news headlines: Business, entertainment & world news,
Retrieved January 19, 2011, fromhttp://www.cbsnews.com/stories/2010/02/15/business/main6209772.shtml (
2010, February 15).
Costello, S.,
iPhone features comparison. iPod – Apple iPhone & iPhone Apps,
Retrieved January 19, 2011, fromhttp://ipod.about.com/od/decidingwhichipodtobuy/a/iphone_chart.htm;
(n.d.).
Grundy, B.J.,
The law enforcement and forensic examiner's introduction to Linux. Linux LEO,
Retrieved February 9, 2011, fromhttp://linuxleo.com/Docs/linuxintro-LEFE-3.78.pdf (
2008, December).
McGlaun, S.,
iPhone takes 3rd in smartphone sales for 2009 – SlashGear. SlashGear – Feeding your gadget and tech obsessions,
Retrieved January 14, 2011, fromhttp://www.slashgear.com/iphone-takes-3rd-in-smartphone-sales-for-2009–2375312 (
2010, February 23).
Moren, D.,
Jailbreaking officially granted DMCA exemption. Macworld,
Retrieved January 17, 2011, fromhttp://www.macworld.com/article/152935/2010/07/jailbreak_exemption.html (
2010, July 26).
National Institute of Standards and Technology (NIST),
Mobile devices. NIST Computer Forensic Tool Testing Program: Project overview,
Retrieved January 10, 2011, fromhttp://www.cftt.nist.gov/project_overview.htm (
2010, November).
Semiconductor Insights,
Teardowns. TechInsights,
Retrieved January 20, 2011, fromwww.ubmtechinsights.com/reports-and-subscriptions/teardowns/;
(n.d.).
United States Copyright Office,
The Digital Millennium Copyright Act of 1998,
Retrieved January 17, 2011, fromhttp://www.copyright.gov/legislation/ (
1998, December).
Wired,
iPhone timeline highlights the handset through the ages. Wired.com,
Retrieved January 19, 2011, fromhttp://www.wired.com/gadgetlab/2008/07/iphone-timeline/ (
2008, July 3).
..................Content has been hidden....................
You can't read the all page of ebook, please click here login for view all page.