Chapter 4
Using Email and Messages
For many people, email and messaging have become primary means of communicating and are another reason for them to have an iPhone. The iPhone comes with the Mail, Messages, and Contacts apps already installed. In addition, the App Store has many alternatives for emailing and messaging. To use any apps for emailing and messaging, however, you must have a connection to the Internet and an email account. If you do not yet have an Internet connection, go back to Chapter 3 and set one up now.
This chapter will discuss getting an email account; setting up the Mail and Messages apps; sending, receiving, and managing email; and sending and receiving text messages.
USE MAIL
The iPhone’s Mail app allows you to send, receive, and manage email over the Internet. This book primarily focuses on the use of the Mail app because it is a modern email program that works well and comes with and is designed for Apple’s iOS. You can also send and receive email through other email apps, as well as web mail accounts using Safari, but this chapter will be devoted to using Mail.
 Set Up Mailx
To begin the use of Mail, you must establish an email account with an email provider recognized by Mail and then convey that information to Mail. You may have already automatically set up Mail during your iPhone installation using the email account you used for your Apple account. If so, you can skip to “Change Mail Settings.”
Establish an Email Account
For an email account, you need the following:
• An email address (for example, [email protected]).
• The password for your mail account.
• You may also need to know the type of mail server you are using—either IMAP or POP (if you have a choice, choose IMAP; it is newer and provides more flexibility). Internet Message Access Protocol (IMAP) keeps a copy of your mail on the server and does not delete it until you do or until some set time, such as three months. This allows you to read your mail on several devices until you delete it on one of them. Post Office Protocol (POP) allows you to download your messages once and then deletes it on the server, unless you choose otherwise, making it hard to use it with both an iPhone and a computer.
At the time this was written, Mail recognizes accounts with iCloud, Microsoft Exchange, Gmail, Yahoo!, AOL, Microsoft Hotmail, Microsoft Outlook, and a number of smaller email services. Because you had to have an email account to get an Apple ID to use iPhone, you can generally use that for your Mail account. It is also likely that when you set up an Internet connection, you were given an email account that you can use. Finally, you can open Safari and go to Google.com, Yahoo.com, Outlook.com (not the Office product, but the replacement for Hotmail), and others to create a new account. Here are the steps with Google:
1. On the Home screen, tap Safari. Tap the address bar, tap the delete icon, and type the site from which you want an email account—in this case, type google.com.
2. Tap More (the three bars on the left) | Gmail | Create An Account. Enter your name, choose a username, create and confirm a password, and complete filling out the registration form.
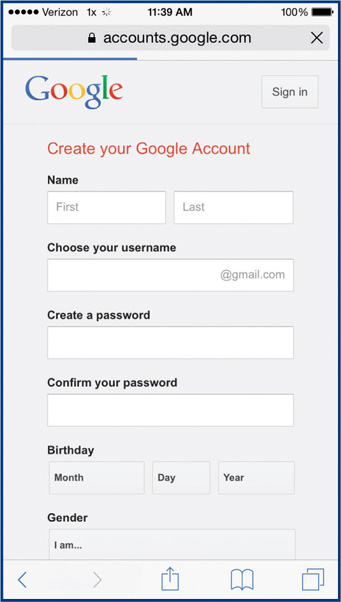
3. When you are done, tap Next Step. To confirm your entries, tap Create Profile.
4. At the Welcome message, tap Continue To Gmail.
5. You are asked if you want the Gmail app. Because you already have the native iPhone Mail app, for the moment, I suggest you ignore the Gmail app and tap Go To The Mobile Site. This shows you your Google mail in Safari. For now, close Safari.
The Gmail account in Safari is called “web mail” and is one of three ways to look at Gmail. The other two are a Gmail app you can download and the iPhone’s Mail app, which is the way we’ll use. After creating an email account, put aside looking at your mail and return to the Home screen to set up Mail.
Set Up Gmail in Mail
With a Gmail account, you not only can view your mail in a web mail account on Safari, but also set it up in Mail. Here’s how:
1. In the Home screen, tap Mail. If you have not previously set up an account in Mail, it will display a number of mail servers. Tap Google. If you have previously set up an account in Mail, follow the instructions in “Set Up Outlook.com in Mail,” substituting “gmail.com” for “outlook.com.”
2. Enter your name, email address, password, and a description of the account and then tap Next. If you want, choose to link Contacts, Calendars, and Notes to Gmail and then tap Save. Your Gmail account will open in Mail.

![]()
TIP A blue dot next to a message in your Inbox indicates that a message has not been read.
Set Up Outlook.com in Mail
Outlook.com (which used to be Hotmail, the Microsoft mail service, and may in some cases have been moved to live.com) is set up in Mail in a similar way to Gmail, but once you have any account configured in Mail, you start in a different way. If Outlook.com is your first account, start with step 1; otherwise, start with step 2.
1. In the Home screen, tap Mail. Mail will display a number of mail servers. Tap Outlook.com and skip to step 3.
2. If you have other Mail accounts, from the Home screen, tap Settings | Mail, Contacts, Calendars | Add Account | Outlook.com.

3. Enter your email address, password, a description of the account, and tap Next. Choose if you want to link Mail, Contacts, Calendars, and Reminders to Outlook and tap Save. You are returned to Settings.
TIP Besides the major six email servers, there are a great number of other mail servers you can access on your iPhone, including smaller email servers and email on a personal website.
Change Mail Settings
Mail settings include settings for each account, as well as for Mail itself.
Change Account Settings
The account’s settings vary by account and can go into a fair amount of technical depth, most of which, if you have been able to complete the setup, you don’t need. The general Mail settings are discussed under “Change General Mail Settings,” later in this chapter. Here’s how to view the settings for a particular account:
![]()
TIP If you are having trouble setting up a mail account, the quickest solution is to contact the mail provider (or Internet service provider, called the ISP) or IT help desk, either online or by phone, and have them lead you through the setup. They will help you with the detail settings for your account.
1. Tap Settings | Mail, Contacts, Calendars | account name (for example, “Gmail”).
2. The account’s top-level settings will open. Here, you can turn on or off portions of the mail service, delete the account, and, by tapping Account, go into the account’s detail settings.
3. In the detail settings, you can change your basic logon information and open the advanced settings for your mail provider. For the latter, I’d recommend that you make any changes with the help of the mail provider.

![]()
NOTE Some mail providers, Gmail in particular, provide the ability to archive messages that you might want, but might not want them to take up room on your iPhone. See the discussion under “Archive, Delete, and Recover Messages,” later in this chapter.
Change General Mail Settings
The general settings that apply to all mail accounts are below the account-specific settings discussed earlier. As mentioned there, tap Settings | Mail, Contacts, Calendars and scroll down a bit. The general settings include the following:
• Fetch New Data allows you to choose how you receive your email from your mail provider. You essentially have three choices, with some subchoices. From the Mail, Contacts, Calendars settings, tap Fetch New Data. On the screen that opens, you have these choices that affect all services:
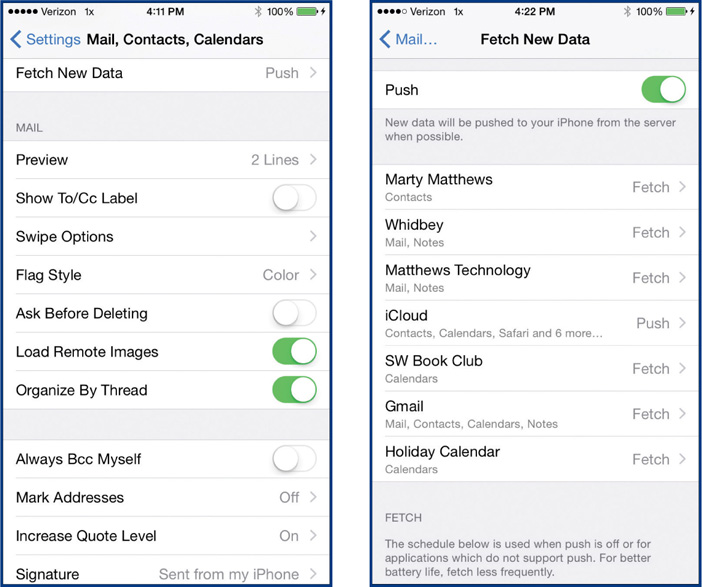
• Push Your mail is automatically pushed to you by the server whenever the mail is available, causing the iPhone to be more active and, therefore, using more of the battery. Only some mail services provide the Push option (in the examples here, it is only iCloud), and you can turn that off by tapping the On/Off button.
• Fetch The iPhone’s Mail app requests the server to send you your mail. This can be done automatically every 15 minutes, 30 minutes, hourly, or manually (meaning you determine when to download your mail). Manually puts the least drain on the battery. Tap the option you would like.
Individual mail services’ settings can be changed by tapping the service you want to change and then tapping the selection you want from the following options:
![]()
NOTE With Push email, the email is received whenever it is available, provided the iPhone is not powered off, even when it is sleeping and regardless of whether the Mail app is active. With Fetch set to a time interval (15 minutes to hourly), mail is received only when Mail is first opened and then periodically on the time interval, so long as Mail remains open. With Fetch set to manual, email is only received when you manually drag down the top of the Inbox with your finger.
• Preview allows you to determine the number of message lines you want displayed in the Inbox.
• Show To/Cc Label adds a label to received emails telling you if you are an addressee or a Cc. If no label appears, the email probably came from a mass mailing and may be spam.
• Flag Style allows you to select the style and color of the flags attached to mail messages.
• Ask Before Deleting gives you a warning and a second chance when you delete a message.
• Load Remote Images allows photos to be received with email when they are attached.
• Organize By Thread organizes your email by subject instead of time and date.
• Always Bcc Myself sends a copy of an email to you so you can get it on another computer, such as your desktop or laptop computer, if you share an email account with that computer.
• Mark Addresses highlights addresses in your mail not ending in a certain domain, such as anisp.com.
• Increase Quote Level increases the indentation of replies and replies to replies in the list of messages in your Inbox. This works particularly well when you organize your messages by their thread (subject).
• Signature allows you to enter a block of text that is added at the end of your email messages. If you want to have different signatures for each of your email accounts, tap Signature, tap Per Account, and add to or replace the default “Sent from my iPhone” text with the signature block you want to use.

• Default Account allows you to specify the email account to use when you send email from an app other than Mail (such as Notes or Photos) and you tap the Share icon and tap Mail.
Send, Receive, and Respond to Email
The purpose of email, of course, is to send messages to others, receive messages from them, and respond to the messages you receive. Mail does this with a simple elegance.
Create and Send Email
To create and send an email message, follow these steps:
1. Tap Mail on the Home screen and in the page that opens, tap the New icon in the upper-right corner. The New Message screen will open.
![]()
2. Start to enter a name in the To text box. If the name is in your Contacts (see “Use Contacts” in Chapter 2), it will be suggested in a list and you can tap to accept that name. If the name is not automatically completed, finish typing a full email address (such as [email protected]) and then tap RETURN.
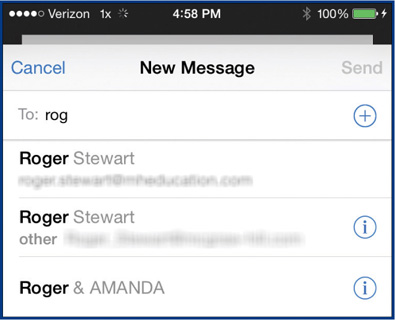
3. If you want more than one addressee, after accepting a suggested name or tapping RETURN after typing one, as directed in step 2, you can simply begin typing a second address after the space that has been added.
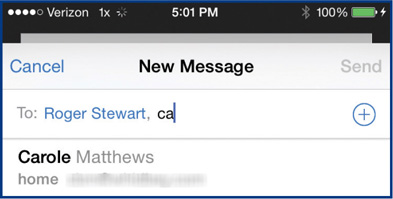
TIP To look up a name in Contacts, tap the plus sign icon on the right of the To address box to open the All Contacts list, where you can scroll down to find a name and then tap it.
4. If you want to differentiate the addressees to whom the message is principally being sent from those for whom it is just information, tap Cc/Bcc to open text boxes for those items and then enter the desired addressees there as you did in the To text box. If you want to send the message to a recipient and not have other recipients see to whom it is sent, tap the Bcc text box and then type the address(es) to be hidden. (Bcc stands for “blind carbon copy.”)
5. Tap in the Subject text box and type a subject for the message.
6. Tap the area beneath the line under Subject and type your message.
7. When you have completed your message, tap Send in the upper-right corner of the message. If you are done, close Mail.
![]()
NOTE If you want to delete or move an email addressee, touch and hold on the name. While you are holding it, it will pop away from the text box and you can drag it where you want, such as from To to Cc. If you just tap it to select it, you can then tap the backspace key to delete it.

Receive Email
Mail can be received automatically if the account is pushing messages to the iPhone or if you have the account set on automatic fetch. Otherwise, you need to manually download your mail by dragging down the Inbox on the screen. You can tell whether you have received email on the Home page by a number in the upper-right corner of the Mail icon. Once you have unread mail in your Inbox, you can follow these steps:
![]()
1. Open Mail (the number opposite the mail account is the number of unviewed messages) and tap one of the accounts that contains newly received messages.

TIP Have a friend send you an email message so you know whether you are receiving messages. Then send the friend a message back and ask them to let you know when they get it so you know you are sending messages.
2. You can tell which messages in the Inbox are newly received by the blue dot beside them. Tap a message to have it displayed so you can read it.

3. If you wish, you can delete a message while it is selected by tapping the Delete icon at the bottom-center of the screen.
![]()
![]()
NOTE You can also delete an email message in the Inbox by swiping across it and tapping Trash. Alternatively, you can archive it by taping Archive (if available). On the same fly-out menu with Trash are Flag, which adds a colored dot to the message in the Inbox, and More, which gives you a number of options you can perform with the message.

Respond to Email
You can also respond to messages you receive. Simply tap the message in the message list and then tap the Reply icon on the right of the screen. Alternatively, you can swipe across the message in the Inbox and tap More | Reply.
![]()
From the menu that appears, you can tap one of the following options:
• Reply To return a message to just the person who sent the original message.
• Reply All To return a message to all the people who were addressees (both To and Cc) in the original message.
• Forward To relay a message to people not shown as addressees on the original message.
• Save Image To save on your iPhone an attached image or an embedded image that you received in the original message. (This is only present when there is an attachment.)
• Print To print the original message.

In the first three cases, a window similar to the New Message window opens and allows you to add or change addressees and the subject as well as to add a new message.
Apply Formatting
In iPhone Mail, you can add bold, italic, and underline formatting to the words, phrases, and paragraphs in an email message. You can also indent paragraphs. Follow these steps:
1. Create a new email message or one that is in response to a message you have received, as described in the previous sections of this chapter.
2. Type the text you want in the message and then tap the text you want specially formatted. The Select bar will appear; tap Select.

3. When the text is selected, drag the ends of the selection box as needed to select the words you want to format.
4. If it isn’t already displayed, tap the selected text to open the Cut, Copy, Paste … bar.

5. Tap the right-pointing arrow to display the BIU, Define, … bar.

6. Tap BIU to open the Bold, Italics, Underline bar.
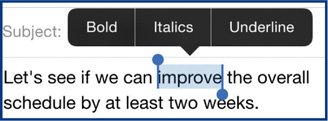
7. Tap the style(s) you want to use (you can use more than one). When you are done, tap outside of the selection.
8. To indent a paragraph, select it and open the Select bar, as done previously in step 2.
9. Tap Quote Level, and then tap either Decrease or Increase to outdent (move to the left) or indent (move to the right), respectively. You can do this several times if you choose. When you are done, tap outside the selection.

Handle Attachments
When you send email, you may want to include a photo, a video, a note, an iWorks (Pages, Numbers, and Keynote) document, a Safari web page, or one of many other items on your iPhone. You can do that either while you are working on a message or while you are looking at the item.
TIP A number of apps have a Share icon that allows you to email the items produced by that app, among other actions. If you don’t see a Share icon or other command that allows you to email an item, you can always take a screenshot of it (press and hold the Sleep/Wake button while pressing the Home button) and then email the resulting image from Photos.
![]()
Add a Photo to a Message
From within an email message, you can attach a number of documents, including photos and videos, without leaving the message. Let’s look at attaching a photo as an example:
1. Create a new email message or one that is in response to a message you received, as described in the previous sections of this chapter.
2. Type the message you want to start with. When you are at the spot where you want to insert the photo, tap RETURN twice to leave a blank line.
3. Press and hold for a moment on the blank line to open the Select bar, tap the right arrow, and then tap Insert Photo Or Video.

4. A list of your photo folders will appear. Tap the folder, tap the photo, and then tap Choose. The picture will appear in your message.
Here’s an alternative method:
1. When you are at the point described at the end of step 2 in the preceding list, you can also press Home and tap Photos to open the Photos app.
2. Open the album needed to locate the photo you want. Then press and hold for a moment on that photo to have the Copy, Hide bar pop up.
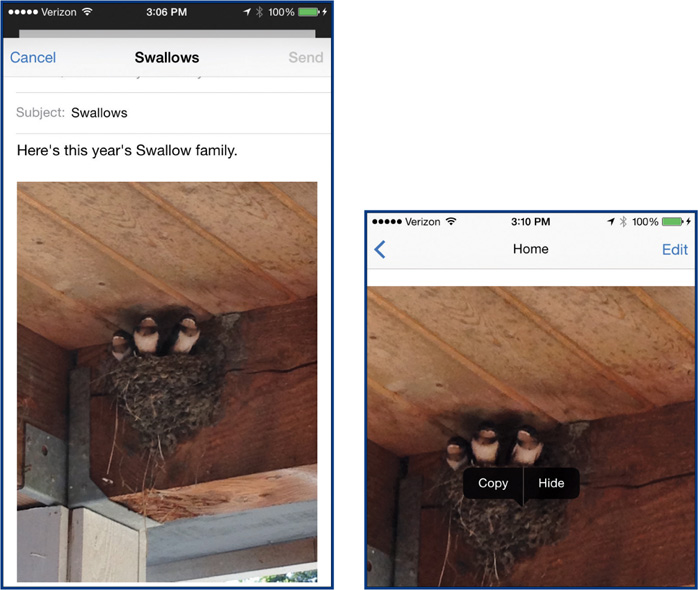
3. Tap Copy. Press the Home button and tap Mail. The email message that you have been working on will appear.
4. Press and hold for a moment on the blank line to open the Select bar and then tap Paste. The photo will appear in your message.
5. When you are ready, send the message as you would normally.
Email Items Directly
In the preceding section, you saw how to insert as well as cut and paste items into an open email message. You can also send photos and other items directly from their respective apps.
1. Open the app with the item you want to email. In that app, navigate to where you can see the item.
2. Select the item, tap the Share icon, and tap Mail. A new email message pops up containing the item you selected.
3. Add the addressees, a subject, and any message you want to include. When you are ready, tap Send.

![]()
NOTE Email that is sent directly from an app other than Mail is sent using your default mail provider, as described earlier in “Change General Mail Settings.”
Handle Received Attachments
You also may need to handle attachments you receive in email on your iPhone. You can tell if a message has an attachment by the paperclip icon in the message header. The attachment can be a photo, video, or other document, including Microsoft Word, Excel, and PowerPoint files, as well as Adobe PDF files and web pages. To process an attachment, follow these steps:
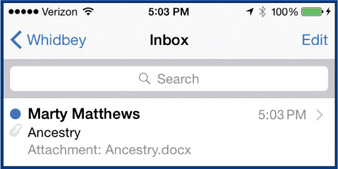
1. Open a message with an attachment as you would any other message. The body of the message will open, and at the bottom you will see the attachment.

2. Tap the attachment to open it. If the attachment is a document that the iPhone can open, it will do so and you can read or view it. If you want to save it, tap the Share icon and then tap the app that you want to save it in. In the case of the Word document, choose Open In Pages or Open In Office Mobile, where it is automatically saved.
3. If the attachment is a photo, it will automatically open in Mail and you can save it by pressing and holding on the photo to open the Share menu. Tap Save Image to place it in your Camera Roll.
4. If the attachment is not a common file type, you can normally re-send it in another email, or store it in a note or cloud app. Tap the attachment to see what options are available. Here, you can see that a file created with a program called Xara (a graphics program I use with my website) can be re-sent in email or stored in Evernote, OneNote, DropBox, or OneDrive.

Manage Email
Mail allows you to organize your mail in both existing and new folders; to archive, delete, and recover messages; and to flag, mark, and search your messages.
Understand Email Folders
Email that you receive and send is stored in folders, both in the Mail app on the iPhone and the mail server you are using, as shown earlier. The folders you have available depend to some degree on the mail service and, if you have previously used it on another computer, how you set it up there. In the latter case, the iPhone will mimic the folder structure on your computer.
Here’s how to work with folders:
1. From an Inbox, the most common working area of Mail, tap the mail provider’s name in the upper-left corner. This may take you to the set of folders for that particular mail provider or to Mailboxes, depending on where you originally started. If you are showing Mailboxes, tap an account in the lower part of the screen to see the folders for that account.
2. If you are displaying the folders for a provider, tap Mailboxes in the upper-left corner. This shows you your mail accounts, both in terms of their Inboxes at the top, where tapping any of the accounts takes you to their Inbox, and the accounts themselves in the lower part of the screen, where tapping takes you to the set of folders for that account.
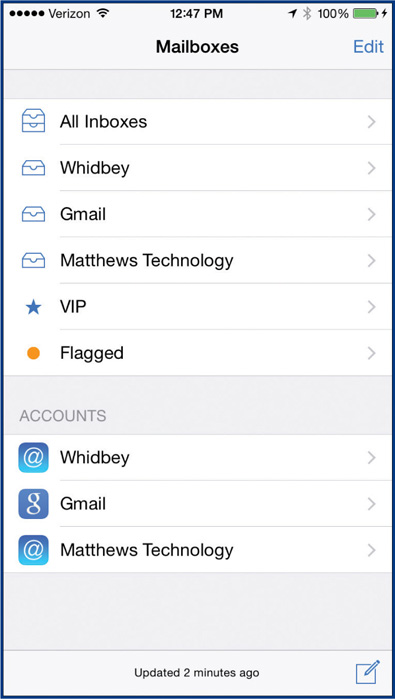
3. Tap an account under All Inboxes to open and observe the respective Inbox. Then return to Mailboxes by tapping the provider’s name in the upper-left corner.
4. Tap an account under Accounts to open and observe the set of folders for this account. Tap Inbox to open and observe the Inbox arrived at in this manner. You can see there is no difference in the Inboxes.
5. Return to Mailboxes by tapping first the provider’s name in the upper-left corner and then tapping Mailboxes in the same location.
Understanding this navigation from Mailboxes to account folders to Inboxes and back is important to easily getting around Mail.
Add and Delete Folders
If you find that you would really like to have additional folders to better organize your mail, you can do that easily. Here’s how:
1. From the Mailboxes screen, shown in the previous section, tap in the Accounts area the mail provider where you want the extra folder. The list of existing folders for that provider will appear.
2. Tap Edit at the top-right corner of the screen and then tap New Mailbox in the bottom-right corner.

![]()
NOTE Some folders in Mail can be moved, have their name changed (which might satisfy the need for a new folder), and deleted, whereas other can’t. You can tell which can be edited after you tap Edit because they are darker.
3. Type the name for the new folder and then tap the account field beneath Mailbox Location to choose where in the current folder hierarchy you want the new folder.
4. Tap where you want the new folder and then tap Save in the upper-right corner.
5. If you want to change the position or name of the new folder, or any other folder, tap Edit in the upper-right area and then tap the folder you want to change.
6. In the Edit Mailbox screen, make any desired changes to the name, tap Mailbox Location, tap the new parent folder, and tap Save.
7. If you want to delete a folder, perform step 5 and then in Edit Mailbox, tap Delete Mailbox. Confirm that by tapping Delete again and then tapping Done.
Organize Messages with Folders
Use the various folders that you have by moving your mail among them:
1. From Mailboxes, tap an account in the upper part of the screen to open the Inbox for that account. Alternatively, tap an account in the lower part of the screen to open another folder for a given mail provider to display the message(s) you want to move to other folders.
2. Tap the message you want to move so it is displayed on the right of the screen.
3. Tap the folder icon at the top of the screen. The mail account’s folders will be displayed.
![]()
4. Tap the folder in which you want to store the message. The message will disappear from its current folder and appear in its new one.
![]()
TIP There are two special mailboxes that display only messages from very important people (VIP) and those that have been flagged. You can select from your contacts those people who are VIPs.
Archive, Delete, and Recover Messages
You may have noticed that when you open a message in Gmail in the icons in the bottom area there is, by default, an archive box, whereas in other mail providers there is a trash can. This is because Gmail allows you to “archive” a message as well as to delete it. Archiving is an intermediate step between placing an item in a normal folder and deleting it.
![]()
• To delete or archive a message, open the message and tap either the delete or archive icon.
• If you choose Archive, you are given the choices of Trash Message or Archive Message.
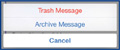
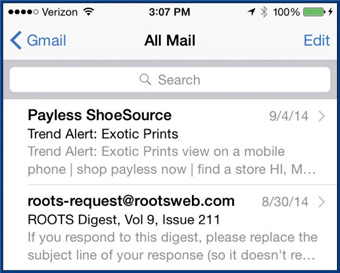
• To recover a message, move it to a new folder using the technique described in “Organize Messages with Folders,” earlier in this chapter. (Go to Mailboxes and tap the account in the lower part of the screen to display that account’s folders.) Deleted messages are in either the Trash or Deleted Messages folder; archived messages are in the All Mail folder.
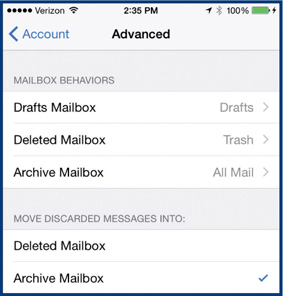
• Determine whether or not to use archiving, if it is available, from the Home screen. Tap Settings | Mail, Contacts, Calendar | account name | Account | Advanced | Archive Mailbox or Deleted Mailbox.
Delete, Move, and Mark Several Messages at Once
Mail has the means to delete, move, and mark a number of messages at one time:
1. Open the folder containing the messages you want to delete, move, or mark.
2. Tap Edit in the upper-right corner of the screen.
3. Tap the messages you want to work on. A white check mark will appear in a blue dot on the messages that are selected. (You unfortunately can’t use Mark All, which only allows you to “Flag” or “Mark As Read,” if some messages are unread, or “Mark As Unread” if all are read.)
4. Tap the command button at the bottom of the screen for the action you want to carry out:
• If you tap Trash, the selected items go into the Trash folder for that account.
• If you tap Move, the list of folders for that Mail account will open and you can tap where you want the messages to move to.

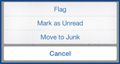
• If you tap Mark, a menu pops up giving you the choice to flag the message, mark it as unread, or move it to the Junk folder, if such a folder exists.
Search Messages
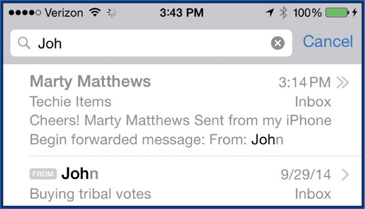
As the number of messages you have in various mailboxes begins to stack up, it may become difficult to find a message that you want to look at. You can use Mail’s Search feature for that purpose. Search, though, searches all folders of all accounts; you can’t just search a single folder.
1. Open a Mail account and folder.
2. Swipe down the list of messages. The search text box will appear at the top of the messages.
3. Type the keywords to search on. As you type, Mail will begin to select messages that match what you’re typing and display their headers in the screen.
USE MESSAGES
Messages allows you to send and receive text messages using an email address or cellular phone number with any device, phone, or tablet that will receive them. It will also send and receive media messages that include photos and videos using Apple’s iMessage, instant messaging (IM or chat) with other iPhone, iPod, iPad, and Mac (Mountain Lion and later) users who are online at the same time as you.
Start and Use Messages
Messages, by default, is in the upper-left corner of the Home screen. The use of iMessage requires your Apple ID, which you must have to use your iPhone. As a result of that, you will automatically be signed in when you open Messages.
1. From the Home screen, tap Messages. Messages will open.
2. If you see a To text box, tap in it and begin to type a name. If you don’t see the To box, tap the New Message icon in the upper-right area of the screen. If you want to search for a name, tap the Add A Contact icon on the far right to open the list of your contacts. Scroll down and tap the contact you want to chat with.
![]()
3. Tap the text tray at the bottom of the screen, type your message, and tap Send.
![]()
4. If you have a photo that you want in the message, you can attach it by tapping the Photo icon and tapping either Photo Library or Take Photo Or Video. In the former case, select the photo, tap Choose, and tap Send. In the latter case, select the front or back camera, tap the shutter release, and then, if you are happy with the photo or video, tap Use Photo.

5. If your correspondent has an iPhone or other recent Apple device, you can send voice messages using Messages. Tap and hold the microphone icon while speaking your message. A set of three controls will appear on the right, an arrowhead in the center to play back what you have recorded, an “X” to delete what you recorded, and an up arrow to send the voice message.
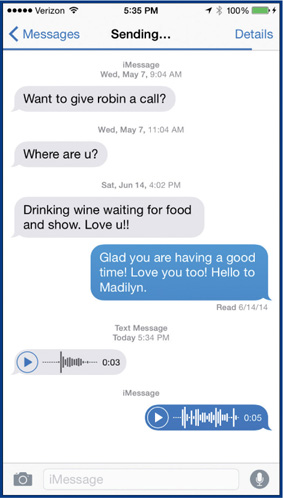
6. Continue the conversation as your correspondent replies. Touch the arrowhead to play an audio or video message.
Review Messages Settings
The Messages settings, opened by tapping Settings | Messages, provide these options:

• iMessage Allows you to turn iMessage on and off.
• Send Read Receipts Provides a notice to the sender when you have read their message.
• Send As SMS Uses Short Message Service (SMS), which is text only, when iMessage is not available if turned on; otherwise, Multimedia Messaging Service (MMS) is used.
• Send & Receive Lets you set the addresses and phone number where you can be sent messages and from which you can send messages.
• MMS Messaging Turns on Multimedia Messaging Service, which allows audio, video, and photographic images to be sent with or as text messages.
• Group Messaging Allows multiple people to share a text message conversation.
• Show Subject Field Allows you to display the Subject field or not.
• Character Count Provides a count of the number of characters when SMS or MMS is being used, if turned on.
• Blocked Opens your Contacts and allows you to select those from whom you do not want to receive messages or FaceTime calls.
• Keep Messages Allows you to choose the length of time to keep text messages—from 30 days, 1 year, or Forever.
• Audio Messages Expire Provides two choices: After 2 Minutes and Never.
• Raise To Listen If this option is selected, raising the phone to your ear automatically starts playing an audio message.
• Video Messages Expire Provides two choices: After 2 Minutes and Never.