Chapter 5
Managing Time and Events
The iPhone provides several apps or areas—including Calendar, Reminders, Clock, Notifications, and Control Center—to help you control the events of your life. This chapter provides a review of all of these, showing you how to set them up, handle their settings, and use them in several circumstances.
SET UP AND USE CALENDAR
The primary purpose of a calendar, of course, is to keep track of upcoming events, such as meetings, appointments, birthdays, and anniversaries. You can also note date-related objectives, such as projects to be completed (book deadlines, in my case) and goals to be accomplished (such as weight loss by a certain date). Whatever the purpose, Calendar has tools to work with it and several views to look at it.
 Get Familiar with Calendar
The iPhone Calendar has implemented on the screen four views of calendar entries and given you easy ways to navigate among them. Open Calendar by tapping its icon on the Home screen. One of Calendar’s four views will appear.
Explore Calendar Views
When the iPhone is held upright, in portrait orientation, the four Calendar views are as follows:
• Day view Displays the events in one day and provides a time-of-day display on the left and the detail for events in that day on the right. The day view is similar to the day books that were popular before computers. You can swipe the dates at the top of the screen to display different days as well as swipe the screen up and down to see other times.
• List view Provides a summary list of events for as many days and months as there is room on the screen. You can swipe up or down to see additional events. I like to use this view as my primary one because I can keep track of a number of events.
• Month view Provides a high-level view of the month with the current day shown within a red dot. Each day with an event has a gray dot beneath the date. Swipe up and down to see additional months.
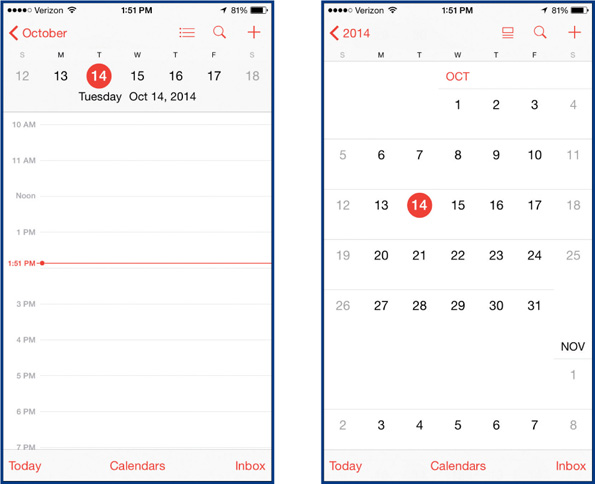
• Year view Displays 12 months on one screen with the current day marked with a red dot. Year view primarily allows you to select the month in which you want to work. Swipe up and down to see additional years.

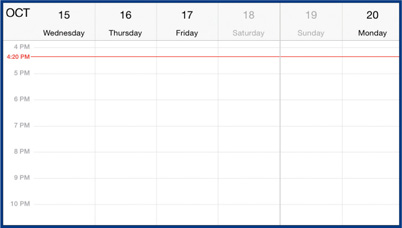
When you hold the iPhone horizontally, in landscape orientation, all the views change to a week view with times down the left side. You can swipe the dates at the top to display other dates and swipe the screen up or down to see other times.
Review Calendar Controls
When the iPhone is in portrait orientation, the calendar has three permanent controls at the bottom as well as two to four controls at the top, which are detailed here from left to right:
• Month or Year Selector Allows you to go from the current day to the current month, and from the current month to the current year. This control disappears in year view.
• List Selector Opens the full events view if the screen was displaying a day, or a partial events list if the screen was displaying a month. If you are displaying the month view and want the full list of events, display a day first and then events.
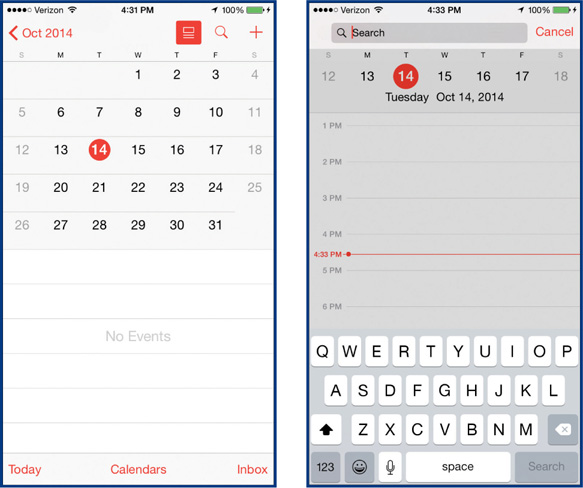
• Search Opens a search text box where you can enter keywords on which to search Calendar.
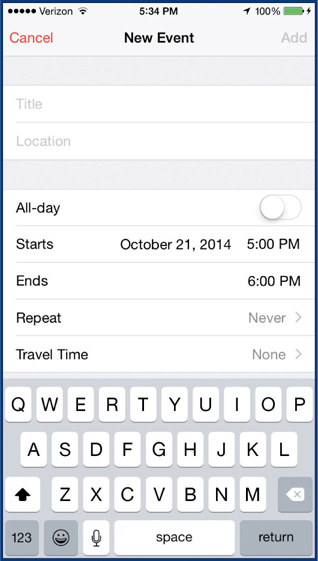
• Add Event This is the plus icon at the top right, which opens the Add Event screen with which you enter events into the calendar.
![]()
Across the bottom from left to right are the following items:
• Today Identifies the current day in the current view.
• Calendars Opens a list of the various calendars you have available. From this list, you can choose which you want to display, if not all of them. Also, by tapping the “i” in a circle for one of the calendars, you can choose which color you want to represent that calendar.

• Inbox Displays the calendar invitations you have received and lets you reply to them.
Change Calendar Settings
The calendar settings, opened by tapping Settings | Mail, Contacts, Calendars and scrolling down to the bottom of the screen, include the following:

• Time Zone Override Changes the default from showing events in the local time zone the iPhone is in to a selected time zone.
• Alternate Calendars Allows the display of Chinese, Hebrew, and Islamic dates.
• Week Numbers Displays the number of the week within the year in day, week, and month view.
• Show Invitee Declines Shows if an invitee has declined an invitation.
• Sync Lets you automatically sync historical as well as future events. Tapping this option allows you to select among several time periods.
• Default Alert Times Determines when alerts are created for birthdays, events, and all-day events. For each, you have a choice of when the alert is posted, from the time of the event to one week before the event.
• Start Week On Lets you specify which day of the week is on the left of a weekly calendar.
• Default Calendar Lets you specify which calendar to use with events that are created outside of Calendar.
Use Calendar
The iPhone’s Calendar app is made for active use as you are on the go. It will sync the entries you have from your desktop or laptop computer or such online calendar resources as Facebook and Google Calendar. It is also a good resource for directly entering and managing events as you go along.
Choose Your Calendar
Depending on your email accounts and what you have on computers and tablets, you may have a number of calendars. To start, I’d recommend that you work with only one. Later in this chapter we’ll come back and look at how to handle multiple calendars.
If you have multiple calendars, begin by turning off all but one. You can then use it for the next several sections until we get to the discussion of multiple calendars.
1. From the Home screen, tap Calendar and then tap Calendars in the bottom-middle area. You will see the list of your calendars.
2. If you have other calendars turned on (they have a check mark beside them), tap all but one calendar to turn them off.
3. Tap Done at the top-right of the screen to close the list of calendars.
Select a Date
Calendar events, of course, are on a certain date or series of dates; therefore, the first task in using Calendar is to select a date. You have several options, depending on where you are looking:
• If you are in year view, tap the month with the event and then tap the day.
• If you are month view, tap the day.
• If you are in day or week view, drag the dates at the top of the screen to display the correct week and then tap the day if you’re in day view.
Add Calendar Events
With a day selected in day view, here’s how to add an event and its specifics:
1. Tap the icon for Add Event in the top-right corner of the screen to open the New Event screen.
![]()
TIP You can also open the New Event screen by pressing and holding for a moment on a day and time in day or week view. A colored box will appear under your finger with the words “New Event.”
![]()
2. Type the title of the event, tap in the Location text box, and type the location.
3. If it is an all-day event (or close enough to call it that), tap the On/Off button for that.
4. Tap Starts to open the date and time rotator. Move your finger up and down on the date to select it and then do the same thing with the hour, minutes, and AM/PM to select the start time.
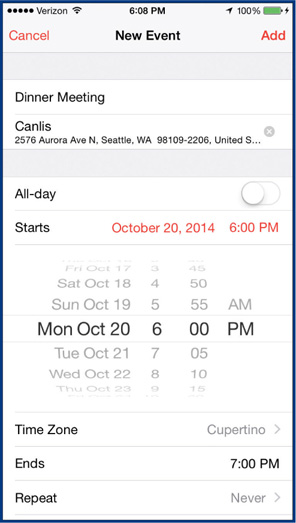
5. If you want a different time zone than your current location, tap the Time Zone selection, if needed, and tap Done.
6. Tap the Ends time and select the appropriate time.
7. If you want a time zone other than your default, tap Time Zone, begin typing a different time zone, and tap the time zone that appears in the list.
8. If the event will happen periodically, tap Repeat and then tap the period of repetition.
9. If it is a factor, tap Travel Time, turn it on, and enter a starting location (if relevant), and/or select a time and tap New Event in the upper-left corner.

10. Tap Calendar if you want this event listed on a calendar other than the default (see “Work with Multiple Calendars,” later in this chapter), and tap New Event to return there, if necessary.
11. If you want to invite people to the event, tap Invitees.
a. Begin typing a name in your Contacts list. When the name that you want is displayed, tap that name.
b. To add more invitees, tap the Add icon (the plus sign) to open your All Contacts list and then tap the person you want to invite. Repeat this for as many people as you want to invite.
c. When you are finished adding invitees, tap Done.
12. Tap Alert and then tap when you want the alert. Repeat this for the second alert if desired.
13. The default is to show your time as being “Busy” when you have an event. This is for shared calendars so others will not schedule events for you during that time. If you want to change from “Busy” to “Free,” tap Show As and tap Free.
14. If desired, you may type in a uniform resource locator, or URL (that is, a web address), and enter notes for the event. When you are ready, tap Add to complete the event.
15. Tap the event to see its information.

TIP For the URL and notes sections of a new event, you can copy and paste information from a website that might be of interest to the people you are inviting to an event.
Change Calendar Events
Changing an event is very easy:
1. With Calendar open on the screen, select the date of the event, as described earlier in this chapter.
2. In day, week, or month view, tap the event and tap Edit to open the Edit Event screen.
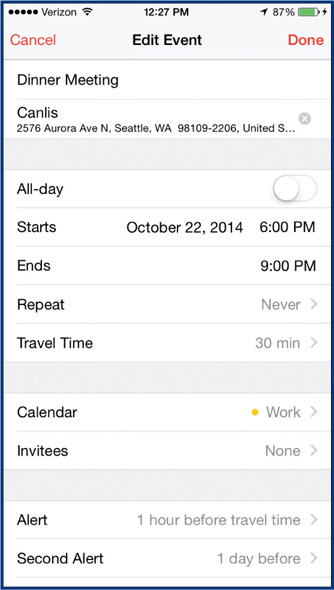
3. In the Edit Event screen, tap the field you want to change and make the desired changes. See “Add Calendar Events,” earlier in this chapter, for field-by-field considerations.
4. When you have made the changes that you want, tap Done.
Delete Calendar Events
Deleting events is even easier:
1. Follow steps 1 and 2 in “Change Calendar Events” immediately preceding this section.
2. In the Edit Event screen, scroll to the bottom and tap Delete Event. Tap Delete Event a second time to confirm it. If the event is repeated, you will have a choice of deleting the current event only or this and all future repetitions of the event.
Work with Multiple Calendars
As you begin to use Calendar, you may find that you are getting events from several sources that you would like to keep on different calendars so you can manage them as a group. Also, you probably want to look at all your calendar events together periodically on one calendar display. The iPhone provides ways to do both of those.
When you start up your iPhone for the first time after setting it up and syncing to iCloud, you will see that, by default, Calendar with iCloud starts out with three independent calendars, labeled “Home,” “Work,” and “Birthdays.” You can, therefore, immediately place events on more than one calendar.
Add Events to a Different Calendar
To add events to one of several calendars, you can use one of three techniques:
• While entering a new event in the Add Event screen, tap Calendars and then tap the calendar you want to use.
• To add a number of events to a single calendar (for example, your Work calendar), turn off all other calendars so that when you open the Add Event screen, the default is your Work calendar.
• If you are going to be working primarily with one calendar, but don’t want to turn off other calendars, you can change the default calendar in Settings. From the Home screen, tap Settings | Mail, Contacts, Calendars | Default Calendar and then tap the calendar you want to be the default.
Show Several Calendars Together
With just one calendar, there is no problem finding an event you want to look at, but as soon as you add another calendar, you have to ask the question, “Which calendar do I look at?” The answer, of course, is to superimpose one calendar on the other so you can see them both at the same time. Calendar allows you to do this by simply turning on the calendars you want to display.
1. With Calendar open on your iPhone, tap Calendars.
2. Tap the calendars in the Calendars screen that you want to be displayed, as you have seen earlier.
Add Another Calendar
The Calendar app has two types of calendars: those tied to mail accounts (such as Gmail, Outlook, and iCloud) and those created within Calendar. You can, therefore, add calendars from either source. Here’s how to add a calendar within Calendar that’s not connected with a mail account:
1. From within Calendar, tap Calendars to open the Show Calendars screen.
2. Tap Edit in the upper-right corner and then tap Add Calendar in the approximate middle of the screen.
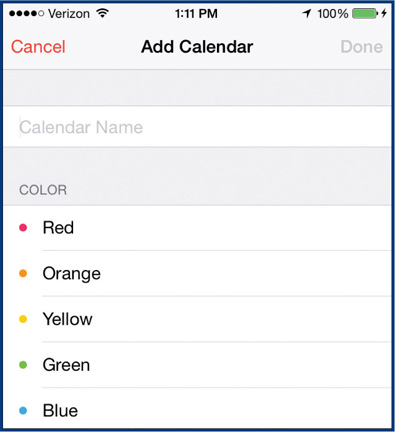
3. In the Add Calendar screen that opens, type the name of the new calendar and tap the color you want to associate with that calendar.
4. When you are ready, tap Done.
To add a calendar from a mail account, follow these steps:
1. Press Home to return to the Home screen.
2. Tap Settings | Mail, Contacts, Calendars and tap the mail account whose calendar you want to add. The mail account’s settings will open. Tap the On/Off button to the right of Calendars to turn it on (not all mail servers have calendar services).
3. Press Home and tap Calendar to return there and eventually see your mail calendar(s).
![]()
NOTE It takes a while before Calendar will see a new mail calendar.
Delete a Calendar
As in adding calendars, you can delete them either from mail accounts or from Calendar itself. You can delete a mail account–related calendar by, in essence, turning it off. Here are the steps to follow:
1. From the Home screen, tap Settings | Mail, Contacts, Calendars.
2. Under Accounts, tap the account with an associated calendar that you want to turn off (those with a calendar will say “Calendars”).
3. In the mail account details, tap the On/Off button to turn it off.
4. Tap Delete to confirm that is what you want to do and then tap Done.
To delete a calendar created within Calendar, follow these steps:
1. From the Home screen, tap Calendar | Calendars in the bottom middle.
2. Tap the right end (the “i” in a circle) of the calendar that you want to delete to open the Edit Calendar screen. You can alternatively tap Edit and tap the calendar you want to delete.
3. Scroll to the bottom of the screen, tap Delete Calendar, and then tap Delete Calendar again to confirm the deletion.
![]()
![]()
TIP Facebook’s calendar is deleted like a mail account’s calendar. Tap Settings | Facebook | Calendar to turn a Facebook calendar off if it is on, and then tap Contacts off to remove Facebook Birthdays.
Handle Invitations
Earlier in this chapter you saw how you can add invitations to a new calendar event. When you do that, an invitation is sent to the invitee. If the recipient has a recent iOS device (iPhone, iPad, or iPod touch) and it is set up normally, they will get a notification at the top of their current screen, and the invitation will go directly to the Calendar’s inbox. If any of those constraints are not true, the recipient will get an email message with the invitation. Both the Calendar and email invitations provide three links the recipient can click or tap to accept, decline, or maybe accept the invitation.
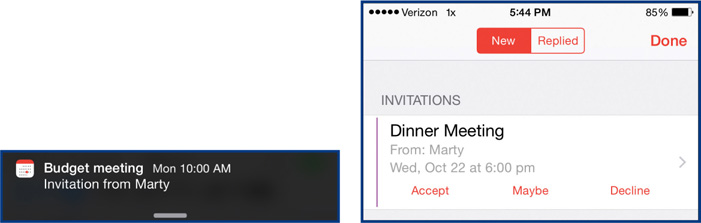
In an email message there is also an attachment, which you can tap in the Inbox, to open a Calendar event. Tap Add to Calendar, select the calendar to use, and tap Done. Press Home to close Mail and then tap Calendar to open it and display the event.

In a Calendar invitation, tapping Accept or Maybe creates a calendar event that you can view like any other. With either a calendar or email invitation, accepting, declining, or saying maybe generates information back to the originator in the form of a notification and a Calendar Inbox message.

Share a Calendar
If several people are working together, sharing a project, have a family in common, or are in an organization together, it can be worthwhile sharing a calendar to better coordinate what they are doing. iPhone’s Calendar provides two tools to facilitate this: fully sharing with one or more people a calendar that all can change, and publishing a public calendar that others can subscribe to but only you can change.
Share a Common Calendar
To create a common calendar that two or more people can share with equal ability to add and change events, follow these steps:
1. From the Home screen, tap Calendar. Tap Calendars and tap the information icon (“i” in a circle) on the calendar you want to share. This opens the Edit Calendar screen.

2. Under Shared With, tap Add Person and begin typing the name of the person in your Contacts with whom you want to share this calendar. The person and their email address should pop up. Tap the person to select them.
3. If you want to share with another person, either begin typing a name or tap the plus sign on the right and repeat step 2.
4. When you have added all the people you want, tap Add to be shown the Edit Calendar screen, where you can tap View & Edit to disallow the other person from editing the calendar or making and changing events.
5. Tap Done when you are ready. Upon returning to the Calendars screen, you will see that the calendar you chose to share will now have “Shared With…” under the name of the calendar.

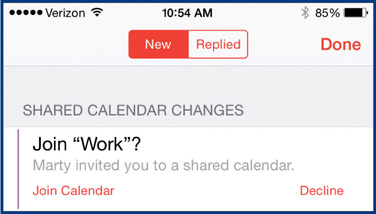
The recipient gets a Calendar notification that you want to share a calendar with them. In their Calendar Inbox they need to tap Join Calendar and Done. You are then told that they have joined the offered Calendar.
If the recipient taps Calendar from the Home screen and then taps Calendars, they should see the newly shared calendar in the list of calendars.
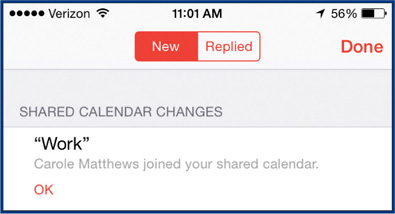
The originator will get a notice that the recipient has accepted the invitation.
On a PC, the recipient gets an invitation that looks like other invitations and is able to access the calendar through a link in the invitation to an iCloud PC web app. On a Mac, the recipient gets an invitation and then can look at the calendar in iCal.
Publish a Public Calendar
If you are responsible for a larger public group, such as a Boy or Girl Scout troop, a Little League team, or a book club, and you want to make available a calendar for that organization, you can make a calendar a public calendar that allows anyone to subscribe to it and peruse it. However, they will not be able to change or write to that calendar. To publically share a calendar, follow these steps:
1. In Calendar, tap Calendars and tap on the right (the “i” in a circle) of the calendar that you want to make public.
2. In Edit Calendar, tap the On/Off button opposite Public Calendar at the bottom to turn it on. This will allow anyone to subscribe to a read-only version of the calendar.
3. After turning on the public calendar, a new option appears: Share Link. Tap this.
4. You are allowed to send the Internet link (URL) for your public calendar to anyone you want using AirDrop, text messaging, email, Twitter, Facebook, or by copying it to a document, website, or blog. Tap the option you want to use. For example, tap Mail, fill in the addressees, and then tap Send.
5. When you are done, tap Cancel, if needed, and then tap Done.
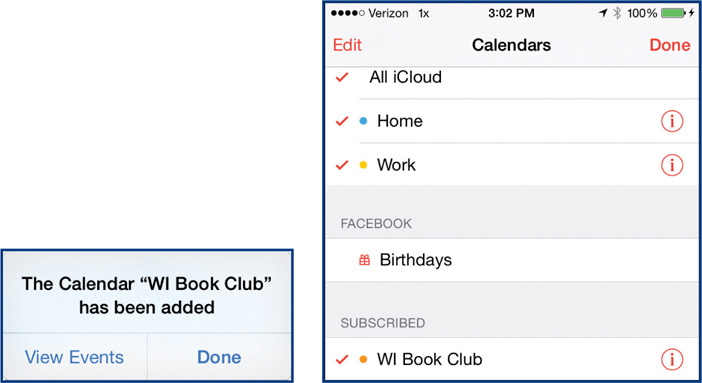
The recipient gets an email, text message, or other invitation, which, when they open it, gives them a very long Internet link. When they tap or click that link, they are asked if they want to subscribe to the public calendar. If they tap or click Subscribe, they are told that the calendar has been added, and they can tap or click View Events to see it. If you open Calendars, you can also see it.

WORK WITH REMINDERS
Reminders is for making lists, to-do lists, shopping lists, and list of steps to complete a project. Reminders may be date and time sensitive and can be marked as completed. They can also remind you that an item has not been completed and can be assigned a priority. Lists can be by date or by list, several of which have been created for you, but you can create as many more as you like. You can sync lists with iCloud and several other products, such as Hotmail’s Calendar. If you add a date and time to an item on a list, the item will appear on both the Scheduled and Reminders lists as well as the original list on which you added it.
Set Up Reminders
Reminders is very simple. The only setup necessary is the adding, deleting, renaming, and rearranging of lists, and there is only one setting to consider. Here’s how set up Reminders:
1. From the Home screen, tap Reminders, which will open the app.

2. For general reminders, tap under Reminders twice to open the keyboard and type a reminder. After you have completed the reminder, tap the information icon on the right to open the Details screen for the reminder.
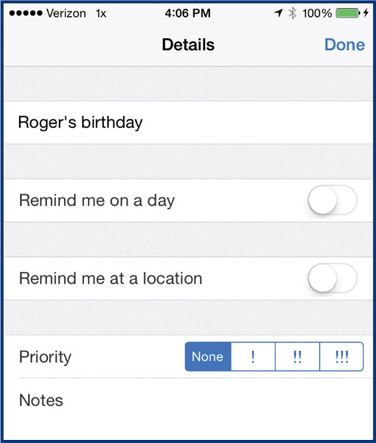
3. If you want to be reminded on a particular day, tap Remind Me On A Day and select the date and time. If desired, tap Repeat and select the period.
4. If you want to be reminded when you are leaving or arriving at a particular location, tap Remind Me At A Location and enter or select the location and then tap Details.
5. Tap a priority, enter any desired notes, and when you are ready, tap Done.
6. To change a reminder that you have entered, tap the reminder, make any desired text changes, tap the information icon, and make any necessary changes to the details of the reminder. When you are ready, tap Done.
7. To delete the reminder or make changes to the list, tap Edit, tap the Do Not Enter icon, and tap Delete. Tap Done when you’re ready.
8. To add a new list, tap the word Reminders at the top of the list, tap New List, type a name for the list, pick a color, and tap Done.
9. Enter the items on the new list and then tap Done.
10. To make changes to a list, tap Edit in the top-right area. Tap Color and tap a new color to make a change. Tap Sharing, tap Add Person, begin typing the person’s name, select the person’s name when it appears, tap Add, and tap Done.
11. While in Edit mode (see step 10), press and hold on the right end lines (“grip strips”) of the list you want to move up or down and then drag it as desired.
12. If you want to delete a list, while in Edit mode, scroll to the bottom of the list and tap Delete List and then tap Delete to confirm it.
13. Tap Done in the top-right area when you have made the changes you want.
14. Review Reminders’ settings by pressing the Home button and tapping Settings | Reminders. Tap Default List, tap the list you want other apps outside of Reminders to automatically add to, and tap Reminders.
GET TIME AND EVENT INFORMATION
The iPhone provides a number of methods to get information to you, including clocks, alarms, notifications, alerts, and a control center. We’ll look at these in three groups: clocks and alarms, notifications and alerts, and the Control Center.
Use the Clock and Alarms
The Clock app contains four components: World Clock, Alarm, Stopwatch, and Timer. Tapping Clock to open the app displays the last component that you used. If it is not already displayed, tap World Clock at the bottom of the Clock screen to begin with that component.
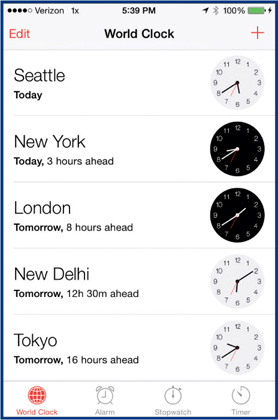
World Clock
World Clock displays a number of clocks for cities around the world. Tap the plus sign in the upper-right corner to add a clock and select the city for it. Tap Edit, use the Do Not Enter icon on the left to delete a world clock, and use the grip strips on the right to change the order of the clocks. Tap Done to complete the editing.
Alarm
The Alarm component allows you to set multiple alarms and turn them on and off as needed. Tap the plus sign in the upper-left corner to add a new alarm. Use the time spinner to select the time the alarm will go off, tap Repeat to select the days of the week the alarm will sound, tap Label to type a label for the alarm, tap Sound to select a sound or a song from your music, and tap Snooze to turn that ability on and off. When you have set an alarm, tap Save. Once you have an alarm, you can turn it on and off.

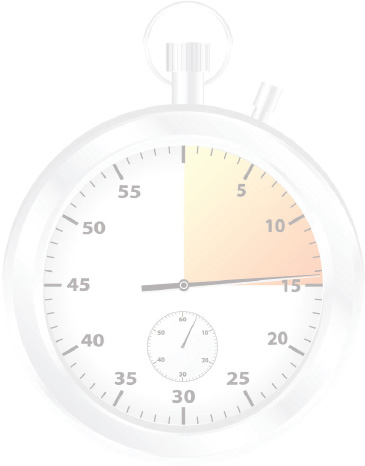
Stopwatch
Stopwatch allows you to tap Start, tap Lap for each lap, and then tap Stop to collect a set of times. You can then tap Reset to start over.
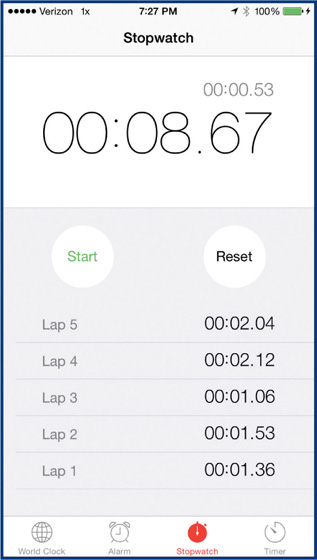
![]()
TIP To save individual times before resetting the stopwatch, take a picture of the iPhone’s screen (a “screenshot”) by pressing and holding the On-Off/Sleep-Wake button while pressing Home.
Timer
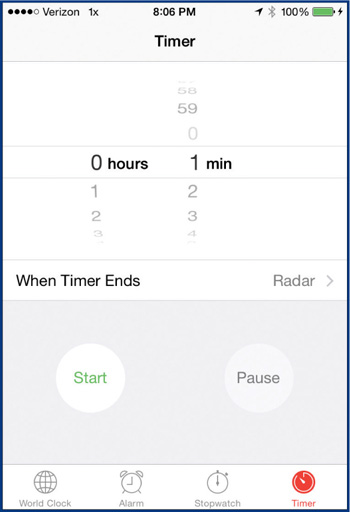
Timer allows you to set a time in hours and minutes and then tap Start to begin a timer for the time you set. You can tap Pause to hold the timer until you tap Resume. When the timer is finished, you will hear a sound that you can select, and a message will appear on the screen.
Handle Notifications and Alerts
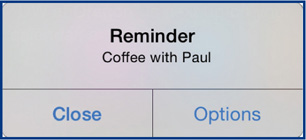
If you have used your iPhone for any time, you have probably seen alerts pop up and notify you about something. They can come from your mail, from your calendar, or from apps you have installed, especially news, sports, and investment publications, as you have seen earlier in this and previous chapters. Alerts generally have self-explanatory buttons—such as OK, View, Close, and Options—that you can tap to carry out that command.
Notifications are another form of alert that repeat their message. Not all notifications have a related alert, but all alerts have a notification. Notifications are in the form of a banner that can be pulled down from the top of the screen by swiping down, usually with a number of other notifications. Tap a banner notification to open the related app and display the item in the notification.
Set Up and Use Notifications
The most important aspect of notifications and alerts is the need to control what you get so you get what is important for you and don’t get so much it overwhelms you. Notifications and alerts are controlled in Settings.
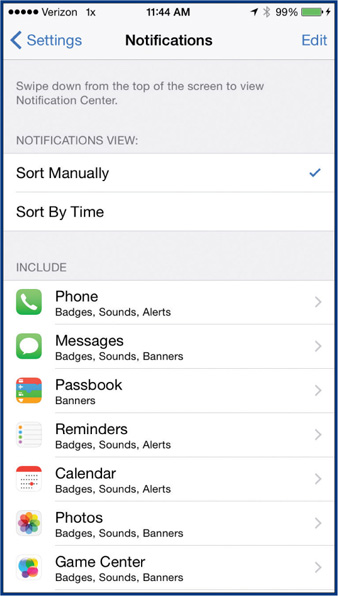
1. From the Home screen, tap Settings | Notifications to open the list of apps in Notifications and other settings.
![]()
NOTE Depending on the apps you have downloaded, you may have more or fewer apps than shown here.
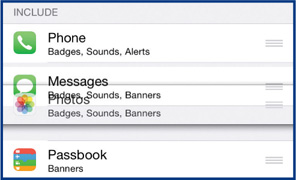
2. Many (if not most) apps, when they are downloaded and set up, put themselves in Notifications and you get a haphazard list of your apps. The default is the sorting of apps manually, but that means you must do it. Here’s how:
a. Tap Edit in the upper-right corner.
b. Press and hold on the grip strip (lines) to the right of an app you want to move.
c. Drag the app where you want it in the list.
d. Repeat steps b and c for all the apps you want to move.
e. Tap Done when you are ready.
3. Each app has several settings within Notifications. As an example, tap Reminders (while still under Notifications in Settings).

a. The first option turns on Reminders in Allow Notifications, the second option lets you determine the number of reminders in Notifications, and the third options lets you select the sound, if any, to be played when the notification appears.
b. You can determine if the app’s badge icon (the icon on the Home page) reflects the notification in the form of a number in a red circle and whether the notification appears on the lock screen (the screen you have to swipe from left to right or use your fingerprint to open the iPhone).
![]()
c. You have a choice of three styles of alerts:
• None
• A banner in Notifications pulled down from the top of the screen
• Alerts that pop up in the middle of the screen in addition to the banner
4. Repeat step 3 for all the apps whose notification settings you want to change. Some apps have one or more special settings, such as whether to repeat the alert and whom to allow alerts from.
5. When you are ready, return to the Home screen.
![]()
NOTE At the bottom of the list of apps in Notifications is an equally important list of apps not in Notifications. For each of these, ask yourself if they are properly categorized.
![]() QuickFacts
QuickFacts
Using Do Not Disturb
Do Not Disturb, which you can turn on or off from Settings | Do Not Disturb and from the Control Center (the crescent moon icon; see the next section), allows you to silence alerts and incoming FaceTime calls by tapping the On/Off button opposite Manual in settings or by tapping the crescent moon icon in the Control Center. If you tap Do Not Disturb in Settings, you can do the following:
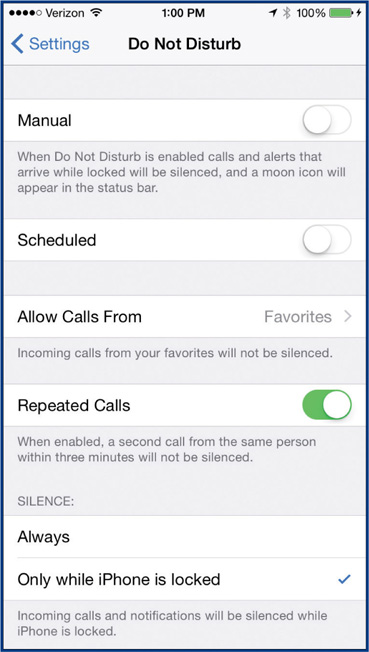
• Override the prohibition of alerts for scheduled events by tapping the On/Off button opposite Scheduled.
• Allow calls and FaceTime calls from certain individuals by tapping Favorites opposite Allow Calls From and tapping whom to allow.
• Allow calls and FaceTime calls when the call is repeated from the same person within three minutes.
• Choose whether you want calls, FaceTime calls, and notifications silenced when Do Not Disturb is turned on always or only while the iPhone is locked.
When Do Not Disturb is turned on, a crescent moon icon appears to the left of the group of icons on the right at the top of the screen.
![]()
Use the Control Center
The Control Center takes the most heavily used settings and gives you immediate access to them from any screen. You can open the Control Center by swiping up from the bottom of the screen.

Here are the controls that appear on the Control Center:
• Airplane mode on/off Allows you to turn on or off Wi-Fi and Bluetooth, which you might be required to do on an airplane.
• Wi-Fi on/off Allows you to turn on or off Wi-Fi.
• Bluetooth on/off Allows you to turn on or off Bluetooth, which is used to communicate with accessories such as headphones and keyboards.
• Do Not Disturb on/off Allows you to turn on or off the silencing of alerts and incoming FaceTime calls.
• Lock rotation Allows you to prevent the screen from rotating when the iPhone is in portrait orientation and you turn it sideways, or if locked when in landscape orientation and you turn it upright.
• Brightness control Allows you to set the screen’s brightness.
• Media player controls Allow you to start and pause playing the currently selected playlist, to go to the beginning of a song (single tap) and the previous song (double-tap), to the next song, and to any point within a song on the bar at the top.

• Volume control Allows you to adjust the current volume.
• AirDrop Allows you to turn on AirDrop and select whom you receive information from. See “Use AirDrop” later in this chapter.
• Turn on the flashlight Allows you to turn on the bright light on the back of the iPhone that is normally used to take pictures.
• Open Timer app Allows you to open the Timer app, which includes the clock, alarm, and stopwatch.
• Calculator Allows you to open and use the Calculator app as you would any calculator.
• Open Camera app Allows you to open the Camera app and take still and video images, as described in Chapter 8.
Use AirDrop
With AirDrop you can directly share files between two nearby (within 33 feet, or 10 meters) compatible devices (a Mac with OS X Lion or later and an iPhone, iPod, or iPad with iOS 7 or later) without the need for Wi-Fi or cellular. Here’s how to use AirDrop:
1. Have two compatible devices within 33 feet of one another.
2. Turn on AirDrop on both devices by opening the Control Center and selecting either Contacts Only (if the other device is owned by a contact) or Everyone. This makes the devices discoverable by one another.

3. In one of the devices, display and select something you want to send to the other device, such as a photo, a document, or a web page. (The selected photos shown next are courtesy of Hank Nelson, Cloudstone Sculpture.)
4. Tap the Share icon to open the Share menu. The discoverable devices near you should appear.
5. Tap the device to which you want to send the file or link.
6. On the receiving device, you should see a notice that the other device would like to share a file. If you want to accept it, tap Accept.