
Chapter 7. Building web apps with Dashcode
|
This chapter covers |
|
|
Thus far, we’ve talked about a lot of great programming libraries that you can use to create versatile and beautiful web apps for use on the iPhone. The WebKit, iUI, and Canvas each offered different ways to program your web pages.
Although we’ve looked at several different libraries, we haven’t concerned ourselves at all with the tools that you use to construct your web apps. You might be building your pages with Emacs or Adobe GoLive. You might be testing them out with Firefox or Opera. A variety of tools could be used for any of these tasks, but in this and the next chapter we’re going to suggest some options that we think are particularly effective. We’ll begin in this chapter with a development environment that allows you to create web pages specifically for the iPhone: Dashcode.
We’re going to give you plenty of information on Dashcode here. We’ll start off with an introductory look at the program and its parts. Then we’ll give some specific advice on using several of the objects and templates that Dashcode provides. Finally, we’ll examine how Dashcode interrelates with the libraries that you’ve worked with over the course of the last three chapters.
Warning: Mac-specific lands ahead
Much of our discussion of developing web pages thus far has not been Macintosh-specific. Clearly, the various libraries will be available no matter what platform you’re writing code on. But starting here we’re going to have a more Apple-centric focus, because tools are more likely to depend on what computer you’re using.
Tip
Some good documentation about Dashcode is available at http://developer.apple.com/webapps/. If you want more information than we’ve presented in this chapter, read the “Dashcode User Guide.”
Let’s get started with a look at where Dashcode came from.
7.1. An introduction to Dashcode
Dashcode is a development environment that was introduced by Apple in 2006. At that time, it only allowed for the creation of dashboard widgets, which are simple web applications built using HTML, CSS, and JavaScript that run under Mac OS X without a browser. Apple’s clock, calendar, and calculator are among the applications that have been built using Dashcode.
Apple released Dashcode 2.0 in 2008 as part of the large set of development tools for use with the iPhone. Under this new version of Dashcode, you can create web applications intended to run not on a Macintosh but, instead, on an external website for use with an iPhone.
Dashcode programs are essentially web pages, so all of your experience with HTML, CSS, and JavaScript will continue to be of use. Much of the HTML and CSS will be hidden by Dashcode’s graphical user interface, but when you want things to happen, you’ll be programming directly in JavaScript.
You could theoretically use Dashcode to program web apps of considerable complexity, but we suggest using it mainly for simple widgets like those found in the native Mac OS X dashboard. For more complex applications, you’ll want to have access to a more complex language like PHP or Ruby on Rails, and though you could integrate that functionality with Dashcode work, as we’ll explain at the end of this chapter, you’d probably do better to use your standard development environments. Dashcode is really best for small and simple (yet elegant) web apps.
At this time, Dashcode 2.0, which is the version that you’ll need to write iPhone web apps, is only available as part of the iPhone SDK. You should thus jump forward to chapter 10 for some information on how to install it. Once you’ve done so, you can run Dashcode from /Developer/Applications/Dashcode.
7.1.1. Starting a Dashcode project
Once you’ve started up Dashcode, you’ll need to begin a project by selecting a template. Each of these templates comes partially filled in with different starting objects intended to make your development experience quicker and simpler. The various possibilities are summarized in table 7.1.
Table 7.1. Dashcode templates get you started quickly
|
Template |
Summary |
SDK equivalent |
|---|---|---|
|
Browser |
A navigation controller that is list-based |
Navigation-based application |
|
Custom |
A totally blank application |
Window-based application |
|
Podcast |
An application that displays and plays podcasts |
N/A |
|
RSS |
An application that reads and displays an RSS feed |
N/A |
|
Utility |
A flipside controller with two screens |
Utility application |
Note that for each template we’ve listed an SDK equivalent template. Apple has used many common techniques for both SDK and Dashcode development, and if you’re transitioning from one to another, these equivalents will help guide you; otherwise, you can ignore them.
Generally, you should be able to easily decide which template you want to use based on the needs of your web app. If you’re linking to podcasts or RSS feeds, you’ll use those specific templates. The Utility template should be used whenever you want a simple one-page application with information or preferences of some sort on a second page, and the Browser template should be used whenever you want to build hierarchies of lists. If none of the templates applies, the Custom template is the right place to start.
7.1.2. The anatomy of Dashcode
When you start a Dashcode project, the main screen will display what your project currently looks like, and it’ll also feature a huge variety of buttons and other controls that can be used to build it up. For example, the starting screen for a project based on the RSS template is shown in figure 7.1.
Figure 7.1. Dashcode includes a top bar (top) for important buttons, a navigator (left) for getting around your web page, and a canvas (right) to show off your content.
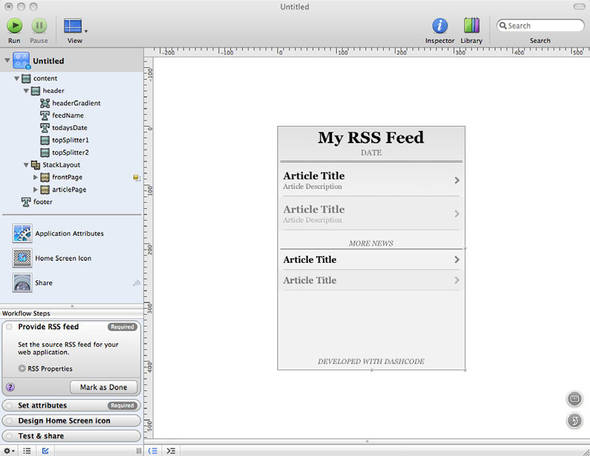
The Dashcode screen is broadly divided into three parts. Above is the top bar, which features a few useful buttons. Below and to the right is the canvas. This is area where you can see what your web app looks like. To the left is the navigator, which gives you access to the entirety of your program (and to some helpful advice). There are three additional screens that aren’t initially visible, but which are each quite important: the source code panel, the inspector and the Library.
We’ll talk about each of these in turn.
About the Top Bar
The top bar provides you with buttons to get to a few important pages inside Dashcode. It’s how you call up the inspector and the Library. The View menu lets you replace the canvas and source code panels with some of the subsidiary panels that we’re not going to dig into in this overview. Finally, the Run button lets you test out web apps as you write them.
The top bar doesn’t bear much additional discussion, but it’s a great navigational tool inside Dashcode.
About the Canvas
Dashcode’s development canvas is the right panel of the main page. It’s simple and easy to use.
You can manipulate graphical objects there by dragging them around, and the canvas will try to help you keep things aligned by showing clear blue lines when objects align to the middle or edges of the screen. It’ll also sometimes limit where your object can go. For example, if you drag around some of the locations for the article listings in the existing template, you will see limits on positioning based on whether you’re using absolute or document-flow positioning for an individual object. This can be adjusted using the inspector for the object, a topic we’ll return to shortly. Resizing items is equally simple.
Besides that, you can also change the textual content of most objects within the canvas. For example, double-clicking on My RSS Feed in the RSS example will allow you to change that title on the page.
Just keep in mind that the canvas is a graphical user interface. You can use it to eyeball the placement of objects in your web app and to make quick and easy changes to the content.
About the Navigator
The navigator, at the left of the Dashcode screen, contains links to all of the various objects that exist as part of your app. The large blue button (Untitled, in figure 7.1) is where most of those objects are linked in, a topic we’ll return to momentarily. Meanwhile, there are a number of additional features in the navigator that we’ll cover first.
The Application Attributes button gives you access to some of the big-picture stuff, like your web page’s name and what your app does when an iPhone is rotated.
The Home Screen Icon button lets you create a 60x60 web clip for your application, just like you did for your own web pages in chapter 3. You should make sure to do this for any web app you’re writing for the iPhone.
Finally, the Share button allows you to deploy your web app. We’ll discuss this in section 7.1.4.
Now let’s return to the blue button at the top of the navigator. If you look, you’ll see that it can be opened to reveal an ever-deepening hierarchy of objects that make up your web page. Three of the first categories that you’ll see are the header (which is a <div> of text that appears across several pages in your web app), the StackLayout (which is an object that contains a listing of all the pages that make up your web app), and the footer (which is a <div> of text that appears at the bottom of your web app).
Each of these categories can be opened to reveal additional items. For example, the sample header in the RSS template contains five different objects: a gradient, a title, a date, and two horizontal rules. Clicking on one of these objects will highlight it on the web page and also allow you to easily modify it with the inspector, which we’ll return to shortly.
About the Source Code
You can access your web app’s source code by calling it up through the View menu in the top bar—this will create a new panel in the bottom right of your main window. Dashcode’s programming is all done in JavaScript, so that’s what you’ll see here. One of the coolest features of Dashcode is that the JavaScript is quite well integrated. As you’ll discover when you’re hooking up buttons, you can hop straight over to the source code, and Dashcode will even fill in some of the details concerning what code you need to write and how.
About the Inspector
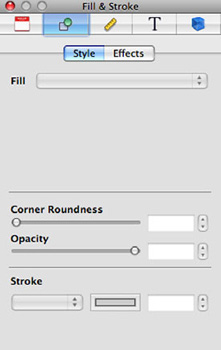
You can call up an inspector window by clicking the appropriate button in the top bar. This will open a window that is used to modify specific information for individual objects in Dashcode. For example, the Fill & Stroke inspector is shown in figure 7.2. Here you can manipulate objects more precisely than you can inside the canvas.
Figure 7.2. The inspector window allows you to modify individual Dashcode objects.
The inspector window includes five different tabs that can be used to modify a wide variety of settings. Here they are, from left to right:
- Attributes— Manipulates some of the most basic information about an object, such as the words or images displayed on it.
- Fill & Stroke— Changes the background color of an object, and how its corners are rounded; also manipulates simple iPhone effects, such as glass and recess.
- Metrics— Modifies CSS positioning information, such as where an object goes, how big it is, and whether it uses absolute or document-flow positioning; also determines how an object resizes, which can be of relevance when the iPhone’s orientation changes and the size of the objects need to change.
- Text— Changes fonts, colors, spacing, and other text-related settings.
- Behaviors— Adds event handlers for simple web events and advanced WebKit events, such as the touch and gesture events discussed in chapter 4.
The changes you make in the inspector window are largely self-explanatory, but we’ll look at some of them in-depth—particularly the resizing controls and the event handlers—in our examples of Dashcode programs in the next section.
About the Library
You can call up the Library window by clicking the appropriate button in the top bar. The Dashcode library contains a variety of objects that you can add to your programs, as shown in figure 7.3.
Figure 7.3. The Dashcode library gives you access to widgets, code, and your pictures.

The items that you can add to your Dashcode programs are divided into three broad classes:
- Parts— The Parts Library contains all the objects that you might want to add to your program, broadly divided into Buttons, Shapes, Containers, Media, and Text. This includes a variety of attractive graphical objects, some of which are styled to match the look and feel of the iPhone.
- Code— The Code Library features rudimentary code snippets, which primarily remind you how to get and set information for various objects. Many of them show you how to extract information from some of the standard Dashcode objects that you’ll find in the Parts Library, such as the stack layout. If you’re a beginning JavaScript programmer, this will be quite useful; otherwise you will probably only use this tab a few times when you’re learning Dashcode.
- Photos— This is a built-in interface to iPhoto, giving you quick and simple access to any images in your iPhoto library.
All the library sections are easy to use. To add a new object to your project, drag it onto your canvas. Blue lines will help you center your object, if you so desire. Afterward, you can resize the object or otherwise manipulate it using the canvas or the inspector, as appropriate.
That concludes our look at the parts of Dashcode. We’ll be putting this all to actual use momentarily, but first we need to talk about what you can do with a Dashcode project when you’re done with it.
7.1.3. Running Dashcode projects
At any time, you can test out your current Dashcode project by clicking the green Run button that appears in the top bar. This will run your program inside the iPhone Simulator, a handy iPhone emulator that we’ll discuss more completely in the next chapter. Dashcode also gives you access to a sophisticated debugger. If there’s a mistake in your JavaScript code, you’ll get precise information on what went wrong and how.
7.1.4. Deploying Dashcode projects
When you’re using Dashcode, you’re creating web pages, complete with HTML and CSS files. In order to make them available for use on iPhones, you need to place them on a web server.
This is easy to do. You just click the Share button in the navigator. You’ll have the option to deploy your web app to your local file system.
Dashcode will then create a directory containing quite a few files, even for a simple program. The collection of files created for a Dashcode program with just a few buttons is shown in figure 7.4.
Figure 7.4. You’ll realize how much work Dashcode does for you when you see all the files it creates, even for a simple program. This terminal window shows just some of the files created.

We suggest using your local server for testing all programs. We’ll talk more about how to do that in the next chapter, which includes guidelines for running an Apache server on your Mac.
Presumably you’ll eventually want to move your Dashcode program over to some larger server, but we’ll leave the specifics of that final deployment to you.
Now that you’ve seen the basics of how Dashcode works, you’re ready to dive into some actual programming.
Saving in Dashcode
It’s important to remember that there are two ways to output files from Dashcode.
First, you can (and should) save your Dashcode project. Do this as soon as you get started, using File > Save. Then, in the Share menu, check the box that says “Save project to disk before deploying” to ensure that your saved Dashcode project always matches your current deployment.
Second, you can (and will) deploy your HTML code to a web server when it’s done.
It’s easy to forget about the Dashcode project when you’re outputting HTML code. By checking that box in the Share menu, you’ll never have to worry about it, and you’ll be sure that your Dashcode project itself is always up to date.
7.2. Writing Dashcode programs
Dashcode is ultimately a tool for writing dynamic web pages of light complexity. Not only does it provide you with a great graphical interface, but it also offers you a huge library of complex objects that can each save you hours of programming.
But making use of it is largely up to you. Programming with Dashcode requires knowledge of HTML and JavaScript that go beyond the scope of this book. You may wish to consult a book like Secrets of the JavaScript Ninja by John Resig (Manning, 2009) for information on these topics.
But to help give you a leg up on using Dashcode, we’ve highlighted four of the most important (or complex) topics that you might encounter: using library parts, adding action buttons, using the list-based Browser template, and working with the stack layout.
7.2.1. Using library parts
In chapter 4, we used the WebKit to create a simple web program that reported the orientation of a user’s iPhone. At the time, we opted to display the information with a textual interface rather than spending the time to put together graphics. Now, with Dashcode at our disposal, we can take advantage of the library parts to display this information graphically with a minimum of work. Table 7.2 shows how to do so, step by step.
Table 7.2. We can create a graphical orientation gauge in just a few minutes in Dashcode.
|
Step |
Description |
|---|---|
|
1. Create a project. |
Select File > New Project. Choose a Custom project. |
|
2. Create a gauge. |
Drag a gauge from the Parts library to the top center of your Dashcode canvas. |
|
3. Adjust the gauge. |
Pop up an inspector window and click on the Attributes tab. In the Values section, change the range to go from 0 to 359, to allow the full range of values. Change the threshold to 0 and warning and critical to 360, to make sure the gauge always remains green. In the Geometry section, change the angles to go from 0 to 359 to match the gauge up with our possible orientation directions. Change the pointer reach to 120% to help it stand out more. |
|
4. Adjust the title and resize. |
In the main window, click the Application Attributes button in the Navigator sidebar. Change the Title to Orientation Gauge. Change the viewport to Adjust page width to fit, to keep your gauge from resizing. Open the Metrics inspector for the content object. Change resizing so that the left and right springs are outside of the subwindow, rather than inside. |
|
5. Input code. |
Open a source code panel using the View button. Drag Set Gauge Value from the Code library to the source code panel. Adjust it appropriately to set the gauge’s value on startup and when the orientation changes. |
|
6. Add a home screen icon. |
Design and input a home screen icon using the Home Screen Icon button in the navigator sidebar. |
|
7. Deploy. |
Release your new program. |
You should be able to run through this complete procedure by following the steps in the table, but the following subsections include some additional information on the more complex steps.
The first three steps—creating the project, creating the gauge, and adjusting the gauge—are all pretty simple. Figure 7.5 shows what your miniature gauge will look like; by the time you’re done with this project, the arrow will always point to the top of your iPhone.
Figure 7.5. A simple gauge shows the ease-of-use of the Dashcode parts.

You could also look through the inspector window for the gauge to see if there’s anything else that you might want to adjust.
The fourth step, where you adjust the resizing, has a few elements that we haven’t previously covered.
Resizing Objects
Dashcode supports two models of viewports. The default, which it calls “Zoom pages to fit,” uses a fixed-size viewport (typically 320 pixels wide) and thus causes an iPhone to zoom in when you move from portrait to landscape mode. The other choice, “Adjust page width to fit,” instead sets the viewport to page-width, which means that the page content remains at the same size when an orientation change occurs.
The latter results in resizing, which we haven’t talked about much up to now. That’s primarily because it’s a pain to deal with unless you have a program helping you out, like Dashcode (or like Interface Builder, later in this book). When an iPhone changes orientation without zooming, the top-level window implicitly changes size, so the program then needs to figure out what to do with its subwindows. Do elements like the gauge maintain their position relative to the center of the page, the left, or the right? The top or bottom? Each of these answers might be correct for a different element on a different page. This is what the Autoresize box of the Metrics inspector is for, as shown in figure 7.6.
Figure 7.6. The Autoresize box tells a window where its subwindows should go when the window’s size changes, usually though an orientation event.

In this case, for the content object’s Autoresize options, you clicked the horizontal springs inside the box to make them go away, and then you clicked new horizontal springs into existence outside of the box. The result is that when the content object resizes, it keeps the gauge at the middle of the screen. Turning on only one of the right or left springs would have kept it justified in that direction.
Writing the Orientation Code
As we’ve previously noted, the Code library returns rudimentary code that will show off the basics of how to access many of the Dashcode objects. Here’s what the Set Gauge Value code snippet looks like, with Apple’s original comments:
// Values you provide
var gaugeToChange = document.getElementById("elementID");
// replace with ID of gauge to change
var newGaugeValue = 100; // new gauge value

// Gauge code
gaugeToChange.object.setValue(newGaugeValue);
Once you have that, you just need to place it at an appropriate place in your source code, with appropriate values filled in. Figuring out the ID of the gauge is simple. It’s on the Attributes tab of the inspector. After that, you just need to individualize the code sample to reset the gauge value when orientation changes occur. We already saw how to look up the orientation value using the WebKit in chapter 4. Listing 7.1 shows what happens when you put that together with a Dashcode object.
Listing 7.1. Automatically setting a gauge based on orientation
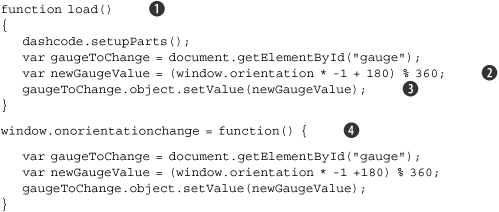
You start by adjusting the existing load() function ![]() so that the pointer will show the orientation when the program starts. This is done by massaging the window.orientation value
so that the pointer will show the orientation when the program starts. This is done by massaging the window.orientation value ![]() to make the pointer always point toward the top of the iPhone, and then setting the gauge
to make the pointer always point toward the top of the iPhone, and then setting the gauge ![]() using the gauge’s built-in setValue method. Afterward, you do the same thing whenever an orientation change occurs
using the gauge’s built-in setValue method. Afterward, you do the same thing whenever an orientation change occurs ![]() .
.
As outlined in table 7.2, you then finish your program by creating the home-screen icon and deploying the program, both simple steps. That’s all there is to building a graphical orientation detector. It has a few more lines of code than the textual one you wrote in chapter 4, but the improvement in style is stunning, thanks to the built-in functionality of Dashcode.
7.2.2. Adding action buttons
We’ve just seen how easy it is to output to a Dashcode part. It’s equally easy to take input from a Dashcode object. As an example, we’ll put together a quick application that includes two lozenge buttons and a horizontal indicator between them. This layout is shown in figure 7.7.
Figure 7.7. A few buttons can be easily added through Dashcode.

Our goal is to make these buttons control the indicator. This would be easy enough to do if you were writing your HTML files by hand—you’d just need to add some onclick event handlers to the appropriate objects in your HTML.
It’s even easier in Dashcode. All you need to do is open the Behavior tab in the inspector for your button. Here you’ll see a list of events (which includes both standard onclick events and the ongesture events that we met in chapter 4) and handlers. To write a new handler, just type the name of a JavaScript function into the Handlers area. The result is shown in figure 7.8.
Figure 7.8. The Behavior inspector allows you to quickly assign functionality to buttons and other inputs.

Typing in a handler does two things. First, it immediately creates the function in your JavaScript file. You can see it by viewing source code. Second, it creates a link from the Behavior inspector, marked by an arrow. Double-clicking that arrow will take you straight to the appropriate function, making it easy for you (or someone else) to examine your Dashcode project in the future.
At this point, you can write your button code using the JavaScript techniques that you’re already familiar with. You’ll want to write the decreaseIndicator function that you’ve already linked in, plus an increaseIndicator function for the other button. The Code library contains two code fragments that can help get you started: Get Indicator and Set Indicator.
Listing 7.2 shows some sample code that could be used to increase the indicator.
Listing 7.2. Modifying an indicator just like other simple objects
 function increaseIndicator(event)
 {
    var indicatorToChange =
        document.getElementById("horizontalLevelIndicator");
    var indicatorValue = indicatorToChange.object.value;

    if (indicatorValue < 11) {
        newIndicatorValue = indicatorValue +1;
        indicatorToChange.object.setValue(newIndicatorValue);
    }
 }
But the code wasn’t really the point of this section, because it’s another simple application of JavaScript. Our real goal here was to show you how easy it is to hook up actions to buttons in Dashcode.
7.2.3. Using the list-based Browser template
Having now looked at how to use Dashcode parts to output data and accept input, we’re ready to dig a bit further into Dashcode, starting with its templates. Each of the templates other than Custom has quite a bit of functionality built into its JavaScript file. Fully investigating all of them is beyond the scope of this book, but we do want to give some particular attention to the Browser template, which allows you to create hierarchical lists of data.
The Browser template closely matches the core data-based paradigm for the iPhone that we highlighted in chapter 5. There we saw it used in iUI’s lists; we’ll meet it again in the SDK when we work with the navigation controller in chapter 15. Now we’re going to look at how Dashcode does lists.
Dashcode manages its lists through a listController object, which contains two methods: numberOfRows returns how many rows a list should contain, and prepareRow sets up an individual row, including its onclick handler. These methods are generally called data source methods, which means they define and create the data content of an object. This is a concept that also appears in the SDK.
By default, the list is created from an array named resort, each element of which has a name and a location. The length of this array is used to set numberOfRows, while a row’s name is read to create the main output of prepareRow. Additional content from the array is accessed after the onclick handler for a row launches a new page using the detailController.
In order to create your own lists, you’ll need to manipulate these functions. Table 7.3 offers suggestions on how to do so.
Table 7.3. You can modify the methods of the listController to create your own list.
|
Task |
Solution |
|---|---|
|
Read from a different array. |
Change the array.length call in numberOfRows. Change the array, lookups in prepareRow and detailController. |
|
Read from a database. |
Make a COUNT(*) call in numberOfRows. Insert SQL lookups into prepareRow and detailController. |
|
Change contents of subpages. |
Modify the detailController method. |
|
Go to a different sort of subpage. |
Modify the onclick handler in prepareRow. |
As of this writing, the listController code included with the Browser template isn’t sufficiently generalized to make new code plug-and-play (because the template includes methods specifically needed for its built-in ski resorts example). But the template does do a good job of showing you a functional example of a list, and that should be a good starting point for doing your own coding.
7.2.4. Working with the stackLayout part
We’re going to finish up our look at Dashcode programs by examining what might be the most complex element of Dashcode: the stackLayout. Though the stackLayout is a pretty major building element that will end up controlling multiple views in many of your programs, it’s just another Dashcode part. You can find it in the Container section of the Parts library.
We’ll look at the main things you might want to do with a stackLayout.
Creating a Stacklayout
Many templates will come with their own stackLayouts already in place. But if you want to create a stackLayout, all you need to do is drag it from the Parts library to your canvas. Positioning shouldn’t really matter, because it’s a virtual object. A stack-Layout will be created with two different views, which is to say, two different pages that can each be filled with different content.
Populating a Stacklayout
The two views that are created by default are imaginatively named view1 and view2. Each of these can be used to control a screen full of information.
If you want to add more views to your stack-Layout, go to the Attributes tab of the inspector window for the stackLayout. It includes a Sub-views section, as shown in figure 7.9. You can add additional views by clicking the plus (+) button.
Figure 7.9. The stackLayout object allows you to add additional views with a GUI.

Once you’ve got the right number of views for your web app, you can fill them by clicking on the view to which you want to add content (which will display that view on the canvas), and then dragging new objects to your canvas. The new object will immediately be placed in the appropriate view. With this process you can fill out multiple pages of content.
Building Outside the Stacklayout
When you’re building multiple pages with your stackLayout, you may want to include information on the top or bottom of every page, such as a header or footer.
To do this, drag a Box container to your canvas, and place it outside and above the stackLayout (for a header) or outside and below the stackLayout (for a footer). You’ll be able to add content to these areas of the page, as usual, by dragging and dropping.
Manipulating a Stacklayout
When a user first visits a web app that uses a stackLayout, they’ll see a page consisting of the first view of your stackLayout plus any header and footer that you created. So, how do you allow users to navigate from one view to another?
You use a few methods that come with the stackLayout part. They are highlighted in table 7.4.
Table 7.4. The stackLayout part contains methods that can be used to manipulate the views.
|
Method |
Arguments |
Summary |
|---|---|---|
|
getAllViews |
N/A |
Returns an array of the IDs of all views |
|
getCurrentView |
N/A |
Returns the ID of the current view |
|
setCurrentView |
View, Reverse |
Changes to the view, with the transition to the view occurring in reverse if the reverse Boolean is set to true |
|
setCurrentViewWithTransition |
View, Transition, Reverse |
Changes to the view, using the transition variable, possibly reversed |
The transitions bear some additional discussion. These are the ways by which one screen changes into another. In the iPhone SDK, these transitions are usually fancy animations involving pages sliding on top of each other, and that’s what’s being reflected here.
The standard transition is a slide from right to left, which can be reversed using a Boolean argument. But as noted, there’s also a setCurrentViewWithTransition method that allows you to define a transition object as part of your view change. This transition could be a dissolve, a slide, a flip, a revolve, a swap, or several others, each laid out with specific timing. The Dashcode User Guide (at http://developer.apple.com/webapps/) contains additional information on creating these transitions.
To show how easy it is to manipulate Dashcode’s stackLayout, we’ve designed a tab bar that allows a user to move between three views in a stackLayout. We would have liked to create a standard iPhone UI tab bar, attached to the bottom of the page, but there weren’t any parts that looked quite right. Instead we took advantage of some of the attractive buttons included in the Parts library, as shown in figure 7.10.
Figure 7.10. A few buttons can make a tab bar.
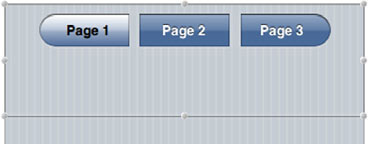
In order to mimic this layout, include a left-rounded push button, a push button, and a right-rounded push button. You can choose to put these buttons in one of two places.
First, you could opt to place them in a header. This will allow you to have an identical set of tab bar buttons on every page.
Second, you could place the buttons at the top of each view. This has the advantage of allowing you to differentiate your buttons, such as by highlighting the button for the current page, but it requires a little extra work. This is the tactic that we took.
In order to lay out your buttons in a row, you’ll need to use absolute positioning. You’ll also want to change the Fill & Stroke information of each: give the side buttons rounded corners (15px) and the middle button unrounded corners (0px). Finally, you may choose to change the color of the text and the button background for the current page.
Once you’ve got your graphical elements in place, you just need to link up the buttons to actions using the techniques we’ve already discussed. Listing 7.3 shows four simple functions that can be hooked up to the buttons to provide navigation among all the pages.
Listing 7.3. Creating a tab bar using the stackLayout
function gotoPageOneRev(event)
{
     document.getElementById('stackL').object.setCurrentView('view1',true);
}

function gotoPageTwoRev(event)
{
     document.getElementById('stackL').object.setCurrentView('view2',true);
}

function gotoPageTwoFor(event)
{
     document.getElementById('stackL').object.setCurrentView('view2',false);
}

function gotoPageThreeFor(event)
{
     document.getElementById('stackL').object.setCurrentView('view3',false);
}
Each function in listing 7.3 transitions the user to a different page. Good use is also made of the transition functions: when a user increases their page number, the For function is used, which scrolls the page right to left, and when a user decreases their page number, the Rev function is used, which scrolls the page left to right.
Using Variable Views
Before we finish with the stackLayout part, we’d like to highlight one last technique. If you take a look at the Browser template, which we discussed in the section 7.2.3, you’ll see that it contains a stackLayout with two views, listLevel and detailLevel. The first view shows the list of items that you see when you load up the program, and the second displays the details of an individual item that you load up when you click on a list entry.
What’s interesting about this is that there are a multitude of detail pages, one for each list item. How does the Browser incorporate them all into one view? It does so by rewriting the detail page before it’s called up each time. This is all done within the list controller’s onclick handler, which is shown in listing 7.4.
Listing 7.4. Updating a single view to look like a multitude of pages

This code fragment doesn’t show the details, but it gives enough of the big picture to make our point. First, it calls a special
function to rewrite the contents of the secondary view ![]() . That’s, of course, done using DOM. Second, it calls up the secondary view
. That’s, of course, done using DOM. Second, it calls up the secondary view ![]() . The list controller uses the browser.goForward method as an alternative to setCurrentView. We find the stackLayout method more readable, but, as usual, you can find more info on the browser method online.
. The list controller uses the browser.goForward method as an alternative to setCurrentView. We find the stackLayout method more readable, but, as usual, you can find more info on the browser method online.
In any case, the trick is a good one, and it shows how you can use the stackLayout to represent many similar pages with slightly different content.
7.2.5. Exploring the rest of Dashcode
We’ve done our best in this chapter to point out the main features of the Dashcode development environment. We’ve shown how to output to parts, how to accept input from them, and how to use two of the most complex parts, the listController and the stackLayout. We could probably write several more chapters on all of the parts and code available within Dashcode, but Apple’s already done the job, so we’ll point you one more time toward their “Dashcode User Guide.” At the time of this writing, the user guide’s appendix B contains an excellent list of parts with special functionality.
To aid your own exploration, table 7.5 lists some of the most interesting parts that you might want to look up.
Table 7.5. Some of the Dashcode parts can provide you with complex functionality.
|
Part |
Summary |
|---|---|
|
Browser |
A grouping element that contains the goForward navigation method used by the listController |
|
Canvas |
A <canvas> area, usable as discussed in chapter 6 |
|
Column Layout |
A simple way to lay out side-by-side columns |
|
Edge-to-Edge List |
A list like the one used in the Browser template |
|
Quartz Composer |
An alternative graphical tool |
|
QuickTime |
An area for playing QuickTime media |
|
Rounded-Rectangle List |
An alternative form of list, built inside a rounded-rectangle on a page |
|
Stack Layout |
A collection of different views |
Together, these parts (and many simpler ones) can provide you with considerable power in Dashcode, even when building relatively simple web apps.
That concludes our look at Dashcode’s parts and templates. But before we leave this Apple tool behind entirely, we want to address one final question: how does Dashcode relate to what you’ve already learned about web apps?
7.3. Integrating Dashcode with existing libraries
Over the previous three chapters, we’ve talked about some great libraries that you can use to create iPhone web apps, and in this chapter we introduced the Dashcode development environment. Since these are somewhat orthogonal directions of iPhone development, we want to briefly touch upon how they can be used together. We’re going to cover each of the iPhone-related libraries in turn: WebKit, iUI, and Canvas.
7.3.1. Integrating Dashcode with WebKit
Apple’s advanced WebKit introduces three classes of features: HTML extensions, CSS extensions, and JavaScript extensions.
The new HTML and CSS features will be largely invisible to you inside Dashcode. This does have its downsides. For example, you don’t have as granular control over the viewport in Dashcode as when programming by hand; instead, you only have access to a couple of options for how the web page zooms. On the other hand, you can depend on Apple to add new features for you without having to learn the new WebKit code.
Lessons for SDK developers
As with the WebKit, Dashcode is being managed at Apple and thus shares a lot of its design sense with the SDK. Although Dashcode itself will never be of direct use for an SDK developer (except perhaps for quickly mocking-up an application on the web), the ideas in this chapter are crucial.
First, as noted within the chapter, the graphical code-creation environment of Dashcode has a clear analogue in the SDK: Interface Builder. Both development environments allow programmers to lay out objects using a graphical interface, then to link them with code. Further, both programs include a lot of the same features, including an inspector to look at individual objects and a library containing standard objects. Once you become familiar with either program, the other will be easy to learn as well.
Some of Dashcode’s parts, such as the lists, should look quite familiar to SDK developers, as they match up with the same ideas used in the SDK. But it’s probably Dashcode’s concept of a variety of pages (views) that are managed by a single controller (the stackLayout) that is most important for SDK developers. This matches not only the MVC architectural model, which is core to the SDK and which we’ll meet in a couple of chapters, but it also reflects how these ideas will be abstracted in the SDK.
Conversely, you’ll always have full access to any new JavaScript features inside Dashcode. We already saw how to integrate the WebKit’s orientation features. The client-side database is probably another JavaScript extension that you’ll want to take advantage of inside Dashcode. Some of the best JavaScript features may even get integrated into Dashcode itself, as is already the case with the ontouch and ongesture events.
7.3.2. Integrating Dashcode with iUI
The third-person iUI library can’t really be integrated with Dashcode. It depends on its own CSS and JavaScript libraries, and these are unlikely to play well with the extensive CSS files generated by Dashcode. Fortunately, iUI and Dashcode can generally be seen as alternatives, as they each provide ways to use web design to create web apps that look like native iPhone apps.
7.3.3. Integrating Dashcode with Canvas
Apple’s Canvas graphical extension is the easiest of all the libraries to incorporate into Dashcode. You just place a Canvas part from within Dashcode, and then you can write JavaScript code as usual.
7.3.4. Deeper integration
For any Dashcode project, you could opt for deeper integration by deploying your Dashcode project and then mucking with the source code by hand—adding WebKit HTML, adjusting viewports, linking in iUI libraries, or whatever else you wish.
There is something to be said for this approach. You can use Dashcode to do simple layout for your web pages and then do coding from within your favorite HTML design platform. As it happens, this is the same division of labor that Apple uses in the SDK, dividing the work between two programs, Xcode and Interface Builder.
But unlike Interface Builder, Dashcode isn’t really set up for this sort of back and forth work, so we suggest keeping it basic in your Dashcode work. Use Dashcode to create simple web apps that fall within the boundaries of its capabilities. For more complex work, we suggest using your preferred development platform from the start.
7.4. Summary
Dashcode is a new tool for creating iPhone web apps. Instead of creating your applications using a text-dominant developer platform, you can use a graphical user interface that makes the placement of objects within a page simple and intuitive. Dashcode makes life even easier for you by providing access to a variety of “parts,” which are preexisting objects with attractive graphical interfaces and predefined behaviors. Though you might not be able to program your most complex pages with Dashcode, there’s a lot you can do with the tool, and the results will be quickly produced and attractive.
Besides its front-end development support, Dashcode also includes some sophisticated back-end development tools, such as an iPhone Simulator and a built-in debugger. That’s great if you’re writing using Dashcode, but what if you’re instead writing a larger scale iPhone web app? How do you test and debug your software then? As it happens, there are a variety of good answers, some of which overlap the topics we’ve already discussed, and all of which are included in the next chapter.