
Chapter 2. Acme Car Rental
- Creating requirements for a fictional project
- Writing code from scratch to satisfy the requirements
- Taking a pass to refactor messy code, without any AOP
- Taking a different pass to refactor, this time using AOP
In this chapter, you’ll be coding the business logic for a new application for the (fictional) Acme Car Rental Company. You’ll be given the requirements; you can then follow along as I gradually add code to conform to those requirements.
I’ll start from scratch and not use any AOP. The business requirements are the most important, so we’ll do those first. Once the business logic is working, we’ll add code to cover the nonfunctional requirements. Once we’ve fulfilled the requirements, we’ll look at possible ways to clean up and refactor the code, again without using any AOP to refactor the cross-cutting concerns.
After this first pass, you’ll turn to the long tail of an application’s life. Software is rarely static for long: new features are requested and new bugs are discovered. A piece of software is rarely in development longer than it’s in production, which means that most of the software’s life is the maintenance phase. An application that’s hard or expensive to maintain leads to either high costs or low quality (or both) and eventually spirals into a big ball of mud.
Then, we’ll take one more pass at refactoring the code, this time with PostSharp. We’ll isolate the individual cross-cutting concerns into their own classes. Once we’ve refactored, we’ll examine some of the benefits of using AOP, particularly with regard to adding more features (such as more business logic). At the end of this chapter, you should have a good idea of how to use AOP and understand its benefits.
2.1. Start a new project
You’re a developer/architect at Acme Car Rental, and you’ve recently joined a team that’s starting a new project called the customer loyalty program (a.k.a. Acme Rewards). The goal of this program is to reward customers for their repeat business and, it is hoped, to increase sales. For certain rentals, the customers will get points, which can be redeemed for future rentals or other items.
We’ll assume a basic three-layer application structure, as shown in figure 2.1. You will start by writing the core business logic layer which contains all of the rules that apply to the loyalty program. The persistence layer keeps track of the loyalty points. The business logic layer is used by all of the UIs available: the website, the mobile application, and the desktop programs that the clerks use (and we leave the door open to other UIs in the future).
Figure 2.1. Three-layer system architecture

In this chapter, we’ll mainly look at the business logic (the middle layer). We can assume that the persistence logic is already done (or that the decision of which persistence technology to use is being postponed and we’re instead using stubs or a transient in-memory database like SQLite for now). We’ll also assume that the UI will be implemented once the business logic is in place.
I highly encourage you to follow along on your own with this chapter; the best way to learn is to work hands-on with the code yourself.
To follow along, you’ll need the tools I mentioned in the first chapter’s “Hello, World” example: Visual Studio (the free Express edition will work), NuGet, and PostSharp (installed via NuGet; again, the free Express edition will work fine). All of the code is available for download from Manning’s website (http://www.manning.com/AOPin.NET) or on GitHub (my GitHub name is mgroves) if you want to follow along without all those tiresome keystrokes.
Any version of Visual Studio 2010 or 2012 should be sufficient to follow along. Post-Sharp has additional features to help you identify what aspects have been applied and where. Those extensions won’t work with Express editions, but they aren’t necessary to complete the examples in this book. Visual Studio 2008 could work, if you’re determined to use it, although without NuGet it will be more difficult.
If you aren’t familiar with NuGet, see appendix B. NuGet’s support for Visual Studio 2010 Express editions seems to be limited to the Web Developer edition. But all Visual Studio 2012 Express editions support NuGet.
2.1.1. Business requirements
The project manager works with you and the stakeholders (such as sales and/or marketing) to identify the business requirements of the loyalty program (illustrated in figure 2.2). You’ve identified two main sets of requirements: accruing and redeeming rewards.
Figure 2.2. Loyalty program rules

Customers accrue at least one point for every qualifying car they rent per each day they rent it. Luxury cars and larger vehicles are worth two points per rental day. The points are added to a customer’s account after he has paid and returned the rental vehicle.
Once a customer has accrued 10 points, he can start spending those points on rewards. Ten points are worth a free day of car rental and 15 points earns the customer a free day’s rental of a luxury car or larger vehicle rental.
That’s all the business requirements for now, but you’ve dealt with sales and marketing before: there’s sure to be something that they’ll want to change or add in the future.
2.1.2. Necessary nonfunctional requirements
Before you give an estimate of time and cost to your project manager, you have your own technical concerns that must be addressed.
First, you see the need for some sort of logging. Customers could get angry if their points are tallied incorrectly, so you want to make sure you have a record of everything that your business logic is doing (particularly at first).
Second, because this business code will be used by multiple UI applications (web, mobile, desktop), you want to make sure that you’re careful about the data that gets passed to your code. Your team may or may not end up writing the integration code in those UIs, so you need to be sure to write defensive code that checks for edge cases and arguments that don’t make sense.
Again, because this code will be used by multiple UI applications over varying types of connections (slow cell phone connections, web browsers in remote countries, and so on), you need to put in transactions and retry logic to make sure that data integrity is maintained and users have a pleasant experience.
Finally, because you can’t plan for everything, and you may not even know what type of persistence is going to be used at this point, you’ll need to have some way to handle exceptions (and probably log them).
2.2. Life without AOP
You submit your estimate to the project manager, and all the necessary approvals and paperwork have been signed. You’re now ready to get started.
Let’s begin. Open Visual Studio and select File->New Project. Use the Class Library template, as shown in figure 2.3. Put the project wherever you want and call the project what you wish—I’m calling it AcmeCarRental.
Figure 2.3. Start new project

Delete the Class1.cs file. Now you have a blank slate.
2.2.1. Write the business logic
Let’s start by creating an interface for accruing loyalty points. ILoyaltyAccrualService seems like as good as name as any.
public interface ILoyaltyAccrualService {
    void Accrue(RentalAgreement agreement);
}
The RentalAgreement is an entity that’s already common to the Acme Car Rental domain, so it would likely be in a different assembly, but for demonstration purposes, we’ll create one in an Entities folder.
public class RentalAgreement {
    public Guid Id { get; set; }
    public Customer Customer { get; set; }
    public Vehicle Vehicle { get; set; }
    public DateTime StartDate { get; set; }
    public DateTime EndDate { get; set; }
}
Two more entities in that RentalAgreement can be added to the Entities folder: Customer and Vehicle. There’s also a Size enumeration, for convenience.
public class Customer {
    public Guid Id { get; set; }
    public string Name { get; set; }
    public string DriversLicense { get; set; }
    public DateTime DateOfBirth { get; set; }
    }

public class Vehicle {
    public Guid Id { get; set; }
    public string Make { get; set; }
    public string Model { get; set; }
    public Size Size { get; set; }
    public string Vin { get; set; }
    }

public enum Size {
    Compact = 0, Midsize, FullSize, Luxury, Truck, SUV
}
With that out of the way, let’s go back and look at the ILoyaltyAccrualService interface. This interface has an Accrue method that interacts with these entities. Software at Acme will be calling the Accrue method with these entities. Let’s write an implementation of the accrual service (see listing 2.1). It will depend on a data service to persist the data. The Accrue method will contain the business logic to figure out the number of days in the agreement, determine how many points each of those days are worth, and store the calculated number of total points in the database.
The ILoyaltyDataService has only two methods, AddPoints and SubtractPoints.
Listing 2.1. An implementation of the accrual service
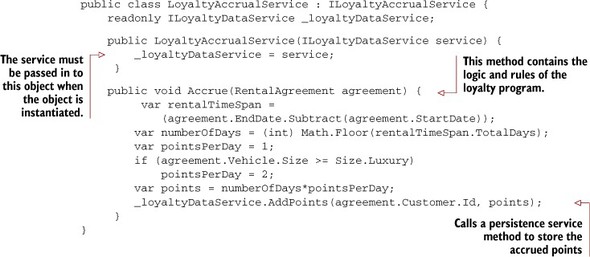
That database interface, ILoyaltyDataService, represents the data layer that will get passed in to the constructor via DI. Again, we’re focused on only the business logic for now, so its implementation (FakeLoyaltyDataService) isn’t going to do any database manipulation:
public class FakeLoyaltyDataService : ILoyaltyDataService {
    public void AddPoints(Guid customerId, int points) {
        Console.WriteLine("Adding {0} points for customer '{1}'",
             points, customerId);
    }
}
And you’re finished with the accrual portion of the business logic. Hooray!
Now, on to what the customer cares about: redeeming loyalty points for free stuff. Let’s create another interface, ILoyaltyRedemptionService:
public interface ILoyaltyRedemptionService {
    void Redeem(Invoice invoice, int numberOfDays);
}
The Invoice class also belongs in the common entities folder, and looks like the following:
public class Invoice {
    public Guid Id { get; set; }
    public Customer Customer { get; set; }
    public Vehicle Vehicle { get; set; }
    public decimal CostPerDay { get; set; }
    public decimal Discount { get; set; }
}
The Redeem implementation subtracts the points from the customer’s account based on the vehicle he’s getting (and the number of free days he’s redeeming) and populates the discount amount in the invoice. It also uses the ILoyaltyDataService to subtract the calculated points from the database, as the following code shows:
public class LoyaltyRedemptionService : ILoyaltyRedemptionService {
    readonly ILoyaltyDataService _loyaltyDataService;

    public LoyaltyRedemptionService(ILoyaltyDataService service) {
        _loyaltyDataService = service;
    }

    public void Redeem(Invoice invoice, int numberOfDays) {
        var pointsPerDay = 10;
        if (invoice.Vehicle.Size >= Size.Luxury)
            pointsPerDay = 15;
        var points = numberOfDays*pointsPerDay;
        _loyaltyDataService.SubtractPoints(invoice.Customer.Id, points);
        invoice.Discount = numberOfDays*invoice.CostPerDay;
    }
}
The following is the fake SubtractPoints implementation, which is similar to the fake AddPoints implementation. A corresponding method signature is also added to the ILoyaltyDataService interface:
public void SubtractPoints(Guid customerId, int points) {
    Console.WriteLine("Subtracting {0} points for customer '{1}'",
         points, customerId);
}
Our completed business logic is ready for a trial run.
2.2.2. Testing the business logic
I created a simple Console UI project to simulate the use of the business logic, as the following shows.
Listing 2.2. A simple Console application to test the business logic


Figure 2.4 shows the console output; the fake data services write to the screen instead of to the database.
Figure 2.4. Console output simulating writes to the database

The business logic is now complete. Our code is clean and separated. It’s easy to read and it’s going to be easy to maintain. This service will get marketing pumped up, and it’s sure to increase your bonus once sales go through the roof.
But wait a minute: this code can’t go into production as is. There are all kinds of things that could go wrong that we need to prepare for. Let’s get cracking on those nonfunctional requirements.
2.2.3. Add logging
Being able to audit loyalty transactions isn’t a requirement (yet), but to be on the safe side, it’s a good idea to log every request, at least for quality assurance (QA) purposes. In production, you may want to limit or eliminate logging, but for now let’s put some simple logging in place to help developers reproduce any bugs that QA finds.
I won’t use a real logging framework. There are many good ones for .NET, such as NLog and log4net, and I encourage you to check those out. The point of this book isn’t to learn a logging tool, so let’s log to Console (or Debug or Trace, if you prefer) for now.
When logging the accrual of points, we should log information about the customer, the vehicle, and the dates. Let’s log that the Accrue method is being used (with a timestamp) first. Then, logging the IDs of the customer and the vehicle should be enough to go on for now. Let’s also log when the accrual ends, along with a timestamp, as shown next.
Listing 2.3. Accrue code, now with logging

Add similar logging code to the Redeem implementation.
Listing 2.4. Redeem code, now with logging

And there you have it. That wasn’t so bad—just a few extra lines of code in each implementation.
2.2.4. Introducing defensive programming
Because this core loyalty business logic has no control over the data that gets passed in as parameters, we may have to check for worst-case scenarios. For a simple example, what if a null reference is passed in for the RentalAgreement parameter? That’s not a problem that our logic can cope with, so an exception should be thrown. We hope the code calling our API can cope with that exception. If not, then at least we’re alerting the UI developers and/or QA that something has gone wrong. This philosophy is known as defensive programming. Like defensive driving, it’s meant to reduce the risk of dangerous (or in the case of programming, invalid) scenarios by anticipating invalid contexts or mistakes in other parts of the application.
In the following listing, you’ll put defensive programming in place to check for the invalid scenario of a null RentalAgreement being passed in.
Listing 2.5. Accrue with defensive programming

We could check numerous other things about the properties of RentalAgreement as well, but for now that’s good enough.
With the Redeem implementation, there are similar issues. The numberOfDays parameter shouldn’t be less than 1. Renting a car for zero days? That’s an invalid argument.
The Invoice argument could be null as well, so let’s also check for that, as shown next.
Listing 2.6. Redeem with defensive programming

Now our code is starting to get more defensive. If something goes wrong outside the control of this core logic, we aren’t going to let it affect us.
With logging and defensive programming in place, the Accrue and Redeem methods are starting to get a little long, and a bit repetitive as well. But let’s soldier on for now and look at transactions and retries.
2.2.5. Working with transactions and retries
Transactions are necessary if we’re using more than one data layer operation in order to make them atomic. That is, we want all the data layer calls to succeed (commit), or for none of them to succeed (rollback). This business logic class might not be the best place for this operation, particularly because we’re unsure about exactly what persistence technology will be used. But hypothetically, it could be put in this layer.
Let’s assume for now that the underlying data layer will use some technology that’s compatible with .NET’s built-in ambient transaction class: TransactionScope (you’ll need to add a System.Transactions reference). Combining with a try/catch block, we can add transaction code to the Accrue implementation, as shown next.
Listing 2.7. Accrue with a transaction

If there’s an exception, then scope.Complete() will never be reached, and when scope is disposed, the transaction will be rolled back. For now, we’re only rethrowing the exception. Similarly, we can use TransactionScope in the Redeem method, as shown here.
Listing 2.8. Redeem with a transaction

This code is starting to get long and ugly. The original business logic is now a couple of indentations deep, surrounded by a bunch of code to take care of the cross-cutting concerns: logging, defensive programming, and the use of a transaction.
But we’re not even done. Let’s assume that the underlying data persistence layer is prone to occasional high traffic and that some requests will thus fail (for example, throwing a timeout exception). If that’s the case, then performing a couple of retries will keep our program running smoothly (albeit a little slower during those high-traffic times). Let’s put a loop around the transaction. Every time the transaction rolls back, we’ll increment the retry count. Once the retry count hits a limit, we’ll let it go, as shown here.
Listing 2.9. Accrue with transaction and retries


Notice that the Accrue complete logging had to be moved inside the try block as well. Add similar code for redemption, as shown in the following listing.
Listing 2.10. Redeem with transaction and retries


Wow! Yet another indentation of the original business logic, and more clutter to go with it. Now the cross-cutting concerns are taking up roughly half of the lines of code in both of these methods.
But we’re still not done. We need to talk some more about handling exceptions.
2.2.6. Handling exceptions
Wait, more exception handling? Wasn’t that first try/catch block enough? Maybe. But if some condition occurs that a retry won’t fix (perhaps a server goes completely offline), then after the retry limit is reached, the exception will be rethrown. And if that’s the case, then you’ll need to handle that exception some other way (before it crashes your program).
So let’s add one more try/catch block immediately after the defensive programming that envelopes everything else, as the following listing shows.
Listing 2.11. Accrue with exception handling


We might be able to recover from certain exceptions. In the case of other exceptions, we may have to log and tell the customer that something went wrong (and suggest trying again later). Let’s do the same thing again with the Redeem method.
Listing 2.12. Redeem with exception handling


At this point, we’ve implemented all the nonfunctional requirements: logging, defensive programming, transactions, retries, and exception handling. Adding all this code to handle these cross-cutting concerns has made the original Accrue and Redeem balloon to huge methods. The code is ready for production (or more likely a QA/staging environment), but yikes, what a mess!
You might be thinking that this approach involves a bit of overkill. Certainly not all of these cross-cutting concerns will always be necessary. And you’re right. You might only need one or two of these solutions in most places, and some of the concerns can move to the data layer or the UI layer. The point I’m trying to make with this example is that cross-cutting concerns can clutter your code. They make the code they are cutting across harder to read, maintain, and debug.
2.2.7. Refactor without AOP
It’s time to clean up this mess. When refactoring, you should always have unit tests in place so you know that your refactoring didn’t cause any regressions, but because this example is relatively small and contrived, I’ve left them as an exercise for the reader. (I’ve always wanted to write that.) But don’t worry: chapter 6 is devoted to the topic of unit testing and aspects.
As you’ve noticed, there’s a lot of duplicated code between the Accrue and Redeem implementations. Certainly, you can factor this code into its own classes/methods. But let’s stop and think about how you’re going to do that.
One option is to refactor all those nonfunctional concerns into static methods. This isn’t a good idea because it couples the business logic too tightly to the nonfunctional concern code. It makes your method look shorter and more readable, but you’re still left with the problem that your methods are doing too much.
You can use a DI strategy and expect that all the logging, defensive programming, and other services will be passed in to the constructors of LoyaltyAccrualService and LoyaltyRedemptionService. Those are going to be some big constructors, but let’s look at the next listing to see how this strategy might affect the Redeem method.
Listing 2.13. Redemption service refactored with DI


This version is a little better. I’ve moved the exception handler code and the transaction/retry code into their own services. This design has its benefits. One, it puts those pieces into their own classes so that they can be reused in the Accrue method. Two, it makes the code easier to read by reducing the noise of the cross-cutting concerns. Those concerns can also be mocked out when writing unit tests later. Mocking is a technique used in writing unit tests so that you don’t need to worry about testing several things at the same time. That isolates the code under test, which will be briefly discussed in chapter 6. We can make similar changes to the Accrual method as well.
Listing 2.14. Accrual service refactored with DI


Not bad. Now you’ve reduced that messy code back to almost how it looked when you started—with only the business logic. There’s that Wrapper stuff in there now, but it doesn’t look all that bad, considering the alternative.
But look at that constructor. It seems excessive, doesn’t it? Not to mention that when you do unit testing, you’ll have to pass in mocks/stubs for each of these dependencies in order to run the test. You might call this a constructor gone wild: methods that have a lot of parameters usually indicate that something is wrong and that refactoring should be done, and constructors are no exception. When you see this sort of thing, it may indicate that the service is doing too much and isn’t following the single responsibility principle.
A code smell is a slang term for often-observed patterns in code that may (but not always) indicate a deeper problem. It’s not a bug, per se, but it indicates that you might have a problem with the architecture. It’s a heuristic (a rule of thumb). Much like a bad smell in the refrigerator could indicate rotten food hiding in the back, a code smell could indicate a rotten design that should be cleaned up.
We could combine the exception handler and the transaction manager services into one service, as the next listing shows.
Listing 2.15. Combined exception handler and transaction handler

This code isn’t too shabby, because things seem pretty cohesive as a single service (though the name could use some work). Combining services isn’t always going to work, though.
One other way to deal with too many dependencies being injected is to move all these individual services into an aggregate service or façade service (that is, use the façade pattern to combine all of these little services into one service that orchestrates all the little services). In our case, the TransactionManager and ExceptionHandler services would stay separate, but you’d use a third façade class to orchestrate their use.
The Facade Pattern
Façade is a pattern that’s used to provide a simplified interface to a larger or more complex piece of code. For instance, a service class that provides a wide variety of methods and options can be put behind a façade interface that reduces complexity by limiting options or providing a small subset of simplified methods.
Listing 2.16. An aggregate service for orchestrating two services

This approach reduces the need to have multiple wrappers, reducing the amount of Wrapper boilerplate that we need in the Accrual service and Redemption service methods.
But look at what’s still left: defensive programming and logging, both of which depend on the parameters of the method. Factoring those concerns out could be messy and could involve reflection. (In other languages such as PHP, JavaScript, or Ruby, this might not be as difficult.)
One other way that you could refactor this code without using AOP and that you might also be familiar with is the decorator or proxy pattern. You’ll see in chapter 7 how this pattern can be used to refactor this kind of code. (Spoiler alert: the decorator/proxy pattern is just a simple form of AOP.)
Don’t get me wrong: I would prefer to use the refactored code over the original mess, for sure. But if there were a way I could somehow get all the way back to the code I started with—only the business logic—that would be even better. It would be the easiest code to read, and I’d have fewer constructor-injected services to worry about. I wouldn’t have to worry about forgetting or accidentally omitting one of these cross-cutting services every time the business logic changes, thus reducing the cost of change.
2.3. The cost of change
One constant in software engineering is change. Requirements change. Business rules change. Technology changes.
Any change in business rules or requirements would be challenging to deal with in the original version of the business logic (before we refactored). You’d have to climb through all the loops, try/catches and ifs, in order to find the meat of the business logic. Once you made the change, you’d have to hope that it didn’t affect the nonfunctional concerns (otherwise, you might have to copy and paste those changes everywhere).
The refactoring we did with DI and/or the façade pattern is pretty good, but it’s more vulnerable to change than you might think. In this section, I want to discuss, however briefly, some of the reasons for change and the costs associated with them because in the next section, we’ll refactor the Acme Car Rental code again, except that we’ll be using PostSharp to demonstrate that AOP can help reduce the costs associated with change.
2.3.1. Requirements will change
Requirements change for any number of reasons. The core assumptions that went into making the requirements could be invalid. The requirements may have been vague in the beginning and get clearer and more concrete only as the software starts taking shape. Your stakeholders could change their minds. What seems like a simple change to them might mean a world of difference in the code (and vice versa).
Even though I know that this axiom—that requirements will change—is true, and even though I’ve seen it over and over again, I still often make the mistake of coding as if nothing will change. Almost every time I make this mistake, I regret it. Being a good developer means not only accepting that requirements may change but also expecting them to change. And even when I do code with change in mind, I often find that I run into the limits of a programming language. Or I find myself lost in architecture land, where I’m continually refactoring back and forth, trying to find a perfect, elegant way of expressing a solution.
2.3.2. Small versus large projects
The size of your project matters a great deal. If you’re a one-person team writing a piece of simple software (for example, a website with maybe one or two forms and mostly static content), then the cost of change may be low because you have less things that can change. If this is the case, you can relax those architectural muscles a little bit. You aren’t cooking a 5-course meal at a 5-star restaurant for 100 tables every night—you’re just throwing a bag of popcorn in the microwave for yourself.
The size of a “small” project is something for which I can’t give you a concrete measure. But I must warn you that what you thought was going to be a small, trivial project can turn into a complex medium-to-large project quickly. So unless you’re entirely certain that you won’t need all the benefits of a well-architectured application, it’s better to be safe than sorry. Otherwise, you might end up building a pyramid and continuously piling rocks on top of each other with brute force.
2.3.3. Signature changes
One of the things that you’ll have to look out for is method signature changes. Consider whether you need to change the signature of a method by adding or removing parameters. If you remove a parameter, you have to remove the defensive programming for that parameter; otherwise, your project won’t build. If you change a parameter’s type, then your defensive programming edge case may also change (from null to 0 or vice versa). And even more dangerously, if you add a parameter, you have to remember to add the defensive programming for that parameter. Unfortunately, your compiler won’t help you there—you’ll have to remember.
If you look back at the Accrue and Redeem methods, you can see that a signature change anywhere will immediately affect the defensive programming and logging concerns, as this listing shows.
Listing 2.17. Accrue method’s defensive programming and logging
public void Accrue(RentalAgreement agreement) {
    // defensive programming
    if(agreement == null) throw new ArgumentNullException("agreement");

    // logging
    Console.WriteLine("Accrue: {0}", DateTime.Now);
    Console.WriteLine("Customer: {0}", agreement.Customer.Id);
    Console.WriteLine("Vehicle: {0}", agreement.Vehicle.Id);

    // ... snip ...

    // logging
    Console.WriteLine("Accrue complete: {0}", DateTime.Now);
}
If there’s another parameter added to this method, you have to remember to add another line of defensive programming. If the parameter’s name changes from agreement to rentalAgreement, then you have to remember to change the string being passed to ArgumentNullException’s constructor. If the method itself changes names (to Accrual, for instance), you’ll have to change the logging to reflect the new name. Refactoring tools such as ReSharper, unit tests, and the C# compiler itself will help you out, but they can do only so much. For the rest of it, you have to rely on your own and your team’s vigilance.
2.3.4. Working on a team
One of the problems with change comes from working on a software team. If you work on software completely by yourself, you may never experience this problem (although you might. Read on).
Suppose there’s a new requirement that needs another method on the ILoyaltyAccrueService interface. Maybe this task falls to some other team member, and this team member implements the business logic and calls the task complete. Unfortunately, this team member forgot to use the Wrapper method of TransactionFacade. His code passes unit tests, so it’s sent over to QA. If you’re working on an Agile project, this might not be a huge issue: QA could catch it and report it back to you within one sprint. In a waterfall project, QA might not discover this bug until months later. Months later, you might not even remember what your intentions were that caused the bug. It’s like you’re working with a new team member: your past self.
Worst case: it might even pass QA, assuming conditions are such that an exception or retry isn’t necessary or noticed. Whoops! Code made it into production without defensive programming, logging, transactions, and so on.
Unfortunately, with DI and/or façade service(s), we can’t do much more with the architecture, because the code is still scattered around—just remember to communicate well with your team, pair program, code review. And hope that no one forgets. The bigger the team and the bigger the project, the harder this gets.
2.4. Refactor with AOP
Let’s try refactoring the code again, this time using AOP. Using NuGet, add PostSharp to your project. You can do this with the Install-Package postsharp command in the Package Manager Console. Alternatively, you can use the NuGet UI by right-clicking References and selecting Manage NuGet Packages. Then click Online, search for PostSharp, and click Install (note that I’m using NuGet 2.0 at the time of this writing).
PostSharp has a trial version of its full Professional edition, and there’s also a free Express edition (which requires a license, but it’s a free license). Either one of these will work, but I won’t use any features in this chapter that you can’t use with the Express edition.
Now that PostSharp is installed, let’s start moving nonfunctional features into their own aspects.
2.4.1. Start simple and isolate the logging
Let’s start with an easy cross-cutting concern to refactor: logging. Let’s log a timestamp when the method is called, and the name of the method. I’ll create a class that inherits one of PostSharp’s built-in base classes, OnMethodBoundaryAspect, which allows us to insert code at the boundaries of a method, as the following listing shows.
Listing 2.18. A method boundary aspect to handle logging
[Serializable]
public class LoggingAspect : OnMethodBoundaryAspect {
    public override void OnEntry(MethodExecutionArgs args) {
        Console.WriteLine("{0}: {1}", args.Method.Name, DateTime.Now);
    }

    public override void OnSuccess(MethodExecutionArgs args) {
        Console.WriteLine("{0} complete: {1}",
            args.Method.Name, DateTime.Now);
    }
}
Notice that we can get the method name from the MethodExecutionArgs argument, so right away we know that this aspect can be reused for redemption, too. LoggingAspect is similar to the “Hello, World” aspect from the previous chapter. Apply the aspect using an attribute, as shown here.
Listing 2.19. Applying the logging aspect to the Accrue and Redeem methods
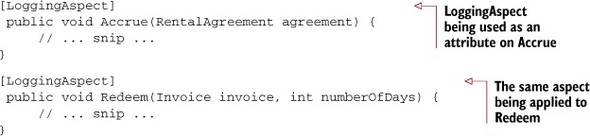
And now you can remove the logging code from each of those methods.
Before we run the console application again to make sure that this is working, you might have noticed that I left something out: the logging of the ID values from the parameters being passed in. With PostSharp, I’m able to examine all of the arguments being passed in, but in order to get the IDs, I have to work a little more (see the following listing). I could apply brute force to it with a couple of if statements.
Listing 2.20. Examining and logging argument value

That’s fine for this contrived example, but in a bigger application, you could have dozens or hundreds of different types. If your requirement is to log entity IDs and information, you might want to use a common interface (or base class) on your entities. If you had an ILoggable interface with a string LogInformation() method and you made both Invoice and RentalAgreement implement that interface, then you could do something like what’s shown here.
Listing 2.21. An alternative way to log certain entities

Reflection would be another option for general use. But this is a decision that you’ll have to make, because it will be related to the specifics of the logging requirements of your project.
The Redeem and Accrue methods are starting to shrink, because we’ve moved logging functionality to its own class. Next, let’s move defensive programming to its own class.
2.4.2. Refactor defensive programming
To refactor the defensive programming shown in listing 2.22, I’ll again use the OnMethodBoundaryAspect base class. Let’s check to make sure that none of the arguments are null and that none of the int arguments are zero or negative.
Listing 2.22. A defensive programming aspect

Check first to see whether the argument is null. After that, see whether the argument is an integer and whether it’s a valid integer (such as a negative number). You can perform these tests by passing in nulls or negative numbers in the console application. (It should crash your console application, but you should see the correct ArgumentNullException or ArgumentException with the parameter name.)
Again, notice that there’s nothing in this class that couples directly to any of the parameter types or service classes, meaning that it can be used on both services, as in the following listing.
Listing 2.23. Refactoring to aspects with an attribute
[LoggingAspect]
[DefensiveProgramming]
public void Accrue(RentalAgreement agreement) {
     // ... snip ...
}

[LoggingAspect]
[DefensiveProgramming]
public void Redeem(Invoice invoice, int numberOfDays) {
     // ... snip ...
}
The defensive programming aspect that I’ve written here is probably not the best approach to writing a general-purpose aspect. With C#, you can put attributes directly on each parameter, so you can take that approach instead. In fact, this is what Phil Haack did when he recently created the NullGuard library (available on NuGet and GitHub).
At this point, it’s important to point out that attributes in .NET aren’t applied in a deterministic way. Although LoggingAspect is listed first, that doesn’t necessarily mean that it will be applied first, and vice versa. This is why I had to put the null check [if(argument != null)] in the logging aspect: in case the logging aspect gets applied first. PostSharp has some features that allow you to specify ordering of aspects, which is covered in chapters 8 and 9.
For the rest of this section, I’m going to assume two things:
- When you use AOP for the first time in your project, you’ll probably start with only one aspect, which means that you won’t have to worry about ordering/dependencies at first.
- The aspects in this example will be applied in the order that we want.
With defensive programming and logging out of the way, we’re on our way back to the nice, clean business logic that we started with. Next up: let’s get that transaction management code into its own class.
2.4.3. Creating an aspect for transactions and retries
To refactor transaction management code this time, instead of OnMethodBoundaryAspect, I’ll use MethodInterceptionAspect, as the next example (listing 2.24) shows. Instead of inserting code at the boundaries of a method, this aspect will intercept any calls to the method. An interception aspect will run code instead of the method that’s being intercepted; a boundary aspect will run code before and after a method executes. I’ll explore boundaries and interception more thoroughly in later chapters.
Listing 2.24. A transaction aspect

That example is largely identical to the code we wrote inside of the service methods, except that I’ve replaced the business logic code with a call to args.Proceed(). The Proceed() call means “proceed to the method that was intercepted.” Once again, I’ve moved all of the transaction code into its own class, and it can be applied with an attribute, as in the following listing.
Listing 2.25. Continuing to refactor with aspects
[DefensiveProgramming]
[LoggingAspect]
[TransactionManagement]
public void Accrue(RentalAgreement agreement) {
    // ... snip ...
}

[DefensiveProgramming]
[LoggingAspect]
[TransactionManagement]
public void Redeem(Invoice invoice, int numberOfDays) {
    // ... snip ...
}
Make sure to remove that transaction code from Accrue and Redeem.
In order to demonstrate that the transaction aspect is working, you can put some Console.WriteLine()s at the start and end of the OnInvoke() function, as figure 2.5 shows.
One more cross-cutting concern to go: exception handling.
Figure 2.5. Console output with the use of AOP

2.4.4. Put exception handling into its own class
For the exception handling aspect, I could use OnMethodBoundaryAspect again, or I could use OnExceptionAspect. Either way, it should look similar to the following.
Listing 2.26. An aspect to handle exceptions
[Serializable]
public class ExceptionAspect : OnExceptionAspect {
    public override void OnException(MethodExecutionArgs args) {
        if (Exceptions.Handle(args.Exception))
            args.FlowBehavior = FlowBehavior.Continue;
    }
}
I’ll still use the Exceptions static class. There’s something new in this aspect: Flow-Behavior, which is how you specify what you want to happen once the aspect is done. In the previous example, I set the behavior to Continue if the exception was handled. This means that the exception will be swallowed and the program will continue. Otherwise, the default FlowBehavior for an OnExceptionAspect is RethrowException, which means that the aspect will have no effect on the method and the exception will be thrown as normal.
Once more, add this attribute to your services and remove the exception handling code from inside of them. Now all of the cross-cutting concerns have been refactored. Let’s take a look at the finished product.
Listing 2.27. All cross-cutting concerns refactored into aspects
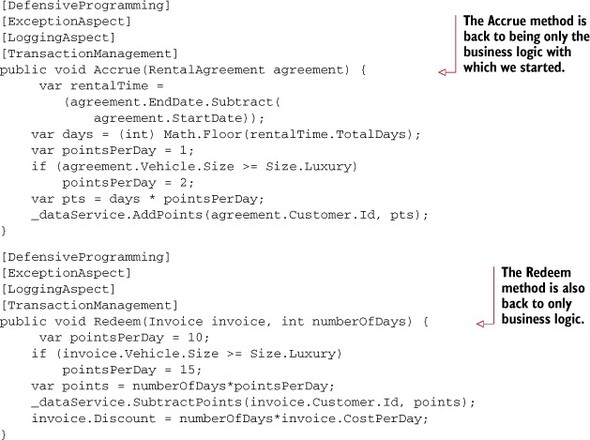
Looks good to me. All of the cross-cutting concerns are now in their own classes. The services are back to their initial unspoiled single responsibility state. They’re easier to read.
Are they easier to change? If you add or change the names of the methods or the parameters of the methods, then the aspects you wrote can cope with that (particularly defensive programming and logging). The aspects don’t care if the business logic changes (for example, if you changed it from 10/15 points to 15/20 points). The business logic doesn’t care if you switch from using Console to using log4net/NLog. Or if you need to use something else besides TransactionScope. Or if you want to change the maximum retries from three to five.
Even more important, if you add a new method to either service (or if you add a new service), you can reuse the aspects that you’ve already written instead of copying and pasting similar code every time.
Maybe you’re looking at that stack of attributes on each method—isn’t that just another form of tight coupling and/or repetition that will have to be copied and pasted? Perhaps. For this example, it’s not a big deal because our project is so small. In later chapters, you’ll learn how to multicast aspects to an entire class, namespace, or assembly with PostSharp.
2.5. Summary
The first goal of this chapter was to demonstrate that cross-cutting concerns can muck up your code. Normal OOP and good use of design patterns can help you refactor but in many cases can get you only part of the way and can still leave your business logic tightly coupled to cross-cutting concerns. Even if your code follows principles such as Single Responsibility and DI, often it’s not enough and can still leave your code tangled, scattered, or repetitive.
The second goal was to show that the cost of change is tied to how flexible, readable, and modular your code is. Even with good refactoring, you’ll find some cross-cutting concerns in traditional OOP that can’t be easily decoupled.
The final goal was to show how an AOP tool such as PostSharp is able to get you that last mile of loose coupling among cross-cutting concerns. In the PostSharp-refactored version, each of the cross-cutting concerns had its own class, and the services were reduced to performing business logic and only business logic.
This chapter is a crash course in using AOP. If this is your first time writing an aspect (it probably isn’t—even if you think it is, keep reading and you’ll see that it might not be), then you’re well on your way to creating better architected software that’s more flexible and easier to change and maintain. In the next chapter, I’m going to expand on the reasons to use AOP, focus on the benefits it provides, and examine in more detail how cross-cutting concerns can wreak havoc in your code.